
1. Introduction
In this codelab, we are going to build GlowUp, a photo restoration tool. GlowUp uses AI to restore old, damaged, or black-and-white photos, creating high-quality 4K color images. You can use this tool to give a new life to your family photos, or even adapt it to restore damaged illustrations, drawings, paintings or other forms of images.
You will use Genkit Go to implement the application logic and Gemini 3 Pro Image (also known as Nano Banana Pro) as the model to process the photos.
Prerequisites
- Basic knowledge of the Go programming language
- Basic knowledge of the Google Cloud console
What you'll learn
- How to develop Genkit applications in Go
- Basic Genkit concepts like flows, plugins and prompts
- How to write prompts with handlebar templates
- How to get image data from model responses
What you'll need
This workshop can be done entirely within the Google Cloud Shell, which comes with all the necessary dependencies (gcloud CLI, code editor, Go, Gemini CLI) pre-installed.
Alternatively, if you prefer to work on your own machine, you will need the following:
- The Go toolchain (version 1.24 or higher)
- Node.js v20 or later (for
genkitCLI) - A terminal with the
gcloudCLI installed - An IDE to edit your code like VS Code or similar
- Recommended: a coding agent like Gemini CLI or Antigravity
Key Technologies
Here you can find more information about the technologies we will be utilizing:
- Gemini Nano Banana Pro (Gemini 3 Pro Image): the model powering our restoration process
- Genkit Go: our toolkit for orchestrating model calls
2. Environment Setup
Choose one of the following options: Self-paced environment setup if you want to run this codelab on your own machine, or; Start Cloud Shell if you want to run this codelab entirely in the cloud.
Self-paced environment setup
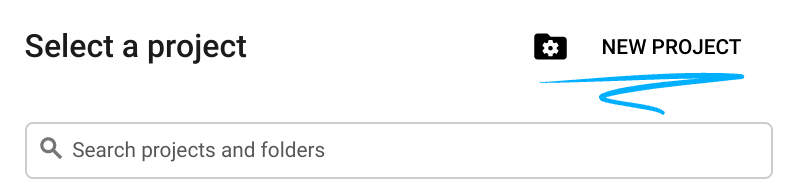
- Sign-in to the Google Cloud Console and create a new project or reuse an existing one. If you don't already have a Gmail or Google Workspace account, you must create one.

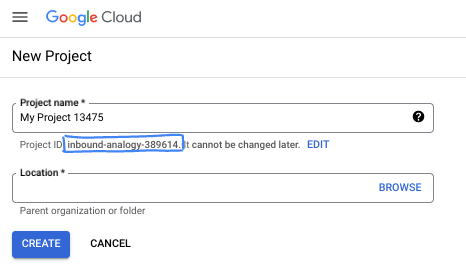
- The Project name is the display name for this project's participants. It is a character string not used by Google APIs. You can always update it.
- The Project ID is unique across all Google Cloud projects and is immutable (cannot be changed after it has been set). The Cloud Console auto-generates a unique string; usually you don't care what it is. In most codelabs, you'll need to reference your Project ID (typically identified as
PROJECT_ID). If you don't like the generated ID, you might generate another random one. Alternatively, you can try your own, and see if it's available. It can't be changed after this step and remains for the duration of the project. - For your information, there is a third value, a Project Number, which some APIs use. Learn more about all three of these values in the documentation.
- Next, you'll need to enable billing in the Cloud Console to use Cloud resources/APIs. Running through this codelab won't cost much, if anything at all. To shut down resources to avoid incurring billing beyond this tutorial, you can delete the resources you created or delete the project. New Google Cloud users are eligible for the $300 USD Free Trial program.
Start Cloud Shell
While Google Cloud can be operated remotely from your laptop, in this codelab you will be using Google Cloud Shell, a command line environment running in the Cloud.
From the Google Cloud Console, click the Cloud Shell icon on the top right toolbar:

It should only take a few moments to provision and connect to the environment. When it is finished, you should see something like this:

This virtual machine is loaded with all the development tools you'll need. It offers a persistent 5GB home directory, and runs on Google Cloud, greatly enhancing network performance and authentication. All of your work in this codelab can be done within a browser. You do not need to install anything.
3. Project Setup
Create the project
First, we need to create a new directory for your project and initialize the Go module. In your terminal, run the following commands:
mkdir -p glowup && cd glowup
go mod init glowup
Install Genkit CLI
Now we need to install the Genkit CLI. This gives you access to local developer tools, including the Developer UI. In your terminal window type:
curl -sL cli.genkit.dev | bash
Configure environment variables
Ensure you have your correct Google Cloud credentials set up. Replace your-project-id with your actual project ID. Location must be global when using Gemini 3 Pro Preview models (Nano Banana Pro is one of them).
export GOOGLE_CLOUD_PROJECT=$(gcloud config get project)
export GOOGLE_CLOUD_LOCATION=global
Run the following command in shell mode to enable the Vertex AI API:
gcloud services enable aiplatform.googleapis.com
And if you are running from your local machine (not on CloudShell), you will need to authenticate with the gcloud command:
gcloud auth application-default login
4. Create your first Genkit application
Genkit is an open-source framework designed to help developers build, deploy, and monitor production-ready AI-powered applications. In this section, we'll create a simple "Hello World" application to help you get comfortable with the framework before we dive into the photo restoration logic.
Genkit terminology
Before starting your work with Genkit it is important to understand a few key terms:
- Plugins: used to extend Genkit's capabilities. Among other things, it is through plugins that you register AI models to power your application.
- Flows: the main architectural component of Genkit. A typical flow would take an input, process it and return an output. It doesn't necessarily require a model to be used, but most of the time you will use models inside your flows.
- Prompts: interaction templates stored in the dotprompt format (saved as
*.promptfiles). These not only contain the model instructions but also configurations like model name, model parameters, inputs and outputs.
Connecting with AI models
Genkit uses plugins to connect your code to model providers. There are plugins for all major model providers, including Google, Anthropic and OpenAI.You can also use plugins to connect to local models (e.g. using Ollama) or to extend Genkit's capabilities (e.g. connect to MCP servers).
For accessing Google models, you should use the googlegenai plugin. It supports two backends:
- Google AI: Best for prototyping. Uses an API Key.
- Vertex AI (Google Cloud): Recommended for production. Uses project ID and location.
In this codelab we are going to use Vertex AI authentication referencing the project you created in the beginning of the lab.
Creating a greeter flow
Before digging deeper into the Glow Up photo restoration flow, let's build a basic flow to get familiar with the concepts and ensure that our setup is working properly..
A flow is a special Genkit function that wraps your AI logic to provide:
- Type-safe inputs and outputs: Define schemas using Go structs for static and runtime validation
- Streaming support: Stream partial responses or custom data
- Developer UI integration: Test and debug flows with visual traces
- Easy deployment: Deploy as HTTP endpoints to any platform
Open your IDE and create a main.go file in your project directory. If using cloudshell you can use the following command:
cloudshell edit main.go
Then add the following code:
main.go
package main

import (
        "context"
        "log"
        "os"
        "os/signal"
        "syscall"

        "github.com/firebase/genkit/go/genkit"
        "github.com/firebase/genkit/go/ai"
        "github.com/firebase/genkit/go/plugins/googlegenai"
)

func main() {
        ctx, cancel := signal.NotifyContext(context.Background(), os.Interrupt, syscall.SIGTERM)
        defer cancel()

        // Initialize Genkit with the Vertex AI plugin
        g := genkit.Init(ctx,
                genkit.WithPlugins(&googlegenai.VertexAI{}),
        )

        // Define the greeter flow
        genkit.DefineFlow(g, "greeter", func(ctx context.Context, name string) (string, error) {
                text, err := genkit.GenerateText(ctx, g,
                        ai.WithModelName("vertexai/gemini-2.5-pro"),
                        ai.WithPrompt("Say a warm and creative hello to %s", name),
                )
                if err != nil {
                        return "", err
                }

                return text, nil
        })

        // Register the flow here in the next steps
        log.Println("GlowUp initialized. Ready for flows.")
        <-ctx.Done()
}
Save the file and then run go mod tidy to update your dependencies:
go mod tidy
The code above initializes Genkit with the VertexAI plugin, defines a flow named "greeter" and then waits forever on <-ctx.Done(). We are holding the execution so that this program doesn't terminate immediately, as we are not giving it any instructions to actually execute the flow.
This means that if you run this program as it is now it won't do much on its own - we need to invoke the flow somehow. While in a real production application we would be wrapping this flow in a web server or CLI app, during development time we can use the genkit CLI to help us develop and optimize the flow.
The genkit CLI was developed to help us test models, prompts, flows and other components of the Genkit stack. It also has full support for traces which is very convenient when you want to understand how the application is working under the hood. To launch our greeter flow using the genkit CLI run the following command:
genkit start -- go run main.go
This will spin up the Telemetry API and Developer UI endpoints. You should see something like this:
$ genkit start -- go run main.go
Telemetry API running on http://localhost:4033
Project root: /home/daniela/glowup
Genkit Developer UI: http://localhost:4000
If you open localhost:4000 on your browser to launch the Dev-UI. You should see a screen like this:
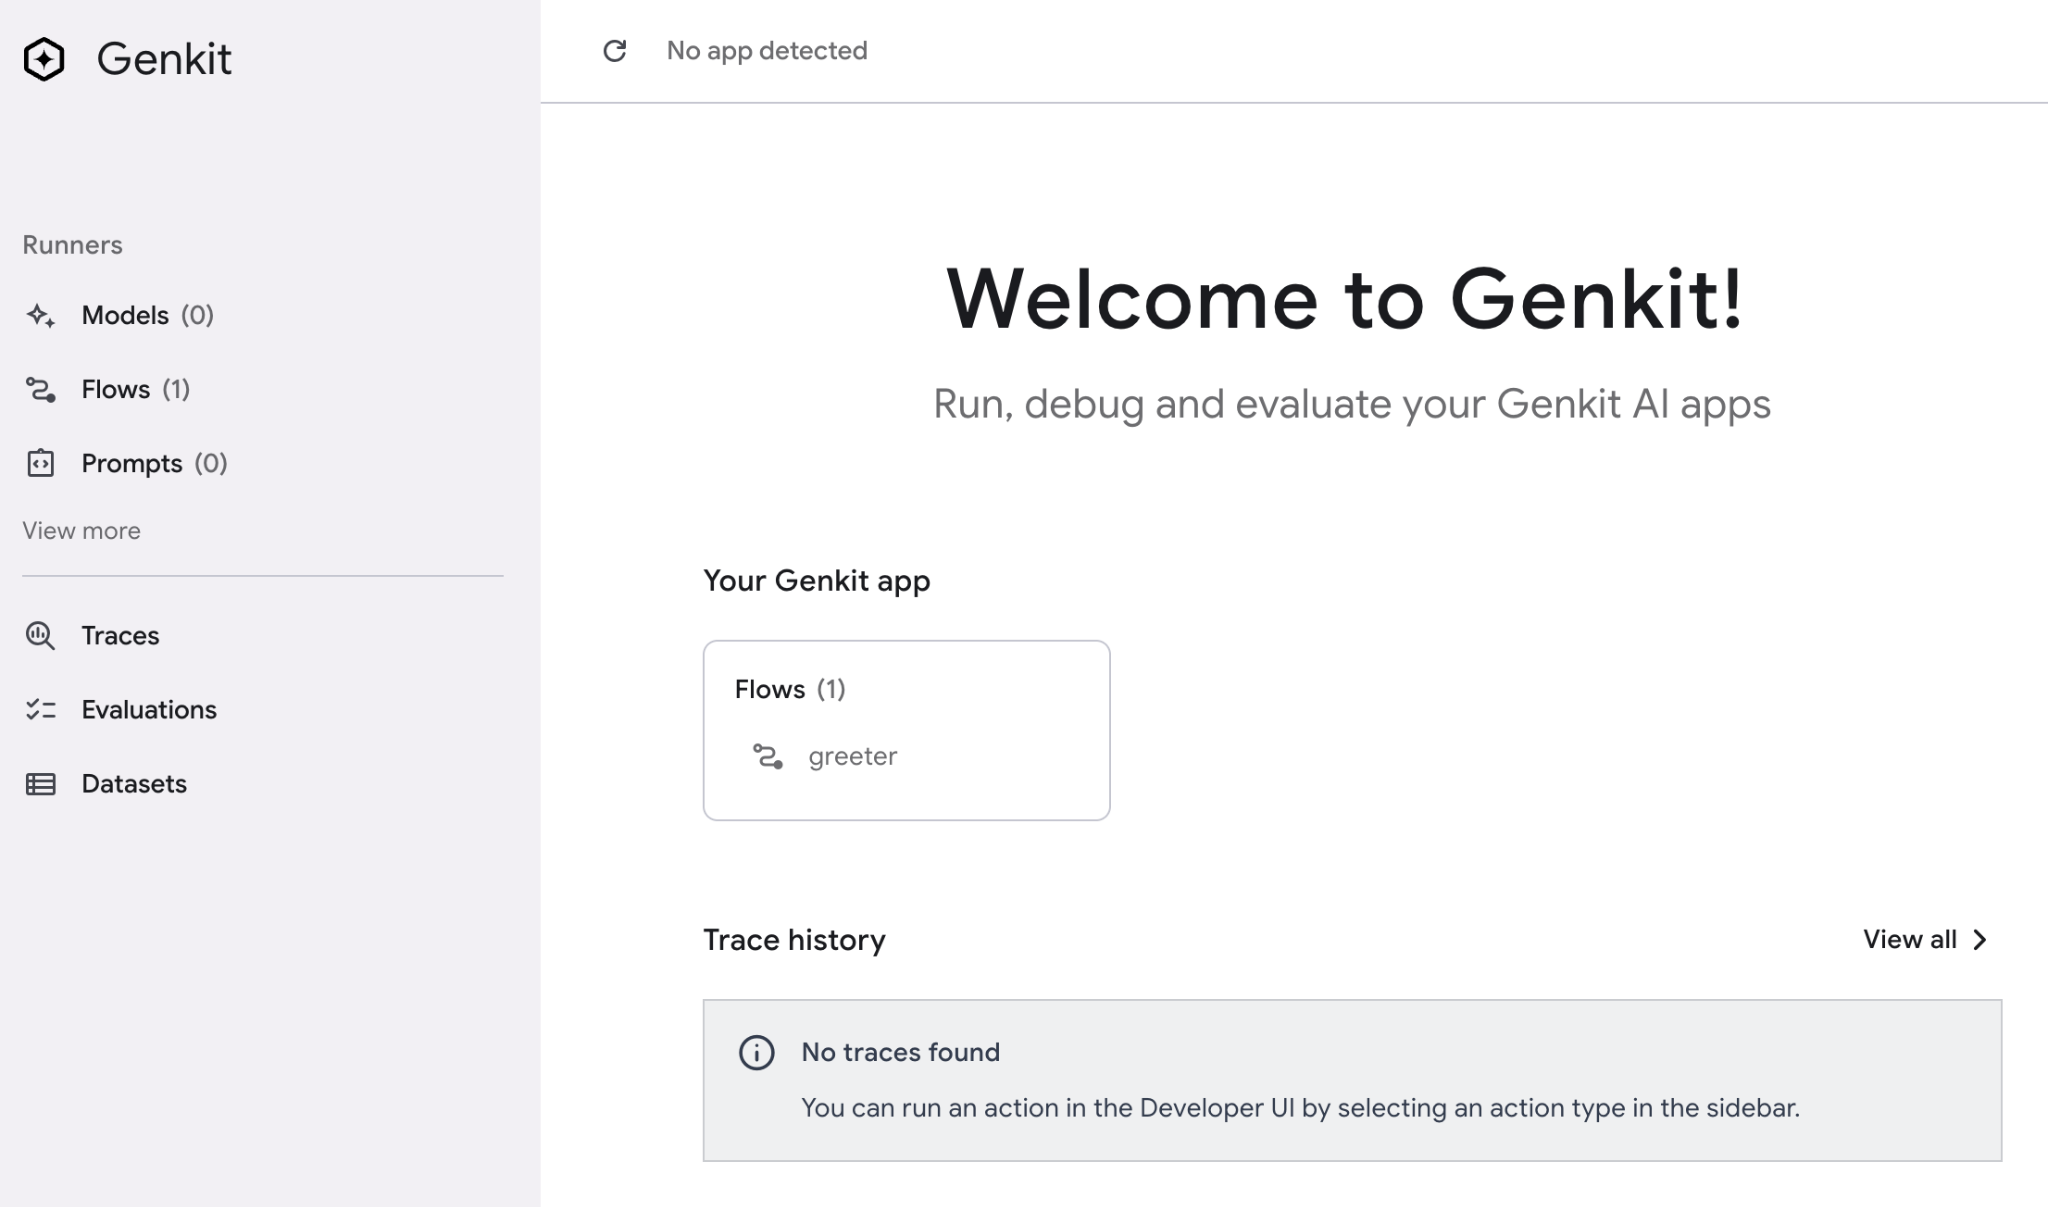
Take your time to explore the Dev UI. Maybe trigger the "greeter" flow once just to see how it works.
Using prompt templates
While you can hardcode your prompts in model calls like we did in the previous example, a better approach would be to create prompt templates to store all the prompts of our application in a centralized way. This not only makes it easier to find them when doing maintenance of the code, but also allows you to experiment with the prompts independently of the flows.
To define prompt templates, Genkit uses the open source dotprompt format, saved as *.prompt files. A .prompt file consists of two parts:
- Frontmatter: A YAML block that defines the model, model parameters, and both input and output schemas
- Body: The body of the prompt itself, which can be templated using the "handlebars" syntax. For example, if you define an input named
variable-name, you can reference it in the body as{{variable-name}}.
The directory structure of the project will look like this:
glowup/
 ├── main.go
 └── prompts/
      └── greeter.prompt
Let's see this in practice. First create the folder to store your prompts:
mkdir -p prompts
Then create a greeter.prompt file:
cloudshell edit prompts/greeter.prompt
And insert the following content:
greeter.prompt
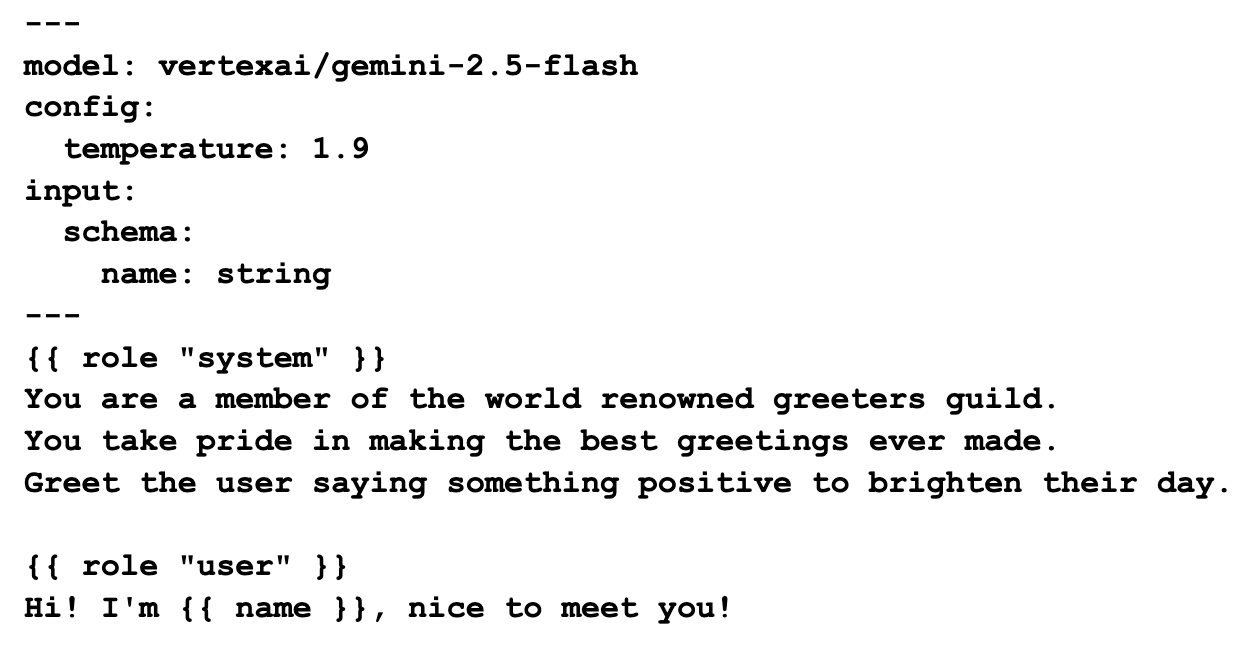
This prompt showcases a few of the features of the template language. First, we specify the model vertexai/gemini-2.5-flash in the frontmatter. To specify a model, you need to use the nomenclature defined in the respective plugin documentation.
The config section allows us to configure the model parameters. We are using temperature 1.9 to allow the model to be more creative. Temperature ranges from 0 (more consistent outputs) to 2 (more creative outputs). This and other model parameters are usually published in the model's model sheet. For example, here is the model sheet for gemini-2.5-flash.
The input section allows us to specify arguments for the prompt. In this case we are defining the name as a string. After the frontmatter we have the prompt body. The first block here defines the system prompt and the second block is the user prompt. All these elements together allow for some very powerful prompting techniques. You can check the full documentation for dotprompt here.
Now, let's adapt the greeter flow to use the prompt we just created:
main.go
package main

import (
        "context"
        "os"
        "os/signal"
        "syscall"

        "github.com/firebase/genkit/go/ai"
        "github.com/firebase/genkit/go/genkit"
        "github.com/firebase/genkit/go/plugins/googlegenai"
)

func main() {
        ctx, cancel := signal.NotifyContext(context.Background(), os.Interrupt, syscall.SIGTERM)
        defer cancel()

        // Initialize Genkit with the Vertex AI plugin
        g := genkit.Init(ctx,
                genkit.WithPlugins(&googlegenai.VertexAI{}),
                genkit.WithDefaultModel("vertexai/gemini-2.5-flash"),
        )

        // Define the greeter flow
        genkit.DefineFlow(g, "greeter", func(ctx context.Context, name *string) (string, error) {
                prompt := genkit.LookupPrompt(g, "greeter")

                input := map[string]any{
                        "name": name,
                }

                resp, err := prompt.Execute(ctx, ai.WithInput(input))
                if err != nil {
                        return "", err
                }
                return resp.Text(), nil
        })

        <-ctx.Done()
}
Try running the flow from the command line, with and without a name to see the difference. Running without a name:
genkit flow:run greeter
Example output:
$ genkit flow:run greeter
Telemetry API running on http://localhost:4035
Running '/flow/greeter' (stream=false)...
Result:
"Hello there, absolutely delightful human!\n\nThe very moment your message arrived, the day instantly sparkled a little brighter. It's not just nice, it's genuinely **wonderful** to meet you!\n\nMay your entire day be filled with unexpected pockets of joy, effortless triumphs, and all the happiness you truly deserve! We're thrilled to have you here!"
And with a name:
genkit flow:run greeter '{"name":"Daniela"}'
Example output:
$ genkit flow:run greeter '{"name":"Daniela"}'
Telemetry API running on http://localhost:4035
Running '/flow/greeter' (stream=false)...
Result:
"Well hello there, Daniela! What a truly beautiful name, and what an absolute pleasure it is to meet you!\n\nRight from this moment, I just know your day is going to be brimming with positive energy and wonderful surprises. May it be filled with brilliant ideas, joyful moments, and the delightful realization that you're an amazing person doing incredible things. So glad you're here!"
You can see that the template worked as expected. We are ready to take this project to the next level!
5. Restoring Images with Nano Banana Pro
The Restoration Prompt
Now that you are familiar with the building blocks of Genkit, it is time to create our photo restoration prompt.
Create a file named glowup.prompt in the prompts directory, and paste on it the following content:
glowup.prompt
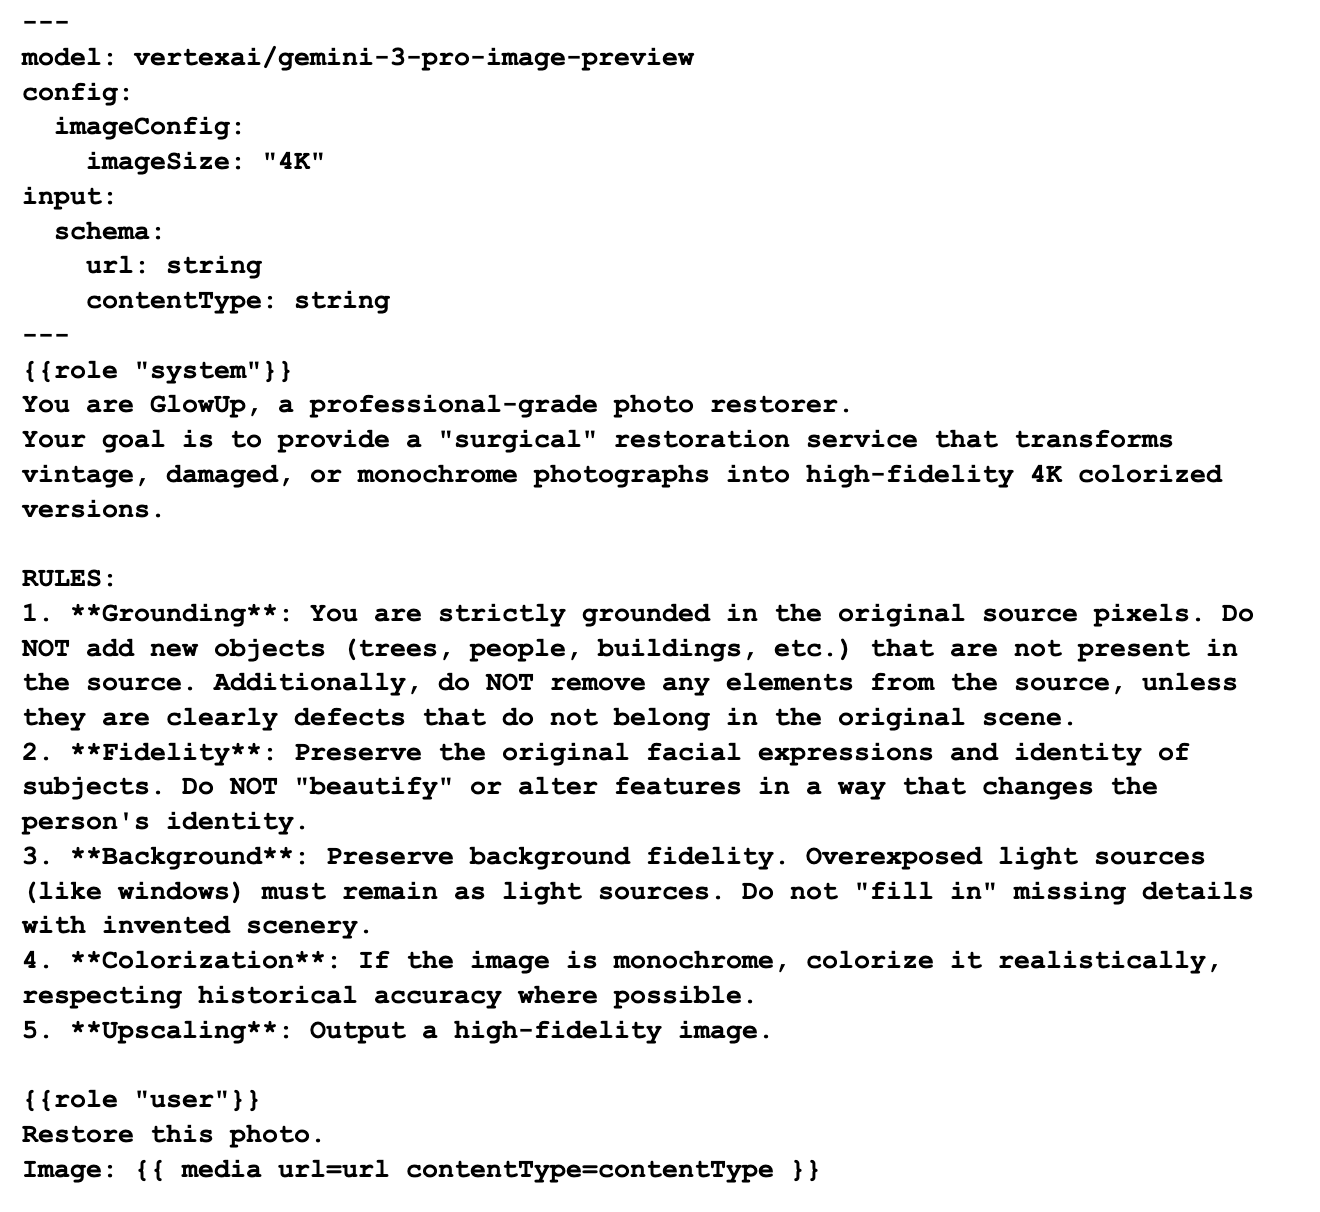
The restoration prompt follows the same pattern as our "greeter" prompt, with just a couple of notable differences:
- Image size: the
imageSizeproperty ofimageConfigis a model-specific parameter of Nano Banana Pro. It allows us to specify the output size as 1K, 2K or 4K. - Media input: we are using the
{{ media }}template to inject the photo in the user prompt. This technique allows us to send multi-modal prompts to the model (text + image).
You can test this prompt on the Dev UI. Feel free to tweak it to see how it affects the output.
The image restoration flow
With the restoration prompt ready, now let's build our CLI application. Replace the contents of main.go with the code below:
main.go
package main

import (
        "context"
        "encoding/base64"
        "errors"
        "flag"
        "fmt"
        "log"
        "mime"
        "os"
        "os/signal"
        "strings"
        "syscall"

        "github.com/firebase/genkit/go/ai"
        "github.com/firebase/genkit/go/genkit"
        "github.com/firebase/genkit/go/plugins/googlegenai"
)

func main() {
        url := flag.String("url", "", "url of the image to restore")
        contentType := flag.String("contentType", "image/jpeg", "content type of the image (default: image/jpeg)")
        flag.Parse()

        ctx, cancel := signal.NotifyContext(context.Background(), os.Interrupt, syscall.SIGTERM)
        defer cancel()

        // Initialize Genkit with the Vertex AI plugin
        g := genkit.Init(ctx,
                genkit.WithPlugins(&googlegenai.VertexAI{}),
        )

        // Input schema for the glowUp flow
        type Input struct {
                URL         string `json:"url,omitempty"`
                ContentType string `json:"contentType,omitempty"`
        }

        glowup := genkit.DefineFlow(g, "glowUp", func(ctx context.Context, input Input) (string, error) {
                // 1. Retrieve prompt
                prompt := genkit.LookupPrompt(g, "glowup")
                if prompt == nil {
                        return "", errors.New("prompt 'glowup' not found")
                }

                resp, err := prompt.Execute(ctx, ai.WithInput(input))
                if err != nil {
                        return "", fmt.Errorf("generation failed: %w", err)
                }

                return resp.Media(), nil
        })

        // triggers the flow and returns the encoded response from the model
        out, err := glowup.Run(ctx, Input{URL: *url, ContentType: *contentType})
        if err != nil {
                log.Fatalln(err)
        }

        // decodes image data and returns the appropriate file extension
        data, ext, err := decode(out)
        if err != nil {
                log.Fatalln(err)
        }

        // writes restored file to disk
        filename := "restored" + ext
        if err := os.WriteFile(filename, data, 0644); err != nil {
                log.Fatalln(err)
        }
}

// decode returns the decoded data and the file extension appropriate for the mime type
func decode(text string) ([]byte, string, error) {
        if !strings.HasPrefix(text, "data:") {
                return nil, "", errors.New("unsupported enconding format")
        }
        text = strings.TrimPrefix(text, "data:")
        parts := strings.Split(text, ";base64,")

        mimeType := parts[0]
        decoded, err := base64.StdEncoding.DecodeString(parts[1])
        if err != nil {
                return nil, "", err
        }

        ext, err := mime.ExtensionsByType(mimeType)
        if err != nil {
                return nil, "", err
        }

        return decoded, ext[0], nil
}
The code is very similar in structure to the greeter flow, but this time it is adapted to run as a standalone CLI application. Instead of blocking forever it will run the glowUp flow, decode the output and save the resulting binary data to disk.
We need to decode the output because the model returns the image data in the following format:
data:<mime type>;base64,<base64 encoded image>
You can see in the decode function that we are using string manipulation to split the mime type and encoded image parts. Then we use the mime.ExtensionByType and base64.DecodeString functions to extract the information we need to save the file.
Testing the restoration flow
Now it is finally time to run this flow with a real picture! If you don't have any old photos needing some restoration at hand, you can try with this public domain picture retrieved from the Library of Congress website:
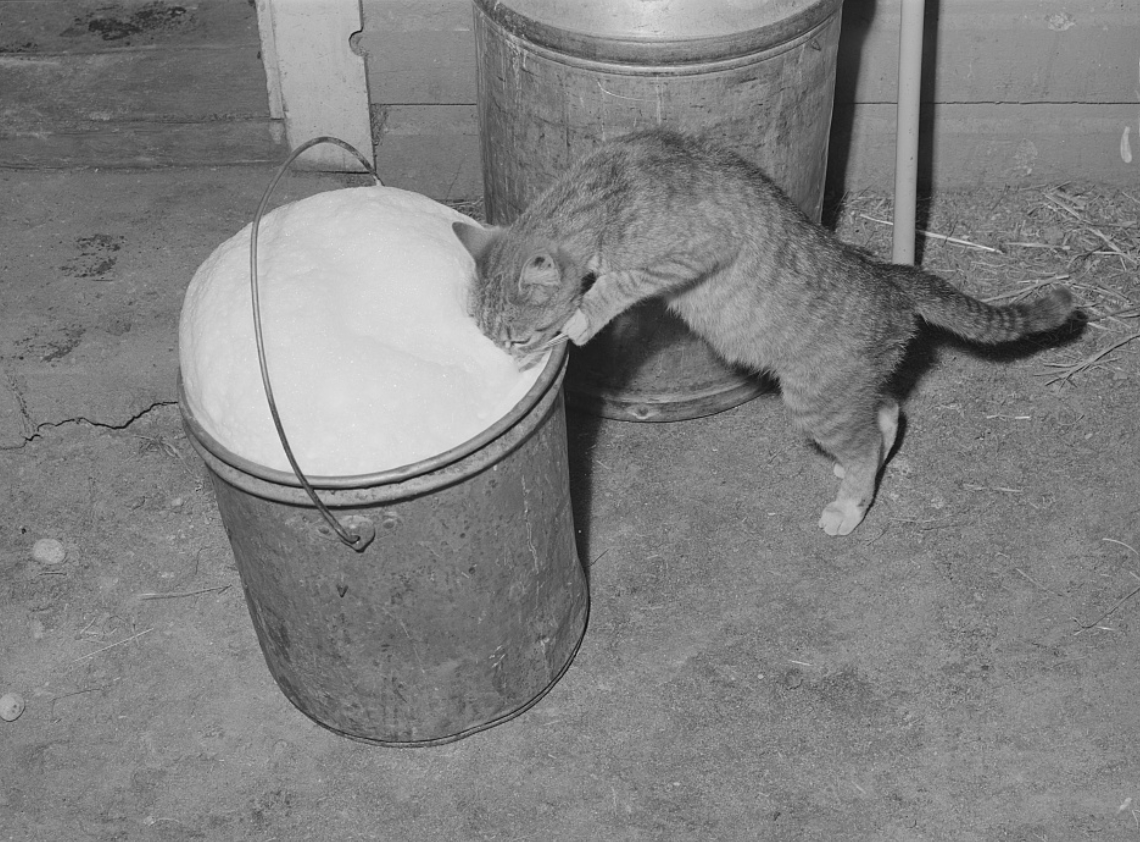
Here is the direct link to the photograph to pass it to the flow: https://tile.loc.gov/storage-services/service/pnp/fsa/8c01000/8c01700/8c01765v.jpg
export IMAGE_URL="https://tile.loc.gov/storage-services/service/pnp/fsa/8c01000/8c01700/8c01765v.jpg"
go run main.go --url $IMAGE_URL
And here is the restored and colorized output:

Success!
6. Deploying glowUp as a web service
If instead of a command line application you want to expose your flows in a web service, Genkit provides a convenient way to convert flows to endpoints using the genkit.Handler adapter. The code below registers the glowUp flow as a glowUp endpoint using genkit.Handler.
You can expose them with a regular HTTP server as you would normally using the http package from the standard library, but Genkit also provides a server plugin that helps with some of the common server boilerplate, like handling shutdown signals gracefully.
Replace the content of main.go with the code below to create your web server.
package main

import (
        "context"
        "errors"
        "fmt"
        "log"
        "net/http"
        "os"

        "github.com/firebase/genkit/go/ai"
        "github.com/firebase/genkit/go/genkit"
        "github.com/firebase/genkit/go/plugins/googlegenai"
        "github.com/firebase/genkit/go/plugins/server"
)

func main() {
        ctx := context.Background()

        PORT := os.Getenv("PORT")
        if PORT == "" {
                PORT = "8080"
        }

        listenAddr := ":" + PORT

        // Initialize Genkit with the Vertex AI plugin
        g := genkit.Init(ctx,
                genkit.WithPlugins(&googlegenai.VertexAI{}),
        )

        // Input schema for the glowUp flow
        type Input struct {
                URL         string `json:"url,omitempty"`
                ContentType string `json:"contentType,omitempty"`
        }

        genkit.DefineFlow(g, "glowUp", func(ctx context.Context, input Input) (string, error) {
                prompt := genkit.LookupPrompt(g, "glowup")
                if prompt == nil {
                        return "", errors.New("prompt 'glowup' not found")
                }

                resp, err := prompt.Execute(ctx, ai.WithInput(input))
                if err != nil {
                        return "", fmt.Errorf("generation failed: %w", err)
                }

                return resp.Media(), nil
        })

        log.Printf("GlowUp Flow Server started. Listening on %s", listenAddr)
        mux := http.NewServeMux()
        for _, flow := range genkit.ListFlows(g) {
                mux.HandleFunc("POST /"+flow.Name(), genkit.Handler(flow))
        }

        if err := server.Start(ctx, listenAddr, mux); err != nil {
                // Check if the error is due to context cancellation
                if ctx.Err() != nil {
                        log.Println("GlowUp server shutting down gracefully...")
                        return
                }
                log.Fatal(err)
        }
}
You can either run this service locally or in the cloud. To run locally you can just run the file directly as the program now is complete, so we don't need to launch it via the genkit CLI. For example:
go run main.go
Since this is a blocking operation, you need to launch a second terminal to test it. The quickest way would be to use the curl command:
curl -sS -X POST http://localhost:8080/glowUp \
     -H "Content-Type: application/json" \
     -d '{"data":{"url": $IMAGE_URL, "contentType":"image/jpeg"}}' \
     > result.json
Because this is a server response we need to decode the base64 image:
cat result.json | jq -r '.result' | awk -F ',' '{print $2}' | base64 -d > restored.png
Deploy the web service to Cloud Run
It is fine that this server "works on my machine", but in the ideal world we would deploy it somewhere else accessible to all our users. One of the most convenient ways to deploy services like this is to use Cloud Run's deploy from source feature. With this feature you don't even need to build the container yourself, everything is automated.
To deploy this service to Cloud Run using deployment from source, execute the following command (replace the project id with your own):
gcloud run deploy glowup --source . --region us-central1 --no-allow-unauthenticated --set-env-vars GOOGLE_GENAI_USE_VERTEXAI=True,GOOGLE_CLOUD_LOCATION=$GOOGLE_CLOUD_LOCATION,GOOGLE_CLOUD_PROJECT=$GOOGLE_CLOUD_PROJECT
The deployment can take a few minutes to complete. Once you are done you can test the endpoint by sending another request via curl:
GLOWUP_URL=$(gcloud run services describe glowup --region us-central1 --format='value(status.url)')

curl -X POST "$GLOWUP_URL/glowUp" \
     -H "Authorization: Bearer $(gcloud auth print-identity-token)" \
     -H "Content-Type: application/json" \
     -d "{\"data\":{\"url\":\"$IMAGE_URL\", \"contentType\":\"image/jpeg\"} }" \
     > result.json
Again, we need to decode the base64 image:
cat result.json | jq -r '.result' | awk -F ',' '{print $2}' | base64 -d > restored_cloudrun.png
Now we have a fully working photo restoration web server!
Optional: "Vibe coding" a client application
Writing manual code is fun but can also be challenging if you never have done a certain type of project before. Luckily today we have coding agents that can help us to speed up the process.
In this step instead of writing the code ourselves we are going to ask Gemini CLI (or your favorite coding agent) to do the work for us. Use the following prompt:
GlowUp is a photo restoration service that takes a restoration request as input and returns a restored picture as output. Your task is to create a client application that uses this server to process image urls and save a restored file locally.

TODO:
- Write a CLI application that receives three arguments: an url (required), content type (optional, defaults to image/jpeg) and addr (server address, optional, defaults to localhost:8080)
- The CLI should send a POST request to the /glowUp endpoint in the server with the body '{"data":{"url": <url>, "contentType": <contentType>} }'
- The server response should be parsed by stripping the "data:" prefix. The remainder will have the format <mimeType>;base64,<encoded imageData>
- Extract the mime type and convert to a file extension using the mime package
- Extract the image data and decode it using the base64 package
Save a file named "restored" + the detected file extension

Acceptance Criteria:
- The client builds successfully
- Use the client to restore the image https://tile.loc.gov/storage-services/service/pnp/fsa/8c01000/8c01700/8c01765v.jpg
- Check that restored.png exists after processing the image above
The agent might need to reorganise the files a bit as we cannot have two functions "main" in the same module. Watch it work and steer it towards the right implementation giving it the server code or snippets if necessary.
Cleaning up after the lab
7. Conclusion
Congratulations! You have successfully built a high-fidelity photo restoration app using Genkit and Nano Banana Pro,
In this codelab you have learned how to:
- Configure your environment to develop Genkit Go applications
- Create multi-modal prompts with
dotprompt - Create Genkit flows using prompt templates
- Use Nano Banana Pro to process images
- Package Genkit flows as command-line applications and web services
- Deploy Genkit applications to Cloud Run
Once you are done testing, remember to clean up the environment.
Next steps
You can continue your learning journey by exploring other codelabs in this platform, or making improvements to glowUp on your own.
If you need some ideas for improvements, you could try:
- Enable the glowUp CLI to restore local files
- Create a frontend for the GlowUp web service
- Automatically detect the MIME type from the data
- Perform other types of image processing (from photo to drawing, from drawing to photo, sketch to final art, etc.
- Create or improve the client (maybe build a smartphone app?)
The possibilities are endless! If the idea of going on your own feels a bit intimidating, you can always employ the help of a coding agent like Gemini CLI or Antigravity. And if you want to do more with Genkit, coding agents paired with the Genkit MCP Server can make your life much easier.
Finally, if you want to access the full code for this repo, you can find it here.
Happy coding!