
1. 简介
Cloud DNS 服务提供高性能、高弹性的全球域名系统 (DNS) 解决方案,让您能够发布可用区和记录,而无需自行管理 DNS 基础架构。
最重要的是,Cloud DNS 在其外部端点路由政策中加入了对健康检查和自动故障切换功能的支持。不过,请注意,这些外部端点的健康检查仅在公开区域中可用,并且端点本身必须可通过互联网公开访问。
学习内容
- 如何创建具有非托管实例组的区域级外部应用负载平衡器。
- 如何为外部 DNS 路由配置 Cloud DNS 健康检查。
- 如何创建故障切换路由政策。
所需条件
- DNS 基础知识。
- Google Compute Engine 基础知识。
- 具备应用负载平衡器的基础知识。
- 具有所有者权限的 Google Cloud 项目
- 您拥有的公开网域,您可以为其创建 Cloud DNS 公开可用区。
- 以下组织政策目前在 Google Cloud 项目中未强制执行:受防护的虚拟机和互联网网络端点组。
2. Codelab 拓扑
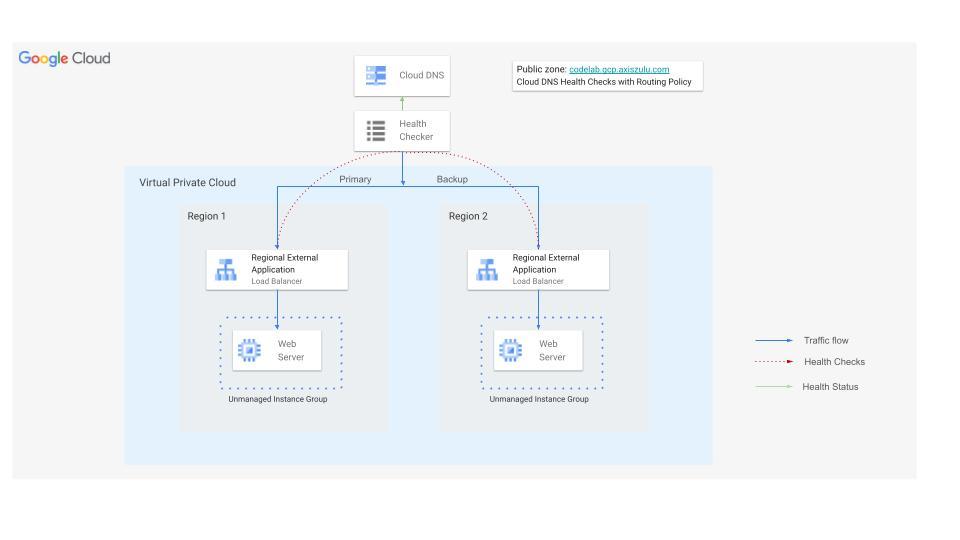
在此 Codelab 中,您将使用 Cloud DNS 外部端点健康检查,以便在主负载平衡器的后端运行状况不佳时将流量重新路由到备用区域级外部应用负载平衡器。
您将在两个区域中构建一个网站,每个区域都由一个外部应用负载平衡器提供前端服务。然后,您将使用故障切换路由政策配置 Cloud DNS 健康检查。
3. 设置和要求
自定进度的环境设置
- 登录 Google Cloud 控制台,然后创建一个新项目或重复使用现有项目。如果您还没有 Gmail 或 Google Workspace 账号,则必须创建一个。

- 项目名称是此项目参与者的显示名称。它是 Google API 尚未使用的字符串。您可以随时对其进行更新。
- 项目 ID 在所有 Google Cloud 项目中是唯一的,并且是不可变的(一经设置便无法更改)。Cloud 控制台会自动生成一个唯一字符串;通常情况下,您无需关注该字符串。在大多数 Codelab 中,您都需要引用项目 ID(通常用
PROJECT_ID标识)。如果您不喜欢生成的 ID,可以再随机生成一个 ID。或者,您也可以尝试自己的项目 ID,看看是否可用。完成此步骤后便无法更改该 ID,并且此 ID 在项目期间会一直保留。 - 此外,还有第三个值,即部分 API 使用的项目编号,供您参考。如需详细了解所有这三个值,请参阅文档。
- 接下来,您需要在 Cloud 控制台中启用结算功能,以便使用 Cloud 资源/API。运行此 Codelab 应该不会产生太多的费用(如果有的话)。若要关闭资源以避免产生超出本教程范围的结算费用,您可以删除自己创建的资源或删除项目。Google Cloud 新用户符合参与 300 美元免费试用计划的条件。
启动 Cloud Shell
虽然可以通过笔记本电脑对 Google Cloud 进行远程操作,但在此 Codelab 中,您将使用 Google Cloud Shell,这是一个在云端运行的命令行环境。
在 Google Cloud 控制台 中,点击右上角工具栏中的 Cloud Shell 图标:

预配和连接到环境应该只需要片刻时间。完成后,您应该会看到如下内容:

这个虚拟机已加载了您需要的所有开发工具。它提供了一个持久的 5 GB 主目录,并且在 Google Cloud 中运行,大大增强了网络性能和身份验证功能。您在此 Codelab 中的所有工作都可以在浏览器中完成。您无需安装任何程序。
4. 准备工作
启用 API
在 Cloud Shell 中,确保您的项目已设置并配置变量。
gcloud auth login
gcloud config list project
gcloud config set project [YOUR-PROJECT-ID]
export projectid=[YOUR-PROJECT-ID]

# Define variables for regions and the domain
export REGION_A=us-central1
export REGION_B=us-west1
export DNS_ZONE=dnscodelab-zone
Export DNS_DOMAIN=gcp.<yourpublicdomain>.com
echo $projectid
echo $REGION_A
echo $REGION_B
echo $DNS_ZONE
echo $DNS_DOMAIN
启用所有必要的服务
gcloud services enable compute.googleapis.com
gcloud services enable dns.googleapis.com
5. 创建 Cloud Load Balancing 基础架构
在本部分中,您将在两个不同的区域中创建必要的 VPC、子网、防火墙规则、虚拟机和非代管式实例组,以支持主负载平衡器和备用负载平衡器。
VPC 网络
从 Cloud Shell
gcloud compute networks create external-lb-vpc --subnet-mode=custom
在 REGION_A(主)和 REGION_B(备份)中创建两个子网,以托管后端 Web 服务器
创建子网
从 Cloud Shell
gcloud compute networks subnets create subnet-a --network=external-lb-vpc --region=$REGION_A --range=10.10.1.0/24

gcloud compute networks subnets create subnet-b --network=external-lb-vpc --region=$REGION_B --range=10.20.1.0/24
在每个区域中为稍后将创建的相应区域级外部应用负载平衡器创建代理专用子网。
对于部署在 external-lb-vpc 网络的同一区域内的所有基于 Envoy 的区域负载平衡器,此专用代理专用子网是强制性要求。这些代理会有效地终止客户端的连接,然后建立与后端服务的新连接。
从 Cloud Shell
gcloud compute networks subnets create proxy-only-subnet-a \
--purpose=REGIONAL_MANAGED_PROXY \
--role=ACTIVE \
--region=$REGION_A \
--network=external-lb-vpc \
--range=10.129.0.0/23

gcloud compute networks subnets create proxy-only-subnet-b \
--purpose=REGIONAL_MANAGED_PROXY \
--role=ACTIVE \
--region=$REGION_B \
--network=external-lb-vpc \
--range=10.130.0.0/23
创建网络防火墙规则
fw-allow-health-check. 适用于负载均衡实例的入站流量规则,该规则允许来自 Google Cloud 健康检查系统(在 130.211.0.0/22 和 35.191.0.0/16 中)的所有 TCP 流量。此示例使用目标标记 load-balanced-backend 来标识防火墙规则应用于的虚拟机。
fw-allow-proxies。适用于负载均衡实例的入站流量规则,该规则允许从区域级外部应用负载平衡器的代管式代理发送到端口 80 的 TCP 流量。此示例使用目标标记 load-balanced-backend 来标识防火墙规则应用于的虚拟机。
从 Cloud Shell
gcloud compute firewall-rules create fw-allow-health-check \
    --network=external-lb-vpc \
    --action=allow \
    --direction=ingress \
    --source-ranges=130.211.0.0/22,35.191.0.0/16 \
    --target-tags=load-balanced-backend \
    --rules=tcp
gcloud compute firewall-rules create fw-allow-proxies \
  --network=external-lb-vpc \
  --action=allow \
  --direction=ingress \
  --source-ranges=10.129.0.0/23,10.130.0.0/23 \
  --target-tags=load-balanced-backend \
  --rules=tcp:80
如需允许 IAP 连接到您的虚拟机实例,请创建一个防火墙规则,该规则应:
- 适用于您希望使用 IAP 可访问的所有虚拟机实例。
- 允许来自 IP 范围 35.235.240.0/20 的入站流量。此范围包含 IAP 用于 TCP 转发的所有 IP 地址。
从 Cloud Shell
gcloud compute firewall-rules create allow-ssh \
    --allow tcp:22 --network external-lb-vpc \
    --source-ranges 35.235.240.0/20  \
    --description "SSH with IAP" \
    --target-tags=allow-ssh
6. 创建 Cloud NAT 和 Cloud Router
您需要在两个区域中都设置 Cloud NAT 网关,以便专用虚拟机能够从互联网下载和安装软件包。
- 我们的 Web 服务器虚拟机需要下载并安装 Apache Web 服务器。
- 客户端虚拟机需要下载并安装 dnsutils 软件包,我们将使用该软件包进行测试。
每个 Cloud NAT 网关都与一个 VPC 网络、区域和 Cloud Router 相关联。因此,在创建 NAT 网关之前,我们需要在每个区域中创建 Cloud Router 路由器。
创建 Cloud Router 路由器
从 Cloud Shell
gcloud compute routers create "$REGION_A-cloudrouter" \
--region $REGION_A --network=external-lb-vpc --asn=65501

gcloud compute routers create "$REGION_B-cloudrouter" \
--region $REGION_B --network=external-lb-vpc --asn=65501
创建 NAT 网关
从 Cloud Shell
gcloud compute routers nats create "$REGION_A-nat-gw" \
--router="$REGION_A-cloudrouter" \
--router-region=$REGION_A \
--nat-all-subnet-ip-ranges --auto-allocate-nat-external-ips

gcloud compute routers nats create "$REGION_B-nat-gw" \
--router="$REGION_B-cloudrouter" \
--router-region=$REGION_B \
--nat-all-subnet-ip-ranges --auto-allocate-nat-external-ips
创建后端虚拟机和非代管式实例组
在每个区域中创建虚拟机并安装 Web 服务器(例如 Apache):
从 Cloud Shell
# Primary (Region A)
gcloud compute instances create vm-a \
--zone=$REGION_A-a \
--image-family=debian-12 --image-project=debian-cloud \
--subnet=subnet-a \
--no-address \
--tags=load-balanced-backend,allow-ssh \
--metadata=startup-script='#! /bin/bash
apt-get update
apt-get install apache2 -y
a2ensite default-ssl
a2enmod ssl
vm_hostname="$(curl -H "Metadata-Flavor:Google" \
http://metadata.google.internal/computeMetadata/v1/instance/name)"
echo "Page served from: $vm_hostname" - $REGION_A Primary Backend |\
tee /var/www/html/index.html
systemctl restart apache2'


# Backup (Region B)
gcloud compute instances create vm-b \
--zone=$REGION_B-a \
--image-family=debian-12 --image-project=debian-cloud \
--subnet=subnet-b \
--no-address \
--tags=load-balanced-backend,allow-ssh \
--metadata=startup-script='#! /bin/bash
apt-get update
apt-get install apache2 -y
a2ensite default-ssl
a2enmod ssl
vm_hostname="$(curl -H "Metadata-Flavor:Google" \
http://metadata.google.internal/computeMetadata/v1/instance/name)"
echo "Page served from: $vm_hostname" - $REGION_B Backup Backend |\
tee /var/www/html/index.html
systemctl restart apache2'
创建非代管式实例组,并将虚拟机实例添加到其中(针对每个区域):
从 Cloud Shell
# Primary (Region A)
gcloud compute instance-groups unmanaged create ig-a --zone=$REGION_A-a

gcloud compute instance-groups unmanaged add-instances ig-a --zone=$REGION_A-a --instances=vm-a

# Backup (Region B)
gcloud compute instance-groups unmanaged create ig-b --zone=$REGION_B-a

gcloud compute instance-groups unmanaged add-instances ig-b --zone=$REGION_B-a --instances=vm-b
7. 配置区域级外部应用负载平衡器
您将在 REGION_A(主区域)和 REGION_B(备份区域)中配置完整的区域级外部应用负载平衡器。
创建健康检查和后端服务
区域级外部应用负载平衡器基于 Envoy,需要配置区域级健康检查。
创建 HTTP 健康检查(供负载平衡器用于检查实例健康状况):
在 Cloud Shell 中
gcloud compute health-checks create http http-lb-hc-primary-region \
--port 80 \
--region=$REGION_A
gcloud compute health-checks create http http-lb-hc-backup-region \
--port 80 \
--region=$REGION_B
创建区域后端服务,并附加每个区域中的实例组**。**
在 Cloud Shell 中
# Primary (Region A)
gcloud compute backend-services create be-svc-a \
--load-balancing-scheme=EXTERNAL_MANAGED \
--protocol=HTTP \
--port-name=http \
--health-checks=http-lb-hc-primary-region \
--health-checks-region=$REGION_A \
--region=$REGION_A

gcloud compute backend-services add-backend be-svc-a \
--instance-group=ig-a \
--instance-group-zone=$REGION_A-a \
--region=$REGION_A

# Backup (Region B)
gcloud compute backend-services create be-svc-b \
--load-balancing-scheme=EXTERNAL_MANAGED \
--protocol=HTTP \
--port-name=http \
--health-checks=http-lb-hc-backup-region \
--health-checks-region=$REGION_B \
--region=$REGION_B

gcloud compute backend-services add-backend be-svc-b --instance-group=ig-b --instance-group-zone=$REGION_B-a --region=$REGION_B
创建前端组件
在两个区域中创建网址映射和目标 HTTP 代理:
在 Cloud Shell 中
#Primary (Region A)
gcloud compute url-maps create url-map-a \
--default-service=be-svc-a \
--region=$REGION_A
gcloud compute target-http-proxies create http-proxy-a \
--url-map=url-map-a \
--url-map-region=$REGION_A \
--region=$REGION_A
#Backup (Region B)
gcloud compute url-maps create url-map-b \
--default-service=be-svc-b \
--region=$REGION_B

gcloud compute target-http-proxies create http-proxy-b \
--url-map=url-map-b \
--url-map-region=$REGION_B \
--region=$REGION_B
为转发规则预留静态 IP 地址(外部):
在 Cloud Shell 中
# Primary IP (Region A)
gcloud compute addresses create rxlb-ip-a --region=$REGION_A

# Backup IP (Region B)
gcloud compute addresses create rxlb-ip-b --region=$REGION_B
为这两个负载平衡器创建转发规则:
在 Cloud Shell 中
# Primary (Region A)
gcloud compute forwarding-rules create http-fwd-rule-a \
--load-balancing-scheme=EXTERNAL_MANAGED \
--network=external-lb-vpc \
--region=$REGION_A \
--target-http-proxy-region=$REGION_A \
--address=rxlb-ip-a \
--target-http-proxy=http-proxy-a \
--ports=80

# Backup (Region B)
gcloud compute forwarding-rules create http-fwd-rule-b \
--load-balancing-scheme=EXTERNAL_MANAGED \
--network=external-lb-vpc \
--region=$REGION_B \
--target-http-proxy-region=$REGION_B \
--address=rxlb-ip-b \
--target-http-proxy=http-proxy-b \
--ports=80
为故障切换配置 Cloud DNS
为外部端点创建 Cloud DNS 健康检查
您必须为负载平衡器的公共 IP 地址创建专用全局健康检查。这与负载平衡器的内部健康检查不同。
首先,我们来确定负载平衡器的外部 IP 地址,以便配置故障切换政策并将其导出为变量
在 Cloud Shell 中
PRIMARY_IP=$(gcloud compute addresses describe rxlb-ip-a --region=$REGION_A --format='get(address)')

BACKUP_IP=$(gcloud compute addresses describe rxlb-ip-b --region=$REGION_B --format='get(address)')
创建全局 DNS 健康检查(需要三个来源区域):
在 Cloud Shell 中
gcloud beta compute health-checks create http dns-failover-health-check \
    --global \
    --source-regions=$REGION_A,$REGION_B,europe-west1 \
    --request-path=/ \
    --check-interval=30s \
    --port=80 \
    --enable-logging
创建公开的托管地区和故障切换路由政策。
创建公共代管区域(使用您拥有的 DNS 网域):
在 Cloud Shell 中
gcloud dns managed-zones create codelab-publiczone --dns-name=$DNS_DOMAIN --description="Codelab DNS Failover Zone"
创建具有故障切换路由政策的 A 记录。此政策指向主 IP,并使用健康检查来确定何时故障切换到备用 IP。
以下命令使用负载平衡器转发规则名称来引用路由政策的 IP 地址。
gcloud beta dns record-sets create codelab.gcp.axiszulu.com. \
--type=A \
--ttl=5 \
--zone=codelab-publiczone \
--routing_policy_type=FAILOVER \
--routing-policy-primary-data=$PRIMARY_IP \
--routing-policy-backup-data-type=GEO \
--routing-policy-backup-item=location=$REGION_B,external_endpoints=$BACKUP_IP \
--health-check=dns-failover-health-check
8. 测试区域故障切换
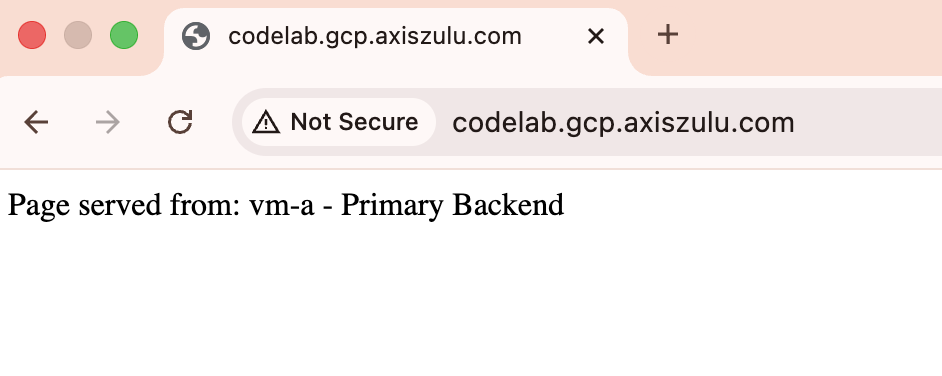
- 初始验证:使用
dig或网络浏览器等工具查询您的网域。它应解析为主要 IP ($PRIMARY_IP),并返回“区域 A - 主要后端”页面。
dig codelab.gcp.axiszulu.com

OUTPUT
; <<>> DiG 9.18.39-0ubuntu0.24.04.2-Ubuntu <<>> codelab.gcp.axiszulu.com
;; global options: +cmd
;; Got answer:
;; ->>HEADER<<- opcode: QUERY, status: NOERROR, id: 16096
;; flags: qr rd ra; QUERY: 1, ANSWER: 1, AUTHORITY: 0, ADDITIONAL: 1

;; OPT PSEUDOSECTION:
; EDNS: version: 0, flags:; udp: 512
;; QUESTION SECTION:
;codelab.gcp.axiszulu.com.      IN      A

;; ANSWER SECTION:
codelab.gcp.axiszulu.com. 5     IN      A   <PRIMARY_IP>
来自浏览器的输出
- 模拟故障切换:登录到主虚拟机 (
vm-a),然后关闭 Apache 以模拟服务中断:
在 Cloud Shell 中
gcloud compute ssh vm-a --zone=$REGION_A-a --command="sudo systemctl stop apache2"
- 验证健康状况不佳状态:等待 2-3 分钟,让 DNS 健康检查将主端点标记为健康状况不佳。
# check health status
gcloud compute backend-services get-health be-svc-a --region=${REGION_A}

Output:
backend: https://www.googleapis.com/compute/v1/projects/precise-airship-466617-c3/zones/us-central1-a/instanceGroups/ig-a
status:
  healthStatus:
  - healthState: UNHEALTHY
    instance: https://www.googleapis.com/compute/v1/projects/precise-airship-466617-c3/zones/us-central1-a/instances/vm-a
    ipAddress: 10.10.1.2
    port: 80
  kind: compute#backendServiceGroupHealth
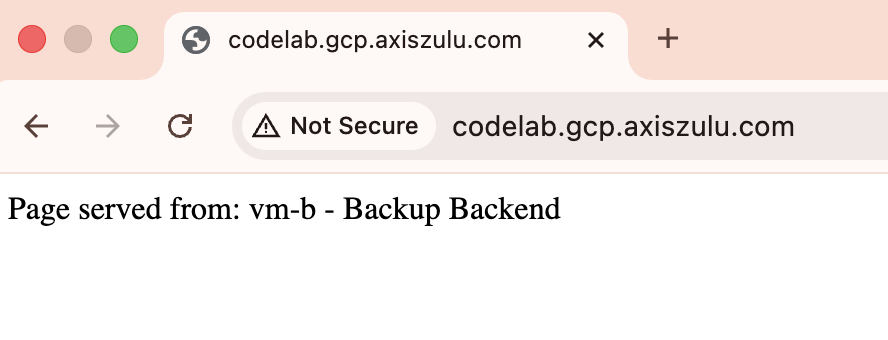
- 验证故障切换:重新查询您的网域。现在,它应该会解析为备份 IP (
$BACKUP_IP),并返回“区域 B - 备份后端”页面。
dig codelab.gcp.axiszulu.com

OUTPUT
; <<>> DiG 9.18.39-0ubuntu0.24.04.2-Ubuntu <<>> codelab.gcp.axiszulu.com
;; global options: +cmd
;; Got answer:
;; ->>HEADER<<- opcode: QUERY, status: NOERROR, id: 16096
;; flags: qr rd ra; QUERY: 1, ANSWER: 1, AUTHORITY: 0, ADDITIONAL: 1

;; OPT PSEUDOSECTION:
; EDNS: version: 0, flags:; udp: 512
;; QUESTION SECTION:
;codelab.gcp.axiszulu.com.      IN      A

;; ANSWER SECTION:
codelab.gcp.axiszulu.com. 5     IN      A   <BACKUP_IP>
来自浏览器的输出
- 模拟故障恢复(可选):通过 SSH 连接到主虚拟机并启动 Apache,然后等待 DNS 健康检查将主端点标记为健康。流量应会自动路由回主 IP。
- 可选:您可以在 Cloud Shell 中运行以下命令,分析 Cloud DNS 健康检查日志记录
gcloud logging read "logName=projects/${projectid}/logs/compute.googleapis.com%2Fhealthchecks" \
--limit=10 \
--project=${projectid} \
--freshness=1d \
--format="table(timestamp:label=TIME, \
jsonPayload.healthCheckProbeResult.ipAddress:label=BACKEND_IP, \
jsonPayload.healthCheckProbeResult.previousDetailedHealthState:label=PREVIOUS_STATE, \
jsonPayload.healthCheckProbeResult.detailedHealthState:label=CURRENT_STATE, \
jsonPayload.healthCheckProbeResult.probeResultText:label=RESULT_TEXT)"
9. 清理步骤
请删除所有组件,以免产生更多费用。
从 Cloud Shell
# Delete VMs
gcloud compute instances delete vm-a --zone=$REGION_A-a --quiet
gcloud compute instances delete vm-b --zone=$REGION_B-a --quiet
# Delete Load Balancer Components (Primary)
gcloud compute forwarding-rules delete http-fwd-rule-a --region=$REGION_A --quiet
gcloud compute target-http-proxies delete http-proxy-a --region=$REGION_A --quiet
gcloud compute url-maps delete url-map-a --region=$REGION_A --quiet
gcloud compute backend-services delete be-svc-a --region=$REGION_A --quiet
gcloud compute addresses delete rxlb-ip-a --region=$REGION_A --quiet
# Delete Load Balancer Components (Backup)
gcloud compute forwarding-rules delete http-fwd-rule-b --region=$REGION_B --quiet
gcloud compute target-http-proxies delete http-proxy-b --region=$REGION_B --quiet
gcloud compute url-maps delete url-map-b --region=$REGION_B --quiet
gcloud compute backend-services delete be-svc-b --region=$REGION_B --quiet
gcloud compute addresses delete rxlb-ip-b --region=$REGION_B --quiet
# Delete Instance Groups and LB Health Checks
gcloud compute instance-groups unmanaged delete ig-a --zone=$REGION_A-a --quiet
gcloud compute instance-groups unmanaged delete ig-b --zone=$REGION_B-a --quiet
gcloud compute health-checks delete http-lb-hc-primary-region --region=$REGION_A --quiet
gcloud compute health-checks delete http-lb-hc-backup-region --region=$REGION_B --quiet

# Delete Cloud DNS Records Zone and DNS Heath Checks
gcloud dns record-sets delete $DNS_DOMAIN --type=A --zone=codelab-publiczone --quiet
gcloud dns managed-zones delete codelab-publiczone --quiet

gcloud compute health-checks delete dns-failover-health-check --global --quiet

# Delete Cloud NAT and Cloud Routers
gcloud compute routers nats delete $REGION_A-nat-gw \
--router=$REGION_A-cloudrouter --region=$REGION_A --quiet

gcloud compute routers nats delete $REGION_B-nat-gw \
--router=$REGION_B-cloudrouter --region=$REGION_B --quiet

gcloud compute routers delete $REGION_A-cloudrouter \
--region=$REGION_A --quiet

gcloud compute routers delete $REGION_B-cloudrouter \
--region=$REGION_B --quiet


# Delete Subnets and Firewall Rules
gcloud compute firewall-rules delete fw-allow-health-check --quiet
gcloud compute firewall-rules delete fw-allow-proxies --quiet
gcloud compute firewall-rules delete allow-ssh --quiet
gcloud compute networks subnets delete subnet-a \
--region=$REGION_A --quiet

gcloud compute networks subnets delete subnet-b \
--region=$REGION_B --quiet
gcloud compute networks subnets delete proxy-only-subnet-a \
--region=$REGION_A --quiet

gcloud compute networks subnets delete proxy-only-subnet-b \
--region=$REGION_B --quiet

gcloud compute networks delete external-lb-vpc --quiet
10. 恭喜!
恭喜您完成此 Codelab。
- 您已成功使用 Cloud DNS 健康检查和区域级外部应用负载平衡器配置并验证了多区域主动-被动故障切换