
1. 簡介
Cloud DNS 服務提供高效能、具韌性的全球網域名稱系統 (DNS) 解決方案,讓您發布區域和記錄,不必自行管理 DNS 基礎架構。
最重要的是,Cloud DNS 在外部端點的路由政策中,支援健康狀態檢查和自動容錯移轉功能。不過請注意,這些外部端點的健康狀態檢查僅適用於公開區域,且端點本身必須可透過網際網路公開存取。
課程內容
- 如何使用非受管理執行個體群組建立區域外部應用程式負載平衡器。
- 如何為外部 DNS 轉送設定 Cloud DNS 健康狀態檢查。
- 如何建立容錯移轉路由政策。
軟硬體需求
- 具備 DNS 基本知識。
- Google Compute Engine 的基本知識。
- 具備應用程式負載平衡器的基本知識。
- 具備擁有者權限的 Google Cloud 專案
- 您擁有的公開網域,可為該網域建立 Cloud DNS 公開區域。
- 目前 Google Cloud 專案中不會強制執行下列機構政策:安全防護 VM 和網際網路網路端點群組。
2. 程式碼研究室拓撲
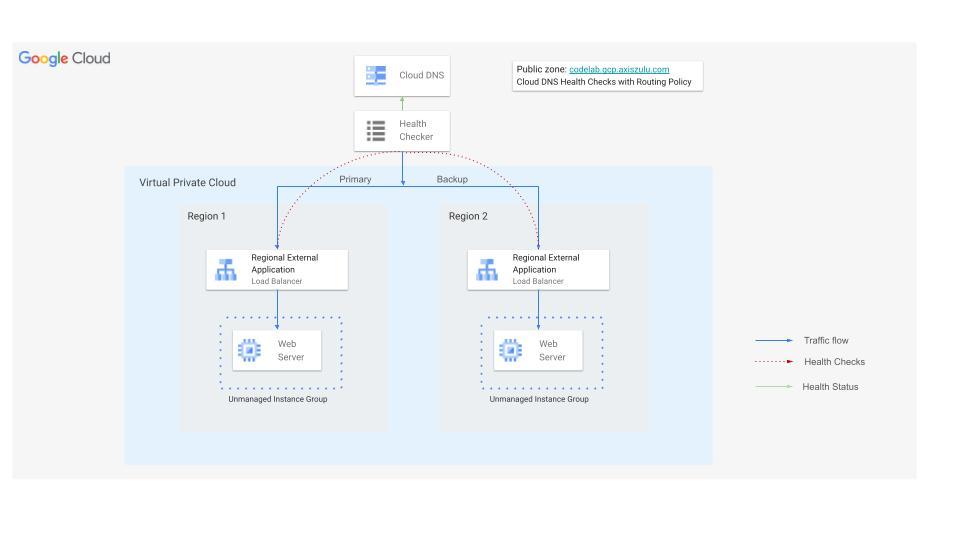
在本程式碼研究室中,您將使用外部端點的 Cloud DNS 健康狀態檢查,在主要負載平衡器的後端健康狀態不佳時,將流量重新導向至備用區域性外部應用程式負載平衡器。
您將在兩個區域中建構網站,每個網站的前端都有外部應用程式負載平衡器。接著,您將使用容錯移轉轉送政策設定 Cloud DNS 健康狀態檢查。
3. 設定和需求
自修實驗室環境設定
- 登入 Google Cloud 控制台,然後建立新專案或重複使用現有專案。如果沒有 Gmail 或 Google Workspace 帳戶,請先建立帳戶。

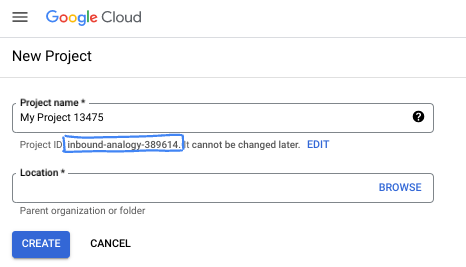
- 專案名稱是這個專案參與者的顯示名稱。這是 Google API 未使用的字元字串。你隨時可以更新。
- 專案 ID 在所有 Google Cloud 專案中都是不重複的,而且設定後即無法變更。Cloud 控制台會自動產生專屬字串,通常您不需要在意該字串為何。在大多數程式碼研究室中,您需要參照專案 ID (通常標示為
PROJECT_ID)。如果您不喜歡產生的 ID,可以產生另一個隨機 ID。你也可以嘗試使用自己的名稱,看看是否可用。完成這個步驟後就無法變更,且專案期間會維持不變。 - 請注意,有些 API 會使用第三個值,也就是「專案編號」。如要進一步瞭解這三種值,請參閱說明文件。
- 接著,您需要在 Cloud 控制台中啟用帳單,才能使用 Cloud 資源/API。完成這個程式碼研究室的費用不高,甚至可能完全免費。如要關閉資源,避免在本教學課程結束後繼續產生費用,請刪除您建立的資源或專案。Google Cloud 新使用者可參加價值$300 美元的免費試用計畫。
啟動 Cloud Shell
雖然可以透過筆電遠端操作 Google Cloud,但在本程式碼研究室中,您將使用 Google Cloud Shell,這是可在雲端執行的指令列環境。
在 Google Cloud 控制台中,點選右上工具列的 Cloud Shell 圖示:

佈建並連線至環境的作業需要一些時間才能完成。完成後,您應該會看到如下的內容:

這部虛擬機器搭載各種您需要的開發工具,並提供永久的 5GB 主目錄,而且可在 Google Cloud 運作,大幅提升網路效能並強化驗證功能。您可以在瀏覽器中完成本程式碼研究室的所有作業。您不需要安裝任何軟體。
4. 事前準備
啟用 API
在 Cloud Shell 中,請確認專案已設定完畢,並設定變數。
gcloud auth login
gcloud config list project
gcloud config set project [YOUR-PROJECT-ID]
export projectid=[YOUR-PROJECT-ID]

# Define variables for regions and the domain
export REGION_A=us-central1
export REGION_B=us-west1
export DNS_ZONE=dnscodelab-zone
Export DNS_DOMAIN=gcp.<yourpublicdomain>.com
echo $projectid
echo $REGION_A
echo $REGION_B
echo $DNS_ZONE
echo $DNS_DOMAIN
啟用所有必要服務
gcloud services enable compute.googleapis.com
gcloud services enable dns.googleapis.com
5. 建立 Cloud Load Balancing 基礎架構
在本節中,您將在兩個不同區域建立必要的虛擬私有雲、子網路、防火牆規則、VM 和非代管執行個體群組,以支援主要和備用負載平衡器。
虛擬私有雲網路
透過 Cloud Shell
gcloud compute networks create external-lb-vpc --subnet-mode=custom
在 REGION_A (主要) 和 REGION_B (備份) 中建立兩個子網路,用於代管後端網頁伺服器
建立子網路
透過 Cloud Shell
gcloud compute networks subnets create subnet-a --network=external-lb-vpc --region=$REGION_A --range=10.10.1.0/24

gcloud compute networks subnets create subnet-b --network=external-lb-vpc --region=$REGION_B --range=10.20.1.0/24
在每個區域中,為稍後建立的個別區域外部應用程式負載平衡器建立僅限 Proxy 子網路。
在 external-lb-vpc 網路的相同區域中部署的所有 Envoy 型區域負載平衡器,都必須使用這個專屬的 Proxy 專用子網路。這些 Proxy 會有效終止用戶端的連線,然後建立與後端服務的新連線。
透過 Cloud Shell
gcloud compute networks subnets create proxy-only-subnet-a \
--purpose=REGIONAL_MANAGED_PROXY \
--role=ACTIVE \
--region=$REGION_A \
--network=external-lb-vpc \
--range=10.129.0.0/23

gcloud compute networks subnets create proxy-only-subnet-b \
--purpose=REGIONAL_MANAGED_PROXY \
--role=ACTIVE \
--region=$REGION_B \
--network=external-lb-vpc \
--range=10.130.0.0/23
建立網路防火牆規則
fw-allow-health-check. 輸入規則,適用於要進行負載平衡的執行個體,可允許來自 Google Cloud 健康狀態檢查系統 (130.211.0.0/22 和 35.191.0.0/16) 的所有 TCP 流量。這個範例會使用目標標記 load-balanced-backend 來辨識套用防火牆規則的 VM。
fw-allow-proxies。輸入規則,適用於要進行負載平衡的執行個體,可在通訊埠 80 上允許來自區域外部應用程式負載平衡器代管 Proxy 的 TCP 流量。這個範例會使用目標標記 load-balanced-backend 來辨識套用防火牆規則的 VM。
透過 Cloud Shell
gcloud compute firewall-rules create fw-allow-health-check \
    --network=external-lb-vpc \
    --action=allow \
    --direction=ingress \
    --source-ranges=130.211.0.0/22,35.191.0.0/16 \
    --target-tags=load-balanced-backend \
    --rules=tcp
gcloud compute firewall-rules create fw-allow-proxies \
  --network=external-lb-vpc \
  --action=allow \
  --direction=ingress \
  --source-ranges=10.129.0.0/23,10.130.0.0/23 \
  --target-tags=load-balanced-backend \
  --rules=tcp:80
如要允許 IAP 連線至您的 VM 執行個體,請根據以下條件建立防火牆規則:
- 套用至所有您希望能透過 IAP 存取的 VM 執行個體。
- 允許來自 IP 範圍 35.235.240.0/20 的輸入流量。這個範圍包含 IAP 用於 TCP 轉送的所有 IP 位址。
透過 Cloud Shell
gcloud compute firewall-rules create allow-ssh \
    --allow tcp:22 --network external-lb-vpc \
    --source-ranges 35.235.240.0/20  \
    --description "SSH with IAP" \
    --target-tags=allow-ssh
6. 建立 Cloud NAT 和 Cloud Router
您需要在兩個區域中都設定 Cloud NAT 閘道,私人 VM 才能從網際網路下載及安裝套件。
- 網路伺服器 VM 必須下載並安裝 Apache 網路伺服器。
- 用戶端 VM 必須下載並安裝 dnsutils 套件,以供測試使用。
每個 Cloud NAT 閘道都與單一 VPC 網路、區域和 Cloud Router 相關聯。因此,在建立 NAT 閘道之前,我們需要在每個區域中建立 Cloud Router。
建立 Cloud Router
透過 Cloud Shell
gcloud compute routers create "$REGION_A-cloudrouter" \
--region $REGION_A --network=external-lb-vpc --asn=65501

gcloud compute routers create "$REGION_B-cloudrouter" \
--region $REGION_B --network=external-lb-vpc --asn=65501
建立 NAT 閘道
透過 Cloud Shell
gcloud compute routers nats create "$REGION_A-nat-gw" \
--router="$REGION_A-cloudrouter" \
--router-region=$REGION_A \
--nat-all-subnet-ip-ranges --auto-allocate-nat-external-ips

gcloud compute routers nats create "$REGION_B-nat-gw" \
--router="$REGION_B-cloudrouter" \
--router-region=$REGION_B \
--nat-all-subnet-ip-ranges --auto-allocate-nat-external-ips
建立後端 VM 和非代管執行個體群組
在每個區域中建立 VM,並安裝網路伺服器 (例如 Apache):
透過 Cloud Shell
# Primary (Region A)
gcloud compute instances create vm-a \
--zone=$REGION_A-a \
--image-family=debian-12 --image-project=debian-cloud \
--subnet=subnet-a \
--no-address \
--tags=load-balanced-backend,allow-ssh \
--metadata=startup-script='#! /bin/bash
apt-get update
apt-get install apache2 -y
a2ensite default-ssl
a2enmod ssl
vm_hostname="$(curl -H "Metadata-Flavor:Google" \
http://metadata.google.internal/computeMetadata/v1/instance/name)"
echo "Page served from: $vm_hostname" - $REGION_A Primary Backend |\
tee /var/www/html/index.html
systemctl restart apache2'


# Backup (Region B)
gcloud compute instances create vm-b \
--zone=$REGION_B-a \
--image-family=debian-12 --image-project=debian-cloud \
--subnet=subnet-b \
--no-address \
--tags=load-balanced-backend,allow-ssh \
--metadata=startup-script='#! /bin/bash
apt-get update
apt-get install apache2 -y
a2ensite default-ssl
a2enmod ssl
vm_hostname="$(curl -H "Metadata-Flavor:Google" \
http://metadata.google.internal/computeMetadata/v1/instance/name)"
echo "Page served from: $vm_hostname" - $REGION_B Backup Backend |\
tee /var/www/html/index.html
systemctl restart apache2'
為每個區域建立非代管執行個體群組,並將 VM 執行個體新增至該群組:
透過 Cloud Shell
# Primary (Region A)
gcloud compute instance-groups unmanaged create ig-a --zone=$REGION_A-a

gcloud compute instance-groups unmanaged add-instances ig-a --zone=$REGION_A-a --instances=vm-a

# Backup (Region B)
gcloud compute instance-groups unmanaged create ig-b --zone=$REGION_B-a

gcloud compute instance-groups unmanaged add-instances ig-b --zone=$REGION_B-a --instances=vm-b
7. 設定區域性外部應用程式負載平衡器
您將在 REGION_A (主要) 和 REGION_B (備份) 中,設定完整的區域外部應用程式負載平衡器。
建立健康狀態檢查和後端服務
區域性外部應用程式負載平衡器以 Envoy 為基礎,需要設定區域性健康狀態檢查。
建立 HTTP 健康狀態檢查 (負載平衡器會使用這項檢查來確認執行個體健康狀態):
在 Cloud Shell 中
gcloud compute health-checks create http http-lb-hc-primary-region \
--port 80 \
--region=$REGION_A
gcloud compute health-checks create http http-lb-hc-backup-region \
--port 80 \
--region=$REGION_B
建立區域性後端服務,並附加每個區域中的執行個體群組。
在 Cloud Shell 中
# Primary (Region A)
gcloud compute backend-services create be-svc-a \
--load-balancing-scheme=EXTERNAL_MANAGED \
--protocol=HTTP \
--port-name=http \
--health-checks=http-lb-hc-primary-region \
--health-checks-region=$REGION_A \
--region=$REGION_A

gcloud compute backend-services add-backend be-svc-a \
--instance-group=ig-a \
--instance-group-zone=$REGION_A-a \
--region=$REGION_A

# Backup (Region B)
gcloud compute backend-services create be-svc-b \
--load-balancing-scheme=EXTERNAL_MANAGED \
--protocol=HTTP \
--port-name=http \
--health-checks=http-lb-hc-backup-region \
--health-checks-region=$REGION_B \
--region=$REGION_B

gcloud compute backend-services add-backend be-svc-b --instance-group=ig-b --instance-group-zone=$REGION_B-a --region=$REGION_B
建立前端元件
在兩個區域中建立網址對應和目標 HTTP Proxy:
在 Cloud Shell 中
#Primary (Region A)
gcloud compute url-maps create url-map-a \
--default-service=be-svc-a \
--region=$REGION_A
gcloud compute target-http-proxies create http-proxy-a \
--url-map=url-map-a \
--url-map-region=$REGION_A \
--region=$REGION_A
#Backup (Region B)
gcloud compute url-maps create url-map-b \
--default-service=be-svc-b \
--region=$REGION_B

gcloud compute target-http-proxies create http-proxy-b \
--url-map=url-map-b \
--url-map-region=$REGION_B \
--region=$REGION_B
為轉送規則預留靜態 IP 位址 (外部):
在 Cloud Shell 中
# Primary IP (Region A)
gcloud compute addresses create rxlb-ip-a --region=$REGION_A

# Backup IP (Region B)
gcloud compute addresses create rxlb-ip-b --region=$REGION_B
為兩個負載平衡器建立轉送規則:
在 Cloud Shell 中
# Primary (Region A)
gcloud compute forwarding-rules create http-fwd-rule-a \
--load-balancing-scheme=EXTERNAL_MANAGED \
--network=external-lb-vpc \
--region=$REGION_A \
--target-http-proxy-region=$REGION_A \
--address=rxlb-ip-a \
--target-http-proxy=http-proxy-a \
--ports=80

# Backup (Region B)
gcloud compute forwarding-rules create http-fwd-rule-b \
--load-balancing-scheme=EXTERNAL_MANAGED \
--network=external-lb-vpc \
--region=$REGION_B \
--target-http-proxy-region=$REGION_B \
--address=rxlb-ip-b \
--target-http-proxy=http-proxy-b \
--ports=80
設定 Cloud DNS 故障轉移
為外部端點建立 Cloud DNS 健康狀態檢查
您必須為負載平衡器的公開 IP 位址建立專屬的全域健康狀態檢查。這與負載平衡器的內部健康狀態檢查不同。
首先,請判斷負載平衡器的外部 IP 位址,以設定容錯移轉政策,並將其匯出為變數
在 Cloud Shell 中
PRIMARY_IP=$(gcloud compute addresses describe rxlb-ip-a --region=$REGION_A --format='get(address)')

BACKUP_IP=$(gcloud compute addresses describe rxlb-ip-b --region=$REGION_B --format='get(address)')
建立全域 DNS 健康狀態檢查 (需要三個來源區域):
在 Cloud Shell 中
gcloud beta compute health-checks create http dns-failover-health-check \
    --global \
    --source-regions=$REGION_A,$REGION_B,europe-west1 \
    --request-path=/ \
    --check-interval=30s \
    --port=80 \
    --enable-logging
建立公開代管區域和容錯移轉轉送政策。
建立代管公開區域 (使用您擁有的 DNS 網域):
在 Cloud Shell 中
gcloud dns managed-zones create codelab-publiczone --dns-name=$DNS_DOMAIN --description="Codelab DNS Failover Zone"
使用容錯移轉路由政策建立 A 記錄。這項政策會指向主要 IP,並使用健康狀態檢查來判斷何時容錯移轉至備份 IP。
下列指令會使用負載平衡器轉送規則名稱,參照路由政策的 IP 位址。
gcloud beta dns record-sets create codelab.gcp.axiszulu.com. \
--type=A \
--ttl=5 \
--zone=codelab-publiczone \
--routing_policy_type=FAILOVER \
--routing-policy-primary-data=$PRIMARY_IP \
--routing-policy-backup-data-type=GEO \
--routing-policy-backup-item=location=$REGION_B,external_endpoints=$BACKUP_IP \
--health-check=dns-failover-health-check
8. 測試區域容錯移轉
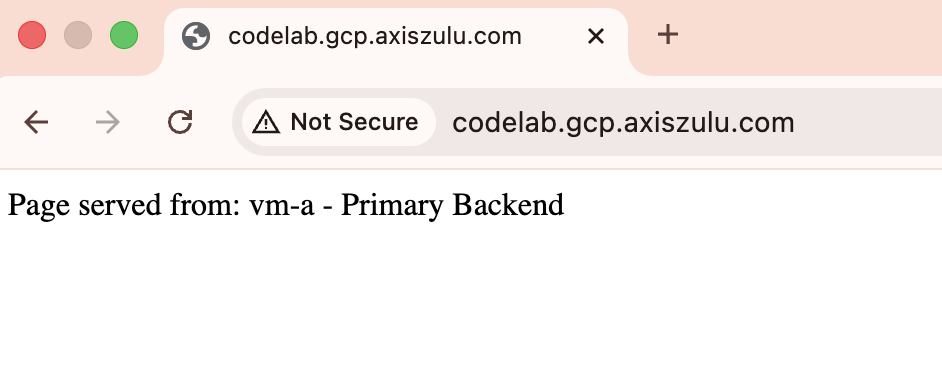
- 初步驗證:使用工具 (例如
dig或網頁瀏覽器) 查詢網域。應解析為主要 IP ($PRIMARY_IP),並傳回「Region A - Primary Backend」頁面。
dig codelab.gcp.axiszulu.com

OUTPUT
; <<>> DiG 9.18.39-0ubuntu0.24.04.2-Ubuntu <<>> codelab.gcp.axiszulu.com
;; global options: +cmd
;; Got answer:
;; ->>HEADER<<- opcode: QUERY, status: NOERROR, id: 16096
;; flags: qr rd ra; QUERY: 1, ANSWER: 1, AUTHORITY: 0, ADDITIONAL: 1

;; OPT PSEUDOSECTION:
; EDNS: version: 0, flags:; udp: 512
;; QUESTION SECTION:
;codelab.gcp.axiszulu.com.      IN      A

;; ANSWER SECTION:
codelab.gcp.axiszulu.com. 5     IN      A   <PRIMARY_IP>
瀏覽器的輸出內容
- 模擬容錯移轉:登入主要 VM (
vm-a) 並關閉 Apache,模擬中斷情形:
在 Cloud Shell 中
gcloud compute ssh vm-a --zone=$REGION_A-a --command="sudo systemctl stop apache2"
- 確認健康狀態不良:等待 2 到 3 分鐘,讓 DNS 健康狀態檢查將主要端點標示為健康狀態不良。
# check health status
gcloud compute backend-services get-health be-svc-a --region=${REGION_A}

Output:
backend: https://www.googleapis.com/compute/v1/projects/precise-airship-466617-c3/zones/us-central1-a/instanceGroups/ig-a
status:
  healthStatus:
  - healthState: UNHEALTHY
    instance: https://www.googleapis.com/compute/v1/projects/precise-airship-466617-c3/zones/us-central1-a/instances/vm-a
    ipAddress: 10.10.1.2
    port: 80
  kind: compute#backendServiceGroupHealth
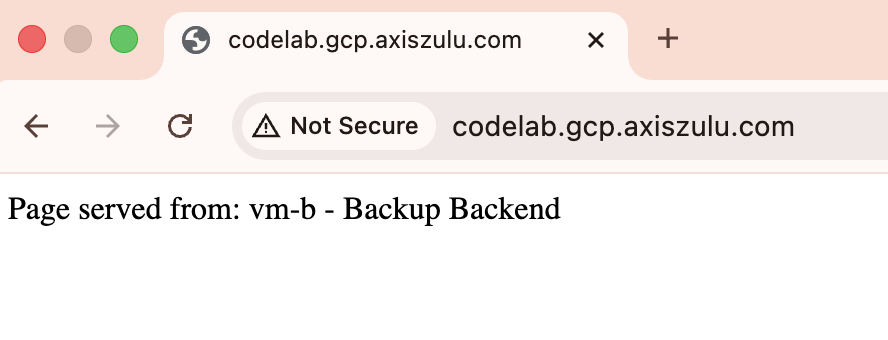
- 驗證容錯移轉:重新查詢網域。現在應該會解析為備份 IP (
$BACKUP_IP),並傳回「Region B - Backup Backend」頁面。
dig codelab.gcp.axiszulu.com

OUTPUT
; <<>> DiG 9.18.39-0ubuntu0.24.04.2-Ubuntu <<>> codelab.gcp.axiszulu.com
;; global options: +cmd
;; Got answer:
;; ->>HEADER<<- opcode: QUERY, status: NOERROR, id: 16096
;; flags: qr rd ra; QUERY: 1, ANSWER: 1, AUTHORITY: 0, ADDITIONAL: 1

;; OPT PSEUDOSECTION:
; EDNS: version: 0, flags:; udp: 512
;; QUESTION SECTION:
;codelab.gcp.axiszulu.com.      IN      A

;; ANSWER SECTION:
codelab.gcp.axiszulu.com. 5     IN      A   <BACKUP_IP>
瀏覽器的輸出內容
- 模擬容錯回復 (選用):透過 SSH 連線至主要 VM 並啟動 Apache,然後等待 DNS 健康狀態檢查將主要端點標示為健康狀態。流量應會自動重新導向至主要 IP。
- 選用:您可以在 Cloud Shell 中執行下列指令,分析 Cloud DNS 健康狀態檢查記錄
gcloud logging read "logName=projects/${projectid}/logs/compute.googleapis.com%2Fhealthchecks" \
--limit=10 \
--project=${projectid} \
--freshness=1d \
--format="table(timestamp:label=TIME, \
jsonPayload.healthCheckProbeResult.ipAddress:label=BACKEND_IP, \
jsonPayload.healthCheckProbeResult.previousDetailedHealthState:label=PREVIOUS_STATE, \
jsonPayload.healthCheckProbeResult.detailedHealthState:label=CURRENT_STATE, \
jsonPayload.healthCheckProbeResult.probeResultText:label=RESULT_TEXT)"
9. 清除步驟
刪除所有元件,以免產生額外費用。
透過 Cloud Shell
# Delete VMs
gcloud compute instances delete vm-a --zone=$REGION_A-a --quiet
gcloud compute instances delete vm-b --zone=$REGION_B-a --quiet
# Delete Load Balancer Components (Primary)
gcloud compute forwarding-rules delete http-fwd-rule-a --region=$REGION_A --quiet
gcloud compute target-http-proxies delete http-proxy-a --region=$REGION_A --quiet
gcloud compute url-maps delete url-map-a --region=$REGION_A --quiet
gcloud compute backend-services delete be-svc-a --region=$REGION_A --quiet
gcloud compute addresses delete rxlb-ip-a --region=$REGION_A --quiet
# Delete Load Balancer Components (Backup)
gcloud compute forwarding-rules delete http-fwd-rule-b --region=$REGION_B --quiet
gcloud compute target-http-proxies delete http-proxy-b --region=$REGION_B --quiet
gcloud compute url-maps delete url-map-b --region=$REGION_B --quiet
gcloud compute backend-services delete be-svc-b --region=$REGION_B --quiet
gcloud compute addresses delete rxlb-ip-b --region=$REGION_B --quiet
# Delete Instance Groups and LB Health Checks
gcloud compute instance-groups unmanaged delete ig-a --zone=$REGION_A-a --quiet
gcloud compute instance-groups unmanaged delete ig-b --zone=$REGION_B-a --quiet
gcloud compute health-checks delete http-lb-hc-primary-region --region=$REGION_A --quiet
gcloud compute health-checks delete http-lb-hc-backup-region --region=$REGION_B --quiet

# Delete Cloud DNS Records Zone and DNS Heath Checks
gcloud dns record-sets delete $DNS_DOMAIN --type=A --zone=codelab-publiczone --quiet
gcloud dns managed-zones delete codelab-publiczone --quiet

gcloud compute health-checks delete dns-failover-health-check --global --quiet

# Delete Cloud NAT and Cloud Routers
gcloud compute routers nats delete $REGION_A-nat-gw \
--router=$REGION_A-cloudrouter --region=$REGION_A --quiet

gcloud compute routers nats delete $REGION_B-nat-gw \
--router=$REGION_B-cloudrouter --region=$REGION_B --quiet

gcloud compute routers delete $REGION_A-cloudrouter \
--region=$REGION_A --quiet

gcloud compute routers delete $REGION_B-cloudrouter \
--region=$REGION_B --quiet


# Delete Subnets and Firewall Rules
gcloud compute firewall-rules delete fw-allow-health-check --quiet
gcloud compute firewall-rules delete fw-allow-proxies --quiet
gcloud compute firewall-rules delete allow-ssh --quiet
gcloud compute networks subnets delete subnet-a \
--region=$REGION_A --quiet

gcloud compute networks subnets delete subnet-b \
--region=$REGION_B --quiet
gcloud compute networks subnets delete proxy-only-subnet-a \
--region=$REGION_A --quiet

gcloud compute networks subnets delete proxy-only-subnet-b \
--region=$REGION_B --quiet

gcloud compute networks delete external-lb-vpc --quiet
10. 恭喜!
恭喜您完成本程式碼研究室。
- 您已使用 Cloud DNS 健康狀態檢查和區域外部應用程式負載平衡器,成功設定及驗證多區域 active-passive 容錯移轉。