
1. מבוא
Private Service Connect (PSC) הוא יכולת של רשתות Google Cloud שמאפשרת לצרכנים לגשת לשירותים מנוהלים באופן פרטי מתוך רשת ה-VPC שלהם. קצה עורפי של PSC הוא קבוצת משנה של תכונות PSC שמאפשרת למאזן עומסים להיות בחזית של שירותים גלובליים מנוהלים של Google, כמו Google Cloud Storage, וכך מאפשרת להחיל שילובים אחרים של איזון עומסים, כמו FQDN שונה. בזמן הפרסום של ה-codelab הזה, רק קבוצה מצומצמת של שירותי Google יכולה לשמש כקצה עורפי של PSC גלובלי. כאן אפשר לראות את הרשימה המלאה.
ב-Codelab הזה תלמדו איך להגדיר בק-אנד של PSC כדי לגשת ל-Google Cloud Storage באמצעות FQDN פנימי.
מה תלמדו
- פריסה של תשתית בסיסית של רשתות VPC
- פריסת קטגוריות בסיסיות ב-Google Cloud Storage
- פריסת מאזן עומסים פנימי אזורי של אפליקציות עם קצה עורפי מסוג PSC ב-Google Cloud Storage
מה תצטרכו
- פרויקט ב-Google Cloud עם הרשאות בעלים
- כללי המדיניות הבאים של הארגון לא נאכפים בפרויקט Google Cloud: מכונות וירטואליות מוגנות
2. טופולוגיית Codelab
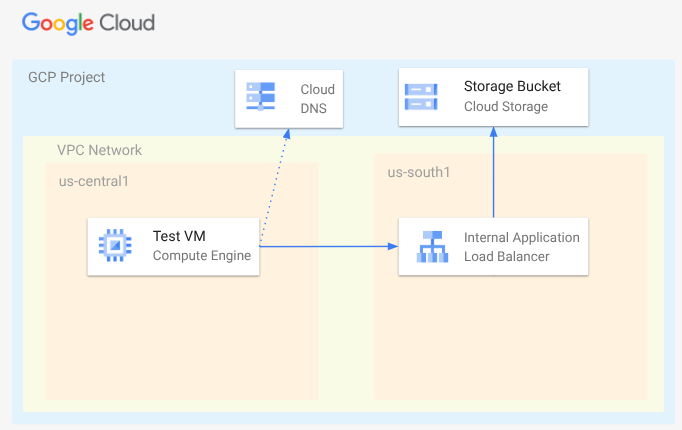
ב-Codelab הזה תפרסו רשת VPC, רשתות משנה, תחום DNS פרטי, כללי חוממת אש, קטגוריה של Cloud Storage, קובץ לדוגמה ומכונה וירטואלית לבדיקה. בשלב הבא, תפרסו מאזן עומסים חוצה אזורים של אפליקציות עם קצה עורפי מסוג PSC ל-Google Cloud Storage. לבסוף, תבדקו את הקישוריות לקובץ בקטגוריה של Google Cloud Storage.
3. הגדרה ודרישות
הגדרת סביבה בקצב אישי
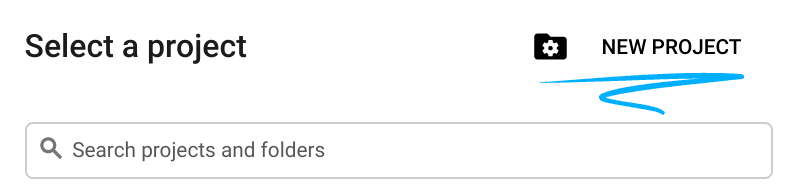
- נכנסים ל-מסוף Google Cloud ויוצרים פרויקט חדש או משתמשים בפרויקט קיים. אם עדיין אין לכם חשבון Gmail או Google Workspace, אתם צריכים ליצור חשבון.

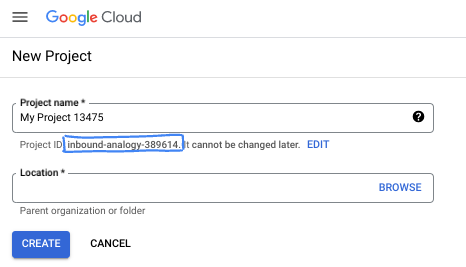
- שם הפרויקט הוא השם המוצג של הפרויקט הזה למשתתפים. זו מחרוזת תווים שלא נמצאת בשימוש ב-Google APIs. תמיד אפשר לעדכן את המיקום.
- מזהה הפרויקט הוא ייחודי לכל הפרויקטים ב-Google Cloud ואי אפשר לשנות אותו אחרי שהוא מוגדר. מסוף Cloud יוצר באופן אוטומטי מחרוזת ייחודית, ובדרך כלל לא צריך לדעת מה היא. ברוב ה-Codelabs, תצטרכו להפנות למזהה הפרויקט (בדרך כלל מסומן כ-
PROJECT_ID). אם אתם לא אוהבים את המזהה שנוצר, אתם יכולים ליצור מזהה אקראי אחר. אפשר גם לנסות שם משתמש משלכם ולבדוק אם הוא זמין. אי אפשר לשנות את ההגדרה הזו אחרי השלב הזה, והיא תישאר לאורך הפרויקט. - לידיעתכם, יש ערך שלישי, מספר פרויקט, שחלק מממשקי ה-API משתמשים בו. במאמרי העזרה מפורט מידע נוסף על שלושת הערכים האלה.
- בשלב הבא, תצטרכו להפעיל את החיוב במסוף Cloud כדי להשתמש במשאבי Cloud או בממשקי API של Cloud. השלמת ה-codelab הזה לא תעלה לכם הרבה, אם בכלל. כדי להשבית את המשאבים ולמנוע חיובים נוספים אחרי שתסיימו את המדריך הזה, תוכלו למחוק את המשאבים שיצרתם או למחוק את הפרויקט. משתמשים חדשים ב-Google Cloud זכאים לתוכנית תקופת ניסיון בחינם בשווי 300$.
מפעילים את Cloud Shell
אפשר להפעיל את Google Cloud מרחוק מהמחשב הנייד, אבל ב-codelab הזה תשתמשו ב-Google Cloud Shell, סביבת שורת פקודה שפועלת בענן.
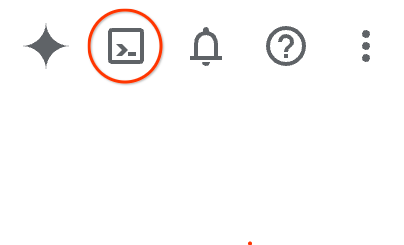
ב-מסוף Google Cloud, לוחצים על סמל Cloud Shell בסרגל הכלים שבפינה הימנית העליונה:
יחלפו כמה רגעים עד שההקצאה והחיבור לסביבת העבודה יושלמו. בסיום התהליך, אמור להופיע משהו כזה:

המכונה הווירטואלית הזו כוללת את כל הכלים שדרושים למפתחים. יש בה ספריית בית בנפח מתמיד של 5GB והיא פועלת ב-Google Cloud, מה שמשפר מאוד את הביצועים והאימות ברשת. אפשר לבצע את כל העבודה ב-codelab הזה בדפדפן. לא צריך להתקין שום דבר.
4. לפני שמתחילים
הפעלת ממשקי ה-API
ב-Cloud Shell, מוודאים שהפרויקט מוגדר ומגדירים משתנים.
gcloud auth login
gcloud config list project
gcloud config set project [YOUR-PROJECT-ID]
export projectid=[YOUR-PROJECT-ID]
export region1=us-central1
export zone1=us-central1-a
export region2=us-south1
echo $projectid
echo $region1
echo $zone1
echo $region2
הפעלת כל השירותים הנדרשים
gcloud services enable compute.googleapis.com
gcloud services enable networkmanagement.googleapis.com
gcloud services enable storage.googleapis.com
gcloud services enable dns.googleapis.com
5. יצירת רשת VPC
יוצרים את רשת ה-VPC שבה יתארחו לקוח המכונה הווירטואלית ורכיבי איזון העומסים.
רשת VPC
מ-Cloud Shell
gcloud compute networks create myvpc \
    --subnet-mode=custom \
    --bgp-routing-mode=global
יוצרים את רשתות המשנה ב-VPC. ברשת המשנה הראשונה יתארח איזון העומסים. רשת המשנה השנייה היא רשת משנה proxy-only למאזן העומסים, והשלישית היא המקום שבו יתארח לקוח המכונה הווירטואלית.
יצירת תת-רשתות
מ-Cloud Shell
gcloud compute networks subnets create $region2-subnet \
    --network=myvpc \
    --range=10.100.0.0/24 \
    --region=$region2

gcloud compute networks subnets create $region2-proxy-subnet \
    --network=myvpc \
    --range=10.100.100.0/24 \
    --region=$region2 \
    --purpose=GLOBAL_MANAGED_PROXY \
    --role=ACTIVE

gcloud compute networks subnets create $region1-subnet \
    --network=myvpc \
    --region=$region1 \
    --range=10.200.0.0/24
יצירת מדיניות של חומת אש ברשת וכללים לחומת האש
מ-Cloud Shell
gcloud compute network-firewall-policies create my-vpc-policy --global

gcloud compute network-firewall-policies associations create \
    --firewall-policy my-vpc-policy \
    --network myvpc \
    --name network-myvpc \
    --global-firewall-policy
כדי לאפשר ל-IAP להתחבר למכונות הווירטואליות, צריך ליצור כלל חומת אש ש:
- רלוונטי לכל מכונות ה-VM שרוצים לגשת אליהן באמצעות IAP.
- מאפשר תנועה נכנסת מטווח כתובות ה-IP 35.235.240.0/20. הטווח הזה מכיל את כל כתובות ה-IP שמשמשות את IAP להעברת TCP.
מ-Cloud Shell
gcloud compute network-firewall-policies rules create 1000 \
    --action ALLOW \
    --firewall-policy my-vpc-policy \
    --description "SSH with IAP" \
    --direction INGRESS \
    --src-ip-ranges 35.235.240.0/20 \
    --layer4-configs tcp:22  \
    --global-firewall-policy
6. יצירת קטגוריה של Cloud Storage, קובץ לדוגמה והענקת הרשאות
מ-Cloud Shell
gcloud storage buckets create gs://$projectid-pscbackend --location=us

echo "Here is my bucket file contents" > my-bucket-contents.txt

gcloud storage cp my-bucket-contents.txt gs://$projectid-pscbackend/my-bucket-contents.txt

computesa=$(gcloud iam service-accounts list \
    --filter='displayName:Compute Engine default service account' \
    --format='value(email)')

echo $computesa


gcloud storage buckets add-iam-policy-binding gs://$projectid-pscbackend \
    --member="serviceAccount:$computesa" \
    --role="roles/storage.objectViewer"
פלט לדוגמה
Creating gs://xxxxxxxxxxx-pscbackend/...
Copying file://my-bucket-contents.txt to gs://xxxxxxxxxxx-pscbackend/my-bucket-contents.txt
  Completed files 1/1 | 32.0B/32.0B
xxxxxxxxxxx-compute@developer.gserviceaccount.com
bindings:
- members:
  - projectEditor:xxxxxxxxxxx
  - projectOwner:xxxxxxxxxxx
  role: roles/storage.legacyBucketOwner
- members:
  - projectViewer:xxxxxxxxxxx
  role: roles/storage.legacyBucketReader
- members:
  - projectEditor:xxxxxxxxxxx
  - projectOwner:xxxxxxxxxxx
  role: roles/storage.legacyObjectOwner
- members:
  - projectViewer:xxxxxxxxxxx
  role: roles/storage.legacyObjectReader
- members:
  - serviceAccount:xxxxxxxxxxx-compute@developer.gserviceaccount.com
  role: roles/storage.objectViewer
etag: CAI=
kind: storage#policy
resourceId: projects/_/buckets/xxxxxxxxxxx-pscbackend
version: 1
7. חשיפה של Google Cloud Storage דרך מאזן עומסים פנימי של אפליקציות (ALB) בין אזורים
יצירת מאזן עומסים פנימי חוצה אזורים של אפליקציות (ALB)
קודם יוצרים את רכיבי מאזן העומסים. תצטרכו ליצור PSC NEG, שירות קצה עורפי, מיפוי של כתובות URL ושרתי proxy של יעד HTTP.
ב-Cloud Shell
gcloud compute network-endpoint-groups create gcs-$region2-neg \
    --region=$region2 \
    --network-endpoint-type=private-service-connect \
    --psc-target-service=storage.googleapis.com

gcloud compute backend-services create gcs-bes \
    --load-balancing-scheme=INTERNAL_MANAGED \
    --protocol=HTTP \
    --global

gcloud compute backend-services add-backend gcs-bes \
    --global \
    --network-endpoint-group=gcs-$region2-neg \
    --network-endpoint-group-region=$region2

gcloud compute url-maps create gcsilb \
    --default-service=gcs-bes \
    --global

gcloud compute target-http-proxies create gcs-http-proxy \
    --url-map=gcsilb \
    --global
יוצרים את כלל ההעברה של מאזן העומסים.
ב-Cloud Shell
gcloud compute forwarding-rules create gcs-ilb-fr \
    --load-balancing-scheme=INTERNAL_MANAGED \
    --network=myvpc \
    --subnet=$region2-subnet \
    --target-http-proxy=gcs-http-proxy \
    --ports=80 \
    --subnet-region=$region2 \
    --global
8. יצירת תחום פרטי ב-Cloud DNS עבור company.com
קודם כל, צריך לקבוע את כתובת ה-IP של מאזן העומסים עבור רשומת A ולייצא אותה כמשתנה
ב-Cloud Shell
gcloud compute forwarding-rules describe gcs-ilb-fr \
    --global

export lbip=$(gcloud compute forwarding-rules describe gcs-ilb-fr \
    --global \
    --format='value(IPAddress)')

echo $lbip
פלט לדוגמה
IPAddress: 10.100.0.4
IPProtocol: TCP
creationTimestamp: 'xxxxxxxxxxxxxxx'
description: ''
fingerprint: xxxxxxxxxx
id: 'xxxxxxxxxxxxxx'
kind: compute#forwardingRule
labelFingerprint: xxxxxxxxxx
loadBalancingScheme: INTERNAL_MANAGED
name: gcs-ilb-fr
network: https://www.googleapis.com/compute/v1/projects/[projectID]/global/networks/myvpc
networkTier: PREMIUM
portRange: 80-80
selfLink: https://www.googleapis.com/compute/v1/projects/[projectID]/global/forwardingRules/gcs-ilb-fr
selfLinkWithId: https://www.googleapis.com/compute/v1/projects/[projectID]/global/forwardingRules/xxxxxxxxxxxxxx
subnetwork: https://www.googleapis.com/compute/v1/projects/[projectID]/regions/us-south1/subnetworks/us-south1-subnet
target: https://www.googleapis.com/compute/v1/projects/[projectID]/global/targetHttpProxies/gcs-http-proxy
10.100.0.4
לאחר מכן, יוצרים את האזור הפרטי ב-DNS ואת רשומת ה-A עבור מאזן העומסים הפנימי שיצרתם.
מ-Cloud Shell
gcloud dns managed-zones create "company-com" \
    --dns-name=company.com. \
    --description="company.com private dns zone" \
    --visibility=private \
    --networks=myvpc

gcloud dns record-sets create "storage.company.com" \
    --zone="company-com" \
    --type="A" \
    --ttl="300" \
    --rrdatas="$lbip"
9. יצירת מכונה וירטואלית לבדיקה
יצירת מכונה וירטואלית של לקוח צרכן
מ-Cloud Shell
gcloud compute instances create testvm \
    --zone="$zone1" \
    --subnet="$region1-subnet" \
    --no-address \
    --metadata "startup-script=#! /bin/bash
cat <<EOF > /etc/profile.d/gcp-startup-vars.sh
export MYBUCKET=\"$projectid-pscbackend\"
export computesa=\"$computesa\"
EOF
chmod +x /etc/profile.d/gcp-startup-vars.sh"
10. בדיקת החיבור ל-Google Cloud Storage דרך מאזן העומסים
התחברות למכונה הווירטואלית של הבדיקה
ב-Cloud Shell
gcloud compute ssh "testvm"\
    --zone "$zone1"\
    --tunnel-through-iap \
    --project $projectid
בדיקת הקישוריות
במכונה וירטואלית לבדיקה
TOKEN=$(curl -s -H "Metadata-Flavor: Google" "http://metadata.google.internal/computeMetadata/v1/instance/service-accounts/$computesa/token" | jq -r .access_token)

curl -H "Authorization: Bearer $TOKEN" "http://storage.company.com/$MYBUCKET/my-bucket-contents.txt"
הפלט הצפוי
Here is my bucket file contents
יוצאים מה-VM.
ב-TestVM
exit
בוצע בהצלחה!
11. שלבי הניקוי
מ-Cloud Shell
gcloud dns record-sets delete "storage.company.com" \
    --zone="company-com" \
    --type="A"

gcloud dns managed-zones delete "company-com"

gcloud compute forwarding-rules delete gcs-ilb-fr \
    --global \
    --quiet

gcloud compute target-http-proxies delete gcs-http-proxy \
    --global \
    --quiet

gcloud compute url-maps delete gcsilb \
    --global \
    --quiet

gcloud compute backend-services delete gcs-bes \
    --global \
    --quiet

gcloud compute network-endpoint-groups delete gcs-$region2-neg \
    --region=$region2 \
    --quiet

gcloud storage rm -r gs://$projectid-pscbackend \
    --quiet

gcloud compute instances delete testvm \
    --zone=$zone1 \
    --quiet

gcloud compute network-firewall-policies rules delete 1000 \
    --firewall-policy my-vpc-policy \
    --global-firewall-policy \
    --quiet

gcloud compute network-firewall-policies associations delete \
    --firewall-policy my-vpc-policy \
    --name=network-myvpc \
    --global-firewall-policy \
    --quiet

gcloud compute network-firewall-policies delete my-vpc-policy \
    --global \
    --quiet

gcloud compute networks subnets delete $region1-subnet \
    --region=$region1 \
    --quiet

gcloud compute networks subnets delete $region2-proxy-subnet \
    --region=$region2 \
    --quiet

gcloud compute networks subnets delete $region2-subnet \
    --region=$region2 \
    --quiet

gcloud compute networks delete myvpc \
    --quiet
12. מעולה!
כל הכבוד, סיימתם את ה-Codelab.
מה נכלל
- פריסת קבצים בסיסיים ב-Google Cloud Storage
- פריסת קצה עורפי של PSC ל-Google Cloud Storage
- פריסת מאזן עומסים פנימי של אפליקציות (ALB) בכמה אזורים