
1. はじめに
Private Service Connect(PSC)は Google Cloud ネットワーキング機能の一つで、コンシューマーが VPC ネットワーク内からマネージド サービスにプライベート接続でアクセスできるようにします。PSC バックエンドは、ロードバランサを Google Cloud Storage などのグローバルな Google マネージド サービスの前に配置して、別の FQDN などの他のロード バランシング統合を適用できるようにする PSC 機能のサブセットです。この Codelab の公開時点では、グローバル PSC バックエンドで使用できる Google サービスは一部のみです。そのリストはこちらで確認できます。
この Codelab では、内部 FQDN を使用して Google Cloud Storage にアクセスするように PSC バックエンドを設定する方法について説明します。
学習内容
- 基本的な VPC ネットワーキング インフラストラクチャのデプロイ
- Google Cloud Storage に基本的なバケットをデプロイする
- PSC バックエンドを持つクロスリージョン内部アプリケーション ロードバランサを Google Cloud Storage にデプロイする
必要なもの
- オーナー権限を持つ Google Cloud プロジェクト
- Google Cloud プロジェクトで適用されない組織のポリシー: シールド VM
2. Codelab のトポロジ
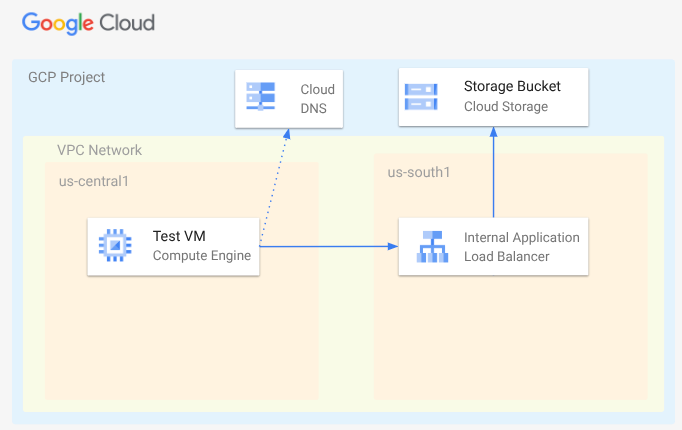
この Codelab では、VPC ネットワーク、サブネット、プライベート DNS ゾーン、ファイアウォール ルール、Google Cloud Storage バケット、サンプル ファイル、テスト VM をデプロイします。次に、Google Cloud Storage 用の PSC バックエンドを使用して、クロスリージョン アプリケーション ロードバランサをデプロイします。最後に、Google Cloud Storage バケット内のファイルへの接続をテストします。
3. 設定と要件
セルフペース型の環境設定
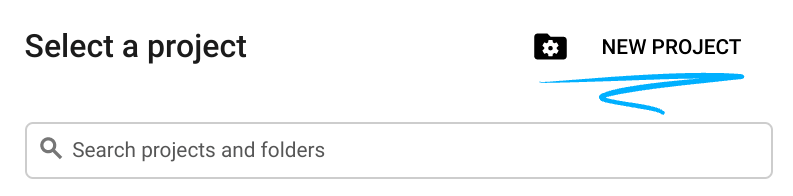
- Google Cloud Console にログインして、プロジェクトを新規作成するか、既存のプロジェクトを再利用します。Gmail アカウントも Google Workspace アカウントもまだお持ちでない場合は、アカウントを作成してください。

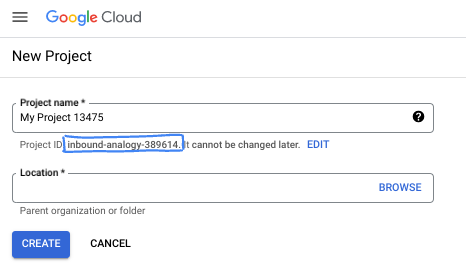
- プロジェクト名は、このプロジェクトの参加者に表示される名称です。Google API では使用されない文字列です。いつでも更新できます。
- プロジェクト ID は、すべての Google Cloud プロジェクトにおいて一意でなければならず、不変です(設定後は変更できません)。Cloud コンソールでは一意の文字列が自動生成されます。通常は、この内容を意識する必要はありません。ほとんどの Codelab では、プロジェクト ID(通常は
PROJECT_IDと識別されます)を参照する必要があります。生成された ID が好みではない場合は、ランダムに別の ID を生成できます。または、ご自身で試して、利用可能かどうかを確認することもできます。このステップ以降は変更できず、プロジェクトを通して同じ ID になります。 - なお、3 つ目の値として、一部の API が使用するプロジェクト番号があります。これら 3 つの値について詳しくは、こちらのドキュメントをご覧ください。
- 次に、Cloud のリソースや API を使用するために、Cloud コンソールで課金を有効にする必要があります。この Codelab の操作をすべて行って、費用が生じたとしても、少額です。このチュートリアルの終了後に請求が発生しないようにリソースをシャットダウンするには、作成したリソースを削除するか、プロジェクトを削除します。Google Cloud の新規ユーザーは、300 米ドル分の無料トライアル プログラムをご利用いただけます。
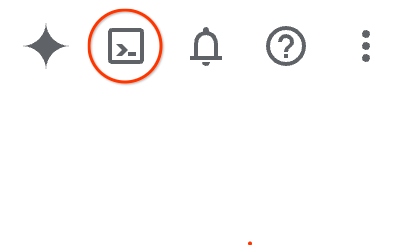
Cloud Shell を起動する
Google Cloud はノートパソコンからリモートで操作できますが、この Codelab では、Google Cloud Shell(Cloud 上で動作するコマンドライン環境)を使用します。
Google Cloud Console で、右上のツールバーにある Cloud Shell アイコンをクリックします。
プロビジョニングと環境への接続にはそれほど時間はかかりません。完了すると、次のように表示されます。

この仮想マシンには、必要な開発ツールがすべて用意されています。永続的なホーム ディレクトリが 5 GB 用意されており、Google Cloud で稼働します。そのため、ネットワークのパフォーマンスと認証機能が大幅に向上しています。この Codelab での作業はすべて、ブラウザ内から実行できます。インストールは不要です。
4. 始める前に
API を有効にする
Cloud Shell で、プロジェクトが設定されていることを確認し、変数を構成します。
gcloud auth login
gcloud config list project
gcloud config set project [YOUR-PROJECT-ID]
export projectid=[YOUR-PROJECT-ID]
export region1=us-central1
export zone1=us-central1-a
export region2=us-south1
echo $projectid
echo $region1
echo $zone1
echo $region2
必要なサービスをすべて有効にする
gcloud services enable compute.googleapis.com
gcloud services enable networkmanagement.googleapis.com
gcloud services enable storage.googleapis.com
gcloud services enable dns.googleapis.com
5. VPC ネットワークを作成する
VM クライアントとロード バランシング コンポーネントがホストされる VPC ネットワークを作成します。
VPC ネットワーク
Cloud Shell から
gcloud compute networks create myvpc \
    --subnet-mode=custom \
    --bgp-routing-mode=global
VPC にサブネットを作成します。最初のサブネットは、ロードバランサがホストされる場所になります。2 番目のサブネットはロードバランサのプロキシ専用サブネットで、3 番目のサブネットは VM クライアントがホストされる場所です。
サブネットを作成する
Cloud Shell から
gcloud compute networks subnets create $region2-subnet \
    --network=myvpc \
    --range=10.100.0.0/24 \
    --region=$region2

gcloud compute networks subnets create $region2-proxy-subnet \
    --network=myvpc \
    --range=10.100.100.0/24 \
    --region=$region2 \
    --purpose=GLOBAL_MANAGED_PROXY \
    --role=ACTIVE

gcloud compute networks subnets create $region1-subnet \
    --network=myvpc \
    --region=$region1 \
    --range=10.200.0.0/24
ネットワーク ファイアウォール ポリシーとファイアウォール ルールを作成する
Cloud Shell から
gcloud compute network-firewall-policies create my-vpc-policy --global

gcloud compute network-firewall-policies associations create \
    --firewall-policy my-vpc-policy \
    --network myvpc \
    --name network-myvpc \
    --global-firewall-policy
IAP に VM インスタンスへの接続を許可するには、次のファイアウォール ルールを作成します。
- IAP を使用してアクセス可能にするすべての VM インスタンスに適用されます。
- IP 範囲 35.235.240.0/20 からの上り(内向き)トラフィックを許可します。この範囲には、IAP が TCP 転送に使用するすべての IP アドレスが含まれています。
Cloud Shell から
gcloud compute network-firewall-policies rules create 1000 \
    --action ALLOW \
    --firewall-policy my-vpc-policy \
    --description "SSH with IAP" \
    --direction INGRESS \
    --src-ip-ranges 35.235.240.0/20 \
    --layer4-configs tcp:22  \
    --global-firewall-policy
6. Google Cloud Storage バケットとサンプル ファイルを作成し、権限を付与する
Cloud Shell から
gcloud storage buckets create gs://$projectid-pscbackend --location=us

echo "Here is my bucket file contents" > my-bucket-contents.txt

gcloud storage cp my-bucket-contents.txt gs://$projectid-pscbackend/my-bucket-contents.txt

computesa=$(gcloud iam service-accounts list \
    --filter='displayName:Compute Engine default service account' \
    --format='value(email)')

echo $computesa


gcloud storage buckets add-iam-policy-binding gs://$projectid-pscbackend \
    --member="serviceAccount:$computesa" \
    --role="roles/storage.objectViewer"
出力例:
Creating gs://xxxxxxxxxxx-pscbackend/...
Copying file://my-bucket-contents.txt to gs://xxxxxxxxxxx-pscbackend/my-bucket-contents.txt
  Completed files 1/1 | 32.0B/32.0B
xxxxxxxxxxx-compute@developer.gserviceaccount.com
bindings:
- members:
  - projectEditor:xxxxxxxxxxx
  - projectOwner:xxxxxxxxxxx
  role: roles/storage.legacyBucketOwner
- members:
  - projectViewer:xxxxxxxxxxx
  role: roles/storage.legacyBucketReader
- members:
  - projectEditor:xxxxxxxxxxx
  - projectOwner:xxxxxxxxxxx
  role: roles/storage.legacyObjectOwner
- members:
  - projectViewer:xxxxxxxxxxx
  role: roles/storage.legacyObjectReader
- members:
  - serviceAccount:xxxxxxxxxxx-compute@developer.gserviceaccount.com
  role: roles/storage.objectViewer
etag: CAI=
kind: storage#policy
resourceId: projects/_/buckets/xxxxxxxxxxx-pscbackend
version: 1
7. クロスリージョン内部アプリケーション ロードバランサを介して Google Cloud Storage を公開する
クロスリージョン内部アプリケーション ロードバランサを作成する
まず、ロードバランサのコンポーネントを作成します。PSC NEG、バックエンド サービス、URL マップ、HTTP ターゲット プロキシを作成します。
Cloud Shell で次の処理を行います。
gcloud compute network-endpoint-groups create gcs-$region2-neg \
    --region=$region2 \
    --network-endpoint-type=private-service-connect \
    --psc-target-service=storage.googleapis.com

gcloud compute backend-services create gcs-bes \
    --load-balancing-scheme=INTERNAL_MANAGED \
    --protocol=HTTP \
    --global

gcloud compute backend-services add-backend gcs-bes \
    --global \
    --network-endpoint-group=gcs-$region2-neg \
    --network-endpoint-group-region=$region2

gcloud compute url-maps create gcsilb \
    --default-service=gcs-bes \
    --global

gcloud compute target-http-proxies create gcs-http-proxy \
    --url-map=gcsilb \
    --global
ロードバランサの転送ルールを作成します。
Cloud Shell で次の処理を行います。
gcloud compute forwarding-rules create gcs-ilb-fr \
    --load-balancing-scheme=INTERNAL_MANAGED \
    --network=myvpc \
    --subnet=$region2-subnet \
    --target-http-proxy=gcs-http-proxy \
    --ports=80 \
    --subnet-region=$region2 \
    --global
8. company.com の Cloud DNS 限定公開ゾーンを作成する
まず、A レコードのロードバランサの IP アドレスを特定し、変数としてエクスポートします。
Cloud Shell で次の処理を行います。
gcloud compute forwarding-rules describe gcs-ilb-fr \
    --global

export lbip=$(gcloud compute forwarding-rules describe gcs-ilb-fr \
    --global \
    --format='value(IPAddress)')

echo $lbip
出力例:
IPAddress: 10.100.0.4
IPProtocol: TCP
creationTimestamp: 'xxxxxxxxxxxxxxx'
description: ''
fingerprint: xxxxxxxxxx
id: 'xxxxxxxxxxxxxx'
kind: compute#forwardingRule
labelFingerprint: xxxxxxxxxx
loadBalancingScheme: INTERNAL_MANAGED
name: gcs-ilb-fr
network: https://www.googleapis.com/compute/v1/projects/[projectID]/global/networks/myvpc
networkTier: PREMIUM
portRange: 80-80
selfLink: https://www.googleapis.com/compute/v1/projects/[projectID]/global/forwardingRules/gcs-ilb-fr
selfLinkWithId: https://www.googleapis.com/compute/v1/projects/[projectID]/global/forwardingRules/xxxxxxxxxxxxxx
subnetwork: https://www.googleapis.com/compute/v1/projects/[projectID]/regions/us-south1/subnetworks/us-south1-subnet
target: https://www.googleapis.com/compute/v1/projects/[projectID]/global/targetHttpProxies/gcs-http-proxy
10.100.0.4
次に、作成した内部ロードバランサの DNS 限定公開ゾーンと A レコードを作成します。
Cloud Shell から
gcloud dns managed-zones create "company-com" \
    --dns-name=company.com. \
    --description="company.com private dns zone" \
    --visibility=private \
    --networks=myvpc

gcloud dns record-sets create "storage.company.com" \
    --zone="company-com" \
    --type="A" \
    --ttl="300" \
    --rrdatas="$lbip"
9. テスト VM を作成する
コンシューマー クライアント VM を作成する
Cloud Shell から
gcloud compute instances create testvm \
    --zone="$zone1" \
    --subnet="$region1-subnet" \
    --no-address \
    --metadata "startup-script=#! /bin/bash
cat <<EOF > /etc/profile.d/gcp-startup-vars.sh
export MYBUCKET=\"$projectid-pscbackend\"
export computesa=\"$computesa\"
EOF
chmod +x /etc/profile.d/gcp-startup-vars.sh"
10. ロードバランサ経由で Google Cloud Storage への接続をテストする
テスト VM に接続する
Cloud Shell で次の処理を行います。
gcloud compute ssh "testvm"\
    --zone "$zone1"\
    --tunnel-through-iap \
    --project $projectid
接続をテストする
テスト VM 内
TOKEN=$(curl -s -H "Metadata-Flavor: Google" "http://metadata.google.internal/computeMetadata/v1/instance/service-accounts/$computesa/token" | jq -r .access_token)

curl -H "Authorization: Bearer $TOKEN" "http://storage.company.com/$MYBUCKET/my-bucket-contents.txt"
想定される出力
Here is my bucket file contents
VM を終了します。
TestVM 内
exit
SUCCESS!
11. クリーンアップ手順
Cloud Shell から
gcloud dns record-sets delete "storage.company.com" \
    --zone="company-com" \
    --type="A"

gcloud dns managed-zones delete "company-com"

gcloud compute forwarding-rules delete gcs-ilb-fr \
    --global \
    --quiet

gcloud compute target-http-proxies delete gcs-http-proxy \
    --global \
    --quiet

gcloud compute url-maps delete gcsilb \
    --global \
    --quiet

gcloud compute backend-services delete gcs-bes \
    --global \
    --quiet

gcloud compute network-endpoint-groups delete gcs-$region2-neg \
    --region=$region2 \
    --quiet

gcloud storage rm -r gs://$projectid-pscbackend \
    --quiet

gcloud compute instances delete testvm \
    --zone=$zone1 \
    --quiet

gcloud compute network-firewall-policies rules delete 1000 \
    --firewall-policy my-vpc-policy \
    --global-firewall-policy \
    --quiet

gcloud compute network-firewall-policies associations delete \
    --firewall-policy my-vpc-policy \
    --name=network-myvpc \
    --global-firewall-policy \
    --quiet

gcloud compute network-firewall-policies delete my-vpc-policy \
    --global \
    --quiet

gcloud compute networks subnets delete $region1-subnet \
    --region=$region1 \
    --quiet

gcloud compute networks subnets delete $region2-proxy-subnet \
    --region=$region2 \
    --quiet

gcloud compute networks subnets delete $region2-subnet \
    --region=$region2 \
    --quiet

gcloud compute networks delete myvpc \
    --quiet
12. 完了
以上で、この Codelab は完了です。
学習した内容
- Google Cloud Storage に基本ファイルをデプロイする
- Google Cloud Storage 用の PSC バックエンドをデプロイする
- クロスリージョン内部アプリケーション ロードバランサのデプロイ