
1. บทนำ
Private Service Connect (PSC) เป็นความสามารถของเครือข่าย Google Cloud ที่ช่วยให้ผู้ใช้เข้าถึงบริการที่มีการจัดการแบบส่วนตัวจากภายในเครือข่าย VPC ได้ แบ็กเอนด์ PSC เป็นชุดย่อยของฟีเจอร์ PSC ที่ช่วยให้ตัวจัดสรรภาระงานอยู่หน้าบริการที่มีการจัดการของ Google ทั่วโลก เช่น Google Cloud Storage ซึ่งช่วยให้ใช้การผสานรวมการจัดสรรภาระงานอื่นๆ ได้ เช่น FQDN ที่แตกต่างกัน ณ เวลาที่เผยแพร่ Codelab นี้ มีเพียงบริการของ Google บางส่วนเท่านั้นที่ใช้กับแบ็กเอนด์ PSC ทั่วโลกได้ ดูรายการดังกล่าวได้ที่นี่
Codelab นี้จะอธิบายวิธีตั้งค่าแบ็กเอนด์ PSC เพื่อเข้าถึง Google Cloud Storage ด้วย FQDN ภายใน
สิ่งที่คุณจะได้เรียนรู้
- การติดตั้งใช้งานโครงสร้างพื้นฐานด้านเครือข่าย VPC ขั้นพื้นฐาน
- การติดตั้งใช้งานที่เก็บข้อมูลพื้นฐานใน Google Cloud Storage
- การติดตั้งใช้งานตัวจัดสรรภาระงานแอปพลิเคชันภายในแบบข้ามภูมิภาคที่มีแบ็กเอนด์ PSC ไปยัง Google Cloud Storage
สิ่งที่คุณต้องมี
- โปรเจ็กต์ Google Cloud ที่มีสิทธิ์เจ้าของ
- นโยบายองค์กรต่อไปนี้ไม่ได้บังคับใช้ในโปรเจ็กต์ Google Cloud: VM ที่มีการป้องกัน
2. โทโพโลยี Codelab
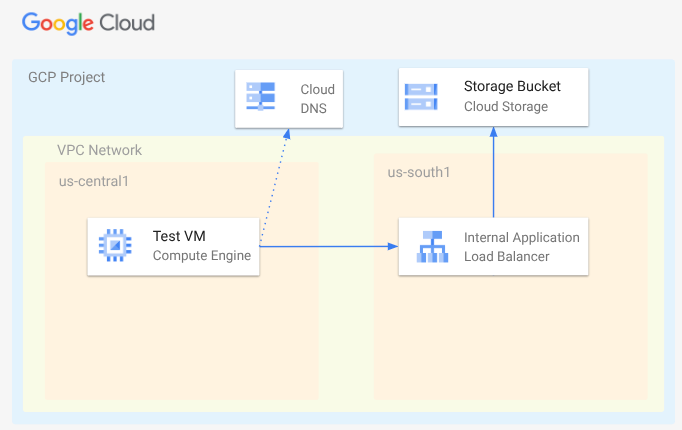
ใน Codelab นี้ คุณจะได้ติดตั้งใช้งานเครือข่าย VPC, เครือข่ายย่อย, โซน DNS ส่วนตัว, กฎไฟร์วอลล์, Bucket ของ Google Cloud Storage, ไฟล์ตัวอย่าง และ VM ทดสอบ จากนั้น คุณจะติดตั้งใช้งานตัวจัดสรรภาระงานของแอปพลิเคชันแบบข้ามภูมิภาคที่มีแบ็กเอนด์ PSC สำหรับ Google Cloud Storage สุดท้าย คุณจะทดสอบการเชื่อมต่อกับไฟล์ใน Bucket ของ Google Cloud Storage
3. การตั้งค่าและข้อกำหนด
การตั้งค่าสภาพแวดล้อมแบบเรียนรู้ด้วยตนเอง
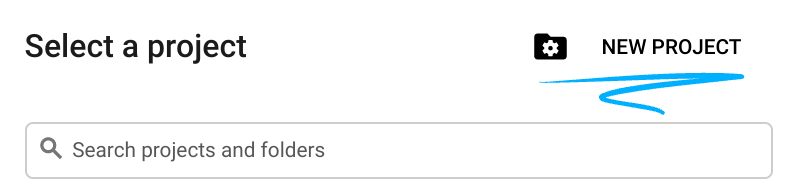
- ลงชื่อเข้าใช้ Google Cloud Console แล้วสร้างโปรเจ็กต์ใหม่หรือใช้โปรเจ็กต์ที่มีอยู่ซ้ำ หากยังไม่มีบัญชี Gmail หรือ Google Workspace คุณต้องสร้างบัญชี

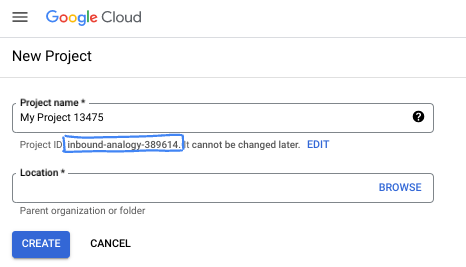
- ชื่อโปรเจ็กต์คือชื่อที่แสดงสำหรับผู้เข้าร่วมโปรเจ็กต์นี้ ซึ่งเป็นสตริงอักขระที่ Google APIs ไม่ได้ใช้ คุณอัปเดตได้ทุกเมื่อ
- รหัสโปรเจ็กต์จะไม่ซ้ำกันในโปรเจ็กต์ Google Cloud ทั้งหมดและเปลี่ยนแปลงไม่ได้ (เปลี่ยนไม่ได้หลังจากตั้งค่าแล้ว) Cloud Console จะสร้างสตริงที่ไม่ซ้ำกันโดยอัตโนมัติ ซึ่งโดยปกติแล้วคุณไม่จำเป็นต้องสนใจว่าสตริงนั้นคืออะไร ใน Codelab ส่วนใหญ่ คุณจะต้องอ้างอิงรหัสโปรเจ็กต์ (โดยทั่วไปจะระบุเป็น
PROJECT_ID) หากไม่ชอบรหัสที่สร้างขึ้น คุณอาจสร้างรหัสแบบสุ่มอีกรหัสหนึ่งได้ หรือคุณอาจลองใช้ชื่อของคุณเองและดูว่ามีชื่อนั้นหรือไม่ คุณจะเปลี่ยนแปลงรหัสนี้หลังจากขั้นตอนนี้ไม่ได้ และรหัสจะคงอยู่ตลอดระยะเวลาของโปรเจ็กต์ - โปรดทราบว่ายังมีค่าที่ 3 ซึ่งคือหมายเลขโปรเจ็กต์ที่ API บางตัวใช้ ดูข้อมูลเพิ่มเติมเกี่ยวกับค่าทั้ง 3 นี้ได้ในเอกสารประกอบ
- จากนั้นคุณจะต้องเปิดใช้การเรียกเก็บเงินใน Cloud Console เพื่อใช้ทรัพยากร/API ของ Cloud การทำตาม Codelab นี้จะไม่มีค่าใช้จ่ายมากนัก หรืออาจไม่มีค่าใช้จ่ายเลย หากต้องการปิดทรัพยากรเพื่อหลีกเลี่ยงการเรียกเก็บเงินนอกเหนือจากบทแนะนำนี้ คุณสามารถลบทรัพยากรที่สร้างขึ้นหรือลบโปรเจ็กต์ได้ ผู้ใช้ Google Cloud รายใหม่มีสิทธิ์เข้าร่วมโปรแกรมช่วงทดลองใช้ฟรีมูลค่า$300 USD
เริ่มต้น Cloud Shell
แม้ว่าคุณจะใช้งาน Google Cloud จากระยะไกลจากแล็ปท็อปได้ แต่ใน Codelab นี้คุณจะใช้ Google Cloud Shell ซึ่งเป็นสภาพแวดล้อมบรรทัดคำสั่งที่ทำงานในระบบคลาวด์
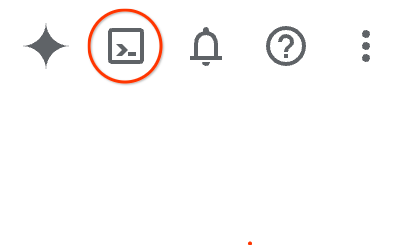
จาก Google Cloud Console ให้คลิกไอคอน Cloud Shell ในแถบเครื่องมือด้านขวาบน
การจัดสรรและเชื่อมต่อกับสภาพแวดล้อมจะใช้เวลาเพียงไม่กี่นาที เมื่อเสร็จแล้ว คุณควรเห็นข้อความคล้ายกับตัวอย่างต่อไปนี้

เครื่องเสมือนนี้มาพร้อมเครื่องมือพัฒนาซอฟต์แวร์ทั้งหมดที่คุณต้องการ โดยมีไดเรกทอรีหลักแบบถาวรขนาด 5 GB และทำงานบน Google Cloud ซึ่งช่วยเพิ่มประสิทธิภาพเครือข่ายและการตรวจสอบสิทธิ์ได้อย่างมาก คุณสามารถทำงานทั้งหมดใน Codelab นี้ได้ภายในเบราว์เซอร์ คุณไม่จำเป็นต้องติดตั้งอะไร
4. ก่อนเริ่มต้น
เปิดใช้ API
ใน Cloud Shell ให้ตรวจสอบว่าได้ตั้งค่าโปรเจ็กต์และกำหนดค่าตัวแปรแล้ว
gcloud auth login
gcloud config list project
gcloud config set project [YOUR-PROJECT-ID]
export projectid=[YOUR-PROJECT-ID]
export region1=us-central1
export zone1=us-central1-a
export region2=us-south1
echo $projectid
echo $region1
echo $zone1
echo $region2
เปิดใช้บริการทั้งหมดที่จำเป็น
gcloud services enable compute.googleapis.com
gcloud services enable networkmanagement.googleapis.com
gcloud services enable storage.googleapis.com
gcloud services enable dns.googleapis.com
5. สร้างเครือข่าย VPC
สร้างเครือข่าย VPC ที่จะโฮสต์คอมโพเนนต์ไคลเอ็นต์ VM และการจัดสรรภาระงาน
เครือข่าย VPC
จาก Cloud Shell
gcloud compute networks create myvpc \
    --subnet-mode=custom \
    --bgp-routing-mode=global
สร้างซับเน็ตใน VPC ซับเน็ตแรกจะเป็นที่โฮสต์ตัวจัดสรรภาระงาน ซับเน็ตที่ 2 คือซับเน็ตเฉพาะพร็อกซีสำหรับตัวจัดสรรภาระงาน และซับเน็ตที่ 3 คือตำแหน่งที่จะโฮสต์ไคลเอ็นต์ VM
สร้างซับเน็ต
จาก Cloud Shell
gcloud compute networks subnets create $region2-subnet \
    --network=myvpc \
    --range=10.100.0.0/24 \
    --region=$region2

gcloud compute networks subnets create $region2-proxy-subnet \
    --network=myvpc \
    --range=10.100.100.0/24 \
    --region=$region2 \
    --purpose=GLOBAL_MANAGED_PROXY \
    --role=ACTIVE

gcloud compute networks subnets create $region1-subnet \
    --network=myvpc \
    --region=$region1 \
    --range=10.200.0.0/24
สร้างนโยบายไฟร์วอลล์เครือข่ายและกฎไฟร์วอลล์
จาก Cloud Shell
gcloud compute network-firewall-policies create my-vpc-policy --global

gcloud compute network-firewall-policies associations create \
    --firewall-policy my-vpc-policy \
    --network myvpc \
    --name network-myvpc \
    --global-firewall-policy
หากต้องการอนุญาตให้ IAP เชื่อมต่อกับอินสแตนซ์ VM ให้สร้างกฎไฟร์วอลล์ที่มีลักษณะดังนี้
- มีผลกับอินสแตนซ์ VM ทั้งหมดที่คุณต้องการให้เข้าถึงได้โดยใช้ IAP
- อนุญาตการรับส่งข้อมูลขาเข้าจากช่วง IP 35.235.240.0/20 ช่วงนี้มีที่อยู่ IP ทั้งหมดที่ IAP ใช้สำหรับการส่งต่อ TCP
จาก Cloud Shell
gcloud compute network-firewall-policies rules create 1000 \
    --action ALLOW \
    --firewall-policy my-vpc-policy \
    --description "SSH with IAP" \
    --direction INGRESS \
    --src-ip-ranges 35.235.240.0/20 \
    --layer4-configs tcp:22  \
    --global-firewall-policy
6. สร้าง Bucket ของ Google Cloud Storage, ไฟล์ตัวอย่าง และให้สิทธิ์
จาก Cloud Shell
gcloud storage buckets create gs://$projectid-pscbackend --location=us

echo "Here is my bucket file contents" > my-bucket-contents.txt

gcloud storage cp my-bucket-contents.txt gs://$projectid-pscbackend/my-bucket-contents.txt

computesa=$(gcloud iam service-accounts list \
    --filter='displayName:Compute Engine default service account' \
    --format='value(email)')

echo $computesa


gcloud storage buckets add-iam-policy-binding gs://$projectid-pscbackend \
    --member="serviceAccount:$computesa" \
    --role="roles/storage.objectViewer"
เอาต์พุตตัวอย่าง
Creating gs://xxxxxxxxxxx-pscbackend/...
Copying file://my-bucket-contents.txt to gs://xxxxxxxxxxx-pscbackend/my-bucket-contents.txt
  Completed files 1/1 | 32.0B/32.0B
xxxxxxxxxxx-compute@developer.gserviceaccount.com
bindings:
- members:
  - projectEditor:xxxxxxxxxxx
  - projectOwner:xxxxxxxxxxx
  role: roles/storage.legacyBucketOwner
- members:
  - projectViewer:xxxxxxxxxxx
  role: roles/storage.legacyBucketReader
- members:
  - projectEditor:xxxxxxxxxxx
  - projectOwner:xxxxxxxxxxx
  role: roles/storage.legacyObjectOwner
- members:
  - projectViewer:xxxxxxxxxxx
  role: roles/storage.legacyObjectReader
- members:
  - serviceAccount:xxxxxxxxxxx-compute@developer.gserviceaccount.com
  role: roles/storage.objectViewer
etag: CAI=
kind: storage#policy
resourceId: projects/_/buckets/xxxxxxxxxxx-pscbackend
version: 1
7. เปิดเผย Google Cloud Storage ผ่านตัวจัดสรรภาระงานแอปพลิเคชันภายในแบบข้ามภูมิภาค
สร้าง Application Load Balancer ภายในแบบข้ามภูมิภาค
ก่อนอื่นให้เริ่มสร้างคอมโพเนนต์ของตัวจัดสรรภาระงาน คุณจะสร้าง NEG ของ PSC, บริการแบ็กเอนด์, แมป URL และพร็อกซีเป้าหมาย HTTP
ใน Cloud Shell
gcloud compute network-endpoint-groups create gcs-$region2-neg \
    --region=$region2 \
    --network-endpoint-type=private-service-connect \
    --psc-target-service=storage.googleapis.com

gcloud compute backend-services create gcs-bes \
    --load-balancing-scheme=INTERNAL_MANAGED \
    --protocol=HTTP \
    --global

gcloud compute backend-services add-backend gcs-bes \
    --global \
    --network-endpoint-group=gcs-$region2-neg \
    --network-endpoint-group-region=$region2

gcloud compute url-maps create gcsilb \
    --default-service=gcs-bes \
    --global

gcloud compute target-http-proxies create gcs-http-proxy \
    --url-map=gcsilb \
    --global
สร้างกฎการส่งต่อของตัวจัดสรรภาระงาน
ใน Cloud Shell
gcloud compute forwarding-rules create gcs-ilb-fr \
    --load-balancing-scheme=INTERNAL_MANAGED \
    --network=myvpc \
    --subnet=$region2-subnet \
    --target-http-proxy=gcs-http-proxy \
    --ports=80 \
    --subnet-region=$region2 \
    --global
8. สร้างโซนส่วนตัวของ Cloud DNS สำหรับ company.com
ก่อนอื่นมาพิจารณาที่อยู่ IP ของ Load Balancer สำหรับระเบียน A และส่งออกเป็นตัวแปรกัน
ใน Cloud Shell
gcloud compute forwarding-rules describe gcs-ilb-fr \
    --global

export lbip=$(gcloud compute forwarding-rules describe gcs-ilb-fr \
    --global \
    --format='value(IPAddress)')

echo $lbip
เอาต์พุตตัวอย่าง
IPAddress: 10.100.0.4
IPProtocol: TCP
creationTimestamp: 'xxxxxxxxxxxxxxx'
description: ''
fingerprint: xxxxxxxxxx
id: 'xxxxxxxxxxxxxx'
kind: compute#forwardingRule
labelFingerprint: xxxxxxxxxx
loadBalancingScheme: INTERNAL_MANAGED
name: gcs-ilb-fr
network: https://www.googleapis.com/compute/v1/projects/[projectID]/global/networks/myvpc
networkTier: PREMIUM
portRange: 80-80
selfLink: https://www.googleapis.com/compute/v1/projects/[projectID]/global/forwardingRules/gcs-ilb-fr
selfLinkWithId: https://www.googleapis.com/compute/v1/projects/[projectID]/global/forwardingRules/xxxxxxxxxxxxxx
subnetwork: https://www.googleapis.com/compute/v1/projects/[projectID]/regions/us-south1/subnetworks/us-south1-subnet
target: https://www.googleapis.com/compute/v1/projects/[projectID]/global/targetHttpProxies/gcs-http-proxy
10.100.0.4
จากนั้นสร้างโซนส่วนตัว DNS และระเบียน A สำหรับตัวจัดสรรภาระงานภายในที่คุณเพิ่งสร้าง
จาก Cloud Shell
gcloud dns managed-zones create "company-com" \
    --dns-name=company.com. \
    --description="company.com private dns zone" \
    --visibility=private \
    --networks=myvpc

gcloud dns record-sets create "storage.company.com" \
    --zone="company-com" \
    --type="A" \
    --ttl="300" \
    --rrdatas="$lbip"
9. สร้าง VM สำหรับทดสอบ
สร้าง VM ไคลเอ็นต์ผู้บริโภค
จาก Cloud Shell
gcloud compute instances create testvm \
    --zone="$zone1" \
    --subnet="$region1-subnet" \
    --no-address \
    --metadata "startup-script=#! /bin/bash
cat <<EOF > /etc/profile.d/gcp-startup-vars.sh
export MYBUCKET=\"$projectid-pscbackend\"
export computesa=\"$computesa\"
EOF
chmod +x /etc/profile.d/gcp-startup-vars.sh"
10. ทดสอบการเชื่อมต่อกับ Google Cloud Storage ผ่านตัวโหลดบาลานซ์
เชื่อมต่อกับ VM ทดสอบ
ใน Cloud Shell
gcloud compute ssh "testvm"\
    --zone "$zone1"\
    --tunnel-through-iap \
    --project $projectid
ทดสอบการเชื่อมต่อ
ใน VM ทดสอบ
TOKEN=$(curl -s -H "Metadata-Flavor: Google" "http://metadata.google.internal/computeMetadata/v1/instance/service-accounts/$computesa/token" | jq -r .access_token)

curl -H "Authorization: Bearer $TOKEN" "http://storage.company.com/$MYBUCKET/my-bucket-contents.txt"
ผลลัพธ์ที่คาดหวัง
Here is my bucket file contents
ออกจาก VM
ใน TestVM
exit
สำเร็จ!
11. ขั้นตอนการล้างข้อมูล
จาก Cloud Shell
gcloud dns record-sets delete "storage.company.com" \
    --zone="company-com" \
    --type="A"

gcloud dns managed-zones delete "company-com"

gcloud compute forwarding-rules delete gcs-ilb-fr \
    --global \
    --quiet

gcloud compute target-http-proxies delete gcs-http-proxy \
    --global \
    --quiet

gcloud compute url-maps delete gcsilb \
    --global \
    --quiet

gcloud compute backend-services delete gcs-bes \
    --global \
    --quiet

gcloud compute network-endpoint-groups delete gcs-$region2-neg \
    --region=$region2 \
    --quiet

gcloud storage rm -r gs://$projectid-pscbackend \
    --quiet

gcloud compute instances delete testvm \
    --zone=$zone1 \
    --quiet

gcloud compute network-firewall-policies rules delete 1000 \
    --firewall-policy my-vpc-policy \
    --global-firewall-policy \
    --quiet

gcloud compute network-firewall-policies associations delete \
    --firewall-policy my-vpc-policy \
    --name=network-myvpc \
    --global-firewall-policy \
    --quiet

gcloud compute network-firewall-policies delete my-vpc-policy \
    --global \
    --quiet

gcloud compute networks subnets delete $region1-subnet \
    --region=$region1 \
    --quiet

gcloud compute networks subnets delete $region2-proxy-subnet \
    --region=$region2 \
    --quiet

gcloud compute networks subnets delete $region2-subnet \
    --region=$region2 \
    --quiet

gcloud compute networks delete myvpc \
    --quiet
12. ยินดีด้วย
ขอแสดงความยินดีที่ทำ Codelab เสร็จสมบูรณ์
สิ่งที่เราได้พูดถึง
- การติดตั้งใช้งานไฟล์พื้นฐานใน Google Cloud Storage
- การติดตั้งใช้งานแบ็กเอนด์ PSC สำหรับ Google Cloud Storage
- การติดตั้งใช้งาน Application Load Balancer ภายในแบบข้ามภูมิภาค