
1. 簡介
Private Service Connect (PSC) 是 Google Cloud 網路功能,可讓消費者從 VPC 網路內部,以私密方式存取代管服務。PSC 後端是 PSC 功能的子集,可讓負載平衡器位於 Google Cloud Storage 等全域 Google 代管服務的前端,以便套用其他負載平衡整合項目,例如不同的 FQDN。發布本程式碼研究室時,只有部分 Google 服務可搭配全域 PSC 後端使用。如要查看該清單,請按這裡。
本程式碼研究室將探討如何設定 PSC 後端,透過內部 FQDN 存取 Google Cloud Storage。
課程內容
- 部署基本的虛擬私有雲網路基礎架構
- 在 Google Cloud Storage 中部署基本值區
- 將採用 PSC 後端的跨區域內部應用程式負載平衡器部署至 Google Cloud Storage
軟硬體需求
- 具備「擁有者」權限的 Google Cloud 專案
- Google Cloud 專案中未強制執行的組織政策:受防護的 VM
2. 程式碼研究室拓撲
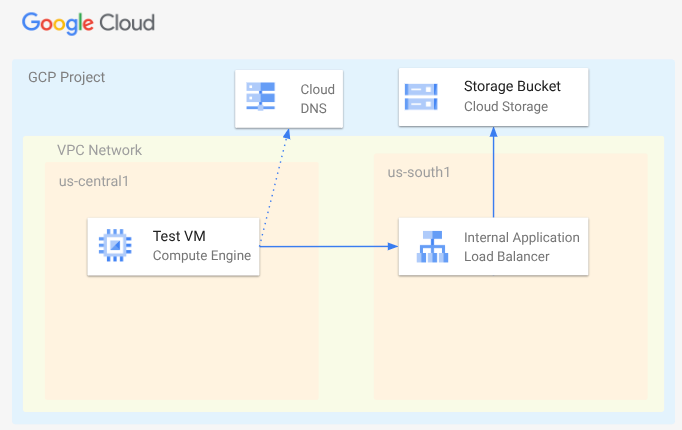
在本 Codelab 中,您將部署虛擬私有雲網路、子網路、私人 DNS 區域、防火牆規則、Google Cloud Storage Bucket、範例檔案和測試 VM。接著,您會部署跨區域應用程式負載平衡器,並為 Google Cloud Storage 採用 PSC 後端。最後,您將測試與 Google Cloud Storage Bucket 中檔案的連線。
3. 設定和需求
自修實驗室環境設定
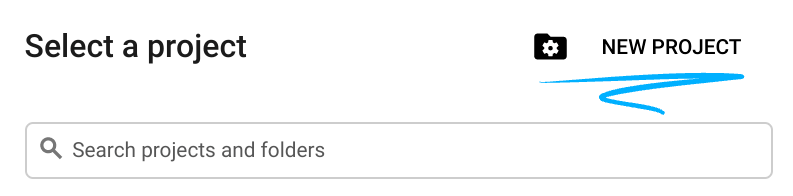
- 登入 Google Cloud 控制台,然後建立新專案或重複使用現有專案。如果沒有 Gmail 或 Google Workspace 帳戶,請先建立帳戶。

- 專案名稱是這個專案參與者的顯示名稱。這是 Google API 未使用的字元字串。你隨時可以更新。
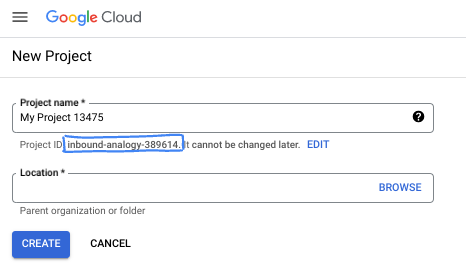
- 專案 ID 在所有 Google Cloud 專案中都是不重複的,而且設定後即無法變更。Cloud 控制台會自動產生專屬字串,通常您不需要在意該字串為何。在大多數程式碼研究室中,您需要參照專案 ID (通常標示為
PROJECT_ID)。如果您不喜歡產生的 ID,可以產生另一個隨機 ID。你也可以嘗試使用自己的名稱,看看是否可用。完成這個步驟後就無法變更,且專案期間會維持不變。 - 請注意,有些 API 會使用第三個值,也就是「專案編號」。如要進一步瞭解這三種值,請參閱說明文件。
- 接著,您需要在 Cloud 控制台中啟用帳單,才能使用 Cloud 資源/API。完成這個程式碼研究室的費用不高,甚至可能完全免費。如要關閉資源,避免在本教學課程結束後繼續產生費用,請刪除您建立的資源或專案。Google Cloud 新使用者可參加價值$300 美元的免費試用計畫。
啟動 Cloud Shell
雖然可以透過筆電遠端操作 Google Cloud,但在本程式碼研究室中,您將使用 Google Cloud Shell,這是可在雲端執行的指令列環境。
在 Google Cloud 控制台中,點選右上工具列的 Cloud Shell 圖示:

佈建並連線至環境的作業需要一些時間才能完成。完成後,您應該會看到如下的內容:

這部虛擬機器搭載各種您需要的開發工具,並提供永久的 5GB 主目錄,而且可在 Google Cloud 運作,大幅提升網路效能並強化驗證功能。您可以在瀏覽器中完成本程式碼研究室的所有作業。您不需要安裝任何軟體。
4. 事前準備
啟用 API
在 Cloud Shell 中,請確認專案已設定完畢,並設定變數。
gcloud auth login
gcloud config list project
gcloud config set project [YOUR-PROJECT-ID]
export projectid=[YOUR-PROJECT-ID]
export region1=us-central1
export zone1=us-central1-a
export region2=us-south1
echo $projectid
echo $region1
echo $zone1
echo $region2
啟用所有必要服務
gcloud services enable compute.googleapis.com
gcloud services enable networkmanagement.googleapis.com
gcloud services enable storage.googleapis.com
gcloud services enable dns.googleapis.com
5. 建立虛擬私有雲網路
建立虛擬私有雲網路,用於代管 VM 用戶端和負載平衡元件。
虛擬私有雲網路
透過 Cloud Shell
gcloud compute networks create myvpc \
    --subnet-mode=custom \
    --bgp-routing-mode=global
在虛擬私有雲中建立子網路。第一個子網路將做為負載平衡器的主機。第二個子網路是負載平衡器的僅限 Proxy 子網路,第三個子網路則會代管 VM 用戶端。
建立子網路
透過 Cloud Shell
gcloud compute networks subnets create $region2-subnet \
    --network=myvpc \
    --range=10.100.0.0/24 \
    --region=$region2

gcloud compute networks subnets create $region2-proxy-subnet \
    --network=myvpc \
    --range=10.100.100.0/24 \
    --region=$region2 \
    --purpose=GLOBAL_MANAGED_PROXY \
    --role=ACTIVE

gcloud compute networks subnets create $region1-subnet \
    --network=myvpc \
    --region=$region1 \
    --range=10.200.0.0/24
建立網路防火牆政策和防火牆規則
透過 Cloud Shell
gcloud compute network-firewall-policies create my-vpc-policy --global

gcloud compute network-firewall-policies associations create \
    --firewall-policy my-vpc-policy \
    --network myvpc \
    --name network-myvpc \
    --global-firewall-policy
如要允許 IAP 連線至您的 VM 執行個體,請根據以下條件建立防火牆規則:
- 套用至所有您希望能透過 IAP 存取的 VM 執行個體。
- 允許來自 IP 範圍 35.235.240.0/20 的輸入流量。這個範圍包含 IAP 用於 TCP 轉送的所有 IP 位址。
透過 Cloud Shell
gcloud compute network-firewall-policies rules create 1000 \
    --action ALLOW \
    --firewall-policy my-vpc-policy \
    --description "SSH with IAP" \
    --direction INGRESS \
    --src-ip-ranges 35.235.240.0/20 \
    --layer4-configs tcp:22  \
    --global-firewall-policy
6. 建立 Google Cloud Storage bucket、範例檔案並授予權限
透過 Cloud Shell
gcloud storage buckets create gs://$projectid-pscbackend --location=us

echo "Here is my bucket file contents" > my-bucket-contents.txt

gcloud storage cp my-bucket-contents.txt gs://$projectid-pscbackend/my-bucket-contents.txt

computesa=$(gcloud iam service-accounts list \
    --filter='displayName:Compute Engine default service account' \
    --format='value(email)')

echo $computesa


gcloud storage buckets add-iam-policy-binding gs://$projectid-pscbackend \
    --member="serviceAccount:$computesa" \
    --role="roles/storage.objectViewer"
輸出內容範例
Creating gs://xxxxxxxxxxx-pscbackend/...
Copying file://my-bucket-contents.txt to gs://xxxxxxxxxxx-pscbackend/my-bucket-contents.txt
  Completed files 1/1 | 32.0B/32.0B
xxxxxxxxxxx-compute@developer.gserviceaccount.com
bindings:
- members:
  - projectEditor:xxxxxxxxxxx
  - projectOwner:xxxxxxxxxxx
  role: roles/storage.legacyBucketOwner
- members:
  - projectViewer:xxxxxxxxxxx
  role: roles/storage.legacyBucketReader
- members:
  - projectEditor:xxxxxxxxxxx
  - projectOwner:xxxxxxxxxxx
  role: roles/storage.legacyObjectOwner
- members:
  - projectViewer:xxxxxxxxxxx
  role: roles/storage.legacyObjectReader
- members:
  - serviceAccount:xxxxxxxxxxx-compute@developer.gserviceaccount.com
  role: roles/storage.objectViewer
etag: CAI=
kind: storage#policy
resourceId: projects/_/buckets/xxxxxxxxxxx-pscbackend
version: 1
7. 透過跨區域內部應用程式負載平衡器公開 Google Cloud Storage
建立跨區域內部應用程式負載平衡器
首先,請建立負載平衡器元件。您將建立 PSC NEG、後端服務、網址對應和 HTTP 目標 Proxy。
在 Cloud Shell 中
gcloud compute network-endpoint-groups create gcs-$region2-neg \
    --region=$region2 \
    --network-endpoint-type=private-service-connect \
    --psc-target-service=storage.googleapis.com

gcloud compute backend-services create gcs-bes \
    --load-balancing-scheme=INTERNAL_MANAGED \
    --protocol=HTTP \
    --global

gcloud compute backend-services add-backend gcs-bes \
    --global \
    --network-endpoint-group=gcs-$region2-neg \
    --network-endpoint-group-region=$region2

gcloud compute url-maps create gcsilb \
    --default-service=gcs-bes \
    --global

gcloud compute target-http-proxies create gcs-http-proxy \
    --url-map=gcsilb \
    --global
建立負載平衡器轉送規則。
在 Cloud Shell 中
gcloud compute forwarding-rules create gcs-ilb-fr \
    --load-balancing-scheme=INTERNAL_MANAGED \
    --network=myvpc \
    --subnet=$region2-subnet \
    --target-http-proxy=gcs-http-proxy \
    --ports=80 \
    --subnet-region=$region2 \
    --global
8. 為 company.com 建立 Cloud DNS 私人區域
首先,請判斷 A 記錄的負載平衡器 IP 位址,並匯出為變數
在 Cloud Shell 中
gcloud compute forwarding-rules describe gcs-ilb-fr \
    --global

export lbip=$(gcloud compute forwarding-rules describe gcs-ilb-fr \
    --global \
    --format='value(IPAddress)')

echo $lbip
輸出內容範例
IPAddress: 10.100.0.4
IPProtocol: TCP
creationTimestamp: 'xxxxxxxxxxxxxxx'
description: ''
fingerprint: xxxxxxxxxx
id: 'xxxxxxxxxxxxxx'
kind: compute#forwardingRule
labelFingerprint: xxxxxxxxxx
loadBalancingScheme: INTERNAL_MANAGED
name: gcs-ilb-fr
network: https://www.googleapis.com/compute/v1/projects/[projectID]/global/networks/myvpc
networkTier: PREMIUM
portRange: 80-80
selfLink: https://www.googleapis.com/compute/v1/projects/[projectID]/global/forwardingRules/gcs-ilb-fr
selfLinkWithId: https://www.googleapis.com/compute/v1/projects/[projectID]/global/forwardingRules/xxxxxxxxxxxxxx
subnetwork: https://www.googleapis.com/compute/v1/projects/[projectID]/regions/us-south1/subnetworks/us-south1-subnet
target: https://www.googleapis.com/compute/v1/projects/[projectID]/global/targetHttpProxies/gcs-http-proxy
10.100.0.4
接著,為剛建立的內部負載平衡器建立 DNS 私人區域和 A 記錄。
透過 Cloud Shell
gcloud dns managed-zones create "company-com" \
    --dns-name=company.com. \
    --description="company.com private dns zone" \
    --visibility=private \
    --networks=myvpc

gcloud dns record-sets create "storage.company.com" \
    --zone="company-com" \
    --type="A" \
    --ttl="300" \
    --rrdatas="$lbip"
9. 建立測試 VM
建立消費者端 VM
透過 Cloud Shell
gcloud compute instances create testvm \
    --zone="$zone1" \
    --subnet="$region1-subnet" \
    --no-address \
    --metadata "startup-script=#! /bin/bash
cat <<EOF > /etc/profile.d/gcp-startup-vars.sh
export MYBUCKET=\"$projectid-pscbackend\"
export computesa=\"$computesa\"
EOF
chmod +x /etc/profile.d/gcp-startup-vars.sh"
10. 測試透過負載平衡器連線至 Google Cloud Storage
連線至測試 VM
在 Cloud Shell 中
gcloud compute ssh "testvm"\
    --zone "$zone1"\
    --tunnel-through-iap \
    --project $projectid
測試連線
測試 VM
TOKEN=$(curl -s -H "Metadata-Flavor: Google" "http://metadata.google.internal/computeMetadata/v1/instance/service-accounts/$computesa/token" | jq -r .access_token)

curl -H "Authorization: Bearer $TOKEN" "http://storage.company.com/$MYBUCKET/my-bucket-contents.txt"
預期輸出
Here is my bucket file contents
退出 VM。
在 TestVM 中
exit
成功!
11. 清除步驟
透過 Cloud Shell
gcloud dns record-sets delete "storage.company.com" \
    --zone="company-com" \
    --type="A"

gcloud dns managed-zones delete "company-com"

gcloud compute forwarding-rules delete gcs-ilb-fr \
    --global \
    --quiet

gcloud compute target-http-proxies delete gcs-http-proxy \
    --global \
    --quiet

gcloud compute url-maps delete gcsilb \
    --global \
    --quiet

gcloud compute backend-services delete gcs-bes \
    --global \
    --quiet

gcloud compute network-endpoint-groups delete gcs-$region2-neg \
    --region=$region2 \
    --quiet

gcloud storage rm -r gs://$projectid-pscbackend \
    --quiet

gcloud compute instances delete testvm \
    --zone=$zone1 \
    --quiet

gcloud compute network-firewall-policies rules delete 1000 \
    --firewall-policy my-vpc-policy \
    --global-firewall-policy \
    --quiet

gcloud compute network-firewall-policies associations delete \
    --firewall-policy my-vpc-policy \
    --name=network-myvpc \
    --global-firewall-policy \
    --quiet

gcloud compute network-firewall-policies delete my-vpc-policy \
    --global \
    --quiet

gcloud compute networks subnets delete $region1-subnet \
    --region=$region1 \
    --quiet

gcloud compute networks subnets delete $region2-proxy-subnet \
    --region=$region2 \
    --quiet

gcloud compute networks subnets delete $region2-subnet \
    --region=$region2 \
    --quiet

gcloud compute networks delete myvpc \
    --quiet
12. 恭喜!
恭喜您完成本程式碼研究室。
涵蓋內容
- 在 Google Cloud Storage 中部署基本檔案
- 部署 Google Cloud Storage 的 PSC 後端
- 部署跨區域內部應用程式負載平衡器