
1. 简介
Google API 的 Private Service Connect (PSC) 是一项 Google Cloud 网络功能,可让用户通过 VPC 内的专用 IP 全局端点配置专用访问通道。对于在通过 VPN 或互连连接到 Google Cloud 的混合环境中运行代码或客户端应用的用户,PSC 用于通过该专用混合连接解析 Google API。
Google API 的 PSC 可以解析许多不同的网域,如需查看完整列表,请点击此处。大多数 Google API 使用的网域是 <API>.googleapis.com。除了此网域之外,PSC 还为用户提供了一个 googleapis.com 版本,即 <API>-<PSC-ENDPOINT-NAME>.**p.**googleapis.com。使用此网域,用户可以将应用配置为使用特定的 PSC 端点。最常见的用例是,用户可以选择哪些应用使用 PSC 端点通过混合连接路由 Google API 流量,同时允许其他应用继续将流量路由到公共 API 端点。
Gemini 属于 Google Cloud 的 Vertex AI 产品套件,并包含在可使用 PSC for Google APIs 解析的 Google API 列表中。
在此 Codelab 中,您将构建一个模拟的混合环境,在本地托管 Workbench 实例,并运行 Gemini Python 代码,该代码通过高可用性 VPN 私密地访问 Gemini API,并连接到 Google API 的 PSC 端点。
学习内容
- 创建 NCC hub。
- 在 NCC hub 中配置 VPC spoke。
- 创建 Cloud 高可用性 VPN。
- 在 NCC 中心配置混合 spoke。
- 为 Google API 端点创建 PSC。
- 通过高可用性 VPN 配置自定义路由。
- 配置 DNS 对等互连区域。
- 配置 Vertex Workbench 实例
- 配置 Gemini Python 代码以使用 Google APIs API 端点的 PSC。
所需条件
- 具有“所有者”或完整“编辑者”权限的 Google Cloud 项目。
2. Codelab 拓扑
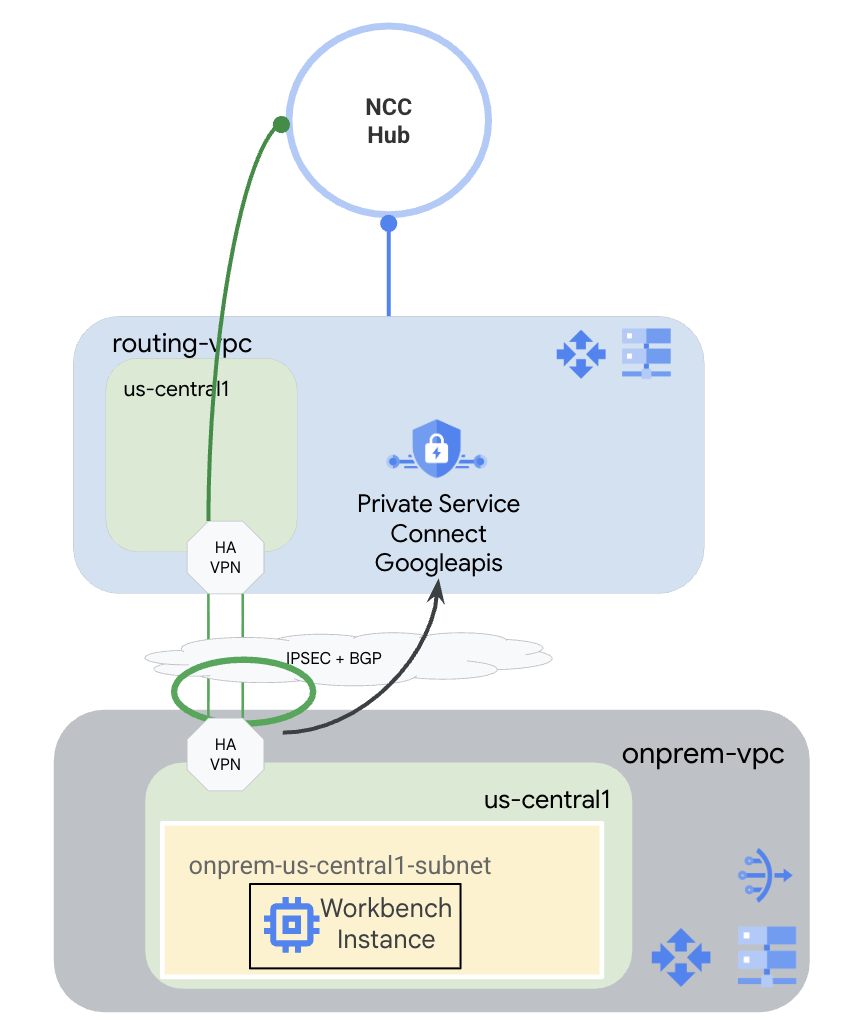
在本 Codelab 中,您将使用 Google Cloud 模拟混合环境。此 Codelab 中的某些步骤是 Google Cloud 特有的,如果从真正的本地环境中进行配置,则会有所不同。我们会明确指出这些步骤。
您将创建一个以路由 VPC 作为 VPC spoke 的 NCC hub。在该 VPC 中,将配置一个连接到本地 VPC 的高可用性 VPN,以模拟本地环境。高可用性 VPN 将在 NCC hub 中配置为混合 spoke。在本地 VPC 中,您将创建一个子网,用于托管 Workbench 实例。您还将创建一个 Cloud NAT,用于在 Workbench 实例上下载软件包。
最后,您将为本地 VPC 创建 DNS 对等互联区域,以便能够使用 PSC for Google API 自动创建的 Service Directory 专用区域(用于 p.googleapis.com)。
3. 设置和要求
自定进度的环境设置
- 登录 Google Cloud 控制台,然后创建一个新项目或重复使用现有项目。如果您还没有 Gmail 或 Google Workspace 账号,则必须创建一个。


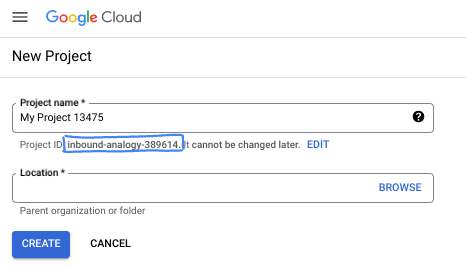
- 项目名称是此项目参与者的显示名称。它是 Google API 尚未使用的字符串。您可以随时对其进行更新。
- 项目 ID 在所有 Google Cloud 项目中是唯一的,并且是不可变的(一经设置便无法更改)。Cloud 控制台会自动生成一个唯一字符串;通常情况下,您无需关注该字符串。在大多数 Codelab 中,您都需要引用项目 ID(通常用
PROJECT_ID标识)。如果您不喜欢生成的 ID,可以再随机生成一个 ID。或者,您也可以尝试自己的项目 ID,看看是否可用。完成此步骤后便无法更改该 ID,并且此 ID 在项目期间会一直保留。 - 此外,还有第三个值,即部分 API 使用的项目编号,供您参考。如需详细了解所有这三个值,请参阅文档。
- 接下来,您需要在 Cloud 控制台中启用结算功能,以便使用 Cloud 资源/API。运行此 Codelab 应该不会产生太多的费用(如果有的话)。若要关闭资源以避免产生超出本教程范围的结算费用,您可以删除自己创建的资源或删除项目。Google Cloud 新用户符合参与 300 美元免费试用计划的条件。
启动 Cloud Shell
虽然可以通过笔记本电脑对 Google Cloud 进行远程操作,但在此 Codelab 中,您将使用 Google Cloud Shell,这是一个在云端运行的命令行环境。
在 Google Cloud 控制台 中,点击右上角工具栏中的 Cloud Shell 图标:

预配和连接到环境应该只需要片刻时间。完成后,您应该会看到如下内容:

这个虚拟机已加载了您需要的所有开发工具。它提供了一个持久的 5 GB 主目录,并且在 Google Cloud 中运行,大大增强了网络性能和身份验证功能。您在此 Codelab 中的所有工作都可以在浏览器中完成。您无需安装任何程序。
4. 准备工作
启用 API
在 Cloud Shell 中,确保您的项目已正确配置并设置了环境变量。
从 Cloud Shell
gcloud config list project
gcloud config set project <project-id>
export project=$(gcloud config get-value project)
export region=us-central1
export zone=$region-a
echo $project
echo $region
echo $zone
在项目中启用所有必需的 Google API。
从 Cloud Shell
gcloud services enable compute.googleapis.com
gcloud services enable networkconnectivity.googleapis.com
gcloud services enable dns.googleapis.com
gcloud services enable notebooks.googleapis.com
gcloud services enable servicedirectory.googleapis.com
gcloud services enable aiplatform.googleapis.com
5. 创建 VPC 和子网
创建影音平台
从 Cloud Shell
gcloud compute networks create routing-vpc \
    --subnet-mode=custom
从 Cloud Shell
gcloud compute networks create onprem-vpc \
    --subnet-mode=custom

gcloud compute networks subnets create onprem-$region-subnet \
    --network=onprem-vpc \
    --range=10.0.0.0/24 \
    --region=$region
    --enable-private-ip-google-access
创建 Cloud Router 和 Cloud NAT
创建将与 routing-vpc 中的高可用性 VPN 搭配使用的 Cloud Router 路由器。
从 Cloud Shell
gcloud compute routers create routing-$region-cr \
    --network=routing-vpc \
    --region=$region \
    --asn=64512
创建将与本地 VPC 中的高可用性 VPN 搭配使用的 Cloud Router。
从 Cloud Shell
gcloud compute routers create onprem-$region-cr \
    --network=onprem-vpc \
    --region=$region \
    --asn=64513
创建将与 onprem-vpc 中的 Cloud NAT 搭配使用的 Cloud Router 路由器。
从 Cloud Shell
gcloud compute routers create onprem-$region-cr-4nat \
    --network=onprem-vpc \
    --region=$region
本地 VPC 中的 Cloud NAT 将用于下载软件包,以供稍后步骤中配置的 Vertex AI Workbench 实例使用。
从 Cloud Shell
gcloud compute routers nats create onprem-$region-nat \
    --router=onprem-$region-cr-4nat \
    --region=$region \
    --nat-all-subnet-ip-ranges \
    --auto-allocate-nat-external-ips
6. 创建 Cloud HA-VPN
创建 VPN 网关。
从 Cloud Shell
gcloud compute vpn-gateways create routing-gateway \
   --network=routing-vpc \
   --region=$region \
   --stack-type=IPV4_ONLY
从 Cloud Shell
gcloud compute vpn-gateways create onprem-gateway \
   --network=onprem-vpc \
   --region=$region \
   --stack-type=IPV4_ONLY
创建源自 routing-vpc 的 VPN 隧道。
从 Cloud Shell
gcloud compute vpn-tunnels create routing-to-onprem-tunnel0 \
    --peer-gcp-gateway=onprem-gateway \
    --region=$region \
    --ike-version=2 \
    --shared-secret=mysecret \
    --router=routing-$region-cr \
    --vpn-gateway=routing-gateway \
    --interface=0

gcloud compute vpn-tunnels create routing-to-onprem-tunnel1 \
    --peer-gcp-gateway=onprem-gateway \
    --region=$region \
    --ike-version=2 \
    --shared-secret=mysecret \
    --router=routing-$region-cr \
    --vpn-gateway=routing-gateway \
    --interface=1
创建源自 onprem-vpc 的 VPN 隧道。
从 Cloud Shell
gcloud compute vpn-tunnels create onprem-to-routing-tunnel0 \
    --peer-gcp-gateway=routing-gateway \
    --region=$region \
    --ike-version=2 \
    --shared-secret=mysecret \
    --router=onprem-$region-cr \
    --vpn-gateway=onprem-gateway \
    --interface=0

    gcloud compute vpn-tunnels create onprem-to-routing-tunnel1 \
    --peer-gcp-gateway=routing-gateway \
    --region=$region \
    --ike-version=2 \
    --shared-secret=mysecret \
    --router=onprem-$region-cr \
    --vpn-gateway=onprem-gateway \
    --interface=1
为源自 routing-vpc 的两条隧道设置 BGP 会话。
从 Cloud Shell
gcloud compute routers add-interface routing-$region-cr \
    --interface-name=routing-interface0 \
    --ip-address=169.254.0.1 \
    --mask-length=30 \
    --vpn-tunnel=routing-to-onprem-tunnel0 \
    --region=$region

gcloud compute routers add-bgp-peer routing-$region-cr \
    --peer-name=routingtoonprem-bgp0 \
    --interface=routing-interface0 \
    --peer-ip-address=169.254.0.2 \
    --peer-asn=64513 \
    --region=$region

gcloud compute routers add-interface routing-$region-cr \
  --interface-name=routing-interface1 \
  --ip-address=169.254.1.1 \
  --mask-length=30 \
  --vpn-tunnel=routing-to-onprem-tunnel1 \
  --region=$region

gcloud compute routers add-bgp-peer routing-$region-cr \
    --peer-name=routingtoonprem-bgp1 \
    --interface=routing-interface1 \
    --peer-ip-address=169.254.1.2 \
    --peer-asn=64513 \
    --region=$region
为源自 onprem-vpc 的两个隧道设置 BGP 会话。
从 Cloud Shell
gcloud compute routers add-interface onprem-$region-cr \
    --interface-name=onprem-interface0 \
    --ip-address=169.254.0.2 \
    --mask-length=30 \
    --vpn-tunnel=onprem-to-routing-tunnel0 \
    --region=$region

gcloud compute routers add-bgp-peer onprem-$region-cr \
    --peer-name=onpremtorouting-bgp0 \
    --interface=onprem-interface0 \
    --peer-ip-address=169.254.0.1 \
    --peer-asn=64512 \
    --region=$region

gcloud compute routers add-interface onprem-$region-cr \
  --interface-name=onprem-interface1 \
  --ip-address=169.254.1.2 \
  --mask-length=30 \
  --vpn-tunnel=onprem-to-routing-tunnel1 \
  --region=$region

gcloud compute routers add-bgp-peer onprem-$region-cr \
    --peer-name=onpremtorouting-bgp1 \
    --interface=onprem-interface1 \
    --peer-ip-address=169.254.1.1 \
    --peer-asn=64512 \
    --region=$region
前往控制台中的 Network Connectivity > VPN 页面,确保高可用性 VPN 隧道和 BGP 会话已正确配置。
7. 配置 NCC hub 和 spoke
创建 NCC Hub
从 Cloud Shell
gcloud network-connectivity hubs create ncc-hub \
    --project="$project" \
    --preset-topology="mesh"
创建 NCC Spoke
NCC gcloud 要求所有 spoke 都配置有完整路径名称或 URI。
从 Cloud Shell
gcloud compute networks describe routing-vpc
请记下以下命令中路由 VPC 的完整路径 (URI)。
输出示例
autoCreateSubnetworks: false
creationTimestamp: '2025-08-20T11:13:42.233-07:00'
id: 'xxx'
kind: compute#network
name: routing-vpc
networkFirewallPolicyEnforcementOrder: AFTER_CLASSIC_FIREWALL
routingConfig:
  bgpBestPathSelectionMode: LEGACY
  routingMode: REGIONAL
selfLink: https://www.googleapis.com/compute/v1/projects/$project/global/networks/routing-vpc
selfLinkWithId: https://www.googleapis.com/compute/v1/projects/$project/global/networks/355666541188722361
x_gcloud_bgp_routing_mode: REGIONAL
x_gcloud_subnet_mode: CUSTOM
配置路由 VPC spoke
从 Cloud Shell
gcloud network-connectivity spokes linked-vpc-network create routing-vpc \
    --hub=ncc-hub \
    --vpc-network=projects/$project/global/networks/routing-vpc \
    --global
从 Cloud Shell
gcloud compute vpn-tunnels describe routing-to-onprem-tunnel0 --region=$region
gcloud compute vpn-tunnels describe routing-to-onprem-tunnel1 --region=$region
请注意源自 routing-vpc 的 VPN 隧道的完整路径 (URI)。
输出示例
creationTimestamp: '2025-08-20T11:33:37.494-07:00'
description: ''
detailedStatus: Tunnel is up and running.
id: 'xxx'
ikeVersion: 2
kind: compute#vpnTunnel
labelFingerprint: xxx
localTrafficSelector:
- 0.0.0.0/0
name: routing-to-onprem-tunnel0
peerGcpGateway: https://www.googleapis.com/compute/v1/projects/$project/regions/us-central1/vpnGateways/onprem-gateway
peerIp: 34.153.54.166
region: https://www.googleapis.com/compute/v1/projects/$project/regions/us-central1
remoteTrafficSelector:
- 0.0.0.0/0
router: https://www.googleapis.com/compute/v1/projects/$project/regions/us-central1/routers/routing-us-central1-cr
selfLink: https://www.googleapis.com/compute/v1/projects/$project/regions/us-central1/vpnTunnels/routing-to-onprem-tunnel0
sharedSecret: '*************'
sharedSecretHash: xxx
status: ESTABLISHED
vpnGateway: https://www.googleapis.com/compute/v1/projects/$project/regions/us-central1/vpnGateways/routing-gateway

vpnGatewayInterface: 0
creationTimestamp: '2025-08-20T11:33:41.829-07:00'
description: ''
detailedStatus: Tunnel is up and running.
id: 'xxx'
ikeVersion: 2
kind: compute#vpnTunnel
labelFingerprint: xxx
localTrafficSelector:
- 0.0.0.0/0
name: routing-to-onprem-tunnel1
peerGcpGateway: https://www.googleapis.com/compute/v1/projects/$project/regions/us-central1/vpnGateways/onprem-gateway
peerIp: 34.153.246.117
region: https://www.googleapis.com/compute/v1/projects/$project/regions/us-central1
remoteTrafficSelector:
- 0.0.0.0/0
router: https://www.googleapis.com/compute/v1/projects/$project/regions/us-central1/routers/routing-us-central1-cr
selfLink: https://www.googleapis.com/compute/v1/projects/$project/regions/us-central1/vpnTunnels/routing-to-onprem-tunnel1
sharedSecret: '*************'
sharedSecretHash: xxx
status: ESTABLISHED
vpnGateway: https://www.googleapis.com/compute/v1/projects/$project/regions/us-central1/vpnGateways/routing-gateway
vpnGatewayInterface: 1
从 Cloud Shell
gcloud network-connectivity spokes linked-vpn-tunnels create $region-vpn-spoke \
    --hub=ncc-hub \
  --vpn-tunnels=projects/$project/regions/$region/vpnTunnels/routing-to-onprem-tunnel0,projects/$project/regions/$region/vpnTunnels/routing-to-onprem-tunnel1 \
    --region=$region
请先检查以确保所有辐条均已正确配置,然后再继续操作。
从 Cloud Shell
gcloud network-connectivity hubs list-spokes ncc-hub
输出示例
NAME: routing-vpc
GROUP: default
PROJECT: $project
LOCATION: global
TYPE: VPC_NETWORK
STATE: ACTIVE
STATE REASON:
ETAG: 2

NAME: us-central1-vpn-spoke
GROUP: default
PROJECT: $project
LOCATION: us-central1
TYPE: VPN_TUNNEL
STATE: ACTIVE
STATE REASON:
ETAG:
8. 为 Google API 设置 Private Service Connect
Google API 的 PSC 端点是使用不在区域级 VPC 子网中的全球 IP 地址创建的。必须专门预留全球 IP 地址,并将其用途设置为 PRIVATE_SERVICE_CONNECT。
从 Cloud Shell
gcloud compute addresses create psc-ip \
  --global \
  --purpose=PRIVATE_SERVICE_CONNECT \
  --addresses=10.100.100.0 \
  --network=routing-vpc
从 Cloud Shell
gcloud compute forwarding-rules create psc4googep \
  --global \
  --network=routing-vpc \
  --address=psc-ip \
  --target-google-apis-bundle=all-apis \
  --service-directory-registration=projects/$project/locations/$region
从 Cloud Shell
gcloud compute routers update routing-$region-cr \
   --project=$project \
   --region=$region \
   --advertisement-mode custom \
   --set-advertisement-groups=ALL_SUBNETS \
   --set-advertisement-ranges=10.100.100.0/32
从 Cloud Shell
gcloud dns managed-zones create peeringzone \
    --description="dns peer onprem to routing" \
    --dns-name=p.googleapis.com \
    --networks=onprem-vpc \
    --target-network=routing-vpc \
    --target-project=$project \
    --visibility=private
9. 设置 Vertex Workbench 实例
创建将用于 Workbench 实例身份的服务账号。
从 Cloud Shell
gcloud iam service-accounts create workbench-sa \
    --display-name="workbench-sa"
记下您的服务账号的全名,并向其授予 aiplatform.admin 权限,以便执行对 Vertex AI/Gemini 的调用。
从 Cloud Shell
gcloud iam service-accounts list
输出示例
DISPLAY NAME: Compute Engine default service account
EMAIL: xxx-compute@developer.gserviceaccount.com
DISABLED: False

DISPLAY NAME: workbench-sa
EMAIL: workbench-sa@$project.iam.gserviceaccount.com
DISABLED: False
请务必将 <your-project-id> 替换为您的实际项目 ID。由于需要使用引号,因此我们无法在此处使用变量 $project。
从 Cloud Shell
gcloud projects add-iam-policy-binding $project --member='serviceAccount:workbench-sa@<your-project-id>.iam.gserviceaccount.com' --role='roles/aiplatform.admin' --condition=None
从 Cloud Shell
gcloud workbench instances create workbench-$region --vm-image-project=cloud-notebooks-managed --vm-image-family=workbench-instances --location=$region-a --network=projects/$project/global/networks/onprem-vpc --subnet=projects/$project/regions/$region/subnetworks/onprem-$region-subnet --subnet-region=$region --disable-public-ip --service-account-email=workbench-sa@$project.iam.gserviceaccount.com
工作台实例的配置可能需要比 gcloud 命令运行更长的时间。
10. 测试 Gemini Code
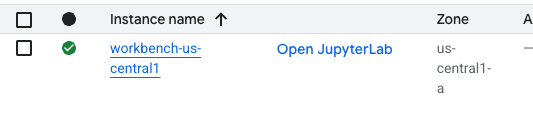
在界面中,点击“打开 JupyterLab”。
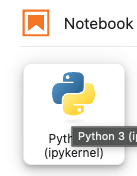
进入 JupyterLab 后,打开新的 Python 3 笔记本。
在笔记本中运行以下代码。请务必更新代码,以包含您的具体项目和地区信息。
从 JupyterLab 笔记本
pip install --upgrade google-genai
重启笔记本内核。

记下 API 端点。在此示例中,我们使用的是 API 端点 <YOUR_REGION>-aiplatform.googleapis.com。这是 Vertex AI 的标准 API 端点。
从 JupyterLab 笔记本
PROJECT_ID="YOUR_PROJECT_ID" # Google Cloud Project ID
LOCATION_ID="YOUR_REGION" # Enter Vertex AI Gemini region such a s us-central1
API_ENDPOINT="https://<YOUR_REGION>-aiplatform.googleapis.com" # API Endpoint
MODEL_ID="gemini-2.0-flash" # Gemini Model ID

from google import genai
from google.genai.types import (
    GenerateContentConfig,
    HarmBlockThreshold,
    HarmCategory,
    Part,
    SafetySetting,
)
从 JupyterLab 笔记本
from google import genai

client= genai.Client(vertexai=True, project=PROJECT_ID, location=LOCATION_ID, http_options={'base_url': API_ENDPOINT})

prompt = "what weighs more, 1kg of feathers or 1kg of stones"

safety_settings = [
    SafetySetting(
        category=HarmCategory.HARM_CATEGORY_DANGEROUS_CONTENT,
        threshold=HarmBlockThreshold.BLOCK_LOW_AND_ABOVE,
    ),
    SafetySetting(
        category=HarmCategory.HARM_CATEGORY_HARASSMENT,
        threshold=HarmBlockThreshold.BLOCK_LOW_AND_ABOVE,
    ),
    SafetySetting(
        category=HarmCategory.HARM_CATEGORY_HATE_SPEECH,
        threshold=HarmBlockThreshold.BLOCK_LOW_AND_ABOVE,
    ),
    SafetySetting(
        category=HarmCategory.HARM_CATEGORY_SEXUALLY_EXPLICIT,
        threshold=HarmBlockThreshold.BLOCK_LOW_AND_ABOVE,
    ),
]

response = client.models.generate_content(
    model=MODEL_ID,
    contents=prompt,
    config=GenerateContentConfig(
        safety_settings=safety_settings,
    ),
)

# Response will be `None` if it is blocked.
print(response.text)
示例响应
This is a classic trick question! They both weigh the same: 1 kilogram. The difference is in the volume they occupy and the density of the materials.
记下您运行代码时使用的 API 名称。YOUR_REGION-aiplatform.googleapis.com 是 Vertex AI 的默认 API 名称。我们需要更改 API 名称,然后再次运行代码。我们可以在工作区实例的终端中运行 TCPdump,以确保代码正在使用 PSC 端点。
在终端中运行 TCPdump
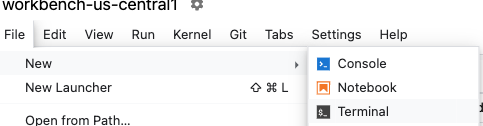
依次点击“文件”>“新建”>“终端”,在工作台中打开终端。
如果您在终端中看到文本输出方面遇到问题,则需要更新终端主题。您可以在“设置”>“终端主题”>“浅色”或“深色”中进行此操作。
从终端
sudo tcpdump host 10.100.100.0
更新 Gemini Code
切换回笔记本,更新 API 端点,然后再次运行代码。请注意,我们将 API 端点更改为 <YOUR_REGION>-aiplatform**-psc4googep.p**.googleapis.com。这符合 PSC 特定的 API 格式 <service>-<endpointname>.p.googleapis.com。
从 JupyterLab 笔记本
API_ENDPOINT="https://<YOUR_REGION>-aiplatform-psc4googep.p.googleapis.com" # API Endpoint
从 JupyterLab 笔记本
from google import genai
from google.genai.types import (
    GenerateContentConfig,
    HarmBlockThreshold,
    HarmCategory,
    Part,
    SafetySetting,
)
从 JupyterLab 笔记本
from google import genai

client= genai.Client(vertexai=True, project=PROJECT_ID, location=LOCATION_ID, http_options={'base_url': API_ENDPOINT})

prompt = "what weighs more, 1kg of feathers or 1kg of stones"

safety_settings = [
    SafetySetting(
        category=HarmCategory.HARM_CATEGORY_DANGEROUS_CONTENT,
        threshold=HarmBlockThreshold.BLOCK_LOW_AND_ABOVE,
    ),
    SafetySetting(
        category=HarmCategory.HARM_CATEGORY_HARASSMENT,
        threshold=HarmBlockThreshold.BLOCK_LOW_AND_ABOVE,
    ),
    SafetySetting(
        category=HarmCategory.HARM_CATEGORY_HATE_SPEECH,
        threshold=HarmBlockThreshold.BLOCK_LOW_AND_ABOVE,
    ),
    SafetySetting(
        category=HarmCategory.HARM_CATEGORY_SEXUALLY_EXPLICIT,
        threshold=HarmBlockThreshold.BLOCK_LOW_AND_ABOVE,
    ),
]

response = client.models.generate_content(
    model=MODEL_ID,
    contents=prompt,
    config=GenerateContentConfig(
        safety_settings=safety_settings,
    ),
)

# Response will be `None` if it is blocked.
print(response.text)
示例响应
They weigh the same. 1 kg is 1 kg, regardless of what it's made of.
检查 TCPdump
切换回终端,并查找对 PSC 端点 (10.100.100.0) 的调用。结束 TCPdump(按 Ctrl+C)
输出示例
listening on ens4, link-type EN10MB (Ethernet), snapshot length 262144 bytes
19:12:01.473886 IP workbench-us-central1.us-central1-a.c.xxx.internal.41886 > 10.100.100.0.https: Flags [S], seq 3367930834, win 65320, options [mss 1420,sackOK,TS val 2933602967 ecr 0,nop,wscale 7], length 0
19:12:01.476561 IP 10.100.100.0.https > workbench-us-central1.us-central1-a.c.xxx.internal.41886: Flags [S.], seq 1863301110, ack 3367930835, win 65535, options [mss 1366,sackOK,TS val 3004118895 ecr 2933602967,nop,wscale 8], length 0
19:12:01.476602 IP workbench-us-central1.us-central1-a.c.xxx.internal.41886 > 10.100.100.0.https: Flags [.], ack 1, win 511, options [nop,nop,TS val 2933602969 ecr 3004118895], length 0
19:12:01.477283 IP workbench-us-central1.us-central1-a.c.xxx.internal.41886 > 10.100.100.0.https: Flags [P.], seq 1:1573, ack 1, win 511, options [nop,nop,TS val 2933602970 ecr 3004118895], length 1572
19:12:01.478836 IP 10.100.100.0.https > workbench-us-central1.us-central1-a.c.xxx.internal.41886: Flags [.], ack 1573, win 1045, options [nop,nop,TS val 3004118898 ecr 2933602970], length 0
19:12:01.480181 IP 10.100.100.0.https > workbench-us-central1.us-central1-a.c.xxx.internal.41886: Flags [P.], seq 1:6041, ack 1573, win 1045, options [nop,nop,TS val 3004118899 ecr 2933602970], length 6040
19:12:01.480183 IP 10.100.100.0.https > workbench-us-central1.us-central1-a.c.xxx.internal.41886: Flags [P.], seq 6041:8378, ack 1573, win 1045, options [nop,nop,TS val 3004118899 ecr 2933602970], length 2337
19:12:01.480215 IP workbench-us-central1.us-central1-a.c.xxx.internal.41886 > 10.100.100.0.https: Flags [.], ack 6041, win 485, options [nop,nop,TS val 2933602973 ecr 3004118899], length 0
19:12:01.480225 IP workbench-us-central1.us-central1-a.c.xxx.internal.41886 > 10.100.100.0.https: Flags [.], ack 8378, win 473, options [nop,nop,TS val 2933602973 ecr 3004118899], length 0
19:12:01.482580 IP workbench-us-central1.us-central1-a.c.xxx.internal.41886 > 10.100.100.0.https: Flags [P.], seq 1573:1653, ack 8378, win 501, options [nop,nop,TS val 2933602975 ecr 3004118899], length 80
大功告成!
11. 清理步骤
关闭 JupyterLab 笔记本,然后返回到 Cloud Shell。确保 Cloud Shell 未超时。如果已设置,请重置变量。
从 Cloud Shell
gcloud config list project
gcloud config set project <project-id>
export project=$(gcloud config get-value project)
export region=us-central1
export zone=$region-a
echo $project
echo $region
echo $zone
删除所有资源。
从 Cloud Shell
gcloud workbench instances delete workbench-$region --location=$zone -q

gcloud iam service-accounts delete workbench-sa@$project.iam.gserviceaccount.com -q

gcloud dns managed-zones delete peeringzone -q

gcloud compute forwarding-rules delete psc4googep --global -q

gcloud compute addresses delete psc-ip --global -q

gcloud network-connectivity spokes delete $region-vpn-spoke --region=$region -q

gcloud network-connectivity spokes delete routing-vpc --global -q

gcloud network-connectivity hubs delete ncc-hub -q

gcloud compute vpn-tunnels delete onprem-to-routing-tunnel1 --region=$region --project=$project -q

gcloud compute vpn-tunnels delete onprem-to-routing-tunnel0 --region=$region --project=$project -q

gcloud compute vpn-tunnels delete routing-to-onprem-tunnel1 --region=$region --project=$project -q

gcloud compute vpn-tunnels delete routing-to-onprem-tunnel0 --region=$region --project=$project -q

gcloud compute vpn-gateways delete onprem-gateway --region=$region --project=$project -q

gcloud compute vpn-gateways delete routing-gateway --region=$region --project=$project -q

gcloud compute routers nats delete onprem-$region-nat --router=onprem-$region-cr-4nat --region=$region -q

gcloud compute routers delete onprem-$region-cr-4nat --region=$region -q

gcloud compute routers delete onprem-$region-cr --region=$region -q

gcloud compute routers delete routing-$region-cr --region=$region -q

gcloud compute networks subnets delete onprem-$region-subnet --region=$region -q

gcloud compute networks delete onprem-vpc -q

gcloud compute networks delete routing-vpc -q
12. 恭喜!
恭喜您完成此 Codelab。
所学内容
- 创建 NCC hub。
- 在 NCC hub 中配置 VPC spoke。
- 创建 Cloud 高可用性 VPN。
- 在 NCC 中心配置混合 spoke。
- 为 Google API 端点创建 PSC。
- 通过高可用性 VPN 配置自定义路由。
- 配置 DNS 对等互连区域。
- 配置 Vertex Workbench 实例
- 配置 Gemini Python 代码以使用 Google APIs API 端点的 PSC。