
1. 簡介
Google API 適用的 Private Service Connect (PSC) 是 Google Cloud 網路功能,可讓使用者透過虛擬私有雲中的私人 IP 全球端點,設定私人存取權。如果使用者在透過 VPN 或 Interconnect 連線至 Google Cloud 的混合式環境中執行程式碼或用戶端應用程式,則可使用 PSC,透過該私人混合式連線解析 Google API。
Google API 的 PSC 可以解析許多不同的網域,完整清單請參閱這篇文章。大多數 Google API 使用的網域是 <API>.googleapis.com。除了這個網域,PSC 也提供 googleapis.com 的版本,即 <API>-<PSC-ENDPOINT-NAME>.**p.**googleapis.com。使用這個網域時,使用者可以設定應用程式來使用特定 PSC 端點。最常見的用途是讓使用者選擇哪些應用程式要使用 PSC 端點,透過混合式連線轉送 Google API 流量,同時允許其他應用程式繼續將流量轉送至公開 API 端點。
Gemini 屬於 Google Cloud 的 Vertex AI 產品套件,並列於可透過 Google API 的 PSC 解決的 Google API 清單中。
在本程式碼研究室中,您將建構模擬的混合式環境,在地端部署代管 Workbench 執行個體,並執行 Gemini Python 程式碼,透過高可用性 VPN 私下存取 Gemini API,連線至 Google API 的 PSC 端點。
課程內容
- 建立 NCC 中樞。
- 在 NCC 中樞中設定 VPC 輪輻。
- 建立 Cloud 高可用性 VPN。
- 在 NCC 中樞中設定混合式輪輻。
- 建立 Google API 的 PSC 端點。
- 透過高可用性 VPN 設定自訂路徑。
- 設定 DNS 對接區域。
- 設定 Vertex Workbench 執行個體
- 設定 Gemini Python 程式碼,將 PSC 用於 Google APIs API 端點。
軟硬體需求
- 具有「擁有者」或完整「編輯者」權限的 Google Cloud 專案。
2. 程式碼研究室拓撲
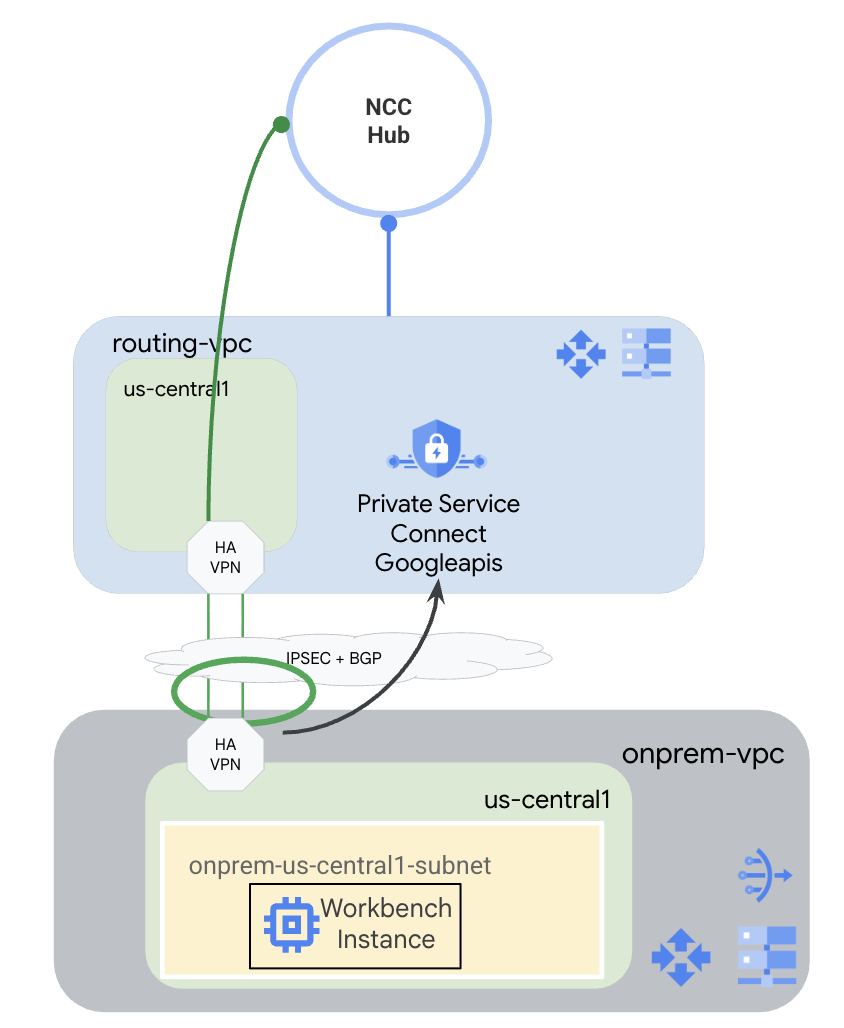
在本程式碼研究室中,您將使用 Google Cloud 模擬混合式環境。本程式碼研究室中的步驟專為 Google Cloud 設計,如果從實際的內部部署環境設定,步驟會有所不同。這些步驟會標示出來。
您將建立 NCC 中樞,並將 routing-vpc 設為 VPC 輪輻。在該 VPC 中,系統會將高可用性 VPN 設定為地端部署 VPC,模擬地端部署環境。高可用性 VPN 會在中樞 NCC 中設為混合式輪輻。在內部部署虛擬私有雲中,您將建立子網路,用於代管 Workbench 執行個體。您也會建立 Cloud NAT,用於在 Workbench 執行個體上下載套件。
最後,您將為地端 VPC 建立 DNS 對等互連區域,以便使用 PSC for Google API 自動建立的 p.googleapis.com 服務目錄私人區域。
3. 設定和需求
自修實驗室環境設定
- 登入 Google Cloud 控制台,然後建立新專案或重複使用現有專案。如果沒有 Gmail 或 Google Workspace 帳戶,請先建立帳戶。


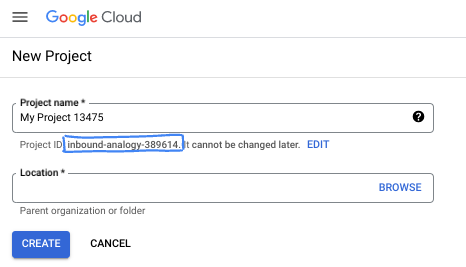
- 專案名稱是這個專案參與者的顯示名稱。這是 Google API 未使用的字元字串。你隨時可以更新。
- 專案 ID 在所有 Google Cloud 專案中都是不重複的,而且設定後即無法變更。Cloud 控制台會自動產生專屬字串,通常您不需要在意該字串為何。在大多數程式碼研究室中,您需要參照專案 ID (通常標示為
PROJECT_ID)。如果您不喜歡產生的 ID,可以產生另一個隨機 ID。你也可以嘗試使用自己的名稱,看看是否可用。完成這個步驟後就無法變更,且專案期間會維持不變。 - 請注意,有些 API 會使用第三個值,也就是「專案編號」。如要進一步瞭解這三種值,請參閱說明文件。
- 接著,您需要在 Cloud 控制台中啟用帳單,才能使用 Cloud 資源/API。完成這個程式碼研究室的費用不高,甚至可能完全免費。如要關閉資源,避免在本教學課程結束後繼續產生費用,請刪除您建立的資源或專案。Google Cloud 新使用者可參加價值$300 美元的免費試用計畫。
啟動 Cloud Shell
雖然可以透過筆電遠端操作 Google Cloud,但在本程式碼研究室中,您將使用 Google Cloud Shell,這是可在雲端執行的指令列環境。
在 Google Cloud 控制台中,點選右上工具列的 Cloud Shell 圖示:

佈建並連線至環境的作業需要一些時間才能完成。完成後,您應該會看到如下的內容:

這部虛擬機器搭載各種您需要的開發工具,並提供永久的 5GB 主目錄,而且可在 Google Cloud 運作,大幅提升網路效能並強化驗證功能。您可以在瀏覽器中完成本程式碼研究室的所有作業。您不需要安裝任何軟體。
4. 事前準備
啟用 API
在 Cloud Shell 中,確認專案設定正確,並設定環境變數。
透過 Cloud Shell
gcloud config list project
gcloud config set project <project-id>
export project=$(gcloud config get-value project)
export region=us-central1
export zone=$region-a
echo $project
echo $region
echo $zone
在專案中啟用所有必要的 Google API。
透過 Cloud Shell
gcloud services enable compute.googleapis.com
gcloud services enable networkconnectivity.googleapis.com
gcloud services enable dns.googleapis.com
gcloud services enable notebooks.googleapis.com
gcloud services enable servicedirectory.googleapis.com
gcloud services enable aiplatform.googleapis.com
5. 建立虛擬私有雲和子網路
建立網路
透過 Cloud Shell
gcloud compute networks create routing-vpc \
    --subnet-mode=custom
透過 Cloud Shell
gcloud compute networks create onprem-vpc \
    --subnet-mode=custom

gcloud compute networks subnets create onprem-$region-subnet \
    --network=onprem-vpc \
    --range=10.0.0.0/24 \
    --region=$region
    --enable-private-ip-google-access
建立 Cloud Router 和 Cloud NAT
建立 Cloud Router,與 routing-vpc 中的高可用性 VPN 搭配使用。
透過 Cloud Shell
gcloud compute routers create routing-$region-cr \
    --network=routing-vpc \
    --region=$region \
    --asn=64512
建立 Cloud Router,與 onprem-vpc 中的高可用性 VPN 搭配使用。
透過 Cloud Shell
gcloud compute routers create onprem-$region-cr \
    --network=onprem-vpc \
    --region=$region \
    --asn=64513
建立 Cloud Router,以便在 onprem-vpc 中與 Cloud NAT 搭配使用。
透過 Cloud Shell
gcloud compute routers create onprem-$region-cr-4nat \
    --network=onprem-vpc \
    --region=$region
onprem-vpc 中的 Cloud NAT 會用於將套件下載至 Vertex AI Workbench 執行個體,該執行個體會在後續步驟中設定。
透過 Cloud Shell
gcloud compute routers nats create onprem-$region-nat \
    --router=onprem-$region-cr-4nat \
    --region=$region \
    --nat-all-subnet-ip-ranges \
    --auto-allocate-nat-external-ips
6. 建立 Cloud 高可用性 VPN
建立 VPN 閘道。
透過 Cloud Shell
gcloud compute vpn-gateways create routing-gateway \
   --network=routing-vpc \
   --region=$region \
   --stack-type=IPV4_ONLY
透過 Cloud Shell
gcloud compute vpn-gateways create onprem-gateway \
   --network=onprem-vpc \
   --region=$region \
   --stack-type=IPV4_ONLY
建立源自於 routing-vpc 的 VPN 通道。
透過 Cloud Shell
gcloud compute vpn-tunnels create routing-to-onprem-tunnel0 \
    --peer-gcp-gateway=onprem-gateway \
    --region=$region \
    --ike-version=2 \
    --shared-secret=mysecret \
    --router=routing-$region-cr \
    --vpn-gateway=routing-gateway \
    --interface=0

gcloud compute vpn-tunnels create routing-to-onprem-tunnel1 \
    --peer-gcp-gateway=onprem-gateway \
    --region=$region \
    --ike-version=2 \
    --shared-secret=mysecret \
    --router=routing-$region-cr \
    --vpn-gateway=routing-gateway \
    --interface=1
建立源自 onprem-vpc 的 VPN 通道。
透過 Cloud Shell
gcloud compute vpn-tunnels create onprem-to-routing-tunnel0 \
    --peer-gcp-gateway=routing-gateway \
    --region=$region \
    --ike-version=2 \
    --shared-secret=mysecret \
    --router=onprem-$region-cr \
    --vpn-gateway=onprem-gateway \
    --interface=0

    gcloud compute vpn-tunnels create onprem-to-routing-tunnel1 \
    --peer-gcp-gateway=routing-gateway \
    --region=$region \
    --ike-version=2 \
    --shared-secret=mysecret \
    --router=onprem-$region-cr \
    --vpn-gateway=onprem-gateway \
    --interface=1
為源自 routing-vpc 的兩個通道設定 BGP 工作階段。
透過 Cloud Shell
gcloud compute routers add-interface routing-$region-cr \
    --interface-name=routing-interface0 \
    --ip-address=169.254.0.1 \
    --mask-length=30 \
    --vpn-tunnel=routing-to-onprem-tunnel0 \
    --region=$region

gcloud compute routers add-bgp-peer routing-$region-cr \
    --peer-name=routingtoonprem-bgp0 \
    --interface=routing-interface0 \
    --peer-ip-address=169.254.0.2 \
    --peer-asn=64513 \
    --region=$region

gcloud compute routers add-interface routing-$region-cr \
  --interface-name=routing-interface1 \
  --ip-address=169.254.1.1 \
  --mask-length=30 \
  --vpn-tunnel=routing-to-onprem-tunnel1 \
  --region=$region

gcloud compute routers add-bgp-peer routing-$region-cr \
    --peer-name=routingtoonprem-bgp1 \
    --interface=routing-interface1 \
    --peer-ip-address=169.254.1.2 \
    --peer-asn=64513 \
    --region=$region
為源自 onprem-vpc 的兩個通道設定 BGP 工作階段。
透過 Cloud Shell
gcloud compute routers add-interface onprem-$region-cr \
    --interface-name=onprem-interface0 \
    --ip-address=169.254.0.2 \
    --mask-length=30 \
    --vpn-tunnel=onprem-to-routing-tunnel0 \
    --region=$region

gcloud compute routers add-bgp-peer onprem-$region-cr \
    --peer-name=onpremtorouting-bgp0 \
    --interface=onprem-interface0 \
    --peer-ip-address=169.254.0.1 \
    --peer-asn=64512 \
    --region=$region

gcloud compute routers add-interface onprem-$region-cr \
  --interface-name=onprem-interface1 \
  --ip-address=169.254.1.2 \
  --mask-length=30 \
  --vpn-tunnel=onprem-to-routing-tunnel1 \
  --region=$region

gcloud compute routers add-bgp-peer onprem-$region-cr \
    --peer-name=onpremtorouting-bgp1 \
    --interface=onprem-interface1 \
    --peer-ip-address=169.254.1.1 \
    --peer-asn=64512 \
    --region=$region
前往控制台的「網路連線」>「VPN」頁面,確認高可用性 VPN 通道和 BGP 工作階段設定正確無誤。
7. 設定 NCC 中樞和輪輻
建立 NCC 中樞
透過 Cloud Shell
gcloud network-connectivity hubs create ncc-hub \
    --project="$project" \
    --preset-topology="mesh"
建立 NCC 輪輻
NCC gcloud 要求所有輪輻都必須以完整路徑名稱或 URI 設定。
透過 Cloud Shell
gcloud compute networks describe routing-vpc
請記下下列指令中 routing-vpc 的完整路徑 (URI)。
輸出範例
autoCreateSubnetworks: false
creationTimestamp: '2025-08-20T11:13:42.233-07:00'
id: 'xxx'
kind: compute#network
name: routing-vpc
networkFirewallPolicyEnforcementOrder: AFTER_CLASSIC_FIREWALL
routingConfig:
  bgpBestPathSelectionMode: LEGACY
  routingMode: REGIONAL
selfLink: https://www.googleapis.com/compute/v1/projects/$project/global/networks/routing-vpc
selfLinkWithId: https://www.googleapis.com/compute/v1/projects/$project/global/networks/355666541188722361
x_gcloud_bgp_routing_mode: REGIONAL
x_gcloud_subnet_mode: CUSTOM
設定路由 VPC 輪輻
透過 Cloud Shell
gcloud network-connectivity spokes linked-vpc-network create routing-vpc \
    --hub=ncc-hub \
    --vpc-network=projects/$project/global/networks/routing-vpc \
    --global
透過 Cloud Shell
gcloud compute vpn-tunnels describe routing-to-onprem-tunnel0 --region=$region
gcloud compute vpn-tunnels describe routing-to-onprem-tunnel1 --region=$region
請記下源自 routing-vpc 的 VPN 通道完整路徑 (URI)。
輸出範例
creationTimestamp: '2025-08-20T11:33:37.494-07:00'
description: ''
detailedStatus: Tunnel is up and running.
id: 'xxx'
ikeVersion: 2
kind: compute#vpnTunnel
labelFingerprint: xxx
localTrafficSelector:
- 0.0.0.0/0
name: routing-to-onprem-tunnel0
peerGcpGateway: https://www.googleapis.com/compute/v1/projects/$project/regions/us-central1/vpnGateways/onprem-gateway
peerIp: 34.153.54.166
region: https://www.googleapis.com/compute/v1/projects/$project/regions/us-central1
remoteTrafficSelector:
- 0.0.0.0/0
router: https://www.googleapis.com/compute/v1/projects/$project/regions/us-central1/routers/routing-us-central1-cr
selfLink: https://www.googleapis.com/compute/v1/projects/$project/regions/us-central1/vpnTunnels/routing-to-onprem-tunnel0
sharedSecret: '*************'
sharedSecretHash: xxx
status: ESTABLISHED
vpnGateway: https://www.googleapis.com/compute/v1/projects/$project/regions/us-central1/vpnGateways/routing-gateway

vpnGatewayInterface: 0
creationTimestamp: '2025-08-20T11:33:41.829-07:00'
description: ''
detailedStatus: Tunnel is up and running.
id: 'xxx'
ikeVersion: 2
kind: compute#vpnTunnel
labelFingerprint: xxx
localTrafficSelector:
- 0.0.0.0/0
name: routing-to-onprem-tunnel1
peerGcpGateway: https://www.googleapis.com/compute/v1/projects/$project/regions/us-central1/vpnGateways/onprem-gateway
peerIp: 34.153.246.117
region: https://www.googleapis.com/compute/v1/projects/$project/regions/us-central1
remoteTrafficSelector:
- 0.0.0.0/0
router: https://www.googleapis.com/compute/v1/projects/$project/regions/us-central1/routers/routing-us-central1-cr
selfLink: https://www.googleapis.com/compute/v1/projects/$project/regions/us-central1/vpnTunnels/routing-to-onprem-tunnel1
sharedSecret: '*************'
sharedSecretHash: xxx
status: ESTABLISHED
vpnGateway: https://www.googleapis.com/compute/v1/projects/$project/regions/us-central1/vpnGateways/routing-gateway
vpnGatewayInterface: 1
透過 Cloud Shell
gcloud network-connectivity spokes linked-vpn-tunnels create $region-vpn-spoke \
    --hub=ncc-hub \
  --vpn-tunnels=projects/$project/regions/$region/vpnTunnels/routing-to-onprem-tunnel0,projects/$project/regions/$region/vpnTunnels/routing-to-onprem-tunnel1 \
    --region=$region
請先確認所有子網域都已正確設定,再繼續操作。
透過 Cloud Shell
gcloud network-connectivity hubs list-spokes ncc-hub
輸出範例
NAME: routing-vpc
GROUP: default
PROJECT: $project
LOCATION: global
TYPE: VPC_NETWORK
STATE: ACTIVE
STATE REASON:
ETAG: 2

NAME: us-central1-vpn-spoke
GROUP: default
PROJECT: $project
LOCATION: us-central1
TYPE: VPN_TUNNEL
STATE: ACTIVE
STATE REASON:
ETAG:
8. 設定適用於 Google API 的 Private Service Connect
Google API 的 PSC 端點是從不屬於區域性 VPC 子網路的全域 IP 位址建立。全域 IP 位址必須專為 PRIVATE_SERVICE_CONNECT 保留。
透過 Cloud Shell
gcloud compute addresses create psc-ip \
  --global \
  --purpose=PRIVATE_SERVICE_CONNECT \
  --addresses=10.100.100.0 \
  --network=routing-vpc
透過 Cloud Shell
gcloud compute forwarding-rules create psc4googep \
  --global \
  --network=routing-vpc \
  --address=psc-ip \
  --target-google-apis-bundle=all-apis \
  --service-directory-registration=projects/$project/locations/$region
透過 Cloud Shell
gcloud compute routers update routing-$region-cr \
   --project=$project \
   --region=$region \
   --advertisement-mode custom \
   --set-advertisement-groups=ALL_SUBNETS \
   --set-advertisement-ranges=10.100.100.0/32
透過 Cloud Shell
gcloud dns managed-zones create peeringzone \
    --description="dns peer onprem to routing" \
    --dns-name=p.googleapis.com \
    --networks=onprem-vpc \
    --target-network=routing-vpc \
    --target-project=$project \
    --visibility=private
9. 設定 Vertex Workbench 執行個體
建立服務帳戶,做為 Workbench 執行個體的身分。
透過 Cloud Shell
gcloud iam service-accounts create workbench-sa \
    --display-name="workbench-sa"
記下服務帳戶的完整名稱,並授予 aiplatform.admin 權限,以便執行對 Vertex AI/Gemini 的呼叫。
透過 Cloud Shell
gcloud iam service-accounts list
輸出範例
DISPLAY NAME: Compute Engine default service account
EMAIL: xxx-compute@developer.gserviceaccount.com
DISABLED: False

DISPLAY NAME: workbench-sa
EMAIL: workbench-sa@$project.iam.gserviceaccount.com
DISABLED: False
請務必將 <your-project-id> 替換為實際的專案 ID。由於需要使用引號,我們無法在此使用 $project 變數。
透過 Cloud Shell
gcloud projects add-iam-policy-binding $project --member='serviceAccount:workbench-sa@<your-project-id>.iam.gserviceaccount.com' --role='roles/aiplatform.admin' --condition=None
透過 Cloud Shell
gcloud workbench instances create workbench-$region --vm-image-project=cloud-notebooks-managed --vm-image-family=workbench-instances --location=$region-a --network=projects/$project/global/networks/onprem-vpc --subnet=projects/$project/regions/$region/subnetworks/onprem-$region-subnet --subnet-region=$region --disable-public-ip --service-account-email=workbench-sa@$project.iam.gserviceaccount.com
Workbench 執行個體的佈建時間可能比 gcloud 指令的執行時間長。
10. 測試 Gemini Code
在 UI 中,按一下「Open JupyterLab」。

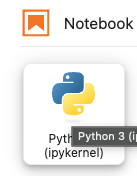
進入 JupyterLab 後,開啟新的 Python 3 筆記本。
在筆記本中執行下列程式碼。請務必更新程式碼,加入特定專案和區域資訊。
從 JupyterLab Notebook
pip install --upgrade google-genai
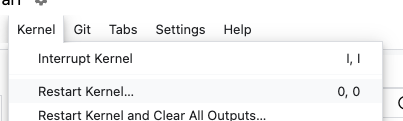
重新啟動筆記本核心。
記下 API 端點。這裡我們使用 API 端點 <YOUR_REGION>-aiplatform.googleapis.com。這是 Vertex AI 的標準 API 端點。
從 JupyterLab Notebook
PROJECT_ID="YOUR_PROJECT_ID" # Google Cloud Project ID
LOCATION_ID="YOUR_REGION" # Enter Vertex AI Gemini region such a s us-central1
API_ENDPOINT="https://<YOUR_REGION>-aiplatform.googleapis.com" # API Endpoint
MODEL_ID="gemini-2.0-flash" # Gemini Model ID

from google import genai
from google.genai.types import (
    GenerateContentConfig,
    HarmBlockThreshold,
    HarmCategory,
    Part,
    SafetySetting,
)
從 JupyterLab Notebook
from google import genai

client= genai.Client(vertexai=True, project=PROJECT_ID, location=LOCATION_ID, http_options={'base_url': API_ENDPOINT})

prompt = "what weighs more, 1kg of feathers or 1kg of stones"

safety_settings = [
    SafetySetting(
        category=HarmCategory.HARM_CATEGORY_DANGEROUS_CONTENT,
        threshold=HarmBlockThreshold.BLOCK_LOW_AND_ABOVE,
    ),
    SafetySetting(
        category=HarmCategory.HARM_CATEGORY_HARASSMENT,
        threshold=HarmBlockThreshold.BLOCK_LOW_AND_ABOVE,
    ),
    SafetySetting(
        category=HarmCategory.HARM_CATEGORY_HATE_SPEECH,
        threshold=HarmBlockThreshold.BLOCK_LOW_AND_ABOVE,
    ),
    SafetySetting(
        category=HarmCategory.HARM_CATEGORY_SEXUALLY_EXPLICIT,
        threshold=HarmBlockThreshold.BLOCK_LOW_AND_ABOVE,
    ),
]

response = client.models.generate_content(
    model=MODEL_ID,
    contents=prompt,
    config=GenerateContentConfig(
        safety_settings=safety_settings,
    ),
)

# Response will be `None` if it is blocked.
print(response.text)
回應範例
This is a classic trick question! They both weigh the same: 1 kilogram. The difference is in the volume they occupy and the density of the materials.
請記下執行程式碼時使用的 API 名稱。YOUR_REGION-aiplatform.googleapis.com 是 Vertex AI 的預設 API 名稱。我們需要變更 API 名稱,然後再次執行程式碼。我們可以在 Workbench 執行個體終端機中執行 TCPdump,確保程式碼使用 PSC 端點。
在終端機中執行 TCPdump
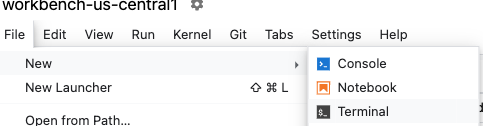
依序點選「File」>「New」>「Terminal」,在 Workbench 中開啟終端機。
如果無法在終端機中看到文字輸出內容,請更新終端機主題。依序前往「設定」>「終端機主題」>「淺色」或「深色」。
出發航廈
sudo tcpdump host 10.100.100.0
更新 Gemini Code
切換回筆記本,更新 API 端點,然後再次執行程式碼。請注意,我們已將 API 端點變更為 <YOUR_REGION>-aiplatform**-psc4googep.p**.googleapis.com。這符合 PSC 專屬的 API 格式 <service>-<endpointname>.p.googleapis.com。
從 JupyterLab Notebook
API_ENDPOINT="https://<YOUR_REGION>-aiplatform-psc4googep.p.googleapis.com" # API Endpoint
從 JupyterLab Notebook
from google import genai
from google.genai.types import (
    GenerateContentConfig,
    HarmBlockThreshold,
    HarmCategory,
    Part,
    SafetySetting,
)
從 JupyterLab Notebook
from google import genai

client= genai.Client(vertexai=True, project=PROJECT_ID, location=LOCATION_ID, http_options={'base_url': API_ENDPOINT})

prompt = "what weighs more, 1kg of feathers or 1kg of stones"

safety_settings = [
    SafetySetting(
        category=HarmCategory.HARM_CATEGORY_DANGEROUS_CONTENT,
        threshold=HarmBlockThreshold.BLOCK_LOW_AND_ABOVE,
    ),
    SafetySetting(
        category=HarmCategory.HARM_CATEGORY_HARASSMENT,
        threshold=HarmBlockThreshold.BLOCK_LOW_AND_ABOVE,
    ),
    SafetySetting(
        category=HarmCategory.HARM_CATEGORY_HATE_SPEECH,
        threshold=HarmBlockThreshold.BLOCK_LOW_AND_ABOVE,
    ),
    SafetySetting(
        category=HarmCategory.HARM_CATEGORY_SEXUALLY_EXPLICIT,
        threshold=HarmBlockThreshold.BLOCK_LOW_AND_ABOVE,
    ),
]

response = client.models.generate_content(
    model=MODEL_ID,
    contents=prompt,
    config=GenerateContentConfig(
        safety_settings=safety_settings,
    ),
)

# Response will be `None` if it is blocked.
print(response.text)
回應範例
They weigh the same. 1 kg is 1 kg, regardless of what it's made of.
檢查 TCPdump
切換回終端機,尋找對 PSC 端點 (10.100.100.0) 的呼叫。結束 TCPdump (Control+C)
輸出內容範例
listening on ens4, link-type EN10MB (Ethernet), snapshot length 262144 bytes
19:12:01.473886 IP workbench-us-central1.us-central1-a.c.xxx.internal.41886 > 10.100.100.0.https: Flags [S], seq 3367930834, win 65320, options [mss 1420,sackOK,TS val 2933602967 ecr 0,nop,wscale 7], length 0
19:12:01.476561 IP 10.100.100.0.https > workbench-us-central1.us-central1-a.c.xxx.internal.41886: Flags [S.], seq 1863301110, ack 3367930835, win 65535, options [mss 1366,sackOK,TS val 3004118895 ecr 2933602967,nop,wscale 8], length 0
19:12:01.476602 IP workbench-us-central1.us-central1-a.c.xxx.internal.41886 > 10.100.100.0.https: Flags [.], ack 1, win 511, options [nop,nop,TS val 2933602969 ecr 3004118895], length 0
19:12:01.477283 IP workbench-us-central1.us-central1-a.c.xxx.internal.41886 > 10.100.100.0.https: Flags [P.], seq 1:1573, ack 1, win 511, options [nop,nop,TS val 2933602970 ecr 3004118895], length 1572
19:12:01.478836 IP 10.100.100.0.https > workbench-us-central1.us-central1-a.c.xxx.internal.41886: Flags [.], ack 1573, win 1045, options [nop,nop,TS val 3004118898 ecr 2933602970], length 0
19:12:01.480181 IP 10.100.100.0.https > workbench-us-central1.us-central1-a.c.xxx.internal.41886: Flags [P.], seq 1:6041, ack 1573, win 1045, options [nop,nop,TS val 3004118899 ecr 2933602970], length 6040
19:12:01.480183 IP 10.100.100.0.https > workbench-us-central1.us-central1-a.c.xxx.internal.41886: Flags [P.], seq 6041:8378, ack 1573, win 1045, options [nop,nop,TS val 3004118899 ecr 2933602970], length 2337
19:12:01.480215 IP workbench-us-central1.us-central1-a.c.xxx.internal.41886 > 10.100.100.0.https: Flags [.], ack 6041, win 485, options [nop,nop,TS val 2933602973 ecr 3004118899], length 0
19:12:01.480225 IP workbench-us-central1.us-central1-a.c.xxx.internal.41886 > 10.100.100.0.https: Flags [.], ack 8378, win 473, options [nop,nop,TS val 2933602973 ecr 3004118899], length 0
19:12:01.482580 IP workbench-us-central1.us-central1-a.c.xxx.internal.41886 > 10.100.100.0.https: Flags [P.], seq 1573:1653, ack 8378, win 501, options [nop,nop,TS val 2933602975 ecr 3004118899], length 80
成功!
11. 清除步驟
關閉 JupyterLab 筆記本,然後返回 Cloud Shell。確認 Cloud Shell 未逾時。如果已設定,請重設變數。
透過 Cloud Shell
gcloud config list project
gcloud config set project <project-id>
export project=$(gcloud config get-value project)
export region=us-central1
export zone=$region-a
echo $project
echo $region
echo $zone
刪除所有資源。
透過 Cloud Shell
gcloud workbench instances delete workbench-$region --location=$zone -q

gcloud iam service-accounts delete workbench-sa@$project.iam.gserviceaccount.com -q

gcloud dns managed-zones delete peeringzone -q

gcloud compute forwarding-rules delete psc4googep --global -q

gcloud compute addresses delete psc-ip --global -q

gcloud network-connectivity spokes delete $region-vpn-spoke --region=$region -q

gcloud network-connectivity spokes delete routing-vpc --global -q

gcloud network-connectivity hubs delete ncc-hub -q

gcloud compute vpn-tunnels delete onprem-to-routing-tunnel1 --region=$region --project=$project -q

gcloud compute vpn-tunnels delete onprem-to-routing-tunnel0 --region=$region --project=$project -q

gcloud compute vpn-tunnels delete routing-to-onprem-tunnel1 --region=$region --project=$project -q

gcloud compute vpn-tunnels delete routing-to-onprem-tunnel0 --region=$region --project=$project -q

gcloud compute vpn-gateways delete onprem-gateway --region=$region --project=$project -q

gcloud compute vpn-gateways delete routing-gateway --region=$region --project=$project -q

gcloud compute routers nats delete onprem-$region-nat --router=onprem-$region-cr-4nat --region=$region -q

gcloud compute routers delete onprem-$region-cr-4nat --region=$region -q

gcloud compute routers delete onprem-$region-cr --region=$region -q

gcloud compute routers delete routing-$region-cr --region=$region -q

gcloud compute networks subnets delete onprem-$region-subnet --region=$region -q

gcloud compute networks delete onprem-vpc -q

gcloud compute networks delete routing-vpc -q
12. 恭喜!
恭喜您完成本程式碼研究室。
涵蓋內容
- 建立 NCC 中樞。
- 在 NCC 中樞中設定 VPC 輪輻。
- 建立 Cloud 高可用性 VPN。
- 在 NCC 中樞中設定混合式輪輻。
- 建立 Google API 的 PSC 端點。
- 透過高可用性 VPN 設定自訂路徑。
- 設定 DNS 對接區域。
- 設定 Vertex Workbench 執行個體
- 設定 Gemini Python 程式碼,將 PSC 用於 Google APIs API 端點。