
1. 概要
Actions on Google は、Google アシスタントのバーチャル パーソナル アシスタント機能を拡張してソフトウェアを作成できるデベロッパー プラットフォームです。スマート スピーカー、スマートフォン、自動車、テレビ、ヘッドフォンなど 10 億以上のデバイスに対応しています。ユーザーは Google アシスタントとの会話を通じて、食料品の購入や乗車の予約などを行うことができます。(使用可能な機能の一覧については、Actions ディレクトリをご覧ください)。デベロッパーは Actions on Google を使用して、ユーザーとサードパーティ サービスの間の快適で効果的な会話エクスペリエンスを簡単に作成、管理できます。
この Codelab の上級モジュールは、Google アシスタント用のアクションの作成経験がある方を対象としています。Actions on Google の開発経験がない場合は、入門 Codelab(レベル 1、レベル 2、レベル 3)に沿って、このプラットフォームに慣れておくことを強くおすすめします。これらの高度なモジュールでは、アクションの機能を拡張し、視聴者を増やすために役立つ一連の機能について説明します。
アクションの成功を測定する重要な方法の一つは、ユーザー エンゲージメント、つまり最初のインタラクション後にユーザーを呼び戻すうえでアクションがどの程度効果的かです。これを簡単にするために、ユーザーが会話に戻れるようにする機能をいくつかアクションに実装できます。
この Codelab では、Actions on Google のユーザー エンゲージメント機能とベスト プラクティスについて説明します。

作成するアプリの概要
すでに構築済みの機能を強化するために、その機能を有効にして以下を行います。
- タップでアクションに話しかけられるよう、最新情報をユーザーに毎日送信します
- アクションにリンクするプッシュ通知をユーザーに送信する
- モバイル ウェブブラウザからアクションにユーザーを誘導するリンクを作成します
学習内容
- ユーザー エンゲージメントとは何か、またユーザー エンゲージメントがアクションの成功にとって重要な理由
- アクションを変更してユーザー エンゲージメントを高める方法
- さまざまな種類のアクションで使用するユーザー エンゲージメント機能
- Actions API を使用してアシスタントから通知を送信する方法
必要なもの
以下の工具が必要です。
- 任意の IDE またはテキスト エディタ(WebStorm、Atom、Sublime など)
- Node.js、npm、git がインストールされたシェルコマンドを実行するためのターミナル
- ウェブブラウザ(Google Chrome など)
- Firebase コマンドライン インターフェースを使用したローカル開発環境
- アシスタントを搭載したモバイル デバイス(Android または iOS)(このプロジェクトの作成に使用する Google アカウントでアシスタントにログインする必要があります)
Webhook のコードを理解するには、必須ではありませんが、JavaScript(ES6)の知識があることも強く推奨されます。
2. プロジェクトをセットアップする
このセクションでは、作成済みの完全なアクションにユーザー エンゲージメント機能を追加する方法について説明します。
サンプルを理解する
この Codelab のサンプルは、「Action Gym」という架空のジム向けのシンプルなアクションです。アクションは、毎日ローテーションされるクラスのリストなど、ジムに関する情報を提供します。このような情報量の多いアクションは、あらゆるユーザー エンゲージメント機能に適しています。クラスリストはローテーションで、毎日異なる有益な情報が提供されるためです。
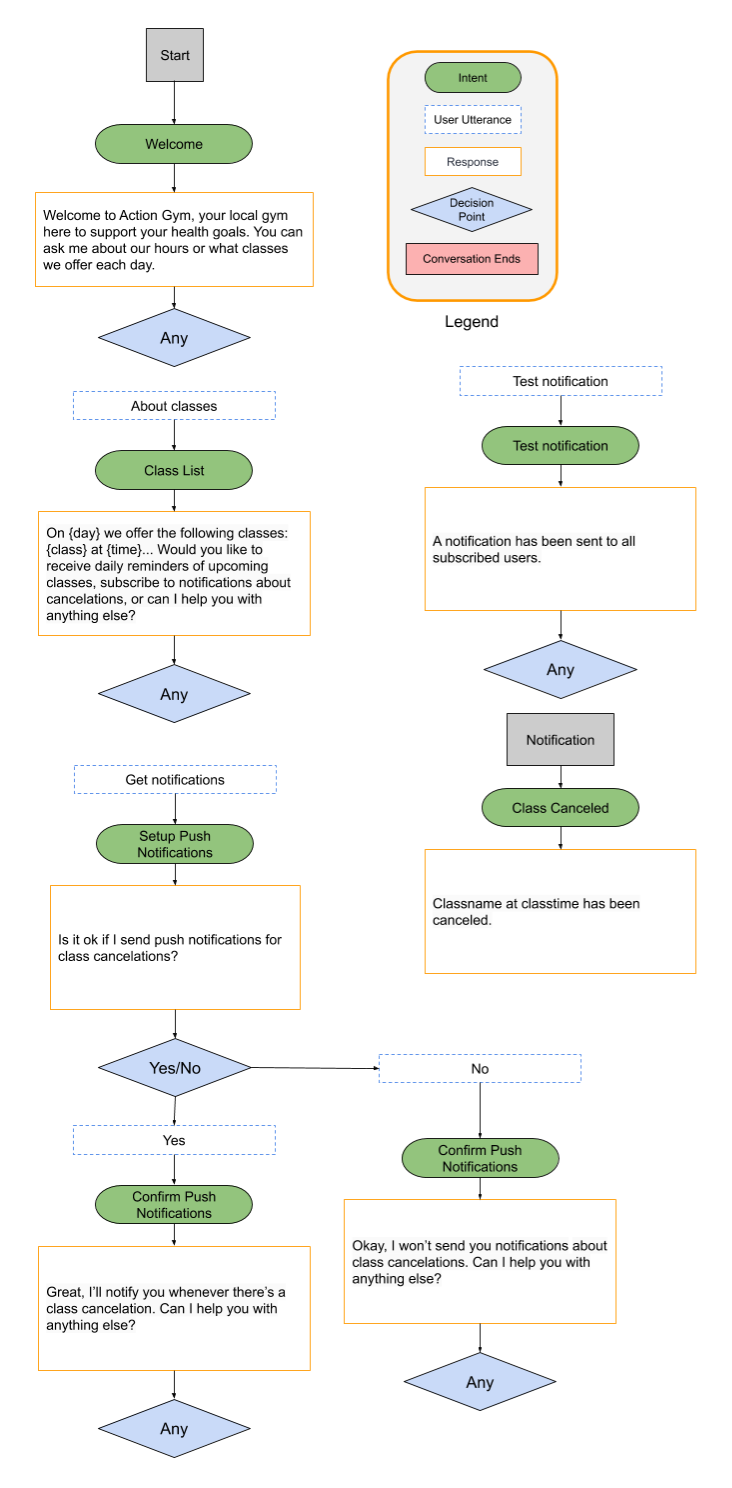
次の図は、Action Gym のサンプルの会話フローを示しています。
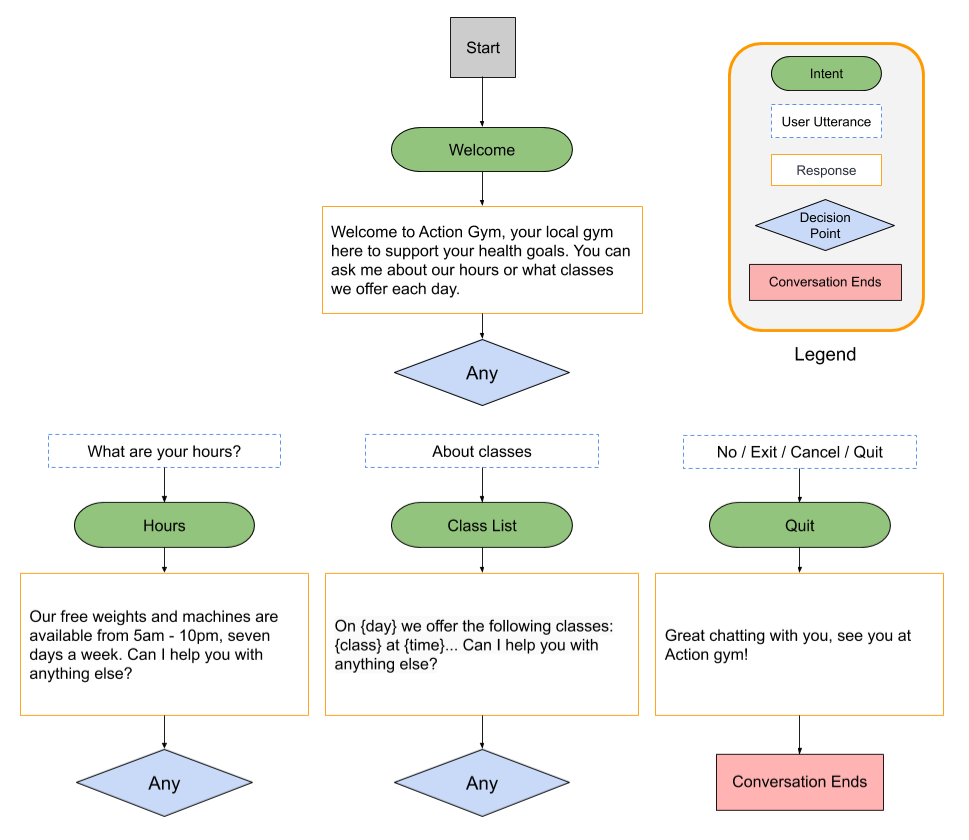
追加するエンゲージメント機能に合わせて、ダイアログに軽微な変更を加えます。ただし、会話の全体的なデザインはそれほど変わりません。
ベースファイルをダウンロードする
次のコマンドを実行して、この Codelab 用の GitHub リポジトリのクローンを作成します。
git clone https://github.com/actions-on-google/user-engagement-codelab-nodejs
プロジェクトとエージェントを設定する
Actions プロジェクトと Dialogflow エージェントを設定する手順は次のとおりです。
- Actions Console を開きます。
- [New project](新しいプロジェクト)をクリックします。
- [プロジェクト名] に名前を入力します(例:
engagement-codelab)。 - [プロジェクトの作成] をクリックします。
- カテゴリを選択するのではなく、[その他のオプション] セクションまで下にスクロールし、[会話] カードをクリックします。
- [Build your Action] をクリックしてオプションを展開し、[Add Action(s)] を選択します。
- [Add Your First Action] をクリックします。
- [Create Action] ダイアログで [Custom Intent] を選択し、[Build] をクリックして Dialogflow コンソールを起動します。
- Dialogflow コンソールのエージェント作成ページで、[Create] をクリックします。
- 左側のナビゲーションで
 (歯車アイコン)をクリックします。
 - [Export and Import]、[Restore From Zip] の順にクリックします。
- 先ほどダウンロードした
/user-engagement-codelab-nodejs/start/ディレクトリからagent.zipファイルをアップロードします。 - 「
RESTORE」と入力して [復元] をクリックします。 - [完了] をクリックします。
フルフィルメントをデプロイする
Actions プロジェクトと Dialogflow エージェントの準備ができたら、Firebase Functions CLI を使用してローカルの index.js ファイルをデプロイします。
ベースファイルのクローンの /user-engagement-codelab-nodejs/start/functions/ ディレクトリから、次のコマンドを実行します。
firebase use <PROJECT_ID>
npm install
firebase deploy
数分後、「Deploy complete!」(デプロイが完了しました)と表示されます。これは、Webhook が Firebase に正常にデプロイされたことを示します。
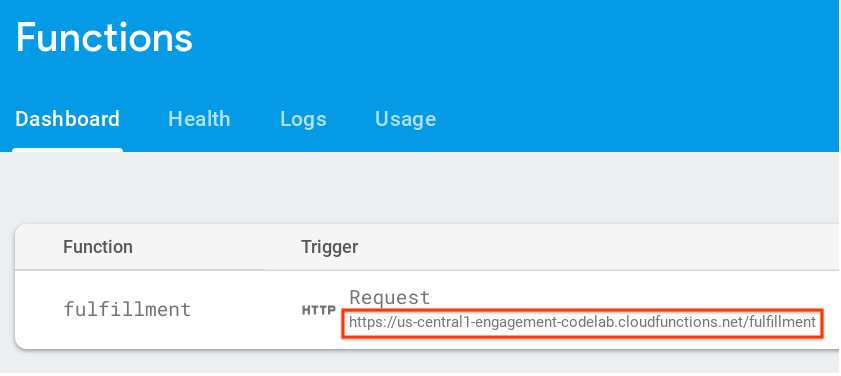
デプロイ URL を取得する
Dialogflow に Cloud Functions の関数の URL を指定する必要があります。この URL を取得する手順は次のとおりです。
- Firebase コンソールを開きます。
- 該当する Actions プロジェクトを一覧から選択します。
- [Develop] > [Develop] >[Functions] をクリックします。[データ共有設定を選択する] というメッセージが表示されたら、[後で行う] をクリックしてこのオプションを無視できます。
- [ダッシュボード] タブに [fulfillment] のエントリが表示されます。URL を [トリガー] の下に挿入します。この URL を保存します。次のセクションで Dialogflow にコピーする必要があります。
Dialogflow で Webhook URL を設定する
次に、フルフィルメントに Webhook を使用するように Dialogflow エージェントを更新する必要があります。そのための手順は以下のとおりです。
- Dialogflow コンソールを開きます(必要に応じて Firebase コンソールを閉じることもできます)。
- 左側のナビゲーションで [Fulfillment] をクリックします。
- [Webhook] を有効にします。
- Firebase ダッシュボードからコピーした URL がまだ表示されない場合は、URL を貼り付けます。
- [保存] をクリックします。
プロジェクトが正しく設定されていることを確認する
営業時間を含むハードコードされたテキスト レスポンスや、曜日ごとのクラス スケジュールをリストしたテキスト レスポンスなど、アクション ジムに関する情報を取得するアクションをユーザーが呼び出せるようにする必要があります。
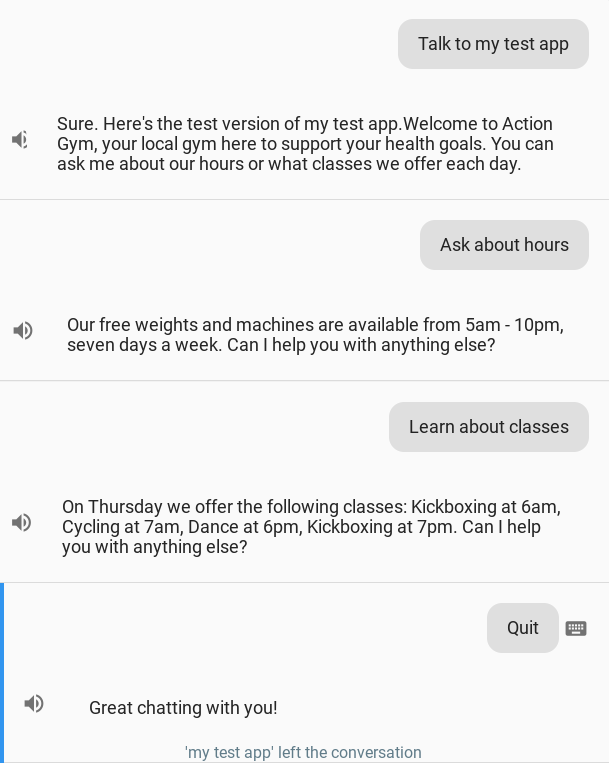
Actions シミュレータでアクションをテストする手順は次のとおりです。
- Dialogflow コンソールの左側のナビゲーションで、[Integrations] をクリックします。Google アシスタント。
- [Auto-preview changes] が有効になっていることを確認し、[Test] をクリックして Actions プロジェクトを更新します。
- Actions シミュレータに Actions プロジェクトが読み込まれます。アクションをテストするには、入力フィールドに「
Talk to my test app」と入力して Enter キーを押します。 - Action Gym を歓迎するレスポンスが表示されます。メッセージに沿って会話を続けながら、入力ごとにフルフィルメントがレスポンスを返すことを確認してください。
3. 毎日の更新のサブスクリプションを追加
ユーザーを引き付ける一般的な方法は、最も役立つタイミングでユーザーに情報を提供することです。これを実現するため、インテントの「日次更新」を購読するオプションをユーザーに提供します。これにより、そのインテントのフルフィルメントに直接リンクするアシスタント通知が送信されます。
このステップでは、日次更新サブスクリプションを学習し、アクションの Class List インテントに追加します。この手順を行うと、アクションの会話は次の図のようになります。

ユーザーを引きつける方法
スマートフォン ユーザーは、アプリ固有の情報やアップデートを提供するプッシュ通知をご存じかもしれません。日次更新購読は、最新情報を送信するインテントが毎日ユーザーに価値を提供し続ける限り、アシスタント以外のモバイル デバイスのユーザーに簡単にアクセスできる方法です。
毎日の通知は有用なエンゲージメント ツールですが、必ずしもすべてのアクションに組み込むべきではありません。毎日の通知のサブスクリプションをアクションに追加するかどうかを決定する際は、以下の点を考慮してください。
- 毎日の通知によって、ユーザーに毎日異なる有用な情報が表示されるようにします。「毎日の更新」をタップしても毎回同じメッセージが表示された場合、ユーザーは数日後に配信を停止してしまうでしょう。
- ユーザーが毎日更新のインテントに直接移動する場合は、ダイアログがユーザーにとって理にかなっていることを確認してください。ユーザーは必ずしも会話の最初から始めるわけではないため、多くのコンテキストを持っていることを期待すべきではありません。
- 最新情報の配信への登録を促す前に、アクションのメリットをユーザーに示してください。ユーザーは「このコンテンツが毎日見たい」と思わせることでしょう。購読のオプションが表示されたときです
- 定期購入のおすすめを繰り返し提示して、ユーザーの負担にならないようにします。毎日の購読を示した直後に、毎日更新される購読を提示し、他の場所でユーザーを煩わせることは避けます。
- 更新インテントがトリガーされた後の会話は短くします。日次更新のほとんどは、レスポンスが 1 つだけで、ユーザーによる入力を必要とせずに終了します。
毎日の通知をオンにする
ユーザーを会話の冒頭に誘導するウェルカム インテントに、毎日の最新情報のサブスクリプションを追加できます。また、会話のどこかにユーザーをディープリンクするために、より具体的なインテントを追加できます。この Codelab では、ダイアログが毎日変わるため、クラスリスト インテントが最も理にかなっています。ユーザーは、どのクラスが利用可能かを思い出すと便利です。
クラスリスト インテントの日次更新を有効にする手順は次のとおりです。
- Actions Console で [Develop] タブをクリックし、左側のナビゲーション バーで [Actions] を選択します。
- [操作] リストで [クラスリスト] をクリックします。
- [ユーザー エンゲージメント] セクションで、[毎日の更新情報をユーザーに提供しますか?] オプションを切り替えます。
- [Content title] に、その日のアップデートの内容を表すわかりやすいタイトルを設定します。コンテキストは「毎日の <コンテンツ タイトル> を何時に送りたいですか」という内容です。タイトルはわかりやすいものにし、読み上げたときに正しく聞こえるようにします。この例では、[Content title] を
list of upcoming Action Gym classesに設定します。 - ページの上部にある [保存] をクリックします。

Dialogflow を設定する
日次更新サブスクリプション フローのインテントを作成するには、Dialogflow コンソールで次の手順を行います。
ユーザーに定期購入を求める
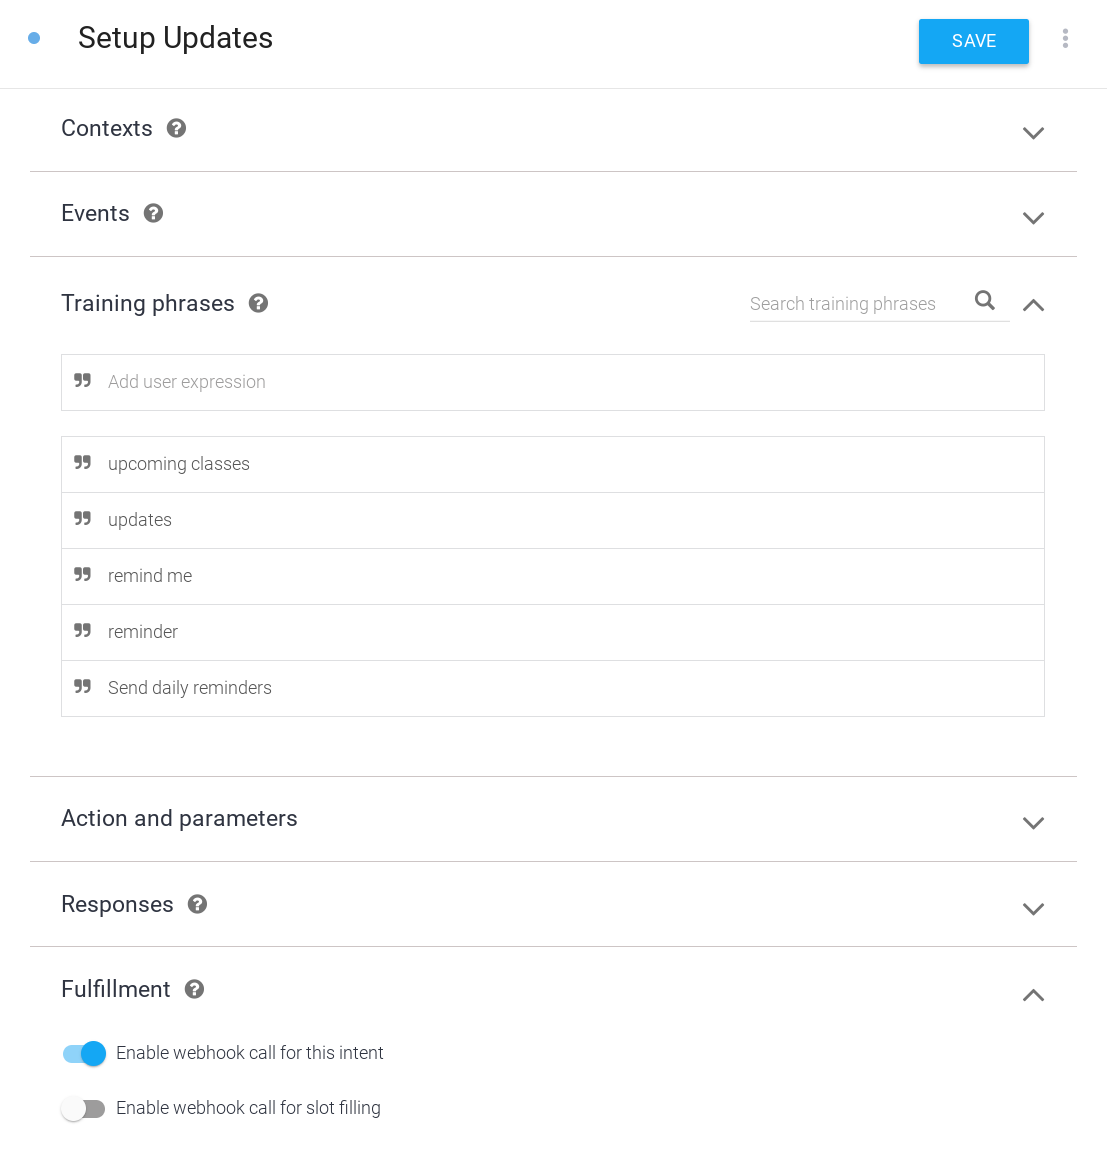
- 毎日の通知の受信を希望するユーザーに対処するための新しいインテントをセットアップします。Dialogflow コンソールで、左側のナビゲーションの [Intents] の横にある [+] ボタンをクリックして新しいインテントを作成します。
- この新しいインテントに「
Setup Updates」という名前を付けます。 - [トレーニング フレーズ] セクションに、次のユーザー表現を追加します。
Send daily remindersReminderRemind meUpdatesUpcoming classes
- [Fulfillment] セクションで、[Enable webhook call for this intent] オプションをオンにします。
- ページの上部にある [保存] をクリックします。
ユーザーの判断に対応する
- 毎日更新される購読のプロンプトに対するユーザーの応答を処理する新しいインテントをセットアップします。左側のナビゲーションの [Intents] の横にある [+] ボタンをクリックして、新しいインテントを作成します。
- この新しいインテントに「
Confirm Updates」という名前を付けます。 - [Events] セクションに
actions_intent_REGISTER_UPDATEを追加します。この Dialogflow イベントは、ユーザーが定期購読に至ったかどうかにかかわらず、日次更新購読フローを完了するとトリガーされます。 - [Fulfillment] セクションで、[Enable webhook call for this intent] オプションをオンにします。
- ページの上部にある [保存] をクリックします。

フルフィルメントを実装する
Webhook にフルフィルメントを実装する手順は次のとおりです。
依存関係を読み込む

index.js ファイルの require() 関数を更新して、actions-on-google パッケージから RegisterUpdate パッケージを追加します。インポートは次のようになります。
index.js
const {
  dialogflow,
  Suggestions,
  RegisterUpdate,
} = require('actions-on-google');
候補ワードを更新する
index.js ファイルで、候補ワードのタイトルのリストに DAILY エントリを追加します。Suggestion 定義は次のようになります。
index.js
// Suggestion chip titles
const Suggestion = {
  HOURS: 'Ask about hours',
  CLASSES: 'Learn about classes',
  DAILY: 'Send daily reminders',
};
新しいインテントのフルフィルメントを追加する
ユーザーが登録を希望すると言ったら、更新のターゲット インテント(Class List)とタイプ(DAILY)を指定して RegisterUpdate ヘルパーを呼び出し、日次更新の購読フローを開始します。定期購入フローが終了すると、アシスタントは定期購入が成功したかどうかを示す status 引数を指定して actions_intent_REGISTER_UPDATE イベントをトリガーします。定期購入のステータスに応じて変わるフォローアップ プロンプトをユーザーに提示します。
index.js ファイルに次のコードを追加します。
index.js
// Start opt-in flow for daily updates
app.intent('Setup Updates', (conv) => {
  conv.ask(new RegisterUpdate({
    intent: 'Class List',
    frequency: 'DAILY',
  }));
});

// Confirm outcome of opt-in for daily updates
app.intent('Confirm Updates', (conv, params, registered) => {
  if (registered && registered.status === 'OK') {
     conv.ask(`Gotcha, I'll send you an update everyday with the ` +
     'list of classes. Can I help you with anything else?');
  } else {
    conv.ask(` I won't send you daily reminders. Can I help you with anything else?`);
  }
  if (conv.screen) {
    conv.ask(new Suggestions([Suggestion.HOURS, Suggestion.CLASSES]));
  }
});
ユーザーに代替メッセージを提示する
[クラスリスト] の回答では、最後に日次更新のサブスクリプションが提示されますが、問題が発生します。ユーザーが毎日更新の通知をタップすると、同じ応答がトリガーされるため、たとえその通知を受け取ったばかりであっても、毎日の更新情報を受け取るよう求められます。ユーザーが再登録が必要だと考えないようにするには、どうすればよいでしょうか。
幸いなことに、conv オブジェクトの引数にはユーザーが会話を開始した場所に関する情報が含まれています。conv 引数を調べて、ユーザーが毎日の更新通知から会話を開始したことを示す UPDATES セクションが含まれているかどうかを確認し、それに応じてレスポンスを変更します。この会話ブランチを使用して、クラスのリストを提供した直後にダイアログを閉じることもできます。これは、毎日の更新を短くするというベスト プラクティスに即しています。
index.js ファイルで、次のコードを置き換えます。
index.js
// Class list intent handler
app.intent('Class List', (conv, {day}) => {
  if (!day) {
    day = DAYS[new Date().getDay()];
  }
  const classes =
  [...new Set(schedule.days[day].map((d) => `${d.name} at ${d.startTime}`))]
  .join(', ');
  const classesMessage =
  `On ${day} we offer the following classes: ${classes}. ` +
  `Can I help you with anything else?`;
  conv.ask(classesMessage);
  if (conv.screen) {
    conv.ask(new Suggestions([Suggestion.HOURS]));
  }
});
これを次のように変更します。
index.js
// Class list intent handler
app.intent('Class List', (conv, {day}) => {
  if (!day) {
    day = DAYS[new Date().getDay()];
  }
  const classes =
  [...new Set(schedule.days[day].map((d) => `${d.name} at ${d.startTime}`))]
  .join(', ');
  let classesMessage = `On ${day} we offer the following classes: ${classes}. `;
  // If the user started the conversation from the context of a daily update,
  // the conv's arguments will contain an 'UPDATES' section.
  let engagement = conv.arguments.get('UPDATES');
  // Check the conv arguments to tailor the conversation based on the context.
  if (engagement) {
    classesMessage += `Hope to see you soon at Action Gym!`;
    conv.close(classesMessage);
  } else {
    classesMessage += `Would you like me to send you daily reminders of upcoming classes, or can I help you with anything else?`;
    conv.ask(classesMessage);
    if (conv.screen) {
      conv.ask(new Suggestions([Suggestion.DAILY, Suggestion.HOURS]));
    };
  };
});
毎日のアップデートをテストする
ターミナルで次のコマンドを実行して、更新した Webhook コードを Firebase にデプロイします。
firebase deploy
Actions シミュレータでカスタム再プロンプトをテストする手順は次のとおりです。
- Actions Console で [Test](テスト)に移動します。
- [入力] フィールドに「
Talk to my test app」と入力して Enter キーを押します。 - 「
Learn about classes」と入力して Enter キーを押します。アクションのレスポンスで、リマインダーを毎日送信できるようになります。 - 「
Send daily reminders」と入力して Enter キーを押します。 - 更新を確認する時刻を入力し、Enter キーを押します。念のため、現在の時刻から 3 ~ 5 分遅れて返信してみてください。
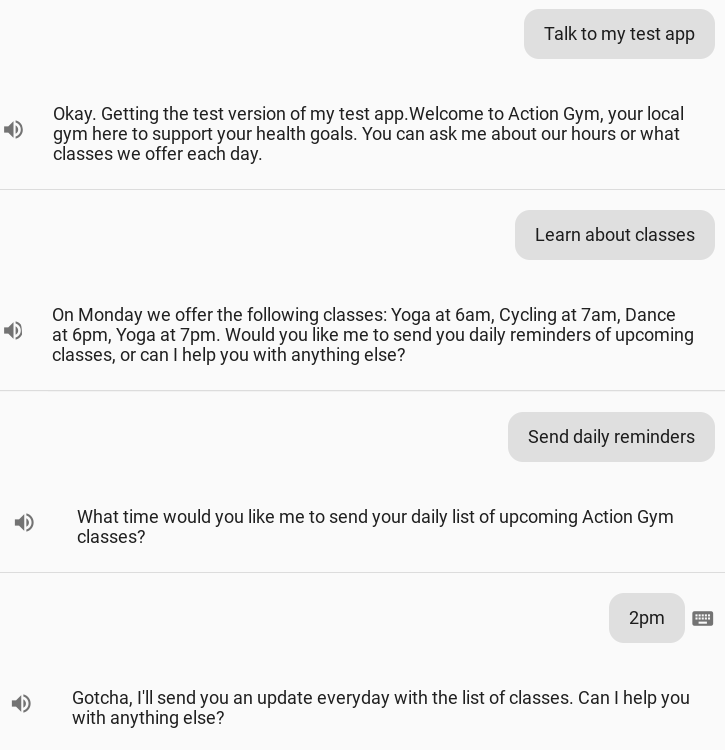
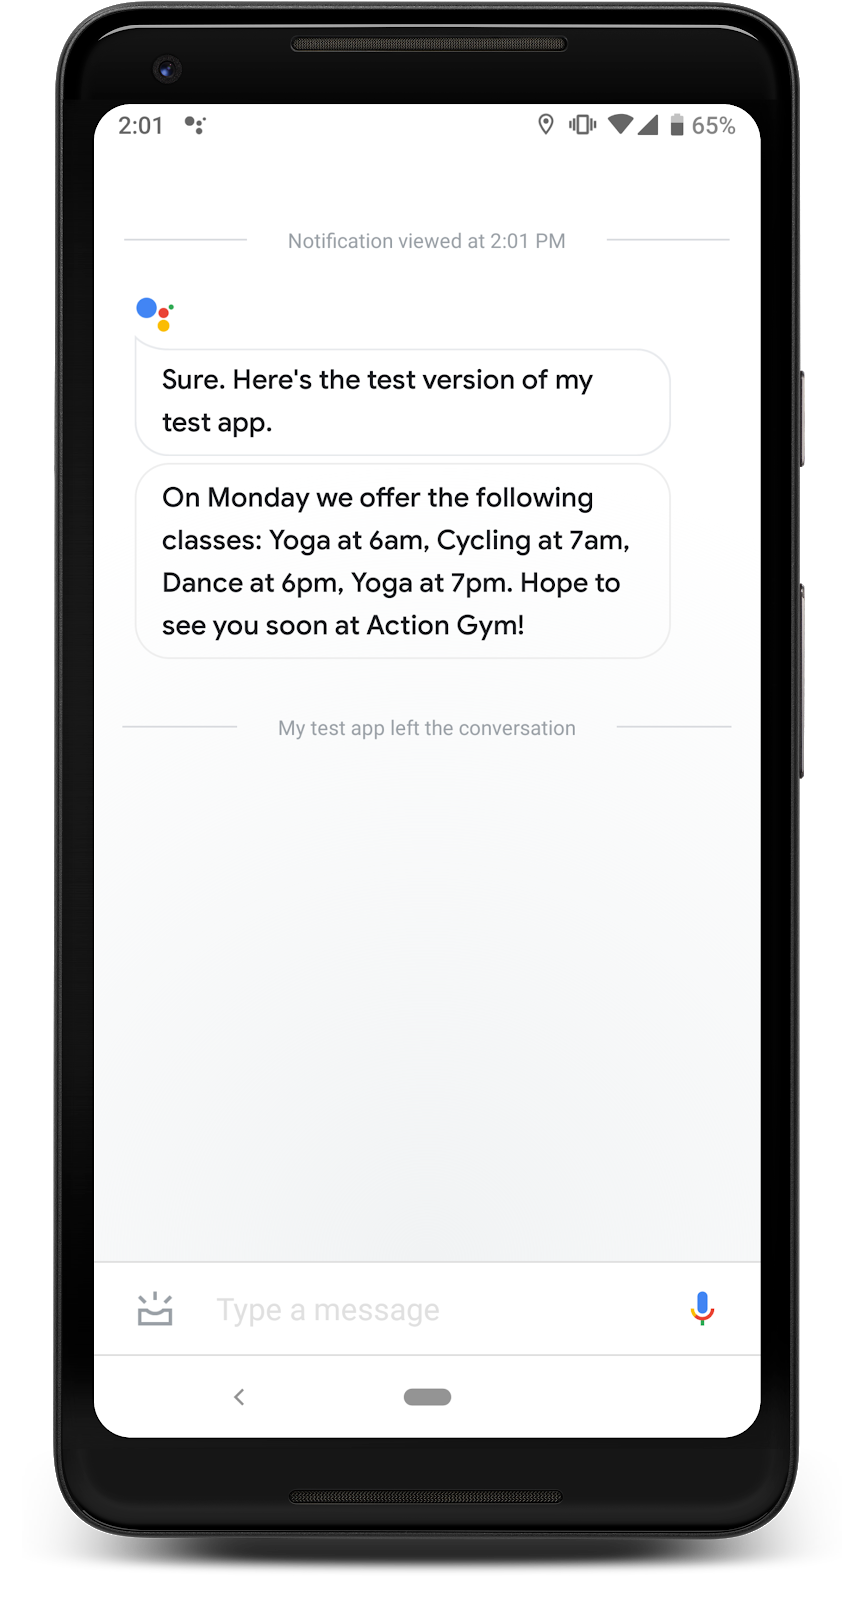
モバイル デバイスに、更新を指定した時刻の前後にアシスタントから通知が届きます。この通知が表示されるまでに数分かかることがあります。通知をタップすると、アシスタントのクラスリスト インテントにディープリンクが直接リンクされ、今後のクラスのリストが表示されます。
4. プッシュ通知を追加する
アクションの外部でユーザーを引き付ける別の方法として、Actions API を呼び出してユーザーにプッシュ通知を送信することもできます。毎日の通知とは異なり、こうした通知はアシスタントで自動的にスケジュール設定されないので、自由に送信できます。
このステップでは、新しい Class Canceled インテントを追加し、クラスのキャンセルを通知する通知をユーザーに送信して、アクションにプッシュ通知を実装する方法を学びます。また、通知の送信に必要な次の 3 つのコンポーネントも設定します。
- Actions API アカウント - API に
POSTリクエストを送信してユーザーに通知を送信します。そのため、この API とやり取りするためのサービス アカウントと認証情報を設定する必要があります。 - 権限ヘルパー - プッシュ通知の送信に必要なユーザー ID にアクセスするための権限が必要です。この例では、クライアント ライブラリ関数を使用して権限ヘルパーを呼び出し、この ID をリクエストします。
- ストレージ - 会話以外でプッシュ通知をユーザーに送信するには、ユーザー ID を任意に思い出せる場所に保存する必要があります。この例では、Firestore データベースを設定して、各ユーザーの情報を保存します。
この手順の後、次のダイアログをアクションの会話に追加します。
ユーザーを引きつける方法
スマートフォン ユーザーは、アプリ固有の情報やアップデートを提供するプッシュ通知をご存じかもしれません。プッシュ通知を有効にする正当な理由が与えられている場合、アシスタント以外のモバイル デバイスでユーザーに柔軟にアクセスできます。毎日アップデートされるので、ユーザーは毎日通知が届くことをすでに認識しています。ところが、プッシュ通知では、通知の頻度が低いだけなのか、1 日に何度か通知が来ることに煩わされることになります。
プッシュ通知は有用なエンゲージメント ツールになり得ますが、必ずしもすべてのアクションに取り入れるべきではありません。アクションにプッシュ通知を追加するかどうかを決定する際は、次のヒントを参考にしてください。
- プッシュ通知のスケジュールの例をいくつか計画します。プッシュ通知を 1 日に 1 回のみ送信する予定の場合は、代わりに毎日の更新を使用することを検討してください。
- プッシュ通知を受信するたびに、有益な情報が提供されるようにしてください。通知はアクションのインテントのいずれかにディープリンクできるので、そのインテントが有用で関連性があることを確認してください。
- ユーザーにプッシュ通知の登録を依頼する場合は、明示的に指定します。各プッシュ通知で何が行われるかを理解し、通知が送信される頻度を把握する必要があります。
Actions API を有効にする
- Google Cloud コンソールを開き、プルダウンから Actions プロジェクト名を選択します。

- ナビゲーション メニュー (☰) から、[API &サービス >ライブラリ。
- Actions API を検索し、[有効にする] をクリックします。

サービス アカウントを作成する
Actions API では認証が必要なため、リクエストを送信するためのサービス アカウントを作成する必要があります。Actions API のサービス アカウント キーを作成してインストールする手順は次のとおりです。
- Google Cloud コンソールのナビゲーション メニュー(☰)で、[API と API をサービス >認証情報。
- [認証情報を作成 >サービス アカウント キー。
- [サービス アカウント] プルダウン メニューで、[新しいサービス アカウント] を選択します。
- 次の情報を入力します。
- サービス アカウント名:
service-account - ロール: プロジェクト >オーナー
- サービス アカウント ID:
service-account(常に @<project_id>.iam.gserviceaccount.com が続く) - キータイプ: JSON
- [作成] をクリックします。
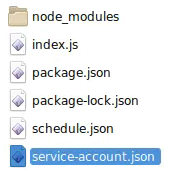
- ダウンロードした JSON ファイルをプロジェクトの /user-engagement-codelab/start/functions/ ディレクトリに移動します。
- JSON ファイルの名前を
service-account.jsonに変更します。
Firestore を有効にする
会話の外で通知を送信するには、通知コードから参照できるユーザー ID を保存する方法が必要です。この例では、Firestore データベースを使用して、登録済みユーザーのユーザー ID を保存します。
アクション用の Firestore データベースを作成する手順は次のとおりです。
- Firebase コンソールで、Actions プロジェクト名を選択します。
- 左側のナビゲーションで、[開発] >Database に移動し、[データベースを作成] をクリックします。
- [テストモードで開始] を選択します。
- [有効にする] をクリックします。

Dialogflow を設定する
Dialogflow コンソールで次の手順に沿って、プッシュ通知のオプトイン フローを作成します。
ユーザーに定期購入を求める
- キャンセルされたクラスのプッシュ通知の購読を希望するユーザーを処理する新しいインテントをセットアップします。Dialogflow コンソールで、左側のナビゲーションの [Intents] の横にある [+] ボタンをクリックして新しいインテントを作成します。
- この新しいインテントに「
Setup Push Notifications」という名前を付けます。 - [トレーニング フレーズ] セクションに、次のユーザー表現を追加します。
Subscribe to notificationsSend notificationNotify meSend class notificationsCancelled notifications
- [Fulfillment] セクションで、[Enable webhook call for this intent] オプションをオンにします。
- ページの上部にある [保存] をクリックします。

ユーザーの判断に対応する
- プッシュ通知の登録プロンプトに対するユーザーのレスポンスを処理する新しいインテントをセットアップします。左側のナビゲーションの [Intents] の横にある [+] ボタンをクリックして、新しいインテントを作成します。
- この新しいインテントに「
Confirm Push Notifications」という名前を付けます。 - [Events] セクションに
actions_intent_PERMISSIONを追加します。この Dialogflow イベントは、ユーザーが最終的にサブスクリプションに登録したかどうかにかかわらず、ユーザーがプッシュ通知のサブスクリプション フローを完了したときにトリガーされます。 - [Fulfillment] セクションで、[Enable webhook call for this intent] オプションをオンにします。
- ページの上部にある [保存] をクリックします。

プッシュ通知を処理する
プッシュ通知を特定のインテントにリンクすることで、プッシュ通知をタップしたユーザーは、アクションのそのインテントに直接ディープリンクされます。この例では、キャンセルされたクラスの詳細を提供するプッシュ通知用の新しいインテントを追加します。
ユーザーがプッシュ通知をタップすることでトリガーされるインテントを追加する手順は次のとおりです。
- Dialogflow コンソールで、左側のナビゲーションの [Intents] の横にある [+] ボタンをクリックして新しいインテントを作成します。
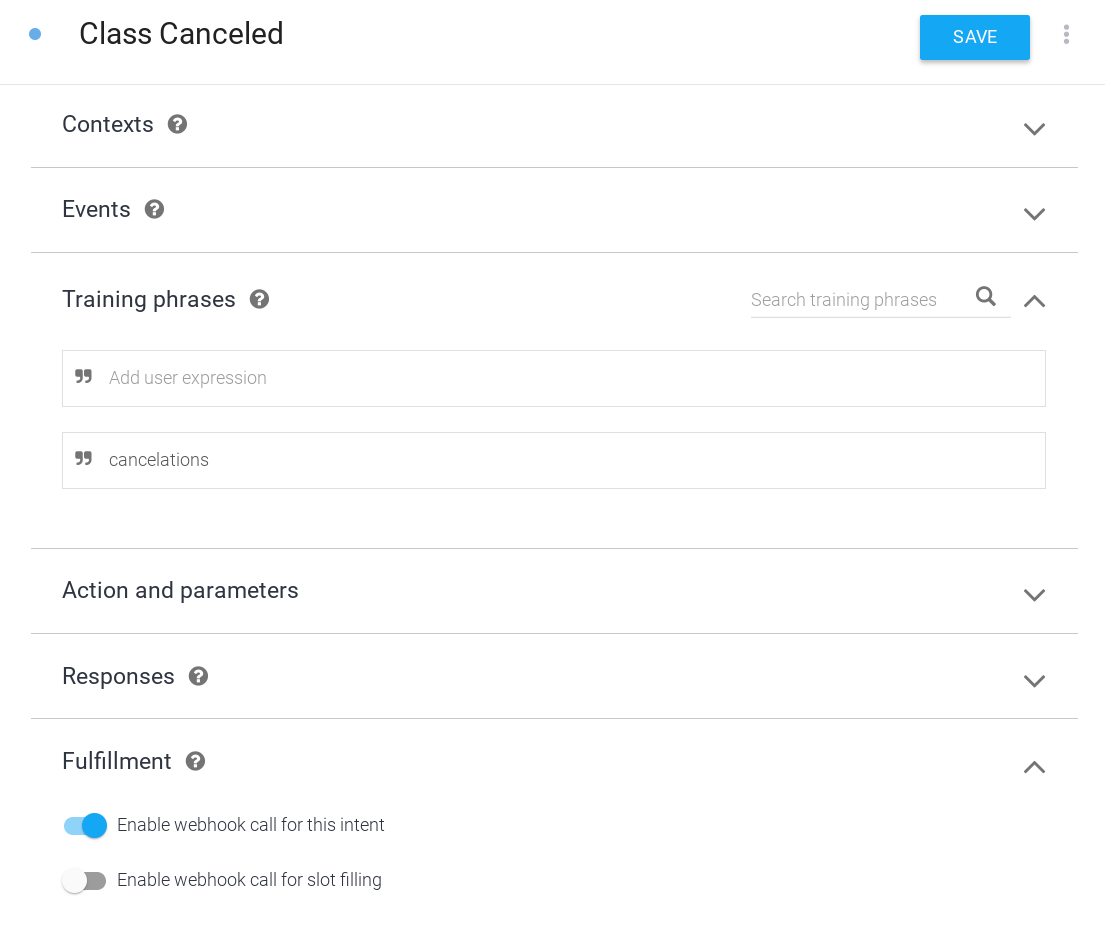
- この新しいインテントに「
Class Canceled」という名前を付けます。 - [トレーニング フレーズ] セクションで、
Cancelationsをユーザー式として追加します。 - [Fulfillment] セクションで、[Enable webhook call for this intent] オプションをオンにします。
- ページの上部にある [保存] をクリックします。
会話中にテスト通知を送信する
本番環境では、プッシュ通知を送信するアクションのフルフィルメント コードとは別のスクリプトが必要です。この例では、アクションに話しかけてプッシュ通知を送信するために呼び出すインテントを作成します。このインテントはデバッグ専用です。実際には、プッシュ通知をフルフィルメントで処理したり、アクションの会話の一部としてトリガーしたりしないでください。
プッシュ通知をテストするインテントを作成する手順は次のとおりです。
- テストやデバッグのために、登録済みのユーザーにプッシュ通知を送信できる新しいインテントをセットアップします。Dialogflow コンソールで、左側のナビゲーションの [Intents] の横にある [+] ボタンをクリックして新しいインテントを作成します。
- この新しいインテントに「
Test Notification」という名前を付けます。 - [トレーニング フレーズ] セクションで、
Test notificationをユーザー式として追加します。 - [Fulfillment] セクションで、[Enable webhook call for this intent] オプションをオンにします。
- ページの上部にある [保存] をクリックします。

プッシュ通知をオンにする
Class Canceled インテントのプッシュ通知を有効にする手順は次のとおりです。
- Dialogflow コンソールで、ナビゲーション バーの [Integrations] に移動します。
- [Google Assistant] カードで [Integration Settings] をクリックします。
- 暗黙的呼び出しインテントとして [Class Canceled] を追加します。この手順は、ユーザーが(プッシュ通知をタップして)Class Canceled インテントで会話を開始できることを Dialogflow が認識するために必要です。
- [閉じる] をクリックします。

- Actions Console で [Develop] タブをクリックし、左側のナビゲーション バーで [Actions] を選択します。
- [操作] リストで [Class Canceled] をクリックします。
- [User engagement](ユーザー エンゲージメント)セクションで [Would you like to send push notifications?](プッシュ通知を送信しますか?)オプションを切り替えます。
- [Content title] に、プッシュ通知の内容を表すわかりやすいタイトルを設定します。コンテキストは「<コンテンツ タイトル> のプッシュ通知を送信しても大丈夫か?」です。そのため、タイトルはわかりやすく、読み上げたときに正しく聞こえるようにしてください。この例では、[Content title] を
class cancelationsに設定します。 - ページの上部にある [保存] をクリックします。

フルフィルメントを実装する
Webhook にフルフィルメントを実装する手順は次のとおりです。
依存関係を読み込む
index.js ファイルの require() 関数を更新して、actions-on-google パッケージから UpdatePermission パッケージを追加します。インポートは次のようになります。
index.js
const {
  dialogflow,
  Suggestions,
  RegisterUpdate,
  UpdatePermission,
} = require('actions-on-google');
候補ワードを更新する
index.js ファイルで、候補ワードのタイトルのリストに NOTIFICATIONS エントリを追加します。Suggestion 定義は次のようになります。
index.js
// Suggestion chip titles
const Suggestion = {
  HOURS: 'Ask about hours',
  CLASSES: 'Learn about classes',
  DAILY: 'Send daily reminders',
  NOTIFICATIONS: 'Get notifications',
};
新しいインポートを設定する
Firestore データベースに接続するには、firebase-admin パッケージを追加し、データベースに保存されているフィールドの定数を追加します。また、google-auth-library パッケージと request パッケージをインポートして、認証と Actions API へのリクエストを処理します。
index.js ファイルで、次のコードをインポートに追加します。
index.js
// Firebase admin import
const admin = require('firebase-admin');

// Initialize Firestore
admin.initializeApp();
const db = admin.firestore();

// Firestore constants
const FirestoreNames = {
 INTENT: 'intent',
 USER_ID: 'userId',
 USERS: 'users',
};

// Actions API authentication imports
const {auth} = require('google-auth-library');
const request = require('request');
クラスのキャンセル通知を設定するよう提案する
index.js ファイルで、次のコードを置き換えます。
index.js
// Class list intent handler
app.intent('Class List', (conv, {day}) => {
  if (!day) {
    day = DAYS[new Date().getDay()];
  }
  const classes =
  [...new Set(schedule.days[day].map((d) => `${d.name} at ${d.startTime}`))]
  .join(', ');
  let classesMessage = `On ${day} we offer the following classes: ${classes}. `;
  // If the user started the conversation from the context of a daily update,
  // the conv's arguments will contain an 'UPDATES' section.
  let engagement = conv.arguments.get('UPDATES');
  // Check the conv arguments to tailor the conversation based on the context.
  if (engagement) {
    classesMessage += `Hope to see you soon at Action Gym!`;
    conv.close(classesMessage);
  } else {
    classesMessage += `Would you like me to send you daily reminders of upcoming classes, or can I help you with anything else?`;
    conv.ask(classesMessage);
    if (conv.screen) {
      conv.ask(new Suggestions([Suggestion.DAILY, Suggestion.HOURS]));
    };
  };
});
これを次のように変更します。
index.js
// Class list intent handler
app.intent('Class List', (conv, {day}) => {
  if (!day) {
    day = DAYS[new Date().getDay()];
  }
  const classes =
  [...new Set(schedule.days[day].map((d) => `${d.name} at ${d.startTime}`))]
  .join(', ');
  let classesMessage = `On ${day} we offer the following classes: ${classes}. `;
  // If the user started the conversation from the context of a daily update,
  // the conv's arguments will contain an 'UPDATES' section.
  let engagement = conv.arguments.get('UPDATES');
  // Check the conv arguments to tailor the conversation based on the context.
  if (engagement) {
    classesMessage += `Hope to see you soon at Action Gym!`;
    conv.close(classesMessage);
  } else {
    classesMessage += `Would you like to receive daily reminders of upcoming classes, subscribe to notifications about cancelations, or can I help you with anything else?`;
    conv.ask(classesMessage);
    if (conv.screen) {
      conv.ask(new Suggestions([Suggestion.DAILY, Suggestion.NOTIFICATIONS,
Suggestion.HOURS]));
    };
  };
});
新しいインテントのフルフィルメントを追加する
ユーザーがプッシュ通知に登録すると言ったら、UpdatePermission ヘルパーを呼び出してユーザーに権限をリクエストします。成功すると、PERMISSION 引数が conv オブジェクトの引数に追加され、これを確認して会話を方向転換できます。
ユーザーの権限を取得したら、conv オブジェクトの引数からユーザー ID を取得してデータベースに保存します。このユーザー ID は後で Actions API に送信します。この API により、アシスタントは通知を受け取るユーザーを決定します。
最後に、プッシュ通知をタップすることでトリガーされる Class Canceled インテントのフルフィルメントを追加します。この例のレスポンスはプレースホルダ文字列ですが、このアクションの本番環境用バージョンでは、どのクラスがキャンセルされたかについて、通知スクリプトでより動的な情報が提供されます。
index.js ファイルに次のコードを追加します。
index.js
// Call the User Information helper for permission to send push notifications
app.intent('Setup Push Notifications', (conv) => {
 conv.ask('Update permission for setting up push notifications');
 conv.ask(new UpdatePermission({intent: 'Class Canceled'}));
});

// Handle opt-in or rejection of push notifications
app.intent('Confirm Push Notifications', (conv) => {
 if (conv.arguments.get('PERMISSION')) {
   let userId = conv.arguments.get('UPDATES_USER_ID');
   if (!userId) {
     userId = conv.request.conversation.conversationId;
   }
   // Add the current conversation ID and the notification's
   // target intent to the Firestore database.
   return db.collection(FirestoreNames.USERS)
   .add({
     [FirestoreNames.INTENT]: 'Class Canceled',
     [FirestoreNames.USER_ID]: userId,
   })
   .then(() => {
     conv.ask(`Great, I'll notify you whenever there's a class cancelation. ` +
     'Can I help you with anything else?');
   });
 } else {
   conv.ask(`Okay, I won't send you notifications about class cancelations. ` +
     'Can I help you with anything else?');
 }
 if (conv.screen) {
    conv.ask(new Suggestions([Suggestion.CLASSES, Suggestion.HOURS]));
  }
});

// Intent triggered by tapping the push notification
app.intent('Class Canceled', (conv) => {
 conv.ask('Classname at classtime has been canceled.');
});
テスト通知を追加する
プッシュ通知をユーザーに送信するには、ユーザー ID、通知のタイトル、ターゲット インテントを指定した POST リクエストを Actions API に送信します。この例では、テスト通知インテントをトリガーすると、Firestore データベースが反復処理され、通知に登録しているすべてのユーザーにプッシュ通知が送信されます。
この例では、プッシュ通知を送信するコードを Webhook フルフィルメントに含めて、会話の中でテスト インテントを呼び出すことでそのコードをトリガーしています。公開するアクションでは、プッシュ通知コードはフルフィルメントとは別のスクリプトに記述されている必要があります。
index.js ファイルに次のコードを追加します。
index.js
// Debug intent to trigger a test push notification
app.intent('Test Notification', (conv) => {
 // Use the Actions API to send a Google Assistant push notification.
 let client = auth.fromJSON(require('./service-account.json'));
 client.scopes = ['https://www.googleapis.com/auth/actions.fulfillment.conversation'];
 let notification = {
   userNotification: {
     title: 'Test Notification from Action Gym',
   },
   target: {},
 };
 client.authorize((err, tokens) => {
   if (err) {
     throw new Error(`Auth error: ${err}`);
   }
   // Iterate through Firestore and send push notifications to every user
   // who's currently opted in to canceled class notifications.
   db.collection(FirestoreNames.USERS)
       .where(FirestoreNames.INTENT, '==', 'Class Canceled')
       .get()
       .then((querySnapshot) => {
         querySnapshot.forEach((user) => {
           notification.target = {
             userId: user.get(FirestoreNames.USER_ID),
             intent: user.get(FirestoreNames.INTENT),
           };
           request.post('https://actions.googleapis.com/v2/conversations:send', {
             'auth': {
               'bearer': tokens.access_token,
             },
             'json': true,
             'body': {'customPushMessage': notification, 'isInSandbox': true},
           }, (err, httpResponse, body) => {
             if (err) {
               throw new Error(`API request error: ${err}`);
             }
             console.log(`${httpResponse.statusCode}: ` +
               `${httpResponse.statusMessage}`);
             console.log(JSON.stringify(body));
           });
         });
       })
       .catch((error) => {
         throw new Error(`Firestore query error: ${error}`);
       });
 });
 conv.ask('A notification has been sent to all subscribed users.');
});
プッシュ通知をテストする
ターミナルで次のコマンドを実行して、更新した Webhook コードを Firebase にデプロイします。
firebase deploy
Actions シミュレータで通知をテストする手順は次のとおりです。
- Actions Console で [テスト] タブに移動します。
- [入力] フィールドに「
Talk to my test app」と入力して Enter キーを押します。 - 「
Learn about classes」と入力して Enter キーを押します。 - 「
Get notifications」と入力して Enter キーを押します。 - アクションにプッシュ通知を送信する権限をまだ付与していない場合は、「
yes」と入力して Enter キーを押します。 - 「
yes」と入力して Enter キーを押します。Google アカウントがこのアクションのプッシュ通知に登録されています。

- 「
no」と入力して Enter キーを押すと、終了します。 - 新しい会話を開始するには、「
Talk to my test app」と入力して Enter キーを押します。 - 「
Test notification」と入力して Enter キーを押します。
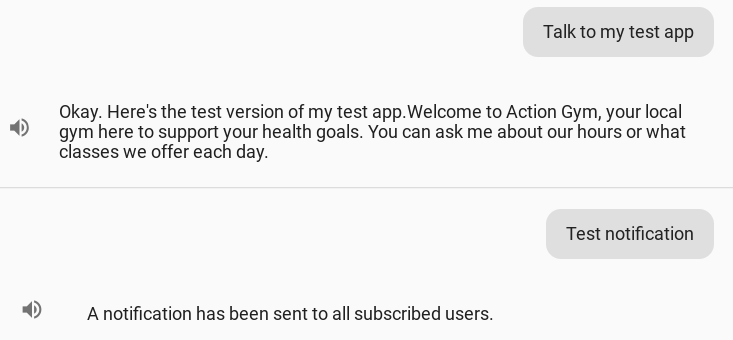
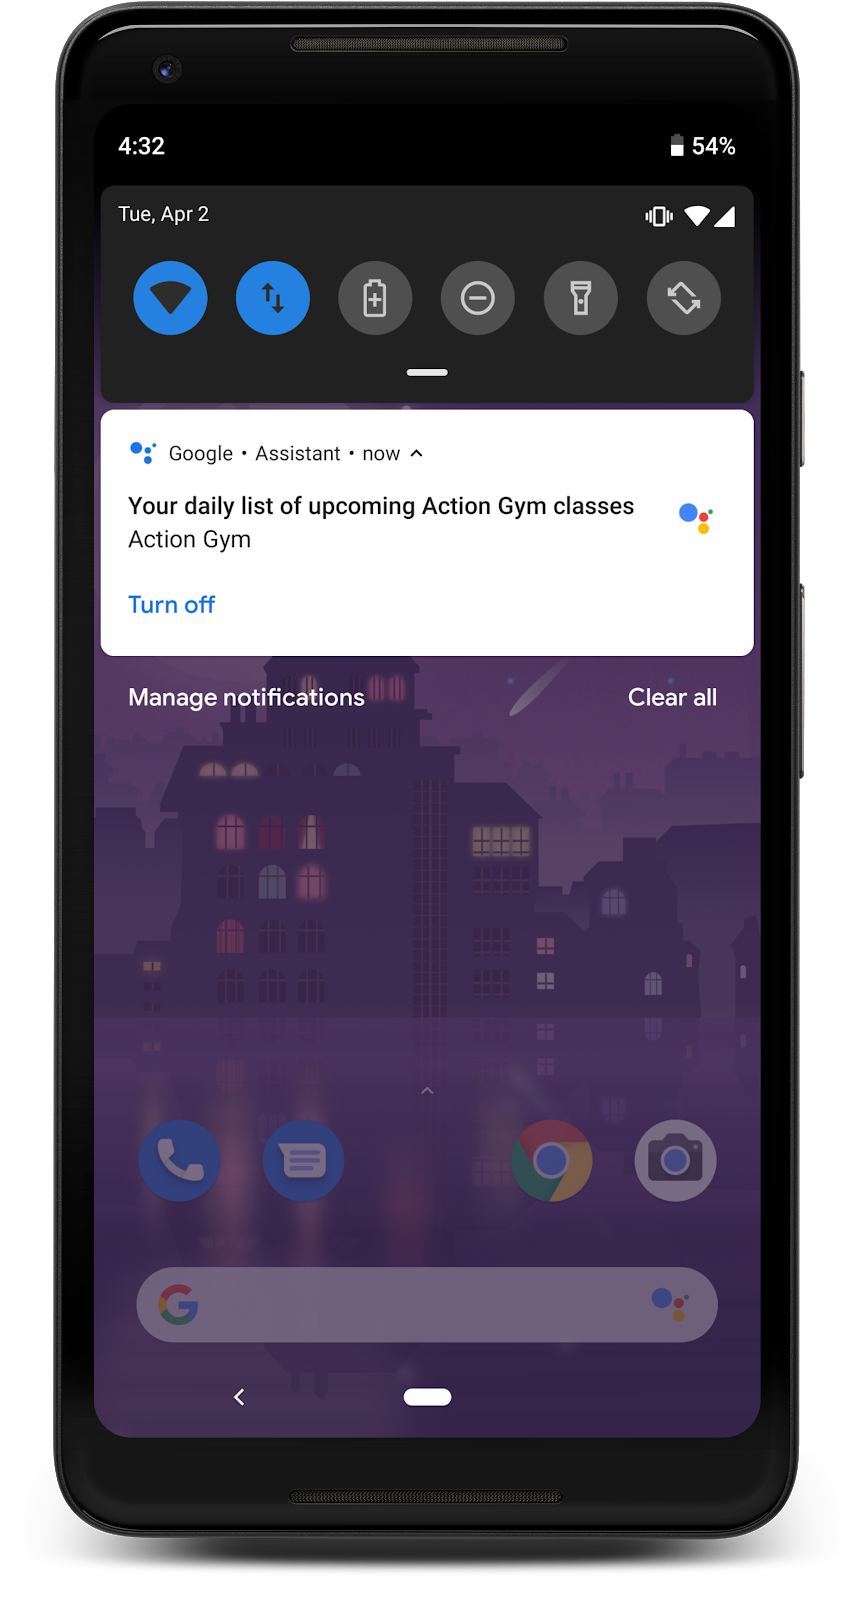
数分以内に「Action Gym からのテスト通知」が届きます。モバイル デバイスでのアシスタントのプッシュ通知この通知をタップすると、アクションの [Class Canceled] のインテントにディープリンクできます。

5. アシスタントとのリンクを作成
ここまで、ユーザーがアクションを繰り返し利用してもらうために実装できるエンゲージメント機能について説明しましたが、これらはユーザーがアクションを見つけて使用することに基づいています。
アシスタントのリンクを作成すると、モバイル デバイスのユーザーをアシスタントのアクションに直接リンクできます。アシスタントのリンクは標準的なハイパーリンクであるため、ウェブサイトや、ブログやソーシャル メディアの投稿などのウェブ マーケティング資料に追加できます。
このステップでは、アシスタント リンクの概要、アクションのウェルカム インテント用にアシスタント リンクを作成する方法、テスト用にシンプルなウェブサイトに追加する方法について学びます。
ユーザーを引きつける方法
初めてユーザーをアクションに引き込むことは、特にユーザーがアシスタントで明示的にアクションを呼び出す必要がある場合には困難な場合があります。アシスタントのリンクを使用すると、ユーザーがアクションに直接リンクできるため、この負担が軽減されます。ユーザーがアシスタント搭載デバイスでアシスタントのリンクをクリックすると、直接アクションに誘導されます。ユーザーがモバイル デバイス以外、またはアシスタントに対応していない他のデバイスでリンクを開いた場合でも、アクション ディレクトリの掲載情報(公開されている場合)に誘導されるため、そうしたユーザーにアクションを引き続き宣伝できます。
アシスタント リンクはエンゲージメント ツールとして役に立つため、ウェブサイトやソーシャル メディアでアクションを宣伝する場合は、アシスタント リンクを作成する必要があります。アシスタントのリンクを作成して配布する前に、次のヒントをご確認ください。
- アシスタントのリンクは、アクションが公開されて初めて機能します。プロジェクトがドラフト状態の場合、リンクは自分のデバイスでのみ機能します。それ以外のユーザーには、Actions ディレクトリの 404 ページが表示されます。
- アクションをアルファ版またはベータ版環境でリリースすることで、ユーザーがアシスタントのリンクを公開前にテストできるようになります。アシスタントのリンクをテストできるのは、アルファ版またはベータ版に参加したユーザーのみです。
- アシスタント リンクのリンク先インテントが新規ユーザーに良い第一印象を与えるようにしましょう。ウェルカム インテントは、アシスタント リンクのデフォルトのデスティネーションです。すでにアクションの導入に適切に貢献しているはずです。
アシスタントのリンクをオンにする
ウェルカム インテントのアシスタント リンクを作成する手順は次のとおりです。
- Actions Console で [Develop] タブをクリックし、左側のナビゲーション バーで [Actions] を選択します。
- [Actions] リストで [actions.intent.MAIN] をクリックします。
- [Links] セクションで、[Would you like a URL for this Action] オプションをオンにします。
- アクションを説明するわかりやすい [リンクのタイトル] を設定します。タイトルは、ユーザーがアクションで達成できることを説明するシンプルな動詞と名詞のペアにします。この例では、[リンクのタイトル] を
learn about Action Gymに設定します。 - このページの一番下にある HTML スニペットをコピーして、後で使用できるように保存します。
- ページの上部にある [保存] をクリックします。

テスト ウェブサイトをデプロイする
アシスタントのリンクをテストするには、Firebase ツールを使用して、フルフィルメントと併せてテストウェブサイトをデプロイできます。このサンプル用の簡単なテスト ウェブサイトはすでに作成済みです。必要な操作はアシスタント リンクを追加することだけです。
フルフィルメントの /user-engagement-codelab-nodejs/start/public/ ディレクトリに移動し、テキスト エディタで index.html ファイルを開きます。
index.html ファイルで、アシスタント リンクの HTML スニペットを body 要素に貼り付けます。ファイルは以下のスニペットのようになります。
index.html
<body>
    <p>
     <a href="https://assistant.google.com/services/invoke/uid/000000efb5f2fd97">🅖 Ask my test app to learn about Action Gym
     </a>
    </p>
</body>
アシスタントのリンクをテスト
ターミナルで次のコマンドを実行して、テストウェブサイトを Firebase にデプロイします。
firebase deploy
deploy コマンドの実行が完了したら、出力の Hosting URL をメモします。

モバイル デバイスのウェブブラウザでこの URL にアクセスすると、テスト用のウェブサイトにアシスタントのリンクが表示されます。モバイル デバイスでこのリンクをクリックすると、アシスタントでアクションのウェルカム インテントが表示されます。

パソコンのブラウザで Hosting URL に移動しても、アクションは公開されていないため、アシスタント ディレクトリの 404 ページが表示されます。
6. 次のステップ
おめでとうございます!
アクションを開発する際のユーザー エンゲージメントの重要性、プラットフォームで利用できるユーザー エンゲージメント機能、各機能をアクションに追加する方法について学習しました。
その他の学習リソース
アクションのユーザー エンゲージメントについて詳しくは、以下のリソースをご覧ください。
- ユーザー エンゲージメントとアシスタントのリンクに関するドキュメント: この Codelab で説明した機能と一般的なユーザー エンゲージメントに関する Actions on Google の公式ドキュメント。
- ユーザー維持率の分析: 公開されたアクションのユーザー維持率を確認できる、Actions Console の分析機能に関するドキュメント。
- 会話の設計ガイドライン: ユーザー エンゲージメント機能の設計方法に関するベスト プラクティスとガイドライン。
- Actions on Google GitHub リポジトリ: サンプルコードとサンプル ライブラリ。
- r/GoogleAssistantDev: アシスタントに取り組むデベロッパー向けの Reddit 公式コミュニティ。
Twitter で @ActionsOnGoogle をフォローして最新情報をチェックしてください。また、作成したアクションについて、ハッシュタグ #AoGDevs でツイートしてください。
フィードバック アンケート
終了する前に、こちらのフォームにご記入のうえ、ご意見やご感想をお知らせください。