
1. 소개
'금붕어' 문제
도쿄로 꿈의 휴가를 떠나기 위해 여행사를 고용한다고 가정해 보겠습니다. 세션 에이전트를 사용하여 '금붕어 문제'를 직접 확인해 보세요.
사무실로 들어가 다음과 같이 말합니다.
'안녕하세요. 도쿄 2일 여행을 계획하고 싶어. 역사 유적지와 초밥에 관심이 있어'라고 말합니다.
상담사가 다음과 같이 열정적으로 대답합니다.
"Great! 고쿄 방문과 스키야바시 지로에서의 스시 저녁 식사를 계획했어.'
미소를 지으며 다음과 같이 말합니다.
'그게 딱 좋겠어요. 일정을 보내주실 수 있나요?
에이전트는 멍하니 당신을 바라보며 다음과 같이 묻습니다.
'안녕하세요. 오늘 여행 계획을 세우는 것을 도와드릴까요?'
이것이 바로 '금붕어 문제'입니다. 메모리가 없으면 모든 상호작용이 백지 상태가 됩니다. 인텔리전스는 있습니다. 에이전트가 여행 계획을 세우는 방법을 알고 있지만 연속성이 없습니다. AI 에이전트가 진정으로 유용하려면 기억해야 합니다.
오늘의 미션
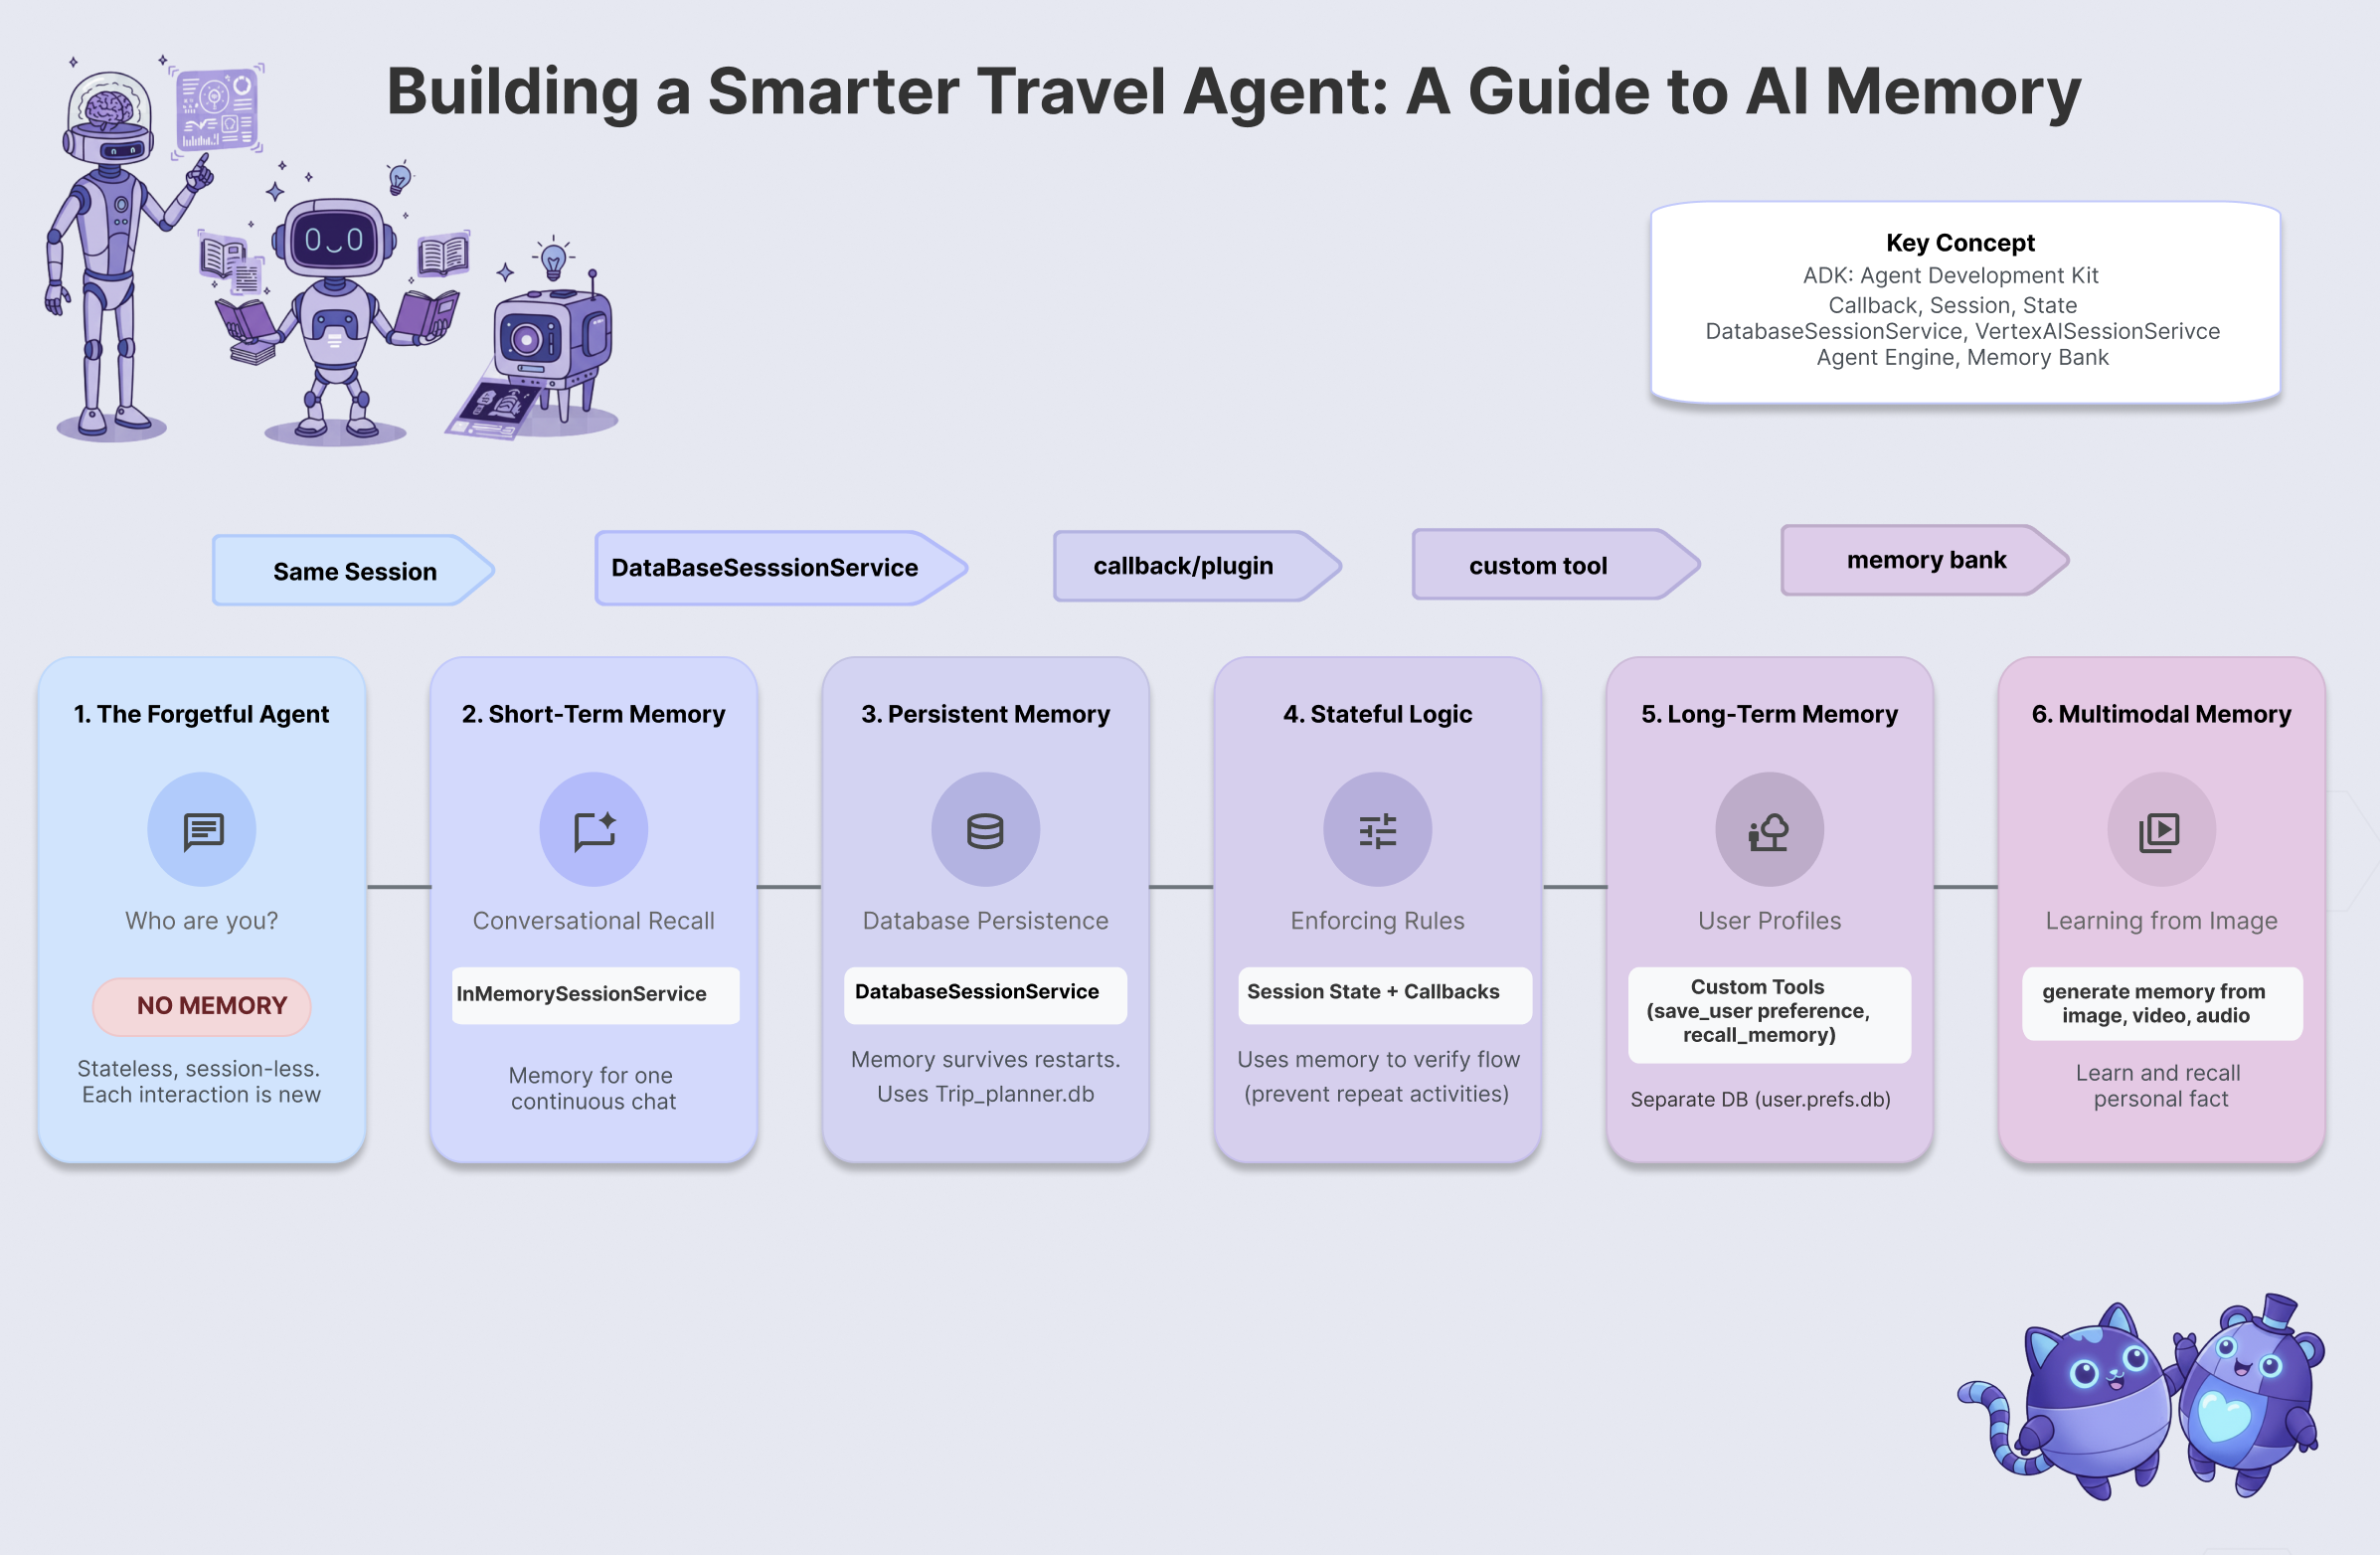
이 워크숍에서는 기억하고, 학습하고, 적응하는 여행사 에이전트를 빌드하여 금붕어 문제를 해결합니다. 6단계의 에이전트 메모리를 거치면서 챗봇보다는 전담 개인 비서에 더 가까운 시스템을 만들게 됩니다.
수준 | 개념 | '슈퍼파워' |
레벨 1 | 세션 및 상태 | 잊지 않고 대화하기 |
Level 2(레벨 2) | 멀티 에이전트 상태 | 팀원 간 메모 공유 |
수준 3 | 지속성 | 시스템 재부팅 후에도 사용자를 기억합니다. |
레벨 4 | 콜백 | 완전 자율적으로 메모리 업데이트 |
5단계 | 맞춤 도구 | 구조화된 사용자 프로필 읽기 및 쓰기 |
레벨 6 | 멀티모달 메모리 | 사진 및 동영상 '보기' 및 기억하기 |
ADK 메모리 스택
코드를 작성하기 전에 사용할 도구를 알아보겠습니다. Google 에이전트 개발 키트 (ADK)는 메모리를 처리하는 구조화된 방법을 제공합니다.
- 세션: 대화의 컨테이너입니다. 여기에는 말한 내용의 기록이 저장됩니다.
- 상태: 세션에 연결된 키-값 '스크래치패드'입니다. 상담사는 이를 사용하여 특정 사실 (예:
destination="Tokyo")을 저장합니다. - MemoryService: 장기 저장소입니다. 사용자 환경설정이나 분석된 문서와 같이 영구적으로 보관되는 항목이 여기에 저장됩니다.
2. 설정
AI 에이전트를 지원하려면 두 가지가 필요합니다. 기반을 제공하는 Google Cloud 프로젝트와
1부: 결제 계정 사용 설정
이 Codelab을 실행하려면 크레딧이 있는 결제 계정이 필요합니다. 이 Codelab 상단의 배너에 있는 크레딧을 사용하여 시작하세요. 이미 결제 계정에 연결되어 있다면 이 단계를 건너뛰어도 됩니다.
2부: 개방형 환경
- 👉 이 링크를 클릭하여 Cloud Shell 편집기로 바로 이동합니다.
- 👉 오늘 언제든지 승인하라는 메시지가 표시되면 승인을 클릭하여 계속합니다.
- 👉 터미널이 화면 하단에 표시되지 않으면 다음을 따라 엽니다.
- 보기를 클릭합니다.
- 터미널을 클릭합니다.

- 👉💻 터미널에서 다음 명령어를 사용하여 이미 인증되었는지, 프로젝트가 프로젝트 ID로 설정되었는지 확인합니다.
gcloud auth list - 👉💻 GitHub에서 부트스트랩 프로젝트를 클론합니다.
git clone https://github.com/cuppibla/memory_agent_starter - 👉💻 프로젝트 디렉터리에서 설정 스크립트를 실행합니다.
cd ~/memory_agent_starter ./init.sh - 👉💻 필요한 프로젝트 ID를 설정합니다.
gcloud config set project $(cat ~/project_id.txt) --quiet
3부: 권한 설정
- 👉💻 다음 명령어를 사용하여 필요한 API를 사용 설정합니다. 이 과정에 몇 분 정도 소요될 수 있습니다.
gcloud services enable \ cloudresourcemanager.googleapis.com \ servicenetworking.googleapis.com \ run.googleapis.com \ aiplatform.googleapis.com \ compute.googleapis.com - 👉💻 터미널에서 다음 명령어를 실행하여 필요한 권한을 부여합니다.
. ~/memory_agent_starter/set_env.sh
.env 파일이 생성됩니다. 프로젝트 정보가 표시됩니다.
3. 기본 사항 - 세션 및 상태
개념: 맥락이 가장 중요함
가장 기본적인 형태의 메모리는 세션 메모리입니다. 이를 통해 에이전트는 '그것을 사고 싶어'라는 문장에서 '그것'이 10초 전에 말한 신발을 의미한다는 것을 알 수 있습니다.
ADK에서는 Session 객체를 사용하여 이를 관리합니다.
- 상태 비저장 접근 방식: 메시지마다 새 세션을 만듭니다.
- 상태 저장 방식: 하나의 세션을 만들고 전체 대화에서 재사용합니다.
1단계: 에이전트 검사
👉💻 Cloud Shell 터미널에서 다음을 실행하여 Cloud Shell 편집기에서 파일을 엽니다.
cloudshell edit ~/memory_agent_starter/01_session_agent/agent.py
~/memory_agent_starter/01_session_agent/agent.py를 엽니다.
👉 agent.py 함수 내에서 # TODO: Create a root agent 주석을 찾습니다.
이 전체 행을 다음 코드로 바꿉니다.
root_agent = LlmAgent(
    name="multi_day_trip_agent",
    model="gemini-2.5-flash",
    description="Agent that progressively plans a multi-day trip, remembering previous days and adapting to user feedback.",
    instruction="""
    You are the "Adaptive Trip Planner" 🗺️ - an AI assistant that builds multi-day travel itineraries step-by-step.

    Your Defining Feature:
    You have short-term memory. You MUST refer back to our conversation to understand the trip's context, what has already been planned, and the user's preferences. If the user asks for a change, you must adapt the plan while keeping the unchanged parts consistent.

    Your Mission:
    1.  **Initiate**: Start by asking for the destination, trip duration, and interests.
    2.  **Plan Progressively**: Plan ONLY ONE DAY at a time. After presenting a plan, ask for confirmation.
    3.  **Handle Feedback**: If a user dislikes a suggestion (e.g., "I don't like museums"), acknowledge their feedback, and provide a *new, alternative* suggestion for that time slot that still fits the overall theme.
    4.  **Maintain Context**: For each new day, ensure the activities are unique and build logically on the previous days. Do not suggest the same things repeatedly.
    5.  **Final Output**: Return each day's itinerary in MARKDOWN format.
    """,
    tools=[google_search]
)
명령어는 LLM에 기억하도록 지시하지만 코드는 기억하는 기능을 제공해야 합니다.
2단계: 두 가지 시나리오
~/memory_agent_starter/01_session_agent/main.py를 엽니다.
👉 Cloud Shell 터미널에서 다음을 실행하여 Cloud Shell 편집기에서 파일을 엽니다.
cloudshell edit ~/memory_agent_starter/01_session_agent/main.py
~/memory_agent_starter/01_session_agent/main.py를 열고 main.py 함수 내에서 # TODO: Create a runner with in memorysession service 주석을 찾습니다.
이 전체 행을 다음 코드로 바꿉니다.
    runner = Runner(
        agent=agent,
        session_service=session_service,
        app_name=agent.name
    )
👉 main.py 함수 내에서 # TODO: create a different session to test 주석을 찾습니다.
이 전체 행을 다음 코드로 바꿉니다.
    tokyo_session_2 = await session_service.create_session(
        app_name=multi_day_agent.name,
        user_id=user_id
    )
테스트
'금붕어' 메모리와 '코끼리' 메모리의 차이를 보여주는 두 가지 함수가 있습니다.
시나리오 1: 스테이트풀(Stateful)(공유 세션)
async def run_trip_same_session_scenario(session_service, user_id):
    # 1. Create ONE session
    trip_session = await session_service.create_session(...)

    # 2. Turn 1
    await run_agent_query(..., trip_session, ...)

    # 3. Turn 2 - REUSING the same session!
    # The agent can "see" Turn 1 because it's in the session history.
    await run_agent_query(..., trip_session, ...)
시나리오 2: 스테이트리스 (매번 새 세션)
async def run_trip_different_session_scenario(session_service, user_id):
    # Turn 1
    tokyo_session = await session_service.create_session(...)
    await run_agent_query(..., tokyo_session, ...)

    # Turn 2 - Creating a FREASH session
    # The agent has NO IDEA what happened in Turn 1.
    tokyo_session_2 = await session_service.create_session(...)
    await run_agent_query(..., tokyo_session_2, ...)
3단계: 에이전트 실행
실제로 차이점을 살펴보겠습니다. 스크립트를 실행합니다.
👉💻 명령줄에서 아래 명령줄을 실행합니다.
cd ~/memory_agent_starter
uv run python ~/memory_agent_starter/01_session_agent/main.py
시나리오 1 관찰: 에이전트가 첫 번째 메시지의 환경설정을 기억하고 두 번째 메시지에서 계획을 조정합니다.
시나리오 2 관찰: 두 번째 턴 ('음식에 대해 제가 좋아했던 점을 기억하시나요?')에서 상담사는 새로운 세션이므로 완전히 실패합니다. '무슨 말을 하는지 모르겠어'라고 말하는 것과 같습니다.
핵심 내용
메모리 규칙 1: 대화 컨텍스트를 유지하려면 항상 session.id를 재사용하세요. Session 객체는 에이전트의 단기 메모리 버퍼입니다.
4. 팀 - 멀티 에이전트 상태

콘셉트: '전화 게임'
여러 에이전트가 함께 작동하는 것은 동료가 파일 폴더를 주고받는 것과 같습니다. 한 상담사가 폴더에 메모를 작성하면 다음 상담사가 이를 읽을 수 있어야 합니다.
ADK에서 이 '폴더'는 상태입니다.
- 상태는 세션 내에 있는 딕셔너리 (
{"key": "value"})입니다. - 세션의 모든 상담사가 읽거나 쓸 수 있습니다.
1단계: 워크플로 검토
👉💻 Cloud Shell 터미널에서 다음을 실행하여 Cloud Shell 편집기에서 파일을 엽니다.
cloudshell edit ~/memory_agent_starter/02_multi_agent/agent.py
👉~/memory_agent_starter/02_multi_agent/agent.py 파일에서 # TODO: foodie agent 주석을 찾습니다.
이 전체 행을 다음 코드로 바꿉니다.
foodie_agent = LlmAgent(
    name="foodie_agent",
    model="gemini-2.5-flash",
    tools=[google_search],
    instruction="""You are an expert food critic. Your goal is to find the best restaurant based on a user's request.

    When you recommend a place, you must output *only* the name of the establishment and nothing else.
    For example, if the best sushi is at 'Jin Sho', you should output only: Jin Sho
    """,
    output_key="destination"  # ADK will save the agent's final response to state['destination']
)
👉 agent.py 함수 내에서 # TODO: transportation agent 주석을 찾습니다.
이 전체 행을 다음 코드로 바꿉니다.
transportation_agent = LlmAgent(
    name="transportation_agent",
    model="gemini-2.5-flash",
    tools=[google_search],
    instruction="""You are a navigation assistant. Given a destination, provide clear directions.
    The user wants to go to: {destination}.

    Analyze the user's full original query to find their starting point.
    Then, provide clear directions from that starting point to {destination}.
    """,
)
👉 agent.py 함수 내에서 # TODO: root_agent 주석을 찾습니다.
이 전체 행을 다음 코드로 바꿉니다.
root_agent = SequentialAgent(
    name="find_and_navigate_agent",
    sub_agents=[foodie_agent, transportation_agent],
    description="A workflow that first finds a location and then provides directions to it."
)
이제 두 에이전트가 순서대로 작동합니다.
- Foodie Agent: 음식점을 찾습니다.
- 교통 상담사: 해당 음식점의 길을 안내합니다.
매직 핸드오프: foodie_agent가 transportation_agent에게 바통을 넘겨주는 것을 확인하세요.
foodie_agent = LlmAgent(
    # ...
    # CRITICAL: This tells ADK to save the agent's output to state['destination']
    output_key="destination"
)

transportation_agent = LlmAgent(
    # ...
    # CRITICAL: This injects state['destination'] into the prompt
    instruction="""
    The user wants to go to: {destination}.
    Provide clear directions...
    """,
)
output_key="destination": Foodie Agent의 답변이 효율적으로 저장됩니다.{destination}: 대중교통 에이전트가 이 답변을 자동으로 읽습니다.
(조치 불필요) 2단계: 오케스트레이터
02_multi_agent/main.py를 엽니다.
SequentialAgent를 사용하여 순서대로 실행합니다.
# 1. Create a single session for the sequential agent
session = await session_service.create_session(...)

# 2. Run the query
# The SequentialAgent manages the state flow:
# Query -> Foodie -> state['destination'] -> Transportation -> Final Answer
await run_agent_query(root_agent, query, ...)
사용자가 프롬프트 하나를 보냅니다.
"Find best sushi in Palo Alto and then tell me how to get there."
에이전트가 함께 작동하여 질문에 답변합니다.
3단계: 팀 운영
👉💻 Cloud Shell 터미널에서 멀티 에이전트 워크플로를 실행합니다.
cd ~/memory_agent_starter
uv run python ~/memory_agent_starter/02_multi_agent/main.py
발생하는 상황
- Foodie Agent: 'Jin Sho' (또는 유사한 이름)를 찾습니다.
- ADK:
state['destination']에 'Jin Sho'를 저장합니다. - Transportation Agent: 명령어에 'Jin Sho'가 포함됩니다.
- 결과: '칼트레인역에서 진 쇼로 가려면 University Ave를 따라 걸어가세요.'
핵심 내용
메모리 규칙 2: 상태를 사용하여 에이전트 간에 구조화된 정보를 전달합니다. output_key를 사용하여 쓰고 {placeholders}를 사용하여 읽습니다.
5. 재부팅 - 지속성
개념: '재부팅 문제'
지금까지 메모리는 InMemory였습니다. 스크립트를 중지했다가 다시 시작하면 에이전트가 모든 것을 잊어버립니다. 컴퓨터를 끌 때마다 하드 드라이브를 초기화하는 것과 같습니다.
이 문제를 해결하려면 영속성이 필요합니다. InMemorySessionService을 DatabaseSessionService로 바꿉니다.
1단계: 데이터베이스 전환
👉💻 Cloud Shell 터미널에서 다음을 실행하여 Cloud Shell 편집기에서 파일을 엽니다.
cloudshell edit ~/memory_agent_starter/03_persistent_agent/main.py
👉 ~/memory_agent_starter/03_persistent_agent/main.py 파일에서 # TODO: Configuration for Persistent Sessions 주석을 찾습니다.
이 전체 행을 다음 코드로 바꿉니다.
SESSIONS_DIR = Path(os.path.expanduser("~")) / ".adk_codelab" / "sessions"
os.makedirs(SESSIONS_DIR, exist_ok=True)
SESSION_DB_FILE = SESSIONS_DIR / "trip_planner.db"
SESSION_URL = f"sqlite:///{SESSION_DB_FILE}"
이제 모든 세션과 이벤트가 SQLite 파일에 저장됩니다.
2단계: 교차 세션 검색
지속성을 사용하면 대화를 재개할 수 있을 뿐만 아니라 이전 대화에서 학습할 수도 있습니다.
동일한 파일~/memory_agent_starter/03_persistent_agent/main.py에서 테스트 사례 3: 교차 세션 검색을 확인합니다.
👉 댓글 찾기 # TODO: retrieve the previous session manually
이 전체 행을 다음 코드로 바꿉니다.
    old_session = await session_service.get_session(
        app_name=root_agent.name, user_id="user_01", session_id=session_id
    )
👉 main.py 함수 내에서 # TODO: Extract content from the OLD session 주석을 찾습니다.
이 전체 행을 다음 코드로 바꿉니다.
previous_context += f"- {role}: {text}\n"
👉 main.py 함수 내에서 # TODO: Manually inject the context to the query 주석을 찾습니다.
이 전체 행을 다음 코드로 바꿉니다.
    query_3 = f"""
    {previous_context}

    I'm planning a new trip to Osaka this time.
    Based on my previous preferences (above), what should I eat?
    """
이는 사용자가 몇 개월 후에 다시 돌아오는 상황을 시뮬레이션합니다. 데이터베이스를 사용해야만 이전 기록을 검색할 수 있습니다.
3단계: 재부팅에서 살아남기
👉💻 터미널에서 스크립트를 실행합니다.
cd ~/memory_agent_starter
uv run python ~/memory_agent_starter/03_persistent_agent/main.py
~/memory_agent_starter/trip_planner.db 파일이 생성됩니다. 다음과 같이 해 보세요. 스크립트를 두 번 실행합니다.
- 두 번째 실행에서 '기존 세션 재개됨'을 찾습니다.
- 에이전트는 데이터베이스 파일에서 로드되므로 첫 번째 실행의 컨텍스트를 기억합니다.
핵심 내용
메모리 규칙 3: 프로덕션에는 DatabaseSessionService를 사용합니다. 이를 통해 사용자 대화가 서버 재시작 후에도 유지되고 장기적인 기록 분석이 가능합니다.
6. 스파이 - 콜백
경우에 따라 에이전트가 말하는 내용뿐만 아니라 에이전트가 수행하는 작업을 기반으로 메모리를 자동으로 업데이트해야 합니다. 상담사를 감시하고 메모를 작성하는 '스파이'가 필요합니다.
ADK에서 이 스파이는 Callback입니다. 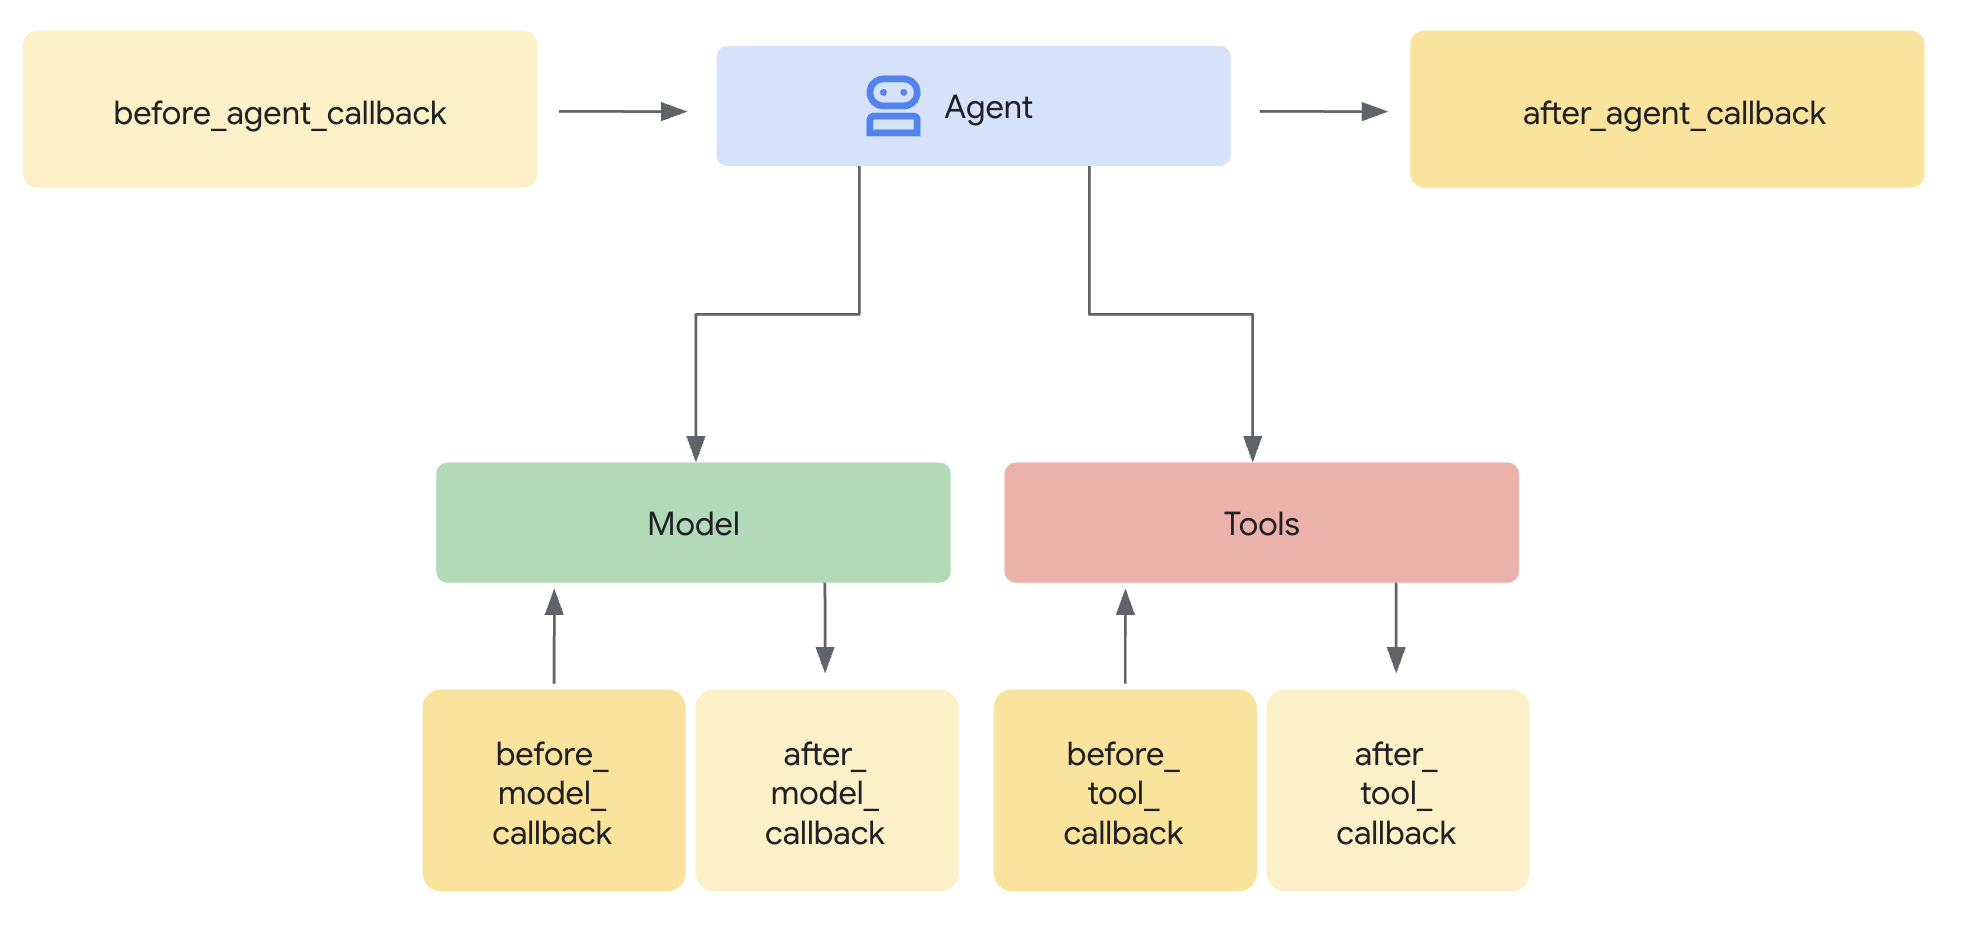
after_tool_callback: 에이전트가 작동할 때마다 실행되는 함수입니다.ToolContext: 함수 내부에서 상태에 쓸 수 있는 방법입니다.
1단계: 로직
👉💻 Cloud Shell 터미널에서 다음을 실행하여 Cloud Shell 편집기에서 파일을 엽니다.
cloudshell edit ~/memory_agent_starter/04_stateful_agent/agent.py
👉 ~/memory_agent_starter/04_stateful_agent/agent.py 파일에서 # TODO: Implement call back logic 주석을 찾습니다.
이 전체 행을 다음 코드로 바꿉니다.
def save_activity_type_callback(
    tool,
    args: Dict[str, Any],
    tool_context: ToolContext,
    tool_response: Dict[str, Any],
) -> Optional[Dict[str, Any]]:
    """
    Callback to save the TYPE of activity just planned into the session state.
    """
    # 1. Get the actual agent name.
    if tool.name == "transfer_to_agent":
         agent_name = args.get("agent_name")
    else:
         agent_name = tool.name

    activity_type = "unknown"

    # 2. Determine the type based on which agent was actually used
    if agent_name == "museum_expert":
        activity_type = "CULTURAL"
    elif agent_name == "restaurant_expert":
        activity_type = "FOOD"
    elif agent_name == "outdoor_expert":
        activity_type = "OUTDOOR"

    print(f"\n🔔 [CALLBACK] The planner transferred to '{agent_name}'.")

    # 3. Update the state directly
    tool_context.state["last_activity_type"] = activity_type
    print(f"💾 [STATE UPDATE] 'last_activity_type' is now set to: {activity_type}\n")

    return tool_response
👉 동일한 파일에서 04_stateful_agent/agent.py 함수 내의 # TODO: add callback to root agent 주석을 찾습니다.
이 전체 행을 다음 코드로 바꿉니다.
after_tool_callback=save_activity_type_callback,
동적 요청 사항: 이제 에이전트의 요청 사항은 문자열이 아닌 함수입니다. 상태에 따라 변경됩니다.
def get_planner_instruction(context):
    last_activity = context.state.get("last_activity_type", "None")

    return f"""
    The last activity was: {last_activity}

    If last_activity is 'CULTURAL' -> `museum_expert` is BANNED.
    """
3단계: 스파이 테스트
👉💻 터미널에서 아래 명령어를 복사하여 붙여넣고 스크립트를 실행합니다.
cd ~/memory_agent_starter
uv run python ~/memory_agent_starter/04_stateful_agent/main.py
이 에이전트를 실행하면 루프가 표시됩니다.
- 1번째 턴: 사용자가 박물관을 요청합니다. 스파이는
last_activity="CULTURAL"를 설정합니다. - 2번째 턴: 사용자가 다른 박물관을 요청합니다.
- 상담사 안내 업데이트: 'CULTURAL은 금지됨'
- 상담사가 '다른 박물관은 안 됩니다. 공원은 어때?'
콘솔 로그에서 [CALLBACK] 및 [STATE UPDATE]를 확인합니다. 상담사가 작업하는 동안 메모리가 실시간으로 변경되는 것을 확인할 수 있습니다.
핵심 내용
메모리 규칙 4: 콜백을 사용하여 상태 관리를 자동화합니다. 에이전트는 작업을 수행하는 것만으로 자체 컨텍스트를 빌드합니다.
7. 파일 캐비닛 - 맞춤 도구
개념: '구조화된 메모리'
지금까지 '메모리'는 채팅 로그 또는 간단한 키-값 쌍이었습니다. 하지만 복잡한 사용자 프로필(예: diet: vegan, budget: high, pets: [cat, dog])을 기억해야 하는 경우는 어떻게 해야 할까요?
이를 위해 메모리를 도구로 취급합니다. 에이전트는 자료실을 열 때 (읽기)와 보고서를 제출할 때 (쓰기)를 명시적으로 결정합니다. 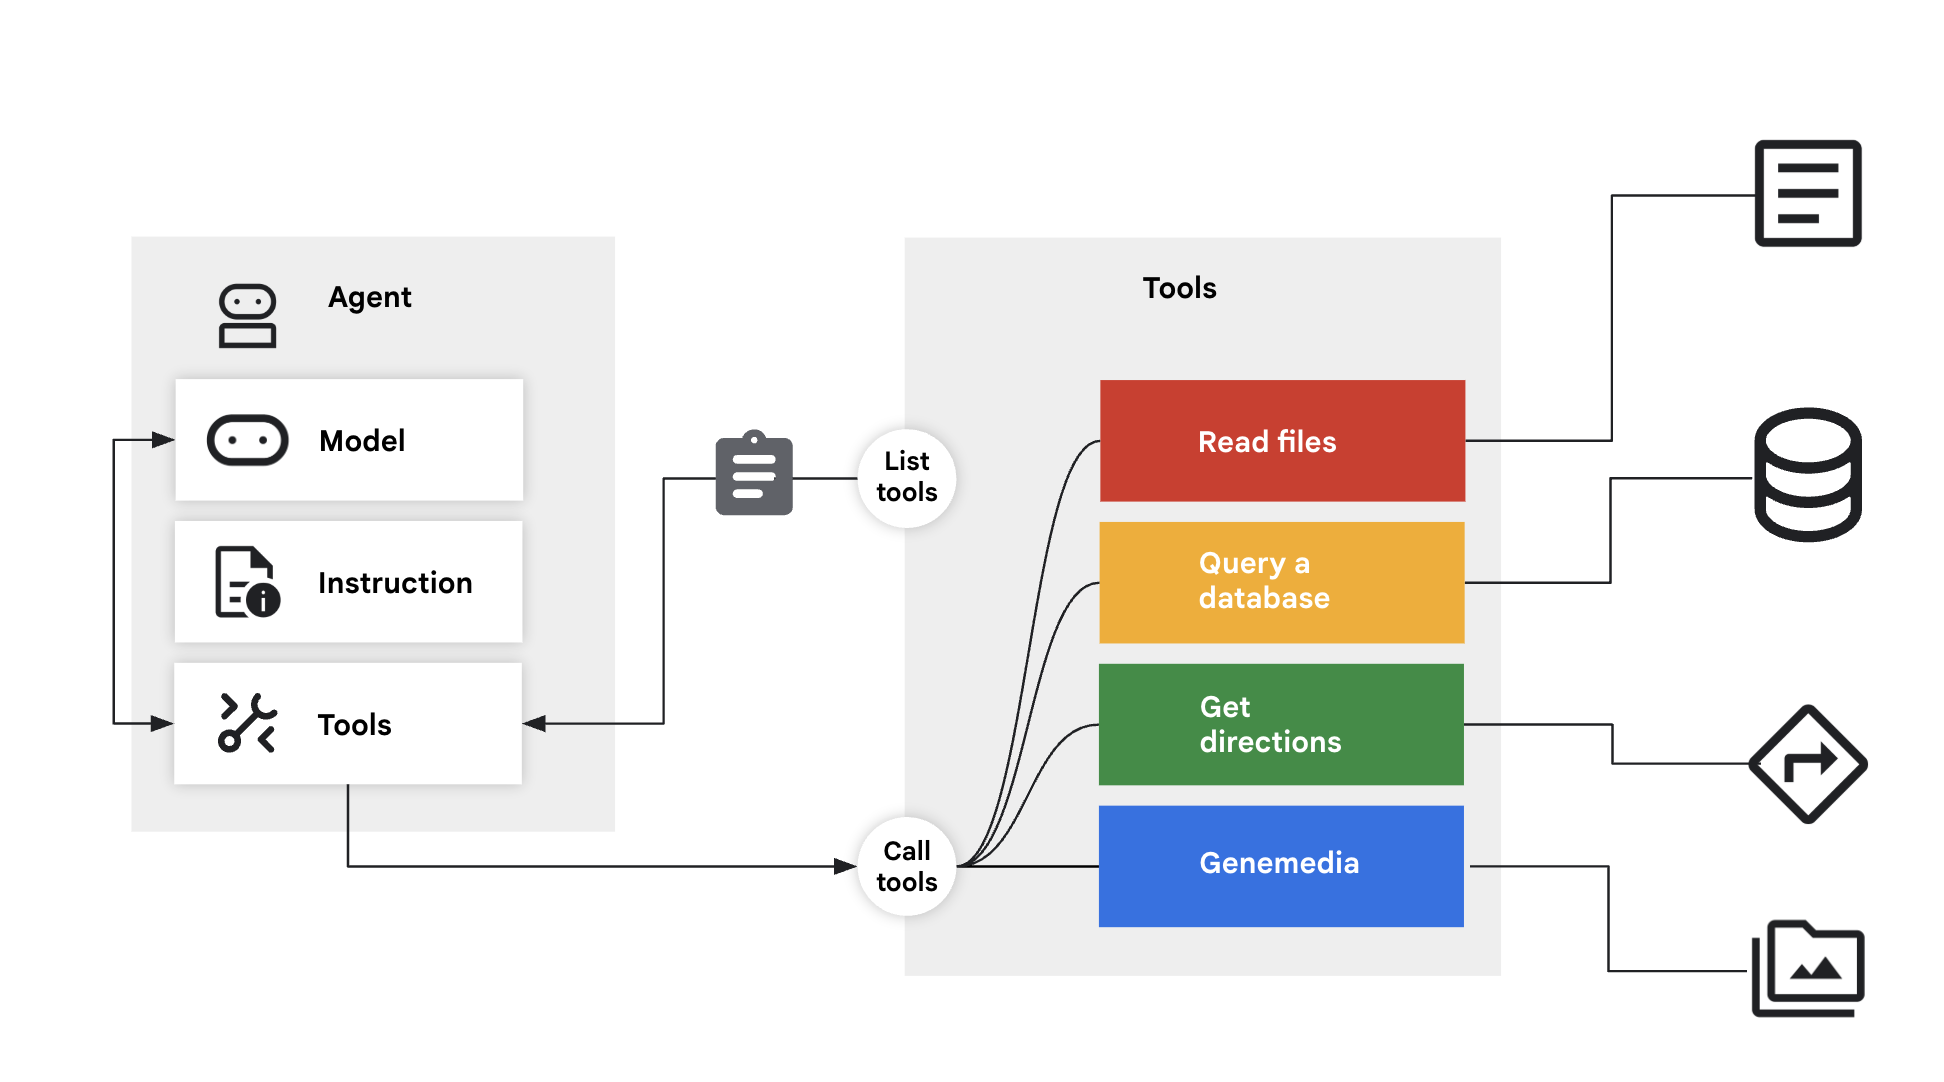
1단계: 도구
👉💻 Cloud Shell 터미널에서 다음을 실행하여 Cloud Shell 편집기에서 파일을 엽니다.
cloudshell edit ~/memory_agent_starter/05_profile_agent/tools.py
👉 이 파일에서: ~/memory_agent_starter/05_profile_agent/tools.py
다음 두 가지 특정 도구를 구현해야 합니다.
save_user_preferences: 데이터베이스에 씁니다.recall_user_preferences: 데이터베이스에서 읽습니다.
~/memory_agent_starter/05_profile_agent/tools.py 함수 내에서 # TODO: implement save_user_preferences tools 주석을 찾습니다.
이 전체 행을 다음 코드로 바꿉니다.
def save_user_preferences(tool_context: ToolContext, new_preferences: Dict[str, Any]) -> str:
    user_id = tool_context.session.user_id
    with sqlite3.connect(USER_DB_FILE) as conn:
        for key, value in new_preferences.items():
            conn.execute("INSERT INTO user_preferences (user_id, pref_key, pref_value) VALUES (?, ?, ?) ON CONFLICT(user_id, pref_key) DO UPDATE SET pref_value = excluded.pref_value;",
                         (user_id, key, json.dumps(value)))
    return f"Preferences updated: {list(new_preferences.keys())}"
👉 05/tools.py 함수 내에서 # TODO: implement recall_user_preferences tools 주석을 찾습니다.
이 전체 행을 다음 코드로 바꿉니다.
def recall_user_preferences(tool_context: ToolContext) -> Dict[str, Any]:
    user_id = tool_context.session.user_id
    preferences = {}
    with sqlite3.connect(USER_DB_FILE) as conn:
        rows = conn.execute("SELECT pref_key, pref_value FROM user_preferences WHERE user_id = ?", (user_id,)).fetchall()
        if not rows: return {"message": "No preferences found."}
        for key, value_str in rows: preferences[key] = json.loads(value_str)
    return preferences
이 명령어는 워크플로를 강제합니다.
instruction="""
1. RECALL FIRST: First action MUST be `recall_user_preferences`.
3. LEARN: If a user states a new preference, use `save_user_preferences`.
"""
2단계: 실행
👉💻 Cloud Shell 터미널에서 다음을 실행하여 Cloud Shell 편집기에서 파일을 엽니다.
cloudshell edit ~/memory_agent_starter/05_profile_agent/main.py
~/memory_agent_starter/05_profile_agent/main.py를 엽니다.
ADK가 상태를 자동으로 처리했던 이전 모듈과 달리 여기서는 에이전트가 제어합니다.
- 시작 시
recall_user_preferences를 호출하도록 선택합니다. - '나는 비건이야'라고 말하면
save_user_preferences를 호출하도록 선택합니다.
3단계: 프로필 빌드
👉💻 스크립트를 실행합니다.
cd ~/memory_agent_starter
uv run python ~/memory_agent_starter/05_profile_agent/main.py
다음 대화 흐름을 사용해 보세요.
- "Hi, 저녁 식사 계획해 줘." -> 상담사가 DB를 확인했지만 아무것도 찾지 못했습니다. 선호사항을 묻습니다.
- '저는 비건입니다.' -> 상담사가 '비건'을 DB에 저장합니다.
- 스크립트를 다시 시작합니다.
- "Hi, 저녁 식사 계획해 줘." -> 상담사가 DB를 확인하고 '비건'을 확인한 후 즉시 비건 레스토랑을 추천합니다.
핵심 내용
메모리 규칙 5: 복잡한 구조화된 데이터의 경우 에이전트에게 읽기/쓰기 도구를 제공합니다. LLM이 자체 장기 스토리지를 관리하도록 합니다.
8. 뇌 - 멀티모달 메모리
개념: '인간 경험'
사람들은 텍스트 이상의 것을 기억합니다. 사진의 분위기, 음성의 소리, 동영상의 느낌을 기억합니다.
Vertex AI 메모리 뱅크를 사용하면 에이전트가 멀티모달 메모리를 처리할 수 있습니다. 이미지, 동영상, 오디오를 수집하고, 이를 '이해'하고, 나중에 검색할 수 있습니다.
1단계: 구성
👉💻 Cloud Shell 터미널에서 다음을 실행하여 Cloud Shell 편집기에서 파일을 엽니다.
cloudshell edit ~/memory_agent_starter/06_multimodal_agent/main.py
👉 06_multimodal_agent/main.py을 엽니다. # TODO: Configure Memory Bank Topic 댓글을 찾습니다.
이 전체 행을 다음 코드로 바꿉니다.
travel_topics = [
    MemoryTopic(
        managed_memory_topic=ManagedMemoryTopic(
            managed_topic_enum=ManagedTopicEnum.USER_PREFERENCES
        )
    ),
    MemoryTopic(
        managed_memory_topic=ManagedMemoryTopic(
            managed_topic_enum=ManagedTopicEnum.USER_PERSONAL_INFO
        )
    ),
    MemoryTopic(
        custom_memory_topic=CustomMemoryTopic(
            label="travel_experiences",
            description="""Memorable travel experiences including:
                - Places visited and impressions
                - Favorite restaurants, cafes, and food experiences
                - Preferred accommodation types and locations
                - Activities enjoyed (museums, hiking, beaches, etc.)
                - Travel companions and social preferences
                - Photos and videos from trips with location context""",
        )
    ),
    MemoryTopic(
        custom_memory_topic=CustomMemoryTopic(
            label="travel_preferences",
            description="""Travel style and preferences:
                - Budget preferences (luxury, mid-range, budget)
                - Transportation preferences (flying, trains, driving)
                - Trip duration preferences
                - Season and weather preferences
                - Cultural interests and language abilities
                - Dietary restrictions and food preferences""",
        )
    ),
    MemoryTopic(
        custom_memory_topic=CustomMemoryTopic(
            label="travel_logistics",
            description="""Practical travel information:
                - Passport and visa information
                - Frequent flyer numbers and hotel loyalty programs
                - Emergency contacts
                - Medical considerations and insurance
                - Packing preferences and essentials
                - Time zone preferences and jet lag strategies""",
        )
    ),
]
댓글 # TODO: Configure Memory Bank Customization 찾기
이 전체 행을 다음 코드로 바꿉니다.
memory_bank_config = {
    "customization_configs": [
        {
            "memory_topics": travel_topics,
        }
    ],
    "similarity_search_config": {
        "embedding_model": f"projects/{PROJECT_ID}/locations/{LOCATION}/publishers/google/models/gemini-embedding-001"
    },
    "generation_config": {
        "model": f"projects/{PROJECT_ID}/locations/{LOCATION}/publishers/google/models/gemini-2.5-flash"
    },
}
2단계: 세상의 데이터 수집
test_trip_planner에서 다음을 전송합니다.
- 문자 메시지 ('Hello')
- 이미지 (랜드마크)
- 동영상 (지중해)
- 오디오 클립 (가에타에 관한 음성 메모)
6_multimodal_agent/main.py 함수 내에서 # TODO create session service and memory service 주석을 찾습니다.
이 전체 행을 다음 코드로 바꿉니다.
session_service = VertexAiSessionService(
    project=PROJECT_ID, location=LOCATION, agent_engine_id=agent_engine_id
)
memory_service = VertexAiMemoryBankService(
    project=PROJECT_ID, location=LOCATION, agent_engine_id=agent_engine_id
)
👉 동일한 파일 06_multimodal_agent/main.py에서 # TODO: create memory from session 주석을 찾습니다.
이 전체 행을 다음 코드로 바꿉니다.
await memory_service.add_session_to_memory(final_session_state)
이 선이 마법의 선입니다. 이 도구는 모든 리치 미디어를 Vertex AI로 전송하며, Vertex AI는 이를 처리하고 색인을 생성합니다.
3단계: 검색
👉💻 Cloud Shell 터미널에서 다음을 실행하여 Cloud Shell 편집기에서 파일을 엽니다.
cloudshell edit ~/memory_agent_starter/06_multimodal_agent/agent.py
에이전트에 PreloadMemoryTool이 있습니다.
tools=[PreloadMemoryTool(), budget_tool]
새 세션이 시작되면 이 도구는 메모리 뱅크에서 관련 과거 경험을 자동으로 검색하여 맥락에 삽입합니다.
4단계: 브레인 실행
👉💻 Cloud Shell 터미널에서 스크립트를 실행합니다 (참고: Vertex AI가 사용 설정된 Google Cloud 프로젝트가 필요함).
cd ~/memory_agent_starter
uv run python ~/memory_agent_starter/06_multimodal_agent/main.py
최종 확인 단계를 시청하세요.
'전에 공유해 주신 사진, 동영상, 오디오를 바탕으로...'
상담사는 다음과 같이 대답합니다.
'가에타에 가 보세요. 지중해 동영상과 가에타를 좋아한다고 말하는 오디오 클립을 보여줬어."
과거의 다양한 미디어 유형을 연결해 줍니다.
핵심 내용
메모리 규칙 6: 최고의 메모리 환경을 위해 Vertex AI 메모리 뱅크를 사용하세요. 텍스트, 이미지, 동영상을 검색 가능한 하나의 브레인으로 통합합니다.
9. 결론
기억력이 좋지 않은 금붕어에서 멀티모달 코끼리로 성장하셨습니다.
내가 만든 항목 | 기능 |
세션 에이전트 | 단기 대화 메모리 |
Multi-Agent | 공유 팀 메모리 |
Persistent Agent | 장기 기록 |
스테이트풀 에이전트 | 동적, 자동 업데이트 메모리 |
프로필 에이전트 | 구조화된 데이터 메모리 |
멀티모달 에이전트 | 인간과 유사한 감각 기억 |
신뢰는 기억을 기반으로 구축됩니다. 이러한 패턴을 구현하면 사용자의 시간과 기록을 존중하는 에이전트를 만들어 더 깊고 효과적인 상호작용을 유도할 수 있습니다.
지금 바로 맞춤 에이전트를 빌드하세요.