
1. Overview
Agent Runtime (previously Agent Engine) offers a managed runtime environment designed for deploying, running, and scaling AI agents effectively. By default, the platform automatically bundles your source code and dependencies during the deployment process.
However, enterprise workloads often require complete ownership over the runtime environment. To support this, Agent Runtime provides Bring Your Own Container(BYOC) capability, allowing you to deploy prebuilt custom container images.
This codelab outlines the end-to-end process for containerizing an agent built with the Google Agent Development Kit (ADK), configuring the necessary Google Cloud permissions, and deploying it to Agent Runtime using either the Python SDK or Terraform.
This codelab guides you through:
- Building a Python agent using the Google Agent Development Kit (ADK).
- Wrapping the agent in a FastAPI application.
- Containerizing the application with Docker.
- Configuring Google Cloud permissions.
- Deploying and testing the containerized agent on Agent Runtime.
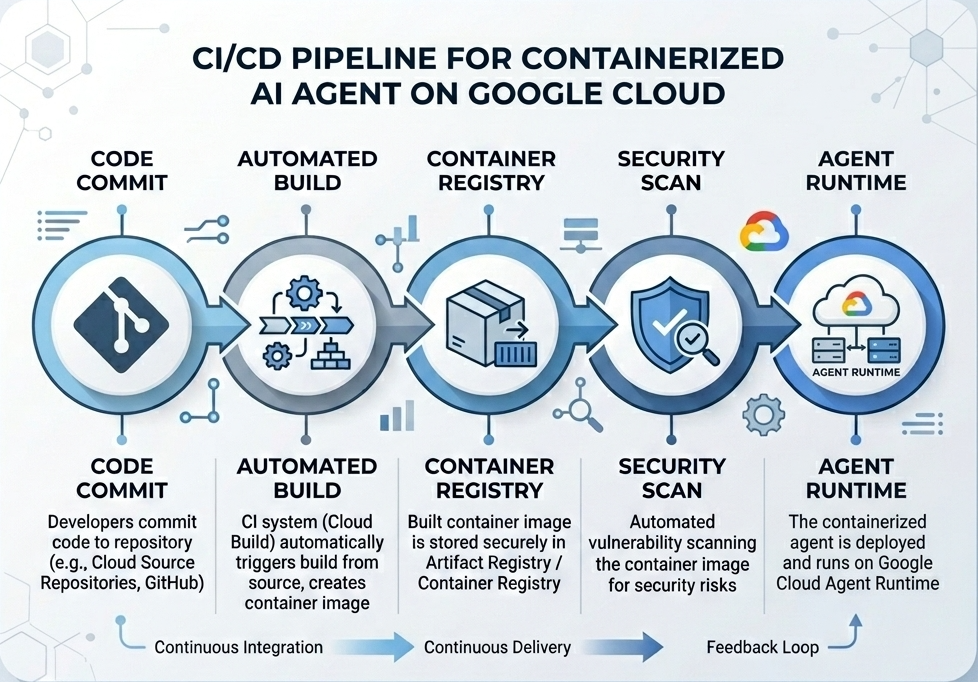
Build and Deployment Flow
The following diagram illustrates the workflow of the build and deployment steps you will perform manually in this codelab:
What You Need
- A Google Cloud Project with billing enabled.
- Access to Cloud Shell (recommended) or a local development environment with
gcloudanddockerinstalled. - Basic knowledge of Python and Docker.
2. Environment Setup
Before starting, you must enable the necessary APIs and configure your environment.
Step 1: Open Cloud Shell
Click the Activate Cloud Shell button in the top right of the Google Cloud Console.

Step 2: Configure Environment Variables
In Cloud Shell, set your project ID and define key environment variables used throughout this codelab. Replace "YOUR_PROJECT_ID" with your actual Google Cloud Project ID:
gcloud config set project "YOUR_PROJECT_ID"
export PROJECT_ID=$(gcloud config get-value project)
export LOCATION="us-central1"
export MODEL="gemini-3.1-flash-lite"
export MODEL_REGION="global"
These variables configure the target deployment settings:
PROJECT_ID: The unique identifier of your Google Cloud Project where all the Gemini Enterprise Agent Platform resources and Artifact Registry will reside.LOCATION: The geographical region (e.g.us-central1) hosting your repositories and runtime workloads.MODEL: The Gemini model version (e.g.gemini-3.1-flash-lite) loaded by the agent context.MODEL_REGION: The endpoint region of the model. Set here as"global"to invoke the Gemini model from the global endpoints.
Step 3: Enable APIs
Enable the required Google Cloud APIs:
gcloud services enable \
    aiplatform.googleapis.com \
    cloudbuild.googleapis.com \
    compute.googleapis.com \
    artifactregistry.googleapis.com \
    storage.googleapis.com
Step 4: Install SDK
Install the Vertex AI SDK with Agent Engine and ADK support:
pip install --upgrade "google-cloud-aiplatform[agent_engines,adk]>=1.144"
3. Source Files Setup
In this step, you will create the structure and code for your agent.
Directory Structure Overview
By the end of this codelab, your files will be organized under the following workspace hierarchy:
weather-agent-byoc/
├── Dockerfile                  # Container definition
├── deploy_byoc.py              # Python SDK deployment script
├── main.py                     # FastAPI server wrapper
├── query_agent.py              # Verify / query script
├── requirements.txt            # Python dependencies
│
├── weather_agent/              # Agent source module
│   ├── __init__.py             # Package declaration
│   ├── agent.py                # Agent & mock tools logic
│   └── config.json             # Environment config variables
│
└── terraform/                  # Terraform configuration files
    ├── main.tf
    ├── outputs.tf
    ├── providers.tf
    ├── terraform.tfvars
    └── variables.tf
Step 1: Create Directories
Start in your home directory and create the workspace structure:
cd ~
mkdir -p weather-agent-byoc/weather_agent
cd weather-agent-byoc
Step 2: Create Config File
Run the following command in Cloud Shell to write the configuration parameters directly to weather_agent/config.json. This command automatically replaces the variables with your environment values:
cat <<EOF > weather_agent/config.json
{
    "PROJECT_ID": "${PROJECT_ID}",
    "LOCATION": "${LOCATION}",
    "MODEL": "${MODEL}",
    "MODEL_REGION": "${MODEL_REGION}"
}
EOF
Step 3: Define the Agent
Run the following script to write the agent configuration and mock tool logic to weather_agent/agent.py:
cat << 'EOF' > weather_agent/agent.py
import json
import random
from google.adk.agents import Agent
from google.adk.models.google_llm import Gemini
from functools import cached_property
from google.genai import Client

# Load config
llm_config = json.load(open("weather_agent/config.json"))
PROJECT_ID = llm_config["PROJECT_ID"]
MODEL = llm_config["MODEL"]
MODEL_REGION = llm_config["MODEL_REGION"]

# Override Gemini class for global endpoint compatibility
class GlobalGemini(Gemini):
  @cached_property
  def api_client(self) -> Client:
    return Client(vertexai=True, location="global")

# Define Tool
def get_temperature(place: str) -> str:
    '''Returns the current temperature of a given place.

    Args:
        place: The name of the city or location.

    Returns:
        str: A string describing the temperature.
    '''
    temp = random.randint(-10, 40)
    return f"The current temperature in {place} is {temp}°C."

# Initialize LLM
llm_model = GlobalGemini(model=MODEL) if MODEL_REGION == "global" else Gemini(model=MODEL)

# Initialize Agent
root_agent = Agent(
    model=llm_model,
    name='weather_agent',
    description='An agent that provides temperature information for locations.',
    instruction='You are a helpful assistant that can provide the current temperature for any given place using the get_temperature tool.',
    tools=[get_temperature],
)
EOF
Create an empty __init__.py to make weather_agent a Python package:
touch weather_agent/__init__.py
Step 4: Create FastAPI Wrapper
Run the following script to write the FastAPI server entrypoint configuration to main.py:
cat << 'EOF' > main.py
import inspect
import json
import logging
import os
from typing import Any, Dict, Optional
import uvicorn
import vertexai
from weather_agent.agent import root_agent
from fastapi import FastAPI, encoders, responses, Request
from vertexai import agent_engines

app = FastAPI()

config_json = json.load(open("weather_agent/config.json"))
PROJECT_ID = config_json["PROJECT_ID"]
LOCATION = config_json["LOCATION"]
MODEL_REGION = config_json["MODEL_REGION"]

vertexai.init(project=PROJECT_ID, location=MODEL_REGION)
adk_app = agent_engines.AdkApp(agent=root_agent)

def _encode_chunk_to_json(chunk):
  try:
    json_chunk = encoders.jsonable_encoder(chunk)
    return json.dumps(json_chunk) + "\n"
  except Exception:
    logging.exception("Failed to encode chunk")
    return None

async def json_generator(output):
  async for chunk in output:
    encoded_chunk = _encode_chunk_to_json(chunk)
    if encoded_chunk is None:
      break
    yield encoded_chunk

async def _invoke_callable_or_raise(invocation_callable, invocation_payload):
  if inspect.iscoroutinefunction(invocation_callable):
    return await invocation_callable(**invocation_payload)
  else:
    return invocation_callable(**invocation_payload)

@app.post("/api/reasoning_engine")
async def query(request: Request) -> responses.JSONResponse:
    request_json = await request.json()
    class_method = request_json.get("class_method")
    input_val = request_json.get("input")
    method = getattr(adk_app, class_method)
    output = await _invoke_callable_or_raise(method, input_val or {})
    try:
      json_serialized_content = encoders.jsonable_encoder({"output": output})
    except ValueError as encoding_error:
      logging.exception("Failed to encode response")
      raise encoding_error
    return responses.JSONResponse(content=json_serialized_content)

@app.post("/api/stream_reasoning_engine")
async def stream_query(request: Request) -> responses.StreamingResponse:
    request_json = await request.json()
    class_method = request_json.get("class_method")
    input_val = request_json.get("input")
    method = getattr(adk_app, class_method)
    output = await _invoke_callable_or_raise(method, input_val or {})
    return responses.StreamingResponse(
        content=json_generator(output),
        media_type="application/json",
    )

if __name__ == "__main__":
    uvicorn.run(app, host="0.0.0.0", port=int(os.environ.get("PORT", 8080)))
EOF
Step 5: Define Dependencies
Write the required Python dependencies to requirements.txt:
cat << 'EOF' > requirements.txt
fastapi
uvicorn
vertexai
google-cloud-aiplatform[agent_engines,adk]>=1.144
pydantic
EOF
4. Containerization
Now, define how your agent will be packaged into a container.
Step 1: Create Dockerfile
Create the Dockerfile in the root of your project directory to specify how your FastAPI application is built:
cat << 'EOF' > Dockerfile
FROM python:3.11-slim

WORKDIR /app

COPY weather_agent/ /app/weather_agent/
COPY main.py .
COPY requirements.txt .
RUN pip install -r requirements.txt

CMD ["sh", "-c", "uvicorn main:app --host 0.0.0.0 --port $PORT"]
EOF
5. Setup Artifact Registry & Cloud Build
You need a repository to store the container image and permissions to push it.
Step 1: Create Repository
Define the repository name and create a Docker repository inside Artifact Registry using the environment variables defined during configuration:
export REPOSITORY_NAME="agents-repo"

gcloud artifacts repositories create $REPOSITORY_NAME \
    --project=$PROJECT_ID \
    --repository-format=docker \
    --location=$LOCATION \
    --description="Docker repository for Agents"
Step 2: Configure Service Account Permissions
Grant the Default Compute Service Account permission to push images to Artifact Registry.
First, get your project number:
export PROJECT_NUMBER=$(gcloud projects describe $PROJECT_ID --format="value(projectNumber)")
Grant the roles:
# Allow pushing to Artifact Registry
gcloud projects add-iam-policy-binding $PROJECT_ID \
    --member="serviceAccount:$PROJECT_NUMBER-compute@developer.gserviceaccount.com" \
    --role="roles/artifactregistry.writer" \
    --condition=None

# Allow Cloud Build to read storage objects
gcloud projects add-iam-policy-binding $PROJECT_NUMBER \
    --member="serviceAccount:$PROJECT_NUMBER-compute@developer.gserviceaccount.com" \
    --role="roles/storage.objectViewer" \
    --condition=None
Step 3: Grant Permissions to Service Agents
Grant Artifact Registry reader access to AI Platform and Reasoning Engine service agents:
gcloud projects add-iam-policy-binding $PROJECT_NUMBER \
    --member="serviceAccount:service-$PROJECT_NUMBER@gcp-sa-aiplatform-re.iam.gserviceaccount.com" \
    --role="roles/artifactregistry.reader"  --condition=None

gcloud projects add-iam-policy-binding $PROJECT_NUMBER \
    --member="serviceAccount:service-$PROJECT_NUMBER@gcp-sa-aiplatform.iam.gserviceaccount.com" \
    --role="roles/artifactregistry.reader"  --condition=None
Step 4: Build and Push Image
Use Cloud Build to build and push the container image:
gcloud builds submit \
    --project=$PROJECT_ID \
    --region=$LOCATION \
    --tag $LOCATION-docker.pkg.dev/$PROJECT_ID/$REPOSITORY_NAME/weather-agent-image:latest \
    .
6. Deploy the Agent with SDK
Now that permissions are configured, you can deploy your custom container.
Step 1: Deploy BYOC Agent
Create the python file deploy_byoc.py inside the root of your project directory to deploy the registry-hosted container to Agent Runtime:
cat << 'EOF' > deploy_byoc.py
import json
import os
import vertexai
from google.cloud import aiplatform

config = json.load(open("weather_agent/config.json"))
PROJECT_ID = config["PROJECT_ID"]
LOCATION = config["LOCATION"]
REPOSITORY_NAME = "agents-repo"

vertexai.init(project=PROJECT_ID, location=LOCATION)
client = vertexai.Client(project=PROJECT_ID, location=LOCATION)

image_uri = f"{LOCATION}-docker.pkg.dev/{PROJECT_ID}/{REPOSITORY_NAME}/weather-agent-image:latest"

print(f"Deploying custom container agent from {image_uri}...")
remote_agent = client.agent_engines.create(
    config={
        "display_name": "byoc_weather_agent",
        "description": "BYOC weather agent from custom container",
        "container_spec": {
            "image_uri": image_uri
        },
        "class_methods": [
            # For convenience to interact with the agent through the Python SDK
            # https://docs.cloud.google.com/gemini-enterprise-agent-platform/scale/runtime/use-an-adk-agent#supported-operations
            {"api_mode": "", "name": "get_session"},
            {"api_mode": "", "name": "list_sessions"},
            {"api_mode": "", "name": "create_session"},
            {"api_mode": "", "name": "delete_session"},
            {"api_mode": "async", "name": "async_get_session"},
            {"api_mode": "async", "name": "async_list_sessions"},
            {"api_mode": "async", "name": "async_create_session"},
            {"api_mode": "async", "name": "async_delete_session"},
            {"api_mode": "async", "name": "async_add_session_to_memory"},
            {"api_mode": "async", "name": "async_search_memory"},
            {"api_mode": "stream", "name": "stream_query"},
            {"api_mode": "async_stream", "name": "async_stream_query"},
            {"api_mode": "async_stream", "name": "streaming_agent_run_with_events"},
        ],
        "agent_framework": "google-adk",
    },
)

print(f"Agent successfully deployed!")
print(f"Resource Name: {remote_agent.api_resource.name}")

# Save resource name for testing
with open("agent_resource_name.txt", "w") as f:
    f.write(remote_agent.api_resource.name)
EOF
Run the deployment script to deploy the agent on Agent Runtime:
python3 deploy_byoc.py
7. Deploy the Agent with Terraform
Alternatively, you can deploy the same containerized agent using Terraform. This is recommended for production environments to manage infrastructure as code.
Step 1: Navigate to Terraform Directory
Create a terraform directory in your project root and navigate to it:
mkdir -p terraform
cd terraform
Step 2: Create Providers Configuration
Run the following script to write the providers mapping to providers.tf:
cat << 'EOF' > providers.tf
terraform {
  required_providers {
    google = {
      source  = "hashicorp/google"
      version = ">= 5.28.0"
    }
  }
}

provider "google" {
  project = var.project_id
  region  = var.location
}
EOF
Step 3: Create Variables Definition
Write the inputs description block to variables.tf:
cat << 'EOF' > variables.tf
variable "project_id" {
  type        = string
  description = "The Google Cloud Project ID"
}

variable "location" {
  type        = string
  description = "The region to deploy the reasoning engine"
  default     = "us-central1"
}

variable "repository_name" {
  type        = string
  description = "The Artifact Registry repository name"
  default     = "agents-repo"
}

variable "image_tag" {
  type        = string
  description = "The tag of the container image to deploy"
  default     = "latest"
}
EOF
Step 4: Create Main Configuration
Write the main resources definition parameters to main.tf:
cat << 'EOF' > main.tf
locals {
  class_methods = [
    {"api_mode" = "", "name" = "get_session"},
    {"api_mode" = "", "name" = "list_sessions"},
    {"api_mode" = "", "name" = "create_session"},
    {"api_mode" = "", "name" = "delete_session"},
    {"api_mode" = "async", "name" = "async_get_session"},
    {"api_mode" = "async", "name" = "async_list_sessions"},
    {"api_mode" = "async", "name" = "async_create_session"},
    {"api_mode" = "async", "name" = "async_delete_session"},
    {"api_mode" = "async", "name" = "async_add_session_to_memory"},
    {"api_mode" = "async", "name" = "async_search_memory"},
    {"api_mode" = "stream", "name" = "stream_query"},
    {"api_mode" = "async_stream", "name" = "async_stream_query"},
    {"api_mode" = "async_stream", "name" = "streaming_agent_run_with_events"}
  ]
}

# define the resource with the BYOC configuration, set agent_framework to "google-adk" to enable interactive features on the console.
resource "google_vertex_ai_reasoning_engine" "byoc_weather_agent" {
  display_name = "byoc_weather_agent_tf"
  description  = "BYOC weather agent deployed via Terraform"
  project      = var.project_id
  location     = var.location

  spec {
    class_methods = jsonencode(local.class_methods)
    agent_framework = "google-adk"
    container_spec {
      image_uri = "${var.location}-docker.pkg.dev/${var.project_id}/${var.repository_name}/weather-agent-image:${var.image_tag}"
    }
  }
}
EOF
Step 5: Create Outputs Definition
Write the outputs block to outputs.tf:
cat << 'EOF' > outputs.tf
output "reasoning_engine_id" {
  value       = google_vertex_ai_reasoning_engine.byoc_weather_agent.id
  description = "The ID of the deployed reasoning engine"
}

output "reasoning_engine_resource_name" {
  value       = google_vertex_ai_reasoning_engine.byoc_weather_agent.id
  description = "The resource name of the deployed reasoning engine"
}
EOF
Step 6: Create Variables Values File (tfvars)
Deploy dynamically without placeholder editing by feeding environment variables directly to terraform.tfvars:
cat <<EOF > terraform.tfvars
project_id      = "${PROJECT_ID}"
location        = "${LOCATION}"
repository_name = "agents-repo"
image_tag       = "latest"
EOF
Step 7: Initialize and Apply
Initialize Terraform and apply the configuration:
terraform init
terraform apply
Confirm the apply by typing yes when prompted.
Once completed, Terraform outputs the resource name. Programmatically capture it to agent_resource_name.txt and return to the root folder:
terraform output -raw reasoning_engine_resource_name > ../agent_resource_name.txt
cd ..
8. Query the Agent
Verify your agent is running and responding.
Step 1: Create Query Script
Write the verification script to query_agent.py using a dynamic setup configuration check to fetch location coordinates:
cat << 'EOF' > query_agent.py
import json
import os
import requests
from google import auth as google_auth
from google.auth.transport import requests as google_requests

# Load config coordinates directly
config_json = json.load(open("weather_agent/config.json"))
LOCATION = config_json["LOCATION"]
PROJECT_ID = config_json["PROJECT_ID"]

# Load agent resource name
with open("agent_resource_name.txt", "r") as f:
    agent_resource_name = f.read().strip()

def get_identity_token():
    credentials, _ = google_auth.default()
    auth_request = google_requests.Request()
    credentials.refresh(auth_request)
    return credentials.token

# Access the agent at the fastapi endpoint that was specified in main.py
url = f"https://{LOCATION}-aiplatform.googleapis.com/reasoningEngines/v1/{agent_resource_name}/api/api/stream_reasoning_engine"

payload = {
    "class_method": "async_stream_query",
    "input": {
        "user_id": "codelab_test_user",
        "message": "What is the temperature in Tokyo?",
    },
}

print(f"Sending query to {url}...")
response = requests.post(
    url,
    headers={
        "Content-Type": "application/json",
        "Authorization": f"Bearer {get_identity_token()}",
    },
    data=json.dumps(payload),
    stream=True,
)

for chunk in response.iter_content(chunk_size=8192):
    if chunk:
        print(chunk.decode('utf-8'))
EOF
Run the query script:
python3 query_agent.py
You should see output streaming back from the agent, including the simulated temperature for Tokyo.
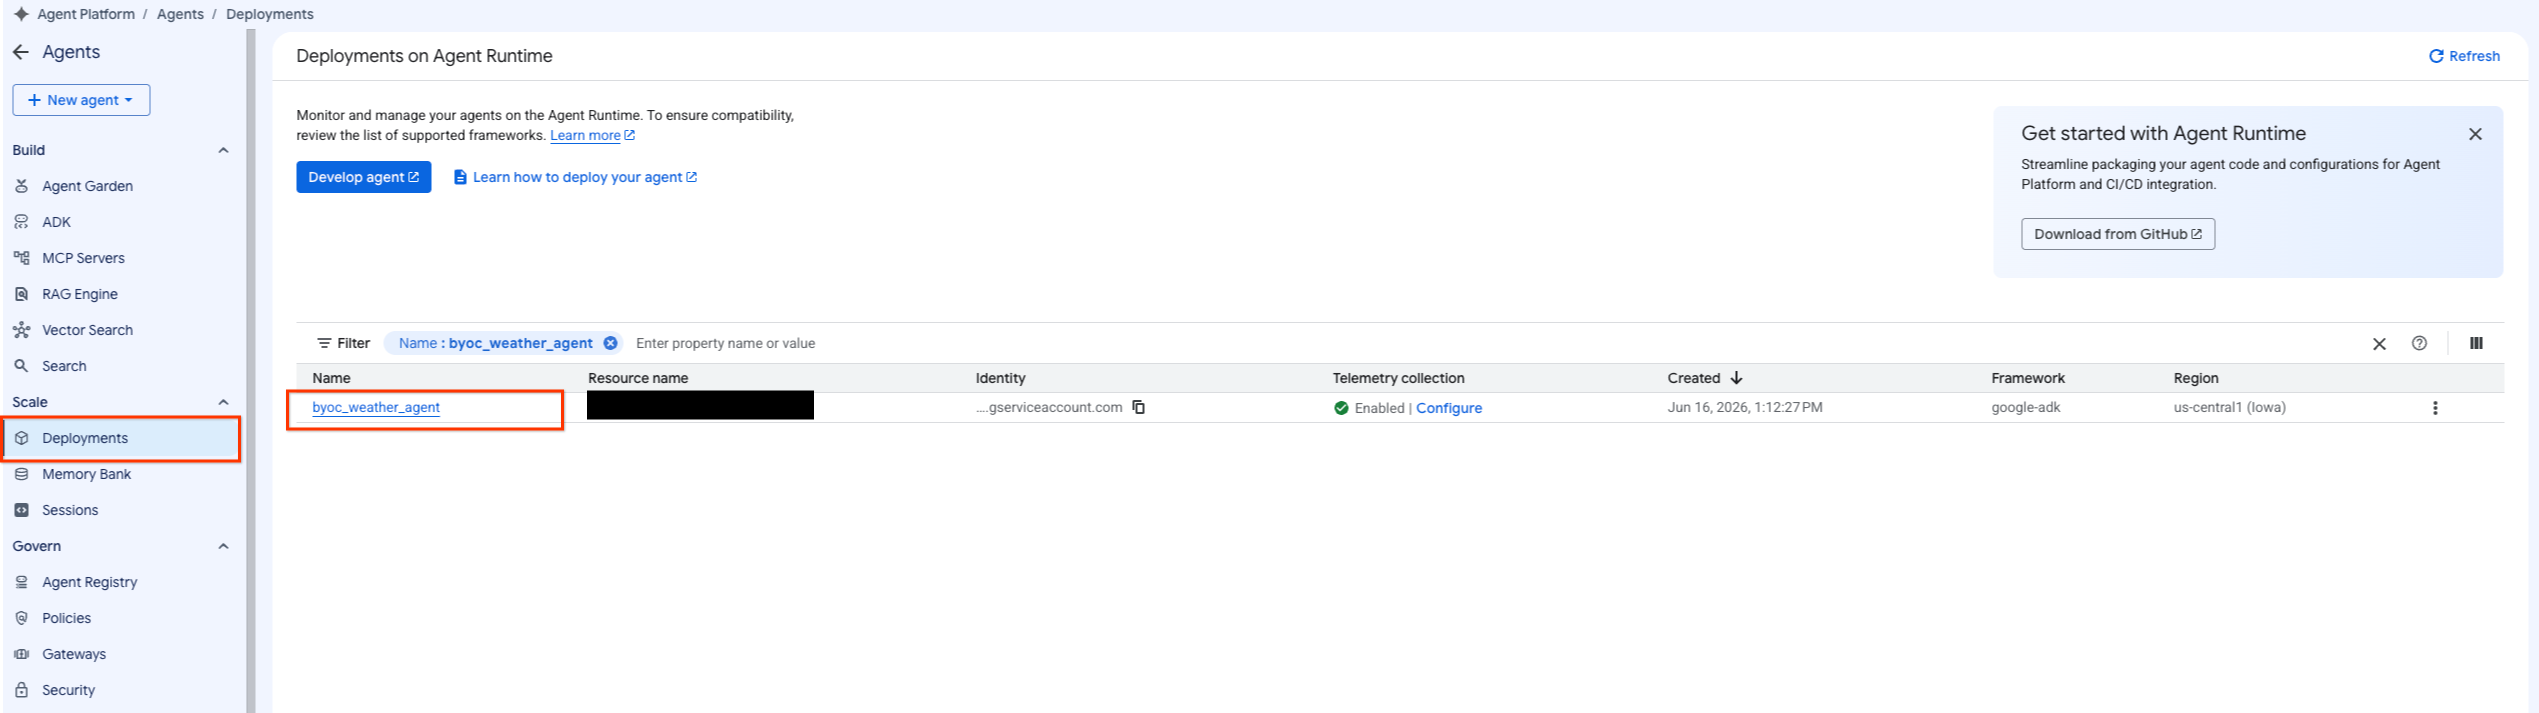
Step 2: Use the console
- Navigate to deployed agent by selecting Agent Platform > Agents > Deployments to filter the list of agents.
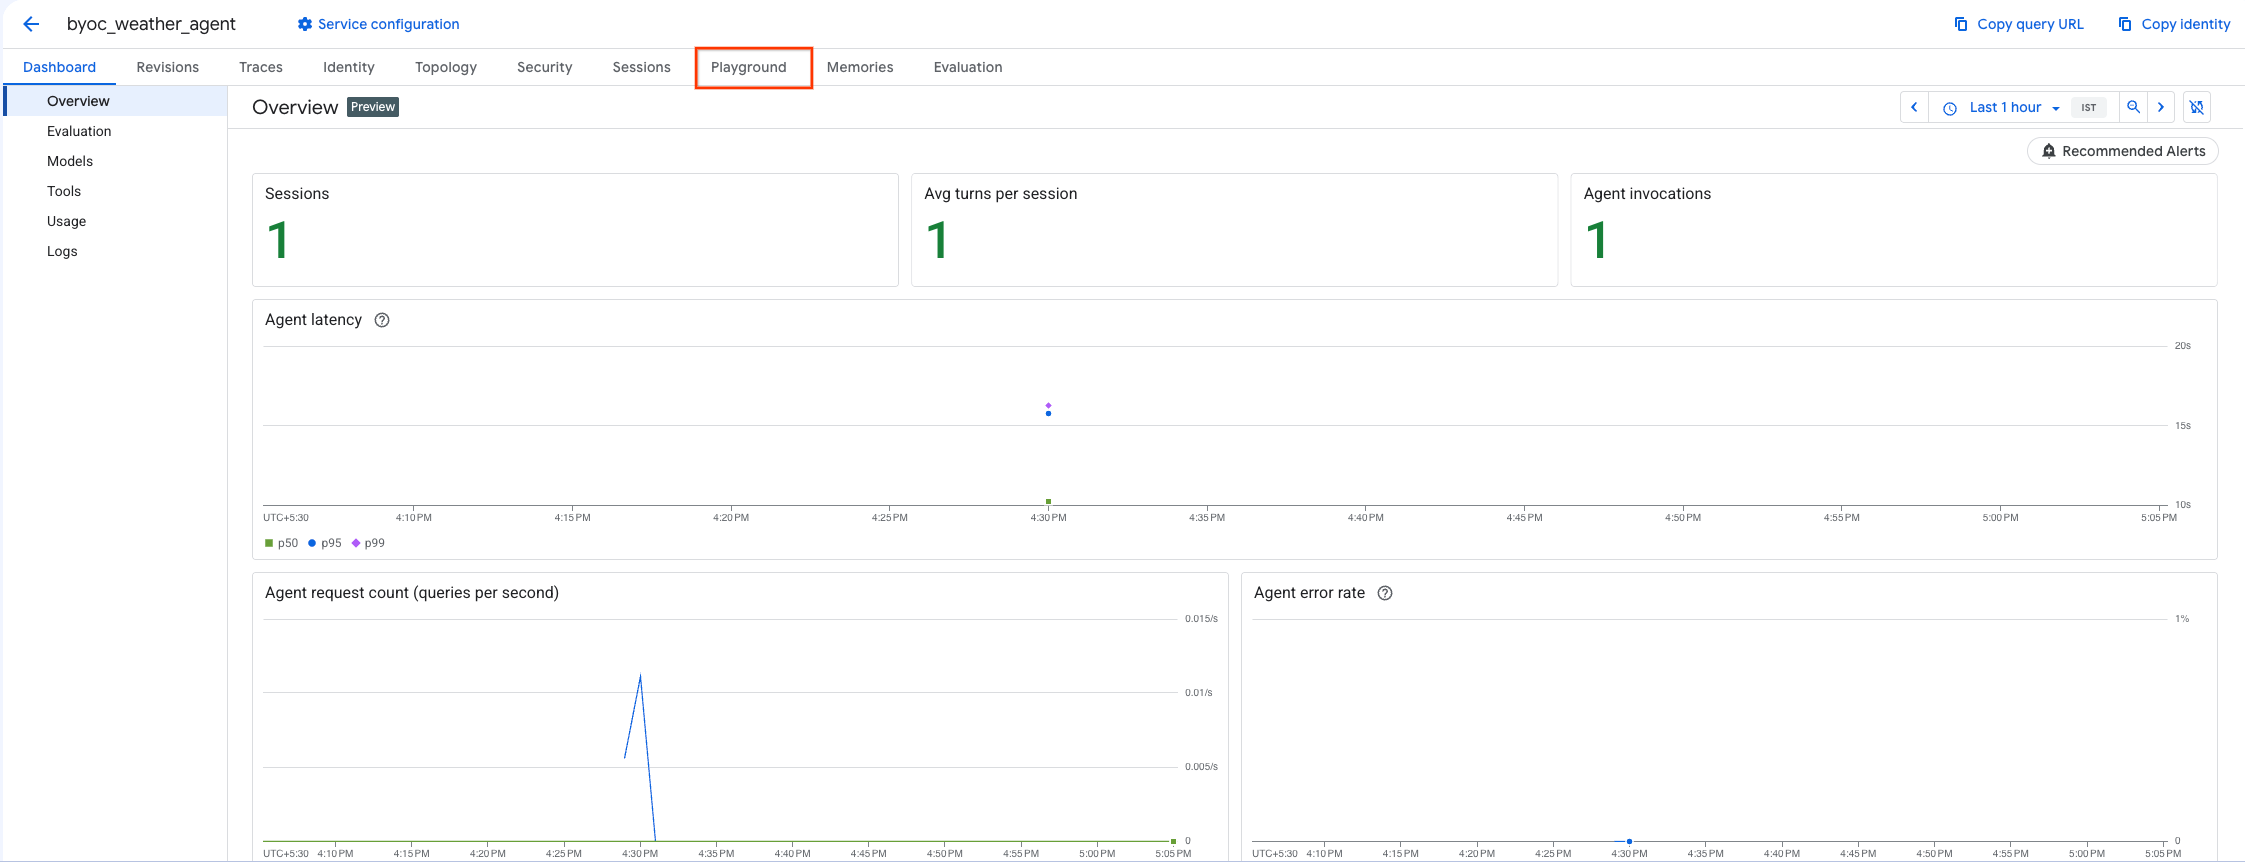
- Select Playground from the Agent's dashboard.
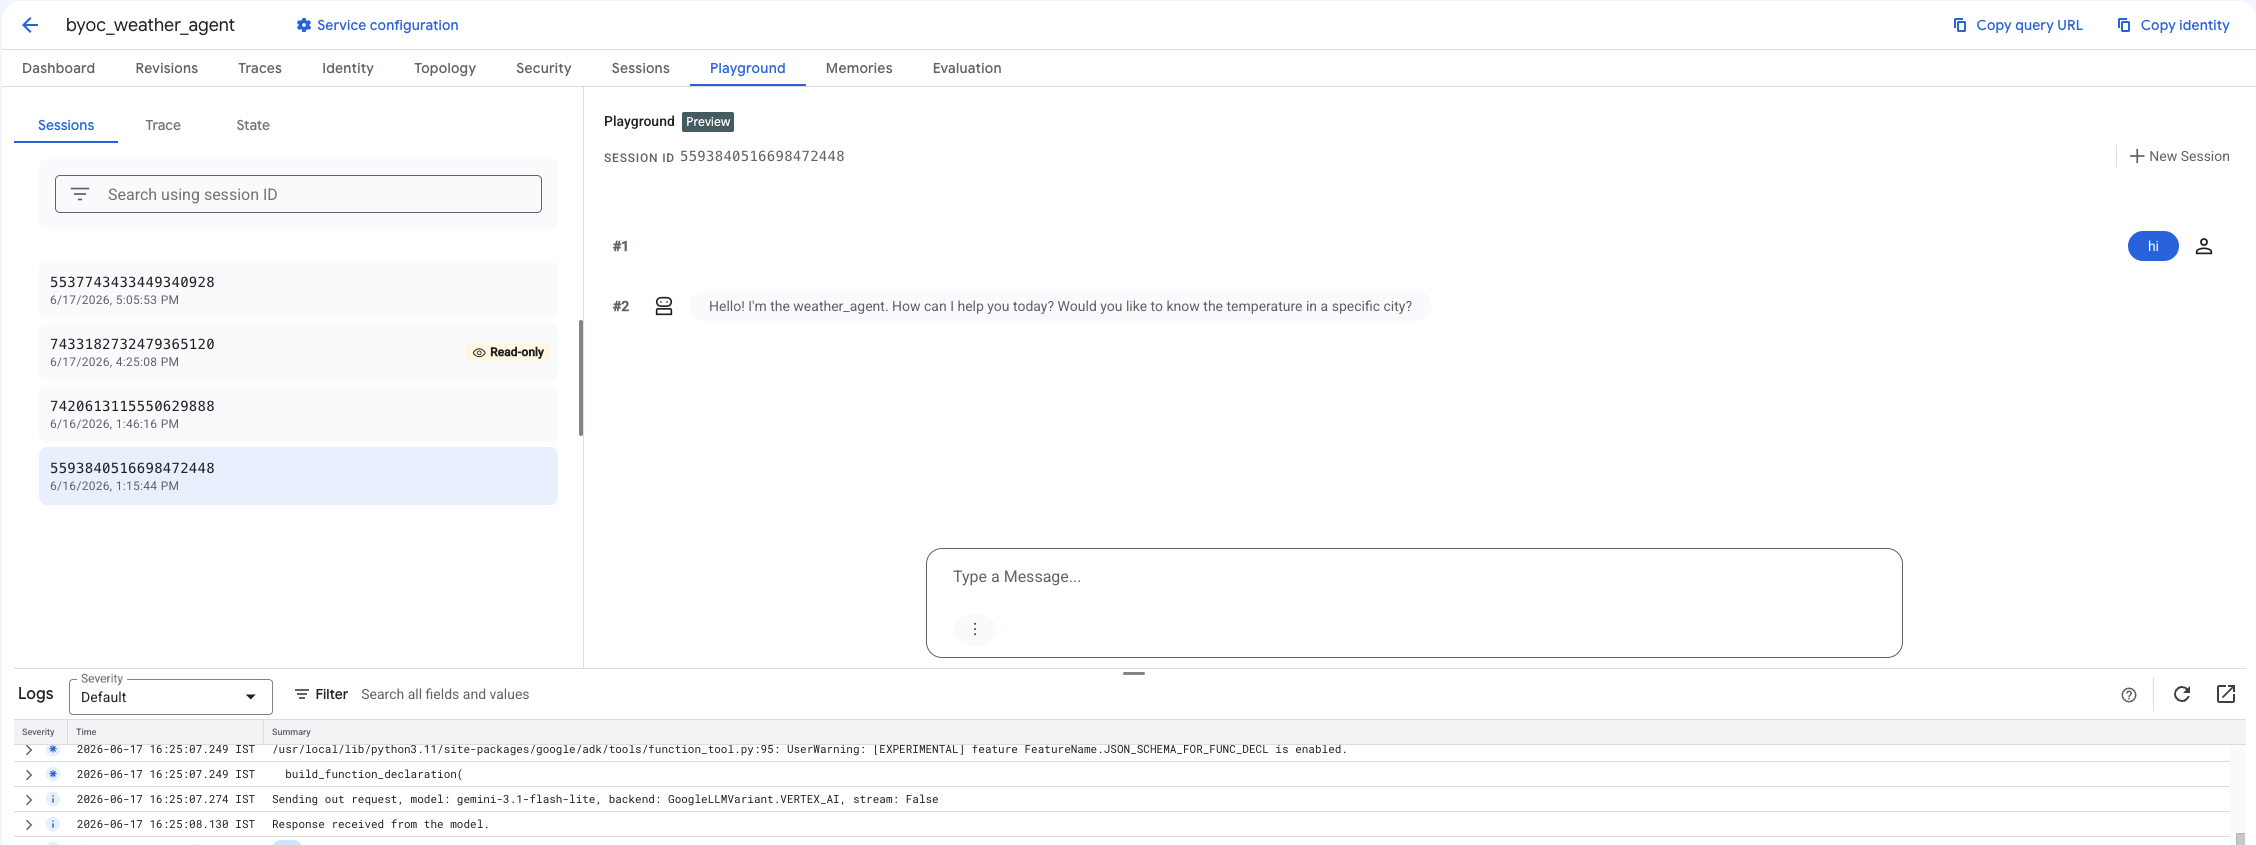
- Create a new session and type in your query to check if the agent is responding to requests as shown.
9. Cleanup
To avoid incurring charges, clean up the resources you created.
If you deployed using Terraform, change into the terraform directory and execute the destroy action:
cd ~/weather-agent-byoc/terraform
terraform destroy
cd ..
If you deployed using the SDK, create the script to delete the deployed agent:
cat << 'EOF' > delete_agent.py
import json
import os
import vertexai
from google.cloud import aiplatform

config = json.load(open("weather_agent/config.json"))
PROJECT_ID = config["PROJECT_ID"]
LOCATION = config["LOCATION"]

vertexai.init(project=PROJECT_ID, location=LOCATION)
client = vertexai.Client(project=PROJECT_ID, location=LOCATION)

with open("agent_resource_name.txt", "r") as f:
    agent_resource_name = f.read().strip()

# 1. Delete the Agent
# Note: We retrieve the list first to ensure we delete the ones created in this session
try:
    page_size = 100
    reasoning_engines = client.agent_engines.list()
    for engine in reasoning_engines:
        if agent_resource_name in engine.api_resource.name:
            print(f"Deleting Reasoning Engine: {engine.api_resource.name}")
            engine.delete(force=True)
except Exception as e:
    print(f"Error deleting reasoning engines: {e}")
EOF
Run the script to delete the agent:
python3 delete_agent.py
To cleanup rest of the resources, navigate back to your home directory and run the following commands in Cloud Shell:
cd ~

# 1. Delete the Artifact Registry Repository
gcloud artifacts repositories delete $REPOSITORY_NAME --location=$LOCATION --quiet

# 2. Clean up files (Optional)
rm -rf ~/weather-agent-byoc
10. Conclusion
Congratulations! You have successfully containerized and deployed an AI agent on Agent Runtime using BYOC.
You learned how to:
- Use ADK to define an Agent and wrap it using FastAPI.
- Create a Dockerfile and build images using Cloud Build.
- Manage IAM permissions for Agent Runtime.
- Deploy your custom container using both the Python SDK and Terraform.
- Test and query your deployed agent.