
1. نظرة عامة
توفّر Agent Runtime (المعروفة سابقًا باسم Agent Engine) بيئة وقت تشغيل مُدارة مصمَّمة لنشر وكلاء الذكاء الاصطناعي وتشغيلهم وتوسيع نطاق عملهم بفعالية. تجمع المنصة تلقائيًا رمز المصدر والتبعيات أثناء عملية النشر.
ومع ذلك، تتطلّب مهام العمل في المؤسسات غالبًا ملكية كاملة لبيئة وقت التشغيل. لإتاحة ذلك، توفّر Agent Runtime إمكانية استخدام الحاوية الخاصة بك(BYOC)، ما يتيح لك نشر صور حاويات مخصّصة تم إنشاؤها مسبقًا.
يوضّح هذا الدرس التطبيقي حول الترميز العملية الكاملة لإنشاء حاوية لوكيل تم إنشاؤه باستخدام Google Agent Development Kit (ADK)، وإعداد أذونات Google Cloud اللازمة، ونشره في Agent Runtime باستخدام حزمة تطوير البرامج (SDK) بلغة Python أو Terraform.
يرشدك هذا الدرس التطبيقي حول الترميز إلى ما يلي:
- إنشاء وكيل Python باستخدام حزمة تطوير الوكلاء (ADK) من Google
- تضمين الوكيل في تطبيق FastAPI
- تضمين التطبيق في حاوية باستخدام Docker
- إعداد أذونات Google Cloud
- نشر الوكيل المحفوظ في حاوية واختباره على Agent Runtime
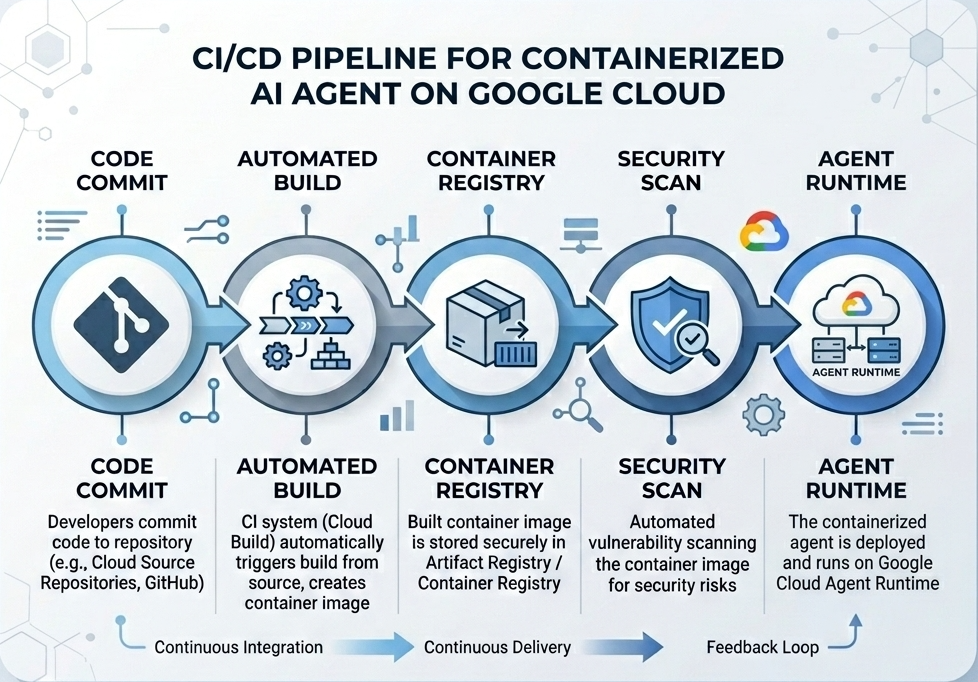
مسار التطوير والنشر
يوضّح المخطّط التالي سير عمل خطوات الإنشاء والنشر التي ستنفّذها يدويًا في هذا الدرس العملي:
المتطلبات
- مشروع Google Cloud تم تفعيل الفوترة فيه
- الوصول إلى Cloud Shell (يُنصح به) أو بيئة تطوير محلية مثبَّت عليها
gcloudوdocker - الإلمام بأساسيات Python وDocker
2. إعداد البيئة
قبل البدء، يجب تفعيل واجهات برمجة التطبيقات اللازمة وإعداد بيئتك.
الخطوة 1: فتح Cloud Shell
انقر على الزر تفعيل Cloud Shell في أعلى يسار Google Cloud Console.

الخطوة 2: ضبط متغيرات البيئة
في Cloud Shell، اضبط رقم تعريف مشروعك وحدِّد متغيّرات البيئة الرئيسية المستخدَمة في هذا الدرس التطبيقي حول الترميز. استبدِل "YOUR_PROJECT_ID" بمعرّف مشروع Google Cloud الفعلي:
gcloud config set project "YOUR_PROJECT_ID"
export PROJECT_ID=$(gcloud config get-value project)
export LOCATION="us-central1"
export MODEL="gemini-3.1-flash-lite"
export MODEL_REGION="global"
تضبط هذه المتغيّرات إعدادات النشر المستهدَف:
PROJECT_ID: المعرّف الفريد لمشروعك على Google Cloud حيث سيتم تخزين جميع موارد Gemini Enterprise Agent Platform وArtifact Registry.LOCATION: المنطقة الجغرافية (مثلus-central1) التي تستضيف المستودعات وأحمال العمل في وقت التشغيل.MODEL: إصدار نموذج Gemini (مثلgemini-3.1-flash-lite) الذي يتم تحميله من خلال سياق الوكيلMODEL_REGION: منطقة نقطة نهاية النموذج. اضبط القيمة هنا على"global"لاستدعاء نموذج Gemini من نقاط النهاية العامة.
الخطوة 3: تفعيل واجهات برمجة التطبيقات
فعِّل واجهات Google Cloud APIs المطلوبة:
gcloud services enable \
    aiplatform.googleapis.com \
    cloudbuild.googleapis.com \
    compute.googleapis.com \
    artifactregistry.googleapis.com \
    storage.googleapis.com
الخطوة 4: تثبيت حزمة تطوير البرامج (SDK)
ثبِّت حزمة تطوير البرامج (SDK) الخاصة بمنصة Vertex AI مع إتاحة استخدام Agent Engine وADK:
pip install --upgrade "google-cloud-aiplatform[agent_engines,adk]>=1.144"
3- إعداد الملفات المصدر
في هذه الخطوة، ستنشئ بنية ورمزًا للوكيل.
نظرة عامة على بنية الدليل
في نهاية هذا الدرس التطبيقي، سيتم تنظيم ملفاتك ضمن التسلسل الهرمي لمساحة العمل التالي:
weather-agent-byoc/
├── Dockerfile                  # Container definition
├── deploy_byoc.py              # Python SDK deployment script
├── main.py                     # FastAPI server wrapper
├── query_agent.py              # Verify / query script
├── requirements.txt            # Python dependencies
│
├── weather_agent/              # Agent source module
│   ├── __init__.py             # Package declaration
│   ├── agent.py                # Agent & mock tools logic
│   └── config.json             # Environment config variables
│
└── terraform/                  # Terraform configuration files
    ├── main.tf
    ├── outputs.tf
    ├── providers.tf
    ├── terraform.tfvars
    └── variables.tf
الخطوة 1: إنشاء أدلة
ابدأ في الدليل الرئيسي وأنشئ بنية مساحة العمل:
cd ~
mkdir -p weather-agent-byoc/weather_agent
cd weather-agent-byoc
الخطوة 2: إنشاء ملف الإعداد
نفِّذ الأمر التالي في Cloud Shell لكتابة مَعلمات الإعداد مباشرةً في weather_agent/config.json. يستبدل هذا الأمر المتغيرات تلقائيًا بقيم بيئتك:
cat <<EOF > weather_agent/config.json
{
    "PROJECT_ID": "${PROJECT_ID}",
    "LOCATION": "${LOCATION}",
    "MODEL": "${MODEL}",
    "MODEL_REGION": "${MODEL_REGION}"
}
EOF
الخطوة 3: تحديد الوكيل
شغِّل النص البرمجي التالي لكتابة إعدادات الوكيل ومنطق الأداة التجريبية إلى weather_agent/agent.py:
cat << 'EOF' > weather_agent/agent.py
import json
import random
from google.adk.agents import Agent
from google.adk.models.google_llm import Gemini
from functools import cached_property
from google.genai import Client

# Load config
llm_config = json.load(open("weather_agent/config.json"))
PROJECT_ID = llm_config["PROJECT_ID"]
MODEL = llm_config["MODEL"]
MODEL_REGION = llm_config["MODEL_REGION"]

# Override Gemini class for global endpoint compatibility
class GlobalGemini(Gemini):
  @cached_property
  def api_client(self) -> Client:
    return Client(vertexai=True, location="global")

# Define Tool
def get_temperature(place: str) -> str:
    '''Returns the current temperature of a given place.

    Args:
        place: The name of the city or location.

    Returns:
        str: A string describing the temperature.
    '''
    temp = random.randint(-10, 40)
    return f"The current temperature in {place} is {temp}°C."

# Initialize LLM
llm_model = GlobalGemini(model=MODEL) if MODEL_REGION == "global" else Gemini(model=MODEL)

# Initialize Agent
root_agent = Agent(
    model=llm_model,
    name='weather_agent',
    description='An agent that provides temperature information for locations.',
    instruction='You are a helpful assistant that can provide the current temperature for any given place using the get_temperature tool.',
    tools=[get_temperature],
)
EOF
أنشئ مجلدًا فارغًا __init__.py لإنشاء weather_agent كحزمة Python:
touch weather_agent/__init__.py
الخطوة 4: إنشاء برنامج تضمين FastAPI
نفِّذ النص البرمجي التالي لكتابة إعداد نقطة دخول خادم FastAPI إلى main.py:
cat << 'EOF' > main.py
import inspect
import json
import logging
import os
from typing import Any, Dict, Optional
import uvicorn
import vertexai
from weather_agent.agent import root_agent
from fastapi import FastAPI, encoders, responses
from pydantic import BaseModel
from vertexai import agent_engines

app = FastAPI()

config_json = json.load(open("weather_agent/config.json"))
PROJECT_ID = config_json["PROJECT_ID"]
LOCATION = config_json["LOCATION"]
MODEL_REGION = config_json["MODEL_REGION"]

class QueryRequest(BaseModel):
    input: Optional[Dict[str, Any]] = None
    class_method: Optional[str] = None

vertexai.init(project=PROJECT_ID, location=MODEL_REGION)
adk_app = agent_engines.AdkApp(agent=root_agent)

def _encode_chunk_to_json(chunk):
  try:
    json_chunk = encoders.jsonable_encoder(chunk)
    return json.dumps(json_chunk) + "\n"
  except Exception:
    logging.exception("Failed to encode chunk")
    return None

async def json_generator(output):
  async for chunk in output:
    encoded_chunk = _encode_chunk_to_json(chunk)
    if encoded_chunk is None:
      break
    yield encoded_chunk

async def _invoke_callable_or_raise(invocation_callable, invocation_payload):
  if inspect.iscoroutinefunction(invocation_callable):
    return await invocation_callable(**invocation_payload)
  else:
    return invocation_callable(**invocation_payload)

@app.post("/api/reasoning_engine")
async def query(request: QueryRequest) -> responses.JSONResponse:
    method = getattr(adk_app, request.class_method)
    output = await _invoke_callable_or_raise(method, request.input or {})
    try:
      json_serialized_content = encoders.jsonable_encoder({"output": output})
    except ValueError as encoding_error:
      logging.exception("Failed to encode response")
      raise encoding_error
    return responses.JSONResponse(content=json_serialized_content)

@app.post("/api/stream_reasoning_engine")
async def stream_query(request: QueryRequest) -> responses.StreamingResponse:
    method = getattr(adk_app, request.class_method)
    output = await _invoke_callable_or_raise(method, request.input or {})
    return responses.StreamingResponse(
        content=json_generator(output),
        media_type="application/json",
    )

if __name__ == "__main__":
    uvicorn.run(app, host="0.0.0.0", port=int(os.environ.get("PORT", 8080)))
EOF
الخطوة 5: تحديد التبعيات
اكتب التبعيات المطلوبة في Python إلى requirements.txt:
cat << 'EOF' > requirements.txt
fastapi
uvicorn
vertexai
google-cloud-aiplatform[agent_engines,adk]>=1.144
pydantic
EOF
4. شحن بالحاويات
الآن، حدِّد كيفية تجميع الوكيل في حاوية.
الخطوة 1: إنشاء Dockerfile
أنشئ ملف Dockerfile في جذر دليل مشروعك لتحديد طريقة إنشاء تطبيق FastAPI:
cat << 'EOF' > Dockerfile
FROM python:3.11-slim

WORKDIR /app

COPY weather_agent/ /app/weather_agent/
COPY main.py .
COPY requirements.txt .
RUN pip install -r requirements.txt

CMD ["sh", "-c", "uvicorn main:app --host 0.0.0.0 --port $PORT"]
EOF
5- إعداد Artifact Registry وCloud Build
تحتاج إلى مستودع لتخزين صورة الحاوية وإلى أذونات لنقلها.
الخطوة 1: إنشاء مستودع
حدِّد اسم المستودع وأنشئ مستودع Docker داخل Artifact Registry باستخدام متغيّرات البيئة المحدّدة أثناء عملية الإعداد:
export REPOSITORY_NAME="agents-repo"

gcloud artifacts repositories create $REPOSITORY_NAME \
    --project=$PROJECT_ID \
    --repository-format=docker \
    --location=$LOCATION \
    --description="Docker repository for Agents"
الخطوة 2: ضبط أذونات حساب الخدمة
امنح حساب خدمة Compute Engine التلقائي الإذن بإرسال الصور إلى Artifact Registry.
أولاً، احصل على رقم مشروعك:
export PROJECT_NUMBER=$(gcloud projects describe $PROJECT_ID --format="value(projectNumber)")
امنح الأدوار التالية:
# Allow pushing to Artifact Registry
gcloud projects add-iam-policy-binding $PROJECT_ID \
    --member="serviceAccount:$PROJECT_NUMBER-compute@developer.gserviceaccount.com" \
    --role="roles/artifactregistry.writer" \
    --condition=None

# Allow Cloud Build to read storage objects
gcloud projects add-iam-policy-binding $PROJECT_NUMBER \
    --member="serviceAccount:$PROJECT_NUMBER-compute@developer.gserviceaccount.com" \
    --role="roles/storage.objectViewer" \
    --condition=None
الخطوة 3: منح الأذونات لموظفي خدمة العملاء
منح وكلاء خدمة AI Platform وReasoning Engine إذن الوصول إلى Artifact Registry:
gcloud projects add-iam-policy-binding $PROJECT_NUMBER \
    --member="serviceAccount:service-$PROJECT_NUMBER@gcp-sa-aiplatform-re.iam.gserviceaccount.com" \
    --role="roles/artifactregistry.reader"  --condition=None

gcloud projects add-iam-policy-binding $PROJECT_NUMBER \
    --member="serviceAccount:service-$PROJECT_NUMBER@gcp-sa-aiplatform.iam.gserviceaccount.com" \
    --role="roles/artifactregistry.reader"  --condition=None
الخطوة 4: إنشاء الصورة ونقلها
استخدِم Cloud Build لإنشاء صورة الحاوية ونقلها:
gcloud builds submit \
    --project=$PROJECT_ID \
    --region=$LOCATION \
    --tag $LOCATION-docker.pkg.dev/$PROJECT_ID/$REPOSITORY_NAME/weather-agent-image:latest \
    .
6. تفعيل "الوكيل" باستخدام حزمة تطوير البرامج (SDK)
بعد إعداد الأذونات، يمكنك نشر الحاوية المخصّصة.
الخطوة 1: نشر BYOC Agent
أنشئ ملف Python deploy_byoc.py داخل جذر دليل مشروعك لنشر الحاوية المستضافة في السجلّ إلى Agent Runtime:
cat << 'EOF' > deploy_byoc.py
import json
import os
import vertexai
from google.cloud import aiplatform

config = json.load(open("weather_agent/config.json"))
PROJECT_ID = config["PROJECT_ID"]
LOCATION = config["LOCATION"]
REPOSITORY_NAME = "agents-repo"

vertexai.init(project=PROJECT_ID, location=LOCATION)
client = vertexai.Client(project=PROJECT_ID, location=LOCATION)

image_uri = f"{LOCATION}-docker.pkg.dev/{PROJECT_ID}/{REPOSITORY_NAME}/weather-agent-image:latest"

print(f"Deploying custom container agent from {image_uri}...")
remote_agent = client.agent_engines.create(
    config={
        "display_name": "byoc_weather_agent",
        "description": "BYOC weather agent from custom container",
        "container_spec": {
            "image_uri": image_uri
        },
        "class_methods": [
            # For convenience to interact with the agent through the Python SDK
            # https://docs.cloud.google.com/gemini-enterprise-agent-platform/scale/runtime/use-an-adk-agent#supported-operations
            {"api_mode": "", "name": "get_session"},
            {"api_mode": "", "name": "list_sessions"},
            {"api_mode": "", "name": "create_session"},
            {"api_mode": "", "name": "delete_session"},
            {"api_mode": "async", "name": "async_get_session"},
            {"api_mode": "async", "name": "async_list_sessions"},
            {"api_mode": "async", "name": "async_create_session"},
            {"api_mode": "async", "name": "async_delete_session"},
            {"api_mode": "async", "name": "async_add_session_to_memory"},
            {"api_mode": "async", "name": "async_search_memory"},
            {"api_mode": "stream", "name": "stream_query"},
            {"api_mode": "async_stream", "name": "async_stream_query"},
            {"api_mode": "async_stream", "name": "streaming_agent_run_with_events"},
        ],
        "agent_framework": "google-adk",
    },
)

print(f"Agent successfully deployed!")
print(f"Resource Name: {remote_agent.api_resource.name}")

# Save resource name for testing
with open("agent_resource_name.txt", "w") as f:
    f.write(remote_agent.api_resource.name)
EOF
نفِّذ نص النشر البرمجي لنشر الوكيل على Agent Runtime:
python3 deploy_byoc.py
7. نشر الوكيل باستخدام Terraform
بدلاً من ذلك، يمكنك نشر الوكيل نفسه الذي تم وضعه في حاوية باستخدام Terraform. ننصح باستخدامها في بيئات الإنتاج لإدارة البنية الأساسية كرمز.
الخطوة 1: الانتقال إلى دليل Terraform
أنشئ الدليل terraform في جذر مشروعك وانتقِل إليه:
mkdir -p terraform
cd terraform
الخطوة 2: إنشاء إعدادات موفّري الخدمة
نفِّذ النص البرمجي التالي لكتابة عملية ربط مقدّمي الخدمة بـ providers.tf:
cat << 'EOF' > providers.tf
terraform {
  required_providers {
    google = {
      source  = "hashicorp/google"
      version = ">= 5.28.0"
    }
  }
}

provider "google" {
  project = var.project_id
  region  = var.location
}
EOF
الخطوة 3: إنشاء تعريف المتغيّرات
اكتبوا كتلة وصف الإدخالات إلى variables.tf:
cat << 'EOF' > variables.tf
variable "project_id" {
  type        = string
  description = "The Google Cloud Project ID"
}

variable "location" {
  type        = string
  description = "The region to deploy the reasoning engine"
  default     = "us-central1"
}

variable "repository_name" {
  type        = string
  description = "The Artifact Registry repository name"
  default     = "agents-repo"
}

variable "image_tag" {
  type        = string
  description = "The tag of the container image to deploy"
  default     = "latest"
}
EOF
الخطوة 4: إنشاء الإعدادات الرئيسية
اكتب مَعلمات تعريف الموارد الرئيسية في main.tf:
cat << 'EOF' > main.tf
locals {
  class_methods = [
    {"api_mode" = "", "name" = "get_session"},
    {"api_mode" = "", "name" = "list_sessions"},
    {"api_mode" = "", "name" = "create_session"},
    {"api_mode" = "", "name" = "delete_session"},
    {"api_mode" = "async", "name" = "async_get_session"},
    {"api_mode" = "async", "name" = "async_list_sessions"},
    {"api_mode" = "async", "name" = "async_create_session"},
    {"api_mode" = "async", "name" = "async_delete_session"},
    {"api_mode" = "async", "name" = "async_add_session_to_memory"},
    {"api_mode" = "async", "name" = "async_search_memory"},
    {"api_mode" = "stream", "name" = "stream_query"},
    {"api_mode" = "async_stream", "name" = "async_stream_query"},
    {"api_mode" = "async_stream", "name" = "streaming_agent_run_with_events"}
  ]
}

# define the resource with the BYOC configuration, set agent_framework to "google-adk" to enable interactive features on the console.
resource "google_vertex_ai_reasoning_engine" "byoc_weather_agent" {
  display_name = "byoc_weather_agent_tf"
  description  = "BYOC weather agent deployed via Terraform"
  project      = var.project_id
  location     = var.location

  spec {
    class_methods = jsonencode(local.class_methods)
    agent_framework = "google-adk"
    container_spec {
      image_uri = "${var.location}-docker.pkg.dev/${var.project_id}/${var.repository_name}/weather-agent-image:${var.image_tag}"
    }
  }
}
EOF
الخطوة 5: إنشاء تعريف المخرجات
اكتبوا كتلة النتائج إلى outputs.tf:
cat << 'EOF' > outputs.tf
output "reasoning_engine_id" {
  value       = google_vertex_ai_reasoning_engine.byoc_weather_agent.id
  description = "The ID of the deployed reasoning engine"
}

output "reasoning_engine_resource_name" {
  value       = google_vertex_ai_reasoning_engine.byoc_weather_agent.id
  description = "The resource name of the deployed reasoning engine"
}
EOF
الخطوة 6: إنشاء ملف قيم المتغيّرات (tfvars)
يمكنك نشر المحتوى بشكل ديناميكي بدون تعديل العناصر النائبة من خلال إدخال متغيرات البيئة مباشرةً إلى terraform.tfvars:
cat <<EOF > terraform.tfvars
project_id      = "${PROJECT_ID}"
location        = "${LOCATION}"
repository_name = "agents-repo"
image_tag       = "latest"
EOF
الخطوة 7: التهيئة والتطبيق
ابدأ Terraform وطبِّق الإعدادات:
terraform init
terraform apply
أكِّد عملية التطبيق من خلال كتابة yes عندما يُطلب منك ذلك.
بعد اكتمال العملية، تعرض Terraform اسم المورد. التقاطها آليًا إلى agent_resource_name.txt والرجوع إلى المجلد الجذر:
terraform output -raw reasoning_engine_resource_name > ../agent_resource_name.txt
cd ..
8. طرح سؤال على "الوكيل"
تأكَّد من أنّ الوكيل يعمل ويستجيب.
الخطوة 1: إنشاء نص برمجي لطلب البحث
اكتب نص التحقّق البرمجي إلى query_agent.py باستخدام عملية تحقّق ديناميكية من إعدادات التهيئة لجلب إحداثيات الموقع الجغرافي:
cat << 'EOF' > query_agent.py
import json
import os
import requests
from google import auth as google_auth
from google.auth.transport import requests as google_requests

# Load config coordinates directly
config_json = json.load(open("weather_agent/config.json"))
LOCATION = config_json["LOCATION"]
PROJECT_ID = config_json["PROJECT_ID"]

# Load agent resource name
with open("agent_resource_name.txt", "r") as f:
    agent_resource_name = f.read().strip()

def get_identity_token():
    credentials, _ = google_auth.default()
    auth_request = google_requests.Request()
    credentials.refresh(auth_request)
    return credentials.token

# Access the agent at the fastapi endpoint that was specified in main.py
url = f"https://{LOCATION}-aiplatform.googleapis.com/v1/{agent_resource_name}/api/stream_reasoning_engine"

payload = {
    "class_method": "async_stream_query",
    "input": {
        "user_id": "codelab_test_user",
        "message": "What is the temperature in Tokyo?",
    },
}

print(f"Sending query to {url}...")
response = requests.post(
    url,
    headers={
        "Content-Type": "application/json",
        "Authorization": f"Bearer {get_identity_token()}",
    },
    data=json.dumps(payload),
    stream=True,
)

for chunk in response.iter_content(chunk_size=8192):
    if chunk:
        print(chunk.decode('utf-8'))
EOF
نفِّذ نص طلب البحث البرمجي:
python3 query_agent.py
من المفترض أن تظهر لك نتائج البث من البرنامج، بما في ذلك درجة الحرارة المحاكية في طوكيو.
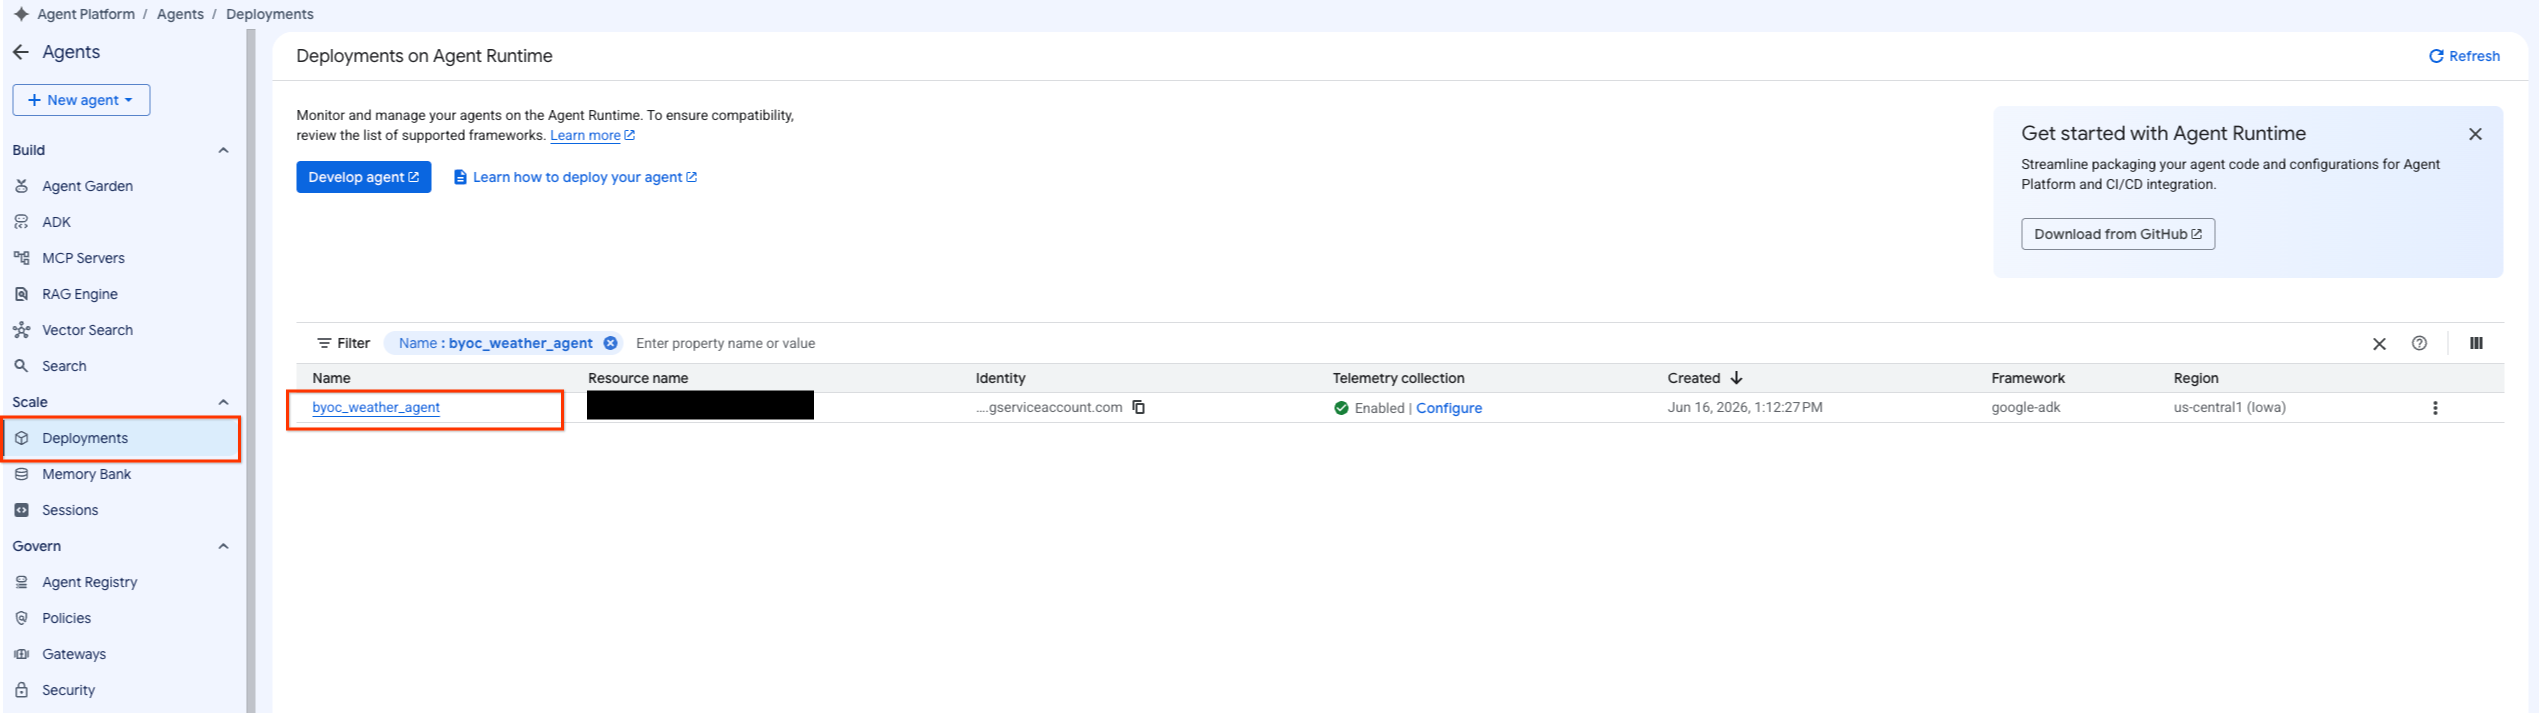
الخطوة 2: استخدام وحدة التحكّم
- انتقِل إلى العامل الذي تم نشره من خلال اختيار منصة العامل > العاملون > عمليات النشر لفلترة قائمة العاملين.
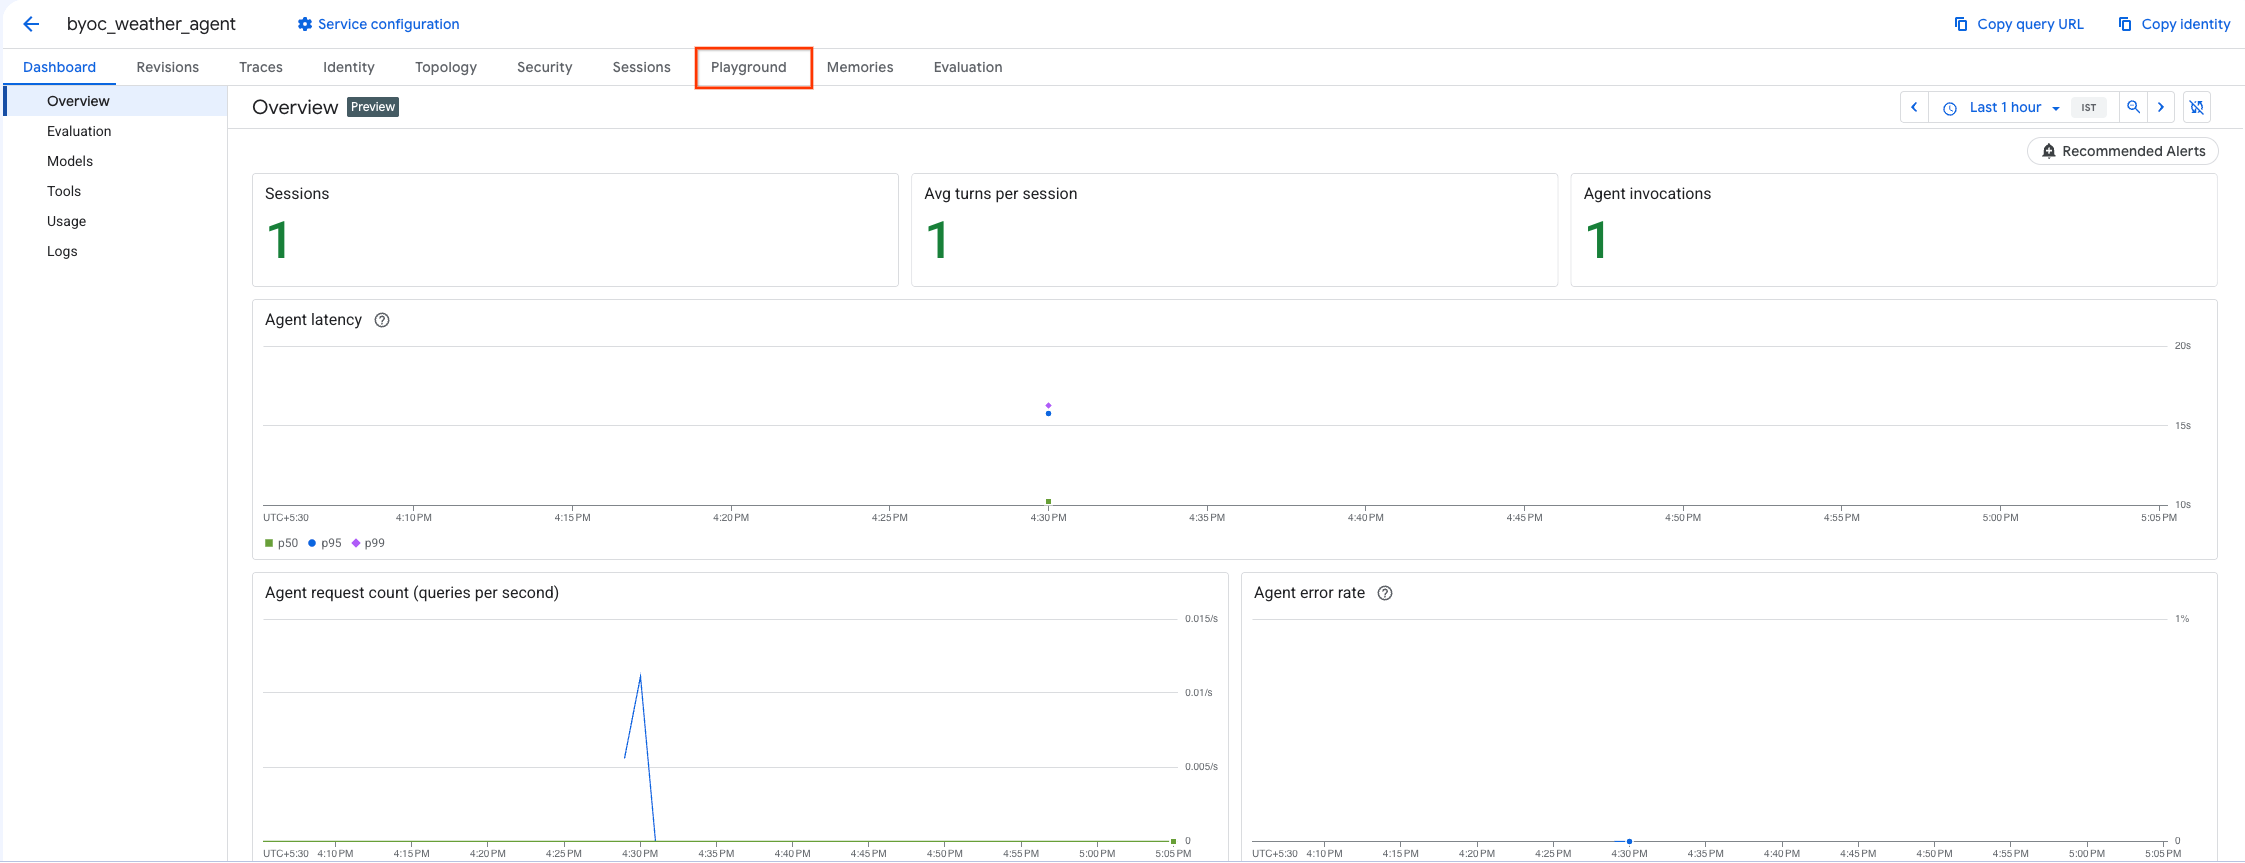
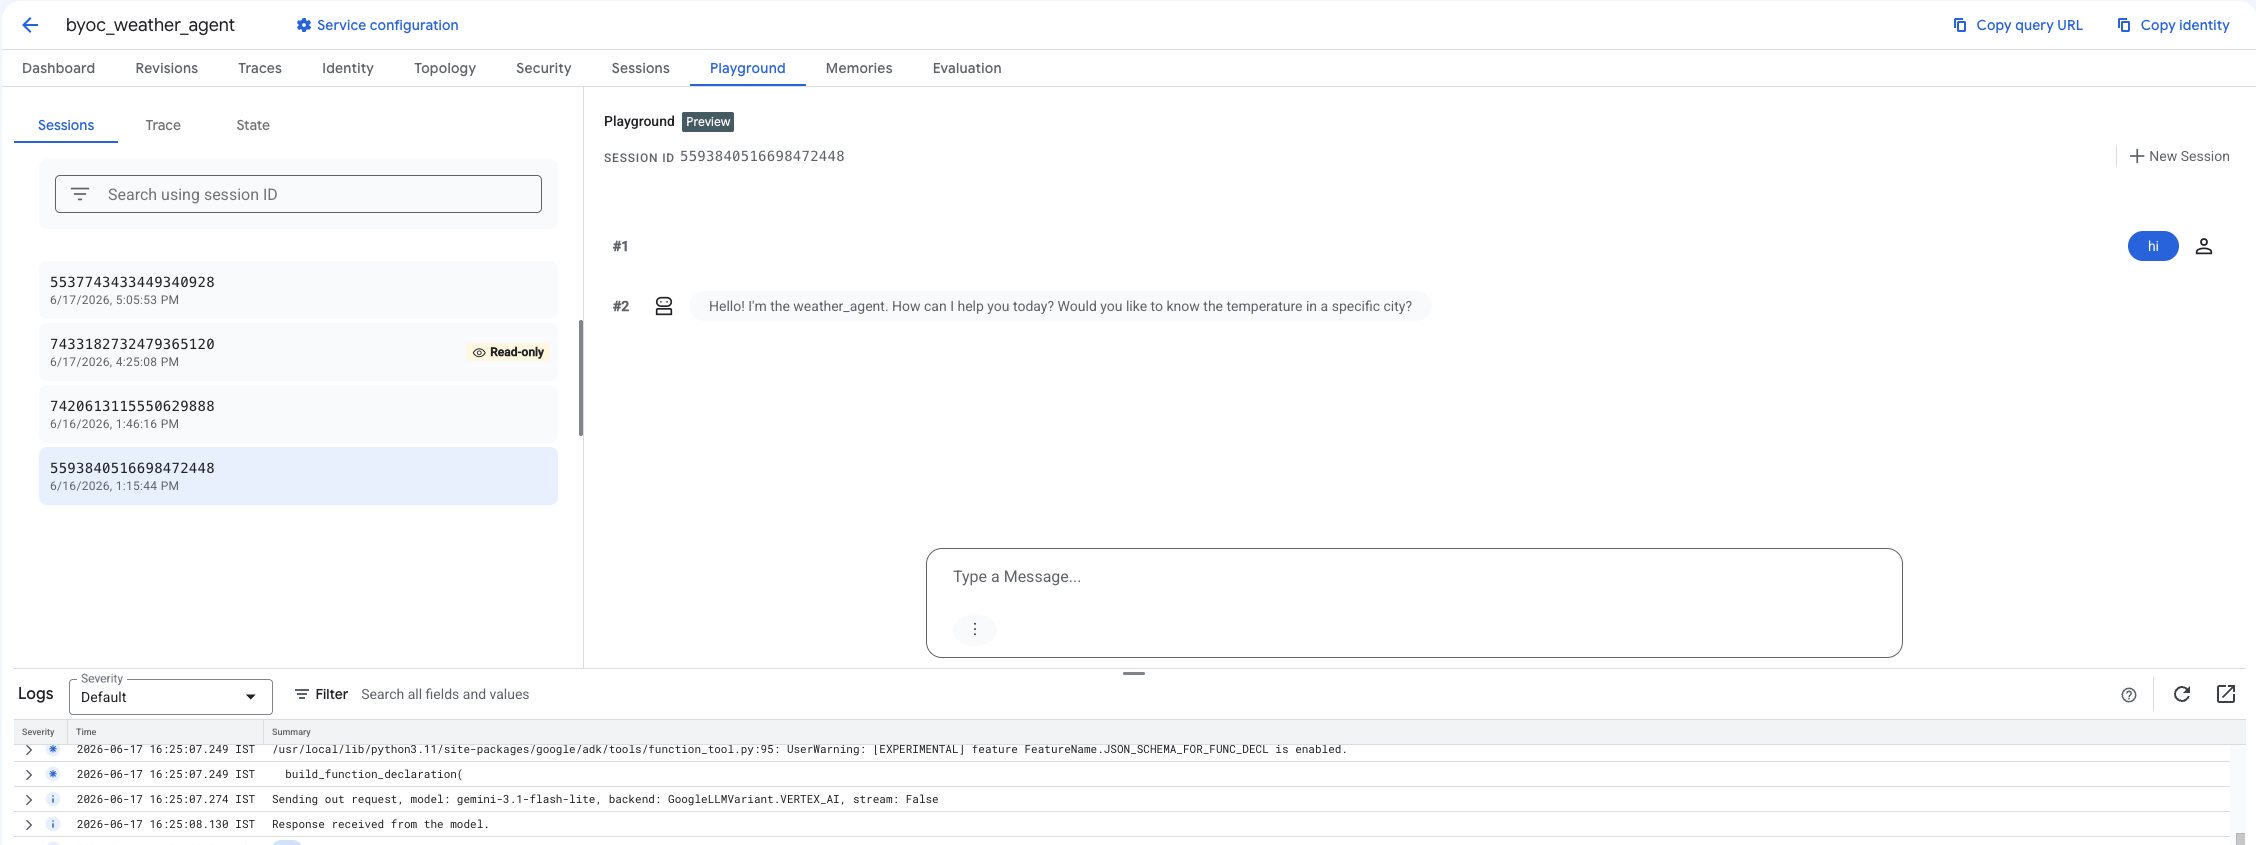
- انقر على Playground من لوحة بيانات "الوكيل".
- أنشئ جلسة جديدة واكتب طلب البحث للتحقّق مما إذا كان الوكيل يستجيب للطلبات كما هو موضّح.
9- تنظيف
لتجنُّب تحمّل رسوم، عليك تنظيف الموارد التي أنشأتها.
إذا تم النشر باستخدام Terraform، انتقِل إلى الدليل terraform ونفِّذ إجراء الحذف:
cd ~/weather-agent-byoc/terraform
terraform destroy
cd ..
إذا تم النشر باستخدام حزمة تطوير البرامج (SDK)، أنشئ النص البرمجي لحذف الوكيل الذي تم نشره:
cat << 'EOF' > delete_agent.py
import json
import os
import vertexai
from google.cloud import aiplatform

config = json.load(open("weather_agent/config.json"))
PROJECT_ID = config["PROJECT_ID"]
LOCATION = config["LOCATION"]

vertexai.init(project=PROJECT_ID, location=LOCATION)
client = vertexai.Client(project=PROJECT_ID, location=LOCATION)

with open("agent_resource_name.txt", "r") as f:
    agent_resource_name = f.read().strip()

# 1. Delete the Agent
# Note: We retrieve the list first to ensure we delete the ones created in this session
try:
    page_size = 100
    reasoning_engines = client.agent_engines.list()
    for engine in reasoning_engines:
        if agent_resource_name in engine.api_resource.name:
            print(f"Deleting Reasoning Engine: {engine.api_resource.name}")
            engine.delete(force=True)
except Exception as e:
    print(f"Error deleting reasoning engines: {e}")
EOF
شغِّل النص البرمجي لحذف الوكيل:
python3 delete_agent.py
لتنظيف بقية الموارد، ارجع إلى الدليل الرئيسي ونفِّذ الأوامر التالية في Cloud Shell:
cd ~

# 1. Delete the Artifact Registry Repository
gcloud artifacts repositories delete $REPOSITORY_NAME --location=$LOCATION --quiet

# 2. Clean up files (Optional)
rm -rf ~/weather-agent-byoc
10. الخاتمة
تهانينا! لقد نجحت في إنشاء حاوية لوكيل الذكاء الاصطناعي ونشره على Agent Runtime باستخدام ميزة "استخدام حاوية خاصة".
لقد تعلّمت كيفية:
- استخدِم حزمة ADK لتحديد وكيل وتغليفه باستخدام FastAPI.
- أنشئ ملف Dockerfile وأنشئ صورًا باستخدام Cloud Build.
- إدارة أذونات "إدارة الهوية وإمكانية الوصول" في Agent Runtime
- يمكنك نشر الحاوية المخصّصة باستخدام كلّ من حزمة تطوير البرامج (SDK) في Python وTerraform.
- اختبار الوكيل الذي تم نشره وإرسال طلبات إليه