
۱. مرور کلی
Agent Runtime (که قبلاً با نام Agent Engine شناخته میشد) یک محیط زمان اجرای مدیریتشده ارائه میدهد که برای استقرار، اجرا و مقیاسبندی مؤثر عاملهای هوش مصنوعی طراحی شده است. بهطور پیشفرض، این پلتفرم بهطور خودکار کد منبع و وابستگیهای شما را در طول فرآیند استقرار، بستهبندی میکند.
با این حال، بارهای کاری سازمانی اغلب نیاز به مالکیت کامل بر محیط زمان اجرا دارند. برای پشتیبانی از این امر، Agent Runtime قابلیت Bring Your Own Container (BYOC) را ارائه میدهد که به شما امکان میدهد تصاویر کانتینر سفارشی از پیش ساخته شده را مستقر کنید.
این آزمایشگاه کد، فرآیند کامل کانتینرسازی یک عامل ساخته شده با کیت توسعه عامل گوگل (ADK)، پیکربندی مجوزهای لازم گوگل کلود و استقرار آن در Agent Runtime با استفاده از SDK پایتون یا Terraform را شرح میدهد.
این آزمایشگاه کد شما را در موارد زیر راهنمایی میکند:
- ساخت یک عامل پایتون با استفاده از کیت توسعه عامل گوگل (ADK) .
- قرار دادن عامل در یک برنامه FastAPI .
- کانتینریزه کردن برنامه با داکر
- پیکربندی مجوزهای گوگل کلود
- استقرار و آزمایش عامل کانتینر شده در Agent Runtime .
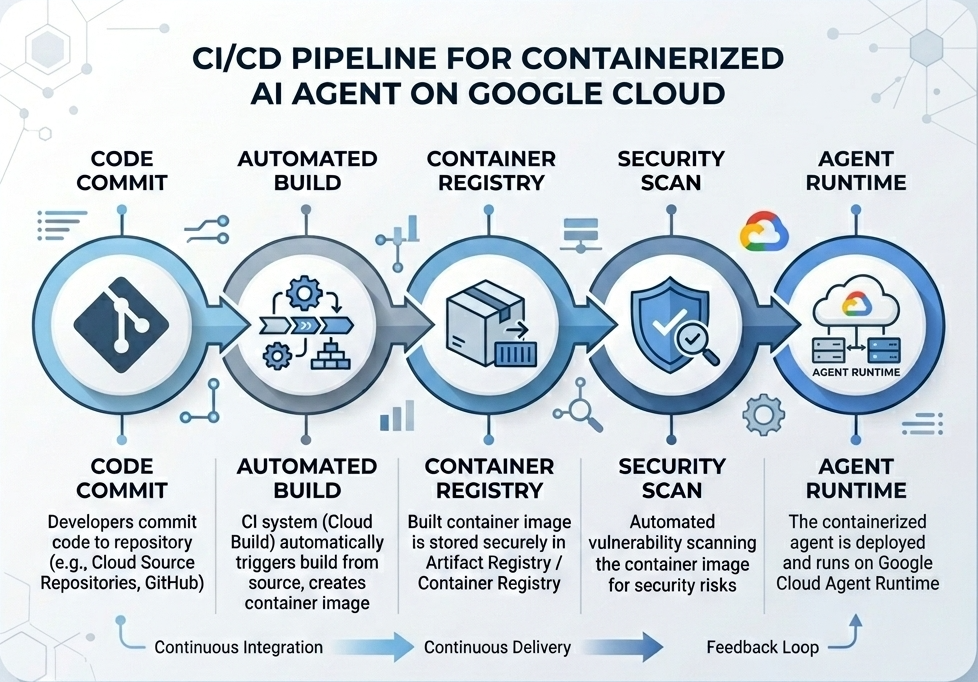
جریان ساخت و استقرار
نمودار زیر گردش کار مراحل ساخت و استقرار را که به صورت دستی در این آزمایشگاه کد انجام خواهید داد، نشان میدهد:
آنچه شما نیاز دارید
- یک پروژه ابری گوگل با قابلیت پرداخت صورتحساب.
- دسترسی به Cloud Shell (توصیه میشود) یا یک محیط توسعه محلی با
gcloudوdockerنصب شده. - آشنایی اولیه با پایتون و داکر.
۲. تنظیمات محیطی
قبل از شروع، باید API های لازم را فعال کرده و محیط خود را پیکربندی کنید.
مرحله ۱: باز کردن Cloud Shell
روی دکمهی «فعالسازی پوستهی ابری» در بالا سمت راست کنسول گوگل کلود کلیک کنید.

مرحله 2: پیکربندی متغیرهای محیطی
در Cloud Shell، شناسه پروژه خود را تنظیم کرده و متغیرهای محیطی کلیدی مورد استفاده در سراسر این codelab را تعریف کنید. "YOUR_PROJECT_ID" را با شناسه واقعی پروژه Google Cloud خود جایگزین کنید:
gcloud config set project "YOUR_PROJECT_ID"
export PROJECT_ID=$(gcloud config get-value project)
export LOCATION="us-central1"
export MODEL="gemini-3.1-flash-lite"
export MODEL_REGION="global"
این متغیرها تنظیمات استقرار هدف را پیکربندی میکنند:
-
PROJECT_ID: شناسه منحصر به فرد پروژه Google Cloud شما که تمام منابع Gemini Enterprise Agent Platform و Artifact Registry در آن قرار خواهند گرفت. -
LOCATION: منطقه جغرافیایی (مثلاًus-central1) که مخازن و بارهای کاری زمان اجرا شما را میزبانی میکند. -
MODEL: نسخه مدل Gemini (مثلاًgemini-3.1-flash-lite) که توسط زمینه عامل بارگذاری شده است. -
MODEL_REGION: ناحیه نقطه پایانی مدل. در اینجا به عنوان"global"تنظیم شده است تا مدل Gemini از نقاط پایانی سراسری فراخوانی شود.
مرحله ۳: فعال کردن APIها
API های مورد نیاز Google Cloud را فعال کنید:
gcloud services enable \
    aiplatform.googleapis.com \
    cloudbuild.googleapis.com \
    compute.googleapis.com \
    artifactregistry.googleapis.com \
    storage.googleapis.com
مرحله ۴: نصب SDK
کیت توسعه نرمافزار Vertex AI را با پشتیبانی از Agent Engine و ADK نصب کنید:
pip install --upgrade "google-cloud-aiplatform[agent_engines,adk]>=1.144"
۳. تنظیمات فایلهای منبع
در این مرحله، ساختار و کد مربوط به عامل خود را ایجاد خواهید کرد.
مرور کلی ساختار دایرکتوری
در پایان این آزمایشگاه کد، فایلهای شما تحت سلسله مراتب فضای کاری زیر سازماندهی خواهند شد:
weather-agent-byoc/
├── Dockerfile                  # Container definition
├── deploy_byoc.py              # Python SDK deployment script
├── main.py                     # FastAPI server wrapper
├── query_agent.py              # Verify / query script
├── requirements.txt            # Python dependencies
│
├── weather_agent/              # Agent source module
│   ├── __init__.py             # Package declaration
│   ├── agent.py                # Agent & mock tools logic
│   └── config.json             # Environment config variables
│
└── terraform/                  # Terraform configuration files
    ├── main.tf
    ├── outputs.tf
    ├── providers.tf
    ├── terraform.tfvars
    └── variables.tf
مرحله ۱: ایجاد دایرکتوریها
از دایرکتوری خانگی خود شروع کنید و ساختار فضای کاری را ایجاد کنید:
cd ~
mkdir -p weather-agent-byoc/weather_agent
cd weather-agent-byoc
مرحله ۲: ایجاد فایل پیکربندی
دستور زیر را در Cloud Shell اجرا کنید تا پارامترهای پیکربندی مستقیماً در weather_agent/config.json نوشته شوند. این دستور به طور خودکار متغیرها را با مقادیر محیطی شما جایگزین میکند:
cat <<EOF > weather_agent/config.json
{
    "PROJECT_ID": "${PROJECT_ID}",
    "LOCATION": "${LOCATION}",
    "MODEL": "${MODEL}",
    "MODEL_REGION": "${MODEL_REGION}"
}
EOF
مرحله ۳: تعریف عامل
اسکریپت زیر را برای نوشتن پیکربندی عامل و شبیهسازی منطق ابزار در weather_agent/agent.py اجرا کنید:
cat << 'EOF' > weather_agent/agent.py
import json
import random
from google.adk.agents import Agent
from google.adk.models.google_llm import Gemini
from functools import cached_property
from google.genai import Client

# Load config
llm_config = json.load(open("weather_agent/config.json"))
PROJECT_ID = llm_config["PROJECT_ID"]
MODEL = llm_config["MODEL"]
MODEL_REGION = llm_config["MODEL_REGION"]

# Override Gemini class for global endpoint compatibility
class GlobalGemini(Gemini):
  @cached_property
  def api_client(self) -> Client:
    return Client(vertexai=True, location="global")

# Define Tool
def get_temperature(place: str) -> str:
    '''Returns the current temperature of a given place.

    Args:
        place: The name of the city or location.

    Returns:
        str: A string describing the temperature.
    '''
    temp = random.randint(-10, 40)
    return f"The current temperature in {place} is {temp}°C."

# Initialize LLM
llm_model = GlobalGemini(model=MODEL) if MODEL_REGION == "global" else Gemini(model=MODEL)

# Initialize Agent
root_agent = Agent(
    model=llm_model,
    name='weather_agent',
    description='An agent that provides temperature information for locations.',
    instruction='You are a helpful assistant that can provide the current temperature for any given place using the get_temperature tool.',
    tools=[get_temperature],
)
EOF
برای تبدیل weather_agent به یک پکیج پایتون، یک __init__.py خالی ایجاد کنید:
touch weather_agent/__init__.py
مرحله 4: ایجاد FastAPI Wrapper
اسکریپت زیر را برای نوشتن پیکربندی نقطه ورودی سرور FastAPI در main.py اجرا کنید:
cat << 'EOF' > main.py
import inspect
import json
import logging
import os
from typing import Any, Dict, Optional
import uvicorn
import vertexai
from weather_agent.agent import root_agent
from fastapi import FastAPI, encoders, responses
from pydantic import BaseModel
from vertexai import agent_engines

app = FastAPI()

config_json = json.load(open("weather_agent/config.json"))
PROJECT_ID = config_json["PROJECT_ID"]
LOCATION = config_json["LOCATION"]
MODEL_REGION = config_json["MODEL_REGION"]

class QueryRequest(BaseModel):
    input: Optional[Dict[str, Any]] = None
    class_method: Optional[str] = None

vertexai.init(project=PROJECT_ID, location=MODEL_REGION)
adk_app = agent_engines.AdkApp(agent=root_agent)

def _encode_chunk_to_json(chunk):
  try:
    json_chunk = encoders.jsonable_encoder(chunk)
    return json.dumps(json_chunk) + "\n"
  except Exception:
    logging.exception("Failed to encode chunk")
    return None

async def json_generator(output):
  async for chunk in output:
    encoded_chunk = _encode_chunk_to_json(chunk)
    if encoded_chunk is None:
      break
    yield encoded_chunk

async def _invoke_callable_or_raise(invocation_callable, invocation_payload):
  if inspect.iscoroutinefunction(invocation_callable):
    return await invocation_callable(**invocation_payload)
  else:
    return invocation_callable(**invocation_payload)

@app.post("/api/reasoning_engine")
async def query(request: QueryRequest) -> responses.JSONResponse:
    method = getattr(adk_app, request.class_method)
    output = await _invoke_callable_or_raise(method, request.input or {})
    try:
      json_serialized_content = encoders.jsonable_encoder({"output": output})
    except ValueError as encoding_error:
      logging.exception("Failed to encode response")
      raise encoding_error
    return responses.JSONResponse(content=json_serialized_content)

@app.post("/api/stream_reasoning_engine")
async def stream_query(request: QueryRequest) -> responses.StreamingResponse:
    method = getattr(adk_app, request.class_method)
    output = await _invoke_callable_or_raise(method, request.input or {})
    return responses.StreamingResponse(
        content=json_generator(output),
        media_type="application/json",
    )

if __name__ == "__main__":
    uvicorn.run(app, host="0.0.0.0", port=int(os.environ.get("PORT", 8080)))
EOF
مرحله ۵: تعریف وابستگیها
وابستگیهای مورد نیاز پایتون را در requirements.txt بنویسید:
cat << 'EOF' > requirements.txt
fastapi
uvicorn
vertexai
google-cloud-aiplatform[agent_engines,adk]>=1.144
pydantic
EOF
۴. کانتینرسازی
حالا، تعریف کنید که عامل شما چگونه در یک ظرف بستهبندی خواهد شد.
مرحله ۱: ایجاد داکرفایل
یک Dockerfile در ریشه دایرکتوری پروژه خود ایجاد کنید تا نحوه ساخت برنامه FastAPI خود را مشخص کنید:
cat << 'EOF' > Dockerfile
FROM python:3.11-slim

WORKDIR /app

COPY weather_agent/ /app/weather_agent/
COPY main.py .
COPY requirements.txt .
RUN pip install -r requirements.txt

CMD ["sh", "-c", "uvicorn main:app --host 0.0.0.0 --port $PORT"]
EOF
۵. راهاندازی رجیستری مصنوعات و ساخت ابری
شما به یک مخزن برای ذخیره تصویر کانتینر و مجوزهای لازم برای ارسال آن نیاز دارید.
مرحله ۱: ایجاد مخزن
نام مخزن را تعریف کنید و با استفاده از متغیرهای محیطی تعریف شده در طول پیکربندی، یک مخزن Docker در داخل رجیستری Artifact ایجاد کنید:
export REPOSITORY_NAME="agents-repo"

gcloud artifacts repositories create $REPOSITORY_NAME \
    --project=$PROJECT_ID \
    --repository-format=docker \
    --location=$LOCATION \
    --description="Docker repository for Agents"
مرحله ۲: پیکربندی مجوزهای حساب سرویس
به حساب کاربری سرویس محاسبات پیشفرض (Default Compute Service Account) اجازه دهید تا تصاویر را به رجیستری مصنوعات (Artifact Registry) ارسال کند.
ابتدا شماره پروژه خود را دریافت کنید:
export PROJECT_NUMBER=$(gcloud projects describe $PROJECT_ID --format="value(projectNumber)")
نقشها را واگذار کنید:
# Allow pushing to Artifact Registry
gcloud projects add-iam-policy-binding $PROJECT_ID \
    --member="serviceAccount:$PROJECT_NUMBER-compute@developer.gserviceaccount.com" \
    --role="roles/artifactregistry.writer" \
    --condition=None

# Allow Cloud Build to read storage objects
gcloud projects add-iam-policy-binding $PROJECT_NUMBER \
    --member="serviceAccount:$PROJECT_NUMBER-compute@developer.gserviceaccount.com" \
    --role="roles/storage.objectViewer" \
    --condition=None
مرحله 3: اعطای مجوز به نمایندگان خدمات
دسترسی به خواننده رجیستری مصنوعات را به نمایندگان خدمات پلتفرم هوش مصنوعی و موتور استدلال اعطا کنید:
gcloud projects add-iam-policy-binding $PROJECT_NUMBER \
    --member="serviceAccount:service-$PROJECT_NUMBER@gcp-sa-aiplatform-re.iam.gserviceaccount.com" \
    --role="roles/artifactregistry.reader"  --condition=None

gcloud projects add-iam-policy-binding $PROJECT_NUMBER \
    --member="serviceAccount:service-$PROJECT_NUMBER@gcp-sa-aiplatform.iam.gserviceaccount.com" \
    --role="roles/artifactregistry.reader"  --condition=None
مرحله ۴: ساخت و انتشار ایمیج
از Cloud Build برای ساخت و ارسال ایمیج کانتینر استفاده کنید:
gcloud builds submit \
    --project=$PROJECT_ID \
    --region=$LOCATION \
    --tag $LOCATION-docker.pkg.dev/$PROJECT_ID/$REPOSITORY_NAME/weather-agent-image:latest \
    .
۶. عامل را با SDK مستقر کنید
اکنون که مجوزها پیکربندی شدهاند، میتوانید کانتینر سفارشی خود را مستقر کنید.
مرحله 1: عامل BYOC را مستقر کنید
فایل پایتون deploy_byoc.py را در ریشه دایرکتوری پروژه خود ایجاد کنید تا کانتینر میزبانی شده توسط رجیستری را در Agent Runtime مستقر کنید:
cat << 'EOF' > deploy_byoc.py
import json
import os
import vertexai
from google.cloud import aiplatform

config = json.load(open("weather_agent/config.json"))
PROJECT_ID = config["PROJECT_ID"]
LOCATION = config["LOCATION"]
REPOSITORY_NAME = "agents-repo"

vertexai.init(project=PROJECT_ID, location=LOCATION)
client = vertexai.Client(project=PROJECT_ID, location=LOCATION)

image_uri = f"{LOCATION}-docker.pkg.dev/{PROJECT_ID}/{REPOSITORY_NAME}/weather-agent-image:latest"

print(f"Deploying custom container agent from {image_uri}...")
remote_agent = client.agent_engines.create(
    config={
        "display_name": "byoc_weather_agent",
        "description": "BYOC weather agent from custom container",
        "container_spec": {
            "image_uri": image_uri
        },
        "class_methods": [
            # For convenience to interact with the agent through the Python SDK
            # https://docs.cloud.google.com/gemini-enterprise-agent-platform/scale/runtime/use-an-adk-agent#supported-operations
            {"api_mode": "", "name": "get_session"},
            {"api_mode": "", "name": "list_sessions"},
            {"api_mode": "", "name": "create_session"},
            {"api_mode": "", "name": "delete_session"},
            {"api_mode": "async", "name": "async_get_session"},
            {"api_mode": "async", "name": "async_list_sessions"},
            {"api_mode": "async", "name": "async_create_session"},
            {"api_mode": "async", "name": "async_delete_session"},
            {"api_mode": "async", "name": "async_add_session_to_memory"},
            {"api_mode": "async", "name": "async_search_memory"},
            {"api_mode": "stream", "name": "stream_query"},
            {"api_mode": "async_stream", "name": "async_stream_query"},
            {"api_mode": "async_stream", "name": "streaming_agent_run_with_events"},
        ],
        "agent_framework": "google-adk",
    },
)

print(f"Agent successfully deployed!")
print(f"Resource Name: {remote_agent.api_resource.name}")

# Save resource name for testing
with open("agent_resource_name.txt", "w") as f:
    f.write(remote_agent.api_resource.name)
EOF
اسکریپت استقرار را برای استقرار عامل در Agent Runtime اجرا کنید:
python3 deploy_byoc.py
۷. عامل را با Terraform مستقر کنید
به عنوان یک روش جایگزین، میتوانید همان عامل کانتینر شده را با استفاده از Terraform مستقر کنید. این روش برای محیطهای عملیاتی جهت مدیریت زیرساخت به صورت کد توصیه میشود.
مرحله ۱: به دایرکتوری Terraform بروید
یک دایرکتوری terraform در ریشه پروژه خود ایجاد کنید و به آن بروید:
mkdir -p terraform
cd terraform
مرحله 2: ایجاد پیکربندی ارائه دهندگان
اسکریپت زیر را برای نوشتن نگاشت provider ها به providers.tf اجرا کنید:
cat << 'EOF' > providers.tf
terraform {
  required_providers {
    google = {
      source  = "hashicorp/google"
      version = ">= 5.28.0"
    }
  }
}

provider "google" {
  project = var.project_id
  region  = var.location
}
EOF
مرحله ۳: ایجاد تعریف متغیرها
بلوک توضیحات ورودیها را در variables.tf بنویسید:
cat << 'EOF' > variables.tf
variable "project_id" {
  type        = string
  description = "The Google Cloud Project ID"
}

variable "location" {
  type        = string
  description = "The region to deploy the reasoning engine"
  default     = "us-central1"
}

variable "repository_name" {
  type        = string
  description = "The Artifact Registry repository name"
  default     = "agents-repo"
}

variable "image_tag" {
  type        = string
  description = "The tag of the container image to deploy"
  default     = "latest"
}
EOF
مرحله ۴: ایجاد پیکربندی اصلی
پارامترهای تعریف منابع اصلی را در main.tf بنویسید:
cat << 'EOF' > main.tf
locals {
  class_methods = [
    {"api_mode" = "", "name" = "get_session"},
    {"api_mode" = "", "name" = "list_sessions"},
    {"api_mode" = "", "name" = "create_session"},
    {"api_mode" = "", "name" = "delete_session"},
    {"api_mode" = "async", "name" = "async_get_session"},
    {"api_mode" = "async", "name" = "async_list_sessions"},
    {"api_mode" = "async", "name" = "async_create_session"},
    {"api_mode" = "async", "name" = "async_delete_session"},
    {"api_mode" = "async", "name" = "async_add_session_to_memory"},
    {"api_mode" = "async", "name" = "async_search_memory"},
    {"api_mode" = "stream", "name" = "stream_query"},
    {"api_mode" = "async_stream", "name" = "async_stream_query"},
    {"api_mode" = "async_stream", "name" = "streaming_agent_run_with_events"}
  ]
}

# define the resource with the BYOC configuration, set agent_framework to "google-adk" to enable interactive features on the console.
resource "google_vertex_ai_reasoning_engine" "byoc_weather_agent" {
  display_name = "byoc_weather_agent_tf"
  description  = "BYOC weather agent deployed via Terraform"
  project      = var.project_id
  location     = var.location

  spec {
    class_methods = jsonencode(local.class_methods)
    agent_framework = "google-adk"
    container_spec {
      image_uri = "${var.location}-docker.pkg.dev/${var.project_id}/${var.repository_name}/weather-agent-image:${var.image_tag}"
    }
  }
}
EOF
مرحله ۵: ایجاد تعریف خروجیها
بلوک outputs را در outputs.tf بنویسید:
cat << 'EOF' > outputs.tf
output "reasoning_engine_id" {
  value       = google_vertex_ai_reasoning_engine.byoc_weather_agent.id
  description = "The ID of the deployed reasoning engine"
}

output "reasoning_engine_resource_name" {
  value       = google_vertex_ai_reasoning_engine.byoc_weather_agent.id
  description = "The resource name of the deployed reasoning engine"
}
EOF
مرحله ۶: ایجاد فایل مقادیر متغیرها (tfvars)
با تغذیه مستقیم متغیرهای محیطی به terraform.tfvars ، بدون ویرایش مکاننما، به صورت پویا مستقر شوید:
cat <<EOF > terraform.tfvars
project_id      = "${PROJECT_ID}"
location        = "${LOCATION}"
repository_name = "agents-repo"
image_tag       = "latest"
EOF
مرحله 7: مقداردهی اولیه و اعمال
Terraform را مقداردهی اولیه کنید و پیکربندی را اعمال کنید:
terraform init
terraform apply
با تایپ کردن yes در هنگام درخواست، درخواست را تأیید کنید.
پس از تکمیل، Terraform نام منبع را نمایش میدهد. به صورت برنامهنویسی آن را در agent_resource_name.txt ذخیره کرده و به پوشه ریشه برمیگرداند:
terraform output -raw reasoning_engine_resource_name > ../agent_resource_name.txt
cd ..
۸. از اپراتور سوال کنید
تأیید کنید که عامل شما در حال اجرا و پاسخگویی است.
مرحله 1: ایجاد اسکریپت پرس و جو
اسکریپت تأیید را با استفاده از یک بررسی پیکربندی راهاندازی پویا برای دریافت مختصات مکان، در query_agent.py بنویسید:
cat << 'EOF' > query_agent.py
import json
import os
import requests
from google import auth as google_auth
from google.auth.transport import requests as google_requests

# Load config coordinates directly
config_json = json.load(open("weather_agent/config.json"))
LOCATION = config_json["LOCATION"]
PROJECT_ID = config_json["PROJECT_ID"]

# Load agent resource name
with open("agent_resource_name.txt", "r") as f:
    agent_resource_name = f.read().strip()

def get_identity_token():
    credentials, _ = google_auth.default()
    auth_request = google_requests.Request()
    credentials.refresh(auth_request)
    return credentials.token

# Access the agent at the fastapi endpoint that was specified in main.py
url = f"https://{LOCATION}-aiplatform.googleapis.com/v1/{agent_resource_name}/api/stream_reasoning_engine"

payload = {
    "class_method": "async_stream_query",
    "input": {
        "user_id": "codelab_test_user",
        "message": "What is the temperature in Tokyo?",
    },
}

print(f"Sending query to {url}...")
response = requests.post(
    url,
    headers={
        "Content-Type": "application/json",
        "Authorization": f"Bearer {get_identity_token()}",
    },
    data=json.dumps(payload),
    stream=True,
)

for chunk in response.iter_content(chunk_size=8192):
    if chunk:
        print(chunk.decode('utf-8'))
EOF
اسکریپت کوئری را اجرا کنید:
python3 query_agent.py
شما باید خروجی را که از عامل برمیگردد، از جمله دمای شبیهسازی شده برای توکیو، ببینید.
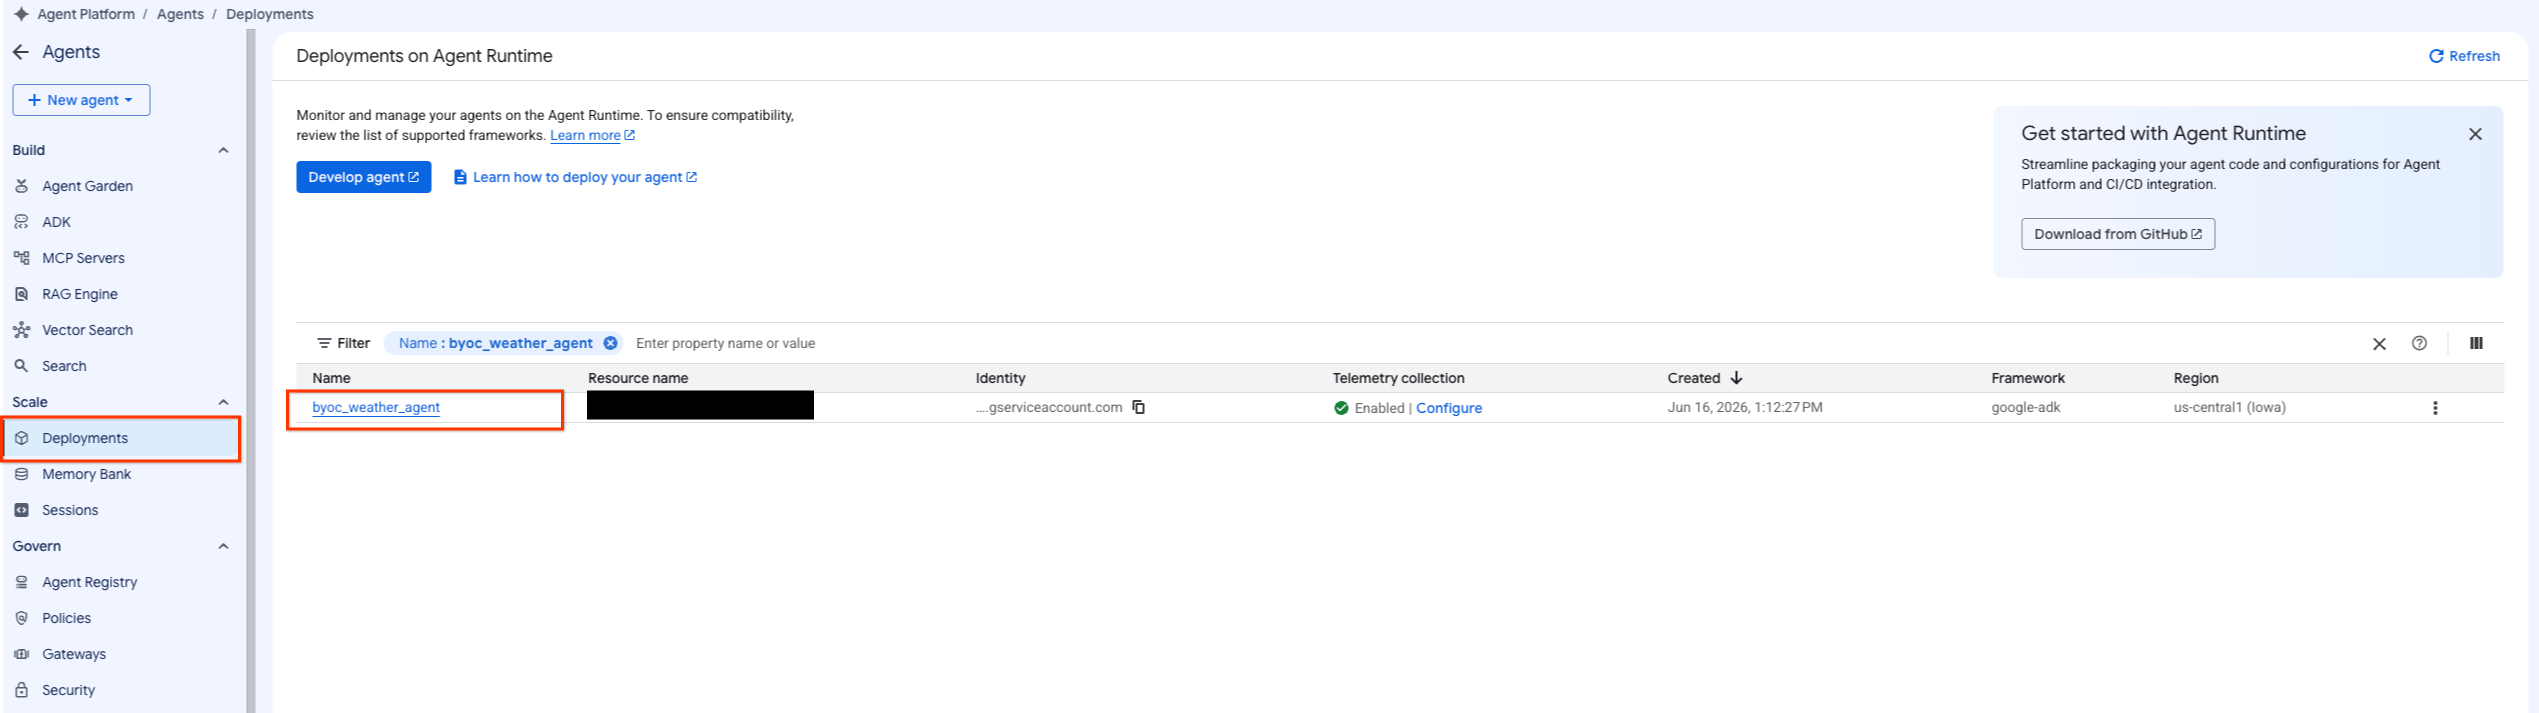
مرحله ۲: استفاده از کنسول
- با انتخاب Agent Platform > Agents > Deployments برای فیلتر کردن لیست Agentها، به Agent مستقر شده بروید.
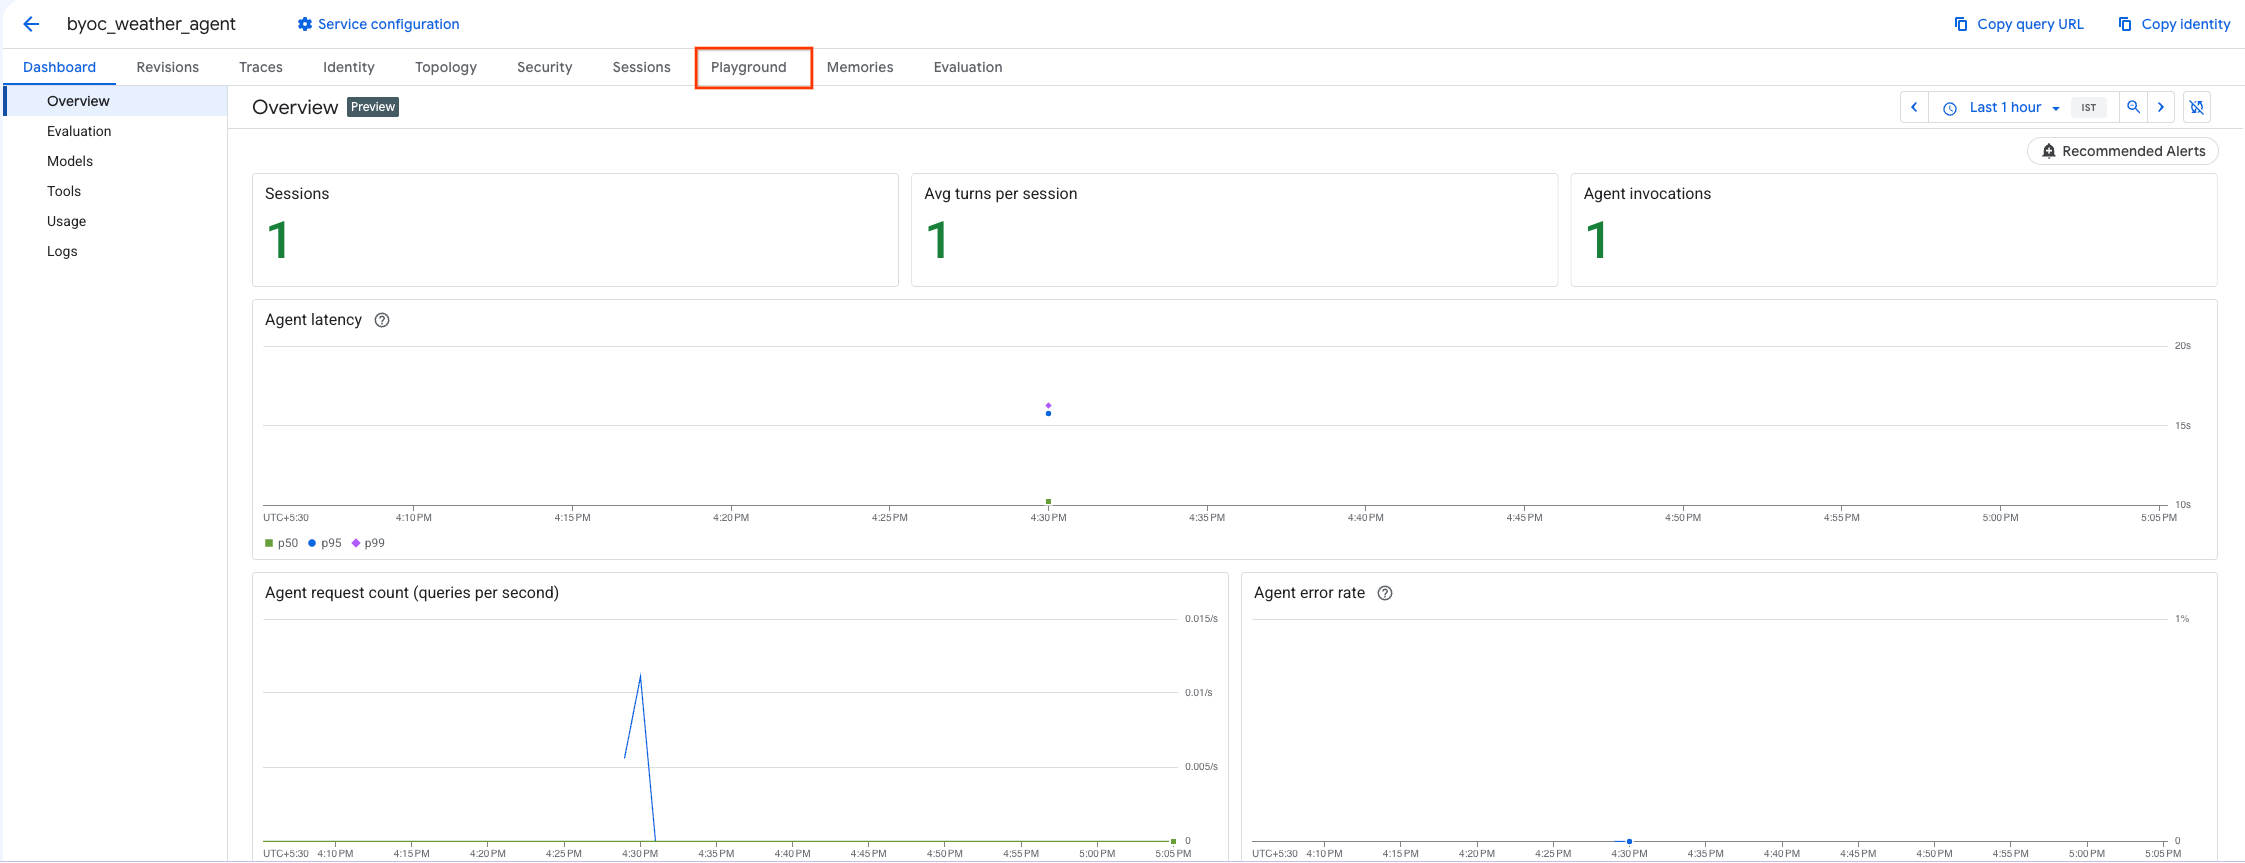
- از داشبورد نماینده، گزینه Playground را انتخاب کنید.
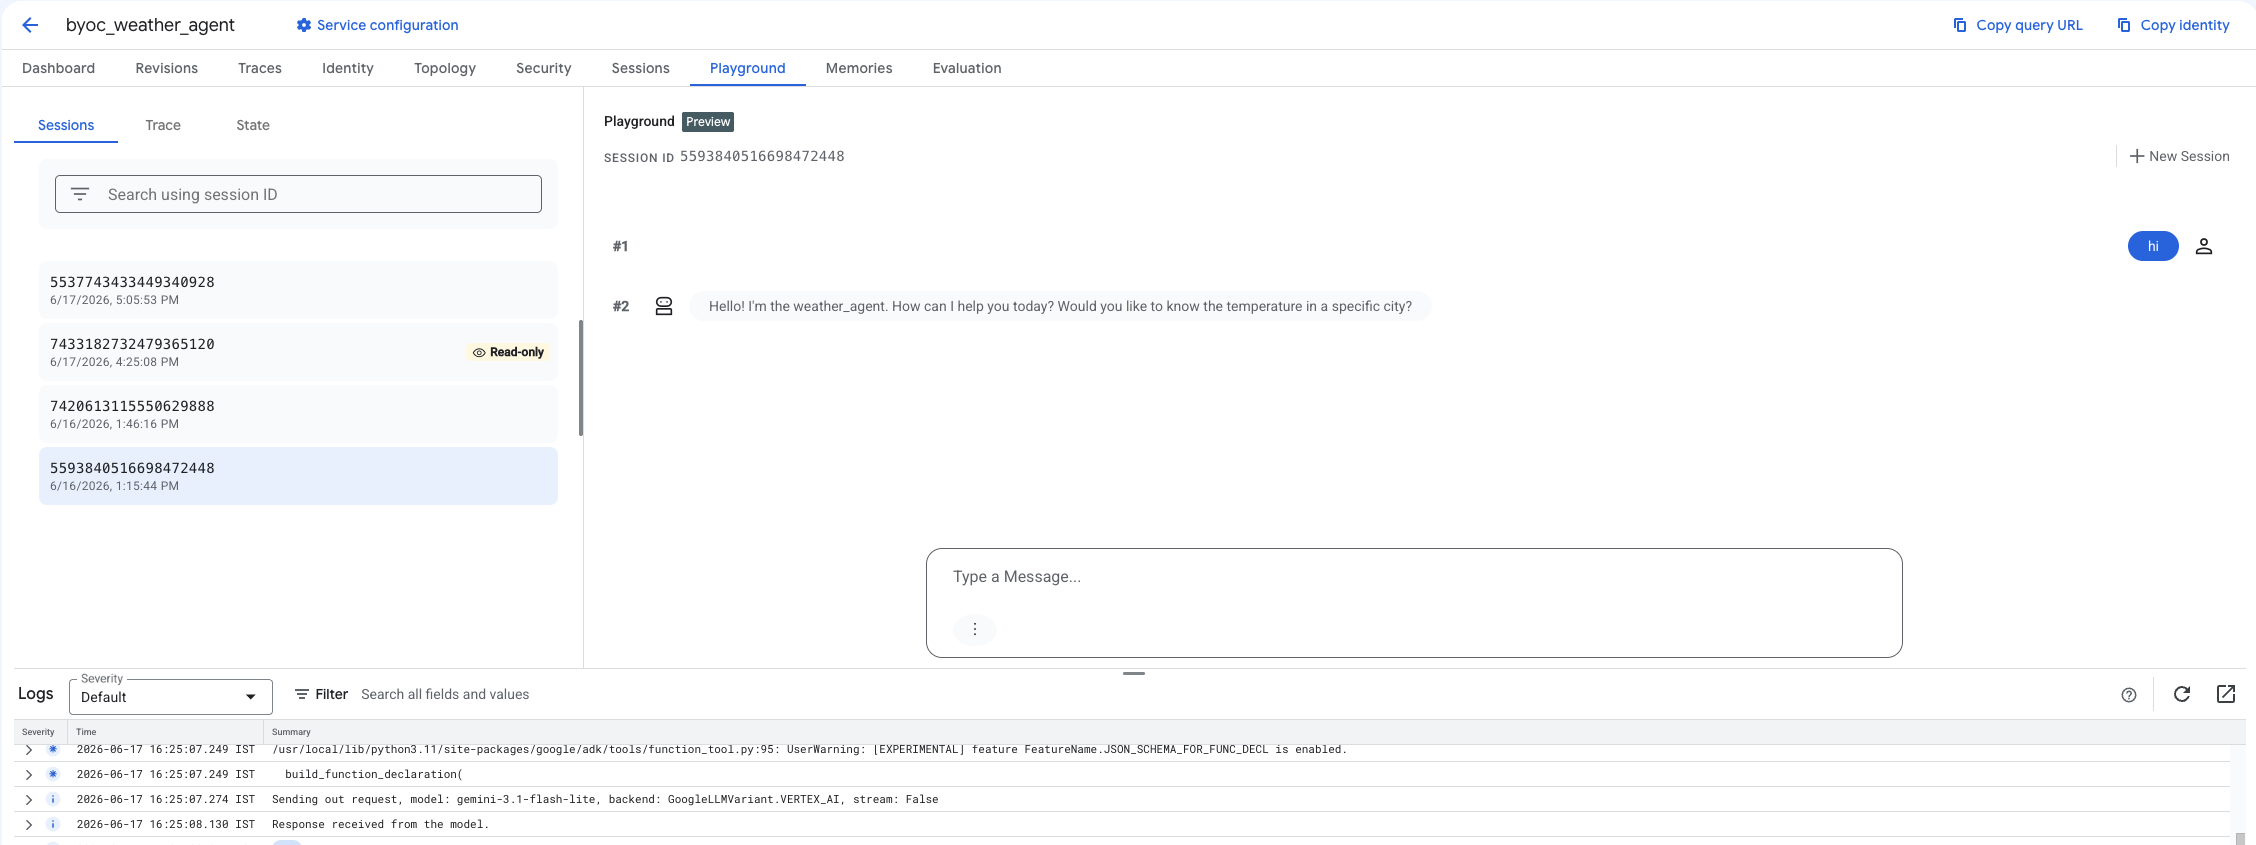
- یک جلسه جدید ایجاد کنید و پرس و جو خود را تایپ کنید تا بررسی کنید که آیا نماینده همانطور که نشان داده شده است به درخواست ها پاسخ می دهد یا خیر.
۹. پاکسازی
برای جلوگیری از تحمیل هزینه، منابعی را که ایجاد کردهاید، پاکسازی کنید.
اگر با استفاده از Terraform مستقر کردهاید، به دایرکتوری terraform بروید و عمل تخریب را اجرا کنید:
cd ~/weather-agent-byoc/terraform
terraform destroy
cd ..
اگر با استفاده از SDK مستقر کردهاید، اسکریپتی برای حذف عامل مستقر شده ایجاد کنید:
cat << 'EOF' > delete_agent.py
import json
import os
import vertexai
from google.cloud import aiplatform

config = json.load(open("weather_agent/config.json"))
PROJECT_ID = config["PROJECT_ID"]
LOCATION = config["LOCATION"]

vertexai.init(project=PROJECT_ID, location=LOCATION)
client = vertexai.Client(project=PROJECT_ID, location=LOCATION)

with open("agent_resource_name.txt", "r") as f:
    agent_resource_name = f.read().strip()

# 1. Delete the Agent
# Note: We retrieve the list first to ensure we delete the ones created in this session
try:
    page_size = 100
    reasoning_engines = client.agent_engines.list()
    for engine in reasoning_engines:
        if agent_resource_name in engine.api_resource.name:
            print(f"Deleting Reasoning Engine: {engine.api_resource.name}")
            engine.delete(force=True)
except Exception as e:
    print(f"Error deleting reasoning engines: {e}")
EOF
اسکریپت را برای حذف عامل اجرا کنید:
python3 delete_agent.py
برای پاکسازی بقیه منابع، به دایرکتوری خانگی خود برگردید و دستورات زیر را در Cloud Shell اجرا کنید:
cd ~

# 1. Delete the Artifact Registry Repository
gcloud artifacts repositories delete $REPOSITORY_NAME --location=$LOCATION --quiet

# 2. Clean up files (Optional)
rm -rf ~/weather-agent-byoc
۱۰. نتیجهگیری
تبریک! شما با موفقیت یک عامل هوش مصنوعی را با استفاده از BYOC در Agent Runtime کانتینر و مستقر کردید.
شما یاد گرفتید که چگونه:
- از ADK برای تعریف یک Agent استفاده کنید و آن را با استفاده از FastAPI پوشش دهید.
- یک Dockerfile ایجاد کنید و با استفاده از Cloud Build تصاویر را بسازید.
- مدیریت مجوزهای IAM برای Agent Runtime
- کانتینر سفارشی خود را با استفاده از SDK پایتون و Terraform مستقر کنید.
- عامل مستقر شده خود را آزمایش و بررسی کنید.