
1. סקירה כללית
Agent Runtime (לשעבר Agent Engine) הוא סביבת זמן ריצה מנוהלת שנועדה לפריסה, להפעלה ולשינוי גודל של סוכני AI בצורה יעילה. כברירת מחדל, הפלטפורמה מאגדת אוטומטית את קוד המקור ואת יחסי התלות במהלך תהליך הפריסה.
עם זאת, עומסי עבודה ארגוניים דורשים לעיתים קרובות בעלות מלאה על סביבת זמן הריצה. כדי לתמוך בכך, Agent Runtime מספק יכולת Bring Your Own Container(BYOC), שמאפשרת לכם לפרוס קובצי אימג' מותאמים אישית של קונטיינרים שנבנו מראש.
בשיעור Codelab הזה נסביר איך ליצור קונטיינר לסוכן שנבנה באמצעות הערכה לפיתוח סוכנים (ADK) של Google, להגדיר את ההרשאות הנדרשות ב-Google Cloud ולפרוס אותו ב-Agent Runtime באמצעות Python SDK או Terraform.
ב-Codelab הזה תלמדו איך:
- יצירת סוכן Python באמצעות Google Agent Development Kit (ADK).
- עוטפים את הסוכן באפליקציית FastAPI.
- יצירת קונטיינר לאפליקציה באמצעות Docker.
- הגדרת ההרשאות ב-Google Cloud.
- פריסה ובדיקה של הסוכן בקונטיינר ב-Agent Runtime.
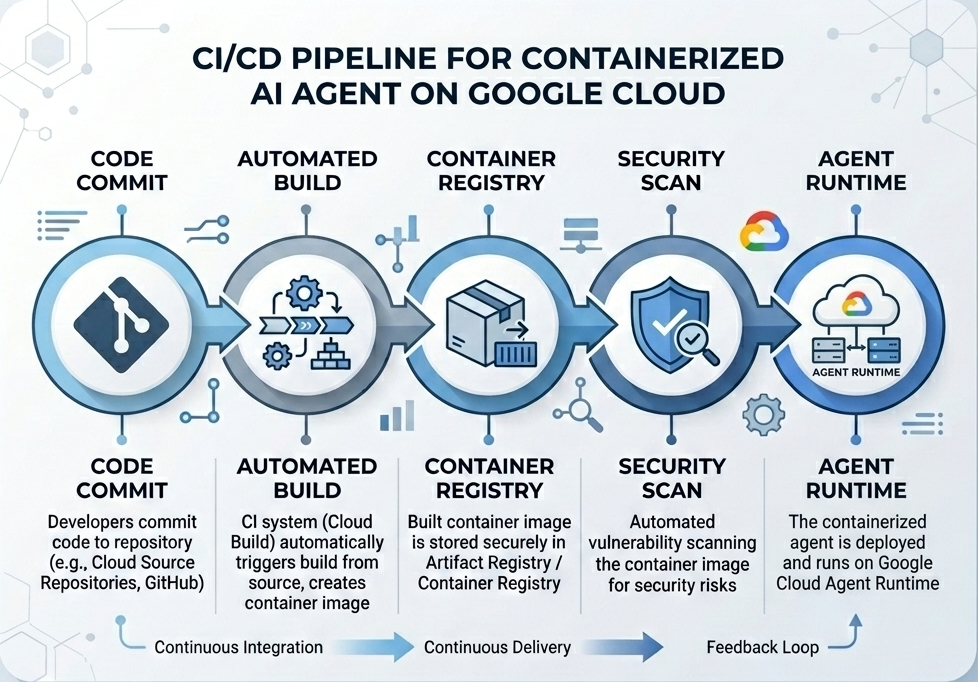
תהליך הפיתוח והפריסה
הדיאגרמה הבאה ממחישה את תהליך העבודה של שלבי הבנייה והפריסה שתבצעו באופן ידני ב-Codelab הזה:
מה צריך
- פרויקט ב-Google Cloud שהחיוב בו מופעל.
- גישה ל-Cloud Shell (מומלץ) או לסביבת פיתוח מקומית עם
gcloudו-dockerמותקנים. - ידע בסיסי ב-Python וב-Docker.
2. הגדרת הסביבה
לפני שמתחילים, צריך להפעיל את ממשקי ה-API הדרושים ולהגדיר את הסביבה.
שלב 1: פותחים את Cloud Shell
לוחצים על הלחצן Activate Cloud Shell (הפעלת Cloud Shell) בפינה הימנית העליונה של מסוף Google Cloud.

שלב 2: הגדרת משתני סביבה
ב-Cloud Shell, מגדירים את מזהה הפרויקט ומגדירים משתני סביבה מרכזיים שמשמשים לאורך שיעור ה-Codelab הזה. מחליפים את "YOUR_PROJECT_ID" במזהה הפרויקט בפועל ב-Google Cloud:
gcloud config set project "YOUR_PROJECT_ID"
export PROJECT_ID=$(gcloud config get-value project)
export LOCATION="us-central1"
export MODEL="gemini-3.1-flash-lite"
export MODEL_REGION="global"
המשתנים האלה מגדירים את הגדרות הפריסה של היעד:
-
PROJECT_ID: המזהה הייחודי של הפרויקט ב-Google Cloud שבו ימוקמו כל המשאבים של Gemini Enterprise Agent Platform ו-Artifact Registry. -
LOCATION: האזור הגיאוגרפי (לדוגמה,us-central1) שבו מתארחים המאגרים ועומסי העבודה של זמן הריצה. -
MODEL: גרסת מודל Gemini (לדוגמה,gemini-3.1-flash-lite) שנטענה על ידי הקשר של הסוכן. -
MODEL_REGION: האזור של נקודת הקצה של המודל. כאן מגדירים את הערך"global"כדי להפעיל את מודל Gemini מנקודות הקצה הגלובליות.
שלב 3: הפעלת ממשקי API
מפעילים את ממשקי ה-API הנדרשים של Google Cloud:
gcloud services enable \
    aiplatform.googleapis.com \
    cloudbuild.googleapis.com \
    compute.googleapis.com \
    artifactregistry.googleapis.com \
    storage.googleapis.com
שלב 4: התקנת SDK
מתקינים את Vertex AI SDK עם תמיכה ב-Agent Engine וב-ADK:
pip install --upgrade "google-cloud-aiplatform[agent_engines,adk]>=1.144"
3. הגדרת קובצי מקור
בשלב הזה יוצרים את המבנה והקוד של הסוכן.
סקירה כללית של מבנה הספרייה
בסוף שיעור ה-Codelab הזה, הקבצים שלכם יהיו מאורגנים בהיררכיית סביבת העבודה הבאה:
weather-agent-byoc/
├── Dockerfile                  # Container definition
├── deploy_byoc.py              # Python SDK deployment script
├── main.py                     # FastAPI server wrapper
├── query_agent.py              # Verify / query script
├── requirements.txt            # Python dependencies
│
├── weather_agent/              # Agent source module
│   ├── __init__.py             # Package declaration
│   ├── agent.py                # Agent & mock tools logic
│   └── config.json             # Environment config variables
│
└── terraform/                  # Terraform configuration files
    ├── main.tf
    ├── outputs.tf
    ├── providers.tf
    ├── terraform.tfvars
    └── variables.tf
שלב 1: יצירת ספריות
מתחילים בספריית הבית ויוצרים את מבנה סביבת העבודה:
cd ~
mkdir -p weather-agent-byoc/weather_agent
cd weather-agent-byoc
שלב 2: יוצרים קובץ הגדרה
מריצים את הפקודה הבאה ב-Cloud Shell כדי לכתוב את פרמטרי ההגדרה ישירות ל-weather_agent/config.json. הפקודה הזו מחליפה אוטומטית את המשתנים בערכים של הסביבה שלכם:
cat <<EOF > weather_agent/config.json
{
    "PROJECT_ID": "${PROJECT_ID}",
    "LOCATION": "${LOCATION}",
    "MODEL": "${MODEL}",
    "MODEL_REGION": "${MODEL_REGION}"
}
EOF
שלב 3: הגדרת הסוכן
מריצים את הסקריפט הבא כדי לכתוב את הגדרות הסוכן ואת הלוגיקה של כלי הדמה ב-weather_agent/agent.py:
cat << 'EOF' > weather_agent/agent.py
import json
import random
from google.adk.agents import Agent
from google.adk.models.google_llm import Gemini
from functools import cached_property
from google.genai import Client

# Load config
llm_config = json.load(open("weather_agent/config.json"))
PROJECT_ID = llm_config["PROJECT_ID"]
MODEL = llm_config["MODEL"]
MODEL_REGION = llm_config["MODEL_REGION"]

# Override Gemini class for global endpoint compatibility
class GlobalGemini(Gemini):
  @cached_property
  def api_client(self) -> Client:
    return Client(vertexai=True, location="global")

# Define Tool
def get_temperature(place: str) -> str:
    '''Returns the current temperature of a given place.

    Args:
        place: The name of the city or location.

    Returns:
        str: A string describing the temperature.
    '''
    temp = random.randint(-10, 40)
    return f"The current temperature in {place} is {temp}°C."

# Initialize LLM
llm_model = GlobalGemini(model=MODEL) if MODEL_REGION == "global" else Gemini(model=MODEL)

# Initialize Agent
root_agent = Agent(
    model=llm_model,
    name='weather_agent',
    description='An agent that provides temperature information for locations.',
    instruction='You are a helpful assistant that can provide the current temperature for any given place using the get_temperature tool.',
    tools=[get_temperature],
)
EOF
יוצרים תיקייה ריקה בשם __init__.py כדי להפוך את weather_agent לחבילת Python:
touch weather_agent/__init__.py
שלב 4: יצירת FastAPI Wrapper
מריצים את הסקריפט הבא כדי לכתוב את הגדרת נקודת הכניסה של שרת FastAPI אל main.py:
cat << 'EOF' > main.py
import inspect
import json
import logging
import os
from typing import Any, Dict, Optional
import uvicorn
import vertexai
from weather_agent.agent import root_agent
from fastapi import FastAPI, encoders, responses
from pydantic import BaseModel
from vertexai import agent_engines

app = FastAPI()

config_json = json.load(open("weather_agent/config.json"))
PROJECT_ID = config_json["PROJECT_ID"]
LOCATION = config_json["LOCATION"]
MODEL_REGION = config_json["MODEL_REGION"]

class QueryRequest(BaseModel):
    input: Optional[Dict[str, Any]] = None
    class_method: Optional[str] = None

vertexai.init(project=PROJECT_ID, location=MODEL_REGION)
adk_app = agent_engines.AdkApp(agent=root_agent)

def _encode_chunk_to_json(chunk):
  try:
    json_chunk = encoders.jsonable_encoder(chunk)
    return json.dumps(json_chunk) + "\n"
  except Exception:
    logging.exception("Failed to encode chunk")
    return None

async def json_generator(output):
  async for chunk in output:
    encoded_chunk = _encode_chunk_to_json(chunk)
    if encoded_chunk is None:
      break
    yield encoded_chunk

async def _invoke_callable_or_raise(invocation_callable, invocation_payload):
  if inspect.iscoroutinefunction(invocation_callable):
    return await invocation_callable(**invocation_payload)
  else:
    return invocation_callable(**invocation_payload)

@app.post("/api/reasoning_engine")
async def query(request: QueryRequest) -> responses.JSONResponse:
    method = getattr(adk_app, request.class_method)
    output = await _invoke_callable_or_raise(method, request.input or {})
    try:
      json_serialized_content = encoders.jsonable_encoder({"output": output})
    except ValueError as encoding_error:
      logging.exception("Failed to encode response")
      raise encoding_error
    return responses.JSONResponse(content=json_serialized_content)

@app.post("/api/stream_reasoning_engine")
async def stream_query(request: QueryRequest) -> responses.StreamingResponse:
    method = getattr(adk_app, request.class_method)
    output = await _invoke_callable_or_raise(method, request.input or {})
    return responses.StreamingResponse(
        content=json_generator(output),
        media_type="application/json",
    )

if __name__ == "__main__":
    uvicorn.run(app, host="0.0.0.0", port=int(os.environ.get("PORT", 8080)))
EOF
שלב 5: הגדרת תלות
כתוב את יחסי התלות הנדרשים של Python ב-requirements.txt:
cat << 'EOF' > requirements.txt
fastapi
uvicorn
vertexai
google-cloud-aiplatform[agent_engines,adk]>=1.144
pydantic
EOF
4. הובלה במכולות
עכשיו מגדירים איך הסוכן ייארז בקונטיינר.
שלב 1: יצירת Dockerfile
יוצרים את הקובץ Dockerfile בספריית השורש של הפרויקט כדי לציין איך אפליקציית FastAPI בנויה:
cat << 'EOF' > Dockerfile
FROM python:3.11-slim

WORKDIR /app

COPY weather_agent/ /app/weather_agent/
COPY main.py .
COPY requirements.txt .
RUN pip install -r requirements.txt

CMD ["sh", "-c", "uvicorn main:app --host 0.0.0.0 --port $PORT"]
EOF
5. הגדרה של Artifact Registry ו-Cloud Build
צריך מאגר כדי לאחסן את קובץ האימג' של הקונטיינר והרשאות כדי להעלות אותו.
שלב 1: יצירת מאגר
מגדירים את שם המאגר ויוצרים מאגר Docker ב-Artifact Registry באמצעות משתני הסביבה שהוגדרו במהלך ההגדרה:
export REPOSITORY_NAME="agents-repo"

gcloud artifacts repositories create $REPOSITORY_NAME \
    --project=$PROJECT_ID \
    --repository-format=docker \
    --location=$LOCATION \
    --description="Docker repository for Agents"
שלב 2: הגדרת ההרשאות לחשבון השירות
נותנים לחשבון השירות שמשמש כברירת מחדל ב-Compute Engine הרשאה להעלאת תמונות ל-Artifact Registry.
קודם צריך למצוא את מספר הפרויקט:
export PROJECT_NUMBER=$(gcloud projects describe $PROJECT_ID --format="value(projectNumber)")
הקצאת התפקידים:
# Allow pushing to Artifact Registry
gcloud projects add-iam-policy-binding $PROJECT_ID \
    --member="serviceAccount:$PROJECT_NUMBER-compute@developer.gserviceaccount.com" \
    --role="roles/artifactregistry.writer" \
    --condition=None

# Allow Cloud Build to read storage objects
gcloud projects add-iam-policy-binding $PROJECT_NUMBER \
    --member="serviceAccount:$PROJECT_NUMBER-compute@developer.gserviceaccount.com" \
    --role="roles/storage.objectViewer" \
    --condition=None
שלב 3: נותנים הרשאות לסוכני שירות
נותנים לסוכני השירות של AI Platform ו-Reasoning Engine גישת קריאה ל-Artifact Registry:
gcloud projects add-iam-policy-binding $PROJECT_NUMBER \
    --member="serviceAccount:service-$PROJECT_NUMBER@gcp-sa-aiplatform-re.iam.gserviceaccount.com" \
    --role="roles/artifactregistry.reader"  --condition=None

gcloud projects add-iam-policy-binding $PROJECT_NUMBER \
    --member="serviceAccount:service-$PROJECT_NUMBER@gcp-sa-aiplatform.iam.gserviceaccount.com" \
    --role="roles/artifactregistry.reader"  --condition=None
שלב 4: בנייה והעלאה של תמונה
משתמשים ב-Cloud Build כדי ליצור ולהעביר בדחיפה את קובץ האימג' של קונטיינר:
gcloud builds submit \
    --project=$PROJECT_ID \
    --region=$LOCATION \
    --tag $LOCATION-docker.pkg.dev/$PROJECT_ID/$REPOSITORY_NAME/weather-agent-image:latest \
    .
6. פריסת הסוכן באמצעות SDK
אחרי שמגדירים את ההרשאות, אפשר לפרוס את מאגר התגים המותאם אישית.
שלב 1: פריסת סוכן BYOC
כדי לפרוס את הקונטיינר שמתארח במאגר אל Agent Runtime, יוצרים את קובץ ה-Python deploy_byoc.py בתיקיית השורש של הפרויקט:
cat << 'EOF' > deploy_byoc.py
import json
import os
import vertexai
from google.cloud import aiplatform

config = json.load(open("weather_agent/config.json"))
PROJECT_ID = config["PROJECT_ID"]
LOCATION = config["LOCATION"]
REPOSITORY_NAME = "agents-repo"

vertexai.init(project=PROJECT_ID, location=LOCATION)
client = vertexai.Client(project=PROJECT_ID, location=LOCATION)

image_uri = f"{LOCATION}-docker.pkg.dev/{PROJECT_ID}/{REPOSITORY_NAME}/weather-agent-image:latest"

print(f"Deploying custom container agent from {image_uri}...")
remote_agent = client.agent_engines.create(
    config={
        "display_name": "byoc_weather_agent",
        "description": "BYOC weather agent from custom container",
        "container_spec": {
            "image_uri": image_uri
        },
        "class_methods": [
            # For convenience to interact with the agent through the Python SDK
            # https://docs.cloud.google.com/gemini-enterprise-agent-platform/scale/runtime/use-an-adk-agent#supported-operations
            {"api_mode": "", "name": "get_session"},
            {"api_mode": "", "name": "list_sessions"},
            {"api_mode": "", "name": "create_session"},
            {"api_mode": "", "name": "delete_session"},
            {"api_mode": "async", "name": "async_get_session"},
            {"api_mode": "async", "name": "async_list_sessions"},
            {"api_mode": "async", "name": "async_create_session"},
            {"api_mode": "async", "name": "async_delete_session"},
            {"api_mode": "async", "name": "async_add_session_to_memory"},
            {"api_mode": "async", "name": "async_search_memory"},
            {"api_mode": "stream", "name": "stream_query"},
            {"api_mode": "async_stream", "name": "async_stream_query"},
            {"api_mode": "async_stream", "name": "streaming_agent_run_with_events"},
        ],
        "agent_framework": "google-adk",
    },
)

print(f"Agent successfully deployed!")
print(f"Resource Name: {remote_agent.api_resource.name}")

# Save resource name for testing
with open("agent_resource_name.txt", "w") as f:
    f.write(remote_agent.api_resource.name)
EOF
מריצים את סקריפט הפריסה כדי לפרוס את הסוכן ב-Agent Runtime:
python3 deploy_byoc.py
7. פריסת הסוכן באמצעות Terraform
אפשר גם לפרוס את אותו סוכן מבוסס-קונטיינר באמצעות Terraform. מומלץ להשתמש בשיטה הזו בסביבות ייצור כדי לנהל את התשתית כקוד.
שלב 1: עוברים לספריית Terraform
יוצרים ספרייה בשם terraform בתיקיית השורש של הפרויקט ועוברים אליה:
mkdir -p terraform
cd terraform
שלב 2: יצירת הגדרות של ספקי זהויות
מריצים את הסקריפט הבא כדי לכתוב את מיפוי הספקים אל providers.tf:
cat << 'EOF' > providers.tf
terraform {
  required_providers {
    google = {
      source  = "hashicorp/google"
      version = ">= 5.28.0"
    }
  }
}

provider "google" {
  project = var.project_id
  region  = var.location
}
EOF
שלב 3: יצירת הגדרת משתנים
כתיבת בלוק תיאור של הקלט ל-variables.tf:
cat << 'EOF' > variables.tf
variable "project_id" {
  type        = string
  description = "The Google Cloud Project ID"
}

variable "location" {
  type        = string
  description = "The region to deploy the reasoning engine"
  default     = "us-central1"
}

variable "repository_name" {
  type        = string
  description = "The Artifact Registry repository name"
  default     = "agents-repo"
}

variable "image_tag" {
  type        = string
  description = "The tag of the container image to deploy"
  default     = "latest"
}
EOF
שלב 4: יצירת הגדרה ראשית
כותבים את הפרמטרים של הגדרת המשאבים העיקריים ל-main.tf:
cat << 'EOF' > main.tf
locals {
  class_methods = [
    {"api_mode" = "", "name" = "get_session"},
    {"api_mode" = "", "name" = "list_sessions"},
    {"api_mode" = "", "name" = "create_session"},
    {"api_mode" = "", "name" = "delete_session"},
    {"api_mode" = "async", "name" = "async_get_session"},
    {"api_mode" = "async", "name" = "async_list_sessions"},
    {"api_mode" = "async", "name" = "async_create_session"},
    {"api_mode" = "async", "name" = "async_delete_session"},
    {"api_mode" = "async", "name" = "async_add_session_to_memory"},
    {"api_mode" = "async", "name" = "async_search_memory"},
    {"api_mode" = "stream", "name" = "stream_query"},
    {"api_mode" = "async_stream", "name" = "async_stream_query"},
    {"api_mode" = "async_stream", "name" = "streaming_agent_run_with_events"}
  ]
}

# define the resource with the BYOC configuration, set agent_framework to "google-adk" to enable interactive features on the console.
resource "google_vertex_ai_reasoning_engine" "byoc_weather_agent" {
  display_name = "byoc_weather_agent_tf"
  description  = "BYOC weather agent deployed via Terraform"
  project      = var.project_id
  location     = var.location

  spec {
    class_methods = jsonencode(local.class_methods)
    agent_framework = "google-adk"
    container_spec {
      image_uri = "${var.location}-docker.pkg.dev/${var.project_id}/${var.repository_name}/weather-agent-image:${var.image_tag}"
    }
  }
}
EOF
שלב 5: יצירת הגדרת פלט
כותבים את בלוק הפלט ל-outputs.tf:
cat << 'EOF' > outputs.tf
output "reasoning_engine_id" {
  value       = google_vertex_ai_reasoning_engine.byoc_weather_agent.id
  description = "The ID of the deployed reasoning engine"
}

output "reasoning_engine_resource_name" {
  value       = google_vertex_ai_reasoning_engine.byoc_weather_agent.id
  description = "The resource name of the deployed reasoning engine"
}
EOF
שלב 6: יוצרים קובץ של ערכי משתנים (tfvars)
כדי לפרוס באופן דינמי בלי לערוך את הפלייסהולדרים, צריך להזין משתני סביבה ישירות ל-terraform.tfvars:
cat <<EOF > terraform.tfvars
project_id      = "${PROJECT_ID}"
location        = "${LOCATION}"
repository_name = "agents-repo"
image_tag       = "latest"
EOF
שלב 7: הפעלה והחלה
מפעילים את Terraform ומחילים את ההגדרות:
terraform init
terraform apply
כשמוצגת בקשה, מקלידים yes כדי לאשר את ההחלה.
בסיום התהליך, Terraform מציג את שם המשאב. לצלם אותו באופן פרוגרמטי ל-agent_resource_name.txt ולחזור לתיקיית הבסיס:
terraform output -raw reasoning_engine_resource_name > ../agent_resource_name.txt
cd ..
8. שליחת שאילתה לסוכן
מוודאים שהנציג פועל ומגיב.
שלב 1: יצירת סקריפט של שאילתה
כותבים את סקריפט האימות ל-query_agent.py באמצעות בדיקה דינמית של הגדרת התצורה כדי לאחזר קואורדינטות של מיקום:
cat << 'EOF' > query_agent.py
import json
import os
import requests
from google import auth as google_auth
from google.auth.transport import requests as google_requests

# Load config coordinates directly
config_json = json.load(open("weather_agent/config.json"))
LOCATION = config_json["LOCATION"]
PROJECT_ID = config_json["PROJECT_ID"]

# Load agent resource name
with open("agent_resource_name.txt", "r") as f:
    agent_resource_name = f.read().strip()

def get_identity_token():
    credentials, _ = google_auth.default()
    auth_request = google_requests.Request()
    credentials.refresh(auth_request)
    return credentials.token

# Access the agent at the fastapi endpoint that was specified in main.py
url = f"https://{LOCATION}-aiplatform.googleapis.com/v1/{agent_resource_name}/api/stream_reasoning_engine"

payload = {
    "class_method": "async_stream_query",
    "input": {
        "user_id": "codelab_test_user",
        "message": "What is the temperature in Tokyo?",
    },
}

print(f"Sending query to {url}...")
response = requests.post(
    url,
    headers={
        "Content-Type": "application/json",
        "Authorization": f"Bearer {get_identity_token()}",
    },
    data=json.dumps(payload),
    stream=True,
)

for chunk in response.iter_content(chunk_size=8192):
    if chunk:
        print(chunk.decode('utf-8'))
EOF
מריצים את סקריפט השאילתה:
python3 query_agent.py
הפלט אמור לחזור מהסוכן בסטרימינג, כולל הטמפרטורה המדומה בטוקיו.
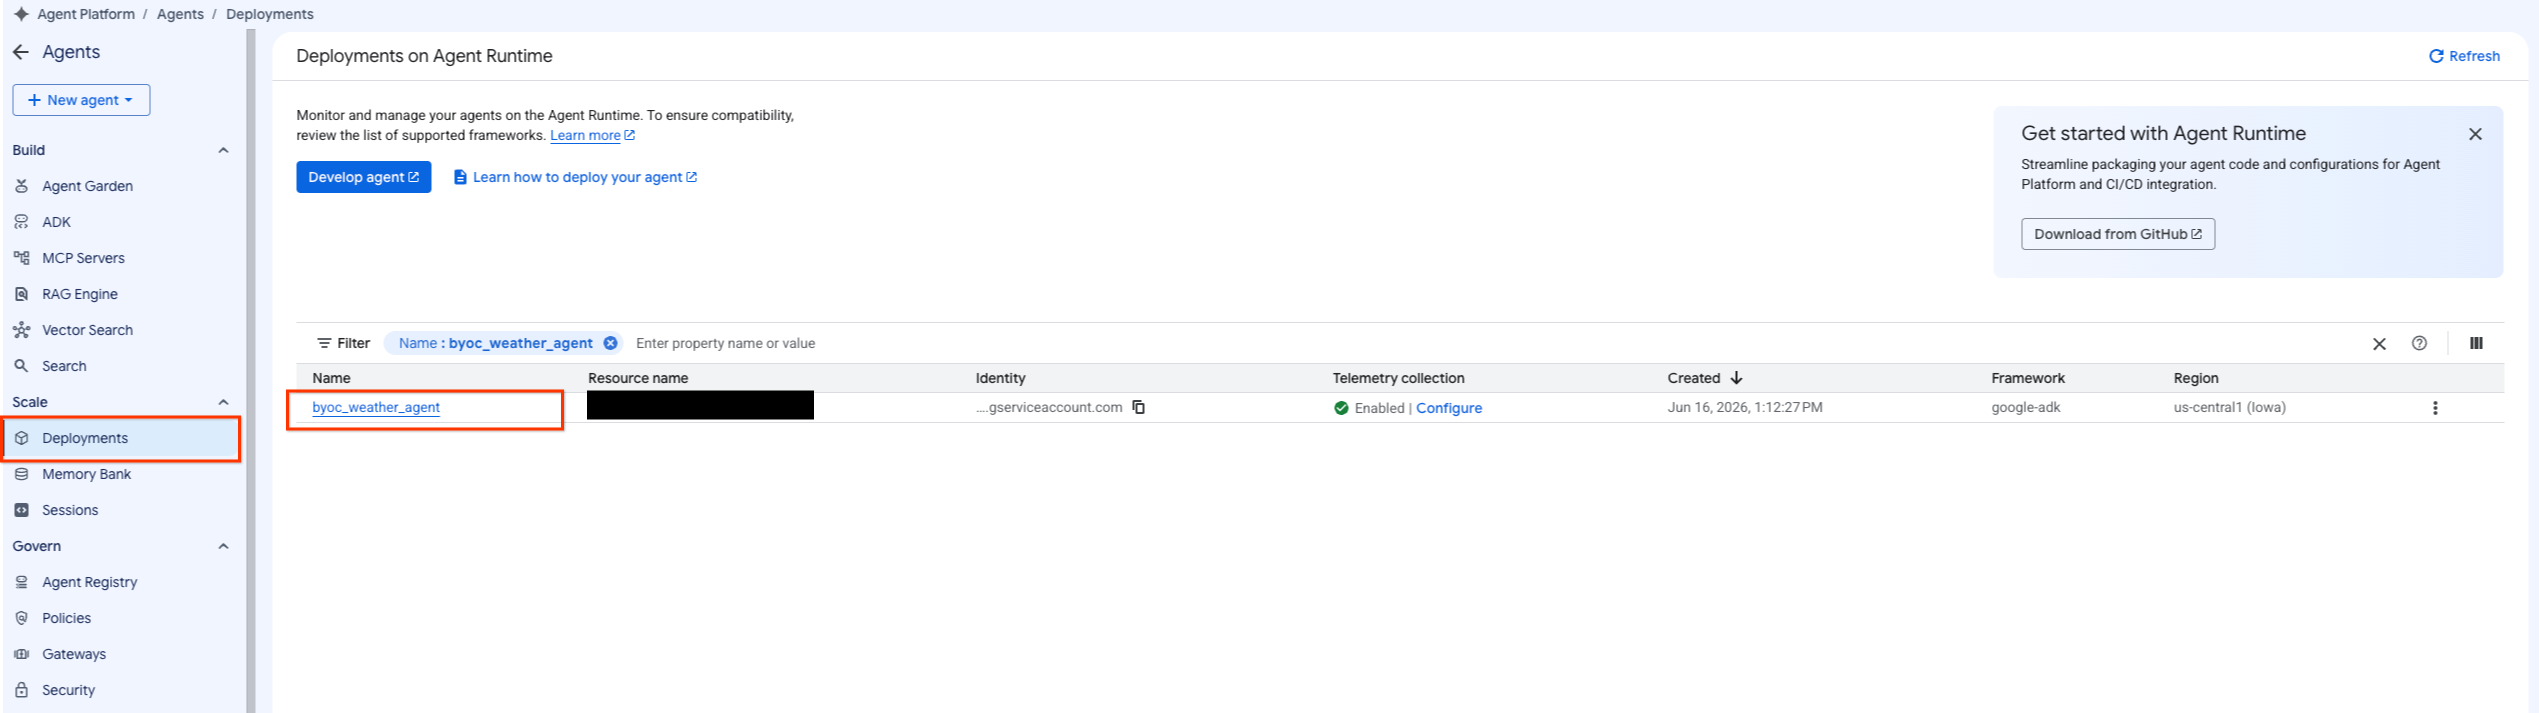
שלב 2: שימוש במסוף
- כדי לסנן את רשימת הסוכנים, בוחרים באפשרות Agent Platform (פלטפורמת סוכנים) > Agents (סוכנים) > Deployments (פריסות).
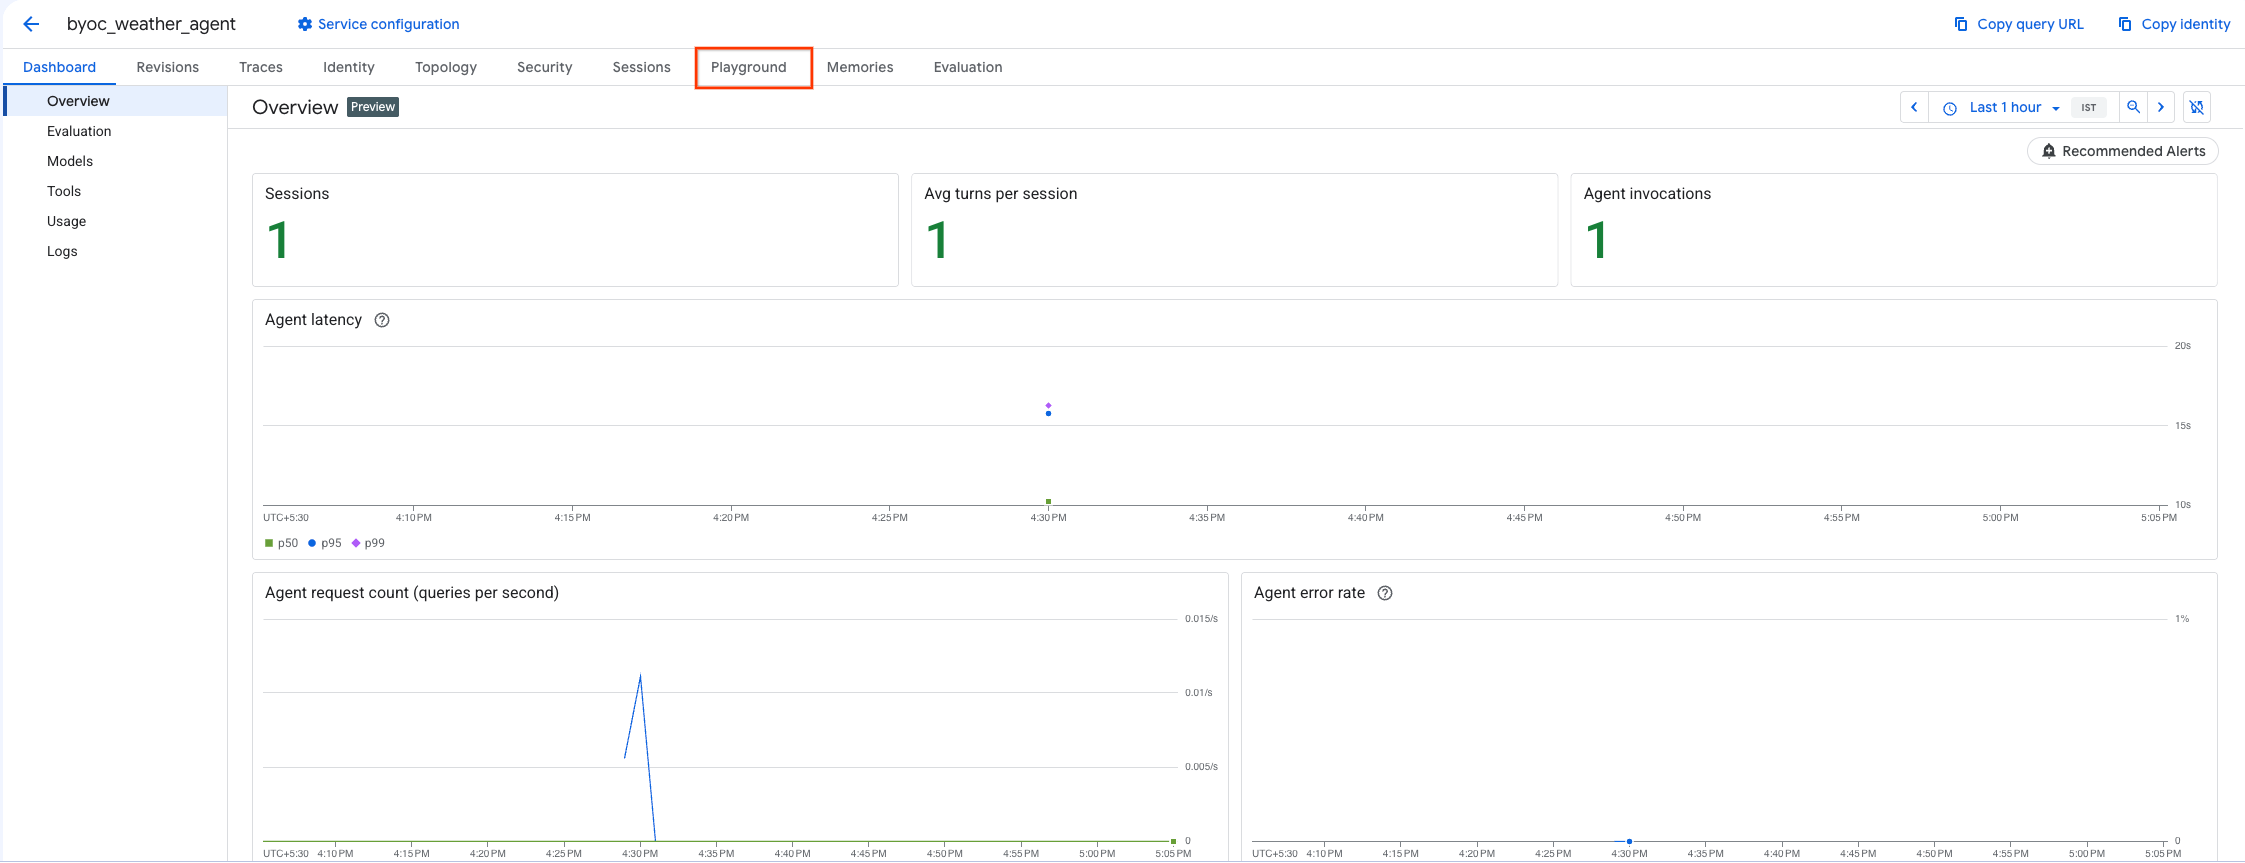
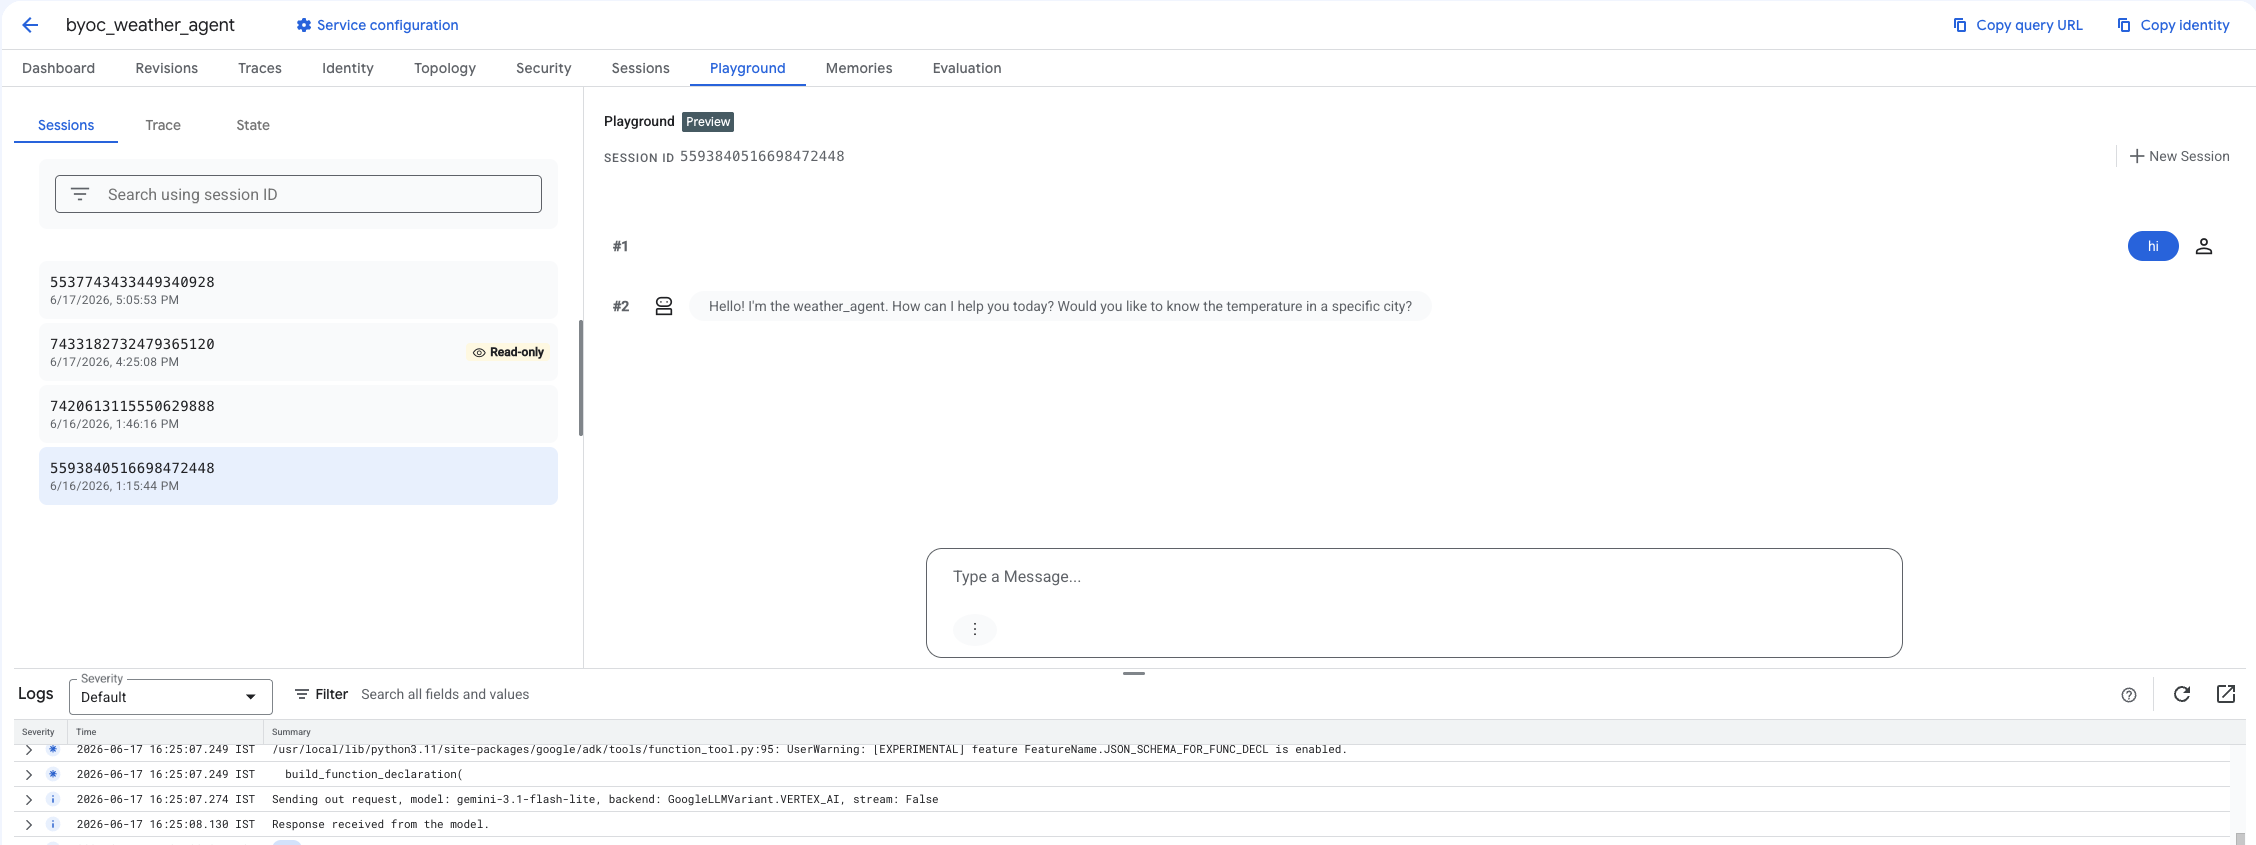
- בוחרים באפשרות Playground ממרכז הבקרה של הסוכן.
- יוצרים סשן חדש ומקלידים את השאילתה כדי לבדוק אם הסוכן מגיב לבקשות כמו שמוצג.
9. הסרת המשאבים
כדי להימנע מחיובים, צריך למחוק את המשאבים שיצרתם.
אם ביצעתם פריסה באמצעות Terraform, עוברים לספרייה terraform ומריצים את פעולת ההסרה:
cd ~/weather-agent-byoc/terraform
terraform destroy
cd ..
אם פרסתם באמצעות SDK, צריך ליצור סקריפט למחיקת הסוכן שנפרס:
cat << 'EOF' > delete_agent.py
import json
import os
import vertexai
from google.cloud import aiplatform

config = json.load(open("weather_agent/config.json"))
PROJECT_ID = config["PROJECT_ID"]
LOCATION = config["LOCATION"]

vertexai.init(project=PROJECT_ID, location=LOCATION)
client = vertexai.Client(project=PROJECT_ID, location=LOCATION)

with open("agent_resource_name.txt", "r") as f:
    agent_resource_name = f.read().strip()

# 1. Delete the Agent
# Note: We retrieve the list first to ensure we delete the ones created in this session
try:
    page_size = 100
    reasoning_engines = client.agent_engines.list()
    for engine in reasoning_engines:
        if agent_resource_name in engine.api_resource.name:
            print(f"Deleting Reasoning Engine: {engine.api_resource.name}")
            engine.delete(force=True)
except Exception as e:
    print(f"Error deleting reasoning engines: {e}")
EOF
מריצים את הסקריפט כדי למחוק את הסוכן:
python3 delete_agent.py
כדי לנקות את שאר המשאבים, חוזרים לספריית הבית ומריצים את הפקודות הבאות ב-Cloud Shell:
cd ~

# 1. Delete the Artifact Registry Repository
gcloud artifacts repositories delete $REPOSITORY_NAME --location=$LOCATION --quiet

# 2. Clean up files (Optional)
rm -rf ~/weather-agent-byoc
10. סיכום
מעולה! הצלחתם להכניס סוכן AI לקונטיינר ולפרוס אותו ב-Agent Runtime באמצעות BYOC.
למדתם איך:
- משתמשים ב-ADK כדי להגדיר סוכן ועוטפים אותו באמצעות FastAPI.
- יצירת קובץ Dockerfile ויצירת קובצי אימג' באמצעות Cloud Build.
- ניהול הרשאות IAM עבור Agent Runtime.
- פורסים את הקונטיינר המותאם אישית באמצעות Python SDK ו-Terraform.
- בודקים את הסוכן שהופעל ומגישים לו שאילתות.