
1. खास जानकारी
एजेंट रनटाइम (पहले इसे एजेंट इंजन कहा जाता था) एक मैनेज किया गया रनटाइम एनवायरमेंट है. इसे एआई एजेंट को असरदार तरीके से डिप्लॉय करने, चलाने, और स्केल करने के लिए डिज़ाइन किया गया है. डिफ़ॉल्ट रूप से, प्लैटफ़ॉर्म डिप्लॉयमेंट प्रोसेस के दौरान, आपके सोर्स कोड और डिपेंडेंसी को अपने-आप बंडल कर देता है.
हालांकि, एंटरप्राइज़ वर्कलोड के लिए अक्सर रनटाइम एनवायरमेंट पर पूरा मालिकाना हक ज़रूरी होता है. इसके लिए, एजेंट रनटाइम में Bring Your Own Container(BYOC) की सुविधा मिलती है. इसकी मदद से, पहले से बने कस्टम कंटेनर इमेज डिप्लॉय की जा सकती हैं.
इस कोडलैब में, Google Agent Development Kit (ADK) की मदद से बनाए गए एजेंट को कंटेनर में पैकेज करने की पूरी प्रोसेस बताई गई है. इसमें ज़रूरी Google Cloud की अनुमतियां कॉन्फ़िगर करने और Python SDK या Terraform का इस्तेमाल करके, एजेंट रनटाइम में डिप्लॉय करने का तरीका भी बताया गया है.
इस कोडलैब में, आपको इन कामों के बारे में जानकारी मिलेगी:
- Google Agent Development Kit (ADK) का इस्तेमाल करके, Python एजेंट बनाना.
- एजेंट को FastAPI ऐप्लिकेशन में रैप करना.
- Docker की मदद से, ऐप्लिकेशन को कंटेनर में पैकेज करना.
- Google Cloud की अनुमतियां कॉन्फ़िगर करना.
- एजेंट रनटाइम पर, कंटेनर में पैकेज किए गए एजेंट को डिप्लॉय और टेस्ट करना.
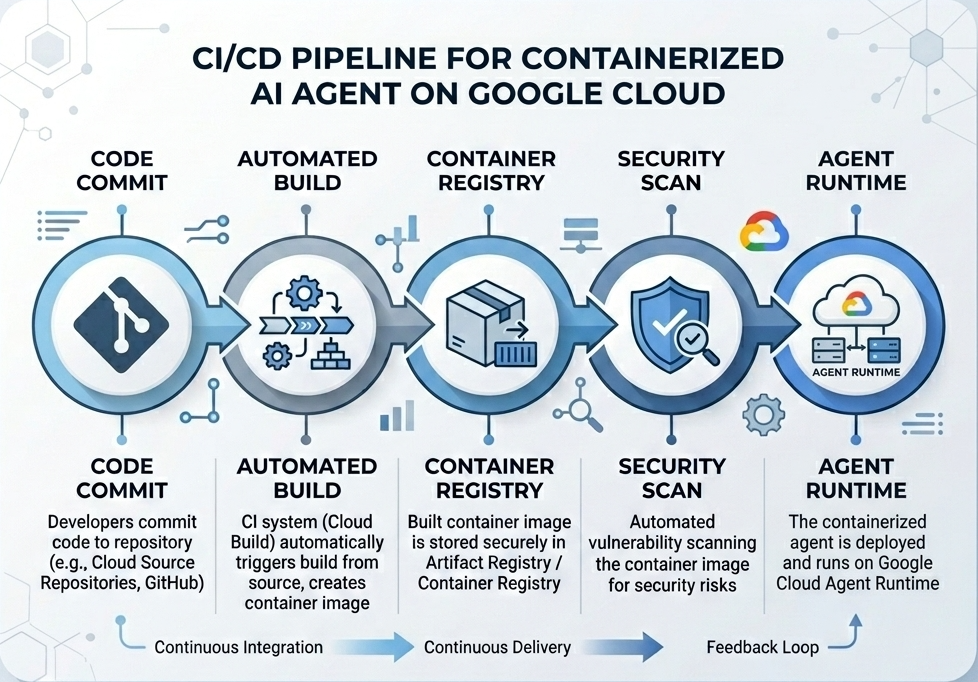
बनाने और डिप्लॉय करने का फ़्लो
इस डायग्राम में, बनाने और डिप्लॉय करने के चरणों का वर्कफ़्लो दिखाया गया है. इन चरणों को आपको इस कोडलैब में मैन्युअल तरीके से पूरा करना होगा:
ज़रूरी शर्तें
- बिलिंग की सुविधा चालू किया गया Google Cloud प्रोजेक्ट.
- Cloud Shell का ऐक्सेस (सुझाया जाता है) या
gcloudऔरdockerइंस्टॉल किया गया लोकल डेवलपमेंट एनवायरमेंट. - Python और Docker की बुनियादी जानकारी.
2. एनवायरमेंट सेट अप करना
शुरू करने से पहले, आपको ज़रूरी एपीआई चालू करने होंगे और अपना एनवायरमेंट कॉन्फ़िगर करना होगा.
पहला चरण: Cloud Shell खोलना
Google Cloud Console में, सबसे ऊपर दाईं ओर मौजूद Cloud Shell चालू करें बटन पर क्लिक करें.

दूसरा चरण: एनवायरमेंट वैरिएबल कॉन्फ़िगर करना
Cloud Shell में, अपना प्रोजेक्ट आईडी सेट करें और इस कोडलैब में इस्तेमाल किए जाने वाले मुख्य एनवायरमेंट वैरिएबल तय करें. "YOUR_PROJECT_ID" की जगह, अपना Google Cloud प्रोजेक्ट आईडी डालें:
gcloud config set project "YOUR_PROJECT_ID"
export PROJECT_ID=$(gcloud config get-value project)
export LOCATION="us-central1"
export MODEL="gemini-3.1-flash-lite"
export MODEL_REGION="global"
इन वैरिएबल से, टारगेट डिप्लॉयमेंट सेटिंग कॉन्फ़िगर होती हैं:
PROJECT_ID: आपके Google Cloud प्रोजेक्ट का यूनीक आइडेंटिफ़ायर. इसमें Gemini Enterprise Agent प्लैटफ़ॉर्म के सभी संसाधन और Artifact Registry मौजूद होंगे.LOCATION: वह भौगोलिक इलाका (उदाहरण के लिए,us-central1), जहां आपकी रिपॉज़िटरी और रनटाइम वर्कलोड होस्ट किए जाते हैं.MODEL: Gemini मॉडल का वह वर्शन (उदाहरण के लिए,gemini-3.1-flash-lite), जिसे एजेंट कॉन्टेक्स्ट लोड करता है.MODEL_REGION: मॉडल का एंडपॉइंट रीजन. Gemini मॉडल को ग्लोबल एंडपॉइंट से शुरू करने के लिए, यहां"global"सेट करें.
तीसरा चरण: एपीआई चालू करना
ज़रूरी Google Cloud API चालू करें:
gcloud services enable \
    aiplatform.googleapis.com \
    cloudbuild.googleapis.com \
    compute.googleapis.com \
    artifactregistry.googleapis.com \
    storage.googleapis.com
चौथा चरण: SDK टूल इंस्टॉल करना
एजेंट इंजन और ADK की सुविधा के साथ, Vertex AI SDK टूल इंस्टॉल करें:
pip install --upgrade "google-cloud-aiplatform[agent_engines,adk]>=1.144"
3. सोर्स फ़ाइलें सेट अप करना
इस चरण में, आपको अपने एजेंट के लिए स्ट्रक्चर और कोड बनाना होगा.
डायरेक्ट्री स्ट्रक्चर की खास जानकारी
इस कोडलैब के आखिर तक, आपकी फ़ाइलें इस तरह के वर्कस्पेस के क्रम में व्यवस्थित होंगी:
weather-agent-byoc/
├── Dockerfile                  # Container definition
├── deploy_byoc.py              # Python SDK deployment script
├── main.py                     # FastAPI server wrapper
├── query_agent.py              # Verify / query script
├── requirements.txt            # Python dependencies
│
├── weather_agent/              # Agent source module
│   ├── __init__.py             # Package declaration
│   ├── agent.py                # Agent & mock tools logic
│   └── config.json             # Environment config variables
│
└── terraform/                  # Terraform configuration files
    ├── main.tf
    ├── outputs.tf
    ├── providers.tf
    ├── terraform.tfvars
    └── variables.tf
पहला चरण: डायरेक्ट्री बनाना
अपनी होम डायरेक्ट्री में जाकर, वर्कस्पेस का स्ट्रक्चर बनाएं:
cd ~
mkdir -p weather-agent-byoc/weather_agent
cd weather-agent-byoc
दूसरा चरण: कॉन्फ़िगरेशन फ़ाइल बनाना
Cloud Shell में यह कमांड चलाकर, कॉन्फ़िगरेशन पैरामीटर सीधे weather_agent/config.json में लिखें. यह कमांड, वैरिएबल को आपके एनवायरमेंट की वैल्यू से अपने-आप बदल देती है:
cat <<EOF > weather_agent/config.json
{
    "PROJECT_ID": "${PROJECT_ID}",
    "LOCATION": "${LOCATION}",
    "MODEL": "${MODEL}",
    "MODEL_REGION": "${MODEL_REGION}"
}
EOF
तीसरा चरण: एजेंट तय करना
weather_agent/agent.py में एजेंट का कॉन्फ़िगरेशन और मॉक टूल लॉजिक लिखने के लिए, यह स्क्रिप्ट चलाएं:
cat << 'EOF' > weather_agent/agent.py
import json
import random
from google.adk.agents import Agent
from google.adk.models.google_llm import Gemini
from functools import cached_property
from google.genai import Client

# Load config
llm_config = json.load(open("weather_agent/config.json"))
PROJECT_ID = llm_config["PROJECT_ID"]
MODEL = llm_config["MODEL"]
MODEL_REGION = llm_config["MODEL_REGION"]

# Override Gemini class for global endpoint compatibility
class GlobalGemini(Gemini):
  @cached_property
  def api_client(self) -> Client:
    return Client(vertexai=True, location="global")

# Define Tool
def get_temperature(place: str) -> str:
    '''Returns the current temperature of a given place.

    Args:
        place: The name of the city or location.

    Returns:
        str: A string describing the temperature.
    '''
    temp = random.randint(-10, 40)
    return f"The current temperature in {place} is {temp}°C."

# Initialize LLM
llm_model = GlobalGemini(model=MODEL) if MODEL_REGION == "global" else Gemini(model=MODEL)

# Initialize Agent
root_agent = Agent(
    model=llm_model,
    name='weather_agent',
    description='An agent that provides temperature information for locations.',
    instruction='You are a helpful assistant that can provide the current temperature for any given place using the get_temperature tool.',
    tools=[get_temperature],
)
EOF
weather_agent को Python पैकेज बनाने के लिए, एक खाली __init__.py बनाएं:
touch weather_agent/__init__.py
चौथा चरण: FastAPI रैपर बनाना
main.py में FastAPI सर्वर एंट्रीपॉइंट का कॉन्फ़िगरेशन लिखने के लिए, यह स्क्रिप्ट चलाएं:
cat << 'EOF' > main.py
import inspect
import json
import logging
import os
from typing import Any, Dict, Optional
import uvicorn
import vertexai
from weather_agent.agent import root_agent
from fastapi import FastAPI, encoders, responses
from pydantic import BaseModel
from vertexai import agent_engines

app = FastAPI()

config_json = json.load(open("weather_agent/config.json"))
PROJECT_ID = config_json["PROJECT_ID"]
LOCATION = config_json["LOCATION"]
MODEL_REGION = config_json["MODEL_REGION"]

class QueryRequest(BaseModel):
    input: Optional[Dict[str, Any]] = None
    class_method: Optional[str] = None

vertexai.init(project=PROJECT_ID, location=MODEL_REGION)
adk_app = agent_engines.AdkApp(agent=root_agent)

def _encode_chunk_to_json(chunk):
  try:
    json_chunk = encoders.jsonable_encoder(chunk)
    return json.dumps(json_chunk) + "\n"
  except Exception:
    logging.exception("Failed to encode chunk")
    return None

async def json_generator(output):
  async for chunk in output:
    encoded_chunk = _encode_chunk_to_json(chunk)
    if encoded_chunk is None:
      break
    yield encoded_chunk

async def _invoke_callable_or_raise(invocation_callable, invocation_payload):
  if inspect.iscoroutinefunction(invocation_callable):
    return await invocation_callable(**invocation_payload)
  else:
    return invocation_callable(**invocation_payload)

@app.post("/api/reasoning_engine")
async def query(request: QueryRequest) -> responses.JSONResponse:
    method = getattr(adk_app, request.class_method)
    output = await _invoke_callable_or_raise(method, request.input or {})
    try:
      json_serialized_content = encoders.jsonable_encoder({"output": output})
    except ValueError as encoding_error:
      logging.exception("Failed to encode response")
      raise encoding_error
    return responses.JSONResponse(content=json_serialized_content)

@app.post("/api/stream_reasoning_engine")
async def stream_query(request: QueryRequest) -> responses.StreamingResponse:
    method = getattr(adk_app, request.class_method)
    output = await _invoke_callable_or_raise(method, request.input or {})
    return responses.StreamingResponse(
        content=json_generator(output),
        media_type="application/json",
    )

if __name__ == "__main__":
    uvicorn.run(app, host="0.0.0.0", port=int(os.environ.get("PORT", 8080)))
EOF
पांचवां चरण: डिपेंडेंसी तय करना
requirements.txt में, ज़रूरी Python डिपेंडेंसी लिखें:
cat << 'EOF' > requirements.txt
fastapi
uvicorn
vertexai
google-cloud-aiplatform[agent_engines,adk]>=1.144
pydantic
EOF
4. कन्टेनरीकरण
अब तय करें कि आपके एजेंट को कंटेनर में कैसे पैकेज किया जाएगा.
पहला चरण: Dockerfile बनाना
अपने प्रोजेक्ट डायरेक्ट्री के रूट में Dockerfile बनाएं. इससे यह तय होगा कि आपका FastAPI ऐप्लिकेशन कैसे बनाया जाएगा:
cat << 'EOF' > Dockerfile
FROM python:3.11-slim

WORKDIR /app

COPY weather_agent/ /app/weather_agent/
COPY main.py .
COPY requirements.txt .
RUN pip install -r requirements.txt

CMD ["sh", "-c", "uvicorn main:app --host 0.0.0.0 --port $PORT"]
EOF
5. Artifact Registry और Cloud Build सेट अप करना
कंटेनर इमेज को सेव करने के लिए, आपको एक रिपॉज़िटरी और उसे पुश करने के लिए अनुमतियों की ज़रूरत होगी.
पहला चरण: रिपॉज़िटरी बनाना
रिपॉज़िटरी का नाम तय करें और कॉन्फ़िगरेशन के दौरान तय किए गए एनवायरमेंट वैरिएबल का इस्तेमाल करके, Artifact Registry में Docker रिपॉज़िटरी बनाएं:
export REPOSITORY_NAME="agents-repo"

gcloud artifacts repositories create $REPOSITORY_NAME \
    --project=$PROJECT_ID \
    --repository-format=docker \
    --location=$LOCATION \
    --description="Docker repository for Agents"
दूसरा चरण: सेवा खाते की अनुमतियां कॉन्फ़िगर करना
डिफ़ॉल्ट Compute सेवा खाते को, Artifact Registry में इमेज पुश करने की अनुमति दें.
सबसे पहले, अपना प्रोजेक्ट नंबर पाएं:
export PROJECT_NUMBER=$(gcloud projects describe $PROJECT_ID --format="value(projectNumber)")
इन भूमिकाओं को अनुमति दें:
# Allow pushing to Artifact Registry
gcloud projects add-iam-policy-binding $PROJECT_ID \
    --member="serviceAccount:$PROJECT_NUMBER-compute@developer.gserviceaccount.com" \
    --role="roles/artifactregistry.writer" \
    --condition=None

# Allow Cloud Build to read storage objects
gcloud projects add-iam-policy-binding $PROJECT_NUMBER \
    --member="serviceAccount:$PROJECT_NUMBER-compute@developer.gserviceaccount.com" \
    --role="roles/storage.objectViewer" \
    --condition=None
तीसरा चरण: सेवा एजेंट को अनुमतियां देना
AI Platform और Reasoning Engine सेवा एजेंट को, Artifact Registry का रीडर ऐक्सेस दें:
gcloud projects add-iam-policy-binding $PROJECT_NUMBER \
    --member="serviceAccount:service-$PROJECT_NUMBER@gcp-sa-aiplatform-re.iam.gserviceaccount.com" \
    --role="roles/artifactregistry.reader"  --condition=None

gcloud projects add-iam-policy-binding $PROJECT_NUMBER \
    --member="serviceAccount:service-$PROJECT_NUMBER@gcp-sa-aiplatform.iam.gserviceaccount.com" \
    --role="roles/artifactregistry.reader"  --condition=None
चौथा चरण: इमेज बनाना और पुश करना
कंटेनर इमेज बनाने और उसे पुश करने के लिए, Cloud Build का इस्तेमाल करें:
gcloud builds submit \
    --project=$PROJECT_ID \
    --region=$LOCATION \
    --tag $LOCATION-docker.pkg.dev/$PROJECT_ID/$REPOSITORY_NAME/weather-agent-image:latest \
    .
6. SDK टूल की मदद से एजेंट डिप्लॉय करना
अनुमतियां कॉन्फ़िगर करने के बाद, अब अपना कस्टम कंटेनर डिप्लॉय किया जा सकता है.
पहला चरण: BYOC एजेंट डिप्लॉय करना
रजिस्ट्री में होस्ट किए गए कंटेनर को एजेंट रनटाइम में डिप्लॉय करने के लिए, अपने प्रोजेक्ट डायरेक्ट्री के रूट में deploy_byoc.py नाम की Python फ़ाइल बनाएं:
cat << 'EOF' > deploy_byoc.py
import json
import os
import vertexai
from google.cloud import aiplatform

config = json.load(open("weather_agent/config.json"))
PROJECT_ID = config["PROJECT_ID"]
LOCATION = config["LOCATION"]
REPOSITORY_NAME = "agents-repo"

vertexai.init(project=PROJECT_ID, location=LOCATION)
client = vertexai.Client(project=PROJECT_ID, location=LOCATION)

image_uri = f"{LOCATION}-docker.pkg.dev/{PROJECT_ID}/{REPOSITORY_NAME}/weather-agent-image:latest"

print(f"Deploying custom container agent from {image_uri}...")
remote_agent = client.agent_engines.create(
    config={
        "display_name": "byoc_weather_agent",
        "description": "BYOC weather agent from custom container",
        "container_spec": {
            "image_uri": image_uri
        },
        "class_methods": [
            # For convenience to interact with the agent through the Python SDK
            # https://docs.cloud.google.com/gemini-enterprise-agent-platform/scale/runtime/use-an-adk-agent#supported-operations
            {"api_mode": "", "name": "get_session"},
            {"api_mode": "", "name": "list_sessions"},
            {"api_mode": "", "name": "create_session"},
            {"api_mode": "", "name": "delete_session"},
            {"api_mode": "async", "name": "async_get_session"},
            {"api_mode": "async", "name": "async_list_sessions"},
            {"api_mode": "async", "name": "async_create_session"},
            {"api_mode": "async", "name": "async_delete_session"},
            {"api_mode": "async", "name": "async_add_session_to_memory"},
            {"api_mode": "async", "name": "async_search_memory"},
            {"api_mode": "stream", "name": "stream_query"},
            {"api_mode": "async_stream", "name": "async_stream_query"},
            {"api_mode": "async_stream", "name": "streaming_agent_run_with_events"},
        ],
        "agent_framework": "google-adk",
    },
)

print(f"Agent successfully deployed!")
print(f"Resource Name: {remote_agent.api_resource.name}")

# Save resource name for testing
with open("agent_resource_name.txt", "w") as f:
    f.write(remote_agent.api_resource.name)
EOF
एजेंट रनटाइम पर एजेंट डिप्लॉय करने के लिए, डिप्लॉयमेंट स्क्रिप्ट चलाएं:
python3 deploy_byoc.py
7. Terraform की मदद से एजेंट डिप्लॉय करना
इसके अलावा, Terraform का इस्तेमाल करके भी, कंटेनर में पैकेज किए गए उसी एजेंट को डिप्लॉय किया जा सकता है. प्रोडक्शन एनवायरमेंट के लिए, कोड के तौर पर इन्फ़्रास्ट्रक्चर मैनेज करने के लिए, हम इसका सुझाव देते हैं.
पहला चरण: Terraform डायरेक्ट्री पर जाना
अपने प्रोजेक्ट के रूट में terraform डायरेक्ट्री बनाएं और उस पर जाएं:
mkdir -p terraform
cd terraform
दूसरा चरण: प्रोवाइडर का कॉन्फ़िगरेशन बनाना
providers.tf में प्रोवाइडर की मैपिंग लिखने के लिए, यह स्क्रिप्ट चलाएं:
cat << 'EOF' > providers.tf
terraform {
  required_providers {
    google = {
      source  = "hashicorp/google"
      version = ">= 5.28.0"
    }
  }
}

provider "google" {
  project = var.project_id
  region  = var.location
}
EOF
तीसरा चरण: वैरिएबल की परिभाषा बनाना
variables.tf में, इनपुट की जानकारी वाला ब्लॉक लिखें:
cat << 'EOF' > variables.tf
variable "project_id" {
  type        = string
  description = "The Google Cloud Project ID"
}

variable "location" {
  type        = string
  description = "The region to deploy the reasoning engine"
  default     = "us-central1"
}

variable "repository_name" {
  type        = string
  description = "The Artifact Registry repository name"
  default     = "agents-repo"
}

variable "image_tag" {
  type        = string
  description = "The tag of the container image to deploy"
  default     = "latest"
}
EOF
चौथा चरण: मुख्य कॉन्फ़िगरेशन बनाना
main.tf में, मुख्य संसाधनों की परिभाषा के पैरामीटर लिखें:
cat << 'EOF' > main.tf
locals {
  class_methods = [
    {"api_mode" = "", "name" = "get_session"},
    {"api_mode" = "", "name" = "list_sessions"},
    {"api_mode" = "", "name" = "create_session"},
    {"api_mode" = "", "name" = "delete_session"},
    {"api_mode" = "async", "name" = "async_get_session"},
    {"api_mode" = "async", "name" = "async_list_sessions"},
    {"api_mode" = "async", "name" = "async_create_session"},
    {"api_mode" = "async", "name" = "async_delete_session"},
    {"api_mode" = "async", "name" = "async_add_session_to_memory"},
    {"api_mode" = "async", "name" = "async_search_memory"},
    {"api_mode" = "stream", "name" = "stream_query"},
    {"api_mode" = "async_stream", "name" = "async_stream_query"},
    {"api_mode" = "async_stream", "name" = "streaming_agent_run_with_events"}
  ]
}

# define the resource with the BYOC configuration, set agent_framework to "google-adk" to enable interactive features on the console.
resource "google_vertex_ai_reasoning_engine" "byoc_weather_agent" {
  display_name = "byoc_weather_agent_tf"
  description  = "BYOC weather agent deployed via Terraform"
  project      = var.project_id
  location     = var.location

  spec {
    class_methods = jsonencode(local.class_methods)
    agent_framework = "google-adk"
    container_spec {
      image_uri = "${var.location}-docker.pkg.dev/${var.project_id}/${var.repository_name}/weather-agent-image:${var.image_tag}"
    }
  }
}
EOF
पांचवां चरण: आउटपुट की परिभाषा बनाना
outputs.tf में, आउटपुट ब्लॉक लिखें:
cat << 'EOF' > outputs.tf
output "reasoning_engine_id" {
  value       = google_vertex_ai_reasoning_engine.byoc_weather_agent.id
  description = "The ID of the deployed reasoning engine"
}

output "reasoning_engine_resource_name" {
  value       = google_vertex_ai_reasoning_engine.byoc_weather_agent.id
  description = "The resource name of the deployed reasoning engine"
}
EOF
छठा चरण: वैरिएबल की वैल्यू वाली फ़ाइल (tfvars) बनाना
terraform.tfvars में सीधे एनवायरमेंट वैरिएबल डालकर, प्लेसहोल्डर में बदलाव किए बिना डाइनैमिक तरीके से डिप्लॉय करें:
cat <<EOF > terraform.tfvars
project_id      = "${PROJECT_ID}"
location        = "${LOCATION}"
repository_name = "agents-repo"
image_tag       = "latest"
EOF
सातवां चरण: शुरू करना और लागू करना
Terraform शुरू करें और कॉन्फ़िगरेशन लागू करें:
terraform init
terraform apply
जब आपसे कहा जाए, तब yes लिखकर, लागू करने की पुष्टि करें.
पूरा होने के बाद, Terraform संसाधन का नाम आउटपुट करता है. इसे प्रोग्राम के ज़रिए agent_resource_name.txt में कैप्चर करें और रूट फ़ोल्डर पर वापस जाएं:
terraform output -raw reasoning_engine_resource_name > ../agent_resource_name.txt
cd ..
8. एजेंट से क्वेरी करना
पुष्टि करें कि आपका एजेंट चल रहा है और जवाब दे रहा है.
पहला चरण: क्वेरी स्क्रिप्ट बनाना
जगह के कोऑर्डिनेट फ़ेच करने के लिए, डाइनैमिक सेटअप कॉन्फ़िगरेशन की जांच का इस्तेमाल करके, query_agent.py में पुष्टि करने वाली स्क्रिप्ट लिखें:
cat << 'EOF' > query_agent.py
import json
import os
import requests
from google import auth as google_auth
from google.auth.transport import requests as google_requests

# Load config coordinates directly
config_json = json.load(open("weather_agent/config.json"))
LOCATION = config_json["LOCATION"]
PROJECT_ID = config_json["PROJECT_ID"]

# Load agent resource name
with open("agent_resource_name.txt", "r") as f:
    agent_resource_name = f.read().strip()

def get_identity_token():
    credentials, _ = google_auth.default()
    auth_request = google_requests.Request()
    credentials.refresh(auth_request)
    return credentials.token

# Access the agent at the fastapi endpoint that was specified in main.py
url = f"https://{LOCATION}-aiplatform.googleapis.com/v1/{agent_resource_name}/api/stream_reasoning_engine"

payload = {
    "class_method": "async_stream_query",
    "input": {
        "user_id": "codelab_test_user",
        "message": "What is the temperature in Tokyo?",
    },
}

print(f"Sending query to {url}...")
response = requests.post(
    url,
    headers={
        "Content-Type": "application/json",
        "Authorization": f"Bearer {get_identity_token()}",
    },
    data=json.dumps(payload),
    stream=True,
)

for chunk in response.iter_content(chunk_size=8192):
    if chunk:
        print(chunk.decode('utf-8'))
EOF
क्वेरी स्क्रिप्ट चलाएं:
python3 query_agent.py
आपको एजेंट से आउटपुट स्ट्रीम होता दिखेगा. इसमें टोक्यो के लिए सिम्युलेटेड तापमान भी शामिल होगा.
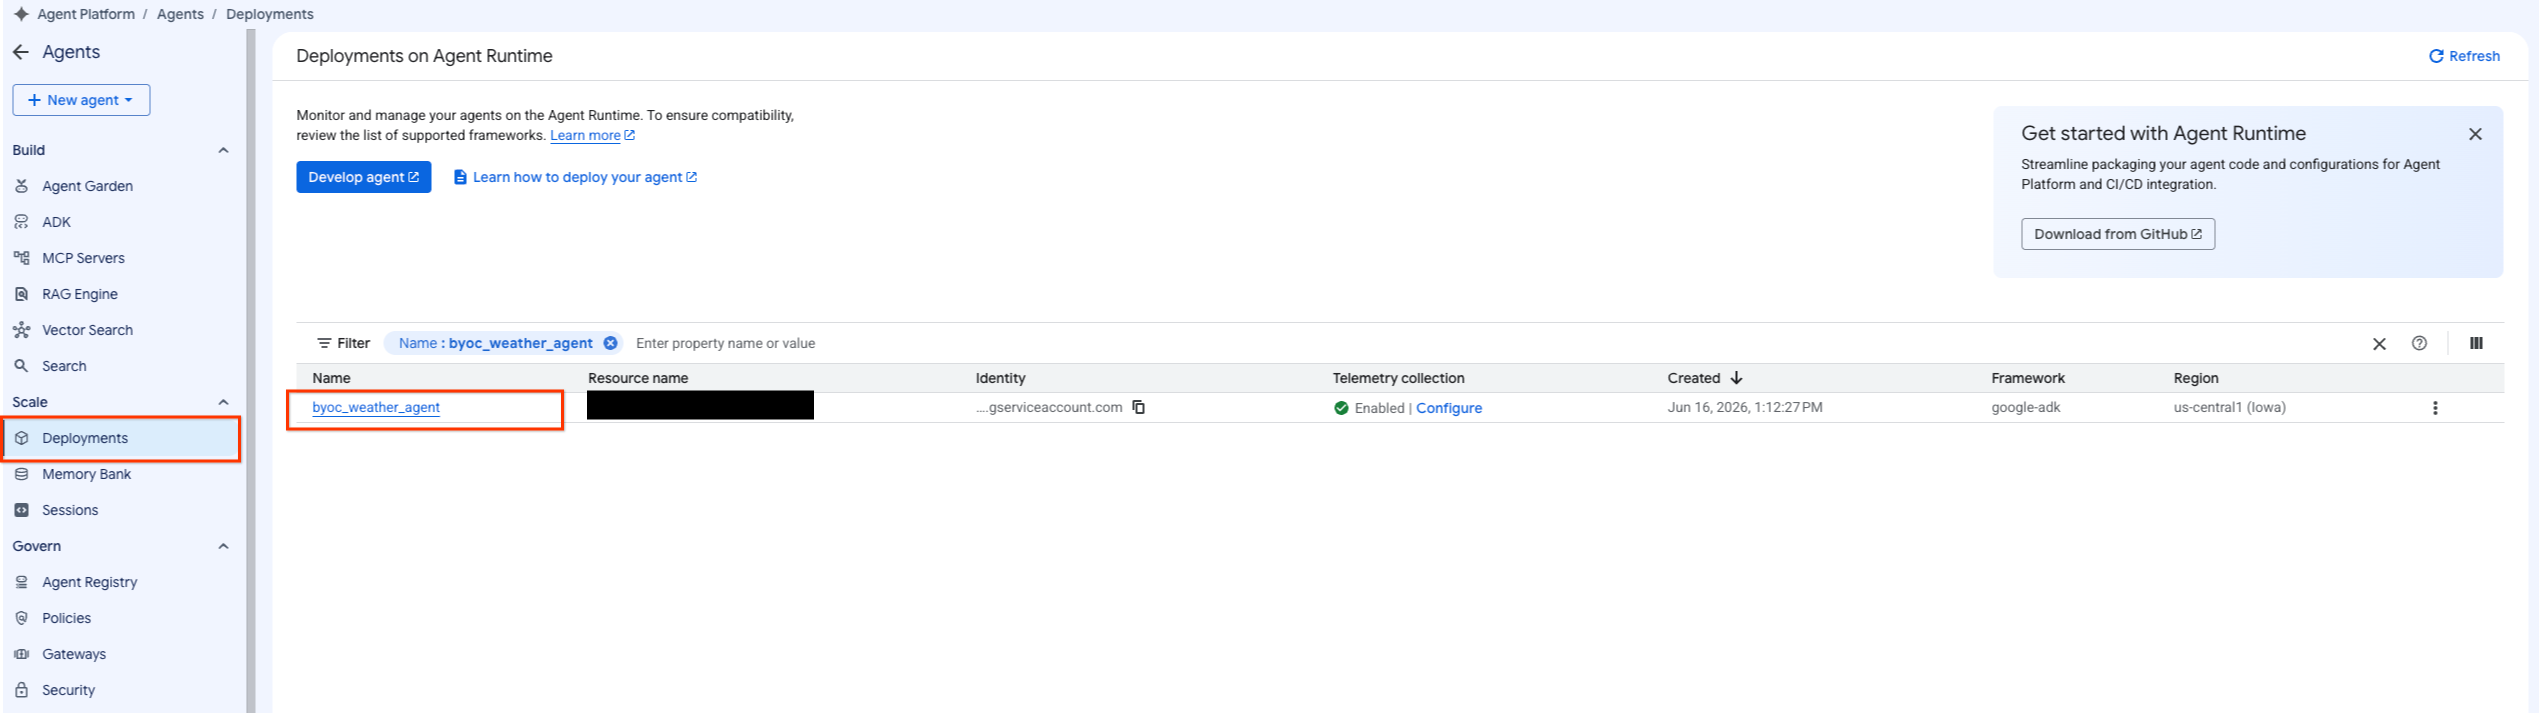
दूसरा चरण: कंसोल का इस्तेमाल करना
- एजेंट की सूची को फ़िल्टर करने के लिए, एजेंट प्लैटफ़ॉर्म > एजेंट > डिप्लॉयमेंट चुनकर, डिप्लॉय किए गए एजेंट पर जाएं.
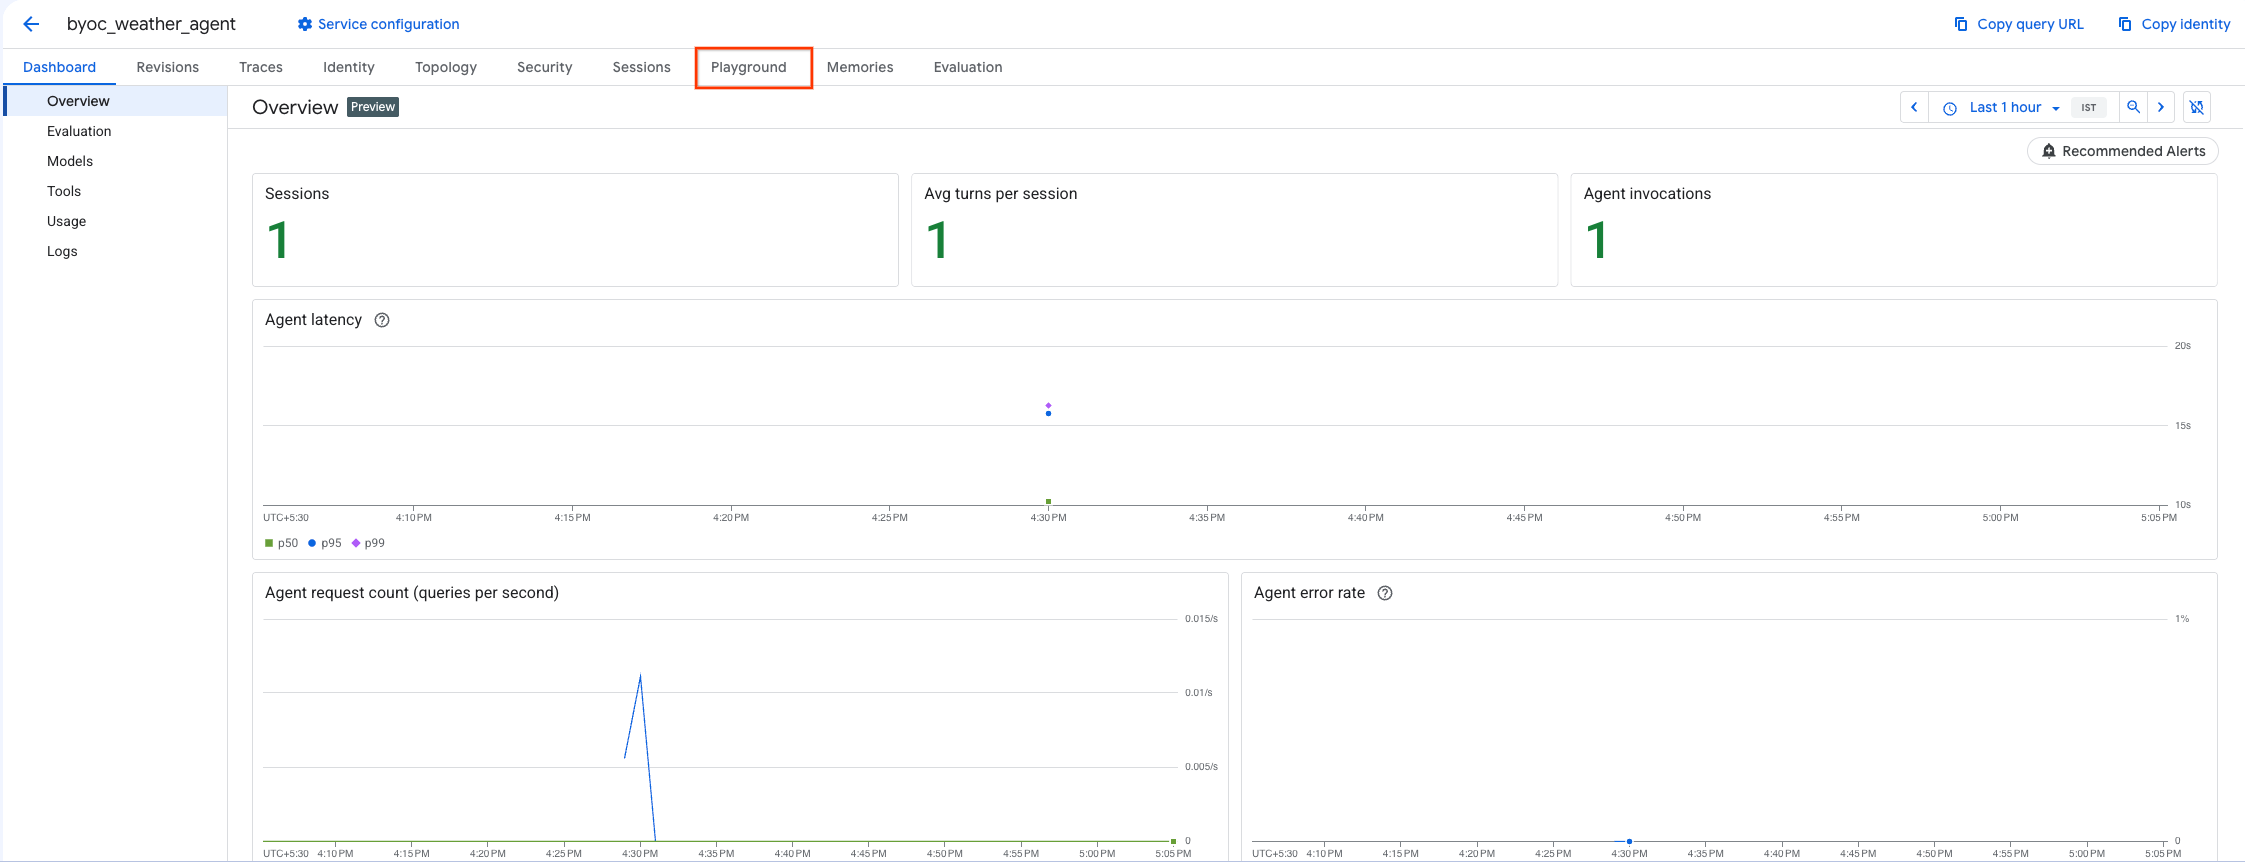
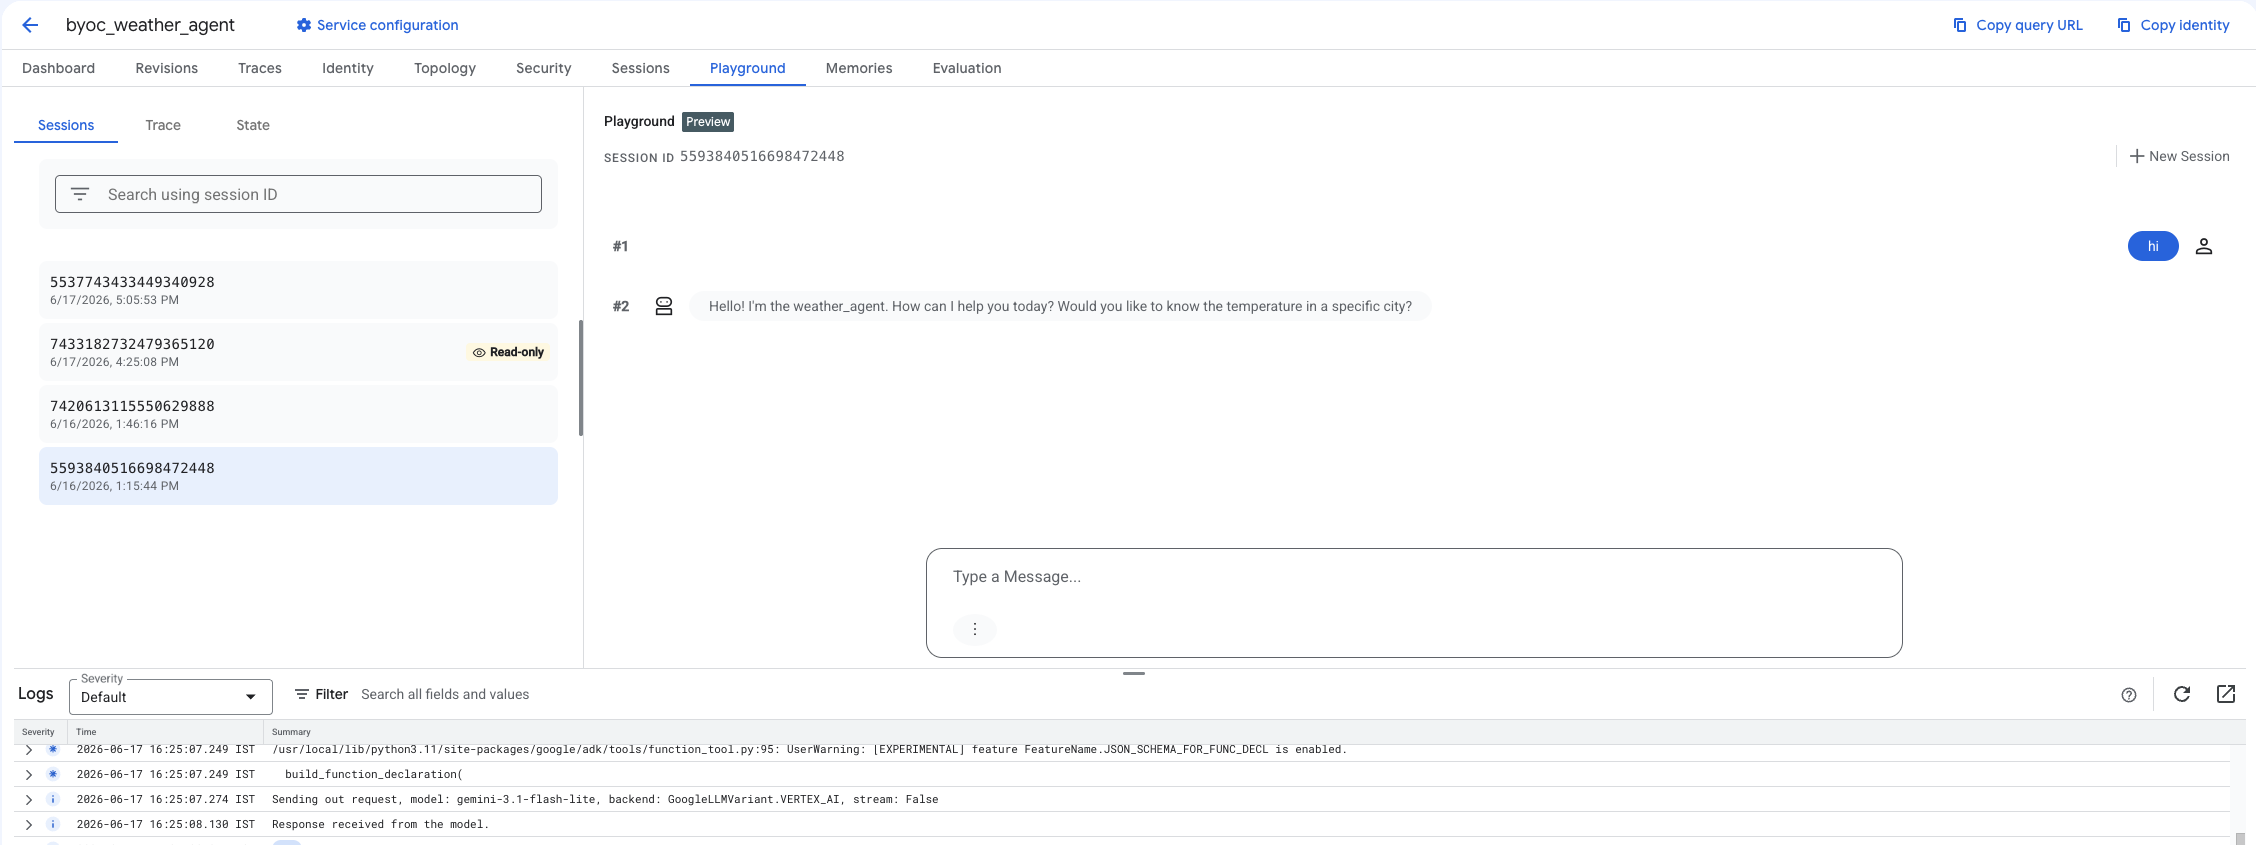
- एजेंट के डैशबोर्ड से प्लेग्राउंड चुनें.
- कोई नया सेशन बनाएं और अपनी क्वेरी टाइप करके देखें कि एजेंट, अनुरोधों का जवाब दे रहा है या नहीं. जैसा कि यहां दिखाया गया है.
9. साफ़-सफ़ाई सेवा
शुल्क से बचने के लिए, बनाए गए संसाधनों को साफ़ करें.
अगर आपने Terraform का इस्तेमाल करके डिप्लॉय किया है, तो terraform डायरेक्ट्री में जाएं और डिस्ट्रॉय ऐक्शन को एक्ज़ीक्यूट करें:
cd ~/weather-agent-byoc/terraform
terraform destroy
cd ..
अगर आपने SDK टूल का इस्तेमाल करके डिप्लॉय किया है, तो डिप्लॉय किए गए एजेंट को मिटाने के लिए स्क्रिप्ट बनाएं:
cat << 'EOF' > delete_agent.py
import json
import os
import vertexai
from google.cloud import aiplatform

config = json.load(open("weather_agent/config.json"))
PROJECT_ID = config["PROJECT_ID"]
LOCATION = config["LOCATION"]

vertexai.init(project=PROJECT_ID, location=LOCATION)
client = vertexai.Client(project=PROJECT_ID, location=LOCATION)

with open("agent_resource_name.txt", "r") as f:
    agent_resource_name = f.read().strip()

# 1. Delete the Agent
# Note: We retrieve the list first to ensure we delete the ones created in this session
try:
    page_size = 100
    reasoning_engines = client.agent_engines.list()
    for engine in reasoning_engines:
        if agent_resource_name in engine.api_resource.name:
            print(f"Deleting Reasoning Engine: {engine.api_resource.name}")
            engine.delete(force=True)
except Exception as e:
    print(f"Error deleting reasoning engines: {e}")
EOF
एजेंट को मिटाने के लिए, स्क्रिप्ट चलाएं:
python3 delete_agent.py
बाकी बचे संसाधनों को साफ़ करने के लिए, अपनी होम डायरेक्ट्री पर वापस जाएं और Cloud Shell में ये कमांड चलाएं:
cd ~

# 1. Delete the Artifact Registry Repository
gcloud artifacts repositories delete $REPOSITORY_NAME --location=$LOCATION --quiet

# 2. Clean up files (Optional)
rm -rf ~/weather-agent-byoc
10. नतीजा
बधाई हो! आपने BYOC का इस्तेमाल करके, एजेंट रनटाइम पर एआई एजेंट को कंटेनर में पैकेज करके डिप्लॉय कर लिया है.
आपने इन कामों के बारे में जानकारी पाई:
- एजेंट तय करने और उसे FastAPI का इस्तेमाल करके रैप करने के लिए, ADK का इस्तेमाल करना.
- Dockerfile बनाना और Cloud Build का इस्तेमाल करके इमेज बनाना.
- एजेंट रनटाइम के लिए, IAM अनुमतियां मैनेज करना.
- Python SDK और Terraform , दोनों का इस्तेमाल करके, अपना कस्टम कंटेनर डिप्लॉय करना.
- डिप्लॉय किए गए एजेंट को टेस्ट करना और उससे क्वेरी करना.