

1. Ringkasan
Agent Runtime (sebelumnya Agent Engine) menawarkan lingkungan runtime terkelola yang dirancang untuk men-deploy, menjalankan, dan menskalakan agen AI secara efektif. Secara default, platform akan otomatis menggabungkan kode sumber dan dependensi Anda selama proses deployment.
Namun, workload perusahaan sering kali memerlukan kepemilikan penuh atas lingkungan runtime. Untuk mendukung hal ini, Agent Runtime menyediakan kemampuan Bring Your Own Container(BYOC), yang memungkinkan Anda men-deploy image container kustom bawaan.
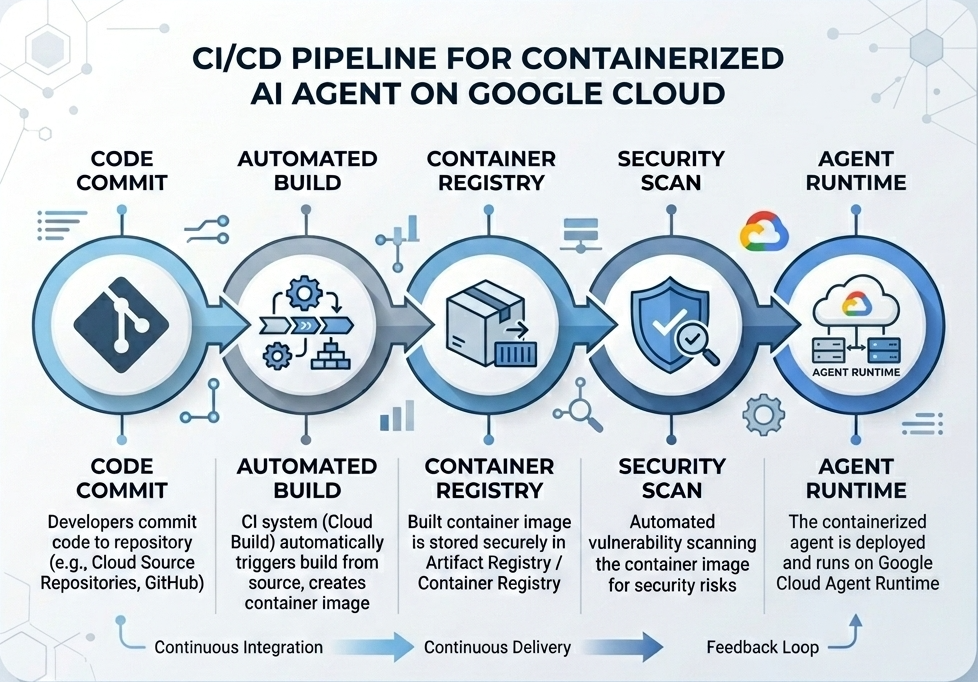
Codelab ini menguraikan proses end-to-end untuk membuat container agen yang dibuat dengan Google Agent Development Kit (ADK), mengonfigurasi izin Google Cloud yang diperlukan, dan men-deploy-nya ke Agent Runtime menggunakan Python SDK atau Terraform.
Codelab ini memandu Anda mempelajari:
- Membangun agen Python menggunakan Google Agent Development Kit (ADK).
- Membungkus agen dalam aplikasi FastAPI.
- Memasukkan aplikasi ke dalam container dengan Docker.
- Mengonfigurasi izin Google Cloud.
- Men-deploy dan menguji agen dalam container di Agent Runtime.
Alur Build dan Deployment
Diagram berikut mengilustrasikan alur kerja langkah-langkah build dan deployment yang akan Anda lakukan secara manual dalam codelab ini:
Yang Anda Butuhkan
- Project Google Cloud yang mengaktifkan penagihan.
- Akses ke Cloud Shell (direkomendasikan) atau lingkungan pengembangan lokal dengan
gclouddandockeryang diinstal. - Pengetahuan dasar tentang Python dan Docker.
2. Penyiapan Lingkungan
Sebelum memulai, Anda harus mengaktifkan API yang diperlukan dan mengonfigurasi lingkungan Anda.
Langkah 1: Buka Cloud Shell
Klik tombol Activate Cloud Shell di kanan atas Konsol Google Cloud.
Langkah 2: Konfigurasi Variabel Lingkungan
Di Cloud Shell, tetapkan project ID Anda dan tentukan variabel lingkungan utama yang digunakan di seluruh codelab ini. Ganti "YOUR_PROJECT_ID" dengan ID Project Google Cloud Anda yang sebenarnya:
gcloud config set project "YOUR_PROJECT_ID"
export PROJECT_ID=$(gcloud config get-value project)
export LOCATION="us-central1"
export MODEL="gemini-3.1-flash-lite"
export MODEL_REGION="global"
Variabel ini mengonfigurasi setelan deployment target:
PROJECT_ID: ID unik Project Google Cloud tempat semua resource Gemini Enterprise Agent Platform dan Artifact Registry akan berada.LOCATION: Region geografis (misalnya,us-central1) yang menghosting repositori dan beban kerja runtime Anda.MODEL: Versi model Gemini (misalnya,gemini-3.1-flash-lite) yang dimuat oleh konteks agen.MODEL_REGION: Region endpoint model. Tetapkan di sini sebagai"global"untuk memanggil model Gemini dari endpoint global.
Langkah 3: Aktifkan API
Aktifkan Google Cloud API yang diperlukan:
gcloud services enable \
    aiplatform.googleapis.com \
    cloudbuild.googleapis.com \
    compute.googleapis.com \
    artifactregistry.googleapis.com \
    storage.googleapis.com
Langkah 4: Instal SDK
Instal Vertex AI SDK dengan dukungan Agent Engine dan ADK:
pip install --upgrade "google-cloud-aiplatform[agent_engines,adk]>=1.144"
3. Penyiapan File Sumber
Pada langkah ini, Anda akan membuat struktur dan kode untuk agen Anda.
Ringkasan Struktur Direktori
Di akhir codelab ini, file Anda akan disusun berdasarkan hierarki ruang kerja berikut:
weather-agent-byoc/
├── Dockerfile                  # Container definition
├── deploy_byoc.py              # Python SDK deployment script
├── main.py                     # FastAPI server wrapper
├── query_agent.py              # Verify / query script
├── requirements.txt            # Python dependencies
│
├── weather_agent/              # Agent source module
│   ├── __init__.py             # Package declaration
│   ├── agent.py                # Agent & mock tools logic
│   └── config.json             # Environment config variables
│
└── terraform/                  # Terraform configuration files
    ├── main.tf
    ├── outputs.tf
    ├── providers.tf
    ├── terraform.tfvars
    └── variables.tf
Langkah 1: Buat Direktori
Mulai di direktori utama Anda dan buat struktur ruang kerja:
cd ~
mkdir -p weather-agent-byoc/weather_agent
cd weather-agent-byoc
Langkah 2: Buat File Konfigurasi
Jalankan perintah berikut di Cloud Shell untuk menulis parameter konfigurasi langsung ke weather_agent/config.json. Perintah ini secara otomatis mengganti variabel dengan nilai lingkungan Anda:
cat <<EOF > weather_agent/config.json
{
    "PROJECT_ID": "${PROJECT_ID}",
    "LOCATION": "${LOCATION}",
    "MODEL": "${MODEL}",
    "MODEL_REGION": "${MODEL_REGION}"
}
EOF
Langkah 3: Tentukan Agen
Jalankan skrip berikut untuk menulis konfigurasi agen dan logika alat tiruan ke weather_agent/agent.py:
cat << 'EOF' > weather_agent/agent.py
import json
import random
from google.adk.agents import Agent
from google.adk.models.google_llm import Gemini
from functools import cached_property
from google.genai import Client

# Load config
llm_config = json.load(open("weather_agent/config.json"))
PROJECT_ID = llm_config["PROJECT_ID"]
MODEL = llm_config["MODEL"]
MODEL_REGION = llm_config["MODEL_REGION"]

# Override Gemini class for global endpoint compatibility
class GlobalGemini(Gemini):
  @cached_property
  def api_client(self) -> Client:
    return Client(vertexai=True, location="global")

# Define Tool
def get_temperature(place: str) -> str:
    '''Returns the current temperature of a given place.

    Args:
        place: The name of the city or location.

    Returns:
        str: A string describing the temperature.
    '''
    temp = random.randint(-10, 40)
    return f"The current temperature in {place} is {temp}°C."

# Initialize LLM
llm_model = GlobalGemini(model=MODEL) if MODEL_REGION == "global" else Gemini(model=MODEL)

# Initialize Agent
root_agent = Agent(
    model=llm_model,
    name='weather_agent',
    description='An agent that provides temperature information for locations.',
    instruction='You are a helpful assistant that can provide the current temperature for any given place using the get_temperature tool.',
    tools=[get_temperature],
)
EOF
Buat __init__.py kosong untuk menjadikan weather_agent sebagai paket Python:
touch weather_agent/__init__.py
Langkah 4: Buat Pembungkus FastAPI
Jalankan skrip berikut untuk menulis konfigurasi titik entri server FastAPI ke main.py:
cat << 'EOF' > main.py
import inspect
import json
import logging
import os
from typing import Any, Dict, Optional
import uvicorn
import vertexai
from weather_agent.agent import root_agent
from fastapi import FastAPI, encoders, responses, Request
from vertexai import agent_engines

app = FastAPI()

config_json = json.load(open("weather_agent/config.json"))
PROJECT_ID = config_json["PROJECT_ID"]
LOCATION = config_json["LOCATION"]
MODEL_REGION = config_json["MODEL_REGION"]

vertexai.init(project=PROJECT_ID, location=MODEL_REGION)
adk_app = agent_engines.AdkApp(agent=root_agent)

def _encode_chunk_to_json(chunk):
  try:
    json_chunk = encoders.jsonable_encoder(chunk)
    return json.dumps(json_chunk) + "\n"
  except Exception:
    logging.exception("Failed to encode chunk")
    return None

async def json_generator(output):
  async for chunk in output:
    encoded_chunk = _encode_chunk_to_json(chunk)
    if encoded_chunk is None:
      break
    yield encoded_chunk

async def _invoke_callable_or_raise(invocation_callable, invocation_payload):
  if inspect.iscoroutinefunction(invocation_callable):
    return await invocation_callable(**invocation_payload)
  else:
    return invocation_callable(**invocation_payload)

@app.post("/api/reasoning_engine")
async def query(request: Request) -> responses.JSONResponse:
    request_json = await request.json()
    class_method = request_json.get("class_method")
    input_val = request_json.get("input")
    method = getattr(adk_app, class_method)
    output = await _invoke_callable_or_raise(method, input_val or {})
    try:
      json_serialized_content = encoders.jsonable_encoder({"output": output})
    except ValueError as encoding_error:
      logging.exception("Failed to encode response")
      raise encoding_error
    return responses.JSONResponse(content=json_serialized_content)

@app.post("/api/stream_reasoning_engine")
async def stream_query(request: Request) -> responses.StreamingResponse:
    request_json = await request.json()
    class_method = request_json.get("class_method")
    input_val = request_json.get("input")
    method = getattr(adk_app, class_method)
    output = await _invoke_callable_or_raise(method, input_val or {})
    return responses.StreamingResponse(
        content=json_generator(output),
        media_type="application/json",
    )

if __name__ == "__main__":
    uvicorn.run(app, host="0.0.0.0", port=int(os.environ.get("PORT", 8080)))
EOF
Langkah 5: Tentukan Dependensi
Tulis dependensi Python yang diperlukan ke requirements.txt:
cat << 'EOF' > requirements.txt
fastapi
uvicorn
vertexai
google-cloud-aiplatform[agent_engines,adk]>=1.144
pydantic
EOF
4. Containerization
Sekarang, tentukan cara agen Anda akan dikemas ke dalam container.
Langkah 1: Buat Dockerfile
Buat Dockerfile di root direktori project Anda untuk menentukan cara membangun aplikasi FastAPI Anda:
cat << 'EOF' > Dockerfile
FROM python:3.11-slim

WORKDIR /app

COPY weather_agent/ /app/weather_agent/
COPY main.py .
COPY requirements.txt .
RUN pip install -r requirements.txt

CMD ["sh", "-c", "uvicorn main:app --host 0.0.0.0 --port $PORT"]
EOF
5. Menyiapkan Artifact Registry & Cloud Build
Anda memerlukan repositori untuk menyimpan image container dan izin untuk mengirimkannya.
Langkah 1: Buat Repositori
Tentukan nama repositori dan buat repositori Docker di dalam Artifact Registry menggunakan variabel lingkungan yang ditentukan selama konfigurasi:
export REPOSITORY_NAME="agents-repo"

gcloud artifacts repositories create $REPOSITORY_NAME \
    --project=$PROJECT_ID \
    --repository-format=docker \
    --location=$LOCATION \
    --description="Docker repository for Agents"
Langkah 2: Mengonfigurasi Izin Akun Layanan
Beri Akun Layanan Compute Default izin untuk mengirim image ke Artifact Registry.
Pertama, dapatkan nomor project Anda:
export PROJECT_NUMBER=$(gcloud projects describe $PROJECT_ID --format="value(projectNumber)")
Berikan peran:
# Allow pushing to Artifact Registry
gcloud projects add-iam-policy-binding $PROJECT_ID \
    --member="serviceAccount:$PROJECT_NUMBER-compute@developer.gserviceaccount.com" \
    --role="roles/artifactregistry.writer" \
    --condition=None

# Allow Cloud Build to read storage objects
gcloud projects add-iam-policy-binding $PROJECT_NUMBER \
    --member="serviceAccount:$PROJECT_NUMBER-compute@developer.gserviceaccount.com" \
    --role="roles/storage.objectViewer" \
    --condition=None
Langkah 3: Berikan Izin kepada Agen Layanan
Memberikan akses pembaca Artifact Registry ke agen layanan AI Platform dan Reasoning Engine:
gcloud projects add-iam-policy-binding $PROJECT_NUMBER \
    --member="serviceAccount:service-$PROJECT_NUMBER@gcp-sa-aiplatform-re.iam.gserviceaccount.com" \
    --role="roles/artifactregistry.reader"  --condition=None

gcloud projects add-iam-policy-binding $PROJECT_NUMBER \
    --member="serviceAccount:service-$PROJECT_NUMBER@gcp-sa-aiplatform.iam.gserviceaccount.com" \
    --role="roles/artifactregistry.reader"  --condition=None
Langkah 4: Bangun dan Kirim Image
Gunakan Cloud Build untuk membangun dan mengirim image container:
gcloud builds submit \
    --project=$PROJECT_ID \
    --region=$LOCATION \
    --tag $LOCATION-docker.pkg.dev/$PROJECT_ID/$REPOSITORY_NAME/weather-agent-image:latest \
    .
6. Men-deploy Agen dengan SDK
Setelah izin dikonfigurasi, Anda dapat men-deploy container kustom.
Langkah 1: Deploy Agen BYOC
Buat file python deploy_byoc.py di dalam root direktori project Anda untuk men-deploy container yang dihosting di registry ke Agent Runtime:
cat << 'EOF' > deploy_byoc.py
import json
import os
import vertexai
from google.cloud import aiplatform

config = json.load(open("weather_agent/config.json"))
PROJECT_ID = config["PROJECT_ID"]
LOCATION = config["LOCATION"]
REPOSITORY_NAME = "agents-repo"

vertexai.init(project=PROJECT_ID, location=LOCATION)
client = vertexai.Client(project=PROJECT_ID, location=LOCATION)

image_uri = f"{LOCATION}-docker.pkg.dev/{PROJECT_ID}/{REPOSITORY_NAME}/weather-agent-image:latest"

print(f"Deploying custom container agent from {image_uri}...")
remote_agent = client.agent_engines.create(
    config={
        "display_name": "byoc_weather_agent",
        "description": "BYOC weather agent from custom container",
        "container_spec": {
            "image_uri": image_uri
        },
        "class_methods": [
            # For convenience to interact with the agent through the Python SDK
            # https://docs.cloud.google.com/gemini-enterprise-agent-platform/scale/runtime/use-an-adk-agent#supported-operations
            {"api_mode": "", "name": "get_session"},
            {"api_mode": "", "name": "list_sessions"},
            {"api_mode": "", "name": "create_session"},
            {"api_mode": "", "name": "delete_session"},
            {"api_mode": "async", "name": "async_get_session"},
            {"api_mode": "async", "name": "async_list_sessions"},
            {"api_mode": "async", "name": "async_create_session"},
            {"api_mode": "async", "name": "async_delete_session"},
            {"api_mode": "async", "name": "async_add_session_to_memory"},
            {"api_mode": "async", "name": "async_search_memory"},
            {"api_mode": "stream", "name": "stream_query"},
            {"api_mode": "async_stream", "name": "async_stream_query"},
            {"api_mode": "async_stream", "name": "streaming_agent_run_with_events"},
        ],
        "agent_framework": "google-adk",
    },
)

print(f"Agent successfully deployed!")
print(f"Resource Name: {remote_agent.api_resource.name}")

# Save resource name for testing
with open("agent_resource_name.txt", "w") as f:
    f.write(remote_agent.api_resource.name)
EOF
Jalankan skrip deployment untuk men-deploy agen di Agent Runtime:
python3 deploy_byoc.py
7. Men-deploy Agen dengan Terraform
Atau, Anda dapat men-deploy agen yang sama dalam container menggunakan Terraform. Cara ini direkomendasikan untuk lingkungan produksi guna mengelola infrastruktur sebagai kode.
Langkah 1: Buka Direktori Terraform
Buat direktori terraform di root project Anda, lalu buka direktori tersebut:
mkdir -p terraform
cd terraform
Langkah 2: Buat Konfigurasi Penyedia
Jalankan skrip berikut untuk menulis pemetaan penyedia ke providers.tf:
cat << 'EOF' > providers.tf
terraform {
  required_providers {
    google = {
      source  = "hashicorp/google"
      version = ">= 5.28.0"
    }
  }
}

provider "google" {
  project = var.project_id
  region  = var.location
}
EOF
Langkah 3: Buat Definisi Variabel
Tulis blok deskripsi input ke variables.tf:
cat << 'EOF' > variables.tf
variable "project_id" {
  type        = string
  description = "The Google Cloud Project ID"
}

variable "location" {
  type        = string
  description = "The region to deploy the reasoning engine"
  default     = "us-central1"
}

variable "repository_name" {
  type        = string
  description = "The Artifact Registry repository name"
  default     = "agents-repo"
}

variable "image_tag" {
  type        = string
  description = "The tag of the container image to deploy"
  default     = "latest"
}
EOF
Langkah 4: Buat Konfigurasi Utama
Tulis parameter definisi resource utama ke main.tf:
cat << 'EOF' > main.tf
locals {
  class_methods = [
    {"api_mode" = "", "name" = "get_session"},
    {"api_mode" = "", "name" = "list_sessions"},
    {"api_mode" = "", "name" = "create_session"},
    {"api_mode" = "", "name" = "delete_session"},
    {"api_mode" = "async", "name" = "async_get_session"},
    {"api_mode" = "async", "name" = "async_list_sessions"},
    {"api_mode" = "async", "name" = "async_create_session"},
    {"api_mode" = "async", "name" = "async_delete_session"},
    {"api_mode" = "async", "name" = "async_add_session_to_memory"},
    {"api_mode" = "async", "name" = "async_search_memory"},
    {"api_mode" = "stream", "name" = "stream_query"},
    {"api_mode" = "async_stream", "name" = "async_stream_query"},
    {"api_mode" = "async_stream", "name" = "streaming_agent_run_with_events"}
  ]
}

# define the resource with the BYOC configuration, set agent_framework to "google-adk" to enable interactive features on the console.
resource "google_vertex_ai_reasoning_engine" "byoc_weather_agent" {
  display_name = "byoc_weather_agent_tf"
  description  = "BYOC weather agent deployed via Terraform"
  project      = var.project_id
  region       = var.location

  spec {
    class_methods = jsonencode(local.class_methods)
    agent_framework = "google-adk"
    container_spec {
      image_uri = "${var.location}-docker.pkg.dev/${var.project_id}/${var.repository_name}/weather-agent-image:${var.image_tag}"
    }
  }
}
EOF
Langkah 5: Buat Definisi Output
Tulis blok output ke outputs.tf:
cat << 'EOF' > outputs.tf
output "reasoning_engine_id" {
  value       = google_vertex_ai_reasoning_engine.byoc_weather_agent.id
  description = "The ID of the deployed reasoning engine"
}

output "reasoning_engine_resource_name" {
  value       = google_vertex_ai_reasoning_engine.byoc_weather_agent.id
  description = "The resource name of the deployed reasoning engine"
}
EOF
Langkah 6: Buat File Nilai Variabel (tfvars)
Deploy secara dinamis tanpa pengeditan placeholder dengan memasukkan variabel lingkungan langsung ke terraform.tfvars:
cat <<EOF > terraform.tfvars
project_id      = "${PROJECT_ID}"
location        = "${LOCATION}"
repository_name = "agents-repo"
image_tag       = "latest"
EOF
Langkah 7: Lakukan Inisialisasi dan Terapkan
Lakukan inisialisasi Terraform dan terapkan konfigurasi:
terraform init
terraform apply
Konfirmasi penerapan dengan mengetik yes saat diminta.
Setelah selesai, Terraform akan menampilkan nama resource. Ambil secara terprogram ke agent_resource_name.txt dan kembali ke folder root:
terraform output -raw reasoning_engine_resource_name > ../agent_resource_name.txt
cd ..
8. Mengirim Kueri ke Agen
Pastikan agen Anda berjalan dan merespons.
Langkah 1: Buat Skrip Kueri
Tulis skrip verifikasi ke query_agent.py menggunakan pemeriksaan konfigurasi penyiapan dinamis untuk mengambil koordinat lokasi:
cat << 'EOF' > query_agent.py
import json
import os
import requests
from google import auth as google_auth
from google.auth.transport import requests as google_requests

# Load config coordinates directly
config_json = json.load(open("weather_agent/config.json"))
LOCATION = config_json["LOCATION"]
PROJECT_ID = config_json["PROJECT_ID"]

# Load agent resource name
with open("agent_resource_name.txt", "r") as f:
    agent_resource_name = f.read().strip()

def get_identity_token():
    credentials, _ = google_auth.default()
    auth_request = google_requests.Request()
    credentials.refresh(auth_request)
    return credentials.token

# Access the agent at the fastapi endpoint that was specified in main.py
url = f"https://{LOCATION}-aiplatform.googleapis.com/reasoningEngines/v1/{agent_resource_name}/api/api/stream_reasoning_engine"

payload = {
    "class_method": "async_stream_query",
    "input": {
        "user_id": "codelab_test_user",
        "message": "What is the temperature in Tokyo?",
    },
}

print(f"Sending query to {url}...")
response = requests.post(
    url,
    headers={
        "Content-Type": "application/json",
        "Authorization": f"Bearer {get_identity_token()}",
    },
    data=json.dumps(payload),
    stream=True,
)

for chunk in response.iter_content(chunk_size=8192):
    if chunk:
        print(chunk.decode('utf-8'))
EOF
Jalankan skrip kueri:
python3 query_agent.py
Anda akan melihat output yang dikirim kembali dari agen, termasuk suhu simulasi untuk Tokyo.
Langkah 2: Gunakan konsol
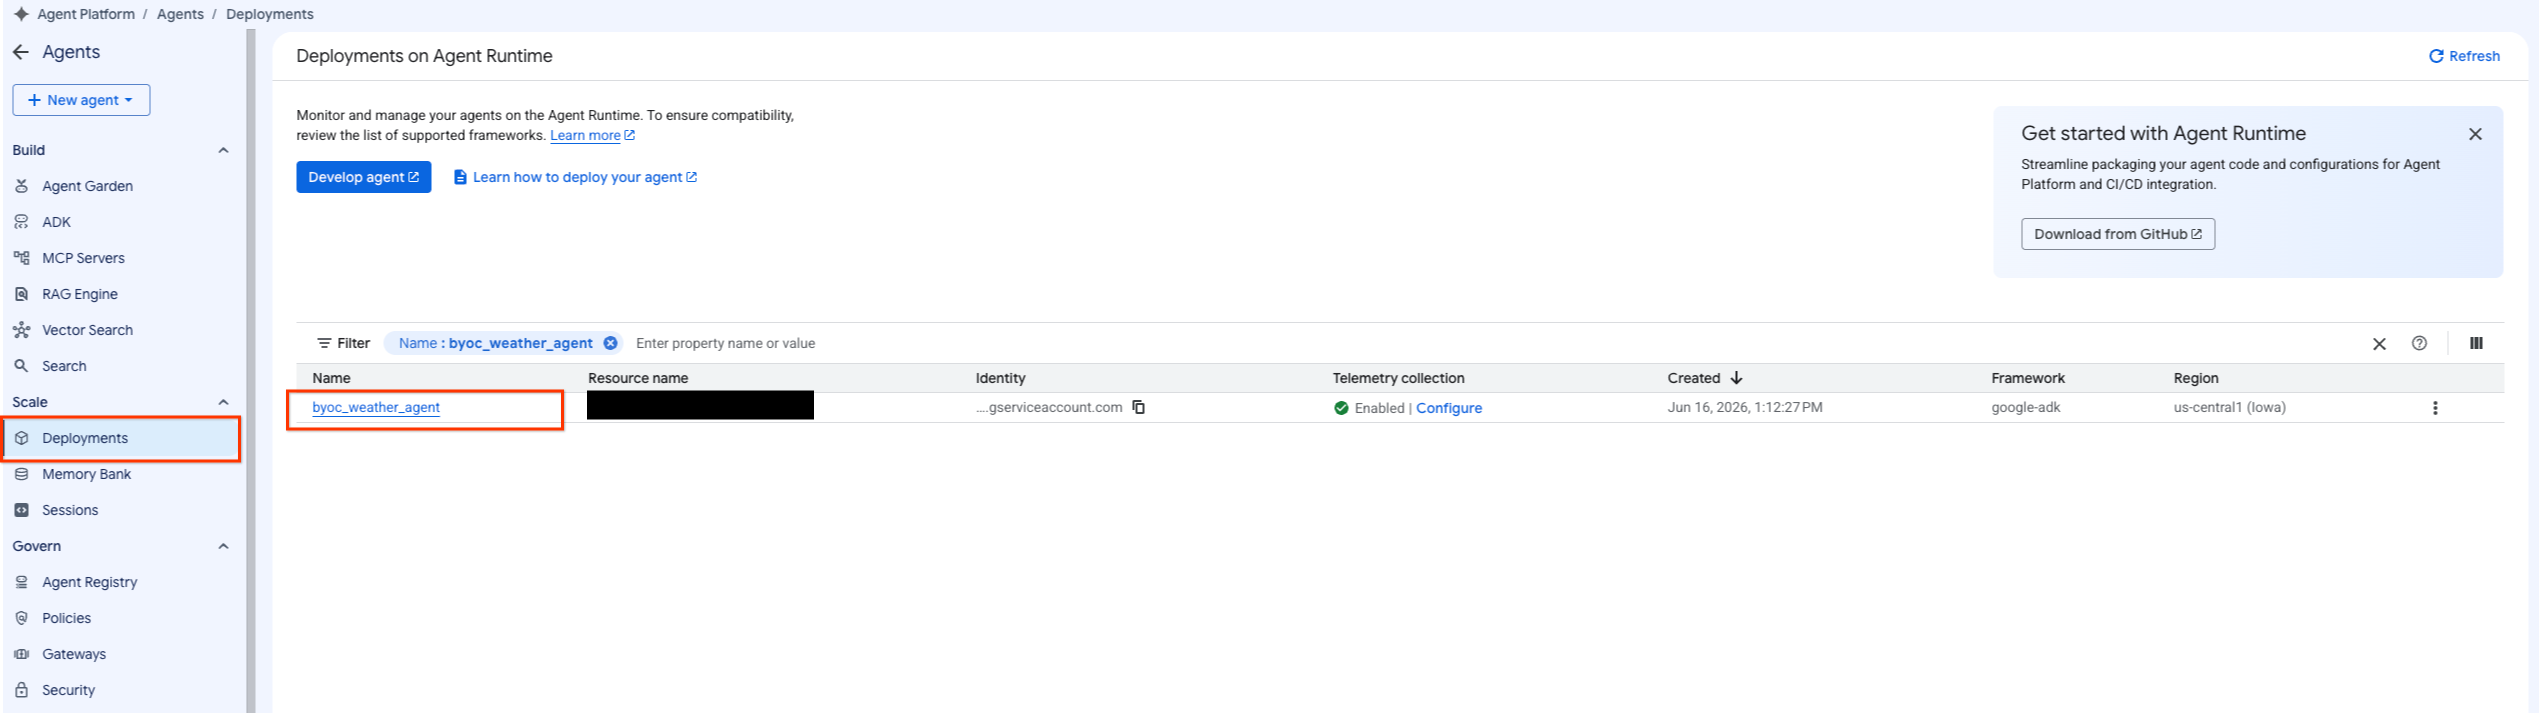
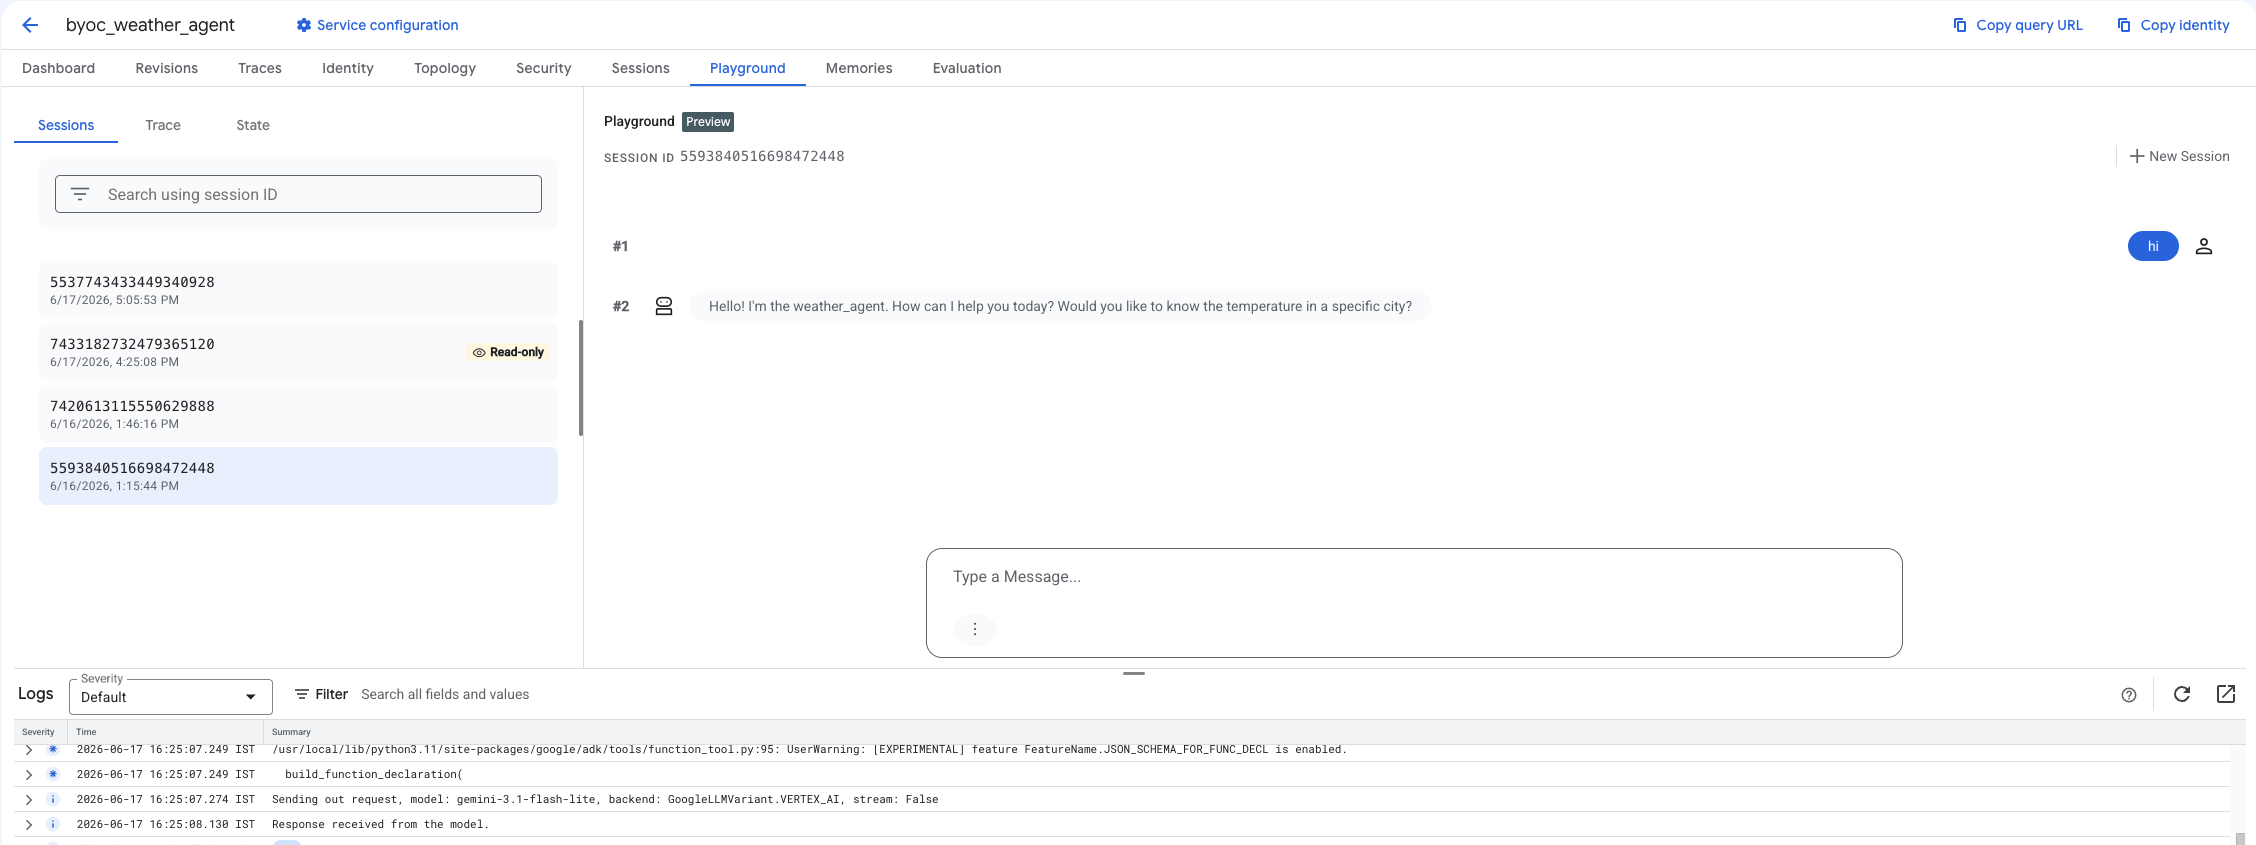
- Buka agen yang di-deploy dengan memilih Agent Platform > Agents > Deployments untuk memfilter daftar agen.
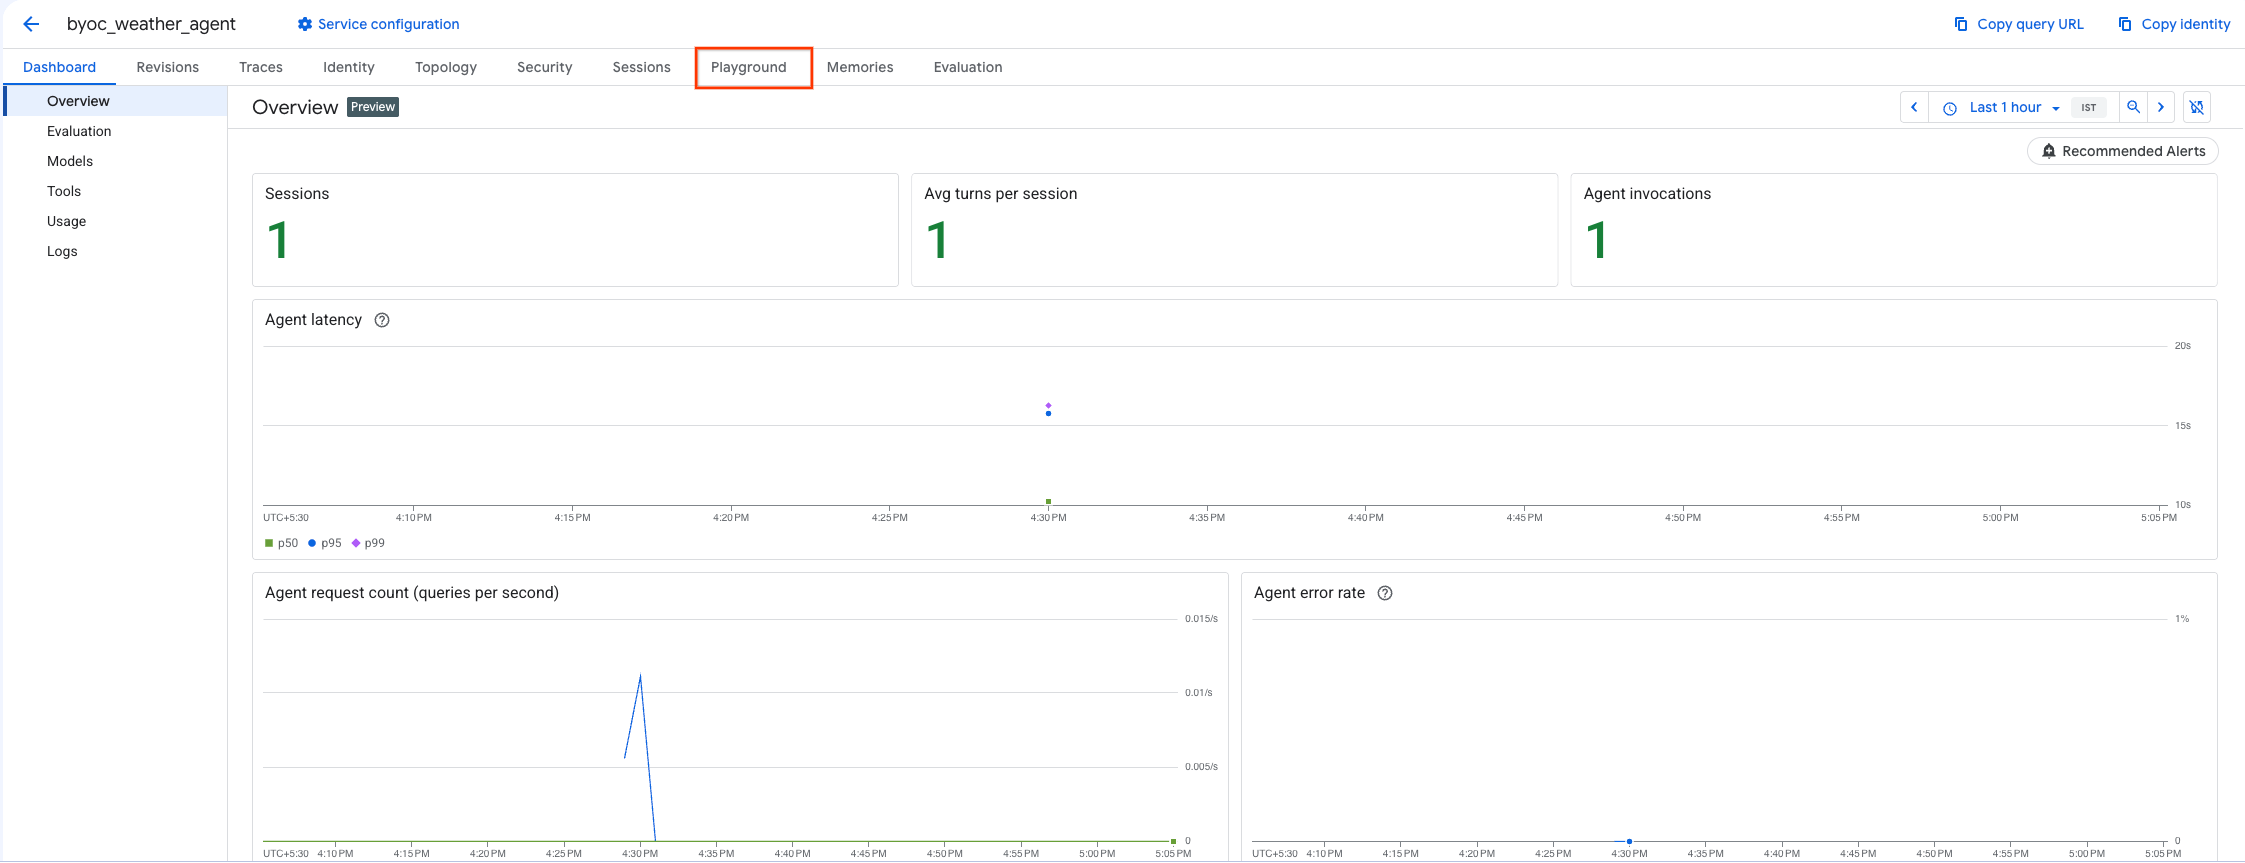
- Pilih Playground dari dasbor Agen.
- Buat sesi baru dan ketik kueri Anda untuk memeriksa apakah agen merespons permintaan seperti yang ditunjukkan.
9. Pembersihan
Agar tidak dikenai biaya, bersihkan resource yang Anda buat.
Jika Anda men-deploy menggunakan Terraform, beralihlah ke direktori terraform dan jalankan tindakan penghancuran:
cd ~/weather-agent-byoc/terraform
terraform destroy
cd ..
Jika Anda men-deploy menggunakan SDK, buat skrip untuk menghapus agen yang di-deploy:
cat << 'EOF' > delete_agent.py
import json
import os
import vertexai
from google.cloud import aiplatform

config = json.load(open("weather_agent/config.json"))
PROJECT_ID = config["PROJECT_ID"]
LOCATION = config["LOCATION"]

vertexai.init(project=PROJECT_ID, location=LOCATION)
client = vertexai.Client(project=PROJECT_ID, location=LOCATION)

with open("agent_resource_name.txt", "r") as f:
    agent_resource_name = f.read().strip()

# 1. Delete the Agent
# Note: We retrieve the list first to ensure we delete the ones created in this session
try:
    page_size = 100
    reasoning_engines = client.agent_engines.list()
    for engine in reasoning_engines:
        if agent_resource_name in engine.api_resource.name:
            print(f"Deleting Reasoning Engine: {engine.api_resource.name}")
            engine.delete(force=True)
except Exception as e:
    print(f"Error deleting reasoning engines: {e}")
EOF
Jalankan skrip untuk menghapus agen:
python3 delete_agent.py
Untuk membersihkan resource lainnya, kembali ke direktori utama Anda dan jalankan perintah berikut di Cloud Shell:
cd ~

# 1. Delete the Artifact Registry Repository
gcloud artifacts repositories delete $REPOSITORY_NAME --location=$LOCATION --quiet

# 2. Clean up files (Optional)
rm -rf ~/weather-agent-byoc
10. Kesimpulan
Selamat! Anda telah berhasil membuat penampung dan men-deploy agen AI di Agent Runtime menggunakan BYOC.
Anda telah mempelajari cara:
- Gunakan ADK untuk menentukan Agen dan membungkusnya menggunakan FastAPI.
- Buat Dockerfile dan bangun image menggunakan Cloud Build.
- Mengelola izin IAM untuk Runtime Agen.
- Deploy container kustom Anda menggunakan Python SDK dan Terraform.
- Uji dan kueri agen yang di-deploy.