
1. 概要
Agent Runtime(以前の Agent Engine)は、AI エージェントを効率的にデプロイ、実行、スケーリングできるように設計されたマネージド ランタイム環境を提供します。デフォルトでは、デプロイ プロセス中にソースコードと依存関係が自動的にバンドルされます。
ただし、エンタープライズ ワークロードでは、ランタイム環境の完全な所有権が必要になることがよくあります。これをサポートするため、Agent Runtime には Bring Your Own Container(BYOC)機能が用意されています。これにより、事前構築済みのカスタム コンテナ イメージをデプロイできます。
この Codelab では、Google Agent Development Kit(ADK)で構築されたエージェントをコンテナ化し、必要な Google Cloud 権限を構成して、Python SDK または Terraform を使用して Agent Runtime にデプロイするエンドツーエンドのプロセスについて説明します。
この Codelab では、次のことを学びます。
- Google Agent Development Kit(ADK) を使用して Python エージェントを構築する。
- エージェントを FastAPI アプリケーションでラップする。
- Docker を使用してアプリケーションをコンテナ化する。
- Google Cloud の権限を構成する。
- コンテナ化されたエージェントを Agent Runtime にデプロイしてテストする。
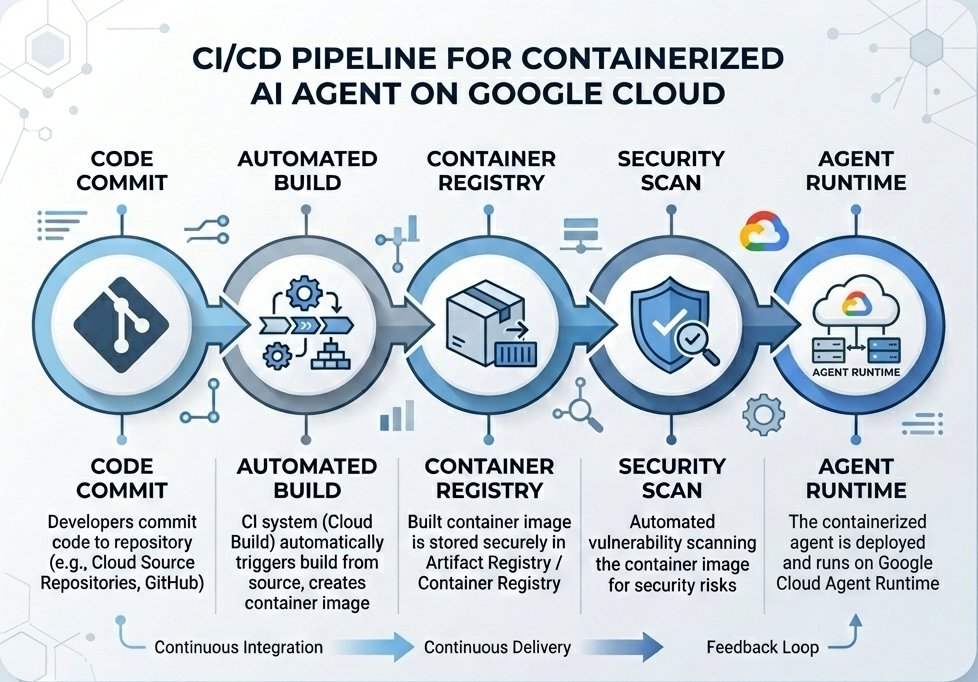
ビルドとデプロイのフロー
次の図は、この Codelab で手動で行うビルドとデプロイの手順のワークフローを示しています。
必要なもの
- 課金が有効な Google Cloud プロジェクトが用意されていること。
- Cloud Shell(推奨)または
gcloudとdockerがインストールされたローカル開発環境にアクセスできること。 - Python と Docker の基本的な知識があること。
2. 環境設定
開始する前に、必要な API を有効にして環境を構成する必要があります。
ステップ 1: Cloud Shell を開く
Google Cloud コンソールの右上にある [Cloud Shell をアクティブにする] ボタンをクリックします。

ステップ 2: 環境変数を構成する
Cloud Shell で、プロジェクト ID を設定し、この Codelab 全体で使用する主要な環境変数を定義します。"YOUR_PROJECT_ID" を実際の Google Cloud プロジェクト ID に置き換えます。
gcloud config set project "YOUR_PROJECT_ID"
export PROJECT_ID=$(gcloud config get-value project)
export LOCATION="us-central1"
export MODEL="gemini-3.1-flash-lite"
export MODEL_REGION="global"
これらの変数は、ターゲット デプロイの設定を構成します。
PROJECT_ID: Gemini Enterprise Agent Platform のすべてのリソースと Artifact Registry が存在する Google Cloud プロジェクトの一意の識別子。LOCATION: リポジトリとランタイム ワークロードをホストする地理的リージョン(us-central1など)。MODEL: エージェント コンテキストによってロードされる Gemini モデルのバージョン(gemini-3.1-flash-liteなど)。MODEL_REGION: モデルのエンドポイント リージョン。グローバル エンドポイントから Gemini モデルを呼び出すには、ここで"global"に設定します。
ステップ 3: API を有効にする
必要な Google Cloud APIs を有効にします。
gcloud services enable \
    aiplatform.googleapis.com \
    cloudbuild.googleapis.com \
    compute.googleapis.com \
    artifactregistry.googleapis.com \
    storage.googleapis.com
ステップ 4: SDK をインストールする
Agent Engine と ADK のサポートを使用して Vertex AI SDK をインストールします。
pip install --upgrade "google-cloud-aiplatform[agent_engines,adk]>=1.144"
3. ソースファイルのセットアップ
このステップでは、エージェントの構造とコードを作成します。
ディレクトリ構造の概要
この Codelab の最後までに、ファイルは次のワークスペース階層に整理されます。
weather-agent-byoc/
├── Dockerfile                  # Container definition
├── deploy_byoc.py              # Python SDK deployment script
├── main.py                     # FastAPI server wrapper
├── query_agent.py              # Verify / query script
├── requirements.txt            # Python dependencies
│
├── weather_agent/              # Agent source module
│   ├── __init__.py             # Package declaration
│   ├── agent.py                # Agent & mock tools logic
│   └── config.json             # Environment config variables
│
└── terraform/                  # Terraform configuration files
    ├── main.tf
    ├── outputs.tf
    ├── providers.tf
    ├── terraform.tfvars
    └── variables.tf
ステップ 1: ディレクトリを作成する
ホーム ディレクトリから開始して、ワークスペース構造を作成します。
cd ~
mkdir -p weather-agent-byoc/weather_agent
cd weather-agent-byoc
ステップ 2: 構成ファイルを作成する
Cloud Shell で次のコマンドを実行して、構成パラメータを weather_agent/config.json に直接書き込みます。このコマンドは、変数を環境値に自動的に置き換えます。
cat <<EOF > weather_agent/config.json
{
    "PROJECT_ID": "${PROJECT_ID}",
    "LOCATION": "${LOCATION}",
    "MODEL": "${MODEL}",
    "MODEL_REGION": "${MODEL_REGION}"
}
EOF
ステップ 3: エージェントを定義する
次のスクリプトを実行して、エージェント構成とモックツール ロジックを weather_agent/agent.py に書き込みます。
cat << 'EOF' > weather_agent/agent.py
import json
import random
from google.adk.agents import Agent
from google.adk.models.google_llm import Gemini
from functools import cached_property
from google.genai import Client

# Load config
llm_config = json.load(open("weather_agent/config.json"))
PROJECT_ID = llm_config["PROJECT_ID"]
MODEL = llm_config["MODEL"]
MODEL_REGION = llm_config["MODEL_REGION"]

# Override Gemini class for global endpoint compatibility
class GlobalGemini(Gemini):
  @cached_property
  def api_client(self) -> Client:
    return Client(vertexai=True, location="global")

# Define Tool
def get_temperature(place: str) -> str:
    '''Returns the current temperature of a given place.

    Args:
        place: The name of the city or location.

    Returns:
        str: A string describing the temperature.
    '''
    temp = random.randint(-10, 40)
    return f"The current temperature in {place} is {temp}°C."

# Initialize LLM
llm_model = GlobalGemini(model=MODEL) if MODEL_REGION == "global" else Gemini(model=MODEL)

# Initialize Agent
root_agent = Agent(
    model=llm_model,
    name='weather_agent',
    description='An agent that provides temperature information for locations.',
    instruction='You are a helpful assistant that can provide the current temperature for any given place using the get_temperature tool.',
    tools=[get_temperature],
)
EOF
空の __init__.py を作成して、weather_agent を Python パッケージにします。
touch weather_agent/__init__.py
ステップ 4: FastAPI ラッパーを作成する
次のスクリプトを実行して、FastAPI サーバーのエントリポイント構成を main.py に書き込みます。
cat << 'EOF' > main.py
import inspect
import json
import logging
import os
from typing import Any, Dict, Optional
import uvicorn
import vertexai
from weather_agent.agent import root_agent
from fastapi import FastAPI, encoders, responses
from pydantic import BaseModel
from vertexai import agent_engines

app = FastAPI()

config_json = json.load(open("weather_agent/config.json"))
PROJECT_ID = config_json["PROJECT_ID"]
LOCATION = config_json["LOCATION"]
MODEL_REGION = config_json["MODEL_REGION"]

class QueryRequest(BaseModel):
    input: Optional[Dict[str, Any]] = None
    class_method: Optional[str] = None

vertexai.init(project=PROJECT_ID, location=MODEL_REGION)
adk_app = agent_engines.AdkApp(agent=root_agent)

def _encode_chunk_to_json(chunk):
  try:
    json_chunk = encoders.jsonable_encoder(chunk)
    return json.dumps(json_chunk) + "\n"
  except Exception:
    logging.exception("Failed to encode chunk")
    return None

async def json_generator(output):
  async for chunk in output:
    encoded_chunk = _encode_chunk_to_json(chunk)
    if encoded_chunk is None:
      break
    yield encoded_chunk

async def _invoke_callable_or_raise(invocation_callable, invocation_payload):
  if inspect.iscoroutinefunction(invocation_callable):
    return await invocation_callable(**invocation_payload)
  else:
    return invocation_callable(**invocation_payload)

@app.post("/api/reasoning_engine")
async def query(request: QueryRequest) -> responses.JSONResponse:
    method = getattr(adk_app, request.class_method)
    output = await _invoke_callable_or_raise(method, request.input or {})
    try:
      json_serialized_content = encoders.jsonable_encoder({"output": output})
    except ValueError as encoding_error:
      logging.exception("Failed to encode response")
      raise encoding_error
    return responses.JSONResponse(content=json_serialized_content)

@app.post("/api/stream_reasoning_engine")
async def stream_query(request: QueryRequest) -> responses.StreamingResponse:
    method = getattr(adk_app, request.class_method)
    output = await _invoke_callable_or_raise(method, request.input or {})
    return responses.StreamingResponse(
        content=json_generator(output),
        media_type="application/json",
    )

if __name__ == "__main__":
    uvicorn.run(app, host="0.0.0.0", port=int(os.environ.get("PORT", 8080)))
EOF
ステップ 5: 依存関係を定義する
必要な Python 依存関係を requirements.txt に書き込みます。
cat << 'EOF' > requirements.txt
fastapi
uvicorn
vertexai
google-cloud-aiplatform[agent_engines,adk]>=1.144
pydantic
EOF
4. コンテナ化
次に、エージェントをコンテナにパッケージ化する方法を定義します。
ステップ 1: Dockerfile を作成する
プロジェクト ディレクトリのルートに Dockerfile を作成して、FastAPI アプリケーションのビルド方法を指定します。
cat << 'EOF' > Dockerfile
FROM python:3.11-slim

WORKDIR /app

COPY weather_agent/ /app/weather_agent/
COPY main.py .
COPY requirements.txt .
RUN pip install -r requirements.txt

CMD ["sh", "-c", "uvicorn main:app --host 0.0.0.0 --port $PORT"]
EOF
5. Artifact Registry と Cloud Build を設定する
コンテナ イメージを保存するリポジトリと、イメージを push する権限が必要です。
ステップ 1: リポジトリを作成する
リポジトリ名を定義し、構成時に定義した環境変数を使用して Artifact Registry 内に Docker リポジトリを作成します。
export REPOSITORY_NAME="agents-repo"

gcloud artifacts repositories create $REPOSITORY_NAME \
    --project=$PROJECT_ID \
    --repository-format=docker \
    --location=$LOCATION \
    --description="Docker repository for Agents"
ステップ 2: サービス アカウントの権限を構成する
Artifact Registry にイメージを push する権限をデフォルトの Compute サービス アカウントに付与します。
まず、プロジェクト番号を取得します。
export PROJECT_NUMBER=$(gcloud projects describe $PROJECT_ID --format="value(projectNumber)")
ロールを付与します。
# Allow pushing to Artifact Registry
gcloud projects add-iam-policy-binding $PROJECT_ID \
    --member="serviceAccount:$PROJECT_NUMBER-compute@developer.gserviceaccount.com" \
    --role="roles/artifactregistry.writer" \
    --condition=None

# Allow Cloud Build to read storage objects
gcloud projects add-iam-policy-binding $PROJECT_NUMBER \
    --member="serviceAccount:$PROJECT_NUMBER-compute@developer.gserviceaccount.com" \
    --role="roles/storage.objectViewer" \
    --condition=None
ステップ 3: サービス エージェントに権限を付与する
AI Platform と Reasoning Engine のサービス エージェントに Artifact Registry 読み取りアクセス権を付与します。
gcloud projects add-iam-policy-binding $PROJECT_NUMBER \
    --member="serviceAccount:service-$PROJECT_NUMBER@gcp-sa-aiplatform-re.iam.gserviceaccount.com" \
    --role="roles/artifactregistry.reader"  --condition=None

gcloud projects add-iam-policy-binding $PROJECT_NUMBER \
    --member="serviceAccount:service-$PROJECT_NUMBER@gcp-sa-aiplatform.iam.gserviceaccount.com" \
    --role="roles/artifactregistry.reader"  --condition=None
ステップ 4: イメージをビルドして push する
Cloud Build を使用してコンテナ イメージをビルドして push します。
gcloud builds submit \
    --project=$PROJECT_ID \
    --region=$LOCATION \
    --tag $LOCATION-docker.pkg.dev/$PROJECT_ID/$REPOSITORY_NAME/weather-agent-image:latest \
    .
6. SDK を使用してエージェントをデプロイする
権限が構成されたので、カスタム コンテナをデプロイできます。
ステップ 1: BYOC エージェントをデプロイする
プロジェクト ディレクトリのルートに python ファイル deploy_byoc.py を作成して、レジストリでホストされているコンテナを Agent Runtime にデプロイします。
cat << 'EOF' > deploy_byoc.py
import json
import os
import vertexai
from google.cloud import aiplatform

config = json.load(open("weather_agent/config.json"))
PROJECT_ID = config["PROJECT_ID"]
LOCATION = config["LOCATION"]
REPOSITORY_NAME = "agents-repo"

vertexai.init(project=PROJECT_ID, location=LOCATION)
client = vertexai.Client(project=PROJECT_ID, location=LOCATION)

image_uri = f"{LOCATION}-docker.pkg.dev/{PROJECT_ID}/{REPOSITORY_NAME}/weather-agent-image:latest"

print(f"Deploying custom container agent from {image_uri}...")
remote_agent = client.agent_engines.create(
    config={
        "display_name": "byoc_weather_agent",
        "description": "BYOC weather agent from custom container",
        "container_spec": {
            "image_uri": image_uri
        },
        "class_methods": [
            # For convenience to interact with the agent through the Python SDK
            # https://docs.cloud.google.com/gemini-enterprise-agent-platform/scale/runtime/use-an-adk-agent#supported-operations
            {"api_mode": "", "name": "get_session"},
            {"api_mode": "", "name": "list_sessions"},
            {"api_mode": "", "name": "create_session"},
            {"api_mode": "", "name": "delete_session"},
            {"api_mode": "async", "name": "async_get_session"},
            {"api_mode": "async", "name": "async_list_sessions"},
            {"api_mode": "async", "name": "async_create_session"},
            {"api_mode": "async", "name": "async_delete_session"},
            {"api_mode": "async", "name": "async_add_session_to_memory"},
            {"api_mode": "async", "name": "async_search_memory"},
            {"api_mode": "stream", "name": "stream_query"},
            {"api_mode": "async_stream", "name": "async_stream_query"},
            {"api_mode": "async_stream", "name": "streaming_agent_run_with_events"},
        ],
        "agent_framework": "google-adk",
    },
)

print(f"Agent successfully deployed!")
print(f"Resource Name: {remote_agent.api_resource.name}")

# Save resource name for testing
with open("agent_resource_name.txt", "w") as f:
    f.write(remote_agent.api_resource.name)
EOF
デプロイ スクリプトを実行して、Agent Runtime にエージェントをデプロイします。
python3 deploy_byoc.py
7. Terraform を使用してエージェントをデプロイする
または、Terraform を使用して同じコンテナ化されたエージェントをデプロイすることもできます。これは、Infrastructure as Code を管理するために、本番環境で推奨されます。
ステップ 1: Terraform ディレクトリに移動する
プロジェクト ルートに terraform ディレクトリを作成して移動します。
mkdir -p terraform
cd terraform
ステップ 2: プロバイダ構成を作成する
次のスクリプトを実行して、プロバイダ マッピングを providers.tf に書き込みます。
cat << 'EOF' > providers.tf
terraform {
  required_providers {
    google = {
      source  = "hashicorp/google"
      version = ">= 5.28.0"
    }
  }
}

provider "google" {
  project = var.project_id
  region  = var.location
}
EOF
ステップ 3: 変数定義を作成する
入力の説明ブロックを variables.tf に書き込みます。
cat << 'EOF' > variables.tf
variable "project_id" {
  type        = string
  description = "The Google Cloud Project ID"
}

variable "location" {
  type        = string
  description = "The region to deploy the reasoning engine"
  default     = "us-central1"
}

variable "repository_name" {
  type        = string
  description = "The Artifact Registry repository name"
  default     = "agents-repo"
}

variable "image_tag" {
  type        = string
  description = "The tag of the container image to deploy"
  default     = "latest"
}
EOF
ステップ 4: メイン構成を作成する
メインリソース定義パラメータを main.tf に書き込みます。
cat << 'EOF' > main.tf
locals {
  class_methods = [
    {"api_mode" = "", "name" = "get_session"},
    {"api_mode" = "", "name" = "list_sessions"},
    {"api_mode" = "", "name" = "create_session"},
    {"api_mode" = "", "name" = "delete_session"},
    {"api_mode" = "async", "name" = "async_get_session"},
    {"api_mode" = "async", "name" = "async_list_sessions"},
    {"api_mode" = "async", "name" = "async_create_session"},
    {"api_mode" = "async", "name" = "async_delete_session"},
    {"api_mode" = "async", "name" = "async_add_session_to_memory"},
    {"api_mode" = "async", "name" = "async_search_memory"},
    {"api_mode" = "stream", "name" = "stream_query"},
    {"api_mode" = "async_stream", "name" = "async_stream_query"},
    {"api_mode" = "async_stream", "name" = "streaming_agent_run_with_events"}
  ]
}

# define the resource with the BYOC configuration, set agent_framework to "google-adk" to enable interactive features on the console.
resource "google_vertex_ai_reasoning_engine" "byoc_weather_agent" {
  display_name = "byoc_weather_agent_tf"
  description  = "BYOC weather agent deployed via Terraform"
  project      = var.project_id
  location     = var.location

  spec {
    class_methods = jsonencode(local.class_methods)
    agent_framework = "google-adk"
    container_spec {
      image_uri = "${var.location}-docker.pkg.dev/${var.project_id}/${var.repository_name}/weather-agent-image:${var.image_tag}"
    }
  }
}
EOF
ステップ 5: 出力定義を作成する
出力ブロックを outputs.tf に書き込みます。
cat << 'EOF' > outputs.tf
output "reasoning_engine_id" {
  value       = google_vertex_ai_reasoning_engine.byoc_weather_agent.id
  description = "The ID of the deployed reasoning engine"
}

output "reasoning_engine_resource_name" {
  value       = google_vertex_ai_reasoning_engine.byoc_weather_agent.id
  description = "The resource name of the deployed reasoning engine"
}
EOF
ステップ 6: 変数値ファイル(tfvars)を作成する
プレースホルダを編集せずに動的にデプロイするには、環境変数を terraform.tfvars に直接フィードします。
cat <<EOF > terraform.tfvars
project_id      = "${PROJECT_ID}"
location        = "${LOCATION}"
repository_name = "agents-repo"
image_tag       = "latest"
EOF
ステップ 7: 初期化して適用する
Terraform を初期化して構成を適用します。
terraform init
terraform apply
プロンプトが表示されたら、「yes」と入力して適用を確認します。
完了すると、Terraform はリソース名を出力します。プログラムで agent_resource_name.txt にキャプチャして、ルートフォルダに戻ります。
terraform output -raw reasoning_engine_resource_name > ../agent_resource_name.txt
cd ..
8. エージェントにクエリを実行する
エージェントが実行されて応答していることを確認します。
ステップ 1: クエリ スクリプトを作成する
動的なセットアップ構成チェックを使用して検証スクリプトを query_agent.py に書き込み、ロケーション座標を取得します。
cat << 'EOF' > query_agent.py
import json
import os
import requests
from google import auth as google_auth
from google.auth.transport import requests as google_requests

# Load config coordinates directly
config_json = json.load(open("weather_agent/config.json"))
LOCATION = config_json["LOCATION"]
PROJECT_ID = config_json["PROJECT_ID"]

# Load agent resource name
with open("agent_resource_name.txt", "r") as f:
    agent_resource_name = f.read().strip()

def get_identity_token():
    credentials, _ = google_auth.default()
    auth_request = google_requests.Request()
    credentials.refresh(auth_request)
    return credentials.token

# Access the agent at the fastapi endpoint that was specified in main.py
url = f"https://{LOCATION}-aiplatform.googleapis.com/v1/{agent_resource_name}/api/stream_reasoning_engine"

payload = {
    "class_method": "async_stream_query",
    "input": {
        "user_id": "codelab_test_user",
        "message": "What is the temperature in Tokyo?",
    },
}

print(f"Sending query to {url}...")
response = requests.post(
    url,
    headers={
        "Content-Type": "application/json",
        "Authorization": f"Bearer {get_identity_token()}",
    },
    data=json.dumps(payload),
    stream=True,
)

for chunk in response.iter_content(chunk_size=8192):
    if chunk:
        print(chunk.decode('utf-8'))
EOF
クエリ スクリプトを実行します。
python3 query_agent.py
エージェントから出力がストリーミングされ、東京のシミュレートされた気温が表示されます。
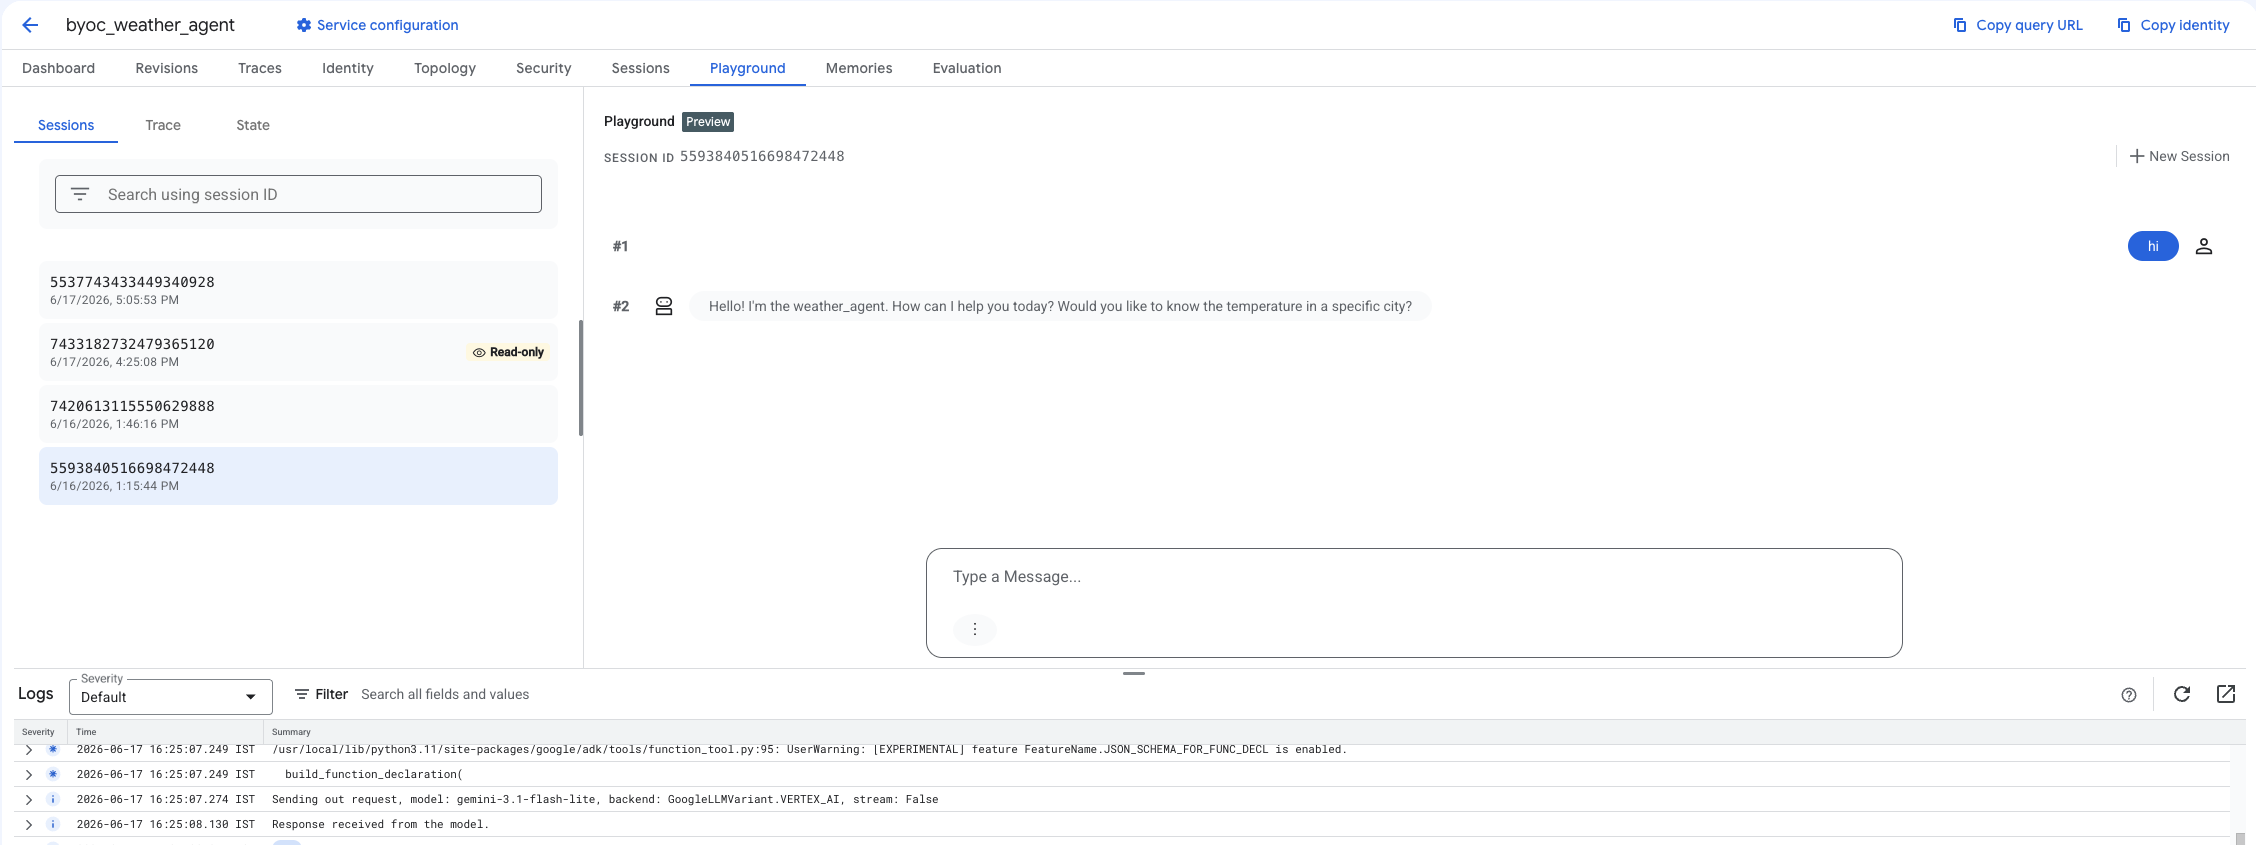
ステップ 2: コンソールを使用する
- [Agent Platform] > [Agents] > [Deployments] を選択して、デプロイされたエージェントに移動し、エージェントのリストをフィルタします。
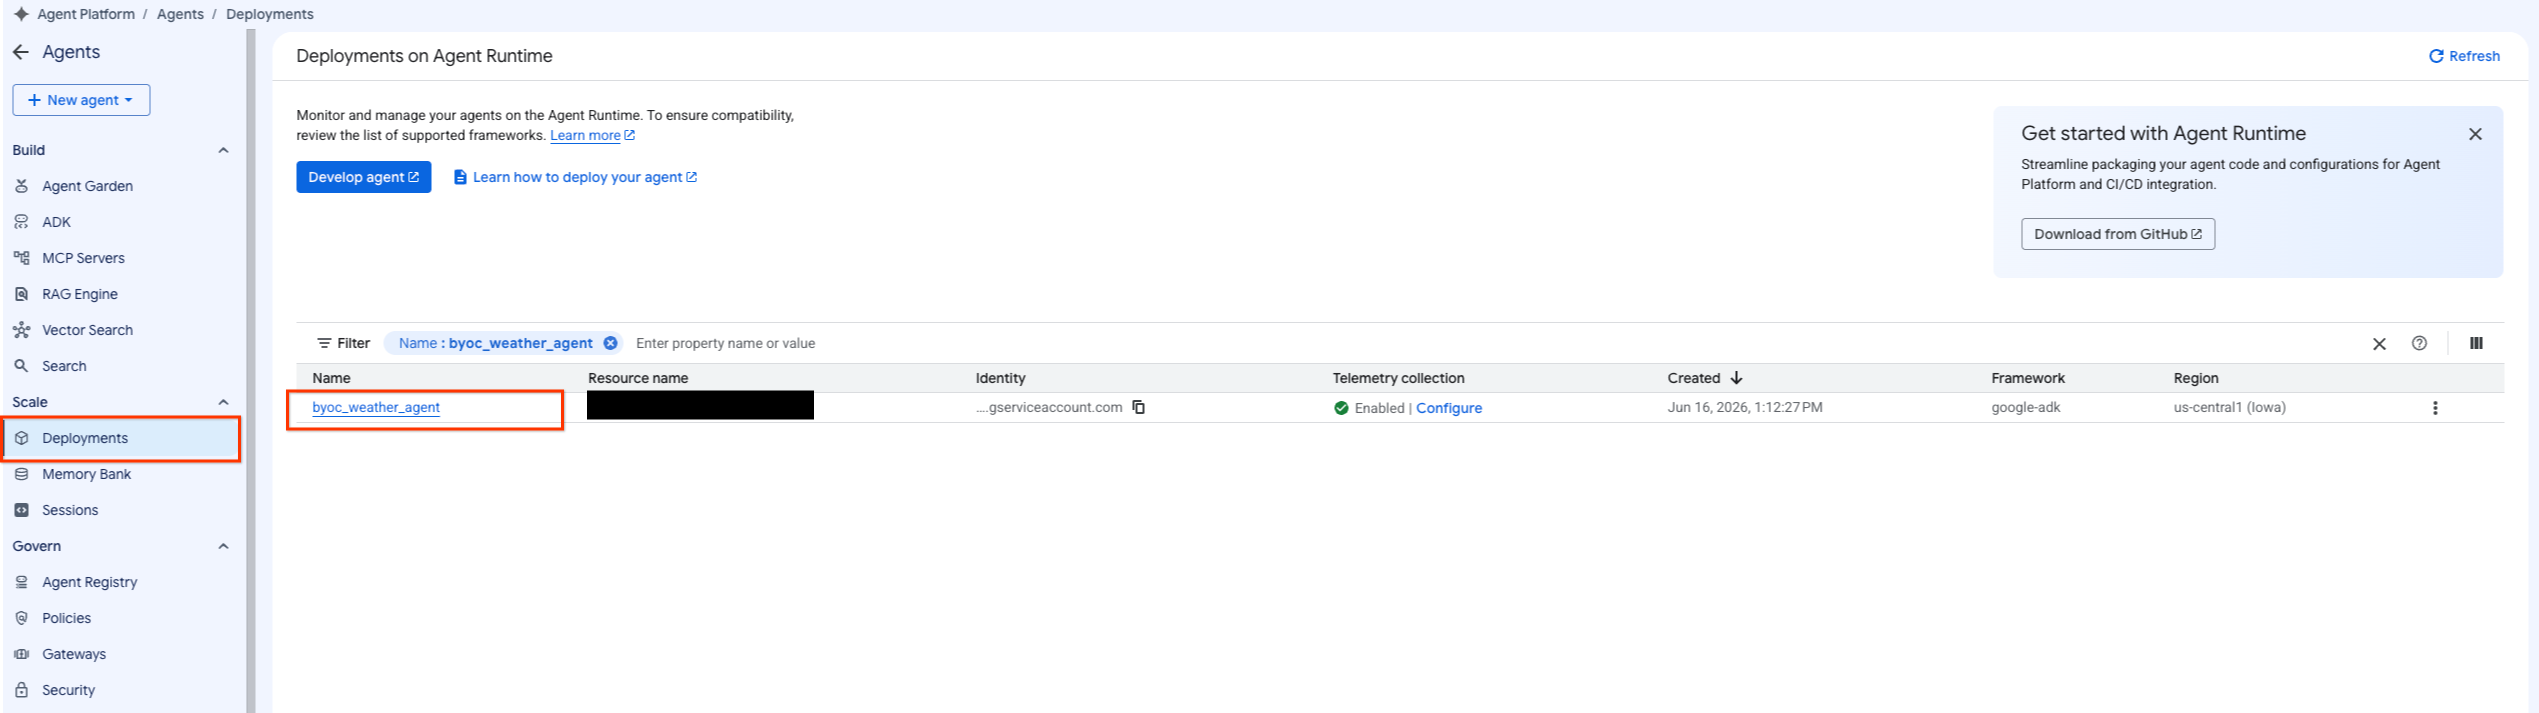
- エージェントのダッシュボードから [Playground] を選択します。
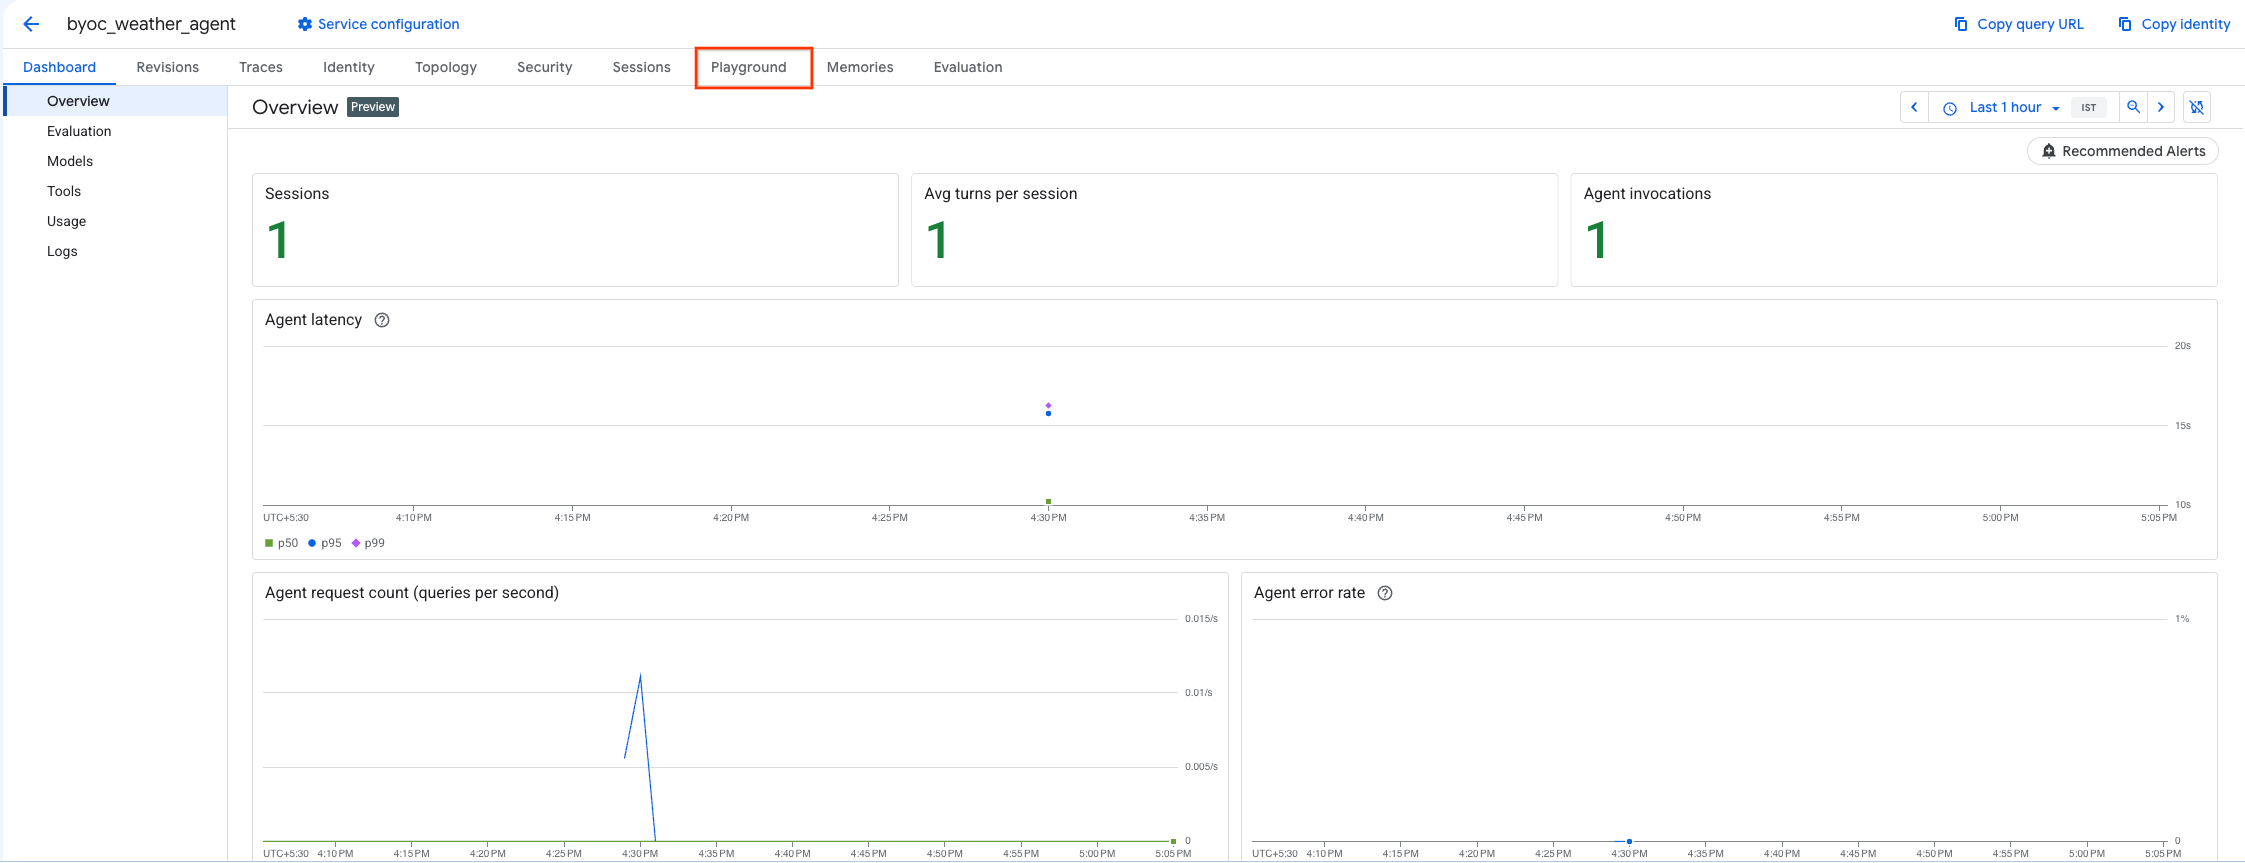
- 新しいセッションを作成し、クエリを入力して、エージェントがリクエストに応答しているかどうかを確認します。
9. クリーンアップ
料金が発生しないように、作成したリソースをクリーンアップします。
Terraform を使用してデプロイした場合は、terraform ディレクトリに移動して破棄アクションを実行します。
cd ~/weather-agent-byoc/terraform
terraform destroy
cd ..
SDK を使用してデプロイした場合は、デプロイされたエージェントを削除するスクリプトを作成します。
cat << 'EOF' > delete_agent.py
import json
import os
import vertexai
from google.cloud import aiplatform

config = json.load(open("weather_agent/config.json"))
PROJECT_ID = config["PROJECT_ID"]
LOCATION = config["LOCATION"]

vertexai.init(project=PROJECT_ID, location=LOCATION)
client = vertexai.Client(project=PROJECT_ID, location=LOCATION)

with open("agent_resource_name.txt", "r") as f:
    agent_resource_name = f.read().strip()

# 1. Delete the Agent
# Note: We retrieve the list first to ensure we delete the ones created in this session
try:
    page_size = 100
    reasoning_engines = client.agent_engines.list()
    for engine in reasoning_engines:
        if agent_resource_name in engine.api_resource.name:
            print(f"Deleting Reasoning Engine: {engine.api_resource.name}")
            engine.delete(force=True)
except Exception as e:
    print(f"Error deleting reasoning engines: {e}")
EOF
スクリプトを実行してエージェントを削除します。
python3 delete_agent.py
残りのリソースをクリーンアップするには、ホーム ディレクトリに戻り、Cloud Shell で次のコマンドを実行します。
cd ~

# 1. Delete the Artifact Registry Repository
gcloud artifacts repositories delete $REPOSITORY_NAME --location=$LOCATION --quiet

# 2. Clean up files (Optional)
rm -rf ~/weather-agent-byoc
10. まとめ
おめでとうございます!BYOC を使用して、Agent Runtime に AI エージェントをコンテナ化してデプロイできました。
具体的には、以下の方法について学習しました。
- ADK を使用してエージェントを定義し、FastAPI を使用してラップする。
- Dockerfile を作成し、Cloud Build を使用してイメージをビルドする。
- Agent Runtime の IAM 権限を管理する。
- Python SDK と Terraform の両方を使用してカスタム コンテナをデプロイする。
- デプロイしたエージェントをテストしてクエリする。