
1. 개요
Agent Runtime (이전의 Agent Engine)은 AI 에이전트를 효과적으로 배포, 실행, 확장하도록 설계된 관리형 런타임 환경을 제공합니다. 기본적으로 플랫폼은 배포 프로세스 중에 소스 코드와 종속 항목을 자동으로 번들링합니다.
하지만 엔터프라이즈 워크로드에는 런타임 환경에 대한 완전한 소유권이 필요한 경우가 많습니다. 이를 지원하기 위해 Agent Runtime은 Bring Your Own Container(BYOC) 기능을 제공하여 사전 빌드된 커스텀 컨테이너 이미지를 배포할 수 있도록 합니다.
이 Codelab에서는 Google 에이전트 개발 키트 (ADK)로 빌드된 에이전트를 컨테이너화하고, 필요한 Google Cloud 권한을 구성하고, Python SDK 또는 Terraform을 사용하여 Agent Runtime에 배포하는 엔드 투 엔드 프로세스를 설명합니다.
이 Codelab에서는 다음을 안내합니다.
- Google 에이전트 개발 키트 (ADK)를 사용하여 Python 에이전트 빌드
- 에이전트를 FastAPI 애플리케이션으로 래핑
- Docker 로 애플리케이션 컨테이너화
- Google Cloud 권한 구성
- Agent Runtime 에서 컨테이너화된 에이전트 배포 및 테스트
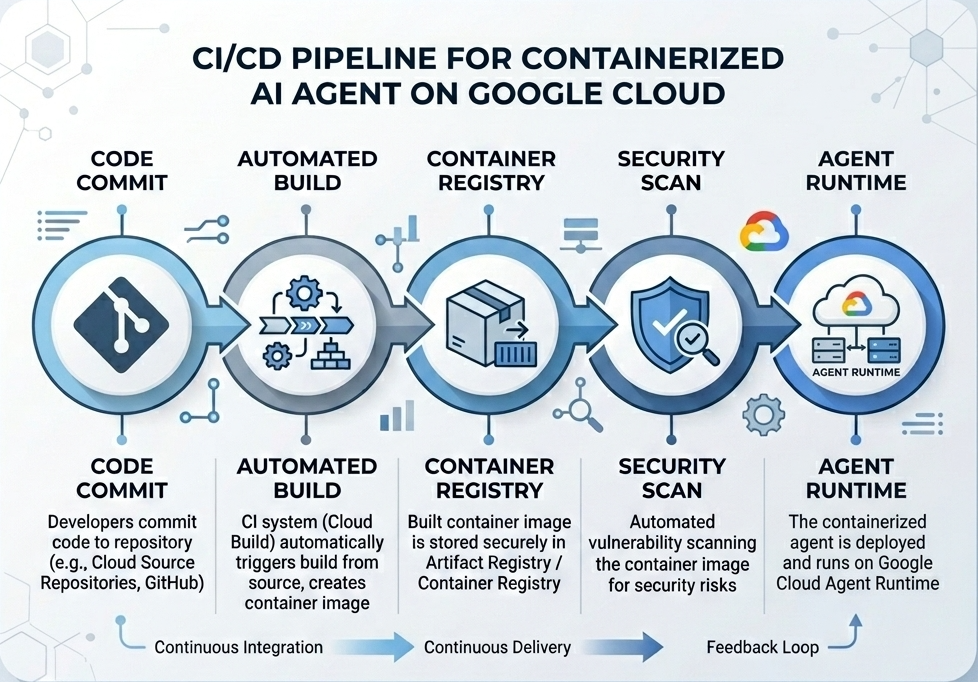
빌드 및 배포 흐름
다음 다이어그램은 이 Codelab에서 수동으로 실행할 빌드 및 배포 단계의 워크플로를 보여줍니다.
필요한 항목
- 결제가 사용 설정된 Google Cloud 프로젝트
gcloud및docker가 설치된 Cloud Shell (권장) 또는 로컬 개발 환경에 대한 액세스 권한- Python 및 Docker에 관한 기본 지식
2. 환경 설정
시작하기 전에 필요한 API를 사용 설정하고 환경을 구성해야 합니다.
1단계: Cloud Shell 열기
Google Cloud 콘솔의 오른쪽 상단에 있는 Cloud Shell 활성화 버튼을 클릭합니다.

2단계: 환경 변수 구성
Cloud Shell에서 프로젝트 ID를 설정하고 이 Codelab 전반에서 사용되는 주요 환경 변수를 정의합니다. "YOUR_PROJECT_ID"를 실제 Google Cloud 프로젝트 ID로 바꿉니다.
gcloud config set project "YOUR_PROJECT_ID"
export PROJECT_ID=$(gcloud config get-value project)
export LOCATION="us-central1"
export MODEL="gemini-3.1-flash-lite"
export MODEL_REGION="global"
이러한 변수는 대상 배포 설정을 구성합니다.
PROJECT_ID: 모든 Gemini Enterprise Agent Platform 리소스와 Artifact Registry가 상주하는 Google Cloud 프로젝트의 고유 식별자입니다.LOCATION: 저장소와 런타임 워크로드를 호스팅하는 지리적 리전 (예:us-central1)MODEL: 에이전트 컨텍스트에서 로드되는 Gemini 모델 버전 (예:gemini-3.1-flash-lite)MODEL_REGION: 모델의 엔드포인트 리전입니다. 전역 엔드포인트에서 Gemini 모델을 호출하려면 여기에서"global"로 설정합니다.
3단계: API 사용 설정
필수 Google Cloud API를 사용 설정합니다.
gcloud services enable \
    aiplatform.googleapis.com \
    cloudbuild.googleapis.com \
    compute.googleapis.com \
    artifactregistry.googleapis.com \
    storage.googleapis.com
4단계: SDK 설치
Agent Engine 및 ADK 지원으로 Vertex AI SDK를 설치합니다.
pip install --upgrade "google-cloud-aiplatform[agent_engines,adk]>=1.144"
3. 소스 파일 설정
이 단계에서는 에이전트의 구조와 코드를 만듭니다.
디렉터리 구조 개요
이 Codelab이 끝나면 파일이 다음 작업공간 계층 구조로 구성됩니다.
weather-agent-byoc/
├── Dockerfile                  # Container definition
├── deploy_byoc.py              # Python SDK deployment script
├── main.py                     # FastAPI server wrapper
├── query_agent.py              # Verify / query script
├── requirements.txt            # Python dependencies
│
├── weather_agent/              # Agent source module
│   ├── __init__.py             # Package declaration
│   ├── agent.py                # Agent & mock tools logic
│   └── config.json             # Environment config variables
│
└── terraform/                  # Terraform configuration files
    ├── main.tf
    ├── outputs.tf
    ├── providers.tf
    ├── terraform.tfvars
    └── variables.tf
1단계: 디렉터리 만들기
홈 디렉터리에서 시작하여 작업공간 구조를 만듭니다.
cd ~
mkdir -p weather-agent-byoc/weather_agent
cd weather-agent-byoc
2단계: 구성 파일 만들기
Cloud Shell에서 다음 명령어를 실행하여 구성 매개변수를 weather_agent/config.json에 직접 씁니다. 이 명령어는 변수를 환경 값으로 자동 대체합니다.
cat <<EOF > weather_agent/config.json
{
    "PROJECT_ID": "${PROJECT_ID}",
    "LOCATION": "${LOCATION}",
    "MODEL": "${MODEL}",
    "MODEL_REGION": "${MODEL_REGION}"
}
EOF
3단계: 에이전트 정의
다음 스크립트를 실행하여 에이전트 구성 및 모의 도구 로직을 weather_agent/agent.py에 씁니다.
cat << 'EOF' > weather_agent/agent.py
import json
import random
from google.adk.agents import Agent
from google.adk.models.google_llm import Gemini
from functools import cached_property
from google.genai import Client

# Load config
llm_config = json.load(open("weather_agent/config.json"))
PROJECT_ID = llm_config["PROJECT_ID"]
MODEL = llm_config["MODEL"]
MODEL_REGION = llm_config["MODEL_REGION"]

# Override Gemini class for global endpoint compatibility
class GlobalGemini(Gemini):
  @cached_property
  def api_client(self) -> Client:
    return Client(vertexai=True, location="global")

# Define Tool
def get_temperature(place: str) -> str:
    '''Returns the current temperature of a given place.

    Args:
        place: The name of the city or location.

    Returns:
        str: A string describing the temperature.
    '''
    temp = random.randint(-10, 40)
    return f"The current temperature in {place} is {temp}°C."

# Initialize LLM
llm_model = GlobalGemini(model=MODEL) if MODEL_REGION == "global" else Gemini(model=MODEL)

# Initialize Agent
root_agent = Agent(
    model=llm_model,
    name='weather_agent',
    description='An agent that provides temperature information for locations.',
    instruction='You are a helpful assistant that can provide the current temperature for any given place using the get_temperature tool.',
    tools=[get_temperature],
)
EOF
빈 __init__.py를 만들어 weather_agent를 Python 패키지로 만듭니다.
touch weather_agent/__init__.py
4단계: FastAPI 래퍼 만들기
다음 스크립트를 실행하여 FastAPI 서버 진입점 구성을 main.py에 씁니다.
cat << 'EOF' > main.py
import inspect
import json
import logging
import os
from typing import Any, Dict, Optional
import uvicorn
import vertexai
from weather_agent.agent import root_agent
from fastapi import FastAPI, encoders, responses
from pydantic import BaseModel
from vertexai import agent_engines

app = FastAPI()

config_json = json.load(open("weather_agent/config.json"))
PROJECT_ID = config_json["PROJECT_ID"]
LOCATION = config_json["LOCATION"]
MODEL_REGION = config_json["MODEL_REGION"]

class QueryRequest(BaseModel):
    input: Optional[Dict[str, Any]] = None
    class_method: Optional[str] = None

vertexai.init(project=PROJECT_ID, location=MODEL_REGION)
adk_app = agent_engines.AdkApp(agent=root_agent)

def _encode_chunk_to_json(chunk):
  try:
    json_chunk = encoders.jsonable_encoder(chunk)
    return json.dumps(json_chunk) + "\n"
  except Exception:
    logging.exception("Failed to encode chunk")
    return None

async def json_generator(output):
  async for chunk in output:
    encoded_chunk = _encode_chunk_to_json(chunk)
    if encoded_chunk is None:
      break
    yield encoded_chunk

async def _invoke_callable_or_raise(invocation_callable, invocation_payload):
  if inspect.iscoroutinefunction(invocation_callable):
    return await invocation_callable(**invocation_payload)
  else:
    return invocation_callable(**invocation_payload)

@app.post("/api/reasoning_engine")
async def query(request: QueryRequest) -> responses.JSONResponse:
    method = getattr(adk_app, request.class_method)
    output = await _invoke_callable_or_raise(method, request.input or {})
    try:
      json_serialized_content = encoders.jsonable_encoder({"output": output})
    except ValueError as encoding_error:
      logging.exception("Failed to encode response")
      raise encoding_error
    return responses.JSONResponse(content=json_serialized_content)

@app.post("/api/stream_reasoning_engine")
async def stream_query(request: QueryRequest) -> responses.StreamingResponse:
    method = getattr(adk_app, request.class_method)
    output = await _invoke_callable_or_raise(method, request.input or {})
    return responses.StreamingResponse(
        content=json_generator(output),
        media_type="application/json",
    )

if __name__ == "__main__":
    uvicorn.run(app, host="0.0.0.0", port=int(os.environ.get("PORT", 8080)))
EOF
5단계: 종속 항목 정의
필요한 Python 종속 항목을 requirements.txt에 씁니다.
cat << 'EOF' > requirements.txt
fastapi
uvicorn
vertexai
google-cloud-aiplatform[agent_engines,adk]>=1.144
pydantic
EOF
4. 컨테이너화
이제 에이전트가 컨테이너로 패키징되는 방법을 정의합니다.
1단계: Dockerfile 만들기
프로젝트 디렉터리의 루트에 Dockerfile을 만들어 FastAPI 애플리케이션이 빌드되는 방식을 지정합니다.
cat << 'EOF' > Dockerfile
FROM python:3.11-slim

WORKDIR /app

COPY weather_agent/ /app/weather_agent/
COPY main.py .
COPY requirements.txt .
RUN pip install -r requirements.txt

CMD ["sh", "-c", "uvicorn main:app --host 0.0.0.0 --port $PORT"]
EOF
5. Artifact Registry 및 Cloud Build 설정
컨테이너 이미지를 저장할 저장소와 이를 푸시할 권한이 필요합니다.
1단계: 저장소 만들기
구성 중에 정의된 환경 변수를 사용하여 Artifact Registry 내에 저장소 이름을 정의하고 Docker 저장소를 만듭니다.
export REPOSITORY_NAME="agents-repo"

gcloud artifacts repositories create $REPOSITORY_NAME \
    --project=$PROJECT_ID \
    --repository-format=docker \
    --location=$LOCATION \
    --description="Docker repository for Agents"
2단계: 서비스 계정 권한 구성
Artifact Registry에 이미지를 푸시할 수 있는 기본 Compute 서비스 계정 권한을 부여합니다.
먼저 프로젝트 번호를 가져옵니다.
export PROJECT_NUMBER=$(gcloud projects describe $PROJECT_ID --format="value(projectNumber)")
역할을 부여합니다.
# Allow pushing to Artifact Registry
gcloud projects add-iam-policy-binding $PROJECT_ID \
    --member="serviceAccount:$PROJECT_NUMBER-compute@developer.gserviceaccount.com" \
    --role="roles/artifactregistry.writer" \
    --condition=None

# Allow Cloud Build to read storage objects
gcloud projects add-iam-policy-binding $PROJECT_NUMBER \
    --member="serviceAccount:$PROJECT_NUMBER-compute@developer.gserviceaccount.com" \
    --role="roles/storage.objectViewer" \
    --condition=None
3단계: 서비스 에이전트에 권한 부여
AI Platform 및 Reasoning Engine 서비스 에이전트에 Artifact Registry 리더 액세스 권한을 부여합니다.
gcloud projects add-iam-policy-binding $PROJECT_NUMBER \
    --member="serviceAccount:service-$PROJECT_NUMBER@gcp-sa-aiplatform-re.iam.gserviceaccount.com" \
    --role="roles/artifactregistry.reader"  --condition=None

gcloud projects add-iam-policy-binding $PROJECT_NUMBER \
    --member="serviceAccount:service-$PROJECT_NUMBER@gcp-sa-aiplatform.iam.gserviceaccount.com" \
    --role="roles/artifactregistry.reader"  --condition=None
4단계: 이미지 빌드 및 푸시
Cloud Build를 사용하여 컨테이너 이미지를 빌드하고 푸시합니다.
gcloud builds submit \
    --project=$PROJECT_ID \
    --region=$LOCATION \
    --tag $LOCATION-docker.pkg.dev/$PROJECT_ID/$REPOSITORY_NAME/weather-agent-image:latest \
    .
6. SDK로 에이전트 배포
이제 권한이 구성되었으므로 커스텀 컨테이너를 배포할 수 있습니다.
1단계: BYOC 에이전트 배포
프로젝트 디렉터리의 루트 내에 Python 파일 deploy_byoc.py를 만들어 레지스트리 호스팅 컨테이너를 Agent Runtime에 배포합니다.
cat << 'EOF' > deploy_byoc.py
import json
import os
import vertexai
from google.cloud import aiplatform

config = json.load(open("weather_agent/config.json"))
PROJECT_ID = config["PROJECT_ID"]
LOCATION = config["LOCATION"]
REPOSITORY_NAME = "agents-repo"

vertexai.init(project=PROJECT_ID, location=LOCATION)
client = vertexai.Client(project=PROJECT_ID, location=LOCATION)

image_uri = f"{LOCATION}-docker.pkg.dev/{PROJECT_ID}/{REPOSITORY_NAME}/weather-agent-image:latest"

print(f"Deploying custom container agent from {image_uri}...")
remote_agent = client.agent_engines.create(
    config={
        "display_name": "byoc_weather_agent",
        "description": "BYOC weather agent from custom container",
        "container_spec": {
            "image_uri": image_uri
        },
        "class_methods": [
            # For convenience to interact with the agent through the Python SDK
            # https://docs.cloud.google.com/gemini-enterprise-agent-platform/scale/runtime/use-an-adk-agent#supported-operations
            {"api_mode": "", "name": "get_session"},
            {"api_mode": "", "name": "list_sessions"},
            {"api_mode": "", "name": "create_session"},
            {"api_mode": "", "name": "delete_session"},
            {"api_mode": "async", "name": "async_get_session"},
            {"api_mode": "async", "name": "async_list_sessions"},
            {"api_mode": "async", "name": "async_create_session"},
            {"api_mode": "async", "name": "async_delete_session"},
            {"api_mode": "async", "name": "async_add_session_to_memory"},
            {"api_mode": "async", "name": "async_search_memory"},
            {"api_mode": "stream", "name": "stream_query"},
            {"api_mode": "async_stream", "name": "async_stream_query"},
            {"api_mode": "async_stream", "name": "streaming_agent_run_with_events"},
        ],
        "agent_framework": "google-adk",
    },
)

print(f"Agent successfully deployed!")
print(f"Resource Name: {remote_agent.api_resource.name}")

# Save resource name for testing
with open("agent_resource_name.txt", "w") as f:
    f.write(remote_agent.api_resource.name)
EOF
배포 스크립트를 실행하여 Agent Runtime에 에이전트를 배포합니다.
python3 deploy_byoc.py
7. Terraform으로 에이전트 배포
또는 Terraform 을 사용하여 동일한 컨테이너화된 에이전트를 배포할 수 있습니다. 코드형 인프라를 관리하기 위해 프로덕션 환경에 권장됩니다.
1단계: Terraform 디렉터리로 이동
프로젝트 루트에 terraform 디렉터리를 만들고 이 디렉터리로 이동합니다.
mkdir -p terraform
cd terraform
2단계: 제공업체 구성 만들기
다음 스크립트를 실행하여 제공업체 매핑을 providers.tf에 씁니다.
cat << 'EOF' > providers.tf
terraform {
  required_providers {
    google = {
      source  = "hashicorp/google"
      version = ">= 5.28.0"
    }
  }
}

provider "google" {
  project = var.project_id
  region  = var.location
}
EOF
3단계: 변수 정의 만들기
입력 설명 블록을 variables.tf에 씁니다.
cat << 'EOF' > variables.tf
variable "project_id" {
  type        = string
  description = "The Google Cloud Project ID"
}

variable "location" {
  type        = string
  description = "The region to deploy the reasoning engine"
  default     = "us-central1"
}

variable "repository_name" {
  type        = string
  description = "The Artifact Registry repository name"
  default     = "agents-repo"
}

variable "image_tag" {
  type        = string
  description = "The tag of the container image to deploy"
  default     = "latest"
}
EOF
4단계: 기본 구성 만들기
기본 리소스 정의 매개변수를 main.tf에 씁니다.
cat << 'EOF' > main.tf
locals {
  class_methods = [
    {"api_mode" = "", "name" = "get_session"},
    {"api_mode" = "", "name" = "list_sessions"},
    {"api_mode" = "", "name" = "create_session"},
    {"api_mode" = "", "name" = "delete_session"},
    {"api_mode" = "async", "name" = "async_get_session"},
    {"api_mode" = "async", "name" = "async_list_sessions"},
    {"api_mode" = "async", "name" = "async_create_session"},
    {"api_mode" = "async", "name" = "async_delete_session"},
    {"api_mode" = "async", "name" = "async_add_session_to_memory"},
    {"api_mode" = "async", "name" = "async_search_memory"},
    {"api_mode" = "stream", "name" = "stream_query"},
    {"api_mode" = "async_stream", "name" = "async_stream_query"},
    {"api_mode" = "async_stream", "name" = "streaming_agent_run_with_events"}
  ]
}

# define the resource with the BYOC configuration, set agent_framework to "google-adk" to enable interactive features on the console.
resource "google_vertex_ai_reasoning_engine" "byoc_weather_agent" {
  display_name = "byoc_weather_agent_tf"
  description  = "BYOC weather agent deployed via Terraform"
  project      = var.project_id
  location     = var.location

  spec {
    class_methods = jsonencode(local.class_methods)
    agent_framework = "google-adk"
    container_spec {
      image_uri = "${var.location}-docker.pkg.dev/${var.project_id}/${var.repository_name}/weather-agent-image:${var.image_tag}"
    }
  }
}
EOF
5단계: 출력 정의 만들기
출력 블록을 outputs.tf에 씁니다.
cat << 'EOF' > outputs.tf
output "reasoning_engine_id" {
  value       = google_vertex_ai_reasoning_engine.byoc_weather_agent.id
  description = "The ID of the deployed reasoning engine"
}

output "reasoning_engine_resource_name" {
  value       = google_vertex_ai_reasoning_engine.byoc_weather_agent.id
  description = "The resource name of the deployed reasoning engine"
}
EOF
6단계: 변수 값 파일 (tfvars) 만들기
환경 변수를 terraform.tfvars에 직접 제공하여 자리표시자 편집 없이 동적으로 배포합니다.
cat <<EOF > terraform.tfvars
project_id      = "${PROJECT_ID}"
location        = "${LOCATION}"
repository_name = "agents-repo"
image_tag       = "latest"
EOF
7단계: 초기화 및 적용
Terraform을 초기화하고 구성을 적용합니다.
terraform init
terraform apply
메시지가 표시되면 yes를 입력하여 적용을 확인합니다.
완료되면 Terraform에서 리소스 이름을 출력합니다. 프로그래매틱 방식으로 agent_resource_name.txt에 캡처하고 루트 폴더로 돌아갑니다.
terraform output -raw reasoning_engine_resource_name > ../agent_resource_name.txt
cd ..
8. 에이전트 쿼리
에이전트가 실행되고 응답하는지 확인합니다.
1단계: 쿼리 스크립트 만들기
동적 설정 구성 검사를 사용하여 위치 좌표를 가져오도록 확인 스크립트를 query_agent.py에 씁니다.
cat << 'EOF' > query_agent.py
import json
import os
import requests
from google import auth as google_auth
from google.auth.transport import requests as google_requests

# Load config coordinates directly
config_json = json.load(open("weather_agent/config.json"))
LOCATION = config_json["LOCATION"]
PROJECT_ID = config_json["PROJECT_ID"]

# Load agent resource name
with open("agent_resource_name.txt", "r") as f:
    agent_resource_name = f.read().strip()

def get_identity_token():
    credentials, _ = google_auth.default()
    auth_request = google_requests.Request()
    credentials.refresh(auth_request)
    return credentials.token

# Access the agent at the fastapi endpoint that was specified in main.py
url = f"https://{LOCATION}-aiplatform.googleapis.com/v1/{agent_resource_name}/api/stream_reasoning_engine"

payload = {
    "class_method": "async_stream_query",
    "input": {
        "user_id": "codelab_test_user",
        "message": "What is the temperature in Tokyo?",
    },
}

print(f"Sending query to {url}...")
response = requests.post(
    url,
    headers={
        "Content-Type": "application/json",
        "Authorization": f"Bearer {get_identity_token()}",
    },
    data=json.dumps(payload),
    stream=True,
)

for chunk in response.iter_content(chunk_size=8192):
    if chunk:
        print(chunk.decode('utf-8'))
EOF
쿼리 스크립트를 실행합니다.
python3 query_agent.py
도쿄의 시뮬레이션된 온도를 비롯하여 에이전트에서 스트리밍되는 출력이 표시됩니다.
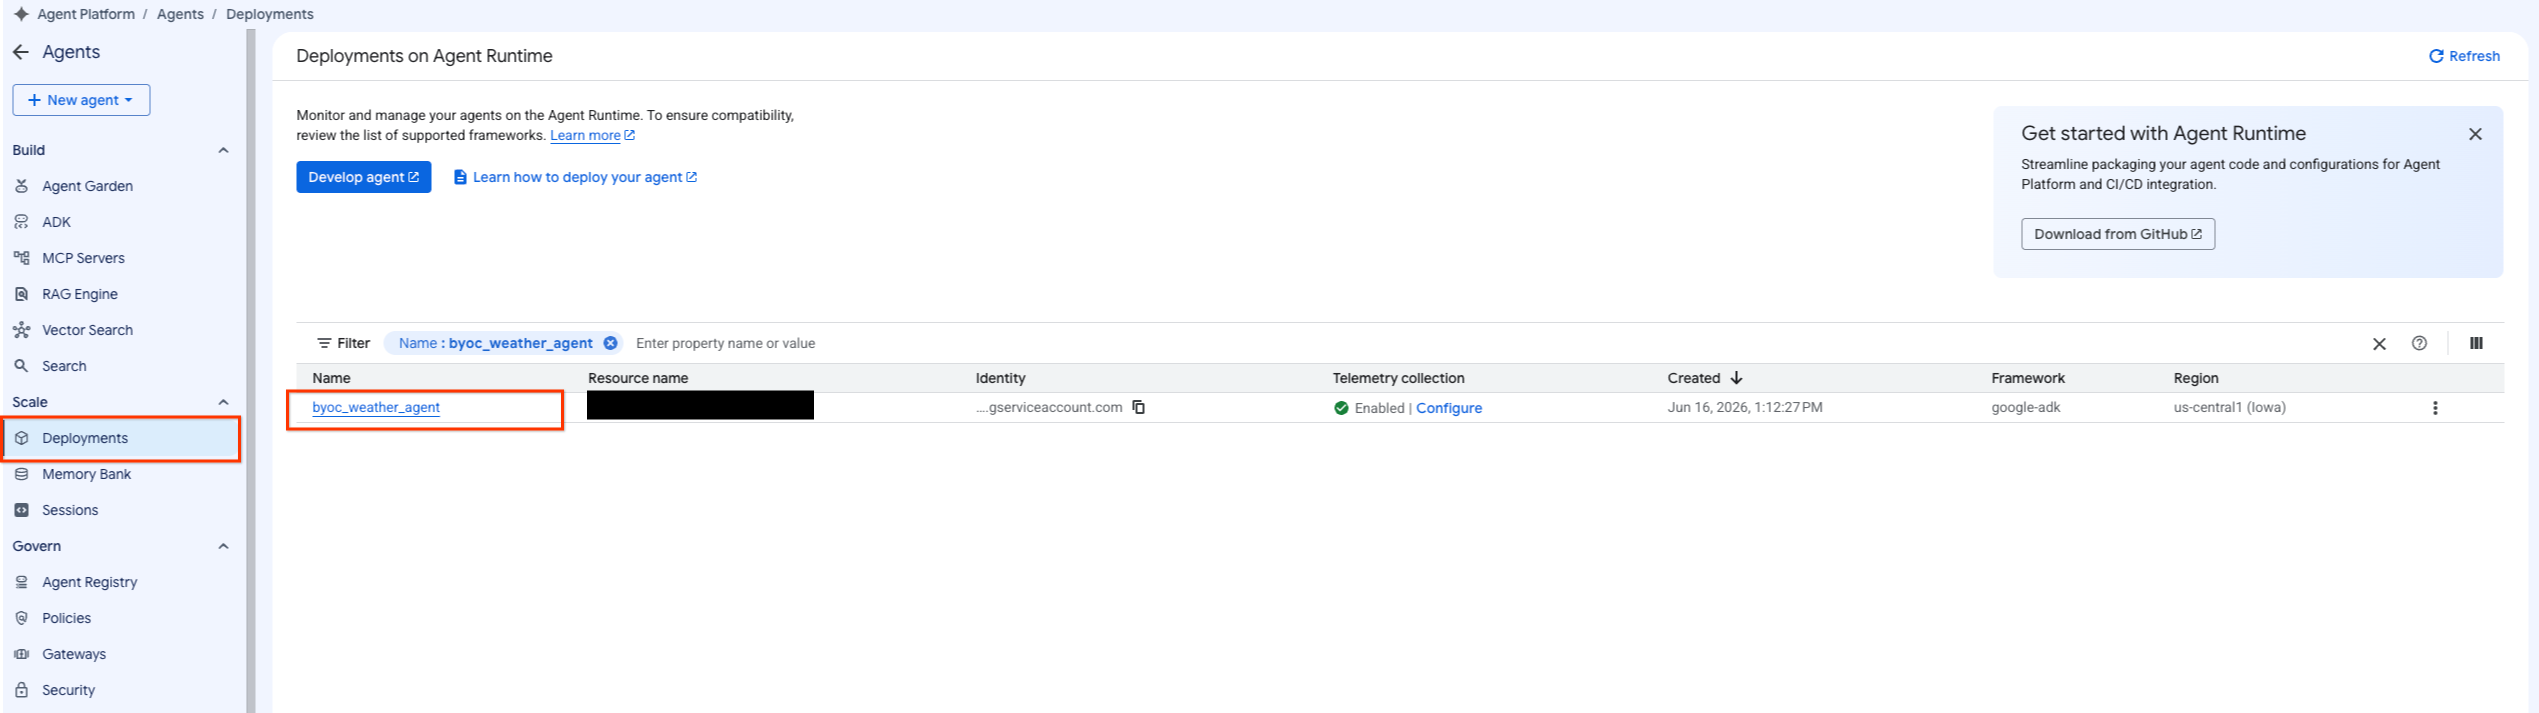
2단계: 콘솔 사용
- Agent Platform > Agents > Deployments 를 선택하여 배포된 에이전트로 이동하여 에이전트 목록을 필터링합니다.
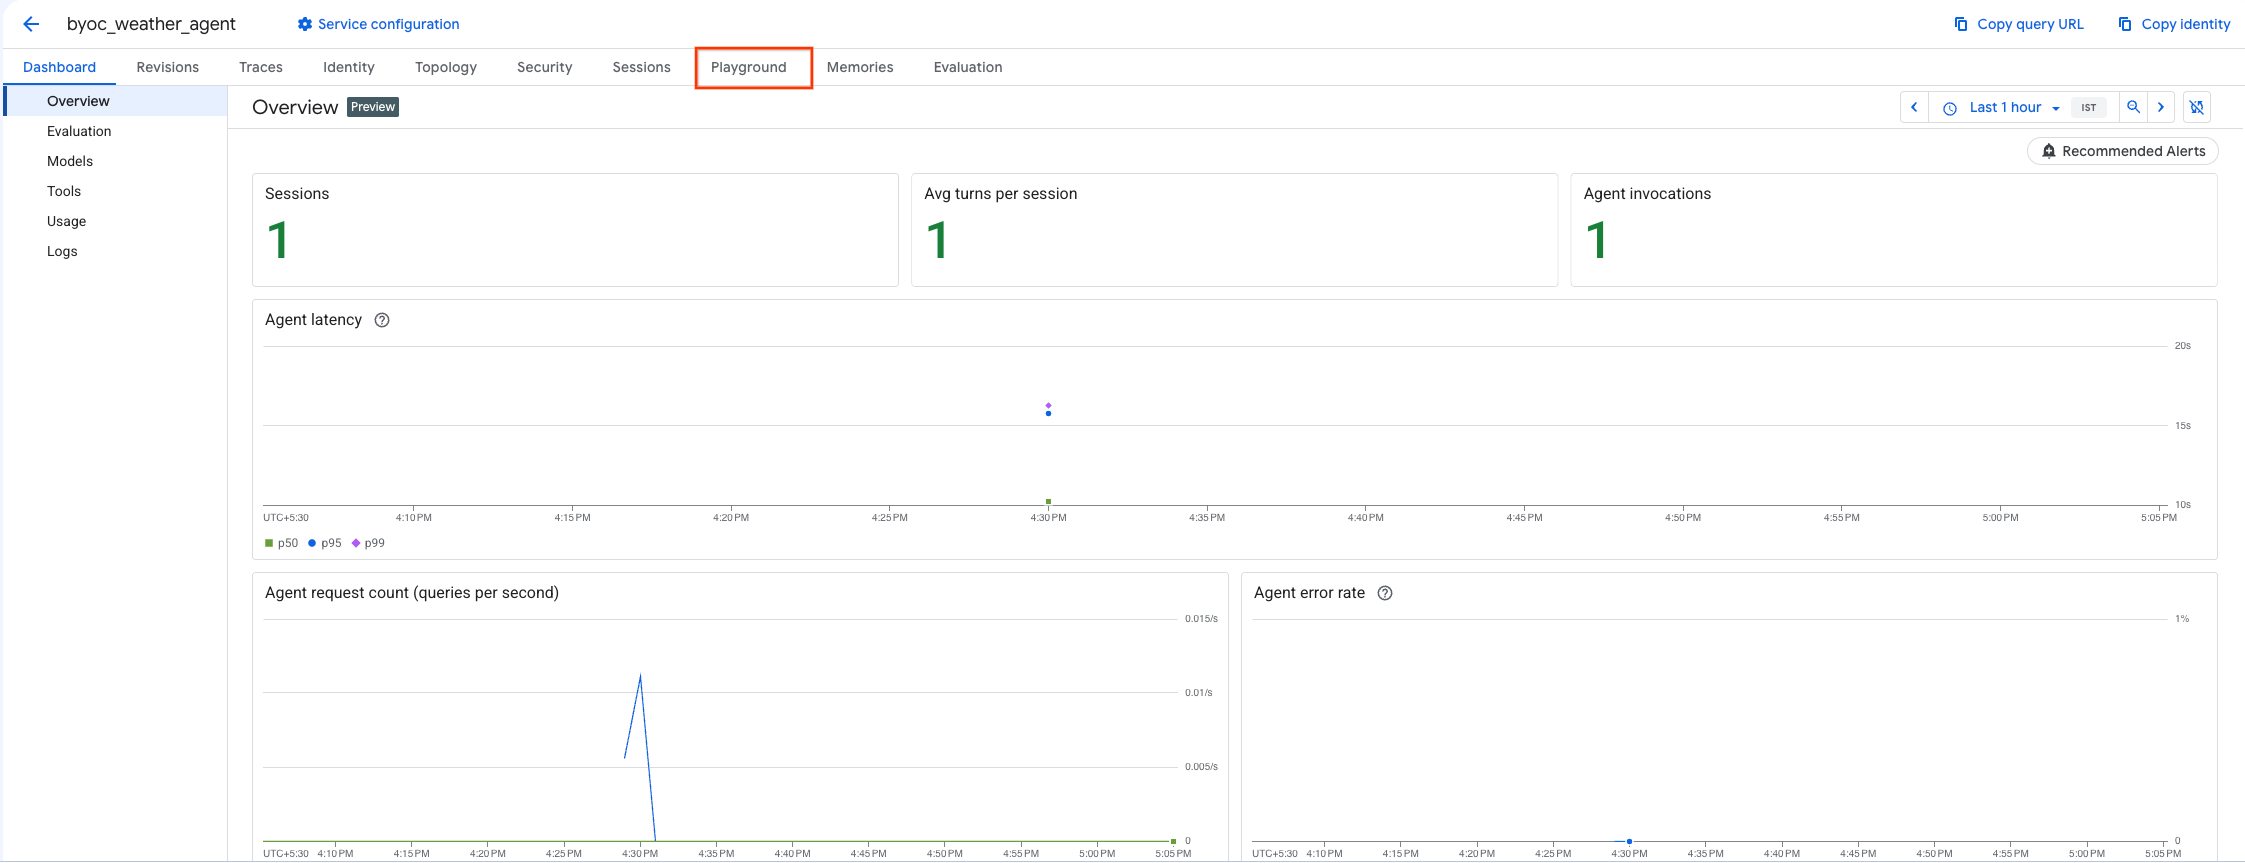
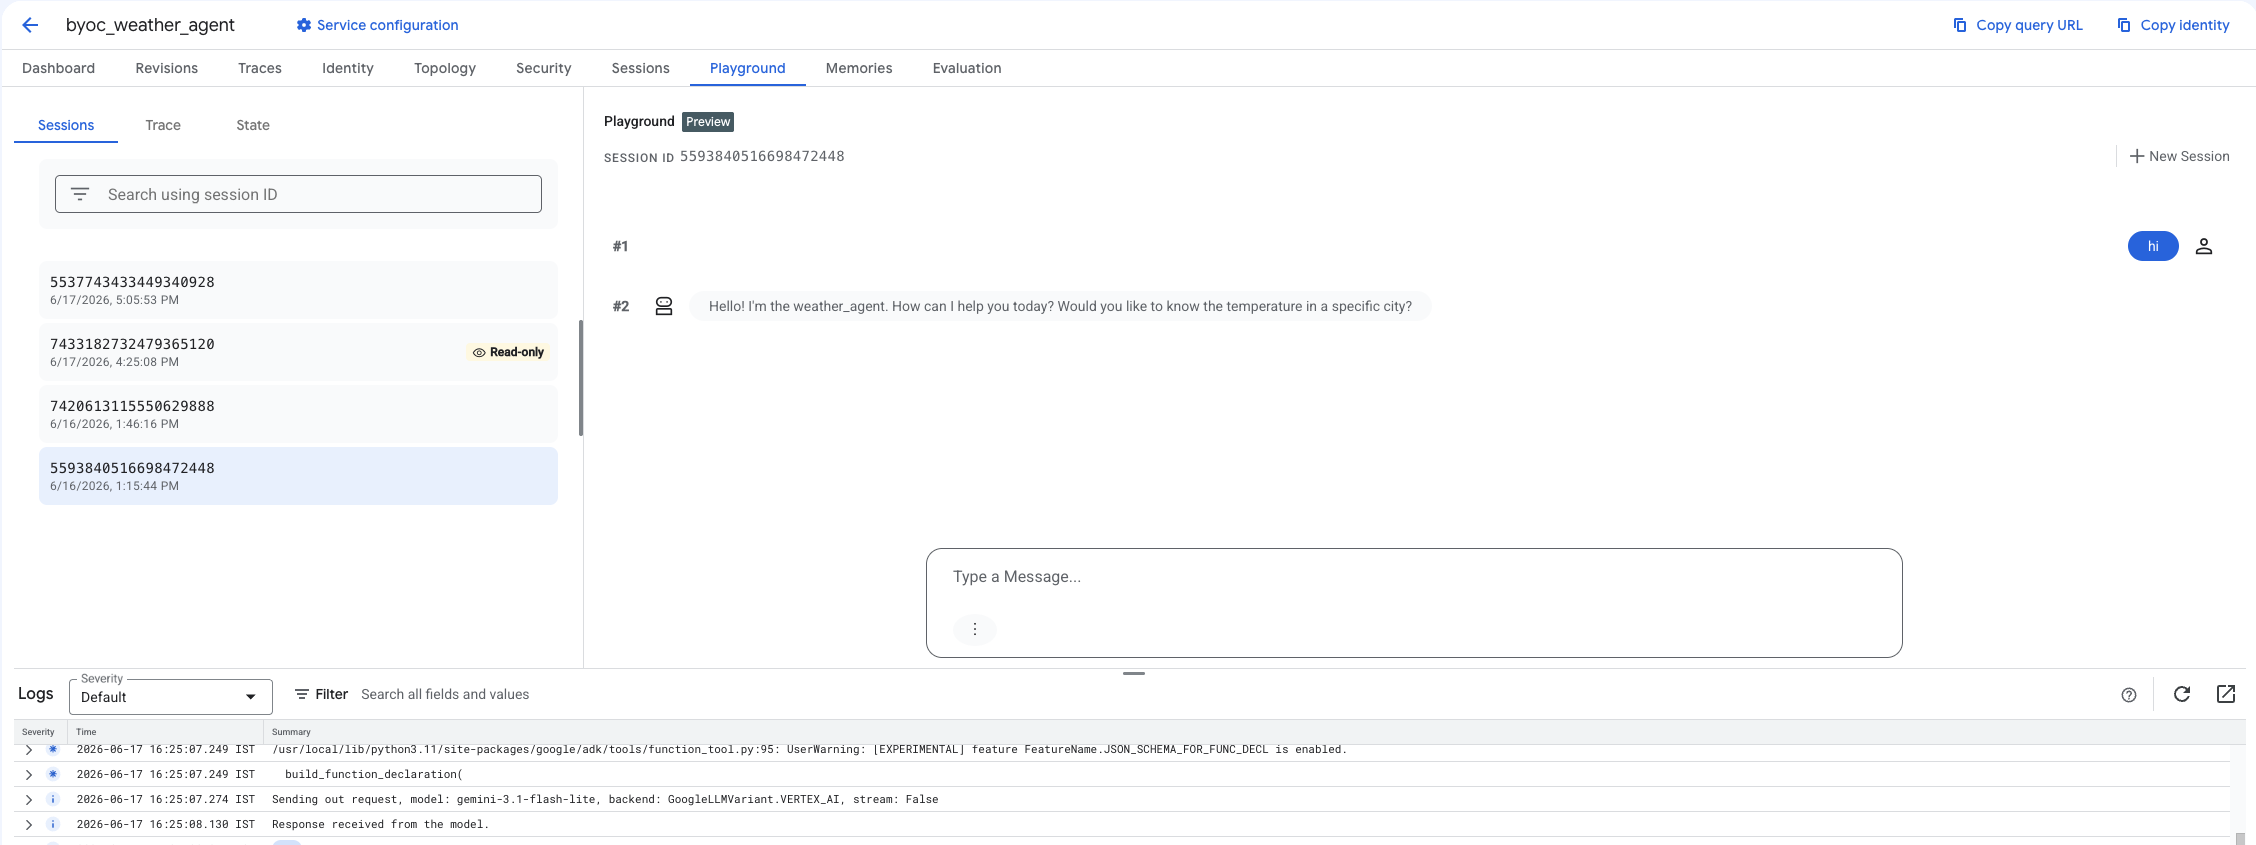
- 에이전트의 대시보드에서 Playground 를 선택합니다.
- 새 세션을 만들고 쿼리를 입력하여 에이전트가 표시된 대로 요청에 응답하는지 확인합니다.
9. 정리
요금이 발생하지 않도록 하려면 생성한 리소스를 정리합니다.
Terraform 을 사용하여 배포한 경우 terraform 디렉터리로 변경하고 삭제 작업을 실행합니다.
cd ~/weather-agent-byoc/terraform
terraform destroy
cd ..
SDK를 사용하여 배포한 경우 배포된 에이전트를 삭제하는 스크립트를 만듭니다.
cat << 'EOF' > delete_agent.py
import json
import os
import vertexai
from google.cloud import aiplatform

config = json.load(open("weather_agent/config.json"))
PROJECT_ID = config["PROJECT_ID"]
LOCATION = config["LOCATION"]

vertexai.init(project=PROJECT_ID, location=LOCATION)
client = vertexai.Client(project=PROJECT_ID, location=LOCATION)

with open("agent_resource_name.txt", "r") as f:
    agent_resource_name = f.read().strip()

# 1. Delete the Agent
# Note: We retrieve the list first to ensure we delete the ones created in this session
try:
    page_size = 100
    reasoning_engines = client.agent_engines.list()
    for engine in reasoning_engines:
        if agent_resource_name in engine.api_resource.name:
            print(f"Deleting Reasoning Engine: {engine.api_resource.name}")
            engine.delete(force=True)
except Exception as e:
    print(f"Error deleting reasoning engines: {e}")
EOF
스크립트를 실행하여 에이전트를 삭제합니다.
python3 delete_agent.py
나머지 리소스를 정리하려면 홈 디렉터리로 돌아가서 Cloud Shell에서 다음 명령어를 실행합니다.
cd ~

# 1. Delete the Artifact Registry Repository
gcloud artifacts repositories delete $REPOSITORY_NAME --location=$LOCATION --quiet

# 2. Clean up files (Optional)
rm -rf ~/weather-agent-byoc
10. 결론
축하합니다. BYOC를 사용하여 Agent Runtime에서 AI 에이전트를 컨테이너화하고 배포했습니다.
지금까지 배운 내용은 다음과 같습니다.
- ADK를 사용하여 에이전트를 정의하고 FastAPI를 사용하여 래핑합니다.
- Dockerfile을 만들고 Cloud Build를 사용하여 이미지를 빌드합니다.
- Agent Runtime의 IAM 권한을 관리합니다.
- Python SDK 와 Terraform 을 모두 사용하여 커스텀 컨테이너를 배포합니다.
- 배포된 에이전트를 테스트하고 쿼리합니다.