
1. Обзор
Agent Runtime (ранее Agent Engine) предлагает управляемую среду выполнения, предназначенную для эффективного развертывания, запуска и масштабирования агентов искусственного интеллекта. По умолчанию платформа автоматически включает исходный код и зависимости в процессе развертывания.
Однако корпоративные рабочие нагрузки часто требуют полного контроля над средой выполнения. Для поддержки этого Agent Runtime предоставляет возможность использования собственных контейнеров (BYOC) , позволяя развертывать предварительно созданные образы контейнеров.
В этом практическом руководстве описан полный процесс контейнеризации агента, созданного с помощью Google Agent Development Kit (ADK), настройки необходимых разрешений Google Cloud и развертывания его в Agent Runtime с использованием либо Python SDK, либо Terraform.
Этот практический урок поможет вам разобраться в следующем:
- Создание агента на Python с использованием комплекта разработки агентов Google (ADK) .
- Обертывание агента в приложение FastAPI .
- Контейнеризация приложения с помощью Docker .
- Настройка разрешений Google Cloud.
- Развертывание и тестирование контейнеризированного агента в среде выполнения агентов .
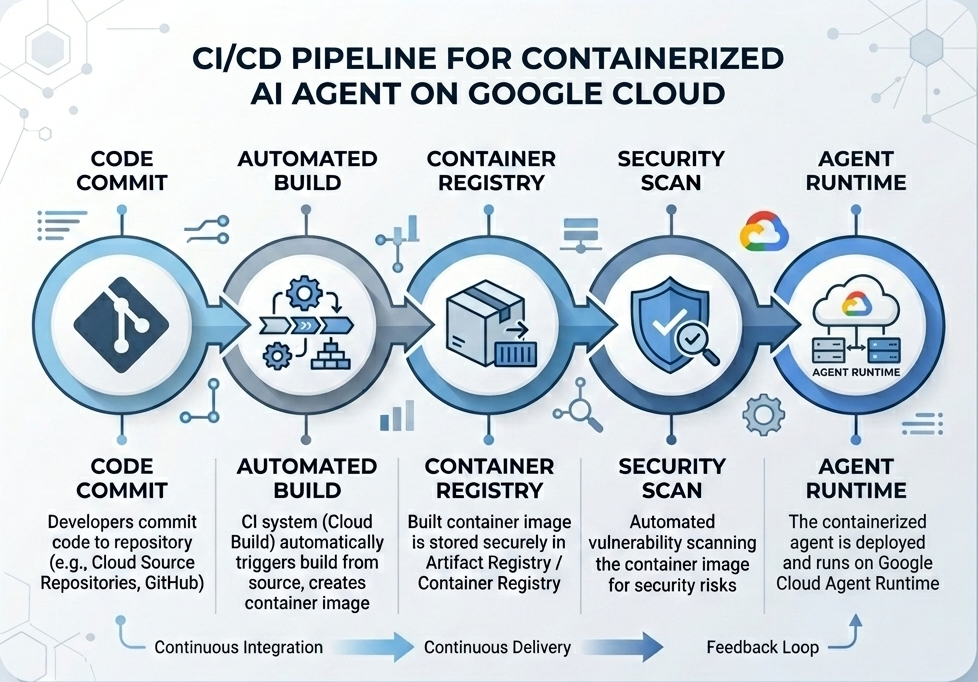
Процесс сборки и развертывания
Следующая диаграмма иллюстрирует последовательность действий при сборке и развертывании, которые вы будете выполнять вручную в этом практическом задании:
Что вам нужно
- Проект в Google Cloud с включенной функцией выставления счетов.
- Требуется доступ к Cloud Shell (рекомендуется) или локальной среде разработки с установленными
gcloudиdocker. - Базовые знания Python и Docker.
2. Настройка среды
Перед началом работы необходимо включить необходимые API и настроить среду.
Шаг 1: Откройте Cloud Shell
Нажмите кнопку «Активировать Cloud Shell» в правом верхнем углу консоли Google Cloud.

Шаг 2: Настройка переменных среды
В Cloud Shell укажите идентификатор вашего проекта и определите ключевые переменные среды, используемые в этом практическом занятии. Замените "YOUR_PROJECT_ID" на фактический идентификатор вашего проекта Google Cloud:
gcloud config set project "YOUR_PROJECT_ID"
export PROJECT_ID=$(gcloud config get-value project)
export LOCATION="us-central1"
export MODEL="gemini-3.1-flash-lite"
export MODEL_REGION="global"
Эти переменные задают параметры развертывания целевого объекта:
-
PROJECT_ID: Уникальный идентификатор вашего проекта Google Cloud, где будут размещены все ресурсы платформы Gemini Enterprise Agent Platform и реестр артефактов. -
LOCATION: Географический регион (напримерus-central1), в котором размещены ваши репозитории и среды выполнения. -
MODEL: Версия модели Gemini (например,gemini-3.1-flash-lite), загружаемая контекстом агента. -
MODEL_REGION: Регион конечных точек модели. Установите здесь значение"global", чтобы вызывать модель Gemini из глобальных конечных точек.
Шаг 3: Включение API
Включите необходимые API Google Cloud:
gcloud services enable \
    aiplatform.googleapis.com \
    cloudbuild.googleapis.com \
    compute.googleapis.com \
    artifactregistry.googleapis.com \
    storage.googleapis.com
Шаг 4: Установите SDK
Установите Vertex AI SDK с поддержкой Agent Engine и ADK:
pip install --upgrade "google-cloud-aiplatform[agent_engines,adk]>=1.144"
3. Настройка исходных файлов
На этом этапе вы создадите структуру и код для своего агента.
Обзор структуры каталогов
По завершении этого практического занятия ваши файлы будут организованы в соответствии со следующей иерархией рабочего пространства:
weather-agent-byoc/
├── Dockerfile                  # Container definition
├── deploy_byoc.py              # Python SDK deployment script
├── main.py                     # FastAPI server wrapper
├── query_agent.py              # Verify / query script
├── requirements.txt            # Python dependencies
│
├── weather_agent/              # Agent source module
│   ├── __init__.py             # Package declaration
│   ├── agent.py                # Agent & mock tools logic
│   └── config.json             # Environment config variables
│
└── terraform/                  # Terraform configuration files
    ├── main.tf
    ├── outputs.tf
    ├── providers.tf
    ├── terraform.tfvars
    └── variables.tf
Шаг 1: Создание каталогов
Начните с домашней директории и создайте структуру рабочего пространства:
cd ~
mkdir -p weather-agent-byoc/weather_agent
cd weather-agent-byoc
Шаг 2: Создание файла конфигурации
Выполните следующую команду в Cloud Shell, чтобы записать параметры конфигурации непосредственно в файл weather_agent/config.json . Эта команда автоматически заменит переменные значениями из вашей среды:
cat <<EOF > weather_agent/config.json
{
    "PROJECT_ID": "${PROJECT_ID}",
    "LOCATION": "${LOCATION}",
    "MODEL": "${MODEL}",
    "MODEL_REGION": "${MODEL_REGION}"
}
EOF
Шаг 3: Определение агента
Запустите следующий скрипт, чтобы записать конфигурацию агента и логику имитации инструмента в файл weather_agent/agent.py :
cat << 'EOF' > weather_agent/agent.py
import json
import random
from google.adk.agents import Agent
from google.adk.models.google_llm import Gemini
from functools import cached_property
from google.genai import Client

# Load config
llm_config = json.load(open("weather_agent/config.json"))
PROJECT_ID = llm_config["PROJECT_ID"]
MODEL = llm_config["MODEL"]
MODEL_REGION = llm_config["MODEL_REGION"]

# Override Gemini class for global endpoint compatibility
class GlobalGemini(Gemini):
  @cached_property
  def api_client(self) -> Client:
    return Client(vertexai=True, location="global")

# Define Tool
def get_temperature(place: str) -> str:
    '''Returns the current temperature of a given place.

    Args:
        place: The name of the city or location.

    Returns:
        str: A string describing the temperature.
    '''
    temp = random.randint(-10, 40)
    return f"The current temperature in {place} is {temp}°C."

# Initialize LLM
llm_model = GlobalGemini(model=MODEL) if MODEL_REGION == "global" else Gemini(model=MODEL)

# Initialize Agent
root_agent = Agent(
    model=llm_model,
    name='weather_agent',
    description='An agent that provides temperature information for locations.',
    instruction='You are a helpful assistant that can provide the current temperature for any given place using the get_temperature tool.',
    tools=[get_temperature],
)
EOF
Создайте пустой файл __init__.py , чтобы сделать weather_agent пакетом Python:
touch weather_agent/__init__.py
Шаг 4: Создание обертки FastAPI
Запустите следующий скрипт, чтобы записать конфигурацию точки входа сервера FastAPI в main.py :
cat << 'EOF' > main.py
import inspect
import json
import logging
import os
from typing import Any, Dict, Optional
import uvicorn
import vertexai
from weather_agent.agent import root_agent
from fastapi import FastAPI, encoders, responses
from pydantic import BaseModel
from vertexai import agent_engines

app = FastAPI()

config_json = json.load(open("weather_agent/config.json"))
PROJECT_ID = config_json["PROJECT_ID"]
LOCATION = config_json["LOCATION"]
MODEL_REGION = config_json["MODEL_REGION"]

class QueryRequest(BaseModel):
    input: Optional[Dict[str, Any]] = None
    class_method: Optional[str] = None

vertexai.init(project=PROJECT_ID, location=MODEL_REGION)
adk_app = agent_engines.AdkApp(agent=root_agent)

def _encode_chunk_to_json(chunk):
  try:
    json_chunk = encoders.jsonable_encoder(chunk)
    return json.dumps(json_chunk) + "\n"
  except Exception:
    logging.exception("Failed to encode chunk")
    return None

async def json_generator(output):
  async for chunk in output:
    encoded_chunk = _encode_chunk_to_json(chunk)
    if encoded_chunk is None:
      break
    yield encoded_chunk

async def _invoke_callable_or_raise(invocation_callable, invocation_payload):
  if inspect.iscoroutinefunction(invocation_callable):
    return await invocation_callable(**invocation_payload)
  else:
    return invocation_callable(**invocation_payload)

@app.post("/api/reasoning_engine")
async def query(request: QueryRequest) -> responses.JSONResponse:
    method = getattr(adk_app, request.class_method)
    output = await _invoke_callable_or_raise(method, request.input or {})
    try:
      json_serialized_content = encoders.jsonable_encoder({"output": output})
    except ValueError as encoding_error:
      logging.exception("Failed to encode response")
      raise encoding_error
    return responses.JSONResponse(content=json_serialized_content)

@app.post("/api/stream_reasoning_engine")
async def stream_query(request: QueryRequest) -> responses.StreamingResponse:
    method = getattr(adk_app, request.class_method)
    output = await _invoke_callable_or_raise(method, request.input or {})
    return responses.StreamingResponse(
        content=json_generator(output),
        media_type="application/json",
    )

if __name__ == "__main__":
    uvicorn.run(app, host="0.0.0.0", port=int(os.environ.get("PORT", 8080)))
EOF
Шаг 5: Определение зависимостей
Запишите необходимые зависимости Python в файл requirements.txt :
cat << 'EOF' > requirements.txt
fastapi
uvicorn
vertexai
google-cloud-aiplatform[agent_engines,adk]>=1.144
pydantic
EOF
4. Контейнеризация
Теперь определите, как ваш агент будет упакован в контейнер.
Шаг 1: Создайте Dockerfile
Создайте Dockerfile в корневом каталоге вашего проекта, чтобы указать, как будет собираться ваше приложение FastAPI:
cat << 'EOF' > Dockerfile
FROM python:3.11-slim

WORKDIR /app

COPY weather_agent/ /app/weather_agent/
COPY main.py .
COPY requirements.txt .
RUN pip install -r requirements.txt

CMD ["sh", "-c", "uvicorn main:app --host 0.0.0.0 --port $PORT"]
EOF
5. Настройка реестра артефактов и облачной сборки.
Для хранения образа контейнера вам потребуется репозиторий и права доступа для его загрузки.
Шаг 1: Создание репозитория
Укажите имя репозитория и создайте репозиторий Docker внутри Artifact Registry, используя переменные среды, определенные во время настройки:
export REPOSITORY_NAME="agents-repo"

gcloud artifacts repositories create $REPOSITORY_NAME \
    --project=$PROJECT_ID \
    --repository-format=docker \
    --location=$LOCATION \
    --description="Docker repository for Agents"
Шаг 2: Настройка разрешений для учетной записи службы
Предоставьте учетной записи службы вычислений по умолчанию разрешение на отправку образов в реестр артефактов.
Для начала узнайте номер своего проекта:
export PROJECT_NUMBER=$(gcloud projects describe $PROJECT_ID --format="value(projectNumber)")
Предоставьте роли:
# Allow pushing to Artifact Registry
gcloud projects add-iam-policy-binding $PROJECT_ID \
    --member="serviceAccount:$PROJECT_NUMBER-compute@developer.gserviceaccount.com" \
    --role="roles/artifactregistry.writer" \
    --condition=None

# Allow Cloud Build to read storage objects
gcloud projects add-iam-policy-binding $PROJECT_NUMBER \
    --member="serviceAccount:$PROJECT_NUMBER-compute@developer.gserviceaccount.com" \
    --role="roles/storage.objectViewer" \
    --condition=None
Шаг 3: Предоставление разрешений агентам службы поддержки
Предоставьте читателям Реестра артефактов доступ к сервисным агентам платформы искусственного интеллекта и механизма рассуждений:
gcloud projects add-iam-policy-binding $PROJECT_NUMBER \
    --member="serviceAccount:service-$PROJECT_NUMBER@gcp-sa-aiplatform-re.iam.gserviceaccount.com" \
    --role="roles/artifactregistry.reader"  --condition=None

gcloud projects add-iam-policy-binding $PROJECT_NUMBER \
    --member="serviceAccount:service-$PROJECT_NUMBER@gcp-sa-aiplatform.iam.gserviceaccount.com" \
    --role="roles/artifactregistry.reader"  --condition=None
Шаг 4: Сборка и загрузка образа
Используйте Cloud Build для сборки и отправки образа контейнера:
gcloud builds submit \
    --project=$PROJECT_ID \
    --region=$LOCATION \
    --tag $LOCATION-docker.pkg.dev/$PROJECT_ID/$REPOSITORY_NAME/weather-agent-image:latest \
    .
6. Разверните агент с помощью SDK.
Теперь, когда права доступа настроены, вы можете развернуть свой пользовательский контейнер.
Шаг 1: Развертывание агента BYOC
Создайте файл Python deploy_byoc.py в корневом каталоге вашего проекта, чтобы развернуть контейнер, размещенный в реестре, в Agent Runtime:
cat << 'EOF' > deploy_byoc.py
import json
import os
import vertexai
from google.cloud import aiplatform

config = json.load(open("weather_agent/config.json"))
PROJECT_ID = config["PROJECT_ID"]
LOCATION = config["LOCATION"]
REPOSITORY_NAME = "agents-repo"

vertexai.init(project=PROJECT_ID, location=LOCATION)
client = vertexai.Client(project=PROJECT_ID, location=LOCATION)

image_uri = f"{LOCATION}-docker.pkg.dev/{PROJECT_ID}/{REPOSITORY_NAME}/weather-agent-image:latest"

print(f"Deploying custom container agent from {image_uri}...")
remote_agent = client.agent_engines.create(
    config={
        "display_name": "byoc_weather_agent",
        "description": "BYOC weather agent from custom container",
        "container_spec": {
            "image_uri": image_uri
        },
        "class_methods": [
            # For convenience to interact with the agent through the Python SDK
            # https://docs.cloud.google.com/gemini-enterprise-agent-platform/scale/runtime/use-an-adk-agent#supported-operations
            {"api_mode": "", "name": "get_session"},
            {"api_mode": "", "name": "list_sessions"},
            {"api_mode": "", "name": "create_session"},
            {"api_mode": "", "name": "delete_session"},
            {"api_mode": "async", "name": "async_get_session"},
            {"api_mode": "async", "name": "async_list_sessions"},
            {"api_mode": "async", "name": "async_create_session"},
            {"api_mode": "async", "name": "async_delete_session"},
            {"api_mode": "async", "name": "async_add_session_to_memory"},
            {"api_mode": "async", "name": "async_search_memory"},
            {"api_mode": "stream", "name": "stream_query"},
            {"api_mode": "async_stream", "name": "async_stream_query"},
            {"api_mode": "async_stream", "name": "streaming_agent_run_with_events"},
        ],
        "agent_framework": "google-adk",
    },
)

print(f"Agent successfully deployed!")
print(f"Resource Name: {remote_agent.api_resource.name}")

# Save resource name for testing
with open("agent_resource_name.txt", "w") as f:
    f.write(remote_agent.api_resource.name)
EOF
Запустите скрипт развертывания, чтобы развернуть агента в среде выполнения агентов:
python3 deploy_byoc.py
7. Разверните агент с помощью Terraform.
В качестве альтернативы вы можете развернуть тот же контейнеризированный агент с помощью Terraform . Это рекомендуется для производственных сред, чтобы управлять инфраструктурой как кодом.
Шаг 1: Перейдите в каталог Terraform.
Создайте директорию terraform в корневом каталоге вашего проекта и перейдите в неё:
mkdir -p terraform
cd terraform
Шаг 2: Создание конфигурации поставщиков
Запустите следующий скрипт, чтобы записать сопоставление поставщиков в файл providers.tf :
cat << 'EOF' > providers.tf
terraform {
  required_providers {
    google = {
      source  = "hashicorp/google"
      version = ">= 5.28.0"
    }
  }
}

provider "google" {
  project = var.project_id
  region  = var.location
}
EOF
Шаг 3: Создание определения переменных
Запишите блок описания входных данных в файл variables.tf :
cat << 'EOF' > variables.tf
variable "project_id" {
  type        = string
  description = "The Google Cloud Project ID"
}

variable "location" {
  type        = string
  description = "The region to deploy the reasoning engine"
  default     = "us-central1"
}

variable "repository_name" {
  type        = string
  description = "The Artifact Registry repository name"
  default     = "agents-repo"
}

variable "image_tag" {
  type        = string
  description = "The tag of the container image to deploy"
  default     = "latest"
}
EOF
Шаг 4: Создание основной конфигурации
Запишите основные параметры определения ресурсов в main.tf :
cat << 'EOF' > main.tf
locals {
  class_methods = [
    {"api_mode" = "", "name" = "get_session"},
    {"api_mode" = "", "name" = "list_sessions"},
    {"api_mode" = "", "name" = "create_session"},
    {"api_mode" = "", "name" = "delete_session"},
    {"api_mode" = "async", "name" = "async_get_session"},
    {"api_mode" = "async", "name" = "async_list_sessions"},
    {"api_mode" = "async", "name" = "async_create_session"},
    {"api_mode" = "async", "name" = "async_delete_session"},
    {"api_mode" = "async", "name" = "async_add_session_to_memory"},
    {"api_mode" = "async", "name" = "async_search_memory"},
    {"api_mode" = "stream", "name" = "stream_query"},
    {"api_mode" = "async_stream", "name" = "async_stream_query"},
    {"api_mode" = "async_stream", "name" = "streaming_agent_run_with_events"}
  ]
}

# define the resource with the BYOC configuration, set agent_framework to "google-adk" to enable interactive features on the console.
resource "google_vertex_ai_reasoning_engine" "byoc_weather_agent" {
  display_name = "byoc_weather_agent_tf"
  description  = "BYOC weather agent deployed via Terraform"
  project      = var.project_id
  location     = var.location

  spec {
    class_methods = jsonencode(local.class_methods)
    agent_framework = "google-adk"
    container_spec {
      image_uri = "${var.location}-docker.pkg.dev/${var.project_id}/${var.repository_name}/weather-agent-image:${var.image_tag}"
    }
  }
}
EOF
Шаг 5: Создание определения выходных данных
Запишите блок outputs в outputs.tf :
cat << 'EOF' > outputs.tf
output "reasoning_engine_id" {
  value       = google_vertex_ai_reasoning_engine.byoc_weather_agent.id
  description = "The ID of the deployed reasoning engine"
}

output "reasoning_engine_resource_name" {
  value       = google_vertex_ai_reasoning_engine.byoc_weather_agent.id
  description = "The resource name of the deployed reasoning engine"
}
EOF
Шаг 6: Создание файла значений переменных (tfvars)
Динамическое развертывание без редактирования заполнителей путем прямой передачи переменных окружения в файл terraform.tfvars :
cat <<EOF > terraform.tfvars
project_id      = "${PROJECT_ID}"
location        = "${LOCATION}"
repository_name = "agents-repo"
image_tag       = "latest"
EOF
Шаг 7: Инициализация и применение
Инициализируйте Terraform и примените конфигурацию:
terraform init
terraform apply
Подтвердите применение, набрав yes в соответствующем запросе.
После завершения Terraform выводит имя ресурса. Программно сохраните его в файл agent_resource_name.txt и верните в корневую папку:
terraform output -raw reasoning_engine_resource_name > ../agent_resource_name.txt
cd ..
8. Отправьте запрос агенту.
Убедитесь, что ваш агент запущен и отвечает.
Шаг 1: Создайте скрипт запроса
Добавьте в файл query_agent.py скрипт проверки, использующий динамическую настройку конфигурации для получения координат местоположения:
cat << 'EOF' > query_agent.py
import json
import os
import requests
from google import auth as google_auth
from google.auth.transport import requests as google_requests

# Load config coordinates directly
config_json = json.load(open("weather_agent/config.json"))
LOCATION = config_json["LOCATION"]
PROJECT_ID = config_json["PROJECT_ID"]

# Load agent resource name
with open("agent_resource_name.txt", "r") as f:
    agent_resource_name = f.read().strip()

def get_identity_token():
    credentials, _ = google_auth.default()
    auth_request = google_requests.Request()
    credentials.refresh(auth_request)
    return credentials.token

# Access the agent at the fastapi endpoint that was specified in main.py
url = f"https://{LOCATION}-aiplatform.googleapis.com/v1/{agent_resource_name}/api/stream_reasoning_engine"

payload = {
    "class_method": "async_stream_query",
    "input": {
        "user_id": "codelab_test_user",
        "message": "What is the temperature in Tokyo?",
    },
}

print(f"Sending query to {url}...")
response = requests.post(
    url,
    headers={
        "Content-Type": "application/json",
        "Authorization": f"Bearer {get_identity_token()}",
    },
    data=json.dumps(payload),
    stream=True,
)

for chunk in response.iter_content(chunk_size=8192):
    if chunk:
        print(chunk.decode('utf-8'))
EOF
Запустите скрипт запроса:
python3 query_agent.py
Вы должны увидеть поток выходных данных от агента, включая смоделированную температуру для Токио.
Шаг 2: Воспользуйтесь консолью
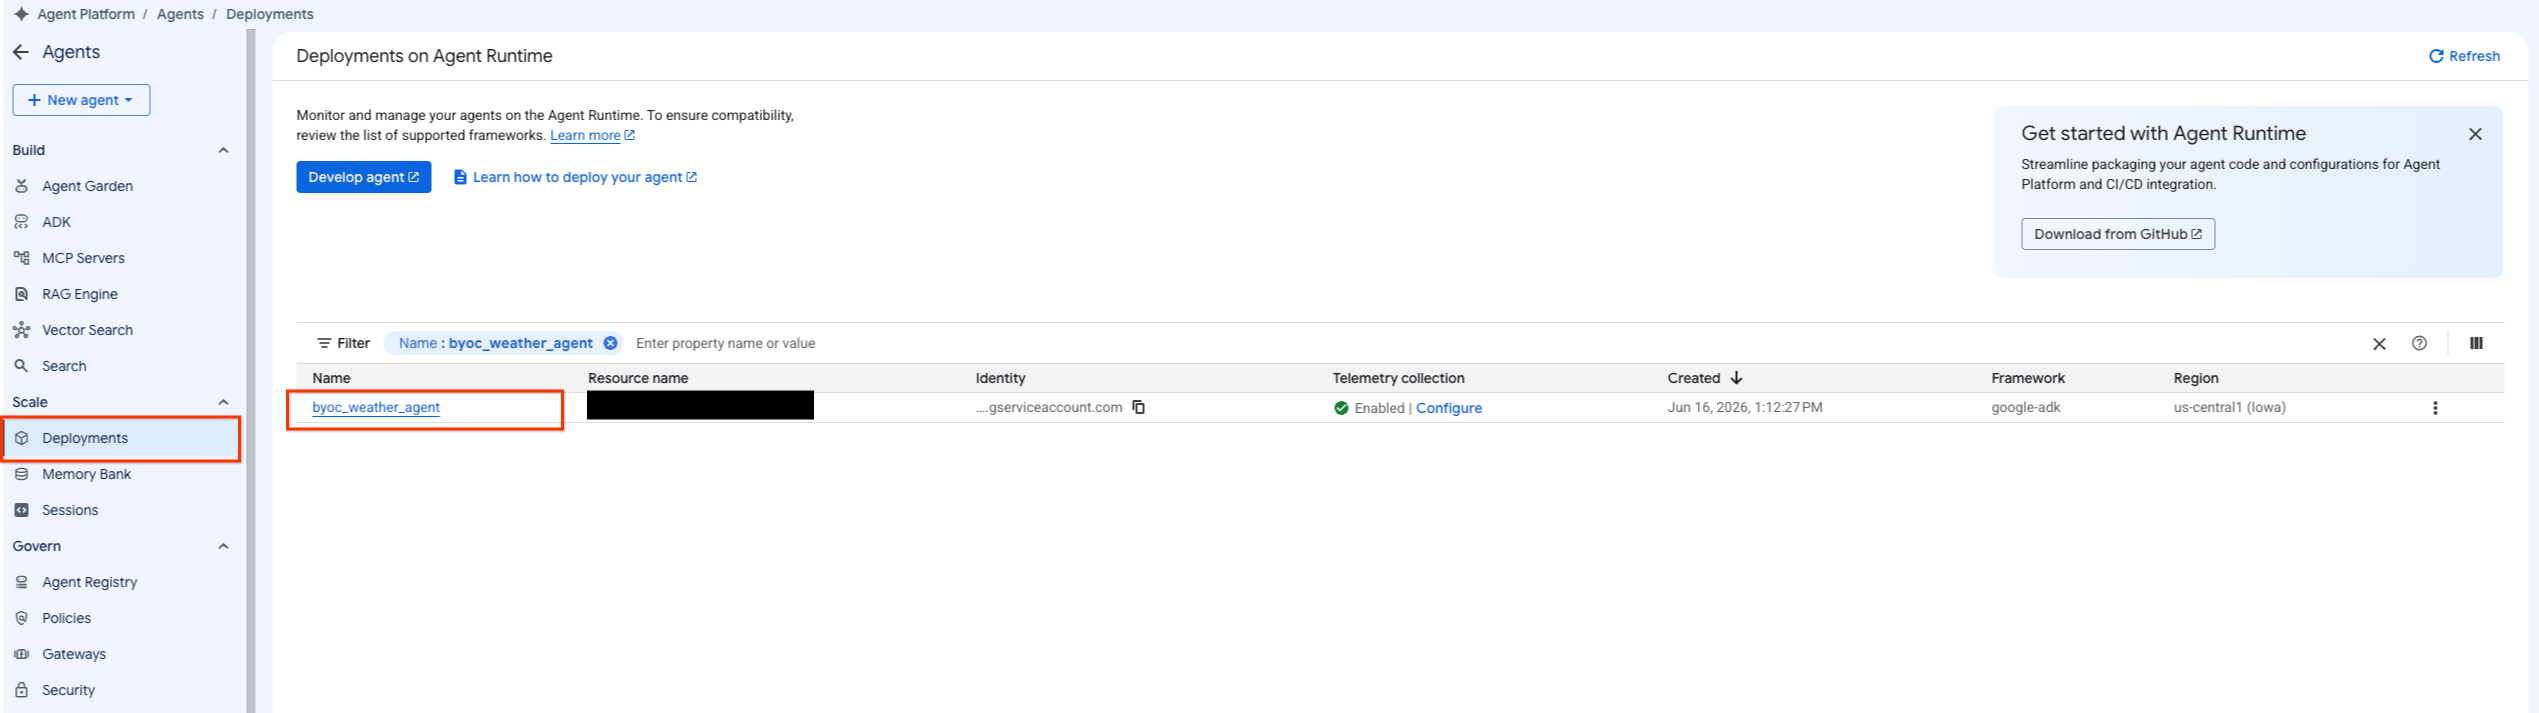
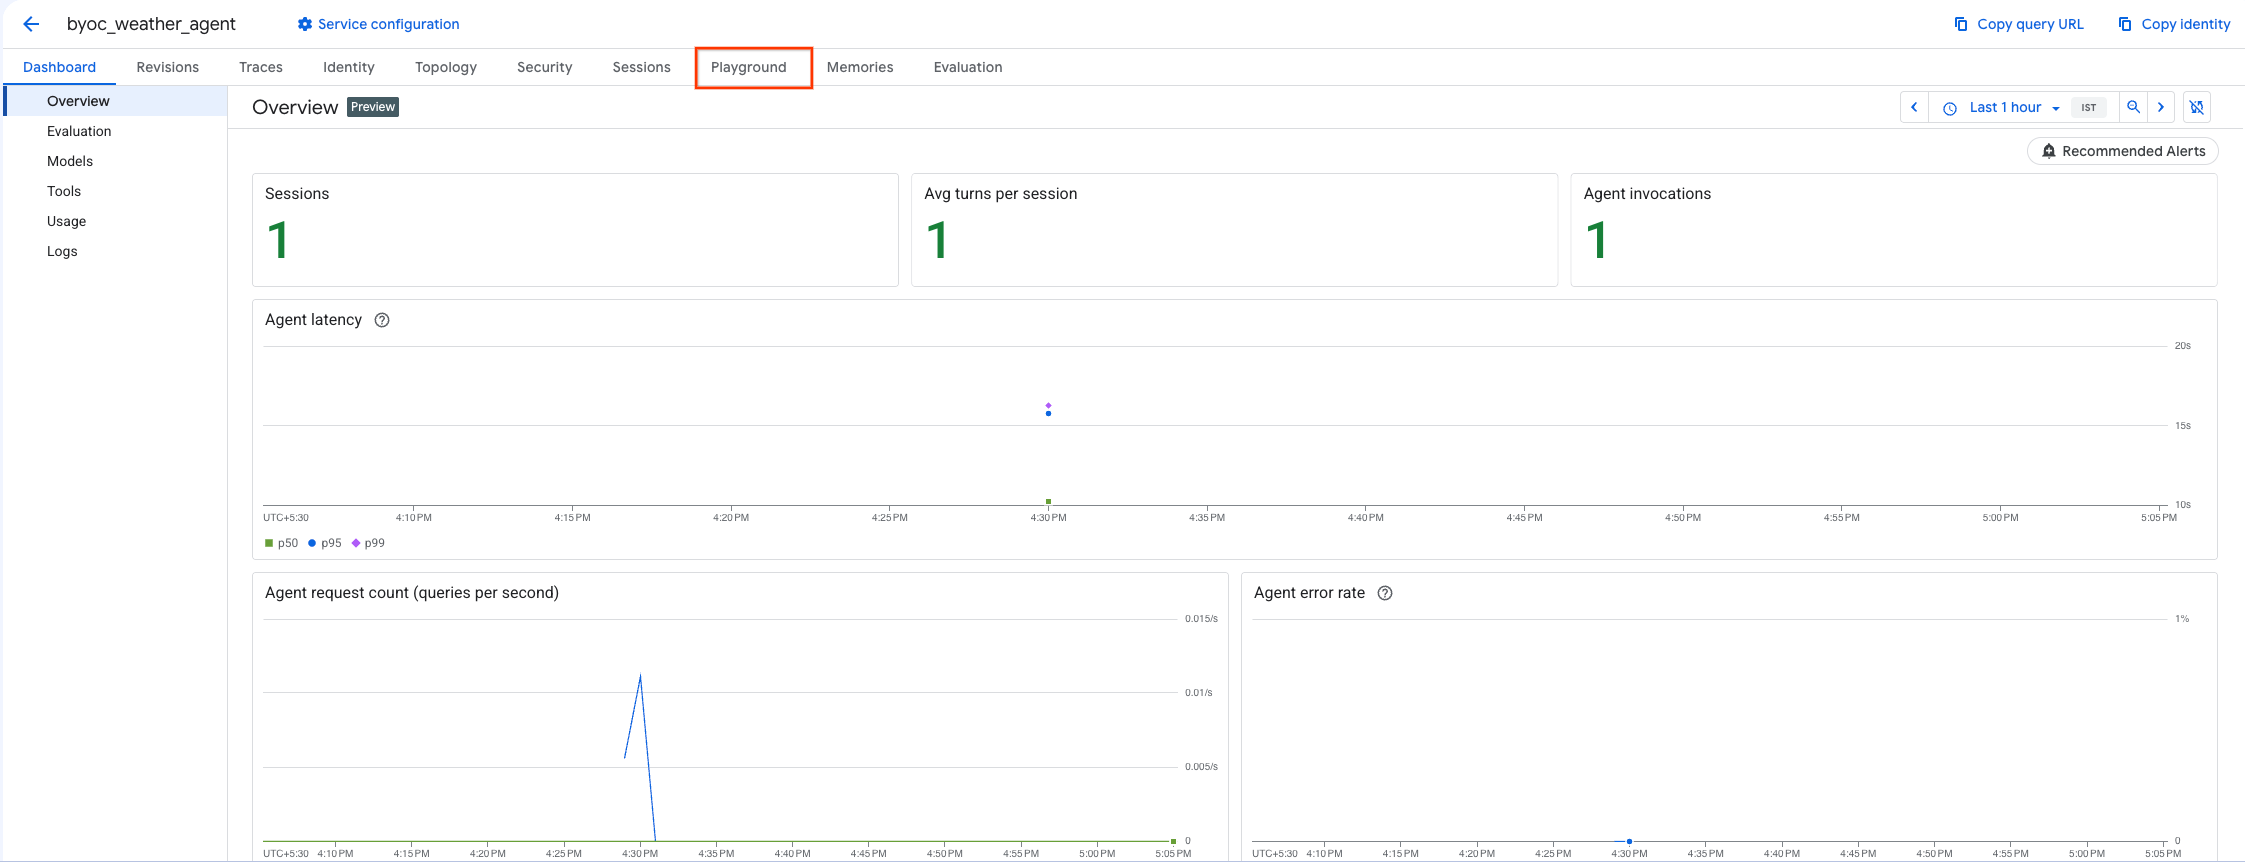
- Для фильтрации списка развернутых агентов перейдите к разделу «Платформа агентов» > «Агенты» > «Развертывания» .
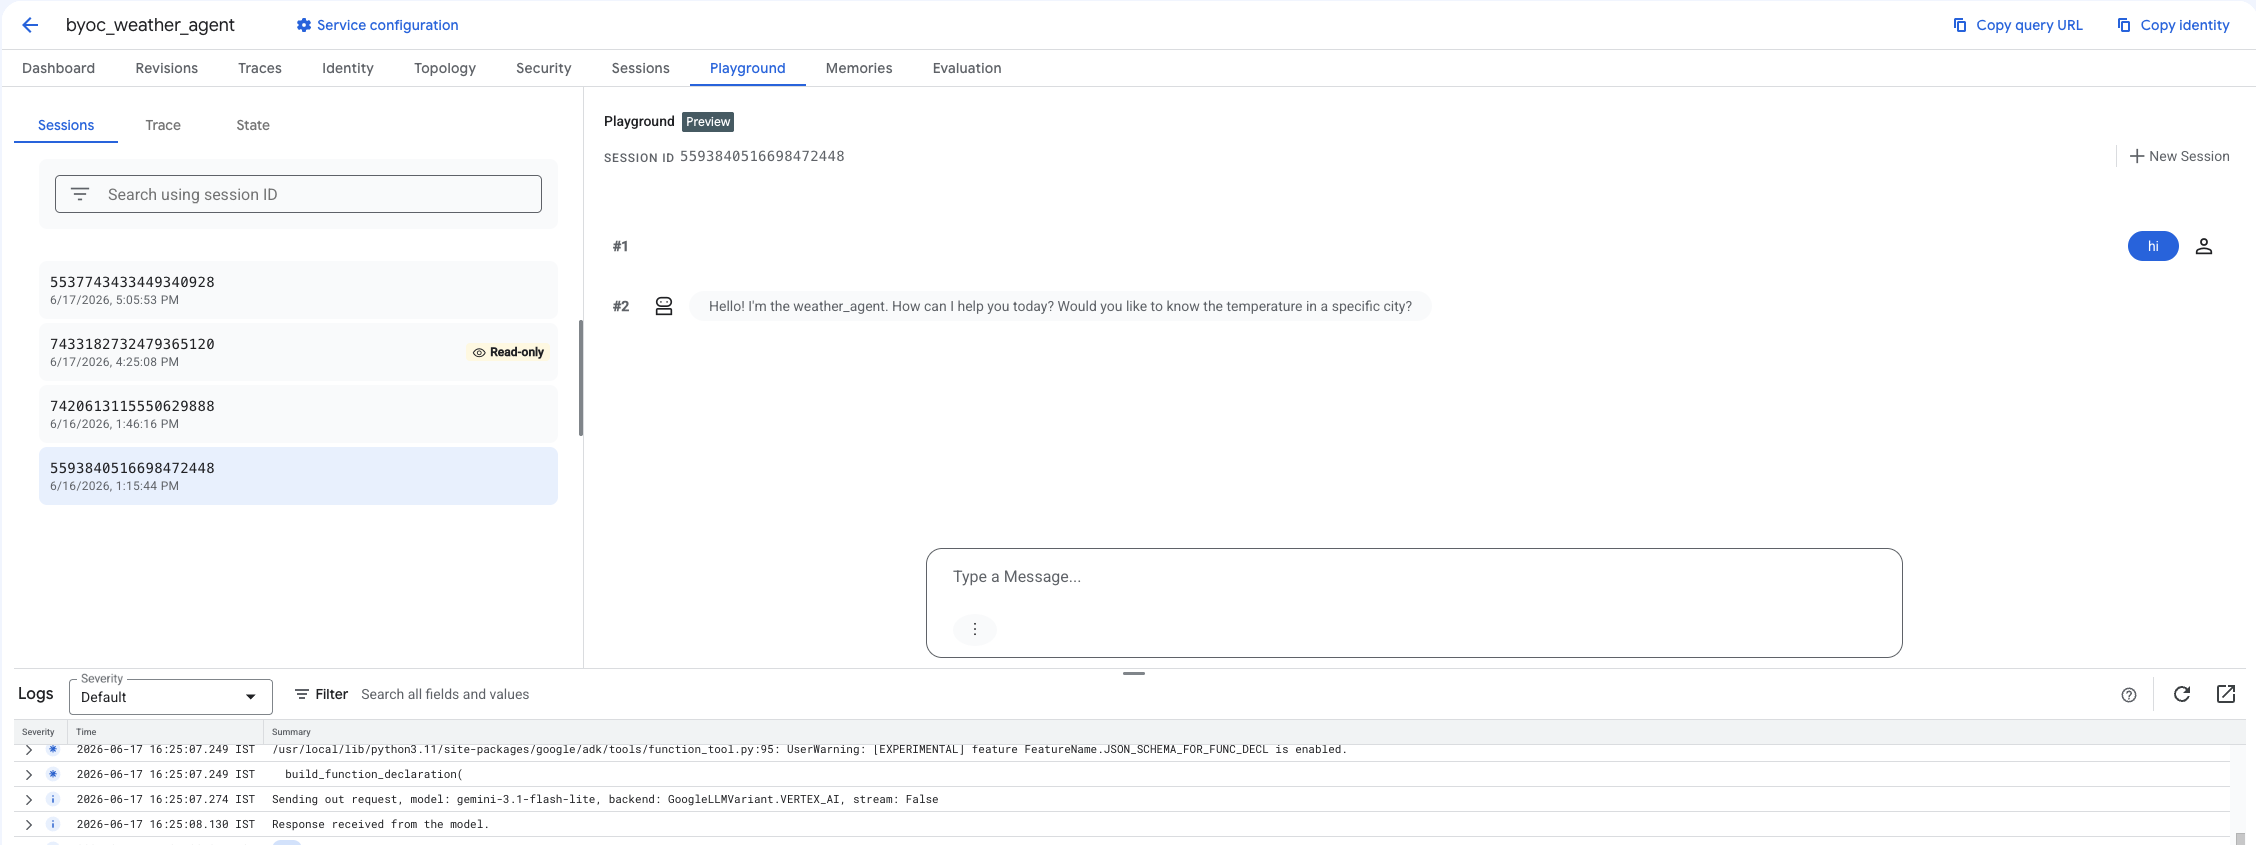
- Выберите «Игровая площадка» на панели управления агента.
- Создайте новую сессию и введите свой запрос, чтобы проверить, отвечает ли агент на запросы, как показано на рисунке.
9. Уборка
Чтобы избежать дополнительных расходов, удалите созданные вами ресурсы.
Если вы использовали Terraform для развертывания, перейдите в каталог terraform и выполните действие destroy:
cd ~/weather-agent-byoc/terraform
terraform destroy
cd ..
Если вы использовали SDK для развертывания, создайте скрипт для удаления развернутого агента:
cat << 'EOF' > delete_agent.py
import json
import os
import vertexai
from google.cloud import aiplatform

config = json.load(open("weather_agent/config.json"))
PROJECT_ID = config["PROJECT_ID"]
LOCATION = config["LOCATION"]

vertexai.init(project=PROJECT_ID, location=LOCATION)
client = vertexai.Client(project=PROJECT_ID, location=LOCATION)

with open("agent_resource_name.txt", "r") as f:
    agent_resource_name = f.read().strip()

# 1. Delete the Agent
# Note: We retrieve the list first to ensure we delete the ones created in this session
try:
    page_size = 100
    reasoning_engines = client.agent_engines.list()
    for engine in reasoning_engines:
        if agent_resource_name in engine.api_resource.name:
            print(f"Deleting Reasoning Engine: {engine.api_resource.name}")
            engine.delete(force=True)
except Exception as e:
    print(f"Error deleting reasoning engines: {e}")
EOF
Запустите скрипт для удаления агента:
python3 delete_agent.py
Чтобы очистить оставшиеся ресурсы, вернитесь в свой домашний каталог и выполните следующие команды в Cloud Shell:
cd ~

# 1. Delete the Artifact Registry Repository
gcloud artifacts repositories delete $REPOSITORY_NAME --location=$LOCATION --quiet

# 2. Clean up files (Optional)
rm -rf ~/weather-agent-byoc
10. Заключение
Поздравляем! Вы успешно контейнеризировали и развернули агента ИИ в среде выполнения агентов с использованием BYOC.
Вы научились:
- Используйте ADK для определения агента и оберните его с помощью FastAPI.
- Создайте Dockerfile и соберите образы с помощью Cloud Build.
- Управление разрешениями IAM для среды выполнения агента.
- Разверните свой собственный контейнер, используя как Python SDK , так и Terraform .
- Протестируйте и запросите информацию у развернутого агента.