
1. ภาพรวม
Agent Runtime (เดิมชื่อ Agent Engine) มีสภาพแวดล้อมรันไทม์ที่มีการจัดการซึ่งออกแบบมาเพื่อติดตั้งใช้งาน เรียกใช้ และปรับขนาด AI Agent ได้อย่างมีประสิทธิภาพ โดยค่าเริ่มต้น แพลตฟอร์มจะรวมซอร์สโค้ดและทรัพยากร Dependency ของคุณโดยอัตโนมัติในระหว่างกระบวนการติดตั้งใช้งาน
อย่างไรก็ตาม ภาระงานระดับองค์กรมักต้องมีการเป็นเจ้าของสภาพแวดล้อมรันไทม์อย่างสมบูรณ์ Agent Runtime จึงมีฟีเจอร์ Bring Your Own Container(BYOC) เพื่อรองรับความต้องการนี้ ซึ่งช่วยให้คุณติดตั้งใช้งานอิมเมจคอนเทนเนอร์ที่กำหนดเองซึ่งสร้างไว้ล่วงหน้าได้
Codelab นี้สรุปกระบวนการตั้งแต่ต้นจนจบสำหรับการขนส่ง Agent ที่สร้างด้วย Google Agent Development Kit (ADK) ด้วยตู้คอนเทนเนอร์ การกำหนดค่าสิทธิ์ที่จำเป็นของ Google Cloud และการติดตั้งใช้งาน Agent ใน Agent Runtime โดยใช้ Python SDK หรือ Terraform
Codelab นี้จะแนะนำคุณเกี่ยวกับสิ่งต่อไปนี้
- การสร้าง Agent Python โดยใช้ Google Agent Development Kit (ADK)
- การรวม Agent ไว้ในแอปพลิเคชัน FastAPI
- การขนส่งแอปพลิเคชันด้วยตู้คอนเทนเนอร์ด้วย Docker
- การกำหนดค่าสิทธิ์ของ Google Cloud
- การติดตั้งใช้งานและทดสอบ Agent ที่ขนส่งด้วยตู้คอนเทนเนอร์ใน Agent Runtime
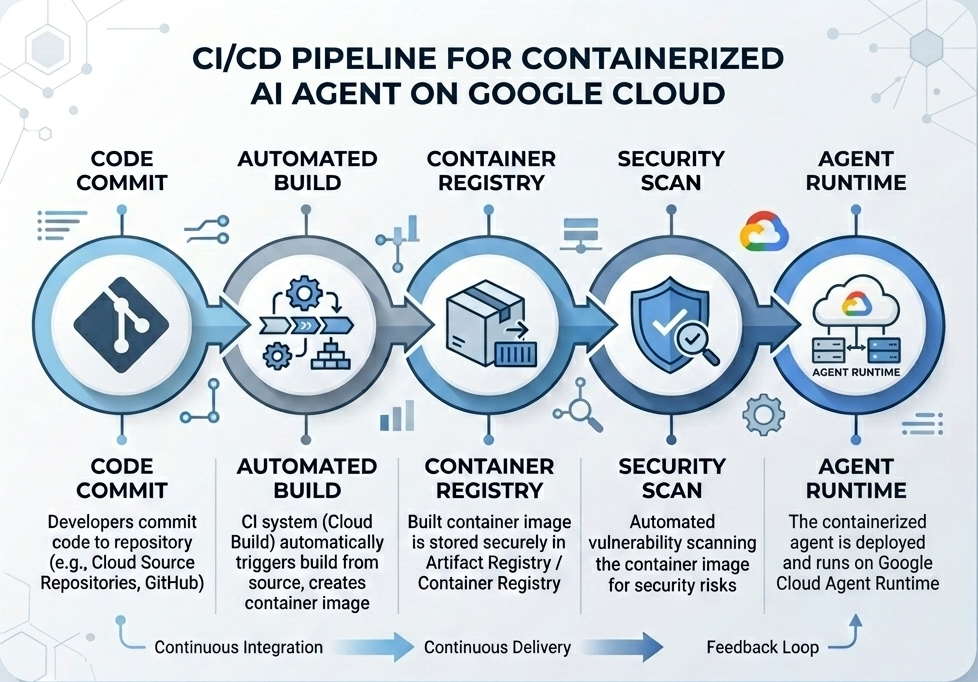
ขั้นตอนการสร้างและติดตั้งใช้งาน
แผนภาพต่อไปนี้แสดงเวิร์กโฟลว์ของขั้นตอนการสร้างและติดตั้งใช้งานที่คุณจะดำเนินการด้วยตนเองใน Codelab นี้
สิ่งที่ต้องมี
- โปรเจ็กต์ Google Cloud ที่เปิดใช้การเรียกเก็บเงิน
- สิทธิ์เข้าถึง Cloud Shell (แนะนำ) หรือสภาพแวดล้อมในการพัฒนาซอฟต์แวร์ในเครื่องที่ติดตั้ง
gcloudและdocker - ความรู้พื้นฐานเกี่ยวกับ Python และ Docker
2. การตั้งค่าสภาพแวดล้อม
ก่อนเริ่มต้น คุณต้องเปิดใช้ API ที่จำเป็นและกำหนดค่าสภาพแวดล้อม
ขั้นตอนที่ 1: เปิด Cloud Shell
คลิกปุ่มเปิดใช้งาน Cloud Shell ที่ด้านขวาบนของคอนโซล Google Cloud

ขั้นตอนที่ 2: กำหนดค่าตัวแปรสภาพแวดล้อม
ตั้งค่ารหัสโปรเจ็กต์และกำหนดตัวแปรสภาพแวดล้อมหลักที่ใช้ตลอด Codelab นี้ใน Cloud Shell แทนที่ "YOUR_PROJECT_ID" ด้วยรหัสโปรเจ็กต์ Google Cloud จริง
gcloud config set project "YOUR_PROJECT_ID"
export PROJECT_ID=$(gcloud config get-value project)
export LOCATION="us-central1"
export MODEL="gemini-3.1-flash-lite"
export MODEL_REGION="global"
ตัวแปรเหล่านี้จะกำหนดค่าการตั้งค่าการติดตั้งใช้งานเป้าหมาย
PROJECT_ID: ตัวระบุที่ไม่ซ้ำกันของโปรเจ็กต์ Google Cloud ที่ทรัพยากรทั้งหมดของ Gemini Enterprise Agent Platform และ Artifact Registry จะอยู่LOCATION: ภูมิภาคทางภูมิศาสตร์ (เช่นus-central1) ที่โฮสต์ที่เก็บและภาระงานรันไทม์MODEL: เวอร์ชันโมเดล Gemini (เช่นgemini-3.1-flash-lite) ที่โหลดโดยบริบทของ AgentMODEL_REGION: ภูมิภาคปลายทางของโมเดล ตั้งค่าเป็น"global"ที่นี่เพื่อเรียกใช้โมเดล Gemini จากปลายทางส่วนกลาง
ขั้นตอนที่ 3: เปิดใช้ API
เปิดใช้ Google Cloud APIs ที่จำเป็น
gcloud services enable \
    aiplatform.googleapis.com \
    cloudbuild.googleapis.com \
    compute.googleapis.com \
    artifactregistry.googleapis.com \
    storage.googleapis.com
ขั้นตอนที่ 4: ติดตั้ง SDK
ติดตั้ง Vertex AI SDK ที่รองรับ Agent Engine และ ADK
pip install --upgrade "google-cloud-aiplatform[agent_engines,adk]>=1.144"
3. การตั้งค่าไฟล์ซอร์สโค้ด
ในขั้นตอนนี้ คุณจะได้สร้างโครงสร้างและโค้ดสำหรับ Agent
ภาพรวมโครงสร้างไดเรกทอรี
เมื่อสิ้นสุด Codelab นี้ ไฟล์ของคุณจะจัดระเบียบไว้ภายใต้ลำดับชั้นของพื้นที่ทำงานต่อไปนี้
weather-agent-byoc/
├── Dockerfile                  # Container definition
├── deploy_byoc.py              # Python SDK deployment script
├── main.py                     # FastAPI server wrapper
├── query_agent.py              # Verify / query script
├── requirements.txt            # Python dependencies
│
├── weather_agent/              # Agent source module
│   ├── __init__.py             # Package declaration
│   ├── agent.py                # Agent & mock tools logic
│   └── config.json             # Environment config variables
│
└── terraform/                  # Terraform configuration files
    ├── main.tf
    ├── outputs.tf
    ├── providers.tf
    ├── terraform.tfvars
    └── variables.tf
ขั้นตอนที่ 1: สร้างไดเรกทอรี
เริ่มต้นในไดเรกทอรีแรกและสร้างโครงสร้างพื้นที่ทำงาน
cd ~
mkdir -p weather-agent-byoc/weather_agent
cd weather-agent-byoc
ขั้นตอนที่ 2: สร้างไฟล์การกำหนดค่า
เรียกใช้คำสั่งต่อไปนี้ใน Cloud Shell เพื่อเขียนพารามิเตอร์การกำหนดค่าลงใน weather_agent/config.json โดยตรง คำสั่งนี้จะแทนที่ตัวแปรด้วยค่าสภาพแวดล้อมของคุณโดยอัตโนมัติ
cat <<EOF > weather_agent/config.json
{
    "PROJECT_ID": "${PROJECT_ID}",
    "LOCATION": "${LOCATION}",
    "MODEL": "${MODEL}",
    "MODEL_REGION": "${MODEL_REGION}"
}
EOF
ขั้นตอนที่ 3: กำหนด Agent
เรียกใช้สคริปต์ต่อไปนี้เพื่อเขียนการกำหนดค่า Agent และตรรกะเครื่องมือจำลองลงใน weather_agent/agent.py
cat << 'EOF' > weather_agent/agent.py
import json
import random
from google.adk.agents import Agent
from google.adk.models.google_llm import Gemini
from functools import cached_property
from google.genai import Client

# Load config
llm_config = json.load(open("weather_agent/config.json"))
PROJECT_ID = llm_config["PROJECT_ID"]
MODEL = llm_config["MODEL"]
MODEL_REGION = llm_config["MODEL_REGION"]

# Override Gemini class for global endpoint compatibility
class GlobalGemini(Gemini):
  @cached_property
  def api_client(self) -> Client:
    return Client(vertexai=True, location="global")

# Define Tool
def get_temperature(place: str) -> str:
    '''Returns the current temperature of a given place.

    Args:
        place: The name of the city or location.

    Returns:
        str: A string describing the temperature.
    '''
    temp = random.randint(-10, 40)
    return f"The current temperature in {place} is {temp}°C."

# Initialize LLM
llm_model = GlobalGemini(model=MODEL) if MODEL_REGION == "global" else Gemini(model=MODEL)

# Initialize Agent
root_agent = Agent(
    model=llm_model,
    name='weather_agent',
    description='An agent that provides temperature information for locations.',
    instruction='You are a helpful assistant that can provide the current temperature for any given place using the get_temperature tool.',
    tools=[get_temperature],
)
EOF
สร้าง __init__.py ที่ว่างเปล่าเพื่อให้ weather_agent เป็นแพ็กเกจ Python
touch weather_agent/__init__.py
ขั้นตอนที่ 4: สร้าง Wrapper FastAPI
เรียกใช้สคริปต์ต่อไปนี้เพื่อเขียนการกำหนดค่าจุดเริ่มต้นของเซิร์ฟเวอร์ FastAPI ลงใน main.py
cat << 'EOF' > main.py
import inspect
import json
import logging
import os
from typing import Any, Dict, Optional
import uvicorn
import vertexai
from weather_agent.agent import root_agent
from fastapi import FastAPI, encoders, responses
from pydantic import BaseModel
from vertexai import agent_engines

app = FastAPI()

config_json = json.load(open("weather_agent/config.json"))
PROJECT_ID = config_json["PROJECT_ID"]
LOCATION = config_json["LOCATION"]
MODEL_REGION = config_json["MODEL_REGION"]

class QueryRequest(BaseModel):
    input: Optional[Dict[str, Any]] = None
    class_method: Optional[str] = None

vertexai.init(project=PROJECT_ID, location=MODEL_REGION)
adk_app = agent_engines.AdkApp(agent=root_agent)

def _encode_chunk_to_json(chunk):
  try:
    json_chunk = encoders.jsonable_encoder(chunk)
    return json.dumps(json_chunk) + "\n"
  except Exception:
    logging.exception("Failed to encode chunk")
    return None

async def json_generator(output):
  async for chunk in output:
    encoded_chunk = _encode_chunk_to_json(chunk)
    if encoded_chunk is None:
      break
    yield encoded_chunk

async def _invoke_callable_or_raise(invocation_callable, invocation_payload):
  if inspect.iscoroutinefunction(invocation_callable):
    return await invocation_callable(**invocation_payload)
  else:
    return invocation_callable(**invocation_payload)

@app.post("/api/reasoning_engine")
async def query(request: QueryRequest) -> responses.JSONResponse:
    method = getattr(adk_app, request.class_method)
    output = await _invoke_callable_or_raise(method, request.input or {})
    try:
      json_serialized_content = encoders.jsonable_encoder({"output": output})
    except ValueError as encoding_error:
      logging.exception("Failed to encode response")
      raise encoding_error
    return responses.JSONResponse(content=json_serialized_content)

@app.post("/api/stream_reasoning_engine")
async def stream_query(request: QueryRequest) -> responses.StreamingResponse:
    method = getattr(adk_app, request.class_method)
    output = await _invoke_callable_or_raise(method, request.input or {})
    return responses.StreamingResponse(
        content=json_generator(output),
        media_type="application/json",
    )

if __name__ == "__main__":
    uvicorn.run(app, host="0.0.0.0", port=int(os.environ.get("PORT", 8080)))
EOF
ขั้นตอนที่ 5: กำหนดทรัพยากร Dependency
เขียนทรัพยากร Dependency ของ Python ที่จำเป็นลงใน requirements.txt
cat << 'EOF' > requirements.txt
fastapi
uvicorn
vertexai
google-cloud-aiplatform[agent_engines,adk]>=1.144
pydantic
EOF
4. การขนส่งด้วยตู้คอนเทนเนอร์
ตอนนี้ให้กำหนดวิธีแพ็กเกจ Agent ลงในคอนเทนเนอร์
ขั้นตอนที่ 1: สร้าง Dockerfile
สร้าง Dockerfile ในรูทของไดเรกทอรีโปรเจ็กต์เพื่อระบุวิธีสร้างแอปพลิเคชัน FastAPI
cat << 'EOF' > Dockerfile
FROM python:3.11-slim

WORKDIR /app

COPY weather_agent/ /app/weather_agent/
COPY main.py .
COPY requirements.txt .
RUN pip install -r requirements.txt

CMD ["sh", "-c", "uvicorn main:app --host 0.0.0.0 --port $PORT"]
EOF
5. ตั้งค่า Artifact Registry และ Cloud Build
คุณต้องมีที่เก็บเพื่อจัดเก็บอิมเมจคอนเทนเนอร์และสิทธิ์ในการพุชอิมเมจ
ขั้นตอนที่ 1: สร้างที่เก็บ
กำหนดชื่อที่เก็บและสร้างที่เก็บ Docker ภายใน Artifact Registry โดยใช้ตัวแปรสภาพแวดล้อมที่กำหนดไว้ระหว่างการกำหนดค่า
export REPOSITORY_NAME="agents-repo"

gcloud artifacts repositories create $REPOSITORY_NAME \
    --project=$PROJECT_ID \
    --repository-format=docker \
    --location=$LOCATION \
    --description="Docker repository for Agents"
ขั้นตอนที่ 2: กำหนดค่าสิทธิ์ของบัญชีบริการ
ให้สิทธิ์บัญชีบริการเริ่มต้นของ Compute ในการพุชอิมเมจไปยัง Artifact Registry
ขั้นแรก ให้รับหมายเลขโปรเจ็กต์
export PROJECT_NUMBER=$(gcloud projects describe $PROJECT_ID --format="value(projectNumber)")
ให้บทบาท
# Allow pushing to Artifact Registry
gcloud projects add-iam-policy-binding $PROJECT_ID \
    --member="serviceAccount:$PROJECT_NUMBER-compute@developer.gserviceaccount.com" \
    --role="roles/artifactregistry.writer" \
    --condition=None

# Allow Cloud Build to read storage objects
gcloud projects add-iam-policy-binding $PROJECT_NUMBER \
    --member="serviceAccount:$PROJECT_NUMBER-compute@developer.gserviceaccount.com" \
    --role="roles/storage.objectViewer" \
    --condition=None
ขั้นตอนที่ 3: ให้สิทธิ์แก่ตัวแทนบริการ
ให้สิทธิ์เข้าถึงแบบอ่าน Artifact Registry แก่ตัวแทนบริการ AI Platform และ Reasoning Engine
gcloud projects add-iam-policy-binding $PROJECT_NUMBER \
    --member="serviceAccount:service-$PROJECT_NUMBER@gcp-sa-aiplatform-re.iam.gserviceaccount.com" \
    --role="roles/artifactregistry.reader"  --condition=None

gcloud projects add-iam-policy-binding $PROJECT_NUMBER \
    --member="serviceAccount:service-$PROJECT_NUMBER@gcp-sa-aiplatform.iam.gserviceaccount.com" \
    --role="roles/artifactregistry.reader"  --condition=None
ขั้นตอนที่ 4: สร้างและพุชอิมเมจ
ใช้ Cloud Build เพื่อสร้างและพุชอิมเมจคอนเทนเนอร์
gcloud builds submit \
    --project=$PROJECT_ID \
    --region=$LOCATION \
    --tag $LOCATION-docker.pkg.dev/$PROJECT_ID/$REPOSITORY_NAME/weather-agent-image:latest \
    .
6. ติดตั้งใช้งาน Agent ด้วย SDK
เมื่อกำหนดค่าสิทธิ์แล้ว คุณก็ติดตั้งใช้งานคอนเทนเนอร์ที่กำหนดเองได้
ขั้นตอนที่ 1: ติดตั้งใช้งาน Agent BYOC
สร้างไฟล์ Python deploy_byoc.py ในรูทของไดเรกทอรีโปรเจ็กต์เพื่อติดตั้งใช้งานคอนเทนเนอร์ที่โฮสต์ในรีจิสทรีใน Agent Runtime
cat << 'EOF' > deploy_byoc.py
import json
import os
import vertexai
from google.cloud import aiplatform

config = json.load(open("weather_agent/config.json"))
PROJECT_ID = config["PROJECT_ID"]
LOCATION = config["LOCATION"]
REPOSITORY_NAME = "agents-repo"

vertexai.init(project=PROJECT_ID, location=LOCATION)
client = vertexai.Client(project=PROJECT_ID, location=LOCATION)

image_uri = f"{LOCATION}-docker.pkg.dev/{PROJECT_ID}/{REPOSITORY_NAME}/weather-agent-image:latest"

print(f"Deploying custom container agent from {image_uri}...")
remote_agent = client.agent_engines.create(
    config={
        "display_name": "byoc_weather_agent",
        "description": "BYOC weather agent from custom container",
        "container_spec": {
            "image_uri": image_uri
        },
        "class_methods": [
            # For convenience to interact with the agent through the Python SDK
            # https://docs.cloud.google.com/gemini-enterprise-agent-platform/scale/runtime/use-an-adk-agent#supported-operations
            {"api_mode": "", "name": "get_session"},
            {"api_mode": "", "name": "list_sessions"},
            {"api_mode": "", "name": "create_session"},
            {"api_mode": "", "name": "delete_session"},
            {"api_mode": "async", "name": "async_get_session"},
            {"api_mode": "async", "name": "async_list_sessions"},
            {"api_mode": "async", "name": "async_create_session"},
            {"api_mode": "async", "name": "async_delete_session"},
            {"api_mode": "async", "name": "async_add_session_to_memory"},
            {"api_mode": "async", "name": "async_search_memory"},
            {"api_mode": "stream", "name": "stream_query"},
            {"api_mode": "async_stream", "name": "async_stream_query"},
            {"api_mode": "async_stream", "name": "streaming_agent_run_with_events"},
        ],
        "agent_framework": "google-adk",
    },
)

print(f"Agent successfully deployed!")
print(f"Resource Name: {remote_agent.api_resource.name}")

# Save resource name for testing
with open("agent_resource_name.txt", "w") as f:
    f.write(remote_agent.api_resource.name)
EOF
เรียกใช้สคริปต์การติดตั้งใช้งานเพื่อติดตั้งใช้งาน Agent ใน Agent Runtime
python3 deploy_byoc.py
7. ติดตั้งใช้งาน Agent ด้วย Terraform
หรือคุณจะติดตั้งใช้งาน Agent ที่ขนส่งด้วยตู้คอนเทนเนอร์เดียวกันโดยใช้ Terraform ก็ได้ เราแนะนำให้ใช้วิธีนี้สำหรับสภาพแวดล้อมในการใช้งานจริงเพื่อจัดการโครงสร้างพื้นฐานเป็นโค้ด
ขั้นตอนที่ 1: ไปที่ไดเรกทอรี Terraform
สร้างไดเรกทอรี terraform ในรูทของโปรเจ็กต์แล้วไปที่ไดเรกทอรีดังกล่าว
mkdir -p terraform
cd terraform
ขั้นตอนที่ 2: สร้างการกำหนดค่าผู้ให้บริการ
เรียกใช้สคริปต์ต่อไปนี้เพื่อเขียนการแมปผู้ให้บริการลงใน providers.tf
cat << 'EOF' > providers.tf
terraform {
  required_providers {
    google = {
      source  = "hashicorp/google"
      version = ">= 5.28.0"
    }
  }
}

provider "google" {
  project = var.project_id
  region  = var.location
}
EOF
ขั้นตอนที่ 3: สร้างคำจำกัดความของตัวแปร
เขียนบล็อกคำอธิบายอินพุตลงใน variables.tf
cat << 'EOF' > variables.tf
variable "project_id" {
  type        = string
  description = "The Google Cloud Project ID"
}

variable "location" {
  type        = string
  description = "The region to deploy the reasoning engine"
  default     = "us-central1"
}

variable "repository_name" {
  type        = string
  description = "The Artifact Registry repository name"
  default     = "agents-repo"
}

variable "image_tag" {
  type        = string
  description = "The tag of the container image to deploy"
  default     = "latest"
}
EOF
ขั้นตอนที่ 4: สร้างการกำหนดค่าหลัก
เขียนพารามิเตอร์คำจำกัดความของทรัพยากรหลักลงใน main.tf
cat << 'EOF' > main.tf
locals {
  class_methods = [
    {"api_mode" = "", "name" = "get_session"},
    {"api_mode" = "", "name" = "list_sessions"},
    {"api_mode" = "", "name" = "create_session"},
    {"api_mode" = "", "name" = "delete_session"},
    {"api_mode" = "async", "name" = "async_get_session"},
    {"api_mode" = "async", "name" = "async_list_sessions"},
    {"api_mode" = "async", "name" = "async_create_session"},
    {"api_mode" = "async", "name" = "async_delete_session"},
    {"api_mode" = "async", "name" = "async_add_session_to_memory"},
    {"api_mode" = "async", "name" = "async_search_memory"},
    {"api_mode" = "stream", "name" = "stream_query"},
    {"api_mode" = "async_stream", "name" = "async_stream_query"},
    {"api_mode" = "async_stream", "name" = "streaming_agent_run_with_events"}
  ]
}

# define the resource with the BYOC configuration, set agent_framework to "google-adk" to enable interactive features on the console.
resource "google_vertex_ai_reasoning_engine" "byoc_weather_agent" {
  display_name = "byoc_weather_agent_tf"
  description  = "BYOC weather agent deployed via Terraform"
  project      = var.project_id
  location     = var.location

  spec {
    class_methods = jsonencode(local.class_methods)
    agent_framework = "google-adk"
    container_spec {
      image_uri = "${var.location}-docker.pkg.dev/${var.project_id}/${var.repository_name}/weather-agent-image:${var.image_tag}"
    }
  }
}
EOF
ขั้นตอนที่ 5: สร้างคำจำกัดความของเอาต์พุต
เขียนบล็อกเอาต์พุตลงใน outputs.tf
cat << 'EOF' > outputs.tf
output "reasoning_engine_id" {
  value       = google_vertex_ai_reasoning_engine.byoc_weather_agent.id
  description = "The ID of the deployed reasoning engine"
}

output "reasoning_engine_resource_name" {
  value       = google_vertex_ai_reasoning_engine.byoc_weather_agent.id
  description = "The resource name of the deployed reasoning engine"
}
EOF
ขั้นตอนที่ 6: สร้างไฟล์ค่าตัวแปร (tfvars)
ติดตั้งใช้งานแบบไดนามิกโดยไม่ต้องแก้ไขตัวยึดตำแหน่งด้วยการป้อนตัวแปรสภาพแวดล้อมลงใน terraform.tfvars โดยตรง
cat <<EOF > terraform.tfvars
project_id      = "${PROJECT_ID}"
location        = "${LOCATION}"
repository_name = "agents-repo"
image_tag       = "latest"
EOF
ขั้นตอนที่ 7: เริ่มต้นและใช้
เริ่มต้น Terraform และใช้การกำหนดค่า
terraform init
terraform apply
ยืนยันการใช้โดยพิมพ์ yes เมื่อได้รับข้อความแจ้ง
เมื่อเสร็จแล้ว Terraform จะแสดงชื่อทรัพยากร ดึงข้อมูลชื่อทรัพยากรนี้แบบเป็นโปรแกรมลงใน agent_resource_name.txt แล้วกลับไปที่โฟลเดอร์รูท
terraform output -raw reasoning_engine_resource_name > ../agent_resource_name.txt
cd ..
8. ค้นหา Agent
ยืนยันว่า Agent ทำงานและตอบสนอง
ขั้นตอนที่ 1: สร้างสคริปต์การค้นหา
เขียนสคริปต์การยืนยันลงใน query_agent.py โดยใช้การตรวจสอบการกำหนดค่าการตั้งค่าแบบไดนามิกเพื่อดึงข้อมูลพิกัดสถานที่ตั้ง
cat << 'EOF' > query_agent.py
import json
import os
import requests
from google import auth as google_auth
from google.auth.transport import requests as google_requests

# Load config coordinates directly
config_json = json.load(open("weather_agent/config.json"))
LOCATION = config_json["LOCATION"]
PROJECT_ID = config_json["PROJECT_ID"]

# Load agent resource name
with open("agent_resource_name.txt", "r") as f:
    agent_resource_name = f.read().strip()

def get_identity_token():
    credentials, _ = google_auth.default()
    auth_request = google_requests.Request()
    credentials.refresh(auth_request)
    return credentials.token

# Access the agent at the fastapi endpoint that was specified in main.py
url = f"https://{LOCATION}-aiplatform.googleapis.com/v1/{agent_resource_name}/api/stream_reasoning_engine"

payload = {
    "class_method": "async_stream_query",
    "input": {
        "user_id": "codelab_test_user",
        "message": "What is the temperature in Tokyo?",
    },
}

print(f"Sending query to {url}...")
response = requests.post(
    url,
    headers={
        "Content-Type": "application/json",
        "Authorization": f"Bearer {get_identity_token()}",
    },
    data=json.dumps(payload),
    stream=True,
)

for chunk in response.iter_content(chunk_size=8192):
    if chunk:
        print(chunk.decode('utf-8'))
EOF
เรียกใช้สคริปต์การค้นหา
python3 query_agent.py
คุณควรเห็นเอาต์พุตสตรีมมิงกลับจาก Agent รวมถึงอุณหภูมิจำลองสำหรับโตเกียว
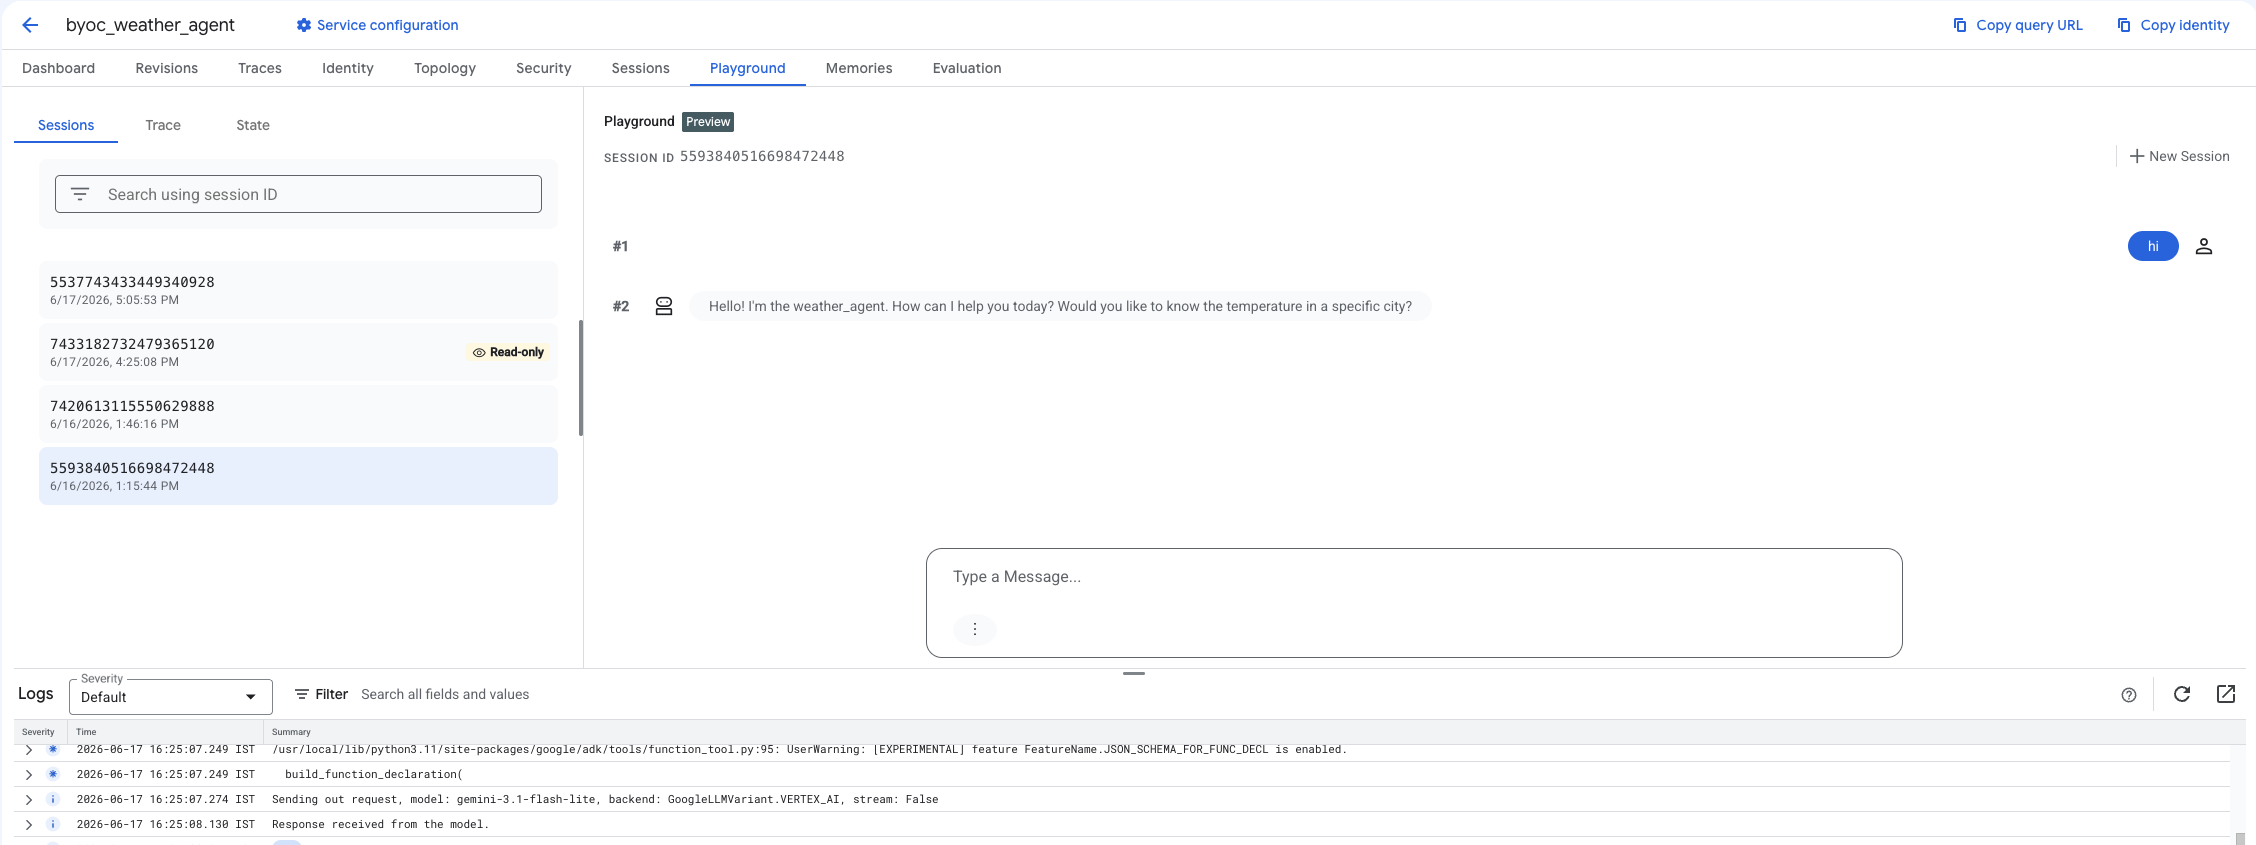
ขั้นตอนที่ 2: ใช้คอนโซล
- ไปที่ Agent ที่ติดตั้งใช้งานโดยเลือกแพลตฟอร์ม Agent > Agent > การติดตั้งใช้งาน เพื่อกรองรายการ Agent

- เลือก Playground จากแดชบอร์ดของ Agent
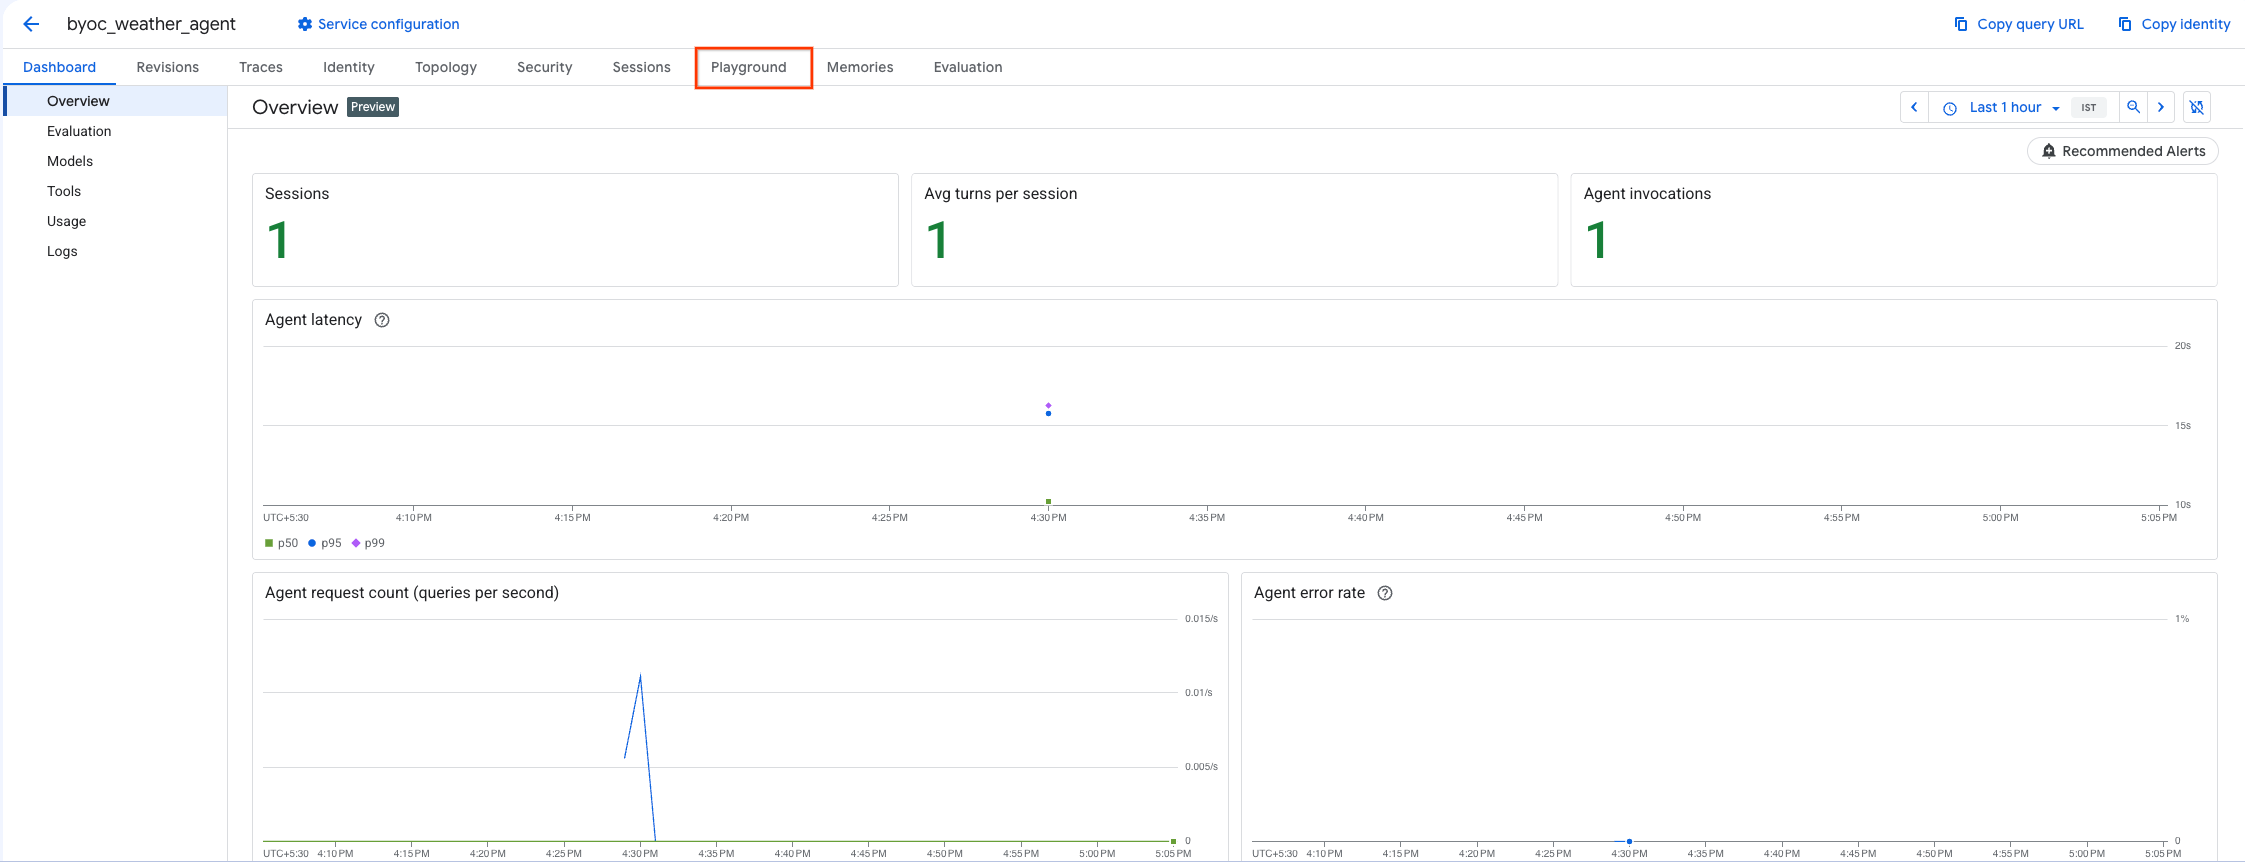
- สร้างเซสชันใหม่และพิมพ์การค้นหาเพื่อตรวจสอบว่า Agent ตอบสนองต่อคำขอตามที่แสดงหรือไม่
9. การทำความสะอาดข้อมูล
ล้างข้อมูลทรัพยากรที่คุณสร้างขึ้นเพื่อหลีกเลี่ยงการเรียกเก็บเงิน
หากติดตั้งใช้งานโดยใช้ Terraform ให้เปลี่ยนเป็นไดเรกทอรี terraform แล้วดำเนินการลบ
cd ~/weather-agent-byoc/terraform
terraform destroy
cd ..
หากติดตั้งใช้งานโดยใช้ SDK ให้สร้างสคริปต์เพื่อลบ Agent ที่ติดตั้งใช้งาน
cat << 'EOF' > delete_agent.py
import json
import os
import vertexai
from google.cloud import aiplatform

config = json.load(open("weather_agent/config.json"))
PROJECT_ID = config["PROJECT_ID"]
LOCATION = config["LOCATION"]

vertexai.init(project=PROJECT_ID, location=LOCATION)
client = vertexai.Client(project=PROJECT_ID, location=LOCATION)

with open("agent_resource_name.txt", "r") as f:
    agent_resource_name = f.read().strip()

# 1. Delete the Agent
# Note: We retrieve the list first to ensure we delete the ones created in this session
try:
    page_size = 100
    reasoning_engines = client.agent_engines.list()
    for engine in reasoning_engines:
        if agent_resource_name in engine.api_resource.name:
            print(f"Deleting Reasoning Engine: {engine.api_resource.name}")
            engine.delete(force=True)
except Exception as e:
    print(f"Error deleting reasoning engines: {e}")
EOF
เรียกใช้สคริปต์เพื่อลบ Agent
python3 delete_agent.py
หากต้องการล้างข้อมูลทรัพยากรที่เหลือ ให้กลับไปที่ไดเรกทอรีแรกแล้วเรียกใช้คำสั่งต่อไปนี้ใน Cloud Shell
cd ~

# 1. Delete the Artifact Registry Repository
gcloud artifacts repositories delete $REPOSITORY_NAME --location=$LOCATION --quiet

# 2. Clean up files (Optional)
rm -rf ~/weather-agent-byoc
10. บทสรุป
ยินดีด้วย คุณได้ขนส่งและติดตั้งใช้งาน AI Agent ใน Agent Runtime โดยใช้ BYOC สำเร็จแล้ว
โดยคุณได้เรียนรู้วิธีต่อไปนี้
- ใช้ ADK เพื่อกำหนด Agent และรวม Agent โดยใช้ FastAPI
- สร้าง Dockerfile และสร้างอิมเมจโดยใช้ Cloud Build
- จัดการสิทธิ์ IAM สำหรับ Agent Runtime
- ติดตั้งใช้งานคอนเทนเนอร์ที่กำหนดเองโดยใช้ทั้ง Python SDK และ Terraform
- ทดสอบและค้นหา Agent ที่ติดตั้งใช้งาน