
1. Genel Bakış
Agent Runtime (eski adıyla Agent Engine), yapay zeka destekli müşteri temsilcisi botlarını etkili bir şekilde dağıtmak, çalıştırmak ve ölçeklendirmek için tasarlanmış yönetilen bir çalışma zamanı ortamı sunar. Varsayılan olarak, platform dağıtım işlemi sırasında kaynak kodunuzu ve bağımlılıklarınızı otomatik olarak paketler.
Ancak kurumsal iş yükleri genellikle çalışma zamanı ortamı üzerinde tam sahiplik gerektirir. Agent Runtime, bu özelliği desteklemek için Bring Your Own Container(BYOC) özelliğini sunar. Bu özellik, önceden oluşturulmuş özel container görüntülerini dağıtmanıza olanak tanır.
Bu codelab'de, Google Agent Development Kit (ADK) ile oluşturulan bir aracı container'a dönüştürme, gerekli Google Cloud izinlerini yapılandırma ve Python SDK veya Terraform kullanarak Agent Runtime'a dağıtma ile ilgili uçtan uca süreç özetlenmektedir.
Bu codelab'de şu konular ele alınmaktadır:
- Google Agent Development Kit (ADK)'yı kullanarak Python aracısı oluşturma.
- Temsilciyi FastAPI uygulamasına sarmalama.
- Uygulamayı Docker ile container'a alma.
- Google Cloud izinlerini yapılandırma
- Container'a yerleştirilmiş aracıyı Agent Runtime'da dağıtma ve test etme.
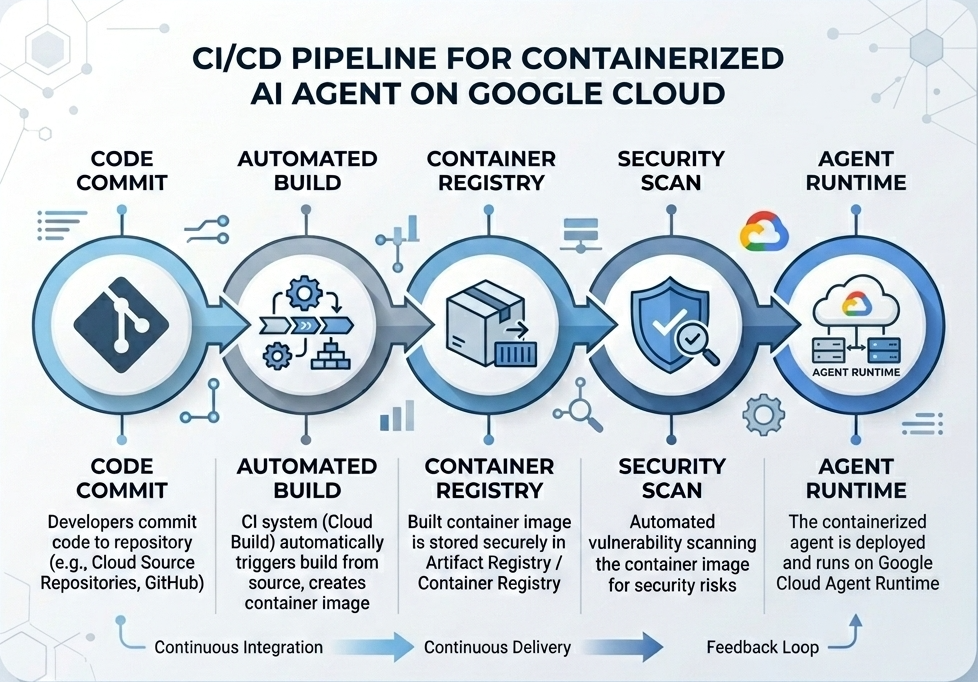
Derleme ve Dağıtım Akışı
Aşağıdaki şemada, bu codelab'de manuel olarak gerçekleştireceğiniz derleme ve dağıtım adımlarının iş akışı gösterilmektedir:
İhtiyacınız olanlar
- Faturalandırmanın etkin olduğu bir Google Cloud projesi.
- Cloud Shell'e erişim (önerilir) veya
gcloudvedocker'nin yüklü olduğu yerel bir geliştirme ortamı. - Python ve Docker hakkında temel düzeyde bilgi
2. Ortam Kurulumu
Başlamadan önce gerekli API'leri etkinleştirmeniz ve ortamınızı yapılandırmanız gerekir.
1. adım: Cloud Shell'i açın
Google Cloud Console'un sağ üst kısmındaki Cloud Shell'i Etkinleştir düğmesini tıklayın.

2. adım: Ortam değişkenlerini yapılandırın
Cloud Shell'de proje kimliğinizi ayarlayın ve bu codelab boyunca kullanılacak temel ortam değişkenlerini tanımlayın. "YOUR_PROJECT_ID" kısmını, gerçek Google Cloud proje kimliğinizle değiştirin:
gcloud config set project "YOUR_PROJECT_ID"
export PROJECT_ID=$(gcloud config get-value project)
export LOCATION="us-central1"
export MODEL="gemini-3.1-flash-lite"
export MODEL_REGION="global"
Bu değişkenler, hedef dağıtım ayarlarını yapılandırır:
PROJECT_ID: Tüm Gemini Enterprise Agent Platform kaynaklarının ve Artifact Registry'nin bulunacağı Google Cloud projenizin benzersiz tanımlayıcısı.LOCATION: Depolarınıza ve çalışma zamanı iş yüklerinize ev sahipliği yapan coğrafi bölge (ör.us-central1).MODEL: Ajan bağlamı tarafından yüklenen Gemini modeli sürümü (ör.gemini-3.1-flash-lite).MODEL_REGION: Modelin uç nokta bölgesi. Burayı"global"olarak ayarlayarak Gemini modelini genel uç noktalardan çağırın.
3. Adım: API'leri etkinleştirme
Gerekli Google Cloud API'lerini etkinleştirin:
gcloud services enable \
    aiplatform.googleapis.com \
    cloudbuild.googleapis.com \
    compute.googleapis.com \
    artifactregistry.googleapis.com \
    storage.googleapis.com
4. adım: SDK'yı yükleyin
Agent Engine ve ADK desteğiyle Vertex AI SDK'yı yükleyin:
pip install --upgrade "google-cloud-aiplatform[agent_engines,adk]>=1.144"
3. Kaynak Dosyaları Kurulumu
Bu adımda, aracınızın yapısını ve kodunu oluşturacaksınız.
Dizin Yapısına Genel Bakış
Bu codelab'in sonunda dosyalarınız aşağıdaki çalışma alanı hiyerarşisine göre düzenlenmiş olacak:
weather-agent-byoc/
├── Dockerfile                  # Container definition
├── deploy_byoc.py              # Python SDK deployment script
├── main.py                     # FastAPI server wrapper
├── query_agent.py              # Verify / query script
├── requirements.txt            # Python dependencies
│
├── weather_agent/              # Agent source module
│   ├── __init__.py             # Package declaration
│   ├── agent.py                # Agent & mock tools logic
│   └── config.json             # Environment config variables
│
└── terraform/                  # Terraform configuration files
    ├── main.tf
    ├── outputs.tf
    ├── providers.tf
    ├── terraform.tfvars
    └── variables.tf
1. adım: Dizin oluşturun
Ana dizininizde başlayın ve çalışma alanı yapısını oluşturun:
cd ~
mkdir -p weather-agent-byoc/weather_agent
cd weather-agent-byoc
2. adım: Yapılandırma dosyası oluşturun
Yapılandırma parametrelerini doğrudan weather_agent/config.json'ya yazmak için Cloud Shell'de aşağıdaki komutu çalıştırın. Bu komut, değişkenleri ortam değerlerinizle otomatik olarak değiştirir:
cat <<EOF > weather_agent/config.json
{
    "PROJECT_ID": "${PROJECT_ID}",
    "LOCATION": "${LOCATION}",
    "MODEL": "${MODEL}",
    "MODEL_REGION": "${MODEL_REGION}"
}
EOF
3. adım: Aracıyı tanımlayın
Aracı yapılandırmasını ve sahte araç mantığını weather_agent/agent.py konumuna yazmak için aşağıdaki komut dosyasını çalıştırın:
cat << 'EOF' > weather_agent/agent.py
import json
import random
from google.adk.agents import Agent
from google.adk.models.google_llm import Gemini
from functools import cached_property
from google.genai import Client

# Load config
llm_config = json.load(open("weather_agent/config.json"))
PROJECT_ID = llm_config["PROJECT_ID"]
MODEL = llm_config["MODEL"]
MODEL_REGION = llm_config["MODEL_REGION"]

# Override Gemini class for global endpoint compatibility
class GlobalGemini(Gemini):
  @cached_property
  def api_client(self) -> Client:
    return Client(vertexai=True, location="global")

# Define Tool
def get_temperature(place: str) -> str:
    '''Returns the current temperature of a given place.

    Args:
        place: The name of the city or location.

    Returns:
        str: A string describing the temperature.
    '''
    temp = random.randint(-10, 40)
    return f"The current temperature in {place} is {temp}°C."

# Initialize LLM
llm_model = GlobalGemini(model=MODEL) if MODEL_REGION == "global" else Gemini(model=MODEL)

# Initialize Agent
root_agent = Agent(
    model=llm_model,
    name='weather_agent',
    description='An agent that provides temperature information for locations.',
    instruction='You are a helpful assistant that can provide the current temperature for any given place using the get_temperature tool.',
    tools=[get_temperature],
)
EOF
weather_agent öğesini Python paketi yapmak için boş bir __init__.py oluşturun:
touch weather_agent/__init__.py
4. adım: FastAPI sarmalayıcı oluşturun
FastAPI sunucu giriş noktası yapılandırmasını main.py konumuna yazmak için aşağıdaki komut dosyasını çalıştırın:
cat << 'EOF' > main.py
import inspect
import json
import logging
import os
from typing import Any, Dict, Optional
import uvicorn
import vertexai
from weather_agent.agent import root_agent
from fastapi import FastAPI, encoders, responses
from pydantic import BaseModel
from vertexai import agent_engines

app = FastAPI()

config_json = json.load(open("weather_agent/config.json"))
PROJECT_ID = config_json["PROJECT_ID"]
LOCATION = config_json["LOCATION"]
MODEL_REGION = config_json["MODEL_REGION"]

class QueryRequest(BaseModel):
    input: Optional[Dict[str, Any]] = None
    class_method: Optional[str] = None

vertexai.init(project=PROJECT_ID, location=MODEL_REGION)
adk_app = agent_engines.AdkApp(agent=root_agent)

def _encode_chunk_to_json(chunk):
  try:
    json_chunk = encoders.jsonable_encoder(chunk)
    return json.dumps(json_chunk) + "\n"
  except Exception:
    logging.exception("Failed to encode chunk")
    return None

async def json_generator(output):
  async for chunk in output:
    encoded_chunk = _encode_chunk_to_json(chunk)
    if encoded_chunk is None:
      break
    yield encoded_chunk

async def _invoke_callable_or_raise(invocation_callable, invocation_payload):
  if inspect.iscoroutinefunction(invocation_callable):
    return await invocation_callable(**invocation_payload)
  else:
    return invocation_callable(**invocation_payload)

@app.post("/api/reasoning_engine")
async def query(request: QueryRequest) -> responses.JSONResponse:
    method = getattr(adk_app, request.class_method)
    output = await _invoke_callable_or_raise(method, request.input or {})
    try:
      json_serialized_content = encoders.jsonable_encoder({"output": output})
    except ValueError as encoding_error:
      logging.exception("Failed to encode response")
      raise encoding_error
    return responses.JSONResponse(content=json_serialized_content)

@app.post("/api/stream_reasoning_engine")
async def stream_query(request: QueryRequest) -> responses.StreamingResponse:
    method = getattr(adk_app, request.class_method)
    output = await _invoke_callable_or_raise(method, request.input or {})
    return responses.StreamingResponse(
        content=json_generator(output),
        media_type="application/json",
    )

if __name__ == "__main__":
    uvicorn.run(app, host="0.0.0.0", port=int(os.environ.get("PORT", 8080)))
EOF
5. adım: Bağımlılıkları tanımlayın
Gerekli Python bağımlılıklarını requirements.txt içine yazın:
cat << 'EOF' > requirements.txt
fastapi
uvicorn
vertexai
google-cloud-aiplatform[agent_engines,adk]>=1.144
pydantic
EOF
4. Konteynerleştirme
Şimdi, aracınızın bir kapsayıcıya nasıl paketleneceğini tanımlayın.
1. adım: Dockerfile oluşturun
FastAPI uygulamanızın nasıl oluşturulacağını belirtmek için proje dizininizin kök dizininde Dockerfile dosyasını oluşturun:
cat << 'EOF' > Dockerfile
FROM python:3.11-slim

WORKDIR /app

COPY weather_agent/ /app/weather_agent/
COPY main.py .
COPY requirements.txt .
RUN pip install -r requirements.txt

CMD ["sh", "-c", "uvicorn main:app --host 0.0.0.0 --port $PORT"]
EOF
5. Artifact Registry ve Cloud Build'i kurma
Container görüntüsünü depolamak için bir depoya ve görüntüyü aktarmak için izinlere ihtiyacınız vardır.
1. adım: Depo oluşturun
Depo adını tanımlayın ve yapılandırma sırasında tanımlanan ortam değişkenlerini kullanarak Artifact Registry'de bir Docker deposu oluşturun:
export REPOSITORY_NAME="agents-repo"

gcloud artifacts repositories create $REPOSITORY_NAME \
    --project=$PROJECT_ID \
    --repository-format=docker \
    --location=$LOCATION \
    --description="Docker repository for Agents"
2. adım: Hizmet hesabı izinlerini yapılandırın
Varsayılan Compute Hizmet Hesabı'na, Artifact Registry'ye görüntü gönderme izni verin.
Öncelikle proje numaranızı alın:
export PROJECT_NUMBER=$(gcloud projects describe $PROJECT_ID --format="value(projectNumber)")
Rolleri verin:
# Allow pushing to Artifact Registry
gcloud projects add-iam-policy-binding $PROJECT_ID \
    --member="serviceAccount:$PROJECT_NUMBER-compute@developer.gserviceaccount.com" \
    --role="roles/artifactregistry.writer" \
    --condition=None

# Allow Cloud Build to read storage objects
gcloud projects add-iam-policy-binding $PROJECT_NUMBER \
    --member="serviceAccount:$PROJECT_NUMBER-compute@developer.gserviceaccount.com" \
    --role="roles/storage.objectViewer" \
    --condition=None
3. adım: Servis temsilcilerine izin verin
AI Platform ve Reasoning Engine hizmet aracılarının Artifact Registry okuyucu erişimini etkinleştirin:
gcloud projects add-iam-policy-binding $PROJECT_NUMBER \
    --member="serviceAccount:service-$PROJECT_NUMBER@gcp-sa-aiplatform-re.iam.gserviceaccount.com" \
    --role="roles/artifactregistry.reader"  --condition=None

gcloud projects add-iam-policy-binding $PROJECT_NUMBER \
    --member="serviceAccount:service-$PROJECT_NUMBER@gcp-sa-aiplatform.iam.gserviceaccount.com" \
    --role="roles/artifactregistry.reader"  --condition=None
4. adım: Görüntü oluşturma ve gönderme
Container görüntüsünü oluşturmak ve aktarmak için Cloud Build'i kullanın:
gcloud builds submit \
    --project=$PROJECT_ID \
    --region=$LOCATION \
    --tag $LOCATION-docker.pkg.dev/$PROJECT_ID/$REPOSITORY_NAME/weather-agent-image:latest \
    .
6. Aracı SDK ile dağıtma
İzinler yapılandırıldığına göre artık özel kapsayıcınızı dağıtabilirsiniz.
1. adım: BYOC aracısını dağıtın
Kayıt defterinde barındırılan kapsayıcıyı Agent Runtime'a dağıtmak için proje dizininizin kök dizininde deploy_byoc.py python dosyasını oluşturun:
cat << 'EOF' > deploy_byoc.py
import json
import os
import vertexai
from google.cloud import aiplatform

config = json.load(open("weather_agent/config.json"))
PROJECT_ID = config["PROJECT_ID"]
LOCATION = config["LOCATION"]
REPOSITORY_NAME = "agents-repo"

vertexai.init(project=PROJECT_ID, location=LOCATION)
client = vertexai.Client(project=PROJECT_ID, location=LOCATION)

image_uri = f"{LOCATION}-docker.pkg.dev/{PROJECT_ID}/{REPOSITORY_NAME}/weather-agent-image:latest"

print(f"Deploying custom container agent from {image_uri}...")
remote_agent = client.agent_engines.create(
    config={
        "display_name": "byoc_weather_agent",
        "description": "BYOC weather agent from custom container",
        "container_spec": {
            "image_uri": image_uri
        },
        "class_methods": [
            # For convenience to interact with the agent through the Python SDK
            # https://docs.cloud.google.com/gemini-enterprise-agent-platform/scale/runtime/use-an-adk-agent#supported-operations
            {"api_mode": "", "name": "get_session"},
            {"api_mode": "", "name": "list_sessions"},
            {"api_mode": "", "name": "create_session"},
            {"api_mode": "", "name": "delete_session"},
            {"api_mode": "async", "name": "async_get_session"},
            {"api_mode": "async", "name": "async_list_sessions"},
            {"api_mode": "async", "name": "async_create_session"},
            {"api_mode": "async", "name": "async_delete_session"},
            {"api_mode": "async", "name": "async_add_session_to_memory"},
            {"api_mode": "async", "name": "async_search_memory"},
            {"api_mode": "stream", "name": "stream_query"},
            {"api_mode": "async_stream", "name": "async_stream_query"},
            {"api_mode": "async_stream", "name": "streaming_agent_run_with_events"},
        ],
        "agent_framework": "google-adk",
    },
)

print(f"Agent successfully deployed!")
print(f"Resource Name: {remote_agent.api_resource.name}")

# Save resource name for testing
with open("agent_resource_name.txt", "w") as f:
    f.write(remote_agent.api_resource.name)
EOF
Temsilciyi Agent Runtime'a dağıtmak için dağıtım komut dosyasını çalıştırın:
python3 deploy_byoc.py
7. Aracı Terraform ile dağıtma
Alternatif olarak, aynı kapsayıcılı aracı Terraform kullanarak da dağıtabilirsiniz. Bu, üretim ortamlarında altyapıyı kod olarak yönetmek için önerilir.
1. adım: Terraform dizinine gidin
Projenizin kök dizininde bir terraform dizini oluşturun ve bu dizine gidin:
mkdir -p terraform
cd terraform
2. adım: Sağlayıcı yapılandırması oluşturun
Sağlayıcı eşlemesini providers.tf konumuna yazmak için aşağıdaki komut dosyasını çalıştırın:
cat << 'EOF' > providers.tf
terraform {
  required_providers {
    google = {
      source  = "hashicorp/google"
      version = ">= 5.28.0"
    }
  }
}

provider "google" {
  project = var.project_id
  region  = var.location
}
EOF
3. adım: Değişken tanımı oluşturun
Giriş açıklaması bloğunu variables.tf olarak yazın:
cat << 'EOF' > variables.tf
variable "project_id" {
  type        = string
  description = "The Google Cloud Project ID"
}

variable "location" {
  type        = string
  description = "The region to deploy the reasoning engine"
  default     = "us-central1"
}

variable "repository_name" {
  type        = string
  description = "The Artifact Registry repository name"
  default     = "agents-repo"
}

variable "image_tag" {
  type        = string
  description = "The tag of the container image to deploy"
  default     = "latest"
}
EOF
4. adım: Ana yapılandırmayı oluşturun
Ana kaynak tanımı parametrelerini main.tf olarak yazın:
cat << 'EOF' > main.tf
locals {
  class_methods = [
    {"api_mode" = "", "name" = "get_session"},
    {"api_mode" = "", "name" = "list_sessions"},
    {"api_mode" = "", "name" = "create_session"},
    {"api_mode" = "", "name" = "delete_session"},
    {"api_mode" = "async", "name" = "async_get_session"},
    {"api_mode" = "async", "name" = "async_list_sessions"},
    {"api_mode" = "async", "name" = "async_create_session"},
    {"api_mode" = "async", "name" = "async_delete_session"},
    {"api_mode" = "async", "name" = "async_add_session_to_memory"},
    {"api_mode" = "async", "name" = "async_search_memory"},
    {"api_mode" = "stream", "name" = "stream_query"},
    {"api_mode" = "async_stream", "name" = "async_stream_query"},
    {"api_mode" = "async_stream", "name" = "streaming_agent_run_with_events"}
  ]
}

# define the resource with the BYOC configuration, set agent_framework to "google-adk" to enable interactive features on the console.
resource "google_vertex_ai_reasoning_engine" "byoc_weather_agent" {
  display_name = "byoc_weather_agent_tf"
  description  = "BYOC weather agent deployed via Terraform"
  project      = var.project_id
  location     = var.location

  spec {
    class_methods = jsonencode(local.class_methods)
    agent_framework = "google-adk"
    container_spec {
      image_uri = "${var.location}-docker.pkg.dev/${var.project_id}/${var.repository_name}/weather-agent-image:${var.image_tag}"
    }
  }
}
EOF
5. adım: Çıkış tanımı oluşturun
Çıkış blokunu outputs.tf olarak yazın:
cat << 'EOF' > outputs.tf
output "reasoning_engine_id" {
  value       = google_vertex_ai_reasoning_engine.byoc_weather_agent.id
  description = "The ID of the deployed reasoning engine"
}

output "reasoning_engine_resource_name" {
  value       = google_vertex_ai_reasoning_engine.byoc_weather_agent.id
  description = "The resource name of the deployed reasoning engine"
}
EOF
6. adım: Değişken değerleri dosyası (tfvars) oluşturun
Ortam değişkenlerini doğrudan terraform.tfvars'ya aktararak yer tutucu düzenlemesi yapmadan dinamik olarak dağıtın:
cat <<EOF > terraform.tfvars
project_id      = "${PROJECT_ID}"
location        = "${LOCATION}"
repository_name = "agents-repo"
image_tag       = "latest"
EOF
7. adım: Başlatın ve uygulayın
Terraform'u başlatın ve yapılandırmayı uygulayın:
terraform init
terraform apply
İstendiğinde yes yazarak uygulamayı onaylayın.
İşlem tamamlandığında Terraform, kaynak adını verir. Programatik olarak agent_resource_name.txt konumuna kaydedin ve kök klasöre dönün:
terraform output -raw reasoning_engine_resource_name > ../agent_resource_name.txt
cd ..
8. Ajana sorgu gönderme
Temsilcinizin çalıştığını ve yanıt verdiğini doğrulayın.
1. adım: Sorgu komut dosyası oluşturun
Yer koordinatlarını getirmek için dinamik kurulum yapılandırma kontrolü kullanarak doğrulama komut dosyasını query_agent.py olarak yazın:
cat << 'EOF' > query_agent.py
import json
import os
import requests
from google import auth as google_auth
from google.auth.transport import requests as google_requests

# Load config coordinates directly
config_json = json.load(open("weather_agent/config.json"))
LOCATION = config_json["LOCATION"]
PROJECT_ID = config_json["PROJECT_ID"]

# Load agent resource name
with open("agent_resource_name.txt", "r") as f:
    agent_resource_name = f.read().strip()

def get_identity_token():
    credentials, _ = google_auth.default()
    auth_request = google_requests.Request()
    credentials.refresh(auth_request)
    return credentials.token

# Access the agent at the fastapi endpoint that was specified in main.py
url = f"https://{LOCATION}-aiplatform.googleapis.com/v1/{agent_resource_name}/api/stream_reasoning_engine"

payload = {
    "class_method": "async_stream_query",
    "input": {
        "user_id": "codelab_test_user",
        "message": "What is the temperature in Tokyo?",
    },
}

print(f"Sending query to {url}...")
response = requests.post(
    url,
    headers={
        "Content-Type": "application/json",
        "Authorization": f"Bearer {get_identity_token()}",
    },
    data=json.dumps(payload),
    stream=True,
)

for chunk in response.iter_content(chunk_size=8192):
    if chunk:
        print(chunk.decode('utf-8'))
EOF
Sorgu komut dosyasını çalıştırın:
python3 query_agent.py
Tokyo'nun simüle edilmiş sıcaklığı da dahil olmak üzere, aracıdan geri gelen çıkış akışını görmeniz gerekir.
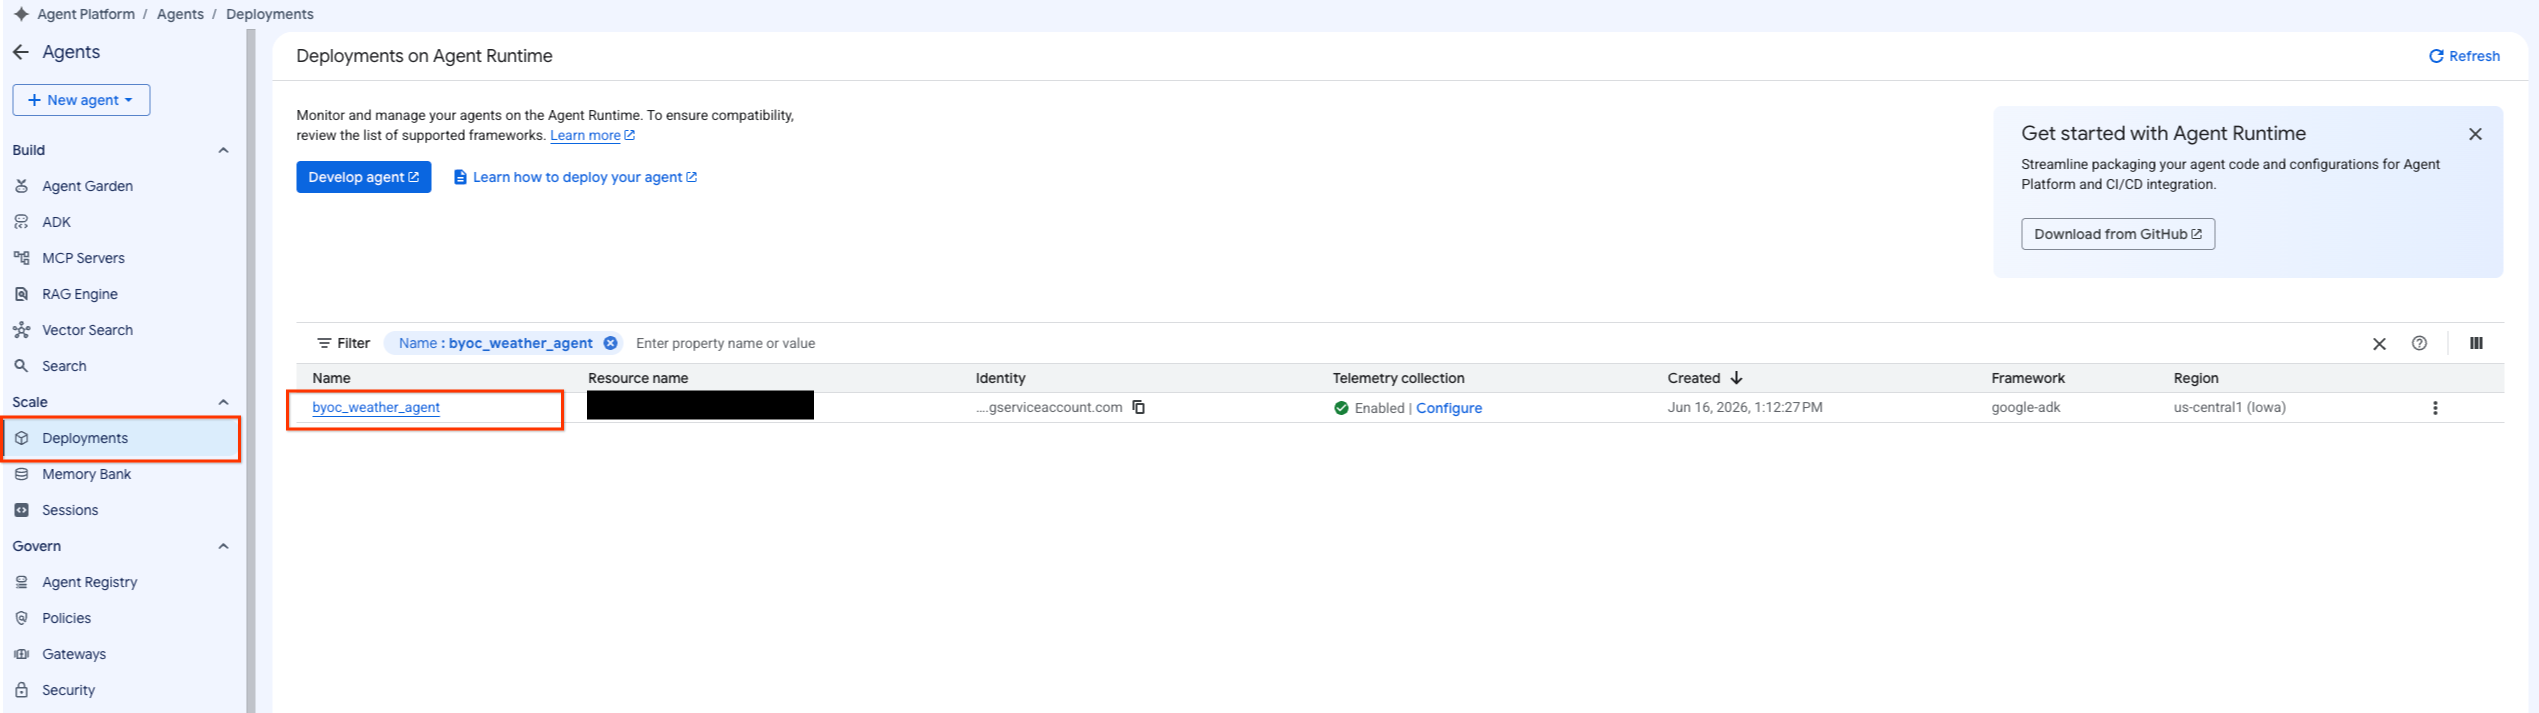
2. adım: Konsolu kullanın
- Agent Platform > Agents > Deployments'ı seçerek dağıtılan aracıya gidin. Bu şekilde, aracı listesini filtreleyebilirsiniz.
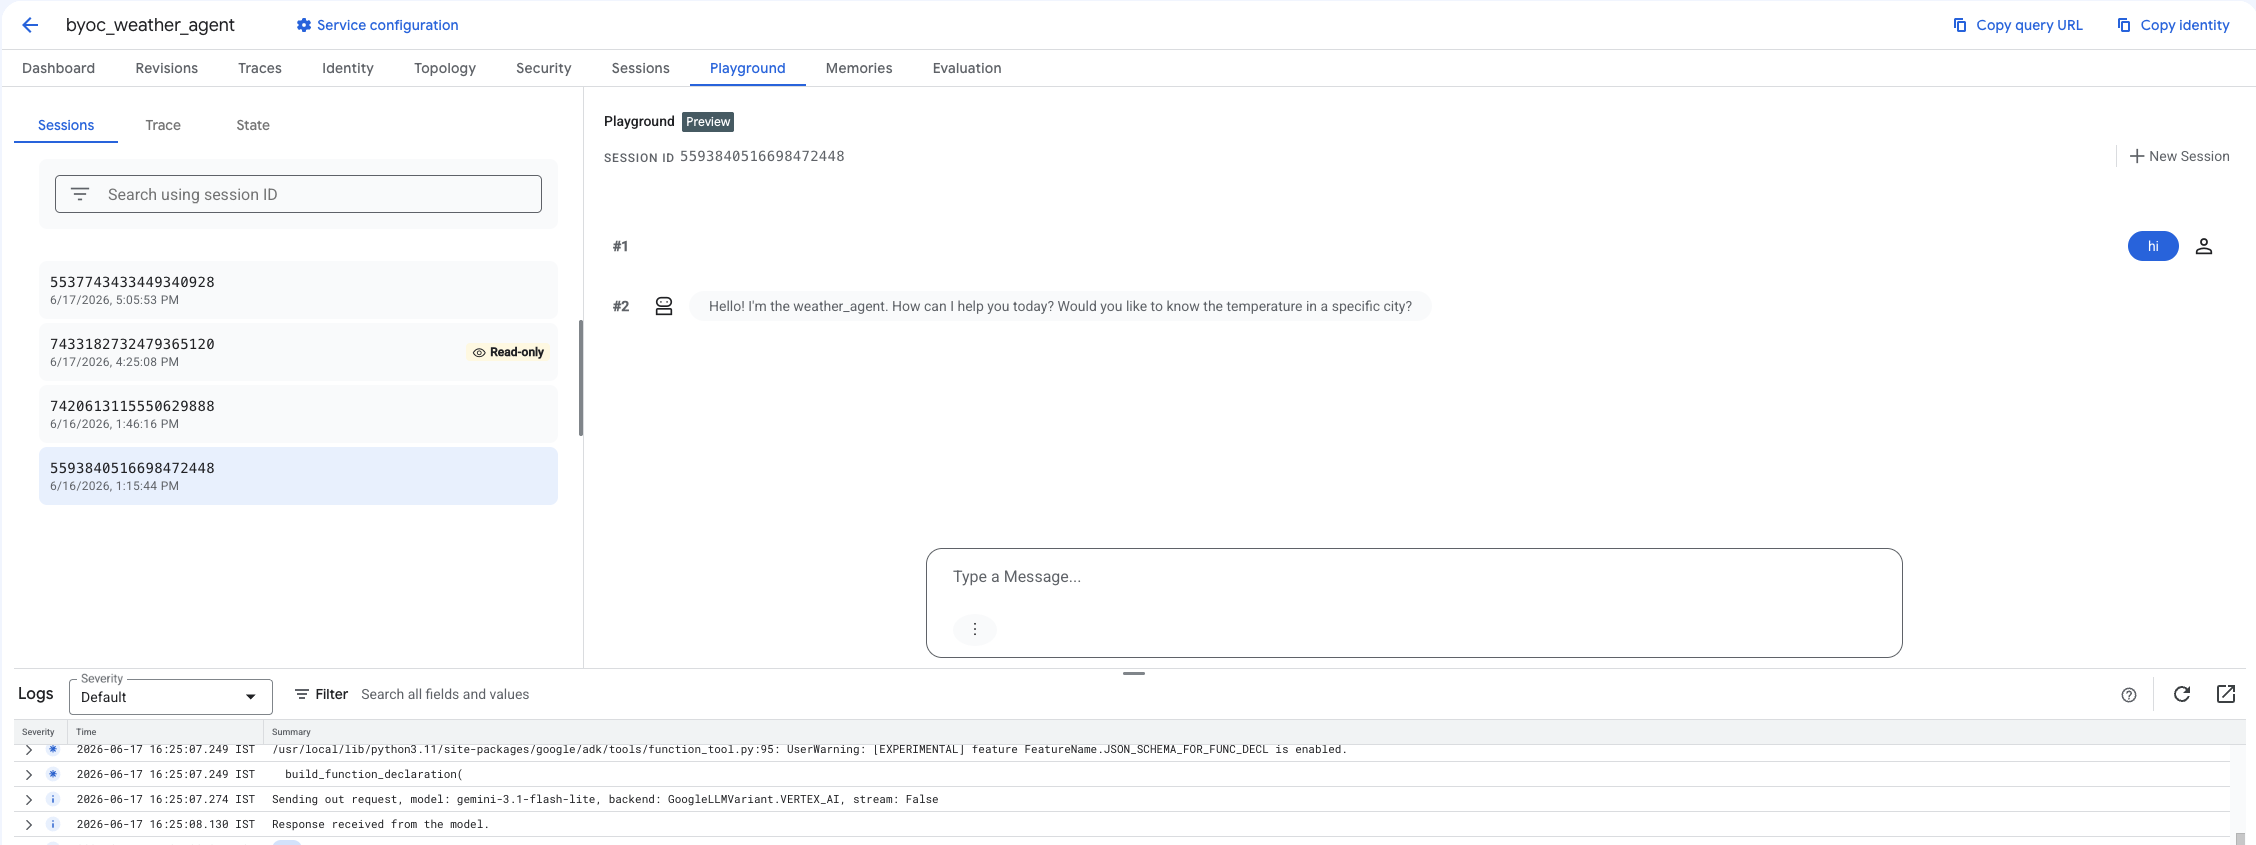
- Aracının kontrol panelinden Playground'u seçin.
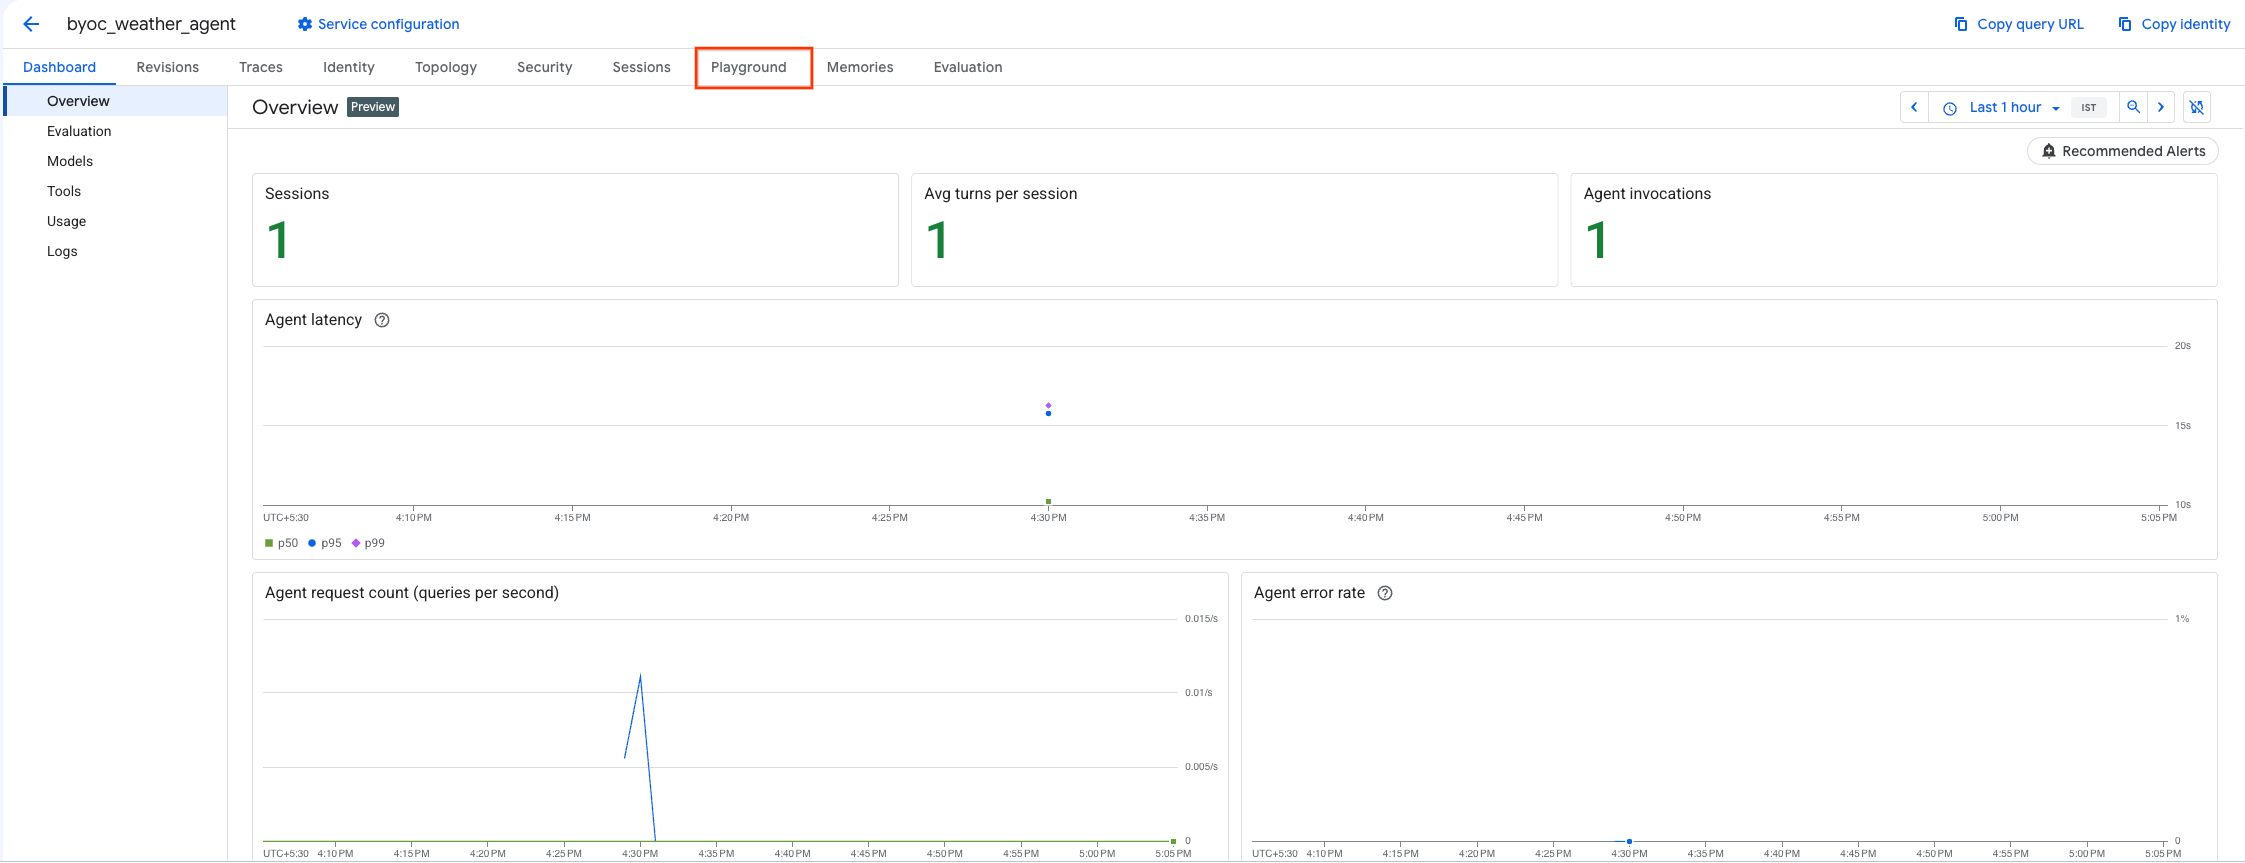
- Yeni bir oturum oluşturun ve sorgunuzu girerek temsilcinin, gösterildiği gibi isteklere yanıt verip vermediğini kontrol edin.
9. Temizleme
Ücretlendirilmemek için oluşturduğunuz kaynakları temizleyin.
Terraform kullanarak dağıtım yaptıysanız terraform dizinine geçin ve destroy işlemini yürütün:
cd ~/weather-agent-byoc/terraform
terraform destroy
cd ..
SDK'yı kullanarak dağıtım yaptıysanız dağıtılan temsilciyi silmek için komut dosyası oluşturun:
cat << 'EOF' > delete_agent.py
import json
import os
import vertexai
from google.cloud import aiplatform

config = json.load(open("weather_agent/config.json"))
PROJECT_ID = config["PROJECT_ID"]
LOCATION = config["LOCATION"]

vertexai.init(project=PROJECT_ID, location=LOCATION)
client = vertexai.Client(project=PROJECT_ID, location=LOCATION)

with open("agent_resource_name.txt", "r") as f:
    agent_resource_name = f.read().strip()

# 1. Delete the Agent
# Note: We retrieve the list first to ensure we delete the ones created in this session
try:
    page_size = 100
    reasoning_engines = client.agent_engines.list()
    for engine in reasoning_engines:
        if agent_resource_name in engine.api_resource.name:
            print(f"Deleting Reasoning Engine: {engine.api_resource.name}")
            engine.delete(force=True)
except Exception as e:
    print(f"Error deleting reasoning engines: {e}")
EOF
Ajanı silmek için komut dosyasını çalıştırın:
python3 delete_agent.py
Kaynakların geri kalanını temizlemek için ana dizininize geri dönün ve Cloud Shell'de aşağıdaki komutları çalıştırın:
cd ~

# 1. Delete the Artifact Registry Repository
gcloud artifacts repositories delete $REPOSITORY_NAME --location=$LOCATION --quiet

# 2. Clean up files (Optional)
rm -rf ~/weather-agent-byoc
10. Sonuç
Tebrikler! BYOC kullanarak bir yapay zeka aracısını başarıyla kapsülleyip Agent Runtime'da dağıttınız.
Öğrendikleriniz:
- Bir aracı tanımlamak ve FastAPI kullanarak sarmalamak için ADK'yı kullanın.
- Dockerfile oluşturun ve Cloud Build kullanarak görüntü derleyin.
- Agent Runtime için IAM izinlerini yönetin.
- Python SDK ve Terraform'u kullanarak özel kapsayıcınızı dağıtın.
- Dağıtılan temsilcinizi test edin ve sorgulayın.