
1. Tổng quan
Thời gian chạy tác nhân (trước đây là Công cụ tác nhân) cung cấp một môi trường thời gian chạy được quản lý, được thiết kế để triển khai, chạy và mở rộng quy mô tác nhân AI một cách hiệu quả. Theo mặc định, nền tảng này sẽ tự động gói mã nguồn và các phần phụ thuộc trong quá trình triển khai.
Tuy nhiên, khối lượng công việc của doanh nghiệp thường yêu cầu quyền sở hữu hoàn toàn đối với môi trường thời gian chạy. Để hỗ trợ điều này, Thời gian chạy tác nhân cung cấp Khả năng mang vùng chứa của riêng bạn(BYOC), cho phép bạn triển khai hình ảnh vùng chứa tuỳ chỉnh được tạo sẵn.
Lớp học lập trình này trình bày quy trình từ đầu đến cuối để đóng gói tác nhân được tạo bằng Bộ công cụ phát triển tác nhân (ADK) của Google, định cấu hình các quyền cần thiết trên Google Cloud và triển khai tác nhân đó vào Thời gian chạy tác nhân bằng Python SDK hoặc Terraform.
Lớp học lập trình này hướng dẫn bạn:
- Tạo tác nhân Python bằng Bộ công cụ phát triển tác nhân (ADK) của Google.
- Gói tác nhân trong ứng dụng FastAPI.
- Đóng gói ứng dụng bằng Docker.
- Định cấu hình quyền trên Google Cloud.
- Triển khai và kiểm thử tác nhân được đóng gói trên Thời gian chạy tác nhân.
Quy trình tạo và triển khai
Sơ đồ sau đây minh hoạ quy trình làm việc của các bước tạo và triển khai mà bạn sẽ thực hiện theo cách thủ công trong lớp học lập trình này:

Những điều bạn cần
- Một Dự án trên Google Cloud đã bật tính năng thanh toán.
- Quyền truy cập vào Cloud Shell (nên dùng) hoặc môi trường phát triển cục bộ đã cài đặt
gcloudvàdocker. - Kiến thức cơ bản về Python và Docker.
2. Thiết lập môi trường
Trước khi bắt đầu, bạn phải bật các API cần thiết và định cấu hình môi trường.
Bước 1: Mở Cloud Shell
Nhấp vào nút Kích hoạt Cloud Shell ở trên cùng bên phải của Google Cloud Console.

Bước 2: Định cấu hình biến môi trường
Trong Cloud Shell, hãy đặt mã dự án và xác định các biến môi trường chính được dùng trong lớp học lập trình này. Thay "YOUR_PROJECT_ID" bằng mã dự án thực tế của bạn trên Google Cloud:
gcloud config set project "YOUR_PROJECT_ID"
export PROJECT_ID=$(gcloud config get-value project)
export LOCATION="us-central1"
export MODEL="gemini-3.1-flash-lite"
export MODEL_REGION="global"
Các biến này định cấu hình chế độ cài đặt triển khai mục tiêu:
PROJECT_ID: Mã nhận dạng duy nhất của Dự án trên Google Cloud nơi tất cả các tài nguyên của Nền tảng tác nhân Gemini Enterprise và Artifact Registry sẽ nằm.LOCATION: Khu vực địa lý (ví dụ:us-central1) lưu trữ kho lưu trữ và khối lượng công việc thời gian chạy.MODEL: Phiên bản mô hình Gemini (ví dụ:gemini-3.1-flash-lite) do ngữ cảnh tác nhân tải.MODEL_REGION: Khu vực điểm cuối của mô hình. Đặt ở đây là"global"để gọi mô hình Gemini từ các điểm cuối toàn cầu.
Bước 3: Bật API
Bật các API cần thiết trên Google Cloud:
gcloud services enable \
    aiplatform.googleapis.com \
    cloudbuild.googleapis.com \
    compute.googleapis.com \
    artifactregistry.googleapis.com \
    storage.googleapis.com
Bước 4: Cài đặt SDK
Cài đặt Vertex AI SDK có hỗ trợ Công cụ tác nhân và ADK:
pip install --upgrade "google-cloud-aiplatform[agent_engines,adk]>=1.144"
3. Thiết lập tệp nguồn
Ở bước này, bạn sẽ tạo cấu trúc và mã cho tác nhân.
Tổng quan về cấu trúc thư mục
Kết thúc lớp học lập trình này, các tệp của bạn sẽ được sắp xếp theo hệ phân cấp không gian làm việc sau:
weather-agent-byoc/
├── Dockerfile                  # Container definition
├── deploy_byoc.py              # Python SDK deployment script
├── main.py                     # FastAPI server wrapper
├── query_agent.py              # Verify / query script
├── requirements.txt            # Python dependencies
│
├── weather_agent/              # Agent source module
│   ├── __init__.py             # Package declaration
│   ├── agent.py                # Agent & mock tools logic
│   └── config.json             # Environment config variables
│
└── terraform/                  # Terraform configuration files
    ├── main.tf
    ├── outputs.tf
    ├── providers.tf
    ├── terraform.tfvars
    └── variables.tf
Bước 1: Tạo thư mục
Bắt đầu trong thư mục chính và tạo cấu trúc không gian làm việc:
cd ~
mkdir -p weather-agent-byoc/weather_agent
cd weather-agent-byoc
Bước 2: Tạo tệp cấu hình
Chạy lệnh sau trong Cloud Shell để ghi trực tiếp các tham số cấu hình vào weather_agent/config.json. Lệnh này sẽ tự động thay thế các biến bằng giá trị môi trường của bạn:
cat <<EOF > weather_agent/config.json
{
    "PROJECT_ID": "${PROJECT_ID}",
    "LOCATION": "${LOCATION}",
    "MODEL": "${MODEL}",
    "MODEL_REGION": "${MODEL_REGION}"
}
EOF
Bước 3: Xác định tác nhân
Chạy tập lệnh sau để ghi cấu hình tác nhân và logic công cụ mô phỏng vào weather_agent/agent.py:
cat << 'EOF' > weather_agent/agent.py
import json
import random
from google.adk.agents import Agent
from google.adk.models.google_llm import Gemini
from functools import cached_property
from google.genai import Client

# Load config
llm_config = json.load(open("weather_agent/config.json"))
PROJECT_ID = llm_config["PROJECT_ID"]
MODEL = llm_config["MODEL"]
MODEL_REGION = llm_config["MODEL_REGION"]

# Override Gemini class for global endpoint compatibility
class GlobalGemini(Gemini):
  @cached_property
  def api_client(self) -> Client:
    return Client(vertexai=True, location="global")

# Define Tool
def get_temperature(place: str) -> str:
    '''Returns the current temperature of a given place.

    Args:
        place: The name of the city or location.

    Returns:
        str: A string describing the temperature.
    '''
    temp = random.randint(-10, 40)
    return f"The current temperature in {place} is {temp}°C."

# Initialize LLM
llm_model = GlobalGemini(model=MODEL) if MODEL_REGION == "global" else Gemini(model=MODEL)

# Initialize Agent
root_agent = Agent(
    model=llm_model,
    name='weather_agent',
    description='An agent that provides temperature information for locations.',
    instruction='You are a helpful assistant that can provide the current temperature for any given place using the get_temperature tool.',
    tools=[get_temperature],
)
EOF
Tạo __init__.py trống để biến weather_agent thành gói Python:
touch weather_agent/__init__.py
Bước 4: Tạo trình bao bọc FastAPI
Chạy tập lệnh sau để ghi cấu hình điểm truy cập máy chủ FastAPI vào main.py:
cat << 'EOF' > main.py
import inspect
import json
import logging
import os
from typing import Any, Dict, Optional
import uvicorn
import vertexai
from weather_agent.agent import root_agent
from fastapi import FastAPI, encoders, responses
from pydantic import BaseModel
from vertexai import agent_engines

app = FastAPI()

config_json = json.load(open("weather_agent/config.json"))
PROJECT_ID = config_json["PROJECT_ID"]
LOCATION = config_json["LOCATION"]
MODEL_REGION = config_json["MODEL_REGION"]

class QueryRequest(BaseModel):
    input: Optional[Dict[str, Any]] = None
    class_method: Optional[str] = None

vertexai.init(project=PROJECT_ID, location=MODEL_REGION)
adk_app = agent_engines.AdkApp(agent=root_agent)

def _encode_chunk_to_json(chunk):
  try:
    json_chunk = encoders.jsonable_encoder(chunk)
    return json.dumps(json_chunk) + "\n"
  except Exception:
    logging.exception("Failed to encode chunk")
    return None

async def json_generator(output):
  async for chunk in output:
    encoded_chunk = _encode_chunk_to_json(chunk)
    if encoded_chunk is None:
      break
    yield encoded_chunk

async def _invoke_callable_or_raise(invocation_callable, invocation_payload):
  if inspect.iscoroutinefunction(invocation_callable):
    return await invocation_callable(**invocation_payload)
  else:
    return invocation_callable(**invocation_payload)

@app.post("/api/reasoning_engine")
async def query(request: QueryRequest) -> responses.JSONResponse:
    method = getattr(adk_app, request.class_method)
    output = await _invoke_callable_or_raise(method, request.input or {})
    try:
      json_serialized_content = encoders.jsonable_encoder({"output": output})
    except ValueError as encoding_error:
      logging.exception("Failed to encode response")
      raise encoding_error
    return responses.JSONResponse(content=json_serialized_content)

@app.post("/api/stream_reasoning_engine")
async def stream_query(request: QueryRequest) -> responses.StreamingResponse:
    method = getattr(adk_app, request.class_method)
    output = await _invoke_callable_or_raise(method, request.input or {})
    return responses.StreamingResponse(
        content=json_generator(output),
        media_type="application/json",
    )

if __name__ == "__main__":
    uvicorn.run(app, host="0.0.0.0", port=int(os.environ.get("PORT", 8080)))
EOF
Bước 5: Xác định các phần phụ thuộc
Ghi các phần phụ thuộc bắt buộc của Python vào requirements.txt:
cat << 'EOF' > requirements.txt
fastapi
uvicorn
vertexai
google-cloud-aiplatform[agent_engines,adk]>=1.144
pydantic
EOF
4. Chuyên chở bằng công ten nơ
Bây giờ, hãy xác định cách tác nhân của bạn sẽ được đóng gói vào một vùng chứa.
Bước 1: Tạo Dockerfile
Tạo Dockerfile trong thư mục gốc của dự án để chỉ định cách tạo ứng dụng FastAPI:
cat << 'EOF' > Dockerfile
FROM python:3.11-slim

WORKDIR /app

COPY weather_agent/ /app/weather_agent/
COPY main.py .
COPY requirements.txt .
RUN pip install -r requirements.txt

CMD ["sh", "-c", "uvicorn main:app --host 0.0.0.0 --port $PORT"]
EOF
5. Thiết lập Artifact Registry và Cloud Build
Bạn cần một kho lưu trữ để lưu hình ảnh vùng chứa và các quyền để đẩy hình ảnh đó.
Bước 1: Tạo kho lưu trữ
Xác định tên kho lưu trữ và tạo kho lưu trữ Docker bên trong Artifact Registry bằng các biến môi trường được xác định trong quá trình định cấu hình:
export REPOSITORY_NAME="agents-repo"

gcloud artifacts repositories create $REPOSITORY_NAME \
    --project=$PROJECT_ID \
    --repository-format=docker \
    --location=$LOCATION \
    --description="Docker repository for Agents"
Bước 2: Định cấu hình quyền của tài khoản dịch vụ
Cấp quyền cho Tài khoản dịch vụ Compute mặc định để đẩy hình ảnh vào Artifact Registry.
Trước tiên, hãy lấy số dự án:
export PROJECT_NUMBER=$(gcloud projects describe $PROJECT_ID --format="value(projectNumber)")
Cấp các vai trò:
# Allow pushing to Artifact Registry
gcloud projects add-iam-policy-binding $PROJECT_ID \
    --member="serviceAccount:$PROJECT_NUMBER-compute@developer.gserviceaccount.com" \
    --role="roles/artifactregistry.writer" \
    --condition=None

# Allow Cloud Build to read storage objects
gcloud projects add-iam-policy-binding $PROJECT_NUMBER \
    --member="serviceAccount:$PROJECT_NUMBER-compute@developer.gserviceaccount.com" \
    --role="roles/storage.objectViewer" \
    --condition=None
Bước 3: Cấp quyền cho các tác nhân dịch vụ
Cấp quyền truy cập vào Artifact Registry cho các tác nhân dịch vụ AI Platform và Reasoning Engine:
gcloud projects add-iam-policy-binding $PROJECT_NUMBER \
    --member="serviceAccount:service-$PROJECT_NUMBER@gcp-sa-aiplatform-re.iam.gserviceaccount.com" \
    --role="roles/artifactregistry.reader"  --condition=None

gcloud projects add-iam-policy-binding $PROJECT_NUMBER \
    --member="serviceAccount:service-$PROJECT_NUMBER@gcp-sa-aiplatform.iam.gserviceaccount.com" \
    --role="roles/artifactregistry.reader"  --condition=None
Bước 4: Tạo và đẩy hình ảnh
Sử dụng Cloud Build để tạo và đẩy hình ảnh vùng chứa:
gcloud builds submit \
    --project=$PROJECT_ID \
    --region=$LOCATION \
    --tag $LOCATION-docker.pkg.dev/$PROJECT_ID/$REPOSITORY_NAME/weather-agent-image:latest \
    .
6. Triển khai tác nhân bằng SDK
Bây giờ, bạn đã định cấu hình các quyền, bạn có thể triển khai vùng chứa tuỳ chỉnh.
Bước 1: Triển khai tác nhân BYOC
Tạo tệp python deploy_byoc.py bên trong thư mục gốc của dự án để triển khai vùng chứa được lưu trữ trong sổ đăng ký vào Thời gian chạy tác nhân:
cat << 'EOF' > deploy_byoc.py
import json
import os
import vertexai
from google.cloud import aiplatform

config = json.load(open("weather_agent/config.json"))
PROJECT_ID = config["PROJECT_ID"]
LOCATION = config["LOCATION"]
REPOSITORY_NAME = "agents-repo"

vertexai.init(project=PROJECT_ID, location=LOCATION)
client = vertexai.Client(project=PROJECT_ID, location=LOCATION)

image_uri = f"{LOCATION}-docker.pkg.dev/{PROJECT_ID}/{REPOSITORY_NAME}/weather-agent-image:latest"

print(f"Deploying custom container agent from {image_uri}...")
remote_agent = client.agent_engines.create(
    config={
        "display_name": "byoc_weather_agent",
        "description": "BYOC weather agent from custom container",
        "container_spec": {
            "image_uri": image_uri
        },
        "class_methods": [
            # For convenience to interact with the agent through the Python SDK
            # https://docs.cloud.google.com/gemini-enterprise-agent-platform/scale/runtime/use-an-adk-agent#supported-operations
            {"api_mode": "", "name": "get_session"},
            {"api_mode": "", "name": "list_sessions"},
            {"api_mode": "", "name": "create_session"},
            {"api_mode": "", "name": "delete_session"},
            {"api_mode": "async", "name": "async_get_session"},
            {"api_mode": "async", "name": "async_list_sessions"},
            {"api_mode": "async", "name": "async_create_session"},
            {"api_mode": "async", "name": "async_delete_session"},
            {"api_mode": "async", "name": "async_add_session_to_memory"},
            {"api_mode": "async", "name": "async_search_memory"},
            {"api_mode": "stream", "name": "stream_query"},
            {"api_mode": "async_stream", "name": "async_stream_query"},
            {"api_mode": "async_stream", "name": "streaming_agent_run_with_events"},
        ],
        "agent_framework": "google-adk",
    },
)

print(f"Agent successfully deployed!")
print(f"Resource Name: {remote_agent.api_resource.name}")

# Save resource name for testing
with open("agent_resource_name.txt", "w") as f:
    f.write(remote_agent.api_resource.name)
EOF
Chạy tập lệnh triển khai để triển khai tác nhân trên Thời gian chạy tác nhân:
python3 deploy_byoc.py
7. Triển khai tác nhân bằng Terraform
Ngoài ra, bạn có thể triển khai cùng một tác nhân được đóng gói bằng Terraform. Bạn nên dùng cách này cho môi trường sản xuất để quản lý cơ sở hạ tầng dưới dạng mã.
Bước 1: Chuyển đến thư mục Terraform
Tạo thư mục terraform trong thư mục gốc của dự án rồi chuyển đến thư mục đó:
mkdir -p terraform
cd terraform
Bước 2: Tạo cấu hình nhà cung cấp
Chạy tập lệnh sau để ghi ánh xạ nhà cung cấp vào providers.tf:
cat << 'EOF' > providers.tf
terraform {
  required_providers {
    google = {
      source  = "hashicorp/google"
      version = ">= 5.28.0"
    }
  }
}

provider "google" {
  project = var.project_id
  region  = var.location
}
EOF
Bước 3: Tạo định nghĩa biến
Ghi khối mô tả đầu vào vào variables.tf:
cat << 'EOF' > variables.tf
variable "project_id" {
  type        = string
  description = "The Google Cloud Project ID"
}

variable "location" {
  type        = string
  description = "The region to deploy the reasoning engine"
  default     = "us-central1"
}

variable "repository_name" {
  type        = string
  description = "The Artifact Registry repository name"
  default     = "agents-repo"
}

variable "image_tag" {
  type        = string
  description = "The tag of the container image to deploy"
  default     = "latest"
}
EOF
Bước 4: Tạo cấu hình chính
Ghi các tham số định nghĩa tài nguyên chính vào main.tf:
cat << 'EOF' > main.tf
locals {
  class_methods = [
    {"api_mode" = "", "name" = "get_session"},
    {"api_mode" = "", "name" = "list_sessions"},
    {"api_mode" = "", "name" = "create_session"},
    {"api_mode" = "", "name" = "delete_session"},
    {"api_mode" = "async", "name" = "async_get_session"},
    {"api_mode" = "async", "name" = "async_list_sessions"},
    {"api_mode" = "async", "name" = "async_create_session"},
    {"api_mode" = "async", "name" = "async_delete_session"},
    {"api_mode" = "async", "name" = "async_add_session_to_memory"},
    {"api_mode" = "async", "name" = "async_search_memory"},
    {"api_mode" = "stream", "name" = "stream_query"},
    {"api_mode" = "async_stream", "name" = "async_stream_query"},
    {"api_mode" = "async_stream", "name" = "streaming_agent_run_with_events"}
  ]
}

# define the resource with the BYOC configuration, set agent_framework to "google-adk" to enable interactive features on the console.
resource "google_vertex_ai_reasoning_engine" "byoc_weather_agent" {
  display_name = "byoc_weather_agent_tf"
  description  = "BYOC weather agent deployed via Terraform"
  project      = var.project_id
  location     = var.location

  spec {
    class_methods = jsonencode(local.class_methods)
    agent_framework = "google-adk"
    container_spec {
      image_uri = "${var.location}-docker.pkg.dev/${var.project_id}/${var.repository_name}/weather-agent-image:${var.image_tag}"
    }
  }
}
EOF
Bước 5: Tạo định nghĩa đầu ra
Ghi khối đầu ra vào outputs.tf:
cat << 'EOF' > outputs.tf
output "reasoning_engine_id" {
  value       = google_vertex_ai_reasoning_engine.byoc_weather_agent.id
  description = "The ID of the deployed reasoning engine"
}

output "reasoning_engine_resource_name" {
  value       = google_vertex_ai_reasoning_engine.byoc_weather_agent.id
  description = "The resource name of the deployed reasoning engine"
}
EOF
Bước 6: Tạo tệp giá trị biến (tfvars)
Triển khai động mà không cần chỉnh sửa trình giữ chỗ bằng cách truyền trực tiếp các biến môi trường vào terraform.tfvars:
cat <<EOF > terraform.tfvars
project_id      = "${PROJECT_ID}"
location        = "${LOCATION}"
repository_name = "agents-repo"
image_tag       = "latest"
EOF
Bước 7: Khởi chạy và áp dụng
Khởi chạy Terraform và áp dụng cấu hình:
terraform init
terraform apply
Xác nhận việc áp dụng bằng cách nhập yes khi được nhắc.
Sau khi hoàn tất, Terraform sẽ xuất tên tài nguyên. Tự động ghi lại tên tài nguyên đó vào agent_resource_name.txt và quay lại thư mục gốc:
terraform output -raw reasoning_engine_resource_name > ../agent_resource_name.txt
cd ..
8. Truy vấn tác nhân
Xác minh rằng tác nhân của bạn đang chạy và phản hồi.
Bước 1: Tạo tập lệnh truy vấn
Ghi tập lệnh xác minh vào query_agent.py bằng cách sử dụng chế độ kiểm tra cấu hình thiết lập động để tìm nạp toạ độ vị trí:
cat << 'EOF' > query_agent.py
import json
import os
import requests
from google import auth as google_auth
from google.auth.transport import requests as google_requests

# Load config coordinates directly
config_json = json.load(open("weather_agent/config.json"))
LOCATION = config_json["LOCATION"]
PROJECT_ID = config_json["PROJECT_ID"]

# Load agent resource name
with open("agent_resource_name.txt", "r") as f:
    agent_resource_name = f.read().strip()

def get_identity_token():
    credentials, _ = google_auth.default()
    auth_request = google_requests.Request()
    credentials.refresh(auth_request)
    return credentials.token

# Access the agent at the fastapi endpoint that was specified in main.py
url = f"https://{LOCATION}-aiplatform.googleapis.com/v1/{agent_resource_name}/api/stream_reasoning_engine"

payload = {
    "class_method": "async_stream_query",
    "input": {
        "user_id": "codelab_test_user",
        "message": "What is the temperature in Tokyo?",
    },
}

print(f"Sending query to {url}...")
response = requests.post(
    url,
    headers={
        "Content-Type": "application/json",
        "Authorization": f"Bearer {get_identity_token()}",
    },
    data=json.dumps(payload),
    stream=True,
)

for chunk in response.iter_content(chunk_size=8192):
    if chunk:
        print(chunk.decode('utf-8'))
EOF
Chạy tập lệnh truy vấn:
python3 query_agent.py
Bạn sẽ thấy kết quả truyền trực tiếp từ tác nhân, bao gồm cả nhiệt độ mô phỏng cho Tokyo.
Bước 2: Sử dụng bảng điều khiển
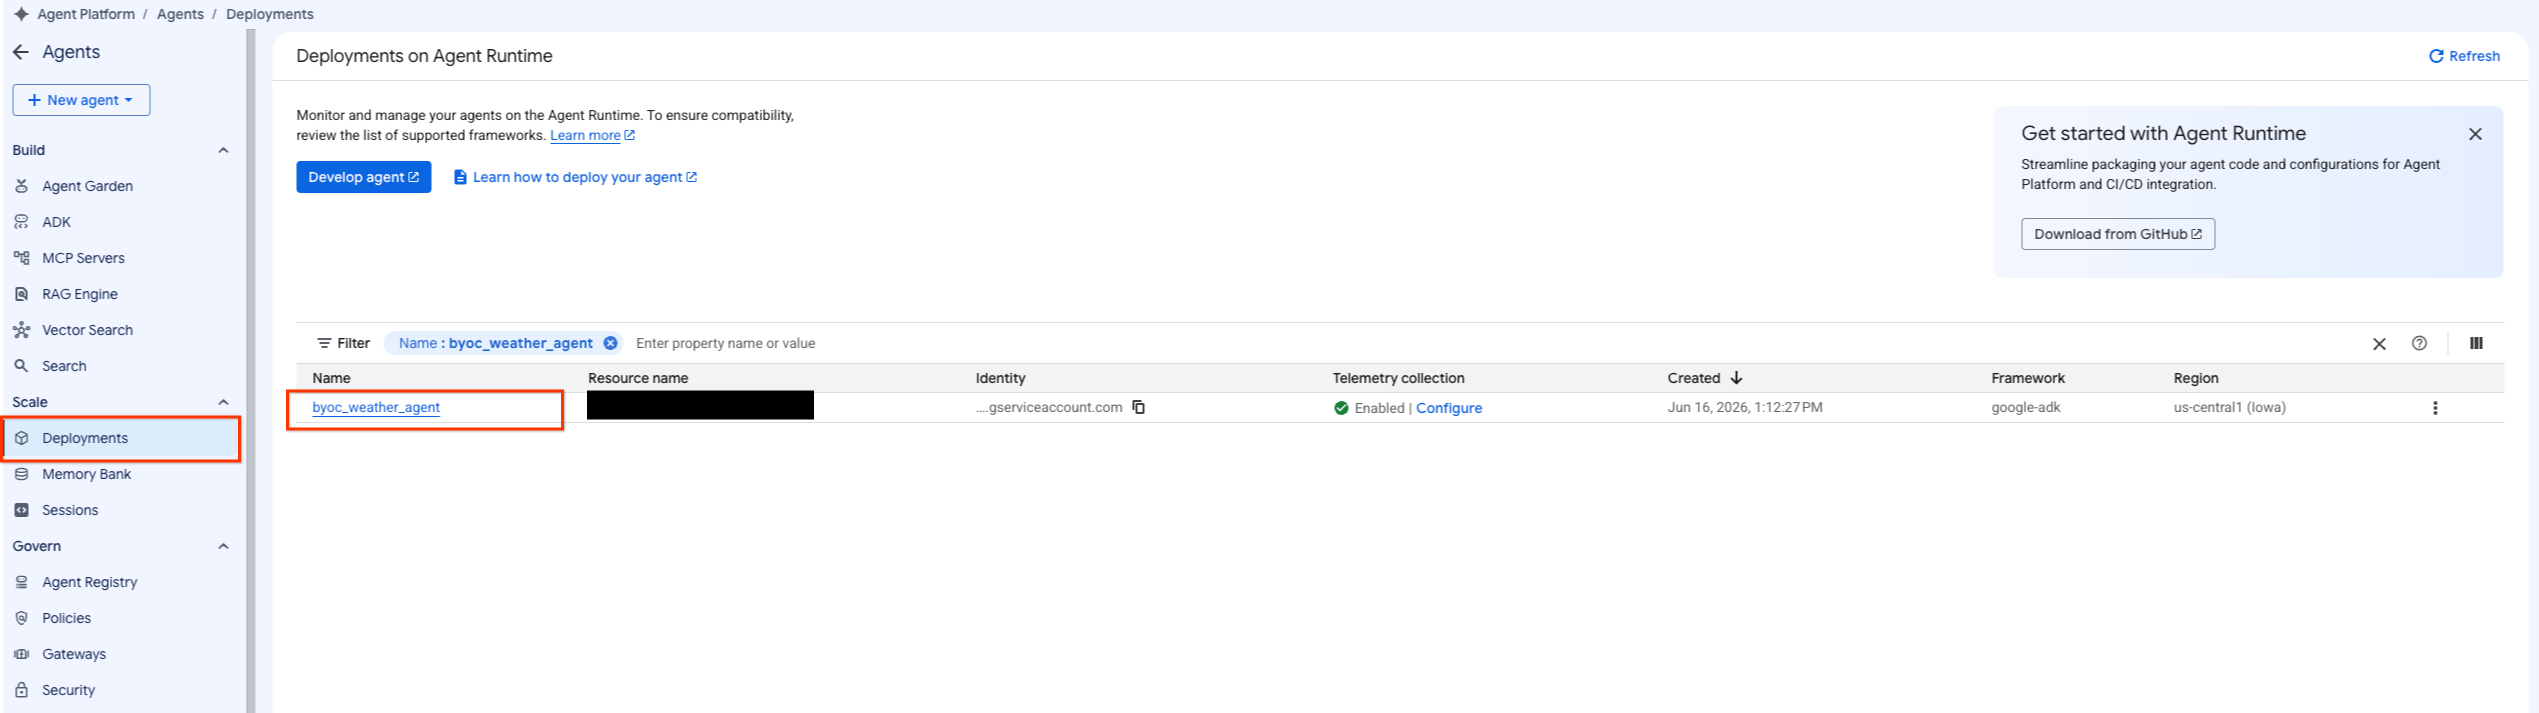
- Chuyển đến tác nhân đã triển khai bằng cách chọn Nền tảng tác nhân > Tác nhân > Triển khai để lọc danh sách tác nhân.
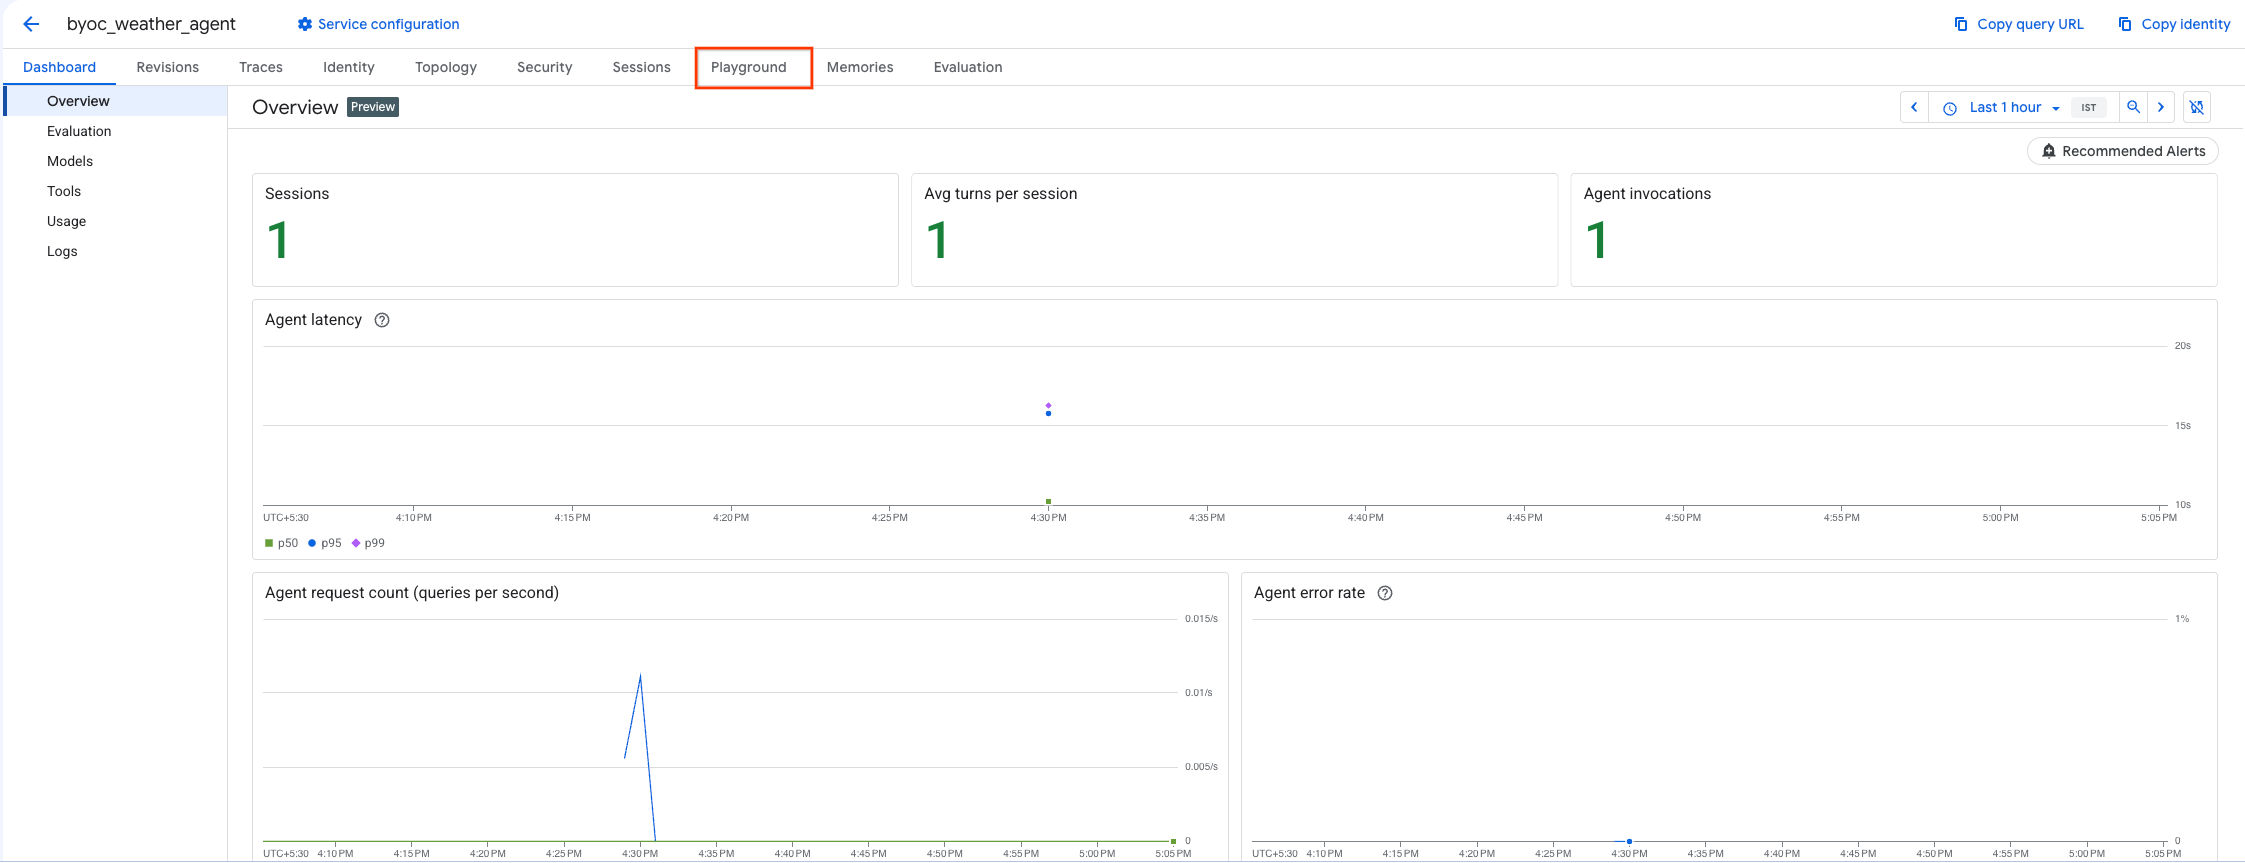
- Chọn Sân chơi trên trang tổng quan của Tác nhân.
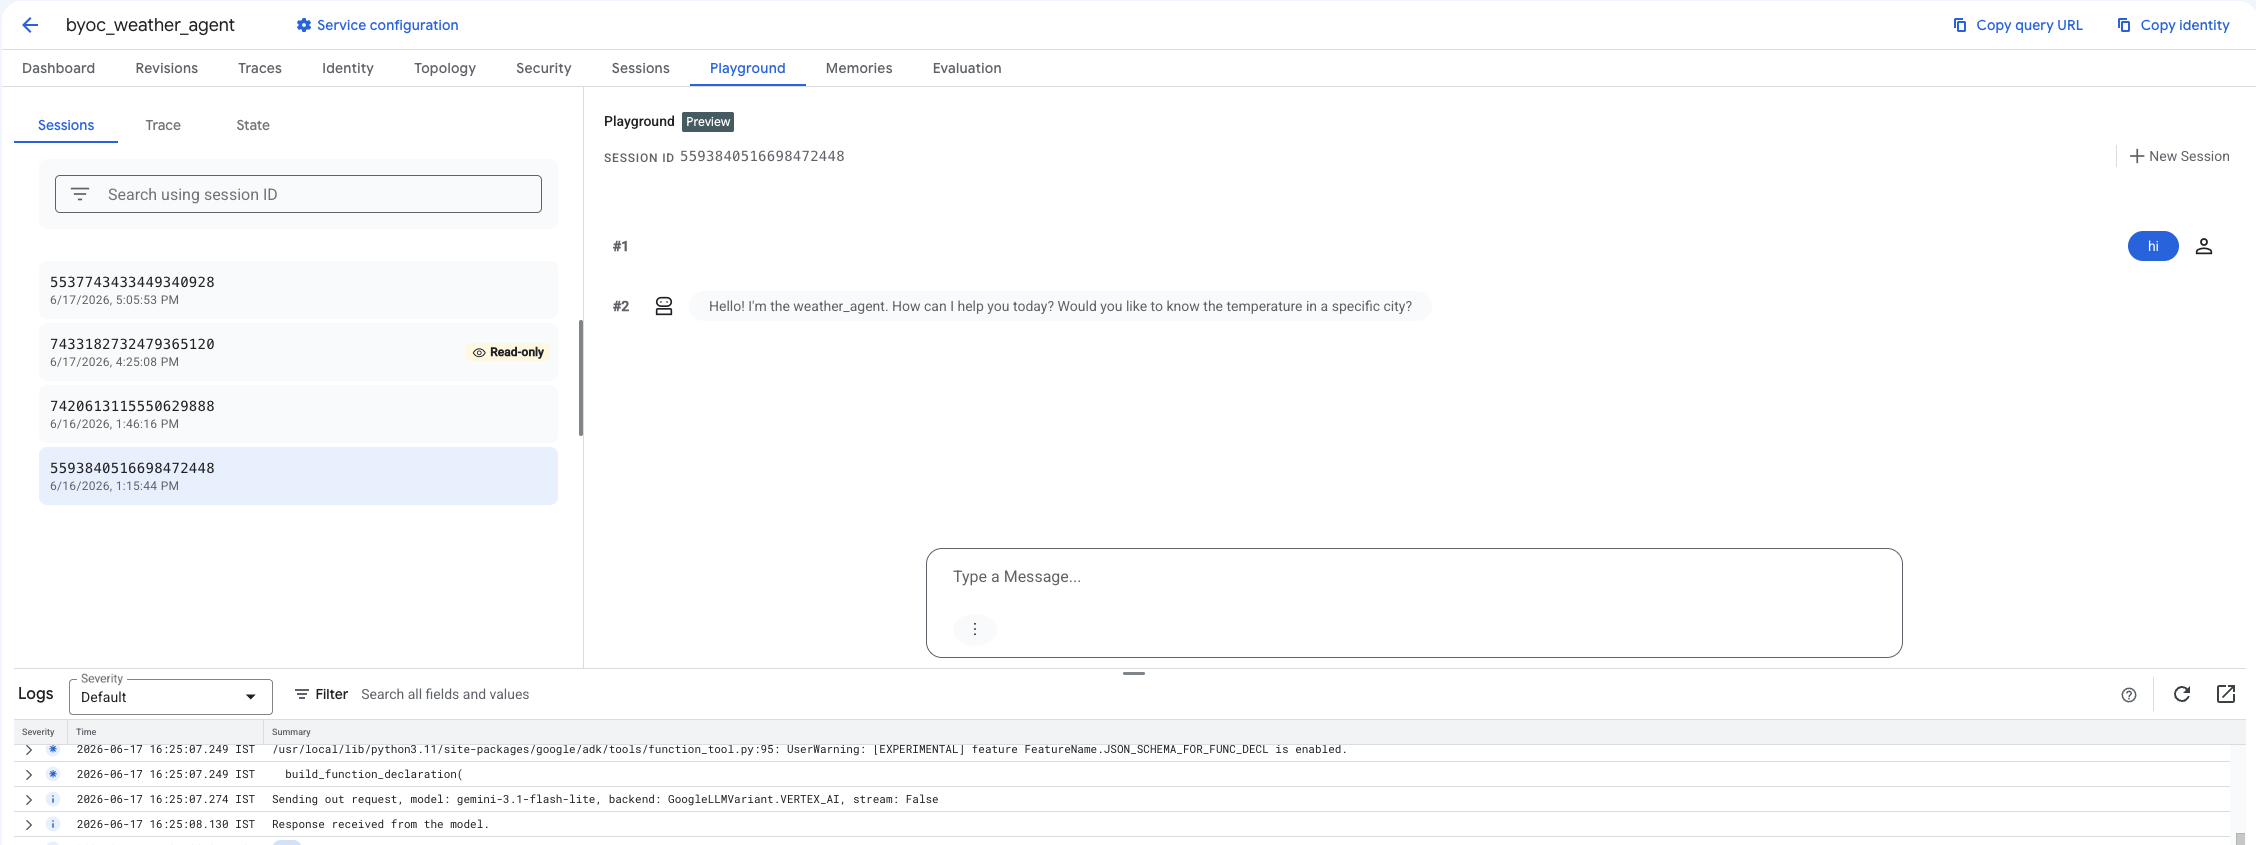
- Tạo một phiên mới và nhập truy vấn để kiểm tra xem tác nhân có phản hồi các yêu cầu như minh hoạ hay không.
9. Dọn dẹp
Để tránh bị tính phí, hãy dọn dẹp các tài nguyên mà bạn đã tạo.
Nếu bạn triển khai bằng Terraform, hãy chuyển sang thư mục terraform và thực thi thao tác hủy bỏ:
cd ~/weather-agent-byoc/terraform
terraform destroy
cd ..
Nếu bạn triển khai bằng SDK, hãy tạo tập lệnh để xoá tác nhân đã triển khai:
cat << 'EOF' > delete_agent.py
import json
import os
import vertexai
from google.cloud import aiplatform

config = json.load(open("weather_agent/config.json"))
PROJECT_ID = config["PROJECT_ID"]
LOCATION = config["LOCATION"]

vertexai.init(project=PROJECT_ID, location=LOCATION)
client = vertexai.Client(project=PROJECT_ID, location=LOCATION)

with open("agent_resource_name.txt", "r") as f:
    agent_resource_name = f.read().strip()

# 1. Delete the Agent
# Note: We retrieve the list first to ensure we delete the ones created in this session
try:
    page_size = 100
    reasoning_engines = client.agent_engines.list()
    for engine in reasoning_engines:
        if agent_resource_name in engine.api_resource.name:
            print(f"Deleting Reasoning Engine: {engine.api_resource.name}")
            engine.delete(force=True)
except Exception as e:
    print(f"Error deleting reasoning engines: {e}")
EOF
Chạy tập lệnh để xoá tác nhân:
python3 delete_agent.py
Để dọn dẹp các tài nguyên còn lại, hãy chuyển về thư mục chính và chạy các lệnh sau trong Cloud Shell:
cd ~

# 1. Delete the Artifact Registry Repository
gcloud artifacts repositories delete $REPOSITORY_NAME --location=$LOCATION --quiet

# 2. Clean up files (Optional)
rm -rf ~/weather-agent-byoc
10. Kết luận
Xin chúc mừng! Bạn đã đóng gói và triển khai thành công một tác nhân AI trên Thời gian chạy tác nhân bằng BYOC.
Bạn đã tìm hiểu cách:
- Sử dụng ADK để xác định Tác nhân và gói tác nhân đó bằng FastAPI.
- Tạo Dockerfile và tạo hình ảnh bằng Cloud Build.
- Quản lý quyền IAM cho Thời gian chạy tác nhân.
- Triển khai vùng chứa tuỳ chỉnh bằng cả Python SDK và Terraform.
- Kiểm thử và truy vấn tác nhân đã triển khai.