
1. 概览
Agent Runtime(以前称为 Agent Engine)提供了一个托管式运行时环境,旨在高效部署、运行和扩缩 AI 智能体。默认情况下,平台会在部署过程中自动捆绑您的源代码和依赖项。
不过,企业工作负载通常需要对运行时环境拥有完全的所有权。为了支持此功能,Agent Runtime 提供了自带容器(BYOC) 功能,让您可以部署预构建的自定义容器映像。
此 Codelab 概述了以下端到端流程:使用 Google 智能体开发套件 (ADK) 将智能体容器化,配置必要的 Google Cloud 权限,并使用 Python SDK 或 Terraform 将其部署到 Agent Runtime。
此 Codelab 将指导您完成以下操作:
- 使用 Google 智能体开发套件 (ADK) 构建 Python 智能体。
- 将代理封装在 FastAPI 应用中。
- 使用 Docker 将应用容器化。
- 配置 Google Cloud 权限。
- 在 Agent Runtime 上部署和测试容器化代理。
构建和部署流程
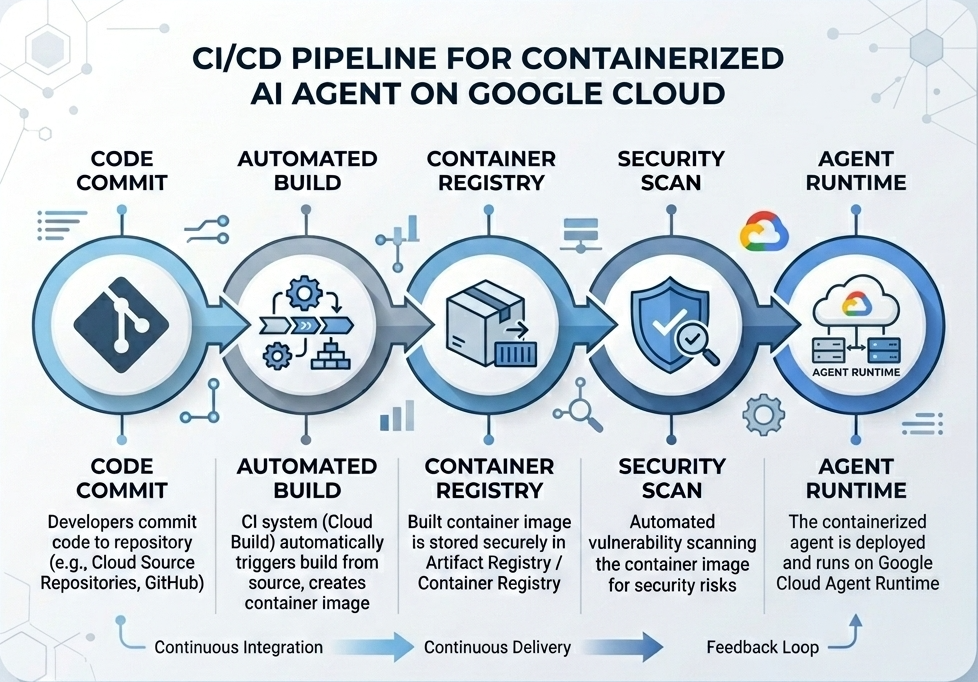
下图展示了您将在本 Codelab 中手动执行的构建和部署步骤的工作流程:
所需条件
- 启用了结算功能的 Google Cloud 项目。
- 能够访问 Cloud Shell(推荐)或安装了
gcloud和docker的本地开发环境。 - 具备 Python 和 Docker 基础知识。
2. 环境设置
在开始之前,您必须启用必要的 API 并配置环境。
第 1 步:打开 Cloud Shell
点击 Google Cloud 控制台右上角的激活 Cloud Shell 按钮。

第 2 步:配置环境变量
在 Cloud Shell 中,设置您的项目 ID 并定义此 Codelab 中使用的关键环境变量。将 "YOUR_PROJECT_ID" 替换为您的实际 Google Cloud 项目 ID:
gcloud config set project "YOUR_PROJECT_ID"
export PROJECT_ID=$(gcloud config get-value project)
export LOCATION="us-central1"
export MODEL="gemini-3.1-flash-lite"
export MODEL_REGION="global"
这些变量用于配置目标部署设置:
PROJECT_ID:您的 Google Cloud 项目的唯一标识符,所有 Gemini Enterprise Agent Platform 资源和 Artifact Registry 都将位于该项目中。LOCATION:托管代码库和运行时工作负载的地理区域(例如us-central1)。MODEL:代理上下文加载的 Gemini 模型版本(例如gemini-3.1-flash-lite)。MODEL_REGION:模型的端点区域。在此处设置为"global",以从全球端点调用 Gemini 模型。
第 3 步:启用 API
启用所需的 Google Cloud API:
gcloud services enable \
    aiplatform.googleapis.com \
    cloudbuild.googleapis.com \
    compute.googleapis.com \
    artifactregistry.googleapis.com \
    storage.googleapis.com
第 4 步:安装 SDK
安装支持 Agent Engine 和 ADK 的 Vertex AI SDK:
pip install --upgrade "google-cloud-aiplatform[agent_engines,adk]>=1.144"
3. 源文件设置
在此步骤中,您将为代理创建结构和代码。
目录结构概览
完成本 Codelab 后,您的文件将按以下工作区层次结构进行整理:
weather-agent-byoc/
├── Dockerfile                  # Container definition
├── deploy_byoc.py              # Python SDK deployment script
├── main.py                     # FastAPI server wrapper
├── query_agent.py              # Verify / query script
├── requirements.txt            # Python dependencies
│
├── weather_agent/              # Agent source module
│   ├── __init__.py             # Package declaration
│   ├── agent.py                # Agent & mock tools logic
│   └── config.json             # Environment config variables
│
└── terraform/                  # Terraform configuration files
    ├── main.tf
    ├── outputs.tf
    ├── providers.tf
    ├── terraform.tfvars
    └── variables.tf
第 1 步:创建目录
从主目录开始,创建工作区结构:
cd ~
mkdir -p weather-agent-byoc/weather_agent
cd weather-agent-byoc
第 2 步:创建配置文件
在 Cloud Shell 中运行以下命令,将配置参数直接写入 weather_agent/config.json。此命令会自动将变量替换为您的环境值:
cat <<EOF > weather_agent/config.json
{
    "PROJECT_ID": "${PROJECT_ID}",
    "LOCATION": "${LOCATION}",
    "MODEL": "${MODEL}",
    "MODEL_REGION": "${MODEL_REGION}"
}
EOF
第 3 步:定义智能体
运行以下脚本,将代理配置和模拟工具逻辑写入 weather_agent/agent.py:
cat << 'EOF' > weather_agent/agent.py
import json
import random
from google.adk.agents import Agent
from google.adk.models.google_llm import Gemini
from functools import cached_property
from google.genai import Client

# Load config
llm_config = json.load(open("weather_agent/config.json"))
PROJECT_ID = llm_config["PROJECT_ID"]
MODEL = llm_config["MODEL"]
MODEL_REGION = llm_config["MODEL_REGION"]

# Override Gemini class for global endpoint compatibility
class GlobalGemini(Gemini):
  @cached_property
  def api_client(self) -> Client:
    return Client(vertexai=True, location="global")

# Define Tool
def get_temperature(place: str) -> str:
    '''Returns the current temperature of a given place.

    Args:
        place: The name of the city or location.

    Returns:
        str: A string describing the temperature.
    '''
    temp = random.randint(-10, 40)
    return f"The current temperature in {place} is {temp}°C."

# Initialize LLM
llm_model = GlobalGemini(model=MODEL) if MODEL_REGION == "global" else Gemini(model=MODEL)

# Initialize Agent
root_agent = Agent(
    model=llm_model,
    name='weather_agent',
    description='An agent that provides temperature information for locations.',
    instruction='You are a helpful assistant that can provide the current temperature for any given place using the get_temperature tool.',
    tools=[get_temperature],
)
EOF
创建空的 __init__.py 以使 weather_agent 成为 Python 软件包:
touch weather_agent/__init__.py
第 4 步:创建 FastAPI 封装容器
运行以下脚本,将 FastAPI 服务器入口点配置写入 main.py:
cat << 'EOF' > main.py
import inspect
import json
import logging
import os
from typing import Any, Dict, Optional
import uvicorn
import vertexai
from weather_agent.agent import root_agent
from fastapi import FastAPI, encoders, responses
from pydantic import BaseModel
from vertexai import agent_engines

app = FastAPI()

config_json = json.load(open("weather_agent/config.json"))
PROJECT_ID = config_json["PROJECT_ID"]
LOCATION = config_json["LOCATION"]
MODEL_REGION = config_json["MODEL_REGION"]

class QueryRequest(BaseModel):
    input: Optional[Dict[str, Any]] = None
    class_method: Optional[str] = None

vertexai.init(project=PROJECT_ID, location=MODEL_REGION)
adk_app = agent_engines.AdkApp(agent=root_agent)

def _encode_chunk_to_json(chunk):
  try:
    json_chunk = encoders.jsonable_encoder(chunk)
    return json.dumps(json_chunk) + "\n"
  except Exception:
    logging.exception("Failed to encode chunk")
    return None

async def json_generator(output):
  async for chunk in output:
    encoded_chunk = _encode_chunk_to_json(chunk)
    if encoded_chunk is None:
      break
    yield encoded_chunk

async def _invoke_callable_or_raise(invocation_callable, invocation_payload):
  if inspect.iscoroutinefunction(invocation_callable):
    return await invocation_callable(**invocation_payload)
  else:
    return invocation_callable(**invocation_payload)

@app.post("/api/reasoning_engine")
async def query(request: QueryRequest) -> responses.JSONResponse:
    method = getattr(adk_app, request.class_method)
    output = await _invoke_callable_or_raise(method, request.input or {})
    try:
      json_serialized_content = encoders.jsonable_encoder({"output": output})
    except ValueError as encoding_error:
      logging.exception("Failed to encode response")
      raise encoding_error
    return responses.JSONResponse(content=json_serialized_content)

@app.post("/api/stream_reasoning_engine")
async def stream_query(request: QueryRequest) -> responses.StreamingResponse:
    method = getattr(adk_app, request.class_method)
    output = await _invoke_callable_or_raise(method, request.input or {})
    return responses.StreamingResponse(
        content=json_generator(output),
        media_type="application/json",
    )

if __name__ == "__main__":
    uvicorn.run(app, host="0.0.0.0", port=int(os.environ.get("PORT", 8080)))
EOF
第 5 步:定义依赖项
将所需的 Python 依赖项写入 requirements.txt:
cat << 'EOF' > requirements.txt
fastapi
uvicorn
vertexai
google-cloud-aiplatform[agent_engines,adk]>=1.144
pydantic
EOF
4. 容器化
现在,定义如何将代理打包到容器中。
第 1 步:创建 Dockerfile
在项目目录的根目录中创建 Dockerfile,以指定 FastAPI 应用的构建方式:
cat << 'EOF' > Dockerfile
FROM python:3.11-slim

WORKDIR /app

COPY weather_agent/ /app/weather_agent/
COPY main.py .
COPY requirements.txt .
RUN pip install -r requirements.txt

CMD ["sh", "-c", "uvicorn main:app --host 0.0.0.0 --port $PORT"]
EOF
5. 设置 Artifact Registry 和 Cloud Build
您需要一个用于存储容器映像的代码库,以及推送该映像的权限。
第 1 步:创建代码库
定义代码库名称,并使用配置期间定义的环境变量在 Artifact Registry 中创建 Docker 代码库:
export REPOSITORY_NAME="agents-repo"

gcloud artifacts repositories create $REPOSITORY_NAME \
    --project=$PROJECT_ID \
    --repository-format=docker \
    --location=$LOCATION \
    --description="Docker repository for Agents"
第 2 步:配置服务账号权限
向默认 Compute 服务账号授予将映像推送到 Artifact Registry 的权限。
首先,获取您的项目编号:
export PROJECT_NUMBER=$(gcloud projects describe $PROJECT_ID --format="value(projectNumber)")
授予角色:
# Allow pushing to Artifact Registry
gcloud projects add-iam-policy-binding $PROJECT_ID \
    --member="serviceAccount:$PROJECT_NUMBER-compute@developer.gserviceaccount.com" \
    --role="roles/artifactregistry.writer" \
    --condition=None

# Allow Cloud Build to read storage objects
gcloud projects add-iam-policy-binding $PROJECT_NUMBER \
    --member="serviceAccount:$PROJECT_NUMBER-compute@developer.gserviceaccount.com" \
    --role="roles/storage.objectViewer" \
    --condition=None
第 3 步:向服务代理授予权限
向 AI Platform 和 Reasoning Engine 服务代理授予 Artifact Registry 读取者访问权限:
gcloud projects add-iam-policy-binding $PROJECT_NUMBER \
    --member="serviceAccount:service-$PROJECT_NUMBER@gcp-sa-aiplatform-re.iam.gserviceaccount.com" \
    --role="roles/artifactregistry.reader"  --condition=None

gcloud projects add-iam-policy-binding $PROJECT_NUMBER \
    --member="serviceAccount:service-$PROJECT_NUMBER@gcp-sa-aiplatform.iam.gserviceaccount.com" \
    --role="roles/artifactregistry.reader"  --condition=None
第 4 步:构建并推送映像
使用 Cloud Build 构建并推送容器映像:
gcloud builds submit \
    --project=$PROJECT_ID \
    --region=$LOCATION \
    --tag $LOCATION-docker.pkg.dev/$PROJECT_ID/$REPOSITORY_NAME/weather-agent-image:latest \
    .
6. 使用 SDK 部署代理
现在,权限已配置完毕,您可以部署自定义容器了。
第 1 步:部署 BYOC 代理
在项目根目录中创建 Python 文件 deploy_byoc.py,以将注册表托管的容器部署到 Agent Runtime:
cat << 'EOF' > deploy_byoc.py
import json
import os
import vertexai
from google.cloud import aiplatform

config = json.load(open("weather_agent/config.json"))
PROJECT_ID = config["PROJECT_ID"]
LOCATION = config["LOCATION"]
REPOSITORY_NAME = "agents-repo"

vertexai.init(project=PROJECT_ID, location=LOCATION)
client = vertexai.Client(project=PROJECT_ID, location=LOCATION)

image_uri = f"{LOCATION}-docker.pkg.dev/{PROJECT_ID}/{REPOSITORY_NAME}/weather-agent-image:latest"

print(f"Deploying custom container agent from {image_uri}...")
remote_agent = client.agent_engines.create(
    config={
        "display_name": "byoc_weather_agent",
        "description": "BYOC weather agent from custom container",
        "container_spec": {
            "image_uri": image_uri
        },
        "class_methods": [
            # For convenience to interact with the agent through the Python SDK
            # https://docs.cloud.google.com/gemini-enterprise-agent-platform/scale/runtime/use-an-adk-agent#supported-operations
            {"api_mode": "", "name": "get_session"},
            {"api_mode": "", "name": "list_sessions"},
            {"api_mode": "", "name": "create_session"},
            {"api_mode": "", "name": "delete_session"},
            {"api_mode": "async", "name": "async_get_session"},
            {"api_mode": "async", "name": "async_list_sessions"},
            {"api_mode": "async", "name": "async_create_session"},
            {"api_mode": "async", "name": "async_delete_session"},
            {"api_mode": "async", "name": "async_add_session_to_memory"},
            {"api_mode": "async", "name": "async_search_memory"},
            {"api_mode": "stream", "name": "stream_query"},
            {"api_mode": "async_stream", "name": "async_stream_query"},
            {"api_mode": "async_stream", "name": "streaming_agent_run_with_events"},
        ],
        "agent_framework": "google-adk",
    },
)

print(f"Agent successfully deployed!")
print(f"Resource Name: {remote_agent.api_resource.name}")

# Save resource name for testing
with open("agent_resource_name.txt", "w") as f:
    f.write(remote_agent.api_resource.name)
EOF
运行部署脚本以将代理部署到 Agent Runtime:
python3 deploy_byoc.py
7. 使用 Terraform 部署代理
或者,您也可以使用 Terraform 部署相同的容器化代理。建议在生产环境中使用此功能来管理基础设施即代码。
第 1 步:前往 Terraform 目录
在项目根目录中创建 terraform 目录,然后前往该目录:
mkdir -p terraform
cd terraform
第 2 步:创建提供程序配置
运行以下脚本,将提供方映射写入 providers.tf:
cat << 'EOF' > providers.tf
terraform {
  required_providers {
    google = {
      source  = "hashicorp/google"
      version = ">= 5.28.0"
    }
  }
}

provider "google" {
  project = var.project_id
  region  = var.location
}
EOF
第 3 步:创建变量定义
将输入说明块写入 variables.tf:
cat << 'EOF' > variables.tf
variable "project_id" {
  type        = string
  description = "The Google Cloud Project ID"
}

variable "location" {
  type        = string
  description = "The region to deploy the reasoning engine"
  default     = "us-central1"
}

variable "repository_name" {
  type        = string
  description = "The Artifact Registry repository name"
  default     = "agents-repo"
}

variable "image_tag" {
  type        = string
  description = "The tag of the container image to deploy"
  default     = "latest"
}
EOF
第 4 步:创建主要配置
将主要资源定义参数写入 main.tf:
cat << 'EOF' > main.tf
locals {
  class_methods = [
    {"api_mode" = "", "name" = "get_session"},
    {"api_mode" = "", "name" = "list_sessions"},
    {"api_mode" = "", "name" = "create_session"},
    {"api_mode" = "", "name" = "delete_session"},
    {"api_mode" = "async", "name" = "async_get_session"},
    {"api_mode" = "async", "name" = "async_list_sessions"},
    {"api_mode" = "async", "name" = "async_create_session"},
    {"api_mode" = "async", "name" = "async_delete_session"},
    {"api_mode" = "async", "name" = "async_add_session_to_memory"},
    {"api_mode" = "async", "name" = "async_search_memory"},
    {"api_mode" = "stream", "name" = "stream_query"},
    {"api_mode" = "async_stream", "name" = "async_stream_query"},
    {"api_mode" = "async_stream", "name" = "streaming_agent_run_with_events"}
  ]
}

# define the resource with the BYOC configuration, set agent_framework to "google-adk" to enable interactive features on the console.
resource "google_vertex_ai_reasoning_engine" "byoc_weather_agent" {
  display_name = "byoc_weather_agent_tf"
  description  = "BYOC weather agent deployed via Terraform"
  project      = var.project_id
  location     = var.location

  spec {
    class_methods = jsonencode(local.class_methods)
    agent_framework = "google-adk"
    container_spec {
      image_uri = "${var.location}-docker.pkg.dev/${var.project_id}/${var.repository_name}/weather-agent-image:${var.image_tag}"
    }
  }
}
EOF
第 5 步:创建输出定义
将输出块写入 outputs.tf:
cat << 'EOF' > outputs.tf
output "reasoning_engine_id" {
  value       = google_vertex_ai_reasoning_engine.byoc_weather_agent.id
  description = "The ID of the deployed reasoning engine"
}

output "reasoning_engine_resource_name" {
  value       = google_vertex_ai_reasoning_engine.byoc_weather_agent.id
  description = "The resource name of the deployed reasoning engine"
}
EOF
第 6 步:创建变量值文件 (tfvars)
通过直接向 terraform.tfvars 提供环境变量,无需修改占位符即可动态部署:
cat <<EOF > terraform.tfvars
project_id      = "${PROJECT_ID}"
location        = "${LOCATION}"
repository_name = "agents-repo"
image_tag       = "latest"
EOF
第 7 步:初始化和应用
初始化 Terraform 并应用配置:
terraform init
terraform apply
在系统提示时,输入 yes 以确认应用。
完成后,Terraform 会输出资源名称。以编程方式将其捕获到 agent_resource_name.txt 并返回到根文件夹:
terraform output -raw reasoning_engine_resource_name > ../agent_resource_name.txt
cd ..
8. 查询智能体
验证代理是否正在运行并响应。
第 1 步:创建查询脚本
使用动态设置配置检查来获取位置坐标,将验证脚本写入 query_agent.py:
cat << 'EOF' > query_agent.py
import json
import os
import requests
from google import auth as google_auth
from google.auth.transport import requests as google_requests

# Load config coordinates directly
config_json = json.load(open("weather_agent/config.json"))
LOCATION = config_json["LOCATION"]
PROJECT_ID = config_json["PROJECT_ID"]

# Load agent resource name
with open("agent_resource_name.txt", "r") as f:
    agent_resource_name = f.read().strip()

def get_identity_token():
    credentials, _ = google_auth.default()
    auth_request = google_requests.Request()
    credentials.refresh(auth_request)
    return credentials.token

# Access the agent at the fastapi endpoint that was specified in main.py
url = f"https://{LOCATION}-aiplatform.googleapis.com/v1/{agent_resource_name}/api/stream_reasoning_engine"

payload = {
    "class_method": "async_stream_query",
    "input": {
        "user_id": "codelab_test_user",
        "message": "What is the temperature in Tokyo?",
    },
}

print(f"Sending query to {url}...")
response = requests.post(
    url,
    headers={
        "Content-Type": "application/json",
        "Authorization": f"Bearer {get_identity_token()}",
    },
    data=json.dumps(payload),
    stream=True,
)

for chunk in response.iter_content(chunk_size=8192):
    if chunk:
        print(chunk.decode('utf-8'))
EOF
运行查询脚本:
python3 query_agent.py
您应该会看到代理返回的流式输出,其中包括东京的模拟温度。
第 2 步:使用控制台
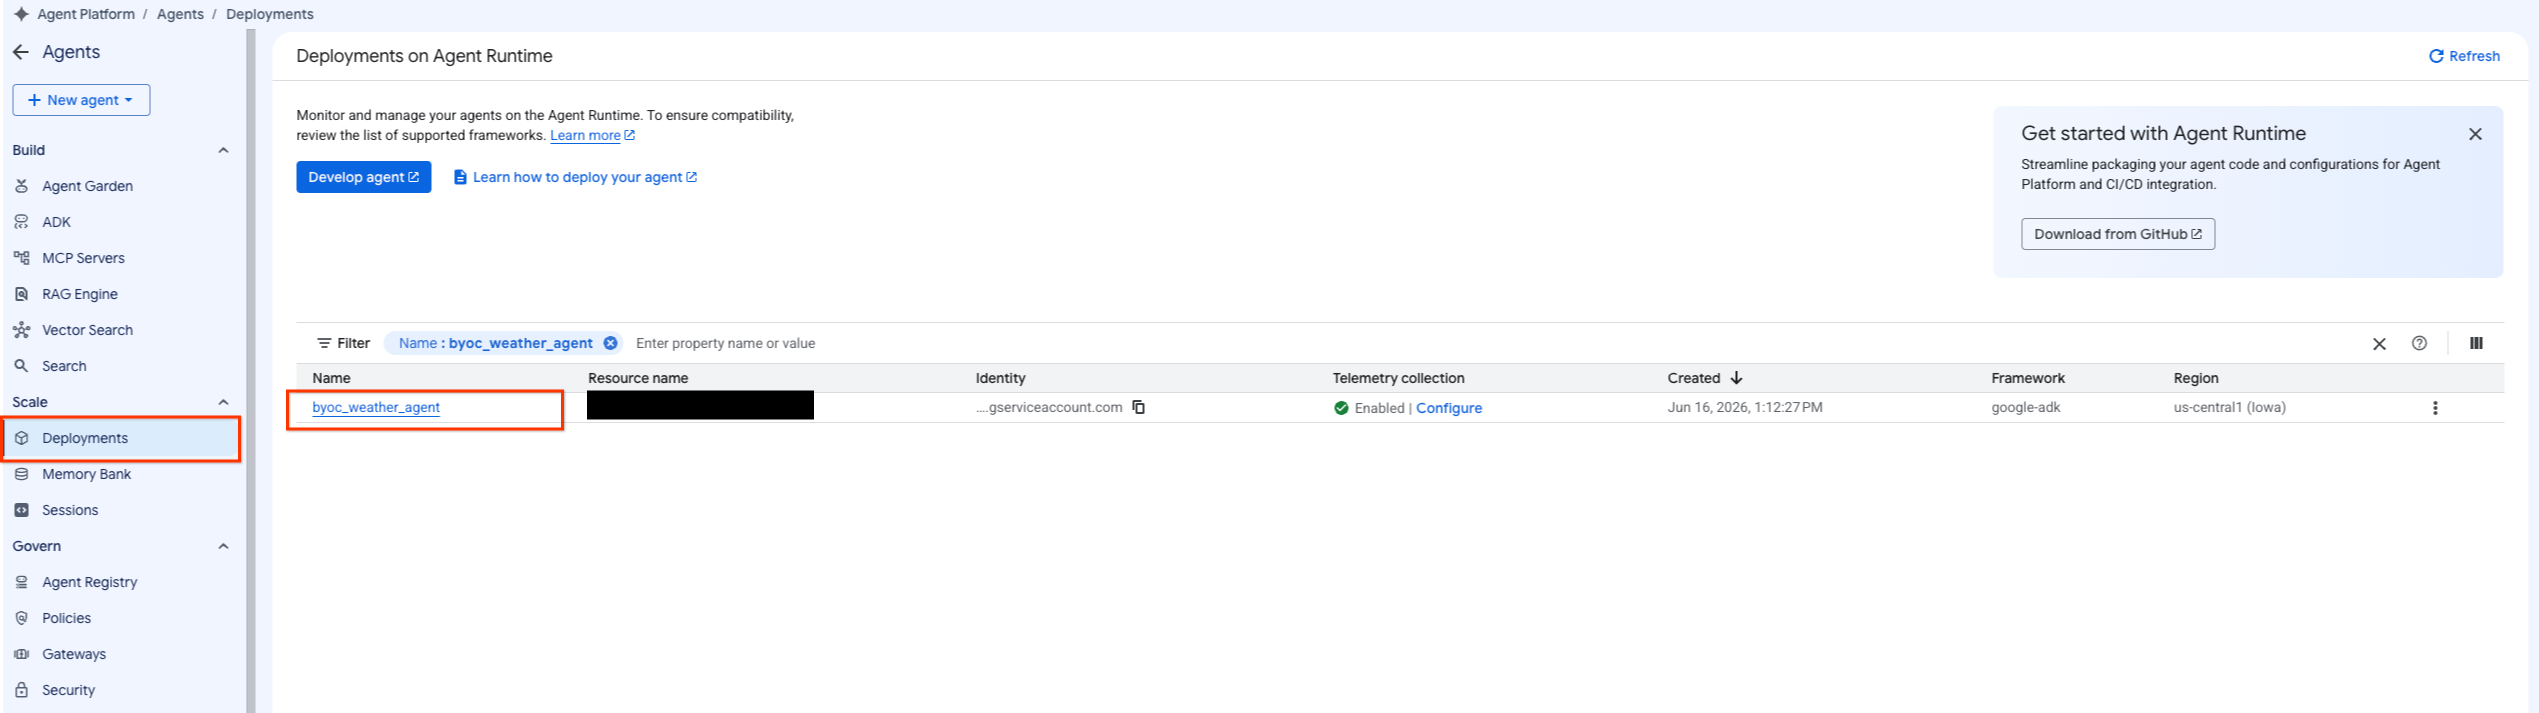
- 依次选择Agent Platform > 代理 > Deployment,过滤代理列表,找到已部署的代理。
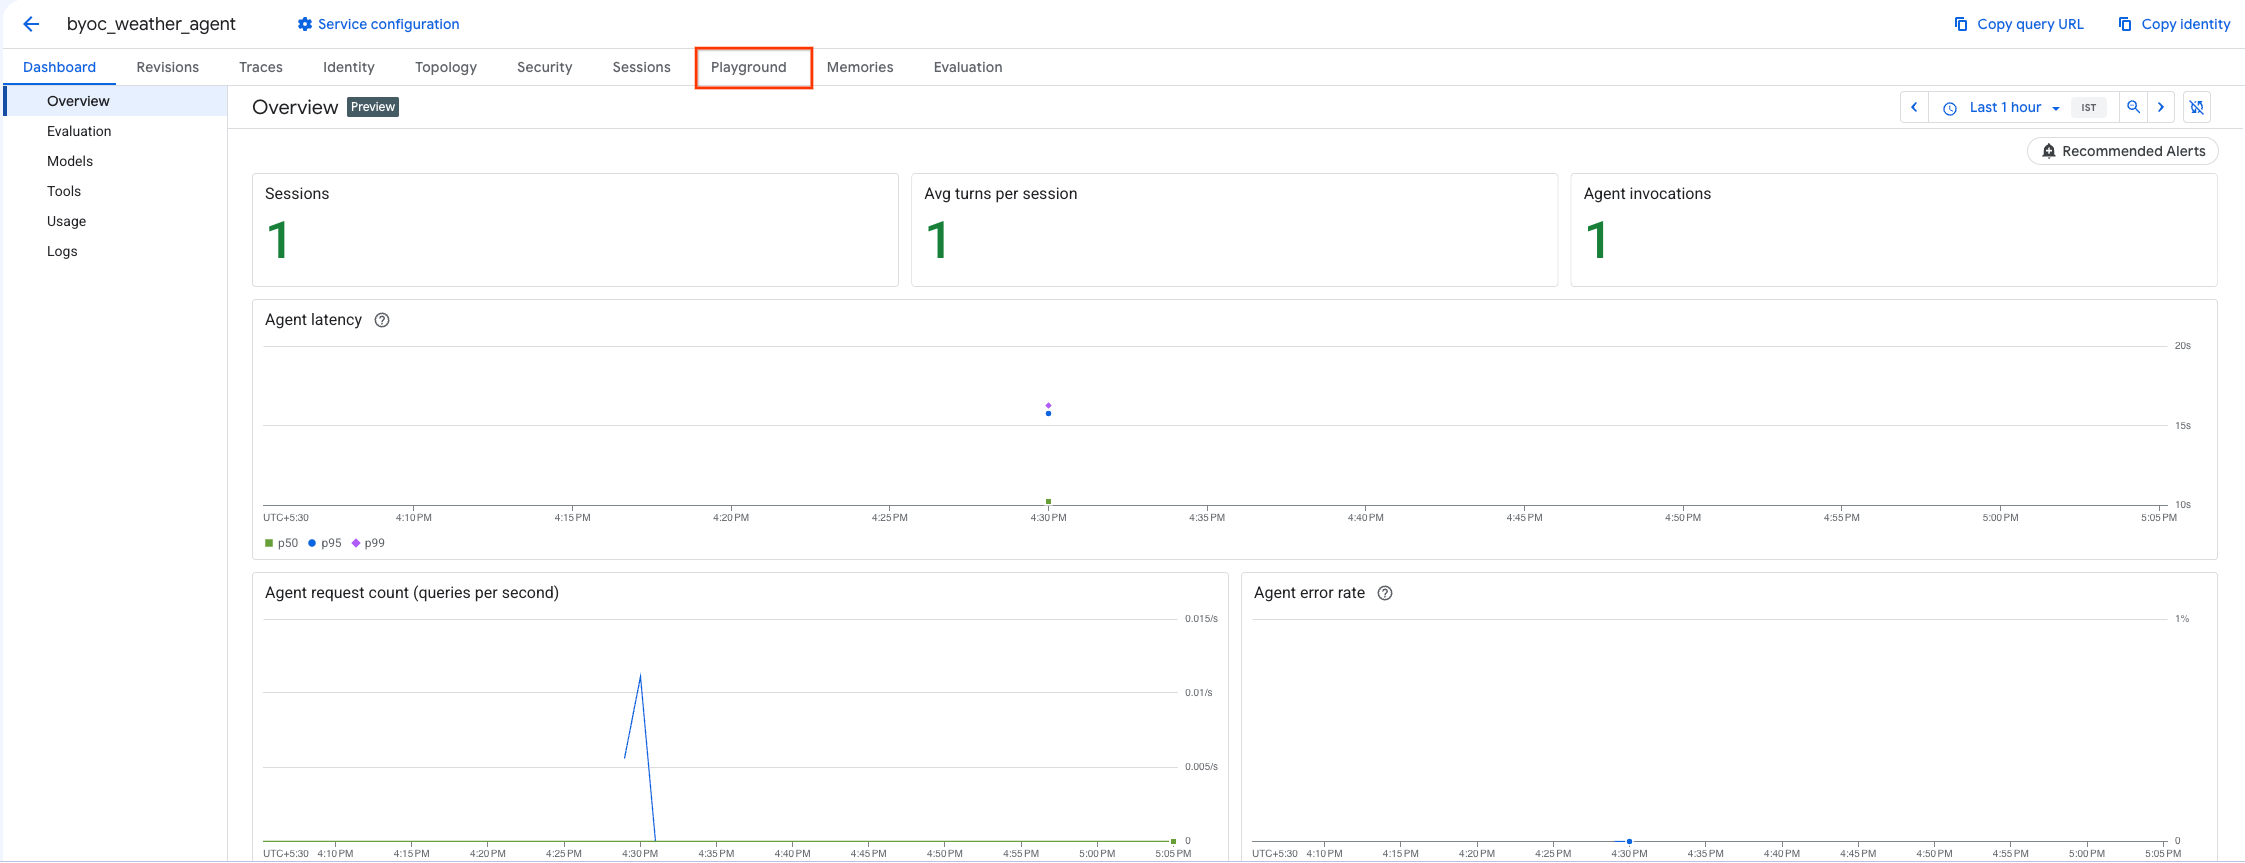
- 从代理的信息中心选择 Playground。
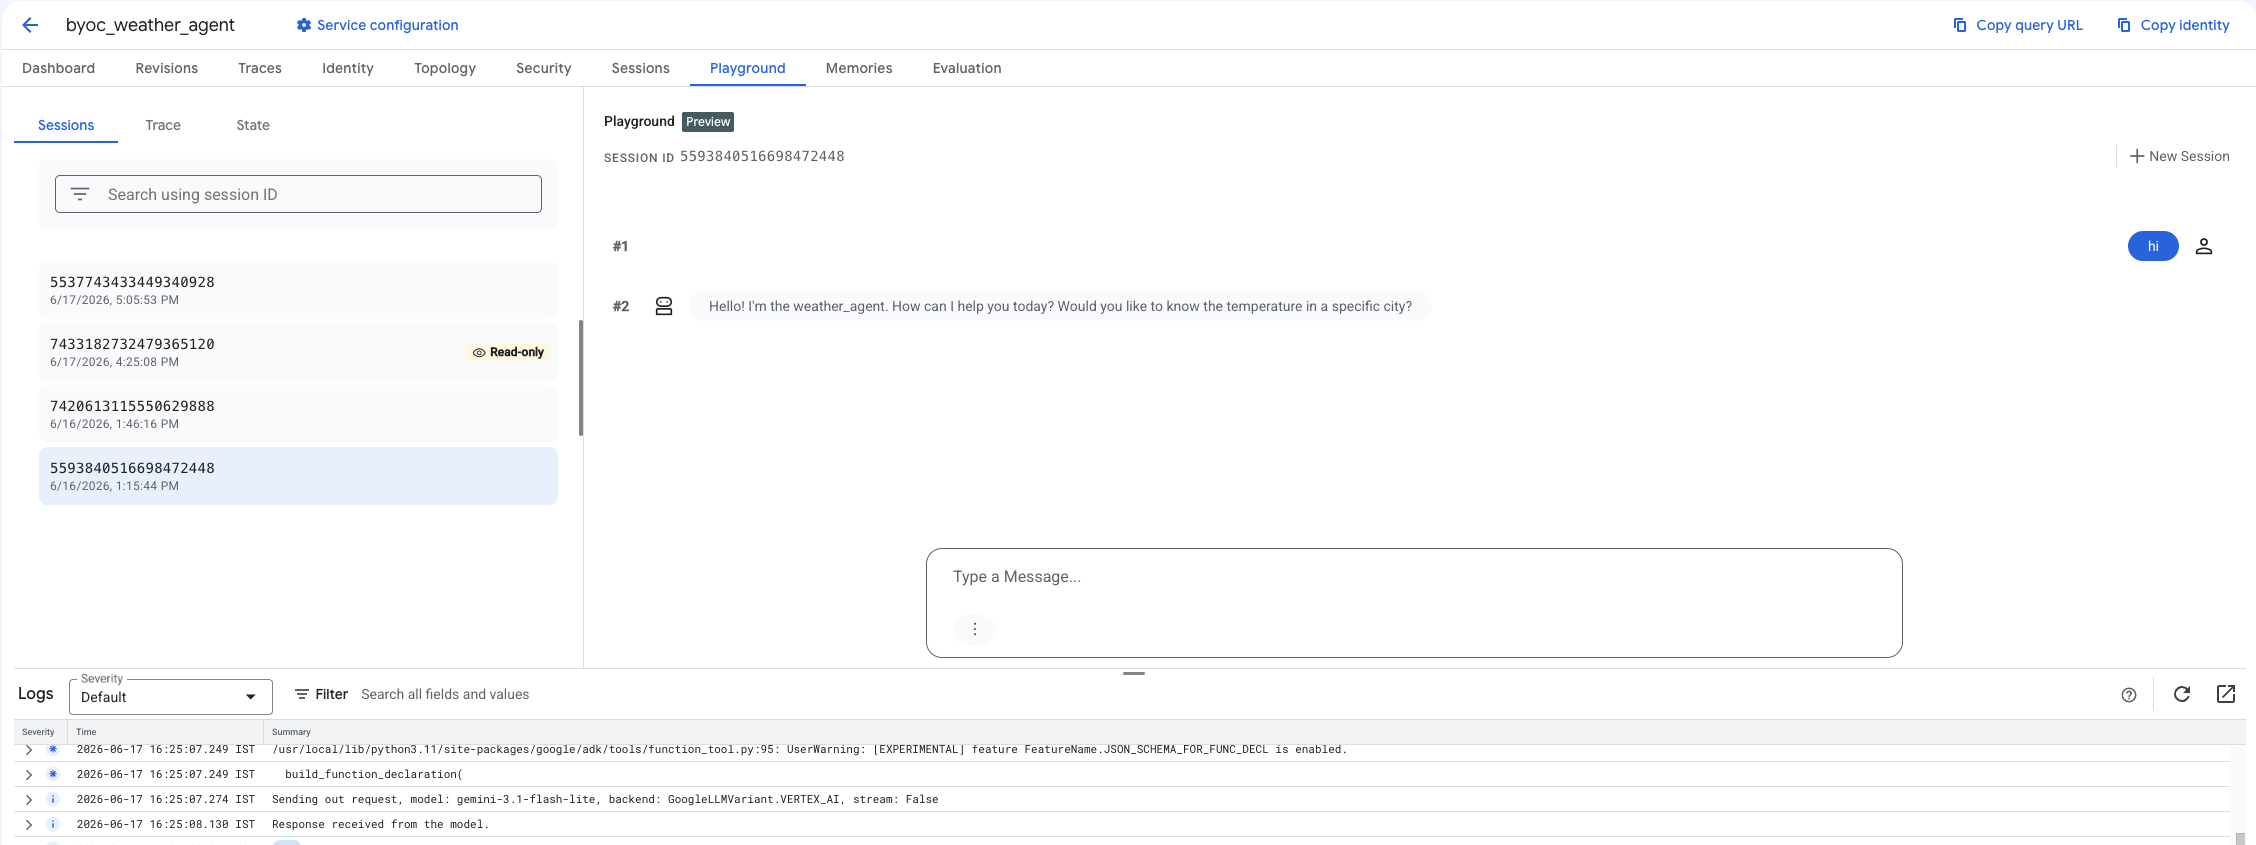
- 创建新会话,然后输入查询内容,以检查智能体是否会按所示方式响应请求。
9. 清理
为避免产生费用,请清理您创建的资源。
如果您是使用 Terraform 部署的,请更改为 terraform 目录并执行销毁操作:
cd ~/weather-agent-byoc/terraform
terraform destroy
cd ..
如果您使用 SDK 进行部署,请创建用于删除已部署代理的脚本:
cat << 'EOF' > delete_agent.py
import json
import os
import vertexai
from google.cloud import aiplatform

config = json.load(open("weather_agent/config.json"))
PROJECT_ID = config["PROJECT_ID"]
LOCATION = config["LOCATION"]

vertexai.init(project=PROJECT_ID, location=LOCATION)
client = vertexai.Client(project=PROJECT_ID, location=LOCATION)

with open("agent_resource_name.txt", "r") as f:
    agent_resource_name = f.read().strip()

# 1. Delete the Agent
# Note: We retrieve the list first to ensure we delete the ones created in this session
try:
    page_size = 100
    reasoning_engines = client.agent_engines.list()
    for engine in reasoning_engines:
        if agent_resource_name in engine.api_resource.name:
            print(f"Deleting Reasoning Engine: {engine.api_resource.name}")
            engine.delete(force=True)
except Exception as e:
    print(f"Error deleting reasoning engines: {e}")
EOF
运行脚本以删除代理:
python3 delete_agent.py
如需清理其余资源,请返回到您的主目录,然后在 Cloud Shell 中运行以下命令:
cd ~

# 1. Delete the Artifact Registry Repository
gcloud artifacts repositories delete $REPOSITORY_NAME --location=$LOCATION --quiet

# 2. Clean up files (Optional)
rm -rf ~/weather-agent-byoc
10. 总结
恭喜!您已成功使用自带容器 (BYOC) 在 Agent Runtime 上将 AI 智能体容器化并部署。
您学习了如何:
- 使用 ADK 定义智能体,并使用 FastAPI 对其进行封装。
- 创建 Dockerfile 并使用 Cloud Build 构建映像。
- 管理 Agent Runtime 的 IAM 权限。
- 使用 Python SDK 和 Terraform 部署自定义容器。
- 测试已部署的智能体并向其发出查询。