
1. 總覽
Agent Runtime (原稱 Agent Engine) 提供代管的執行階段環境,可有效部署、執行及擴充 AI 代理。根據預設,平台會在部署程序中自動將原始碼和依附元件組合在一起。
不過,企業工作負載通常需要完全掌控執行階段環境。為支援這項功能,Agent Runtime 提供「自備容器」(BYOC) 功能,可讓您部署預建的自訂容器映像檔。
本程式碼實驗室會說明完整流程,包括將使用 Google Agent Development Kit (ADK) 建構的代理程式容器化、設定必要的 Google Cloud 權限,以及使用 Python SDK 或 Terraform 將代理程式部署至 Agent Runtime。
本程式碼研究室會逐步引導您完成下列操作:
- 使用 Google Agent Development Kit (ADK) 打造 Python 代理。
- 將代理封裝在 FastAPI 應用程式中。
- 使用 Docker 將應用程式容器化。
- 設定 Google Cloud 權限。
- 在 Agent Runtime 部署及測試容器化代理。
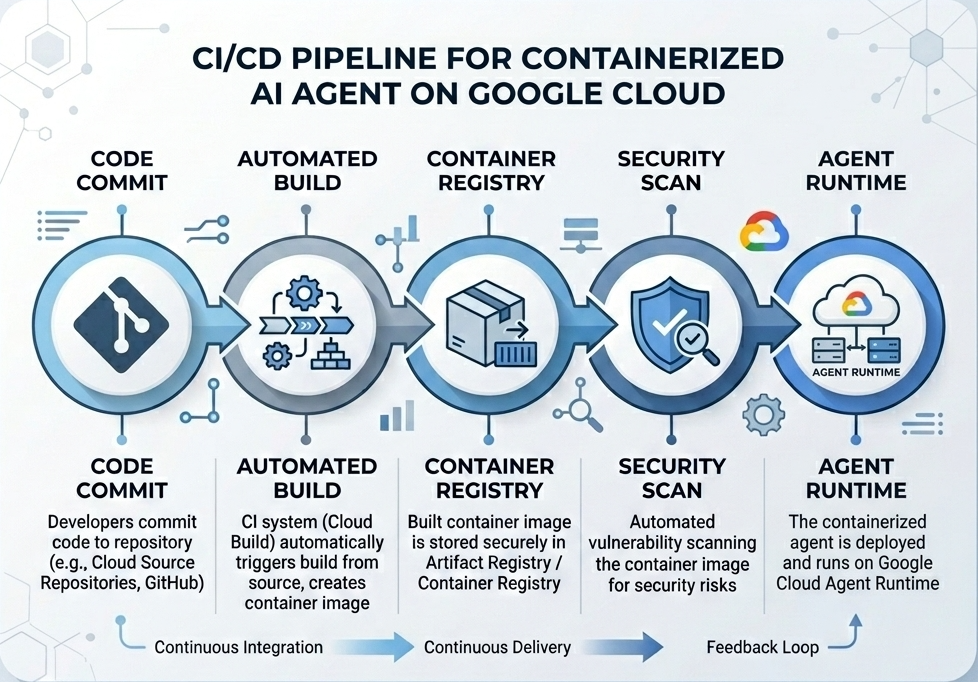
建構及部署流程
下圖說明您將在本程式碼研究室中手動執行的建構和部署步驟工作流程:
需求條件
- 已啟用計費功能的 Google Cloud 專案。
- 存取 Cloud Shell (建議) 或已安裝
gcloud和docker的本機開發環境。 - Python 和 Docker 的基本知識。
2. 環境設定
開始前,請務必啟用必要的 API 並設定環境。
步驟 1:開啟 Cloud Shell
按一下 Google Cloud 控制台右上方的「啟用 Cloud Shell」按鈕。

步驟 2:設定環境變數
在 Cloud Shell 中設定專案 ID,並定義本程式碼研究室全程使用的重要環境變數。將 "YOUR_PROJECT_ID" 替換為實際的 Google Cloud 專案 ID:
gcloud config set project "YOUR_PROJECT_ID"
export PROJECT_ID=$(gcloud config get-value project)
export LOCATION="us-central1"
export MODEL="gemini-3.1-flash-lite"
export MODEL_REGION="global"
這些變數會設定目標部署設定:
PROJECT_ID:Google Cloud 專案的專屬 ID,所有 Gemini Enterprise Agent Platform 資源和 Artifact Registry 都會位於這個專案中。LOCATION:代管存放區和執行階段工作負載的地理區域 (例如us-central1)。MODEL:代理程式環境載入的 Gemini 模型版本 (例如gemini-3.1-flash-lite)。MODEL_REGION:模型的端點區域。在此設為"global",從全域端點叫用 Gemini 模型。
步驟 3:啟用 API
啟用必要的 Google Cloud API:
gcloud services enable \
    aiplatform.googleapis.com \
    cloudbuild.googleapis.com \
    compute.googleapis.com \
    artifactregistry.googleapis.com \
    storage.googleapis.com
步驟 4:安裝 SDK
安裝 Vertex AI SDK,並支援 Agent Engine 和 ADK:
pip install --upgrade "google-cloud-aiplatform[agent_engines,adk]>=1.144"
3. 設定來源檔案
在這個步驟中,您將建立代理程式的結構和程式碼。
目錄結構總覽
完成本程式碼研究室後,您的檔案會依下列工作區階層結構整理:
weather-agent-byoc/
├── Dockerfile                  # Container definition
├── deploy_byoc.py              # Python SDK deployment script
├── main.py                     # FastAPI server wrapper
├── query_agent.py              # Verify / query script
├── requirements.txt            # Python dependencies
│
├── weather_agent/              # Agent source module
│   ├── __init__.py             # Package declaration
│   ├── agent.py                # Agent & mock tools logic
│   └── config.json             # Environment config variables
│
└── terraform/                  # Terraform configuration files
    ├── main.tf
    ├── outputs.tf
    ├── providers.tf
    ├── terraform.tfvars
    └── variables.tf
步驟 1:建立目錄
從主目錄開始,建立工作區結構:
cd ~
mkdir -p weather-agent-byoc/weather_agent
cd weather-agent-byoc
步驟 2:建立設定檔
在 Cloud Shell 中執行下列指令,將設定參數直接寫入 weather_agent/config.json。這項指令會自動將變數替換為環境值:
cat <<EOF > weather_agent/config.json
{
    "PROJECT_ID": "${PROJECT_ID}",
    "LOCATION": "${LOCATION}",
    "MODEL": "${MODEL}",
    "MODEL_REGION": "${MODEL_REGION}"
}
EOF
步驟 3:定義代理
執行下列指令碼,將代理程式設定和模擬工具邏輯寫入 weather_agent/agent.py:
cat << 'EOF' > weather_agent/agent.py
import json
import random
from google.adk.agents import Agent
from google.adk.models.google_llm import Gemini
from functools import cached_property
from google.genai import Client

# Load config
llm_config = json.load(open("weather_agent/config.json"))
PROJECT_ID = llm_config["PROJECT_ID"]
MODEL = llm_config["MODEL"]
MODEL_REGION = llm_config["MODEL_REGION"]

# Override Gemini class for global endpoint compatibility
class GlobalGemini(Gemini):
  @cached_property
  def api_client(self) -> Client:
    return Client(vertexai=True, location="global")

# Define Tool
def get_temperature(place: str) -> str:
    '''Returns the current temperature of a given place.

    Args:
        place: The name of the city or location.

    Returns:
        str: A string describing the temperature.
    '''
    temp = random.randint(-10, 40)
    return f"The current temperature in {place} is {temp}°C."

# Initialize LLM
llm_model = GlobalGemini(model=MODEL) if MODEL_REGION == "global" else Gemini(model=MODEL)

# Initialize Agent
root_agent = Agent(
    model=llm_model,
    name='weather_agent',
    description='An agent that provides temperature information for locations.',
    instruction='You are a helpful assistant that can provide the current temperature for any given place using the get_temperature tool.',
    tools=[get_temperature],
)
EOF
建立空白 __init__.py,將 weather_agent 設為 Python 套件:
touch weather_agent/__init__.py
步驟 4:建立 FastAPI 包裝函式
執行下列指令碼,將 FastAPI 伺服器進入點設定寫入 main.py:
cat << 'EOF' > main.py
import inspect
import json
import logging
import os
from typing import Any, Dict, Optional
import uvicorn
import vertexai
from weather_agent.agent import root_agent
from fastapi import FastAPI, encoders, responses
from pydantic import BaseModel
from vertexai import agent_engines

app = FastAPI()

config_json = json.load(open("weather_agent/config.json"))
PROJECT_ID = config_json["PROJECT_ID"]
LOCATION = config_json["LOCATION"]
MODEL_REGION = config_json["MODEL_REGION"]

class QueryRequest(BaseModel):
    input: Optional[Dict[str, Any]] = None
    class_method: Optional[str] = None

vertexai.init(project=PROJECT_ID, location=MODEL_REGION)
adk_app = agent_engines.AdkApp(agent=root_agent)

def _encode_chunk_to_json(chunk):
  try:
    json_chunk = encoders.jsonable_encoder(chunk)
    return json.dumps(json_chunk) + "\n"
  except Exception:
    logging.exception("Failed to encode chunk")
    return None

async def json_generator(output):
  async for chunk in output:
    encoded_chunk = _encode_chunk_to_json(chunk)
    if encoded_chunk is None:
      break
    yield encoded_chunk

async def _invoke_callable_or_raise(invocation_callable, invocation_payload):
  if inspect.iscoroutinefunction(invocation_callable):
    return await invocation_callable(**invocation_payload)
  else:
    return invocation_callable(**invocation_payload)

@app.post("/api/reasoning_engine")
async def query(request: QueryRequest) -> responses.JSONResponse:
    method = getattr(adk_app, request.class_method)
    output = await _invoke_callable_or_raise(method, request.input or {})
    try:
      json_serialized_content = encoders.jsonable_encoder({"output": output})
    except ValueError as encoding_error:
      logging.exception("Failed to encode response")
      raise encoding_error
    return responses.JSONResponse(content=json_serialized_content)

@app.post("/api/stream_reasoning_engine")
async def stream_query(request: QueryRequest) -> responses.StreamingResponse:
    method = getattr(adk_app, request.class_method)
    output = await _invoke_callable_or_raise(method, request.input or {})
    return responses.StreamingResponse(
        content=json_generator(output),
        media_type="application/json",
    )

if __name__ == "__main__":
    uvicorn.run(app, host="0.0.0.0", port=int(os.environ.get("PORT", 8080)))
EOF
步驟 5:定義依附元件
將必要的 Python 依附元件寫入 requirements.txt:
cat << 'EOF' > requirements.txt
fastapi
uvicorn
vertexai
google-cloud-aiplatform[agent_engines,adk]>=1.144
pydantic
EOF
4. 容器化
現在,請定義如何將代理程式封裝到容器中。
步驟 1:建立 Dockerfile
在專案目錄的根目錄中建立 Dockerfile,指定 FastAPI 應用程式的建構方式:
cat << 'EOF' > Dockerfile
FROM python:3.11-slim

WORKDIR /app

COPY weather_agent/ /app/weather_agent/
COPY main.py .
COPY requirements.txt .
RUN pip install -r requirements.txt

CMD ["sh", "-c", "uvicorn main:app --host 0.0.0.0 --port $PORT"]
EOF
5. 設定 Artifact Registry 和 Cloud Build
您需要存放區來儲存容器映像檔,以及推送映像檔的權限。
步驟 1:建立存放區
定義存放區名稱,並使用設定期間定義的環境變數,在 Artifact Registry 內建立 Docker 存放區:
export REPOSITORY_NAME="agents-repo"

gcloud artifacts repositories create $REPOSITORY_NAME \
    --project=$PROJECT_ID \
    --repository-format=docker \
    --location=$LOCATION \
    --description="Docker repository for Agents"
步驟 2:設定服務帳戶權限
授予預設 Compute 服務帳戶權限,將映像檔推送至 Artifact Registry。
首先,請取得專案編號:
export PROJECT_NUMBER=$(gcloud projects describe $PROJECT_ID --format="value(projectNumber)")
授予角色:
# Allow pushing to Artifact Registry
gcloud projects add-iam-policy-binding $PROJECT_ID \
    --member="serviceAccount:$PROJECT_NUMBER-compute@developer.gserviceaccount.com" \
    --role="roles/artifactregistry.writer" \
    --condition=None

# Allow Cloud Build to read storage objects
gcloud projects add-iam-policy-binding $PROJECT_NUMBER \
    --member="serviceAccount:$PROJECT_NUMBER-compute@developer.gserviceaccount.com" \
    --role="roles/storage.objectViewer" \
    --condition=None
步驟 3:授予服務代理人權限
授予 AI Platform 和 Reasoning Engine 服務代理人 Artifact Registry 讀取者存取權:
gcloud projects add-iam-policy-binding $PROJECT_NUMBER \
    --member="serviceAccount:service-$PROJECT_NUMBER@gcp-sa-aiplatform-re.iam.gserviceaccount.com" \
    --role="roles/artifactregistry.reader"  --condition=None

gcloud projects add-iam-policy-binding $PROJECT_NUMBER \
    --member="serviceAccount:service-$PROJECT_NUMBER@gcp-sa-aiplatform.iam.gserviceaccount.com" \
    --role="roles/artifactregistry.reader"  --condition=None
步驟 4:建構及推送映像檔
使用 Cloud Build 建構及推送容器映像檔:
gcloud builds submit \
    --project=$PROJECT_ID \
    --region=$LOCATION \
    --tag $LOCATION-docker.pkg.dev/$PROJECT_ID/$REPOSITORY_NAME/weather-agent-image:latest \
    .
6. 使用 SDK 部署代理
權限設定完成後,即可部署自訂容器。
步驟 1:部署 BYOC 代理程式
在專案目錄的根目錄中建立 Python 檔案 deploy_byoc.py,將登錄檔代管的容器部署至 Agent Runtime:
cat << 'EOF' > deploy_byoc.py
import json
import os
import vertexai
from google.cloud import aiplatform

config = json.load(open("weather_agent/config.json"))
PROJECT_ID = config["PROJECT_ID"]
LOCATION = config["LOCATION"]
REPOSITORY_NAME = "agents-repo"

vertexai.init(project=PROJECT_ID, location=LOCATION)
client = vertexai.Client(project=PROJECT_ID, location=LOCATION)

image_uri = f"{LOCATION}-docker.pkg.dev/{PROJECT_ID}/{REPOSITORY_NAME}/weather-agent-image:latest"

print(f"Deploying custom container agent from {image_uri}...")
remote_agent = client.agent_engines.create(
    config={
        "display_name": "byoc_weather_agent",
        "description": "BYOC weather agent from custom container",
        "container_spec": {
            "image_uri": image_uri
        },
        "class_methods": [
            # For convenience to interact with the agent through the Python SDK
            # https://docs.cloud.google.com/gemini-enterprise-agent-platform/scale/runtime/use-an-adk-agent#supported-operations
            {"api_mode": "", "name": "get_session"},
            {"api_mode": "", "name": "list_sessions"},
            {"api_mode": "", "name": "create_session"},
            {"api_mode": "", "name": "delete_session"},
            {"api_mode": "async", "name": "async_get_session"},
            {"api_mode": "async", "name": "async_list_sessions"},
            {"api_mode": "async", "name": "async_create_session"},
            {"api_mode": "async", "name": "async_delete_session"},
            {"api_mode": "async", "name": "async_add_session_to_memory"},
            {"api_mode": "async", "name": "async_search_memory"},
            {"api_mode": "stream", "name": "stream_query"},
            {"api_mode": "async_stream", "name": "async_stream_query"},
            {"api_mode": "async_stream", "name": "streaming_agent_run_with_events"},
        ],
        "agent_framework": "google-adk",
    },
)

print(f"Agent successfully deployed!")
print(f"Resource Name: {remote_agent.api_resource.name}")

# Save resource name for testing
with open("agent_resource_name.txt", "w") as f:
    f.write(remote_agent.api_resource.name)
EOF
執行部署指令碼,將代理部署至 Agent Runtime:
python3 deploy_byoc.py
7. 使用 Terraform 部署代理程式
或者,您也可以使用 Terraform 部署相同的容器化代理程式。建議您在正式環境中採用這種做法,以管理基礎架構即程式碼。
步驟 1:前往 Terraform 目錄
在專案根目錄中建立 terraform 目錄,然後前往該目錄:
mkdir -p terraform
cd terraform
步驟 2:建立供應商設定
執行下列指令碼,將供應商對應項寫入 providers.tf:
cat << 'EOF' > providers.tf
terraform {
  required_providers {
    google = {
      source  = "hashicorp/google"
      version = ">= 5.28.0"
    }
  }
}

provider "google" {
  project = var.project_id
  region  = var.location
}
EOF
步驟 3:建立變數定義
將輸入說明區塊寫入 variables.tf:
cat << 'EOF' > variables.tf
variable "project_id" {
  type        = string
  description = "The Google Cloud Project ID"
}

variable "location" {
  type        = string
  description = "The region to deploy the reasoning engine"
  default     = "us-central1"
}

variable "repository_name" {
  type        = string
  description = "The Artifact Registry repository name"
  default     = "agents-repo"
}

variable "image_tag" {
  type        = string
  description = "The tag of the container image to deploy"
  default     = "latest"
}
EOF
步驟 4:建立主要設定
將主要資源定義參數寫入 main.tf:
cat << 'EOF' > main.tf
locals {
  class_methods = [
    {"api_mode" = "", "name" = "get_session"},
    {"api_mode" = "", "name" = "list_sessions"},
    {"api_mode" = "", "name" = "create_session"},
    {"api_mode" = "", "name" = "delete_session"},
    {"api_mode" = "async", "name" = "async_get_session"},
    {"api_mode" = "async", "name" = "async_list_sessions"},
    {"api_mode" = "async", "name" = "async_create_session"},
    {"api_mode" = "async", "name" = "async_delete_session"},
    {"api_mode" = "async", "name" = "async_add_session_to_memory"},
    {"api_mode" = "async", "name" = "async_search_memory"},
    {"api_mode" = "stream", "name" = "stream_query"},
    {"api_mode" = "async_stream", "name" = "async_stream_query"},
    {"api_mode" = "async_stream", "name" = "streaming_agent_run_with_events"}
  ]
}

# define the resource with the BYOC configuration, set agent_framework to "google-adk" to enable interactive features on the console.
resource "google_vertex_ai_reasoning_engine" "byoc_weather_agent" {
  display_name = "byoc_weather_agent_tf"
  description  = "BYOC weather agent deployed via Terraform"
  project      = var.project_id
  location     = var.location

  spec {
    class_methods = jsonencode(local.class_methods)
    agent_framework = "google-adk"
    container_spec {
      image_uri = "${var.location}-docker.pkg.dev/${var.project_id}/${var.repository_name}/weather-agent-image:${var.image_tag}"
    }
  }
}
EOF
步驟 5:建立輸出定義
將輸出內容區塊寫入 outputs.tf:
cat << 'EOF' > outputs.tf
output "reasoning_engine_id" {
  value       = google_vertex_ai_reasoning_engine.byoc_weather_agent.id
  description = "The ID of the deployed reasoning engine"
}

output "reasoning_engine_resource_name" {
  value       = google_vertex_ai_reasoning_engine.byoc_weather_agent.id
  description = "The resource name of the deployed reasoning engine"
}
EOF
步驟 6:建立變數值檔案 (tfvars)
直接將環境變數饋送至 terraform.tfvars,即可動態部署,不必編輯預留位置:
cat <<EOF > terraform.tfvars
project_id      = "${PROJECT_ID}"
location        = "${LOCATION}"
repository_name = "agents-repo"
image_tag       = "latest"
EOF
步驟 7:初始化及套用
初始化 Terraform 並套用設定:
terraform init
terraform apply
系統提示時,輸入 yes 確認套用。
完成後,Terraform 會輸出資源名稱。透過程式輔助方式擷取至 agent_resource_name.txt,然後返回根資料夾:
terraform output -raw reasoning_engine_resource_name > ../agent_resource_name.txt
cd ..
8. 查詢虛擬服務專員
確認代理程式正在執行並回應。
步驟 1:建立查詢指令碼
使用動態設定配置檢查,擷取位置座標,然後將驗證指令碼寫入 query_agent.py:
cat << 'EOF' > query_agent.py
import json
import os
import requests
from google import auth as google_auth
from google.auth.transport import requests as google_requests

# Load config coordinates directly
config_json = json.load(open("weather_agent/config.json"))
LOCATION = config_json["LOCATION"]
PROJECT_ID = config_json["PROJECT_ID"]

# Load agent resource name
with open("agent_resource_name.txt", "r") as f:
    agent_resource_name = f.read().strip()

def get_identity_token():
    credentials, _ = google_auth.default()
    auth_request = google_requests.Request()
    credentials.refresh(auth_request)
    return credentials.token

# Access the agent at the fastapi endpoint that was specified in main.py
url = f"https://{LOCATION}-aiplatform.googleapis.com/v1/{agent_resource_name}/api/stream_reasoning_engine"

payload = {
    "class_method": "async_stream_query",
    "input": {
        "user_id": "codelab_test_user",
        "message": "What is the temperature in Tokyo?",
    },
}

print(f"Sending query to {url}...")
response = requests.post(
    url,
    headers={
        "Content-Type": "application/json",
        "Authorization": f"Bearer {get_identity_token()}",
    },
    data=json.dumps(payload),
    stream=True,
)

for chunk in response.iter_content(chunk_size=8192):
    if chunk:
        print(chunk.decode('utf-8'))
EOF
執行查詢指令碼:
python3 query_agent.py
您應該會看到代理程式傳回的輸出內容,包括東京的模擬溫度。
步驟 2:使用控制台
- 依序選取「Agent Platform」 >「Agents」 >「Deployments」,篩選代理程式清單,然後前往已部署的代理程式。
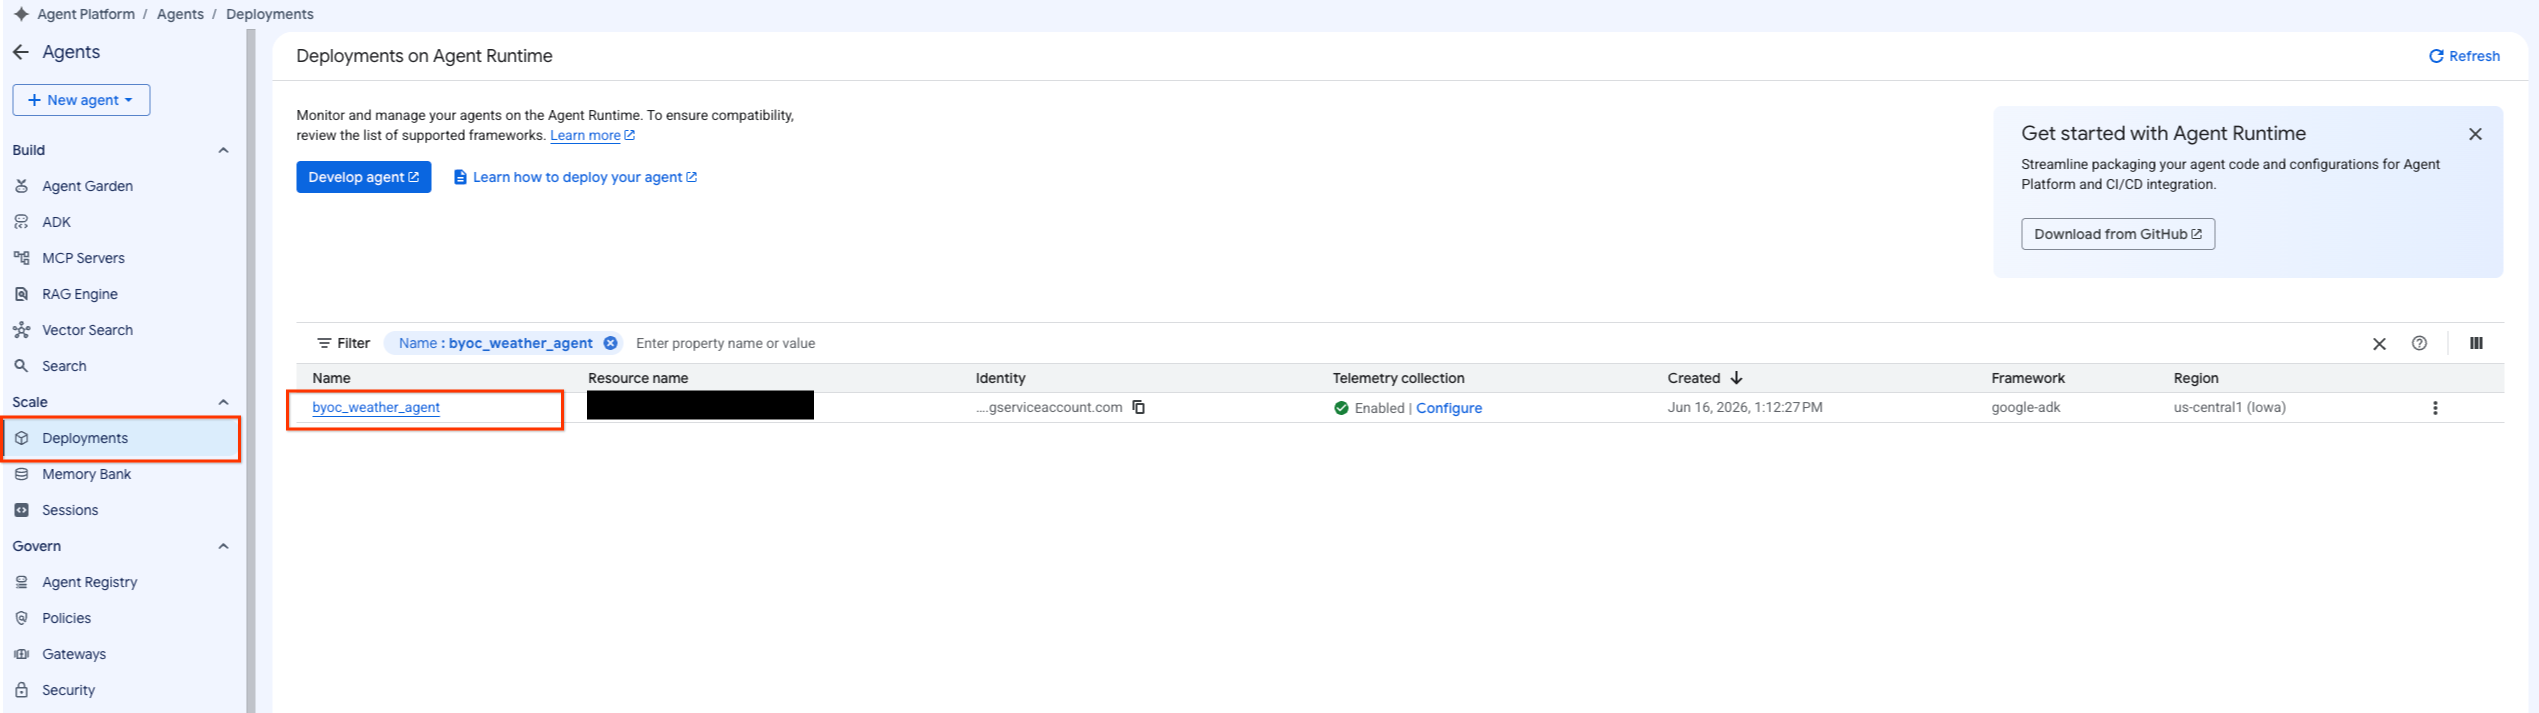
- 在代理程式資訊主頁中選取「Playground」。

- 建立新工作階段並輸入查詢,確認代理程式是否如畫面所示回應要求。

9. 清除
為避免產生費用,請清理您建立的資源。
如果您使用 Terraform 部署,請切換至 terraform 目錄並執行刪除動作:
cd ~/weather-agent-byoc/terraform
terraform destroy
cd ..
如果您是使用 SDK 部署,請建立指令碼來刪除已部署的代理程式:
cat << 'EOF' > delete_agent.py
import json
import os
import vertexai
from google.cloud import aiplatform

config = json.load(open("weather_agent/config.json"))
PROJECT_ID = config["PROJECT_ID"]
LOCATION = config["LOCATION"]

vertexai.init(project=PROJECT_ID, location=LOCATION)
client = vertexai.Client(project=PROJECT_ID, location=LOCATION)

with open("agent_resource_name.txt", "r") as f:
    agent_resource_name = f.read().strip()

# 1. Delete the Agent
# Note: We retrieve the list first to ensure we delete the ones created in this session
try:
    page_size = 100
    reasoning_engines = client.agent_engines.list()
    for engine in reasoning_engines:
        if agent_resource_name in engine.api_resource.name:
            print(f"Deleting Reasoning Engine: {engine.api_resource.name}")
            engine.delete(force=True)
except Exception as e:
    print(f"Error deleting reasoning engines: {e}")
EOF
執行指令碼來刪除代理程式:
python3 delete_agent.py
如要清除其餘資源,請返回主目錄,並在 Cloud Shell 中執行下列指令:
cd ~

# 1. Delete the Artifact Registry Repository
gcloud artifacts repositories delete $REPOSITORY_NAME --location=$LOCATION --quiet

# 2. Clean up files (Optional)
rm -rf ~/weather-agent-byoc
10. 結語
恭喜!您已成功使用 BYOC,將 AI 代理程式容器化並部署至 Agent Runtime。
您學到了下列內容:
- 使用 ADK 定義代理,並以 FastAPI 包裝。
- 建立 Dockerfile,並使用 Cloud Build 建構映像檔。
- 管理 Agent Runtime 的 IAM 權限。
- 使用 Python SDK 和 Terraform 部署自訂容器。
- 測試並查詢已部署的代理。