
1. Introduction
While Python remains popular for model training and research, the requirements for serving and orchestrating AI agents align closely with Go's strengths: low latency, high concurrency, and type safety.
Transitioning from a prototype to a production agent introduces engineering challenges that Go can handle exceptionally well. Go's static typing eliminates runtime errors when parsing structured LLM outputs. Its lightweight goroutines, which start with just a few kilobytes of stack memory compared to several megabytes for OS threads, allow agents to handle thousands of concurrent tool executions without the overhead of heavy thread management.
Google's Agent Development Kit (ADK) bridges the gap between these architectural advantages and generative AI. In this guide, you will scaffold a new project and deploy it as a secure microservice on Google Cloud.
What you'll do:
- Scaffold a production-ready agent project using the Agent Starter Pack
- Utilize the local Agent Development Kit web UI to debug and test your agent
- Develop and understand Go-based ADK agent logic
- Run unit and end-to-end (E2E) tests
- Deploy the agent securely to Cloud Run
What you'll need:
- A web browser such as Chrome
- A Google Cloud project with billing enabled
2. Before you begin
Create a Google Cloud Project
If you don't already have one:
- In the Google Cloud Console, on the project selector page, select or create a Google Cloud project.
- Make sure that billing is enabled for your Cloud project.
Start Cloud Shell
Cloud Shell is a command-line environment running in Google Cloud that comes preloaded with necessary tools. It will serve as your primary development environment for this lab.
- Click Activate Cloud Shell at the top of the Google Cloud console.
- Once connected to Cloud Shell, run this command to verify your authentication in Cloud Shell:
gcloud auth list
- Run the following command to confirm that your project is configured for use with gcloud:
gcloud config get project
- Confirm the project is as expected, and then run the command below to set your project ID:
export PROJECT_ID=$(gcloud config get project)
3. Get Started with the Agent Starter Pack
The good news is you don't need to start from scratch. The Agent Starter Pack is a CLI tool that scaffolds a production-ready folder structure, including CI/CD pipelines, infrastructure configuration, and boilerplate code.
To get started, simply run the build creation command with uvx:
uvx agent-starter-pack create
The CLI will guide you through an interactive setup. For this project, select the following options:
- Project Name:
my-first-go-agent - Template: Option 6 (Go ADK, Go agent with A2A)
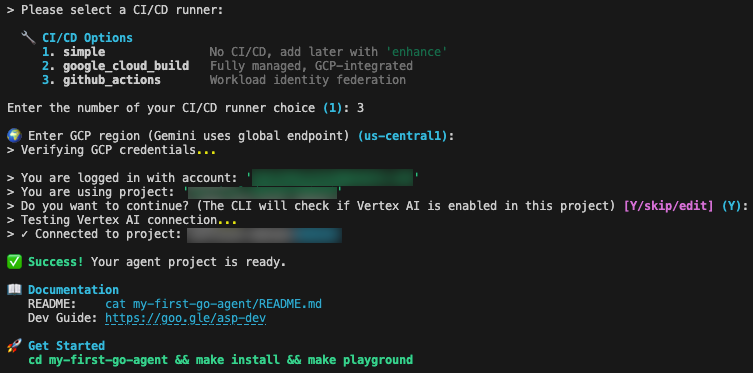
- CI/CD: Option 3 (GitHub Actions)
- Region:
us-central1
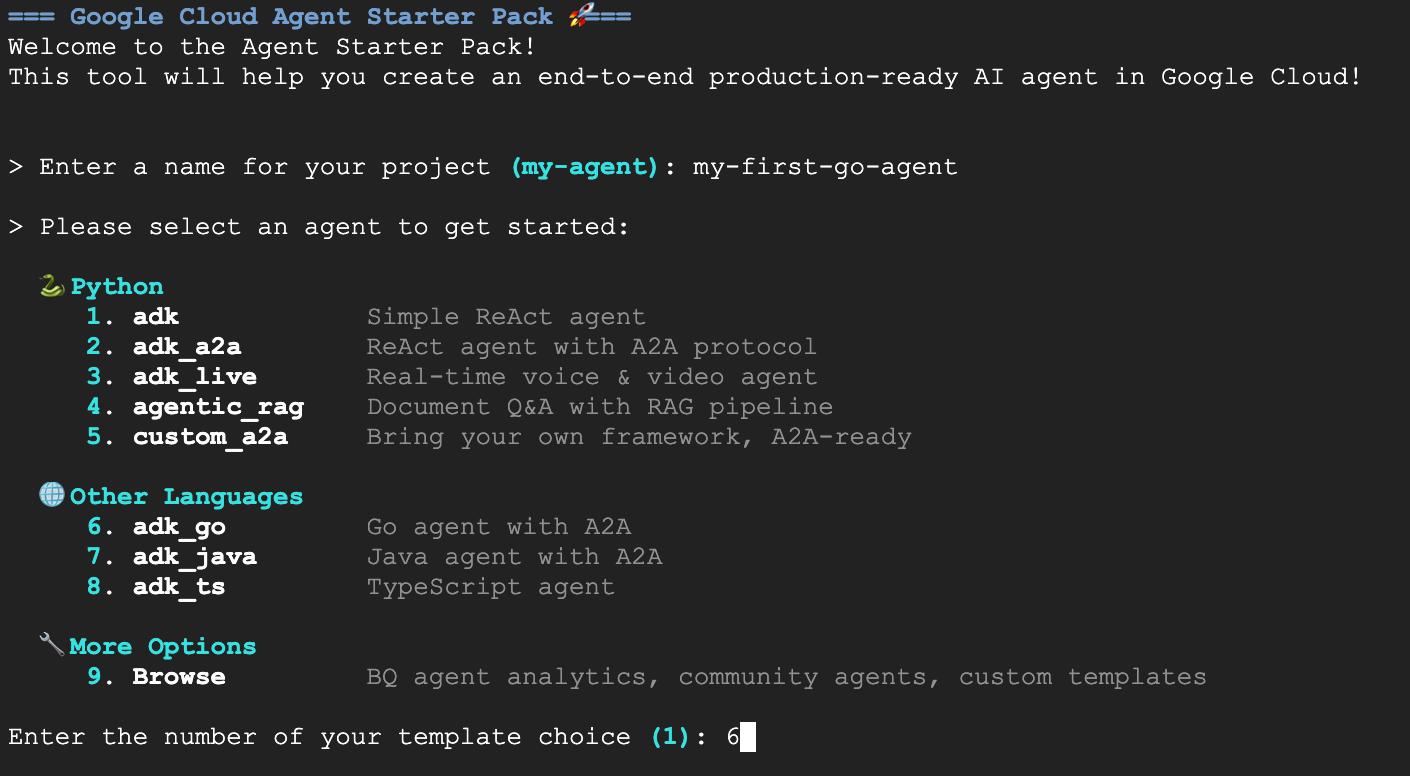
Once you see the green Success! message, you're ready to proceed.
4. Visualizing the Agent Locally
One of the most convenient features of the ADK is the ability to visually debug your agent before deploying it. By running the commands below, you launch a local development server with a built-in UI. Yes, it has a chat window, but it goes way beyond that by tracing events, tool calls, and more.
Change to your project directory and start the playground:
cd my-first-go-agent
make install
make playground
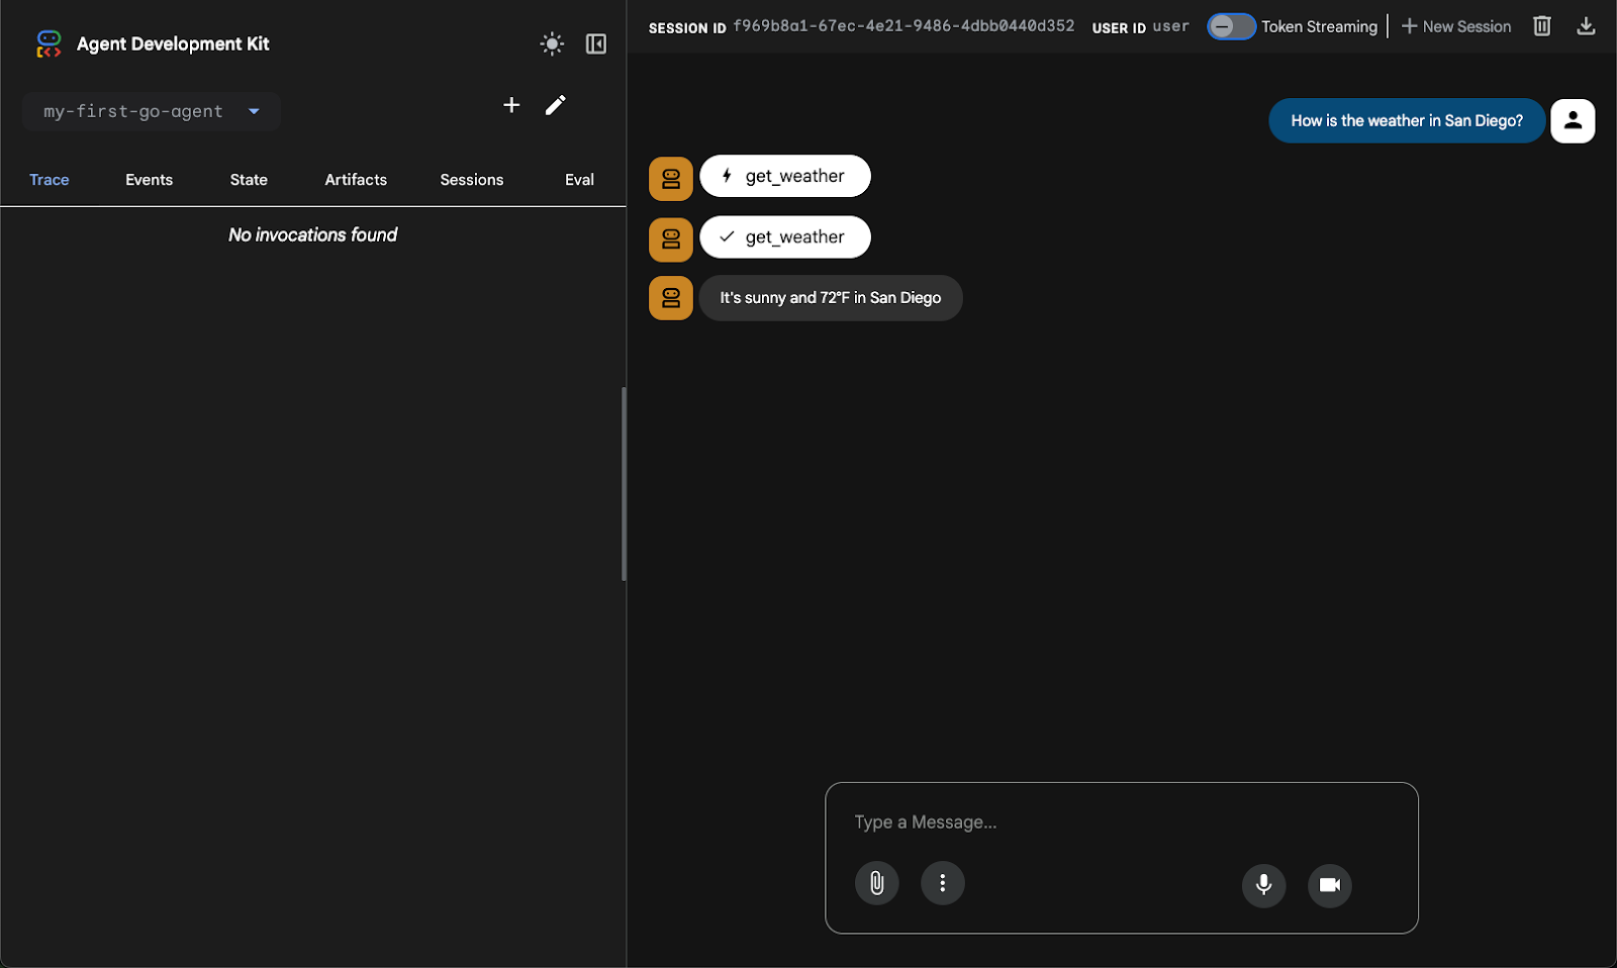
Once the playground is running, open the web preview in Cloud Shell to interact with your newly created agent.
The agent is configured with a ReAct (Reasoning and Acting) pattern—a framework that has become foundational in agentic AI. The ReAct pattern's continuous loop of "Thought", "Action", and "Observation" enhances problem-solving and interpretability, making the agent's decision-making process transparent.
For instance, if you ask for the weather, the agent recognizes the intent, invokes the get_weather tool, and returns the structured data.
5. Understanding the Code
Now that we've seen the agent in action, let's look at the Go code that makes this work. The logic lives in agent/agent.go. This file handles tool definitions, model configuration, and initialization.
The ADK uses standard Go structs to define how the Large Language Model (LLM) interacts with your code. To define the input parameters for our weather tool, we define a struct with json and jsonschema tags:
type GetWeatherArgs struct {
    City string `json:"city" jsonschema:"City name to get weather for"`
}
GetWeatherResult defines the structure of the data returned to the agent after the tool executes:
// GetWeatherResult defines the output for the get_weather tool.
type GetWeatherResult struct {
	Weather string `json:"weather"`
}
GetWeather is a standard Go function that accepts tool.Context and the arguments struct, performing the business logic and returning the result struct:
// GetWeather returns mock weather data for a city.
func GetWeather(_ tool.Context, args GetWeatherArgs) (GetWeatherResult, error) {
	return GetWeatherResult{
		Weather: "It's sunny and 72°F in " + args.City,
	}, nil
}
The NewRootAgent function is responsible for assembling and returning the agent.Agent instance that the application launcher requires. It begins by initializing the model configuration, creating a gemini-2.5-flash model instance backed by genai.BackendVertexAI.
Next, it bridges the gap between Go code and the LLM by wrapping the local GetWeather function into a functiontool. This step registers the tool with the name get_weather and provides the necessary description for the model's context. Finally, it constructs the agent using llmagent.New, which combines the initialized Gemini model, the system instructions that define the agent's behavior, and the slice of available tools into a single unit.
// NewRootAgent creates and returns the root agent with all configured tools.
func NewRootAgent(ctx context.Context) (agent.Agent, error) {
	model, err := gemini.NewModel(ctx, "gemini-2.5-flash", &genai.ClientConfig{
		Backend: genai.BackendVertexAI,
	})

	weatherTool, err := functiontool.New(functiontool.Config{
		Name:        "get_weather",
		Description: "Get the current weather for a city.",
	}, GetWeather)

	rootAgent, err := llmagent.New(llmagent.Config{
		Name:        "my-first-go-agent",
		Model:       model,
		Description: "A helpful AI assistant.",
		Instruction: "You are a helpful AI assistant designed to provide accurate and useful information.",
		Tools:       []tool.Tool{weatherTool},
	})
	// ... (additional logic omitted for brevity)
	return rootAgent, nil
}
6. Testing
The project contains both unit tests for internal logic, and end-to-end tests for server integration.
In agent/agent_test.go, the GetWeather function is called with a suite of test cases to verify that the output string matches its expectations.
func TestGetWeather(t *testing.T) {
	// tests struct initialized with "San Francisco" and "New York"

	for _, tt := range tests {
		t.Run(tt.name, func(t *testing.T) {
			// Pass nil for tool.Context since GetWeather doesn't use it
			result, err := GetWeather(nil, GetWeatherArgs{City: tt.city})
			if err != nil {
				t.Fatalf("GetWeather() error = %v", err)
			}
			if !strings.Contains(result.Weather, tt.wantCity) {
				t.Errorf("GetWeather() = %v, want city %v in response", result.Weather, tt.wantCity)
			}
		})
	}
}
The end-to-end tests verify that the agent works correctly when running as a server, specifically checking that A2A or Agent-to-Agent protocol support is working correctly. The E2E tests start a real instance of the server, sending HTTP requests to it, and check the responses.
Here's a snippet from e2e/integration/server_e2e_test.go:
func TestA2AMessageSend(t *testing.T) {
    if testing.Short() { t.Skip("Skipping E2E test in short mode") }

    // Start server (local variable to avoid race conditions)
    t.Log("Starting server process")
    serverProcess := startServer(t)
    defer stopServer(t, serverProcess)

    if !waitForServer(t, 90*time.Second) {
	    t.Fatal("Server failed to start")
    }
    t.Log("Server process started")
    // ...
}
You can run all tests locally using the makefile:
make test
7. Deployment
When you're ready to share your agent with the world or connect it to production ecosystems, run the included deploy command:
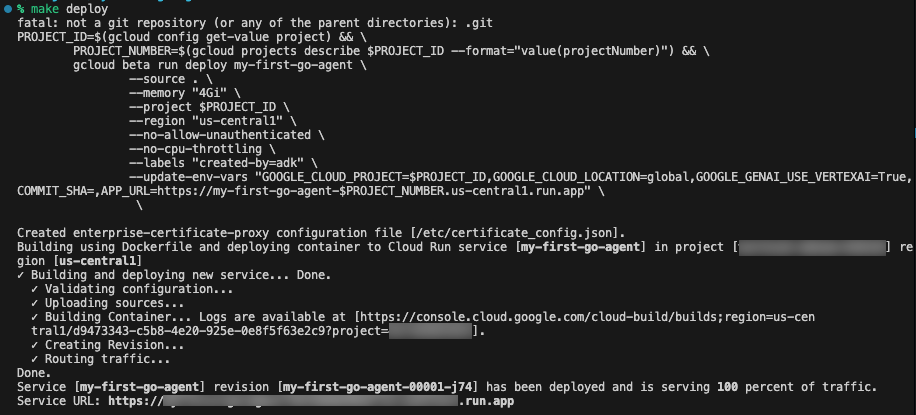
make deploy
This command automatically builds your application from source using Google Cloud Buildpacks, triggered by the --source . flag. It deploys this image to Cloud Run with several production-optimized flags: --memory "4Gi" to provide ample RAM for LLM operations, and --no-cpu-throttling to ensure the CPU remains allocated 24/7, which can prevent cold starts and ensure quick responses in agent interactions.
To ensure your agent runs securely, the system is deployed with a strict configuration using --no-allow-unauthenticated to block all public access by default, requiring Identity and Access Management (IAM) authentication for any requests. It also injects environment variables including GOOGLE_GENAI_USE_VERTEXAI=True.
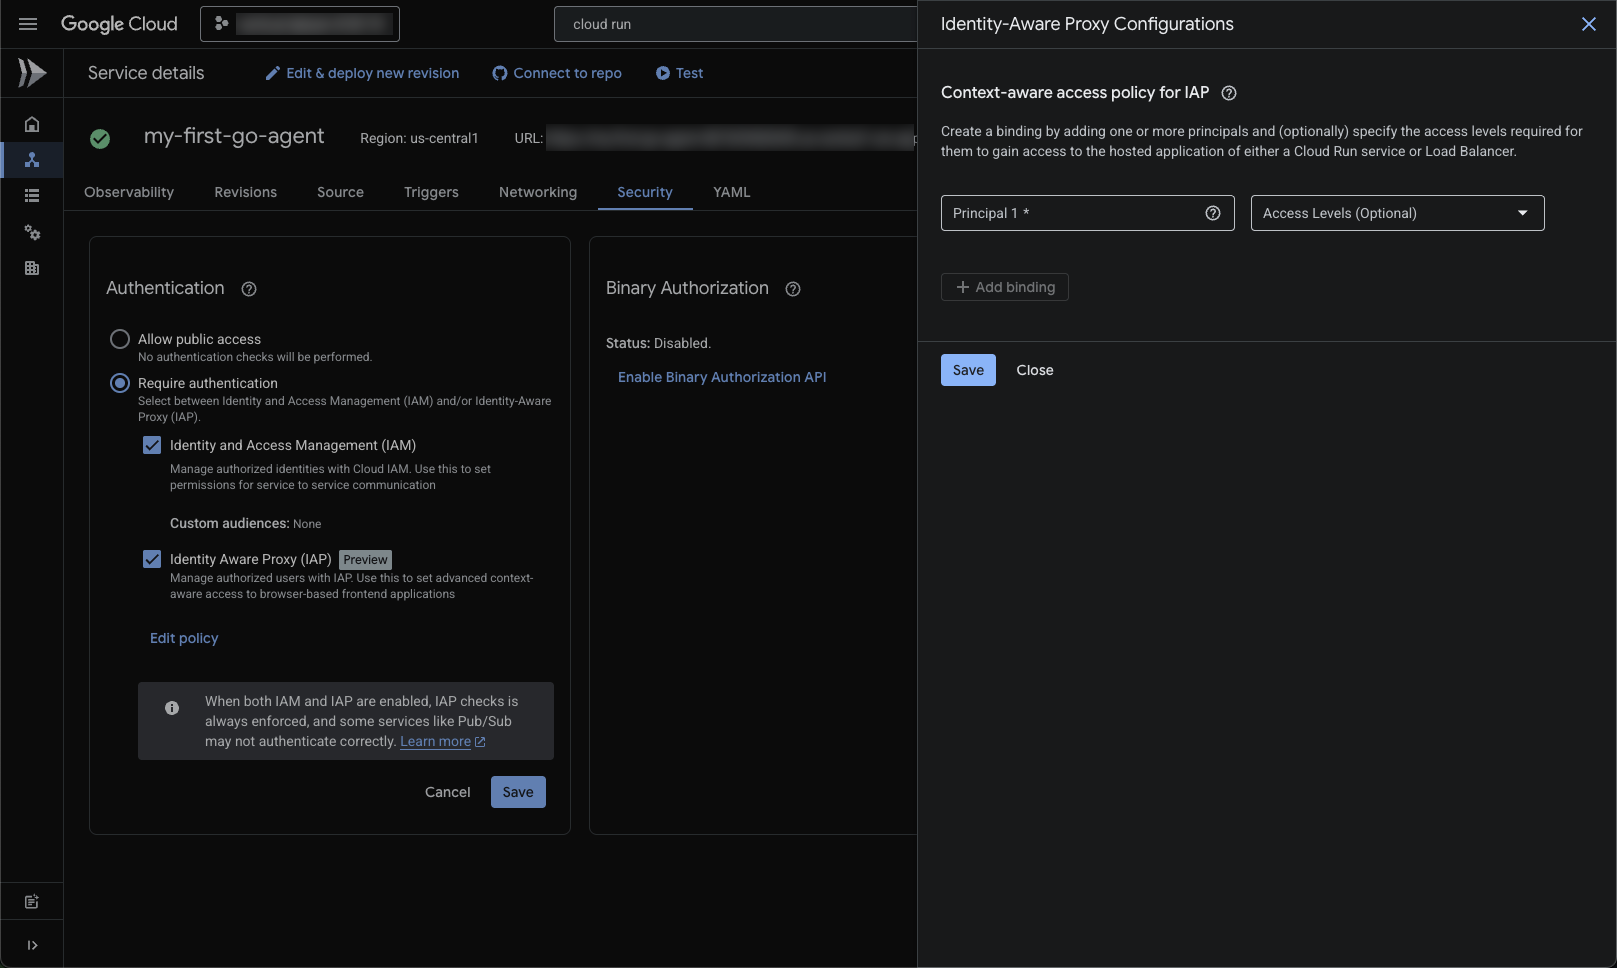
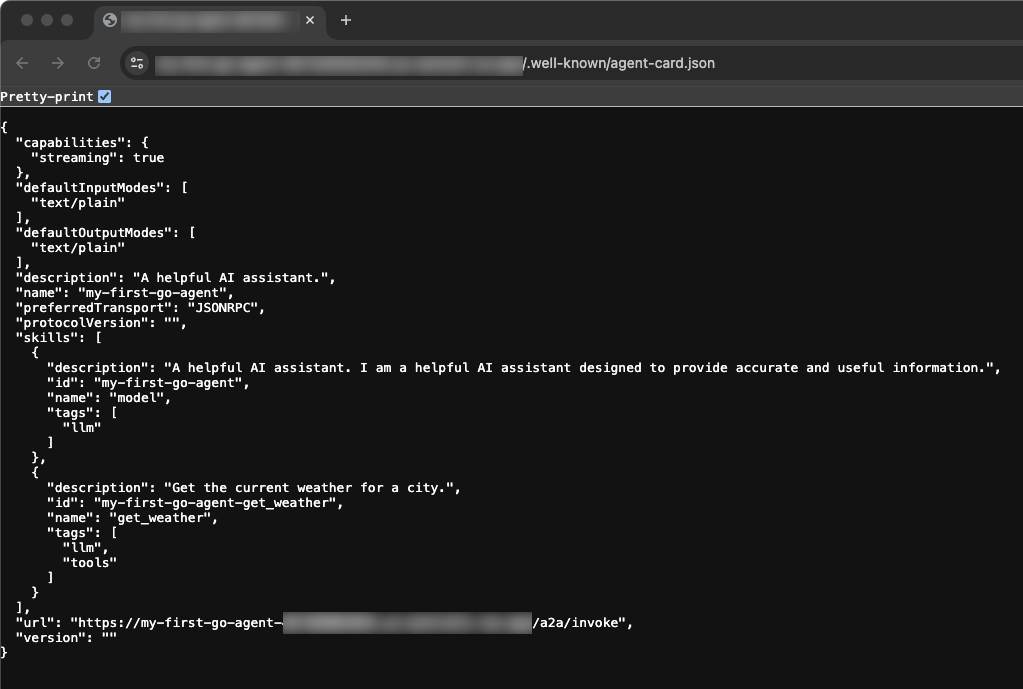
Once IAP is enabled and your email is added as a principal, you can navigate to the Service URL provided after deployment. Viewing the base Service URL allows you to see the deployed Agent Card. This JSON structure serves as your agent's standard interface, allowing it to be dynamically discovered and consumed by other agents, orchestrators, or human-facing UIs.
8. Clean Up
To avoid incurring ongoing charges to your Google Cloud account, delete the resources created during this Codelab.
You can delete your Cloud project, which stops billing for all the resources used within it:
gcloud projects delete $PROJECT_ID
You may also want to delete the codelab project directory from your Cloud Shell disk:
rm -rf ~/my-first-go-agent
9. Congratulations!
🎊 Mission Complete! You have successfully scaffolded, tested, and deployed an AI Agent in Go using the Agent Development Kit.
What you accomplished:
- Scaffolded an initial structured baseline using Agent Starter Pack
- Verified and tested the agent UI and code locally
- Digged into the typed schemas and functions mapping LLM behaviors to Go objects
- Deployed the Go service to Cloud Run
What's next?
- ADK Documentation: Complete guides on advanced patterns, multi-agent orchestration, and memory systems
- Agent Starter Pack: Explore templates, including multi-agent systems and complex architectures
- Cloud Run Documentation: Deep dives on performance optimization, scaling strategies, and security best practices
- Go Concurrency Patterns: Understanding goroutines and channels will help you build more efficient agent tooling
- Vertex AI Agent Engine: For managed agent infrastructure with built-in orchestration and tooling