
1. 簡介

雖然 Python 仍是模型訓練和研究的熱門選擇,但 供應和協調 AI 代理程式的需求與 Go 的優勢密切相關:低延遲、高並行和型別安全。
從原型轉換為正式版代理程式時,會遇到工程方面的挑戰,而 Go 語言在這方面表現出色。Go 的靜態型別可消除剖析結構化 LLM 輸出內容時的執行階段錯誤。與 OS 執行緒的數百萬位元組相比,輕量型 goroutine 僅需幾千位元組的堆疊記憶體,因此代理程式可處理數千個並行工具執行作業,不會造成繁重的執行緒管理負擔。
Google 的 Agent Development Kit (ADK) 彌合了這些架構優勢與生成式 AI 之間的差距。在本指南中,您將架構新專案,並在 Google Cloud 上以安全微服務的形式部署專案。
實際行動:
- 使用 Agent Starter Pack 搭建可投入生產的代理程式專案
- 使用本機 Agent Development Kit 網頁 UI 偵錯及測試代理程式
- 開發及瞭解以 Go 為基礎的 ADK 代理邏輯
- 執行單元和端對端 (E2E) 測試
- 將代理程式安全地部署至 Cloud Run
您需要準備:
- 網路瀏覽器,例如 Chrome
- 已啟用計費功能的 Google Cloud 專案
2. 事前準備
建立 Google Cloud 專案
如果沒有,請先加以建立:
- 在 Google Cloud 控制台的專案選取器頁面中,選取或建立 Google Cloud 專案。
- 確認 Cloud 專案已啟用計費功能。
啟動 Cloud Shell
Cloud Shell 是在 Google Cloud 中運作的指令列環境,已預先載入必要工具。在本實驗室中,這將做為您的主要開發環境。
- 點選 Google Cloud 控制台頂端的「啟用 Cloud Shell」。
- 連線至 Cloud Shell 後,請執行下列指令,在 Cloud Shell 中驗證您的驗證:
gcloud auth list
- 執行下列指令,確認專案已設定為搭配 gcloud 使用:
gcloud config get project
- 確認專案符合預期,然後執行下列指令設定專案 ID:
export PROJECT_ID=$(gcloud config get project)
3. 開始使用 Agent Starter Pack
好消息是您不必從頭開始。Agent Starter Pack 是一項 CLI 工具,可搭建適用於正式環境的資料夾結構,包括 CI/CD 管道、基礎架構設定和樣板程式碼。
如要開始使用,只要使用 uvx 執行建構建立指令即可:
uvx agent-starter-pack create
CLI 會引導您完成互動式設定。請為這個專案選取下列選項:
- 專案名稱:
my-first-go-agent - 範本:選項 6 (Go ADK,Go 代理 (含 A2A))
- 持續整合/持續推送軟體更新:選項 3 (GitHub Actions)
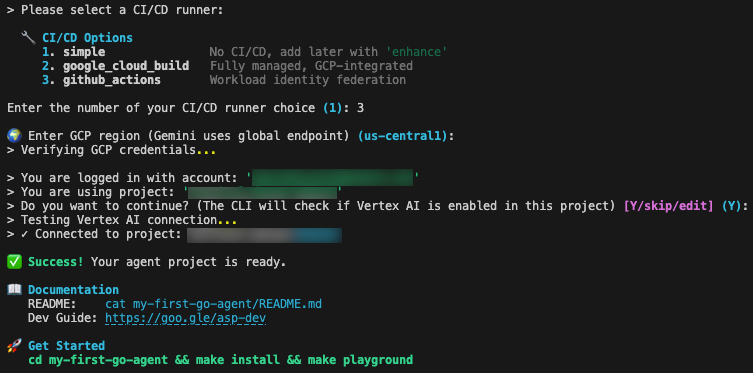
- 區域:
us-central1
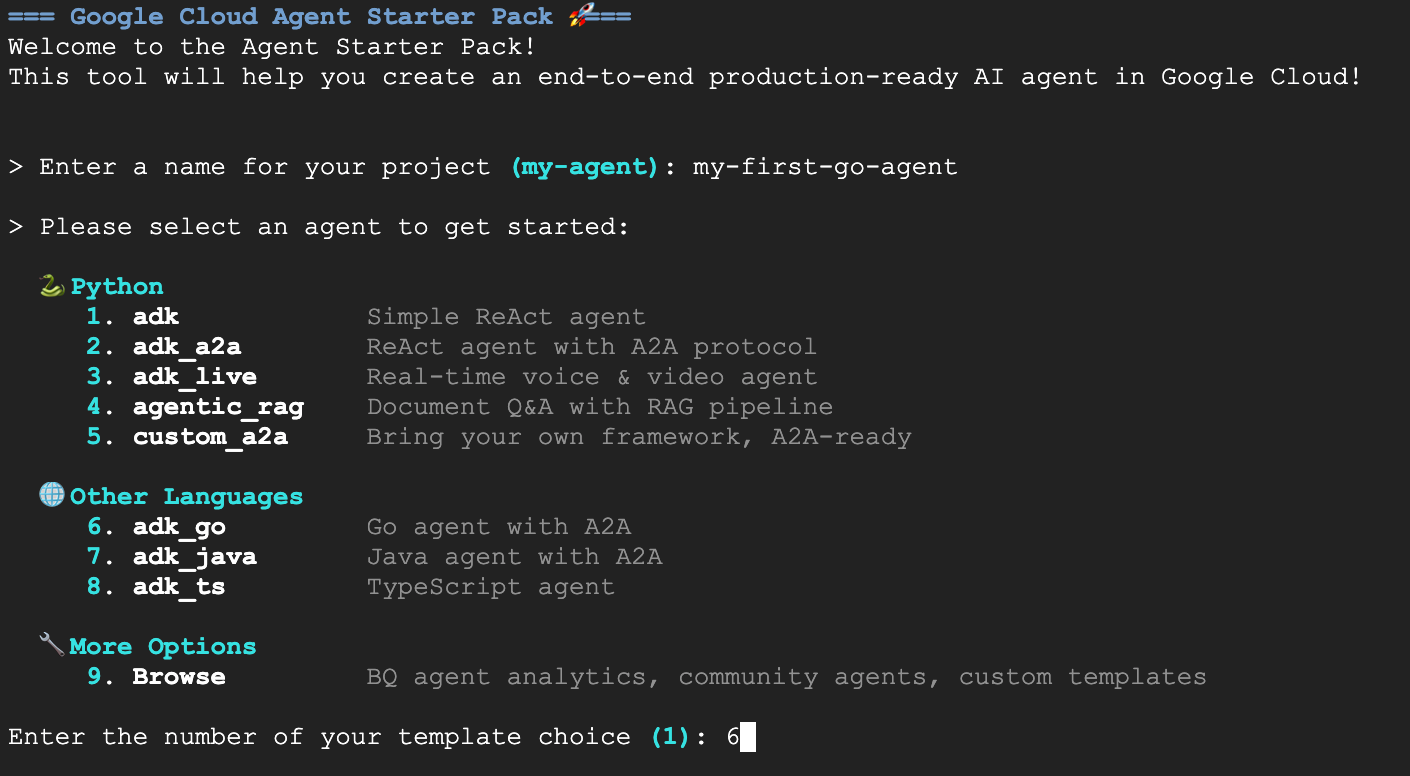
看到綠色的「成功!」訊息後,即可繼續。
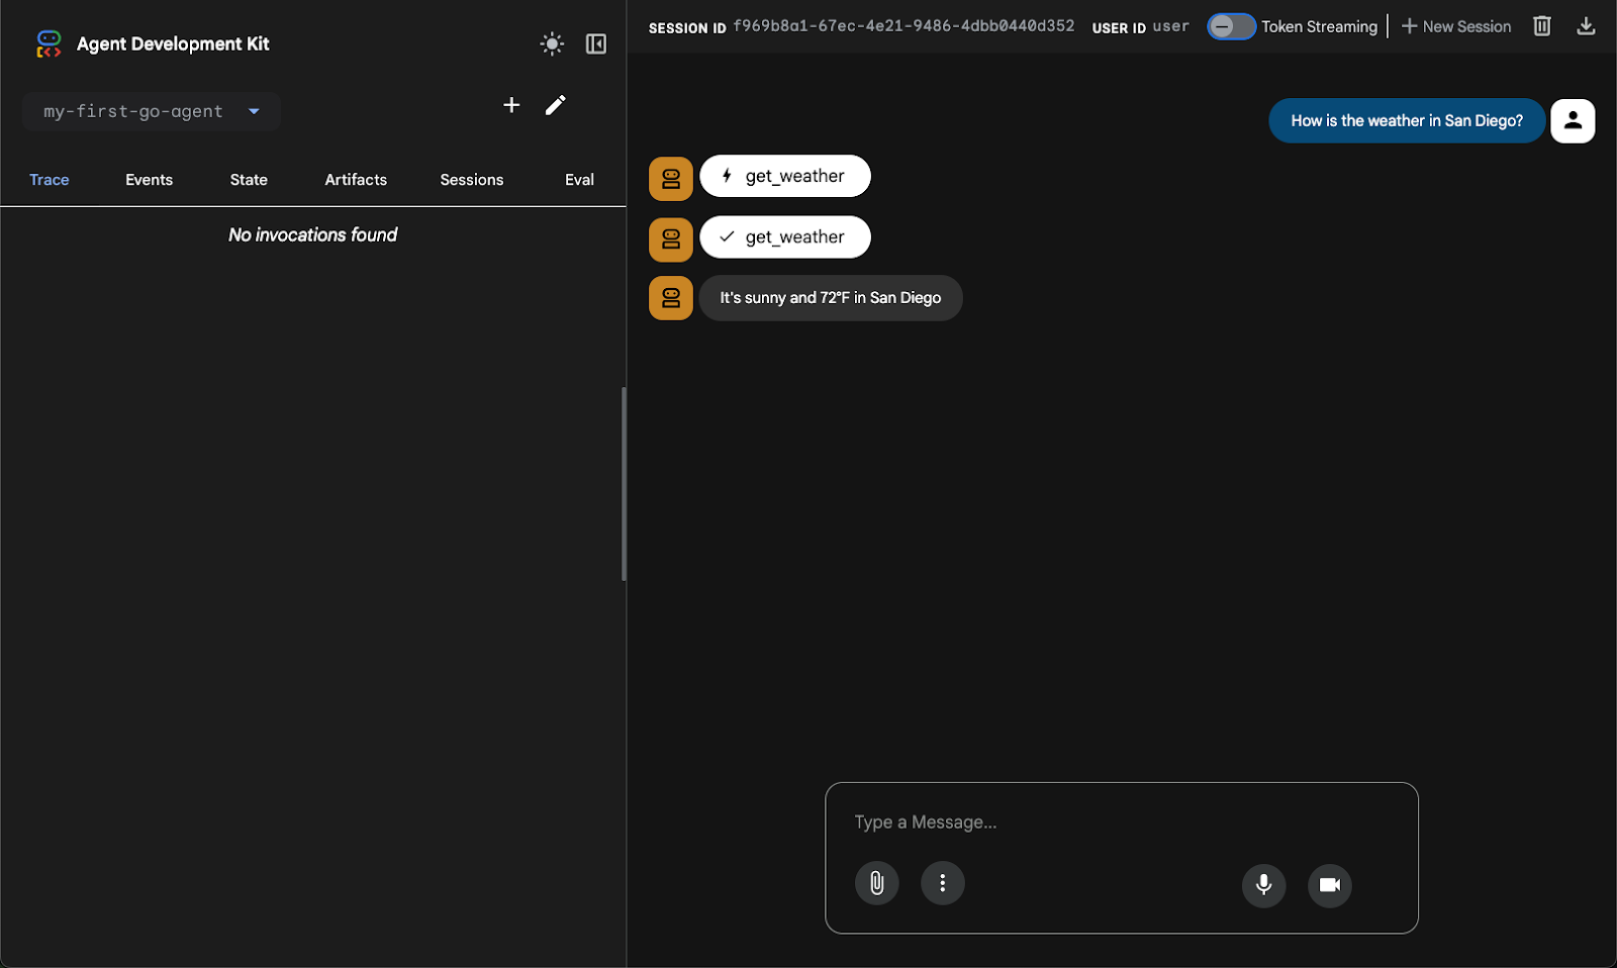
4. 在本機將代理程式視覺化
ADK 最方便的功能之一,就是能在部署代理前以視覺化方式進行偵錯。執行下列指令,即可啟動內建 UI 的本機開發伺服器。沒錯,這項工具設有即時通訊視窗,但功能遠不止於此,還能追蹤事件、工具呼叫等。
切換至專案目錄並啟動 Playground:
cd my-first-go-agent
make install
make playground
遊樂區執行完畢後,開啟 Cloud Shell 中的網頁預覽功能,即可與新建立的代理程式互動。
這個代理採用 ReAct (Reasoning and Acting) 模式設定,這項架構已成為代理式 AI 的基礎。ReAct 模式會持續進行「思考」、「行動」和「觀察」的迴圈,提升解決問題和解讀能力,讓代理的決策過程一目瞭然。
舉例來說,如果你詢問天氣,代理程式會辨識意圖、叫用 get_weather 工具,並傳回結構化資料。
5. 瞭解程式碼
我們已瞭解代理程式的運作方式,接下來看看讓代理程式運作的 Go 程式碼。邏輯位於 agent/agent.go 中。這個檔案會處理工具定義、模型設定和初始化作業。
ADK 會使用標準 Go 結構體,定義大型語言模型 (LLM) 與程式碼的互動方式。如要定義天氣工具的輸入參數,請使用 json 和 jsonschema 標記定義結構:
type GetWeatherArgs struct {
    City string `json:"city" jsonschema:"City name to get weather for"`
}
GetWeatherResult 會定義工具執行後傳回給代理程式的資料結構:
// GetWeatherResult defines the output for the get_weather tool.
type GetWeatherResult struct {
	Weather string `json:"weather"`
}
GetWeather 是標準的 Go 函式,可接受 tool.Context 和引數結構體,執行商業邏輯並傳回結果結構體:
// GetWeather returns mock weather data for a city.
func GetWeather(_ tool.Context, args GetWeatherArgs) (GetWeatherResult, error) {
	return GetWeatherResult{
		Weather: "It's sunny and 72°F in " + args.City,
	}, nil
}
NewRootAgent 函式負責組裝並傳回應用程式啟動器所需的 agent.Agent 例項。首先,初始化模型設定,並建立由 genai.BackendVertexAI 支援的 gemini-2.5-flash 模型例項。
接著,它會將本機 GetWeather 函式包裝成 functiontool,縮小 Go 程式碼與 LLM 之間的差距。這個步驟會以 get_weather 名稱註冊工具,並提供模型背景資訊的必要說明。最後,它會使用 llmagent.New 建構代理程式,將初始化的 Gemini 模型、定義代理程式行為的系統指令,以及可用工具的切片合併為單一單元。
// NewRootAgent creates and returns the root agent with all configured tools.
func NewRootAgent(ctx context.Context) (agent.Agent, error) {
	model, err := gemini.NewModel(ctx, "gemini-2.5-flash", &genai.ClientConfig{
		Backend: genai.BackendVertexAI,
	})

	weatherTool, err := functiontool.New(functiontool.Config{
		Name:        "get_weather",
		Description: "Get the current weather for a city.",
	}, GetWeather)

	rootAgent, err := llmagent.New(llmagent.Config{
		Name:        "my-first-go-agent",
		Model:       model,
		Description: "A helpful AI assistant.",
		Instruction: "You are a helpful AI assistant designed to provide accurate and useful information.",
		Tools:       []tool.Tool{weatherTool},
	})
	// ... (additional logic omitted for brevity)
	return rootAgent, nil
}
6. 測試
這個專案包含內部邏輯的單元測試,以及伺服器整合的端對端測試。
在 agent/agent_test.go 中,系統會使用一連串測試案例呼叫 GetWeather 函式,確認輸出字串符合預期。
func TestGetWeather(t *testing.T) {
	// tests struct initialized with "San Francisco" and "New York"

	for _, tt := range tests {
		t.Run(tt.name, func(t *testing.T) {
			// Pass nil for tool.Context since GetWeather doesn't use it
			result, err := GetWeather(nil, GetWeatherArgs{City: tt.city})
			if err != nil {
				t.Fatalf("GetWeather() error = %v", err)
			}
			if !strings.Contains(result.Weather, tt.wantCity) {
				t.Errorf("GetWeather() = %v, want city %v in response", result.Weather, tt.wantCity)
			}
		})
	}
}
端對端測試會驗證代理程式以伺服器形式執行時是否正常運作,特別是檢查 A2A 或代理程式對代理程式通訊協定支援是否正常運作。E2E 測試會啟動伺服器的實際執行個體,向該執行個體傳送 HTTP 要求,並檢查回應。
以下是「e2e/integration/server_e2e_test.go」的摘要:
func TestA2AMessageSend(t *testing.T) {
    if testing.Short() { t.Skip("Skipping E2E test in short mode") }

    // Start server (local variable to avoid race conditions)
    t.Log("Starting server process")
    serverProcess := startServer(t)
    defer stopServer(t, serverProcess)

    if !waitForServer(t, 90*time.Second) {
	    t.Fatal("Server failed to start")
    }
    t.Log("Server process started")
    // ...
}
您可以使用 makefile 在本機執行所有測試:
make test
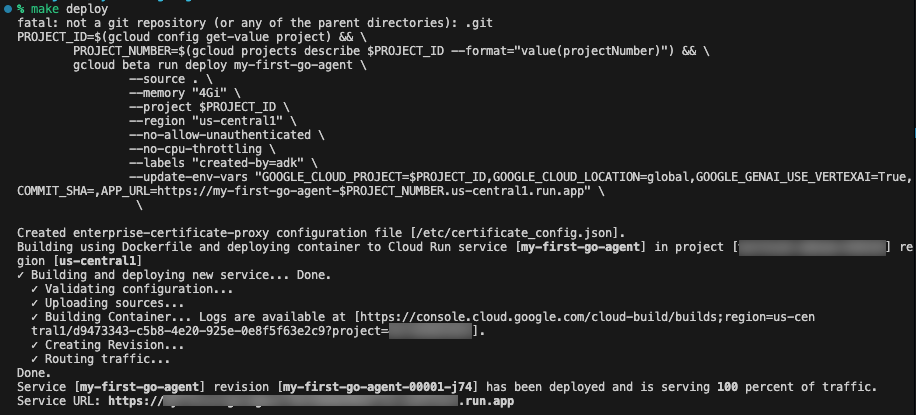
7. 部署
準備好與全世界分享代理程式,或將代理程式連結至實際執行生態系統時,請執行隨附的部署指令:
make deploy
這個指令會使用 Google Cloud Buildpacks 從來源自動建構應用程式,並由 --source . 標記觸發。這個指令會將映像檔部署至 Cloud Run,並使用多個經過最佳化的生產環境專用標記:--memory "4Gi" 為 LLM 作業提供充足的 RAM,以及 --no-cpu-throttling 確保 CPU 全天候保持分配狀態,避免冷啟動並確保在代理程式互動中快速回應。
為確保代理程式安全無虞地執行,系統會使用 --no-allow-unauthenticated 部署嚴格的設定,根據預設封鎖所有公開存取權,並要求所有要求都必須通過 Identity and Access Management (IAM) 驗證。也會注入環境變數,包括 GOOGLE_GENAI_USE_VERTEXAI=True。
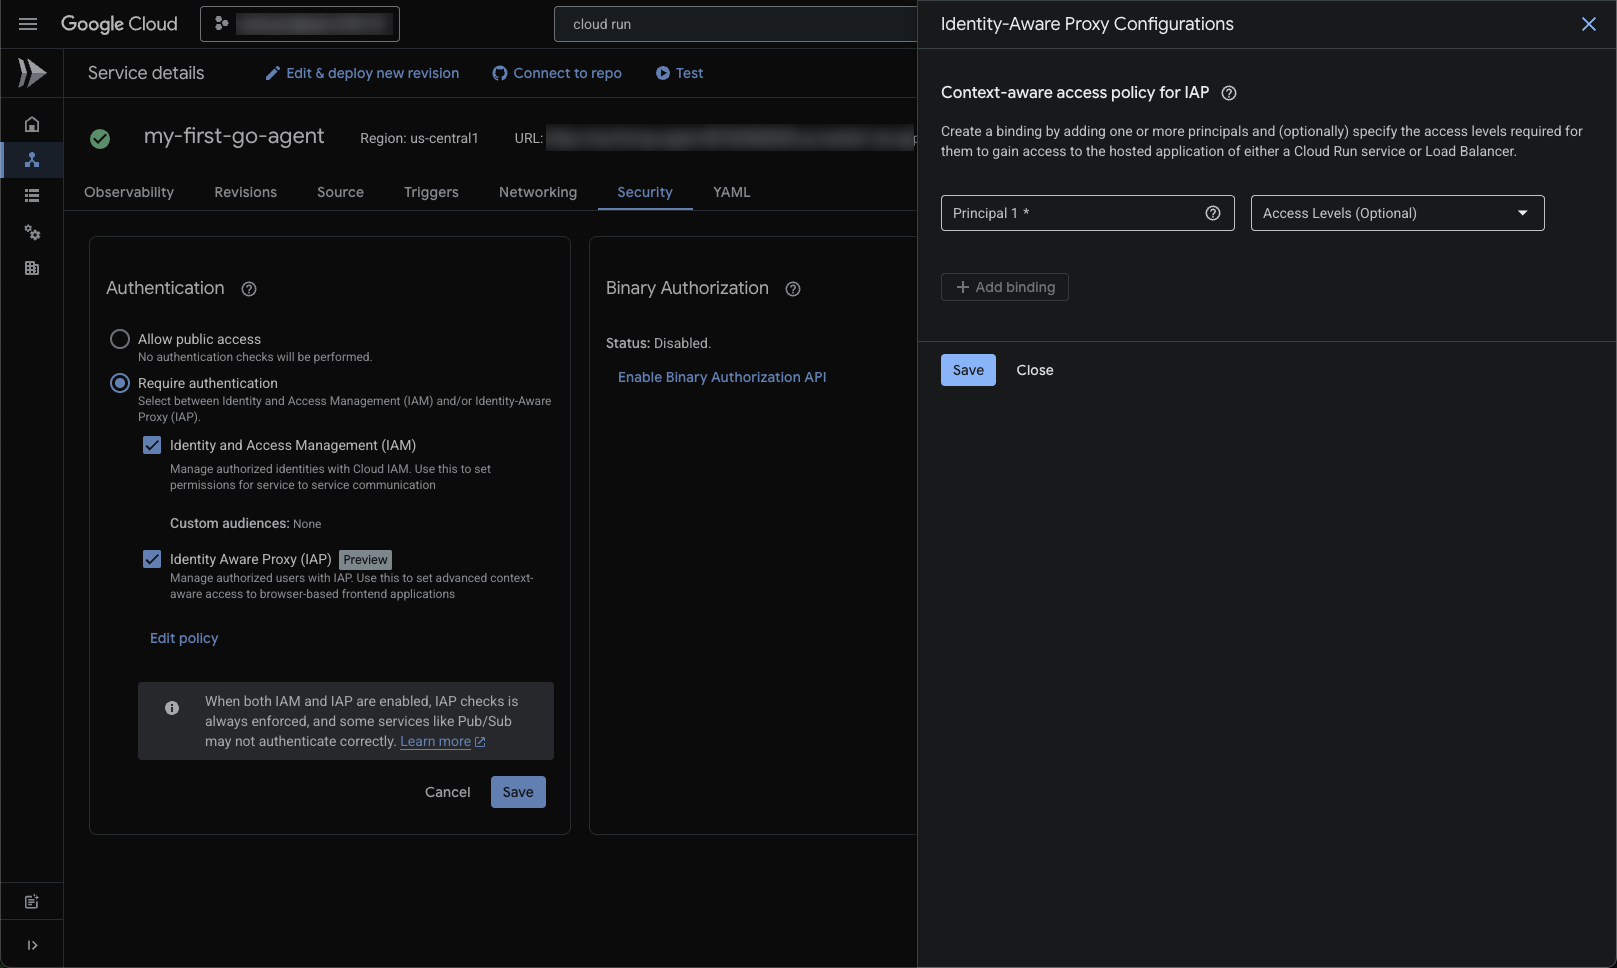
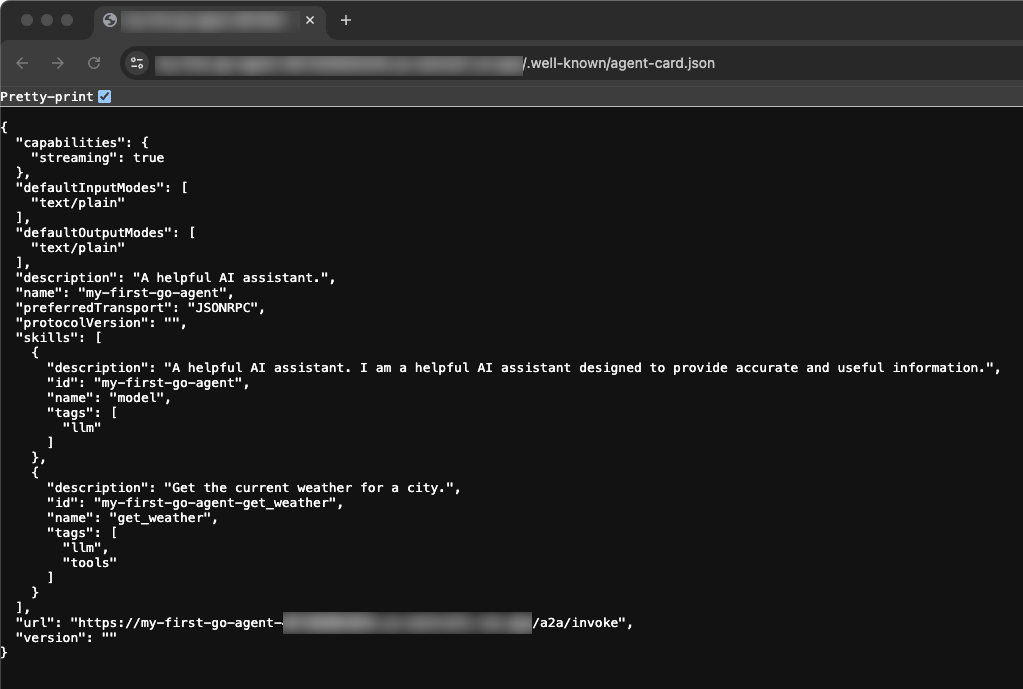
啟用 IAP 並將電子郵件地址新增為主體後,您就能前往部署作業後提供的服務網址。查看基本服務網址,即可看到已部署的服務專員卡。這個 JSON 結構是代理的標準介面,可供其他代理、協調器或面向使用者的 UI 動態探索及使用。
8. 清除
如要避免系統持續向您的 Google Cloud 帳戶收取費用,請刪除在本程式碼研究室中建立的資源。
您可以刪除 Cloud 專案,這樣系統就會停止對專案使用的所有資源收取費用:
gcloud projects delete $PROJECT_ID
您也可以從 Cloud Shell 磁碟刪除 Codelab 專案目錄:
rm -rf ~/my-first-go-agent
9. 恭喜!
🎊 任務完成!您已使用 Agent Development Kit,成功以 Go 語言架構、測試及部署 AI 代理程式。
完成的目標:
- 使用 Agent Starter Pack 搭建初始結構化基準
- 在本地驗證及測試代理程式 UI 和程式碼
- 深入瞭解型別結構定義和函式,將 LLM 行為對應至 Go 物件
- 將 Go 服務部署至 Cloud Run
後續步驟
- ADK 說明文件:進階模式、多代理自動調度管理和記憶體系統的完整指南
- Agent Starter Pack:探索範本,包括多代理系統和複雜架構
- Cloud Run 說明文件:深入瞭解效能最佳化、擴充策略和安全性最佳做法
- Go 並行模式:瞭解 goroutine 和管道有助於建構更有效率的代理程式工具
- Vertex AI Agent Engine:適用於內建自動化調度管理和工具的代管代理基礎架構