

1. はじめに
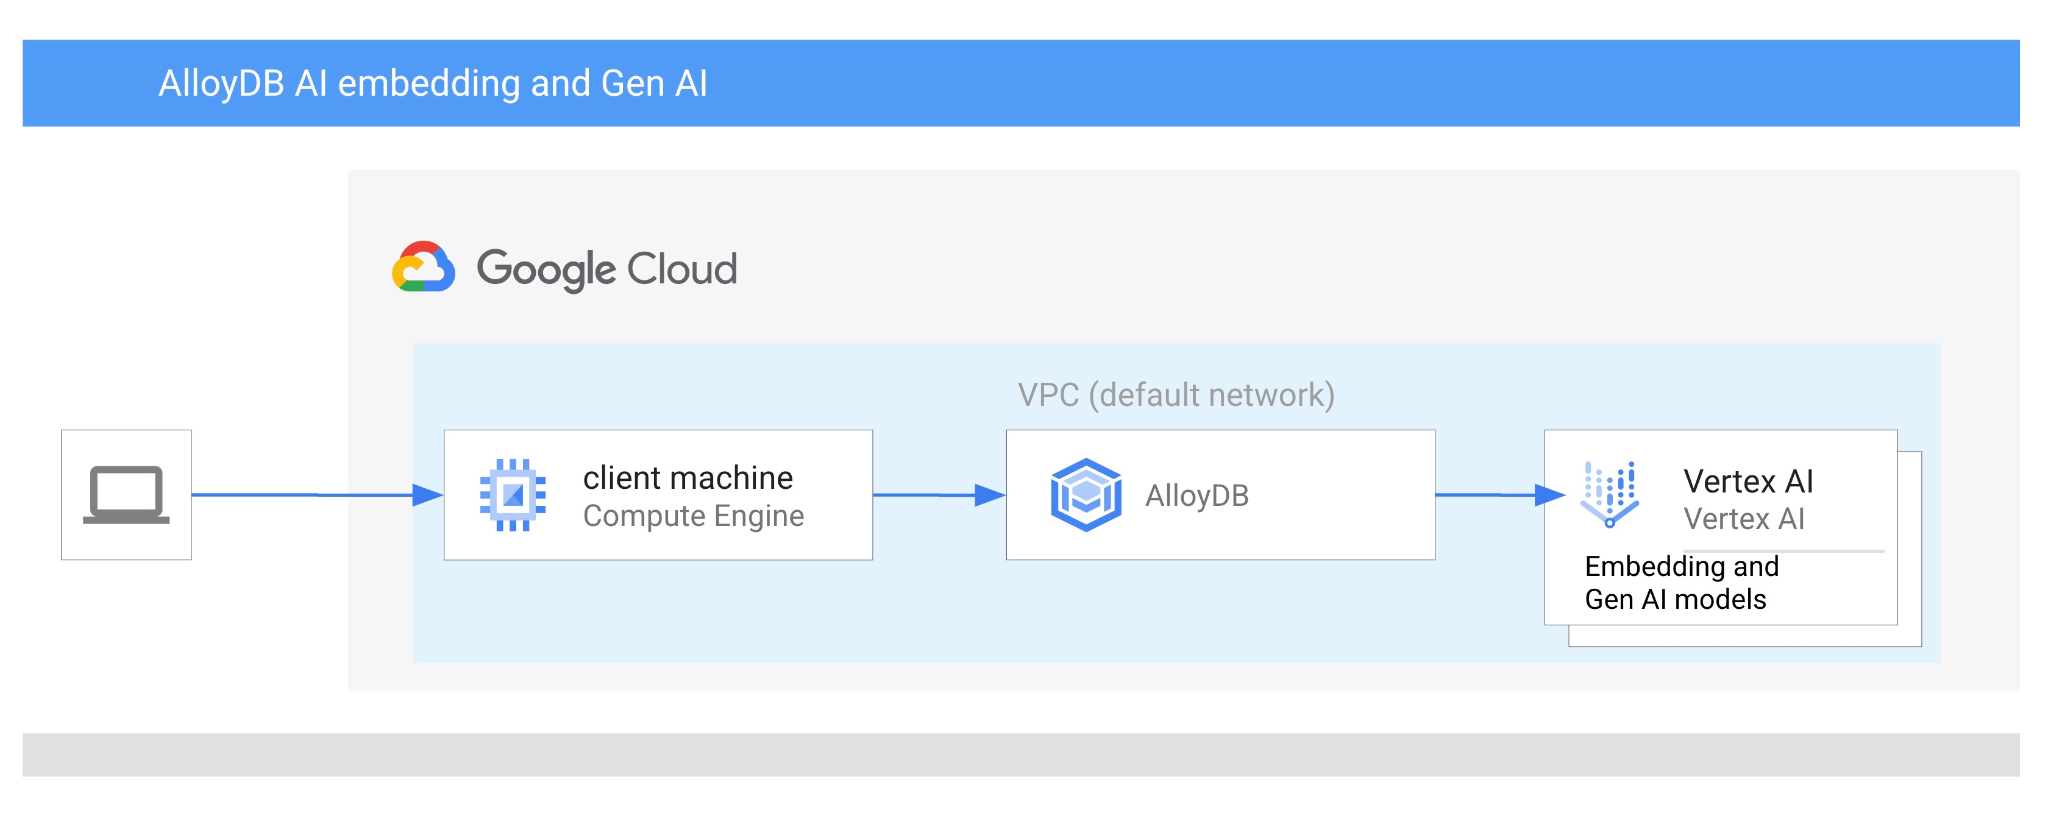
この Codelab では、ベクトル検索と Vertex AI エンベディングを組み合わせて AlloyDB AI を使用する方法を学びます。このラボは、AlloyDB AI 機能専用のラボ コレクションの一部です。詳細については、ドキュメントの AlloyDB AI ページをご覧ください。
前提条件
- Google Cloud コンソールの基本的な知識
- コマンドライン インターフェースと Google Shell の基本的なスキル
学習内容
- AlloyDB クラスタとプライマリ インスタンスをデプロイする方法
- Google Compute Engine VM から AlloyDB に接続する方法
- データベースを作成して AlloyDB AI を有効にする方法
- データベースにデータを読み込む方法
- AlloyDB Studio の使用方法
- AlloyDB で Vertex AI エンベディング モデルを使用する方法
- Vertex AI Studio の使用方法
- Vertex AI 生成モデルを使用して結果を拡充する方法
- ベクトル インデックスを使用してパフォーマンスを改善する方法
必要なもの
- Google Cloud アカウントと Google Cloud プロジェクト
- ウェブブラウザ(Chrome など)
2. 設定と要件
プロジェクトのセットアップ
- Google Cloud コンソールにログインします。Gmail アカウントも Google Workspace アカウントもまだお持ちでない場合は、アカウントを作成してください。
仕事用または学校用のアカウントではなく、個人用のアカウントを使用します。
- 新しいプロジェクトを作成するか、既存のプロジェクトを再利用します。Google Cloud コンソールで新しいプロジェクトを作成するには、ヘッダーで [プロジェクトを選択] ボタンをクリックします。ポップアップ ウィンドウが開きます。

[プロジェクトを選択] ウィンドウで [新しいプロジェクト] ボタンを押すと、新しいプロジェクトのダイアログ ボックスが開きます。

ダイアログ ボックスで、任意のプロジェクト名を入力し、ロケーションを選択します。
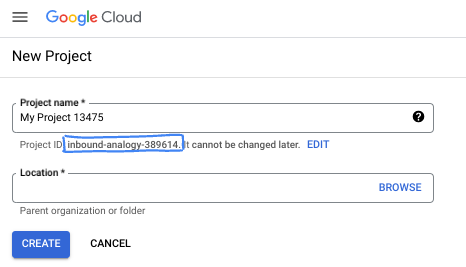
- プロジェクト名は、このプロジェクトの参加者に表示される名称です。プロジェクト名は Google API では使用されず、いつでも変更できます。
- プロジェクト ID は、すべての Google Cloud プロジェクトにおいて一意でなければならず、不変です(設定後は変更できません)。Google Cloud コンソールでは一意の ID が自動的に生成されますが、カスタマイズすることもできます。生成された ID が気に入らない場合は、別のランダムな ID を生成するか、独自の ID を指定して使用可能かどうかを確認できます。ほとんどの Codelab では、プロジェクト ID を参照する必要があります。通常、プロジェクト ID はプレースホルダ PROJECT_ID で識別されます。
- なお、3 つ目の値として、一部の API が使用するプロジェクト番号があります。これら 3 つの値について詳しくは、こちらのドキュメントをご覧ください。
課金を有効にする
課金を有効にするには、次の 2 つの方法があります。個人用の請求先アカウントを使用するか、次の手順でクレジットを利用できます。
Google Cloud クレジットを利用する(省略可)
このワークショップを実施するには、クレジットが設定された請求先アカウントが必要です。この Codelab の上部にあるバナーのクレジットを使用して、開始します。請求先アカウントにすでに接続している場合は、この手順をスキップできます。
個人用の請求先アカウントを設定する
Google Cloud クレジットを使用して課金を設定した場合は、この手順をスキップできます。
個人用の請求先アカウントを設定するには、Cloud コンソールでこちらに移動して課金を有効にします。
注意事項:
- このラボを完了するのにかかる Cloud リソースの費用は 3 米ドル未満です。
- このラボの最後の手順に沿ってリソースを削除すると、それ以上の料金は発生しません。
- 新規ユーザーは、300 米ドル分の無料トライアルをご利用いただけます。
Cloud Shell の起動
Google Cloud はノートパソコンからリモートで操作できますが、この Codelab では、Google Cloud Shell(Cloud 上で動作するコマンドライン環境)を使用します。
Google Cloud Console で、右上のツールバーにある Cloud Shell アイコンをクリックします。

または、G キーを押してから S キーを押します。このシーケンスは、Google Cloud コンソール内からアクセスした場合、またはこのリンクを使用した場合に Cloud Shell をアクティブにします。
プロビジョニングと環境への接続にはそれほど時間はかかりません。完了すると、次のように表示されます。

この仮想マシンには、必要な開発ツールがすべて用意されています。永続的なホーム ディレクトリが 5 GB 用意されており、Google Cloud で稼働します。そのため、ネットワークのパフォーマンスと認証機能が大幅に向上しています。この Codelab での作業はすべて、ブラウザ内から実行できます。インストールは不要です。
3. はじめに
API を有効にする
出力:
AlloyDB、Compute Engine、ネットワーキング サービス、Vertex AI を使用するには、Google Cloud プロジェクトでそれぞれの API を有効にする必要があります。
API の有効化
Cloud Shell のターミナルで、プロジェクト ID が設定されていることを確認します。
gcloud config set project [YOUR-PROJECT-ID]
環境変数 PROJECT_ID を設定します。
PROJECT_ID=$(gcloud config get-value project)
必要な API をすべて有効にします。
gcloud services enable alloydb.googleapis.com \
                       compute.googleapis.com \
                       cloudresourcemanager.googleapis.com \
                       servicenetworking.googleapis.com \
                       aiplatform.googleapis.com
想定される出力
student@cloudshell:~ (test-project-001-402417)$ gcloud config set project test-project-001-402417
Updated property [core/project].
student@cloudshell:~ (test-project-001-402417)$ PROJECT_ID=$(gcloud config get-value project)
Your active configuration is: [cloudshell-14650]
student@cloudshell:~ (test-project-001-402417)$
student@cloudshell:~ (test-project-001-402417)$ gcloud services enable alloydb.googleapis.com \
                       compute.googleapis.com \
                       cloudresourcemanager.googleapis.com \
                       servicenetworking.googleapis.com \
                       aiplatform.googleapis.com
Operation "operations/acat.p2-4470404856-1f44ebd8-894e-4356-bea7-b84165a57442" finished successfully.
API の概要
- AlloyDB API(
alloydb.googleapis.com)を使用すると、AlloyDB for PostgreSQL クラスタの作成、管理、スケーリングを行うことができます。要求の厳しいエンタープライズ トランザクション ワークロードと分析ワークロード用に設計された、PostgreSQL 互換のフルマネージド データベース サービスを提供します。 - Compute Engine API(
compute.googleapis.com)を使用すると、仮想マシン(VM)、永続ディスク、ネットワーク設定を作成して管理できます。これは、ワークロードの実行と、多くのマネージド サービスの基盤となるインフラストラクチャのホストに必要な、Infrastructure-as-a-Service(IaaS)の基盤となるものです。 - Cloud Resource Manager API(
cloudresourcemanager.googleapis.com)を使用すると、Google Cloud プロジェクトのメタデータと構成をプログラムで管理できます。これにより、リソースの整理、Identity and Access Management(IAM)ポリシーの処理、プロジェクト階層全体での権限の検証が可能になります。 - Service Networking API(
servicenetworking.googleapis.com)を使用すると、Virtual Private Cloud(VPC)ネットワークと Google のマネージド サービス間のプライベート接続の設定を自動化できます。AlloyDB などのサービスが他のリソースと安全に通信できるように、プライベート IP アクセスを確立するために必要です。 - Vertex AI API(
aiplatform.googleapis.com)を使用すると、アプリケーションで ML モデルを構築、デプロイ、スケーリングできます。これは、生成 AI モデル(Gemini など)へのアクセスやカスタムモデルのトレーニングなど、Google Cloud のすべての AI サービスに統合インターフェースを提供します。
必要に応じて、Vertex AI エンベディング モデルを使用するようにデフォルトのリージョンを構成できます。Vertex AI で使用可能なロケーションの詳細を確認する。この例では、us-central1 リージョンを使用しています。
gcloud config set compute/region us-central1
4. AlloyDB をデプロイする
AlloyDB クラスタを作成する前に、将来の AlloyDB インスタンスで使用する VPC で使用可能なプライベート IP 範囲が必要です。ない場合は、作成して内部の Google サービスで使用されるように割り当てる必要があります。その後、クラスタとインスタンスを作成できます。
プライベート IP 範囲を作成する
AlloyDB の VPC でプライベート サービス アクセス構成を構成する必要があります。ここでは、プロジェクトに「デフォルト」の VPC ネットワークがあり、すべてのアクションで使用されることを前提としています。
プライベート IP 範囲を作成します。
gcloud compute addresses create psa-range \
    --global \
    --purpose=VPC_PEERING \
    --prefix-length=24 \
    --description="VPC private service access" \
    --network=default
割り振られた IP 範囲を使用してプライベート接続を作成します。
gcloud services vpc-peerings connect \
    --service=servicenetworking.googleapis.com \
    --ranges=psa-range \
    --network=default
想定されるコンソール出力:
student@cloudshell:~ (test-project-402417)$ gcloud compute addresses create psa-range \
    --global \
    --purpose=VPC_PEERING \
    --prefix-length=24 \
    --description="VPC private service access" \
    --network=default
Created [https://www.googleapis.com/compute/v1/projects/test-project-402417/global/addresses/psa-range].

student@cloudshell:~ (test-project-402417)$ gcloud services vpc-peerings connect \
    --service=servicenetworking.googleapis.com \
    --ranges=psa-range \
    --network=default
Operation "operations/pssn.p24-4470404856-595e209f-19b7-4669-8a71-cbd45de8ba66" finished successfully.

student@cloudshell:~ (test-project-402417)$
AlloyDB クラスタを作成する
このセクションでは、us-central1 リージョンに AlloyDB クラスタを作成します。
postgres ユーザーのパスワードを定義します。独自のパスワードを定義することも、ランダム関数を使用してパスワードを生成することもできます。
export PGPASSWORD=`openssl rand -hex 12`
想定されるコンソール出力:
student@cloudshell:~ (test-project-402417)$ export PGPASSWORD=`openssl rand -hex 12`
後で使用できるように PostgreSQL のパスワードをメモしておきます。
echo $PGPASSWORD
このパスワードは、後で postgres ユーザーとしてインスタンスに接続するために必要になります。後で使用できるように、書き留めるかどこかにコピーしておくことをおすすめします。
想定されるコンソール出力:
student@cloudshell:~ (test-project-402417)$ echo $PGPASSWORD
bbefbfde7601985b0dee5723
無料トライアル クラスタを作成する
AlloyDB を使用したことがない場合は、無料のトライアル クラスタを作成できます。
リージョンと AlloyDB クラスタ名を定義します。ここでは、us-central1 リージョンと alloydb-aip-01 をクラスタ名として使用します。
export REGION=us-central1
export ADBCLUSTER=alloydb-aip-01
コマンドを実行してクラスタを作成します。
gcloud alloydb clusters create $ADBCLUSTER \
    --password=$PGPASSWORD \
    --network=default \
    --region=$REGION \
    --subscription-type=TRIAL
想定されるコンソール出力:
export REGION=us-central1
export ADBCLUSTER=alloydb-aip-01
gcloud alloydb clusters create $ADBCLUSTER \
    --password=$PGPASSWORD \
    --network=default \
    --region=$REGION \
    --subscription-type=TRIAL
Operation ID: operation-1697655441138-6080235852277-9e7f04f5-2012fce4
Creating cluster...done.
同じ Cloud Shell セッションで、クラスタの AlloyDB プライマリ インスタンスを作成します。切断された場合は、リージョンとクラスタ名の環境変数を再度定義する必要があります。
gcloud alloydb instances create $ADBCLUSTER-pr \
    --instance-type=PRIMARY \
    --cpu-count=8 \
    --region=$REGION \
    --cluster=$ADBCLUSTER
想定されるコンソール出力:
student@cloudshell:~ (test-project-402417)$ gcloud alloydb instances create $ADBCLUSTER-pr \
    --instance-type=PRIMARY \
    --cpu-count=8 \
    --region=$REGION \
    --availability-type ZONAL \
    --cluster=$ADBCLUSTER
Operation ID: operation-1697659203545-6080315c6e8ee-391805db-25852721
Creating instance...done.
AlloyDB Standard クラスタを作成する
プロジェクトで最初の AlloyDB クラスタでない場合は、標準クラスタの作成に進みます。
リージョンと AlloyDB クラスタ名を定義します。ここでは、us-central1 リージョンと alloydb-aip-01 をクラスタ名として使用します。
export REGION=us-central1
export ADBCLUSTER=alloydb-aip-01
コマンドを実行してクラスタを作成します。
gcloud alloydb clusters create $ADBCLUSTER \
    --password=$PGPASSWORD \
    --network=default \
    --region=$REGION
想定されるコンソール出力:
export REGION=us-central1
export ADBCLUSTER=alloydb-aip-01
gcloud alloydb clusters create $ADBCLUSTER \
    --password=$PGPASSWORD \
    --network=default \
    --region=$REGION
Operation ID: operation-1697655441138-6080235852277-9e7f04f5-2012fce4
Creating cluster...done.
同じ Cloud Shell セッションで、クラスタの AlloyDB プライマリ インスタンスを作成します。切断された場合は、リージョンとクラスタ名の環境変数を再度定義する必要があります。
gcloud alloydb instances create $ADBCLUSTER-pr \
    --instance-type=PRIMARY \
    --cpu-count=2 \
    --region=$REGION \
    --cluster=$ADBCLUSTER
想定されるコンソール出力:
student@cloudshell:~ (test-project-402417)$ gcloud alloydb instances create $ADBCLUSTER-pr \
    --instance-type=PRIMARY \
    --cpu-count=2 \
    --region=$REGION \
    --availability-type ZONAL \
    --cluster=$ADBCLUSTER
Operation ID: operation-1697659203545-6080315c6e8ee-391805db-25852721
Creating instance...done.
5. AlloyDB に接続する
AlloyDB はプライベート接続のみを使用してデプロイされるため、データベースを操作するには PostgreSQL クライアントがインストールされた VM が必要です。
GCE VM をデプロイする
AlloyDB クラスタと同じリージョンと VPC に GCE VM を作成します。
Cloud Shell で、次のコマンドを実行します。
export ZONE=us-central1-a
gcloud compute instances create instance-1 \
    --zone=$ZONE \
    --create-disk=auto-delete=yes,boot=yes,image=projects/debian-cloud/global/images/$(gcloud compute images list --filter="family=debian-12 AND family!=debian-12-arm64" --format="value(name)") \
    --scopes=https://www.googleapis.com/auth/cloud-platform
想定されるコンソール出力:
student@cloudshell:~ (test-project-402417)$ export ZONE=us-central1-a
student@cloudshell:~ (test-project-402417)$ export ZONE=us-central1-a
gcloud compute instances create instance-1 \
    --zone=$ZONE \
    --create-disk=auto-delete=yes,boot=yes,image=projects/debian-cloud/global/images/$(gcloud compute images list --filter="family=debian-12 AND family!=debian-12-arm64" --format="value(name)") \
    --scopes=https://www.googleapis.com/auth/cloud-platform

Created [https://www.googleapis.com/compute/v1/projects/test-project-402417/zones/us-central1-a/instances/instance-1].
NAME: instance-1
ZONE: us-central1-a
MACHINE_TYPE: n1-standard-1
PREEMPTIBLE:
INTERNAL_IP: 10.128.0.2
EXTERNAL_IP: 34.71.192.233
STATUS: RUNNING
Postgres Client をインストールする
デプロイされた VM に PostgreSQL クライアント ソフトウェアをインストールします。
VM に接続します。
gcloud compute ssh instance-1 --zone=us-central1-a
想定されるコンソール出力:
student@cloudshell:~ (test-project-402417)$ gcloud compute ssh instance-1 --zone=us-central1-a
Updating project ssh metadata...working..Updated [https://www.googleapis.com/compute/v1/projects/test-project-402417].
Updating project ssh metadata...done.
Waiting for SSH key to propagate.
Warning: Permanently added 'compute.5110295539541121102' (ECDSA) to the list of known hosts.
Linux instance-1.us-central1-a.c.gleb-test-short-001-418811.internal 6.1.0-18-cloud-amd64 #1 SMP PREEMPT_DYNAMIC Debian 6.1.76-1 (2024-02-01) x86_64

The programs included with the Debian GNU/Linux system are free software;
the exact distribution terms for each program are described in the
individual files in /usr/share/doc/*/copyright.

Debian GNU/Linux comes with ABSOLUTELY NO WARRANTY, to the extent
permitted by applicable law.
student@instance-1:~$
VM 内でソフトウェア実行コマンドをインストールします。
sudo apt-get update
sudo apt-get install --yes postgresql-client
想定されるコンソール出力:
student@instance-1:~$ sudo apt-get update
sudo apt-get install --yes postgresql-client
Get:1 https://packages.cloud.google.com/apt google-compute-engine-bullseye-stable InRelease [5146 B]
Get:2 https://packages.cloud.google.com/apt cloud-sdk-bullseye InRelease [6406 B]
Hit:3 https://deb.debian.org/debian bullseye InRelease
Get:4 https://deb.debian.org/debian-security bullseye-security InRelease [48.4 kB]
Get:5 https://packages.cloud.google.com/apt google-compute-engine-bullseye-stable/main amd64 Packages [1930 B]
Get:6 https://deb.debian.org/debian bullseye-updates InRelease [44.1 kB]
Get:7 https://deb.debian.org/debian bullseye-backports InRelease [49.0 kB]
...redacted...
update-alternatives: using /usr/share/postgresql/13/man/man1/psql.1.gz to provide /usr/share/man/man1/psql.1.gz (psql.1.gz) in auto mode
Setting up postgresql-client (13+225) ...
Processing triggers for man-db (2.9.4-2) ...
Processing triggers for libc-bin (2.31-13+deb11u7) ...
インスタンスに接続する
psql を使用して VM からプライマリ インスタンスに接続します。
インスタンス 1 VM への SSH セッションが開いている Cloud Shell の同じタブで、次の操作を行います。
メモした AlloyDB パスワード(PGPASSWORD)の値と AlloyDB クラスタ ID を使用して、GCE VM から AlloyDB に接続します。
export PGPASSWORD=<Noted password>
export PROJECT_ID=$(gcloud config get-value project)
export REGION=us-central1
export ADBCLUSTER=alloydb-aip-01
export INSTANCE_IP=$(gcloud alloydb instances describe $ADBCLUSTER-pr --cluster=$ADBCLUSTER --region=$REGION --format="value(ipAddress)")
psql "host=$INSTANCE_IP user=postgres sslmode=require"
想定されるコンソール出力:
student@instance-1:~$ export PGPASSWORD=CQhOi5OygD4ps6ty
student@instance-1:~$ ADBCLUSTER=alloydb-aip-01
student@instance-1:~$ REGION=us-central1
student@instance-1:~$ INSTANCE_IP=$(gcloud alloydb instances describe $ADBCLUSTER-pr --cluster=$ADBCLUSTER --region=$REGION --format="value(ipAddress)")
gleb@instance-1:~$ psql "host=$INSTANCE_IP user=postgres sslmode=require"
psql (15.6 (Debian 15.6-0+deb12u1), server 15.5)
SSL connection (protocol: TLSv1.3, cipher: TLS_AES_256_GCM_SHA384, compression: off)
Type "help" for help.

postgres=>
psql セッションを閉じます。
exit
6. データベースを準備する
データベースを作成し、Vertex AI インテグレーションを有効にして、データベース オブジェクトを作成し、データをインポートする必要があります。
AlloyDB に必要な権限を付与する
AlloyDB サービス エージェントに Vertex AI 権限を追加します。
上部の「+」記号を選択して、別の Cloud Shell タブを開きます。
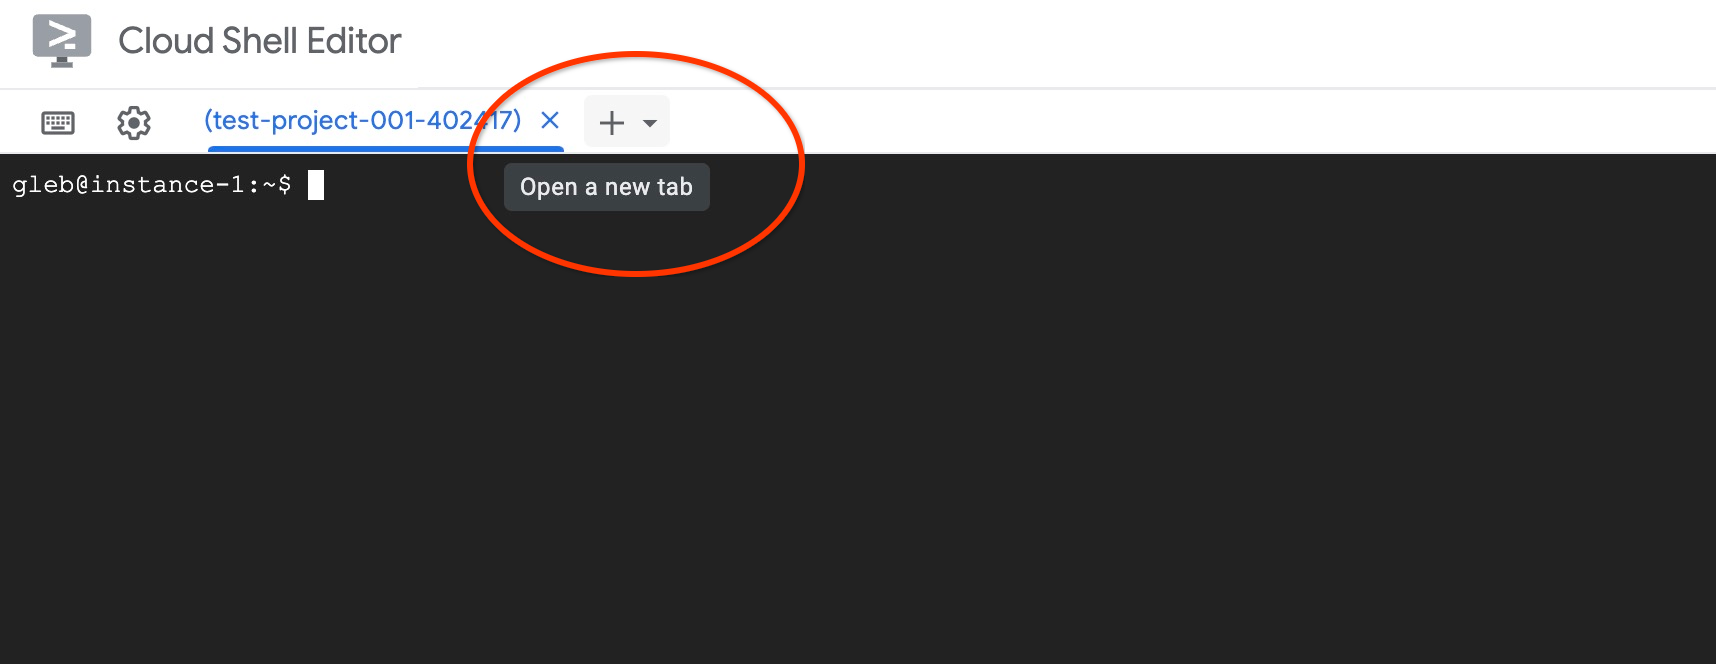
新しい Cloud Shell タブで、次のコマンドを実行します。
PROJECT_ID=$(gcloud config get-value project)
gcloud projects add-iam-policy-binding $PROJECT_ID \
  --member="serviceAccount:service-$(gcloud projects describe $PROJECT_ID --format="value(projectNumber)")@gcp-sa-alloydb.iam.gserviceaccount.com" \
  --role="roles/aiplatform.user"
想定されるコンソール出力:
student@cloudshell:~ (test-project-001-402417)$ PROJECT_ID=$(gcloud config get-value project)
Your active configuration is: [cloudshell-11039]
student@cloudshell:~ (test-project-001-402417)$ gcloud projects add-iam-policy-binding $PROJECT_ID \
  --member="serviceAccount:service-$(gcloud projects describe $PROJECT_ID --format="value(projectNumber)")@gcp-sa-alloydb.iam.gserviceaccount.com" \
  --role="roles/aiplatform.user"
Updated IAM policy for project [test-project-001-402417].
bindings:
- members:
  - serviceAccount:service-4470404856@gcp-sa-alloydb.iam.gserviceaccount.com
  role: roles/aiplatform.user
- members:
...
etag: BwYIEbe_Z3U=
version: 1
タブに実行コマンド「exit」を入力して、タブを閉じます。
exit
データベースを作成する
データベース作成のクイックスタート。
GCE VM セッションで、次のコマンドを実行します。
データベースを作成します。
psql "host=$INSTANCE_IP user=postgres" -c "CREATE DATABASE quickstart_db"
想定されるコンソール出力:
student@instance-1:~$ psql "host=$INSTANCE_IP user=postgres" -c "CREATE DATABASE quickstart_db"
CREATE DATABASE
student@instance-1:~$
Vertex AI の統合を有効にする
Vertex AI の統合とデータベースの pgvector 拡張機能を有効にします。
GCE VM で次のコマンドを実行します。
psql "host=$INSTANCE_IP user=postgres dbname=quickstart_db" -c "CREATE EXTENSION IF NOT EXISTS google_ml_integration CASCADE"
psql "host=$INSTANCE_IP user=postgres dbname=quickstart_db" -c "CREATE EXTENSION IF NOT EXISTS vector"
想定されるコンソール出力:
student@instance-1:~$ psql "host=$INSTANCE_IP user=postgres dbname=quickstart_db" -c "CREATE EXTENSION IF NOT EXISTS google_ml_integration CASCADE"
psql "host=$INSTANCE_IP user=postgres dbname=quickstart_db" -c "CREATE EXTENSION IF NOT EXISTS vector"
CREATE EXTENSION
CREATE EXTENSION
student@instance-1:~$
データをインポート
準備したデータをダウンロードして、新しいデータベースにインポートします。
GCE VM で次のコマンドを実行します。
gcloud storage cat gs://cloud-training/gcc/gcc-tech-004/cymbal_demo_schema.sql |psql "host=$INSTANCE_IP user=postgres dbname=quickstart_db"
gcloud storage cat gs://cloud-training/gcc/gcc-tech-004/cymbal_products.csv |psql "host=$INSTANCE_IP user=postgres dbname=quickstart_db" -c "\copy cymbal_products from stdin csv header"
gcloud storage cat gs://cloud-training/gcc/gcc-tech-004/cymbal_inventory.csv |psql "host=$INSTANCE_IP user=postgres dbname=quickstart_db" -c "\copy cymbal_inventory from stdin csv header"
gcloud storage cat gs://cloud-training/gcc/gcc-tech-004/cymbal_stores.csv |psql "host=$INSTANCE_IP user=postgres dbname=quickstart_db" -c "\copy cymbal_stores from stdin csv header"
想定されるコンソール出力:
student@instance-1:~$ gsutil cat gs://cloud-training/gcc/gcc-tech-004/cymbal_demo_schema.sql |psql "host=$INSTANCE_IP user=postgres dbname=quickstart_db"
SET
SET
SET
SET
SET
 set_config
------------

(1 row)
SET
SET
SET
SET
SET
SET
CREATE TABLE
ALTER TABLE
CREATE TABLE
ALTER TABLE
CREATE TABLE
ALTER TABLE
CREATE TABLE
ALTER TABLE
CREATE SEQUENCE
ALTER TABLE
ALTER SEQUENCE
ALTER TABLE
ALTER TABLE
ALTER TABLE
student@instance-1:~$ gsutil cat gs://cloud-training/gcc/gcc-tech-004/cymbal_products.csv |psql "host=$INSTANCE_IP user=postgres dbname=quickstart_db" -c "\copy cymbal_products from stdin csv header"
COPY 941
student@instance-1:~$ gsutil cat gs://cloud-training/gcc/gcc-tech-004/cymbal_inventory.csv |psql "host=$INSTANCE_IP user=postgres dbname=quickstart_db" -c "\copy cymbal_inventory from stdin csv header"
COPY 263861
student@instance-1:~$ gsutil cat gs://cloud-training/gcc/gcc-tech-004/cymbal_stores.csv |psql "host=$INSTANCE_IP user=postgres dbname=quickstart_db" -c "\copy cymbal_stores from stdin csv header"
COPY 4654
student@instance-1:~$
7. エンベディングを計算する
データをインポートすると、cymbal_products テーブルに商品データ、cymbal_inventory テーブルに各店舗の在庫数、cymbal_stores テーブルに店舗のリストが作成されます。商品の説明に基づいてベクトルデータを計算する必要があります。そのためには、エンベディング関数を使用します。この関数を使用して、Vertex AI インテグレーションを使用して商品の説明に基づいてベクトル データを計算し、テーブルに追加します。使用されているテクノロジーの詳細については、ドキュメントをご覧ください。
数行であれば簡単に生成できますが、数千行ある場合は効率的に行うにはどうすればよいですか?ここでは、大規模なテーブルのエンベディングを生成して管理する方法について説明します。さまざまなオプションと手法については、ガイドをご覧ください。
高速エンベディング生成を有効にする
AlloyDB インスタンスの IP と postgres のパスワードを使用して、VM から psql を使用してデータベースに接続します。
psql "host=$INSTANCE_IP user=postgres dbname=quickstart_db"
google_ml_integration 拡張機能のバージョンを確認します。
SELECT extversion FROM pg_extension WHERE extname = 'google_ml_integration';
バージョンは 1.5.2 以降である必要があります。出力例を次に示します。
quickstart_db=> SELECT extversion FROM pg_extension WHERE extname = 'google_ml_integration';
 extversion
------------
 1.5.2
(1 row)
デフォルトのバージョンは 1.5.2 以降ですが、インスタンスに古いバージョンが表示されている場合は、更新が必要になる可能性があります。インスタンスのメンテナンスが無効になっているかどうかを確認します。
次に、データベース フラグを確認する必要があります。google_ml_integration.enable_faster_embedding_generation フラグをオンにする必要があります。同じ psql セッションで、フラグの値を確認します。
show google_ml_integration.enable_faster_embedding_generation;
フラグが正しい位置にある場合、出力は次のようになります。
quickstart_db=> show google_ml_integration.enable_faster_embedding_generation;
 google_ml_integration.enable_faster_embedding_generation
----------------------------------------------------------
 on
(1 row)
[オフ] と表示されている場合は、インスタンスを更新する必要があります。ドキュメントに記載されているように、ウェブ コンソールまたは gcloud コマンドを使用して実行できます。ここでは、gcloud コマンドを使用してこれを行う方法を示します。
export PROJECT_ID=$(gcloud config get-value project)
export REGION=us-central1
export ADBCLUSTER=alloydb-aip-01
gcloud beta alloydb instances update $ADBCLUSTER-pr \
   --database-flags google_ml_integration.enable_faster_embedding_generation=on \
   --region=$REGION \
   --cluster=$ADBCLUSTER \
   --project=$PROJECT_ID \
   --update-mode=FORCE_APPLY
数分かかることがありますが、最終的にはフラグの値が「オン」に切り替わります。その後、次の手順に進むことができます。
エンベディング列を作成する
psql を使用してデータベースに接続し、cymbal_products テーブルのエンベディング関数を使用してベクトルデータを含む仮想列を作成します。エンベディング関数は、product_description 列から提供されたデータに基づいて、Vertex AI からベクトルデータを返します。
psql "host=$INSTANCE_IP user=postgres dbname=quickstart_db"
データベースに接続した後の psql セッションで、次のコマンドを実行します。
ALTER TABLE cymbal_products ADD COLUMN embedding vector(768);
このコマンドは、仮想列を作成し、ベクトルデータを入力します。
想定されるコンソール出力:
quickstart_db=> ALTER TABLE cymbal_products ADD COLUMN embedding vector(768);
ALTER TABLE
quickstart_db=>
これで、それぞれ 50 行のバッチを使用してエンベディングを生成できます。さまざまなバッチサイズを試して、実行時間が変化するかどうかを確認できます。同じ psql セッションで、次のコマンドを実行します。
タイミングを有効にして、所要時間を測定します。
\timing
次のコマンドを実行します。
CALL ai.initialize_embeddings(
    model_id => 'text-embedding-005',
    table_name => 'cymbal_products',
    content_column => 'product_description',
    embedding_column => 'embedding',
    batch_size => 50
);
コンソール出力には、エンベディングの生成に 2 秒未満かかったことが示されています。
quickstart_db=> CALL ai.initialize_embeddings(
    model_id => 'text-embedding-005',
    table_name => 'cymbal_products',
    content_column => 'product_description',
    embedding_column => 'embedding',
    batch_size => 50
);
NOTICE:  Initialize embedding completed successfully for table cymbal_products
CALL
Time: 1458.704 ms (00:01.459)
quickstart_db=>
デフォルトでは、対応する product_description 列が更新されたり、新しい行全体が挿入されたりしても、エンベディングは更新されません。ただし、パラメータ incremental_refresh_mode を定義することで、実行できます。「product_embeddings」という列を作成し、自動的に更新できるようにします。
ALTER TABLE cymbal_products ADD COLUMN product_embedding vector(768);
CALL ai.initialize_embeddings(
    model_id => 'text-embedding-005',
    table_name => 'cymbal_products',
    content_column => 'product_description',
    embedding_column => 'product_embedding',
    batch_size => 50,
    incremental_refresh_mode => 'transactional'
);
テーブルに新しい行を挿入してみましょう。
INSERT INTO "cymbal_products" ("uniq_id", "crawl_timestamp", "product_url", "product_name", "product_description", "list_price", "sale_price", "brand", "item_number", "gtin", "package_size", "category", "postal_code", "available", "product_embedding", "embedding") VALUES ('fd604542e04b470f9e6348e640cff794', NOW(), 'https://example.com/new_product', 'New Cymbal Product', 'This is a new cymbal product description.', 199.99, 149.99, 'Example Brand', 'EB123', '1234567890', 'Single', 'Cymbals', '12345', TRUE, NULL, NULL);
次のクエリを使用して、列の違いを比較できます。
SELECT uniq_id,embedding, (product_embedding::real[])[1:5] as product_embedding FROM cymbal_products WHERE uniq_id='fd604542e04b470f9e6348e640cff794';
出力を見ると、embedding 列は空のままですが、product_embedding 列は自動的に更新されています。
quickstart_db=> SELECT uniq_id,embedding, (product_embedding::real[])[1:5] as product_embedding  FROM cymbal_products WHERE uniq_id='fd604542e04b470f9e6348e640cff794';
             uniq_id              | embedding |                       product_embedding
----------------------------------+-----------+---------------------------------------------------------------
 fd604542e04b470f9e6348e640cff794 |           | {0.015003494,-0.005349732,-0.059790313,-0.0087091,-0.0271452}
(1 row)

Time: 3.295 ms
8. 類似性検索を実行する
これで、説明用に計算されたベクトル値とリクエストで取得したベクトル値に基づいて、類似性検索を使用して検索を実行できます。
SQL クエリは、同じ psql コマンドライン インターフェースから実行できます。また、AlloyDB Studio から実行することもできます。複数行の複雑な出力は、AlloyDB Studio で表示した方が見やすい場合があります。
AlloyDB Studio に接続する
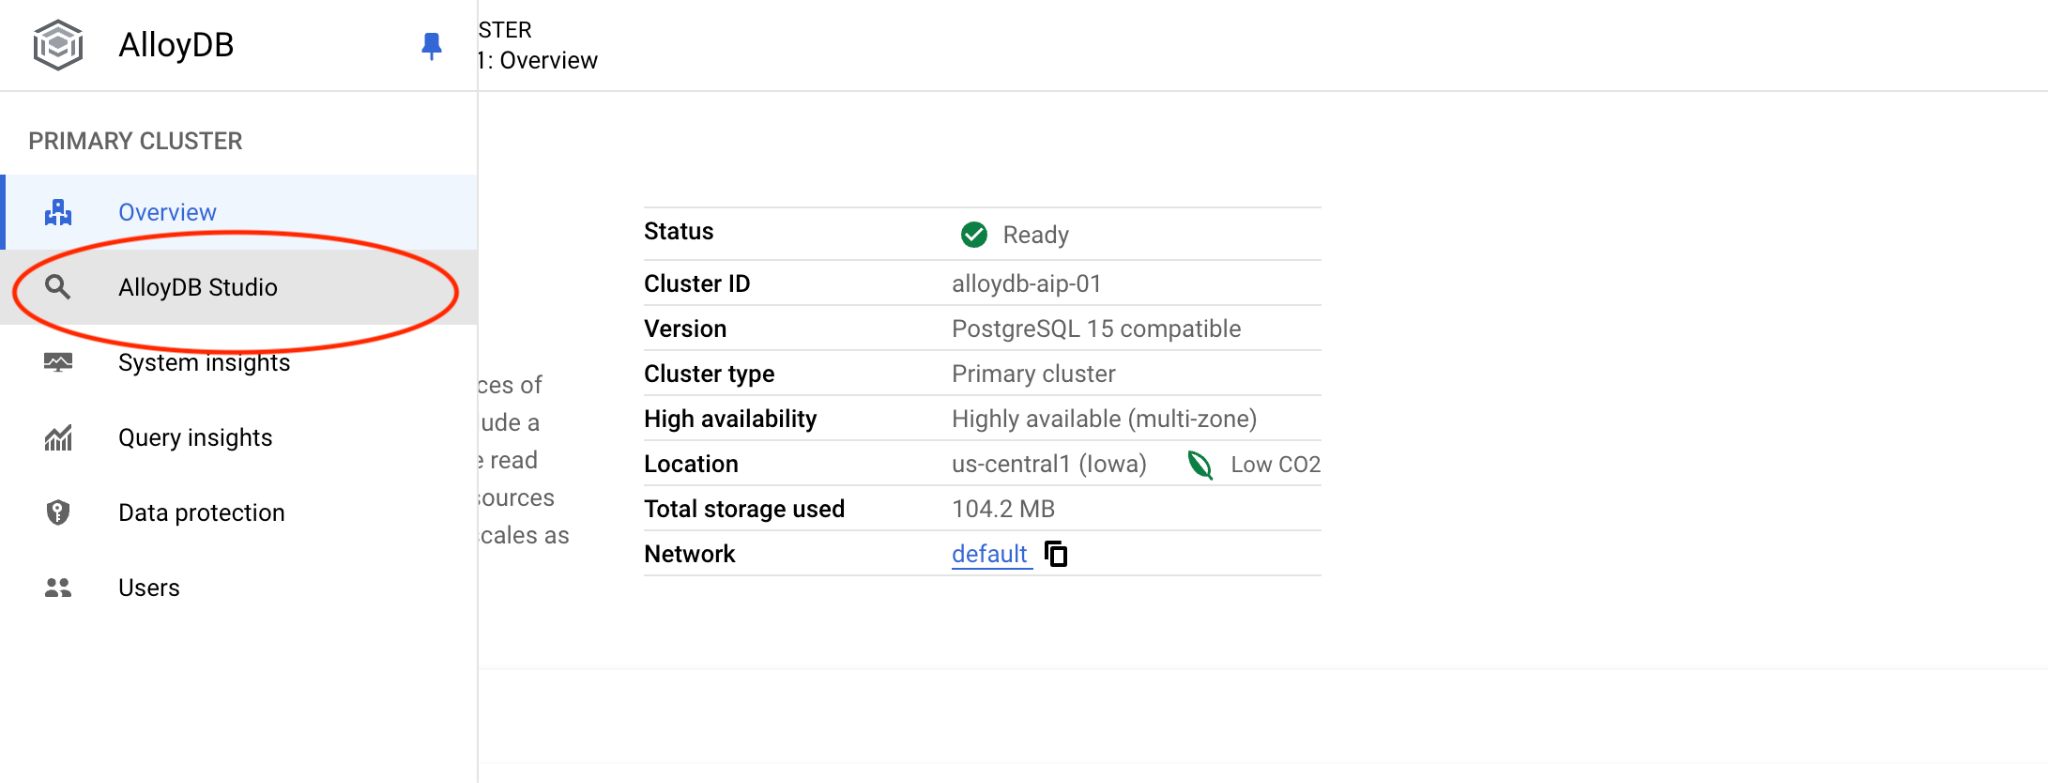
以降の章では、データベースへの接続を必要とするすべての SQL コマンドを AlloyDB Studio で実行できます。コマンドを実行するには、プライマリ インスタンスをクリックして AlloyDB クラスタのウェブ コンソール インターフェースを開く必要があります。
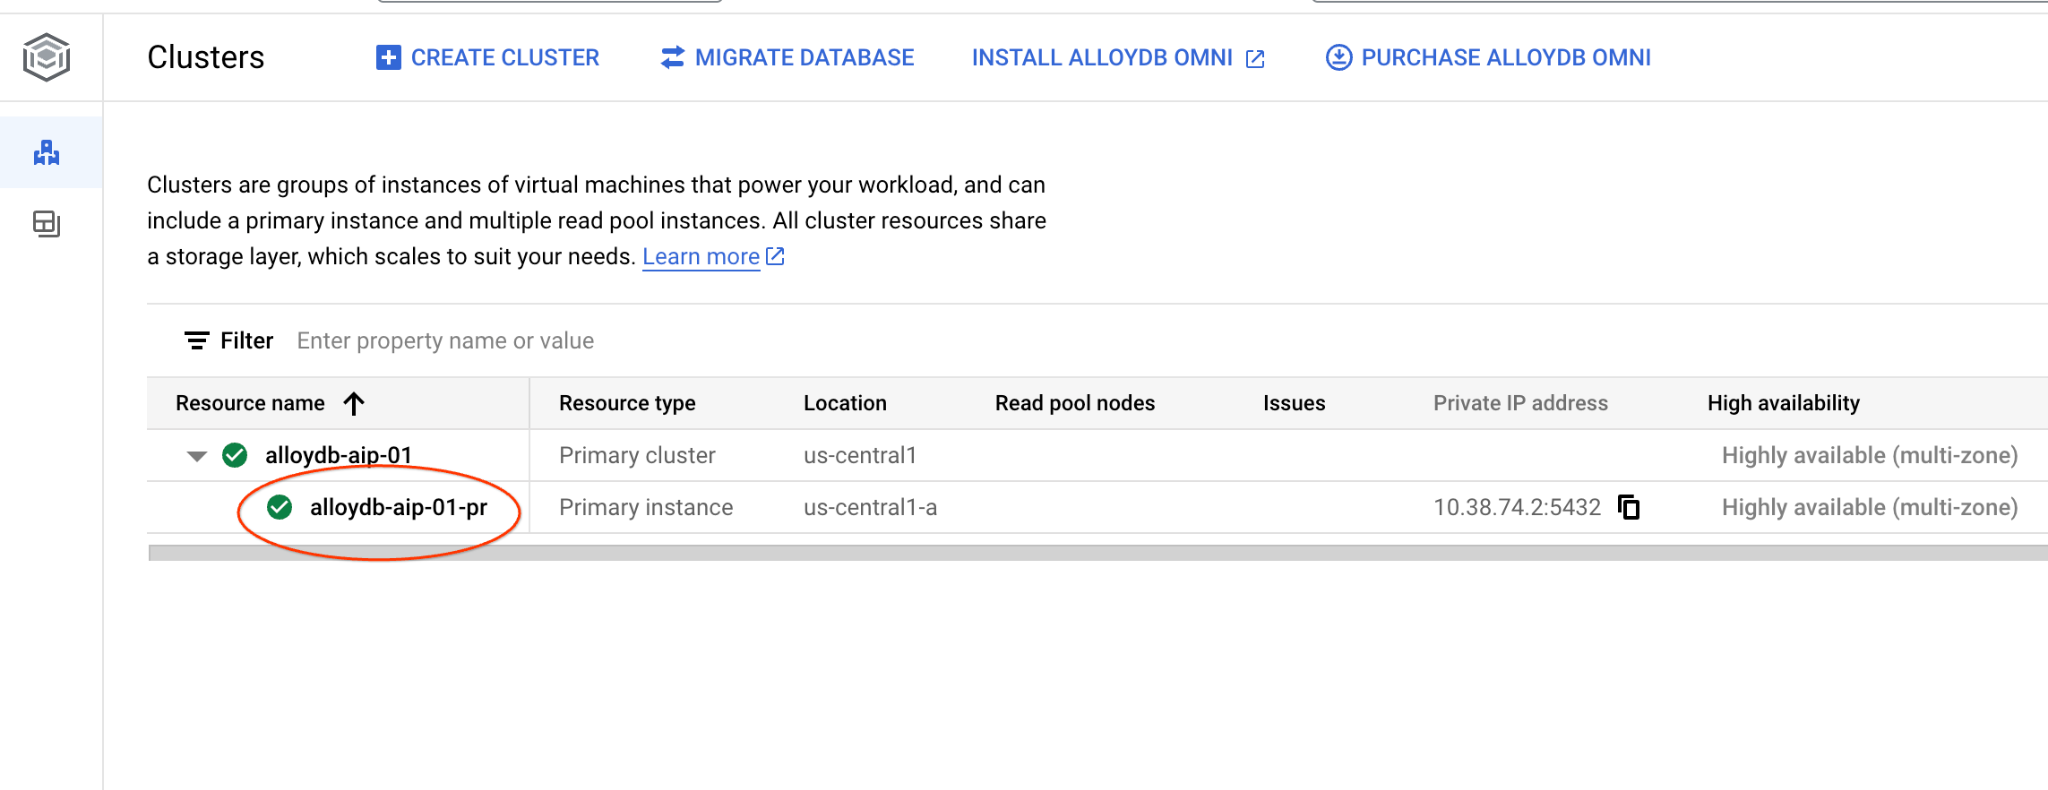
次に、左側の [AlloyDB Studio] をクリックします。
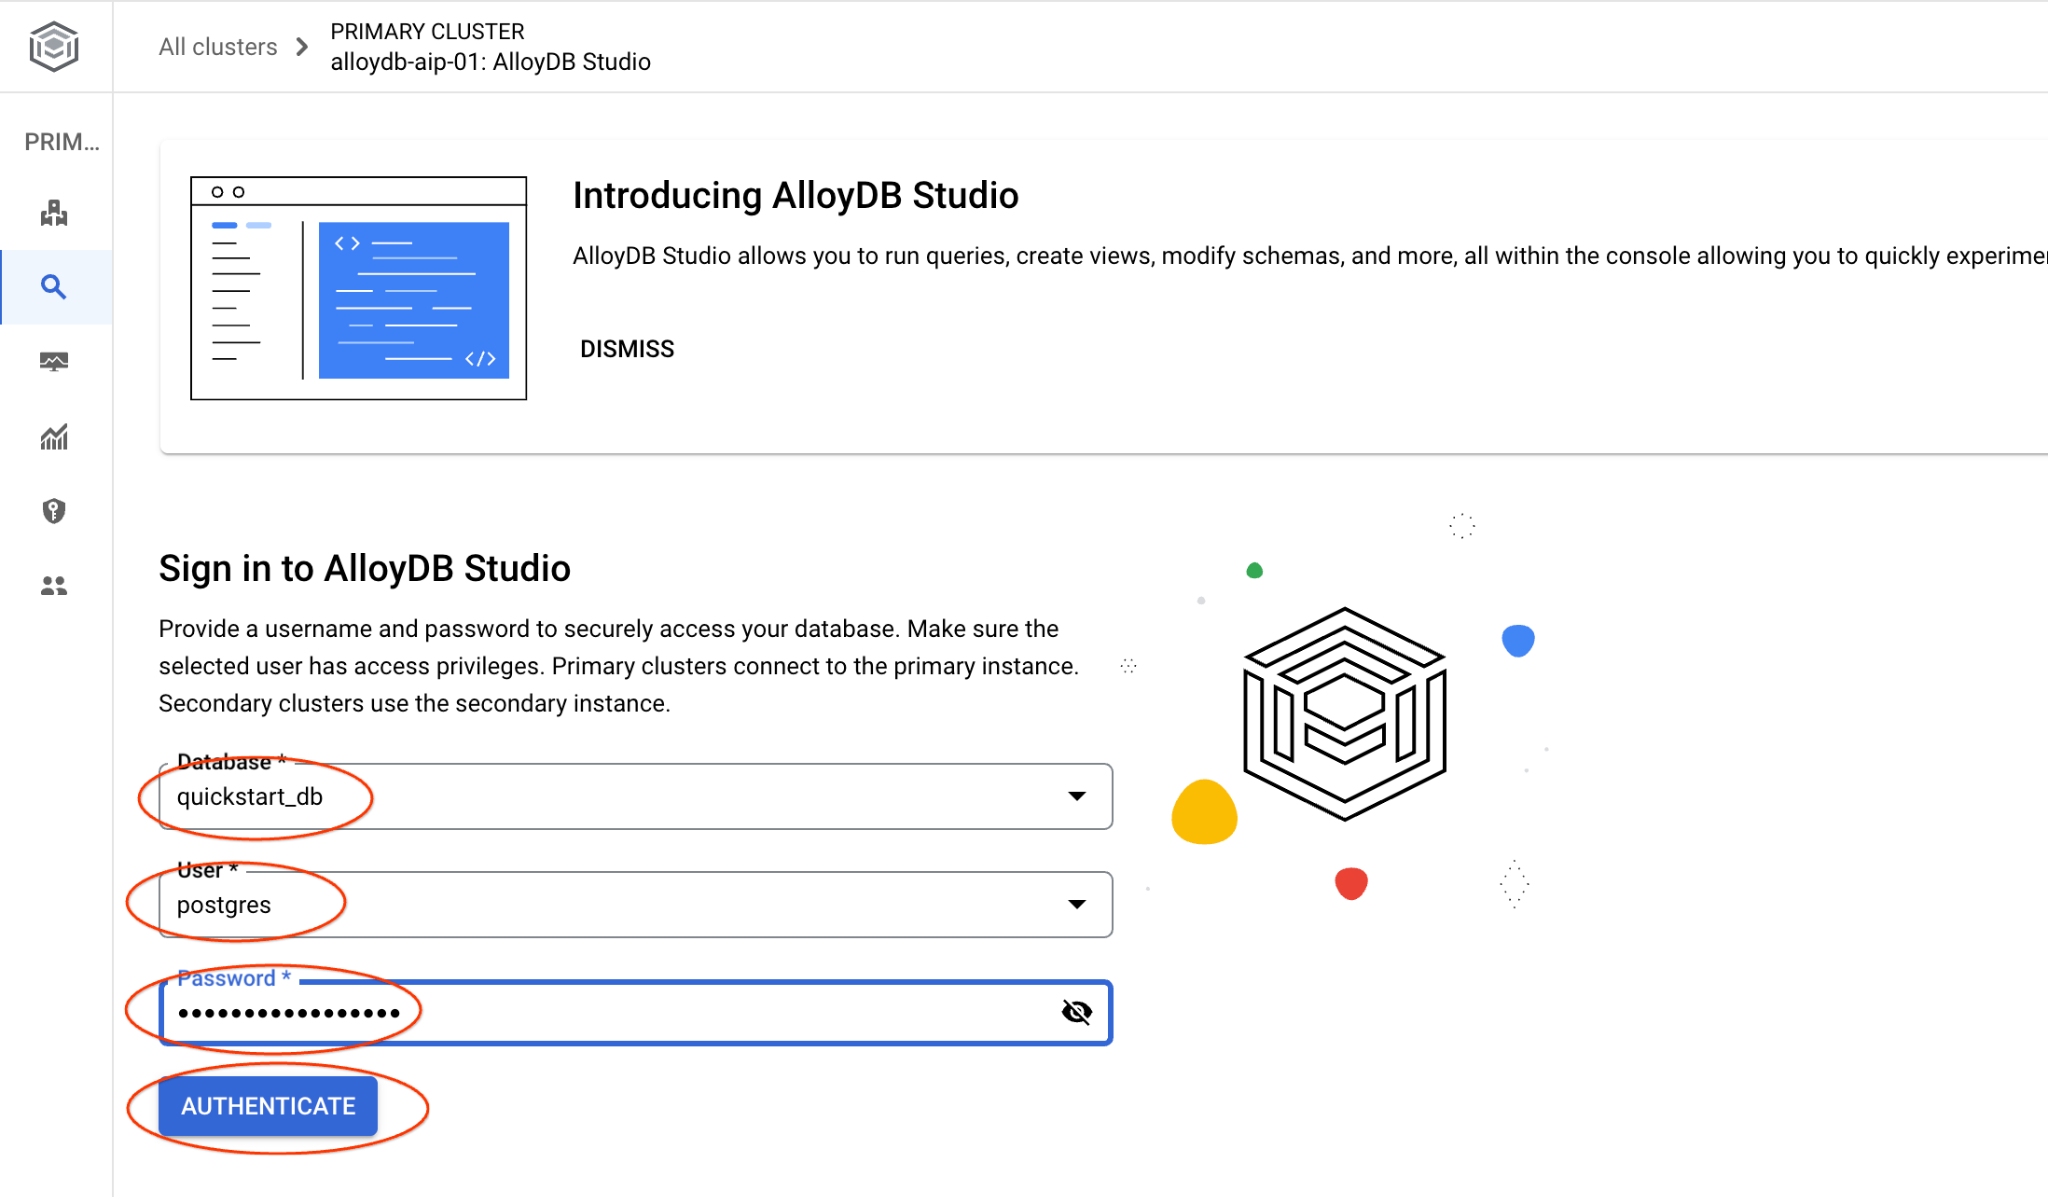
quickstart_db データベースとユーザー postgres を選択し、クラスタの作成時にメモしたパスワードを入力します。[認証] ボタンをクリックします。
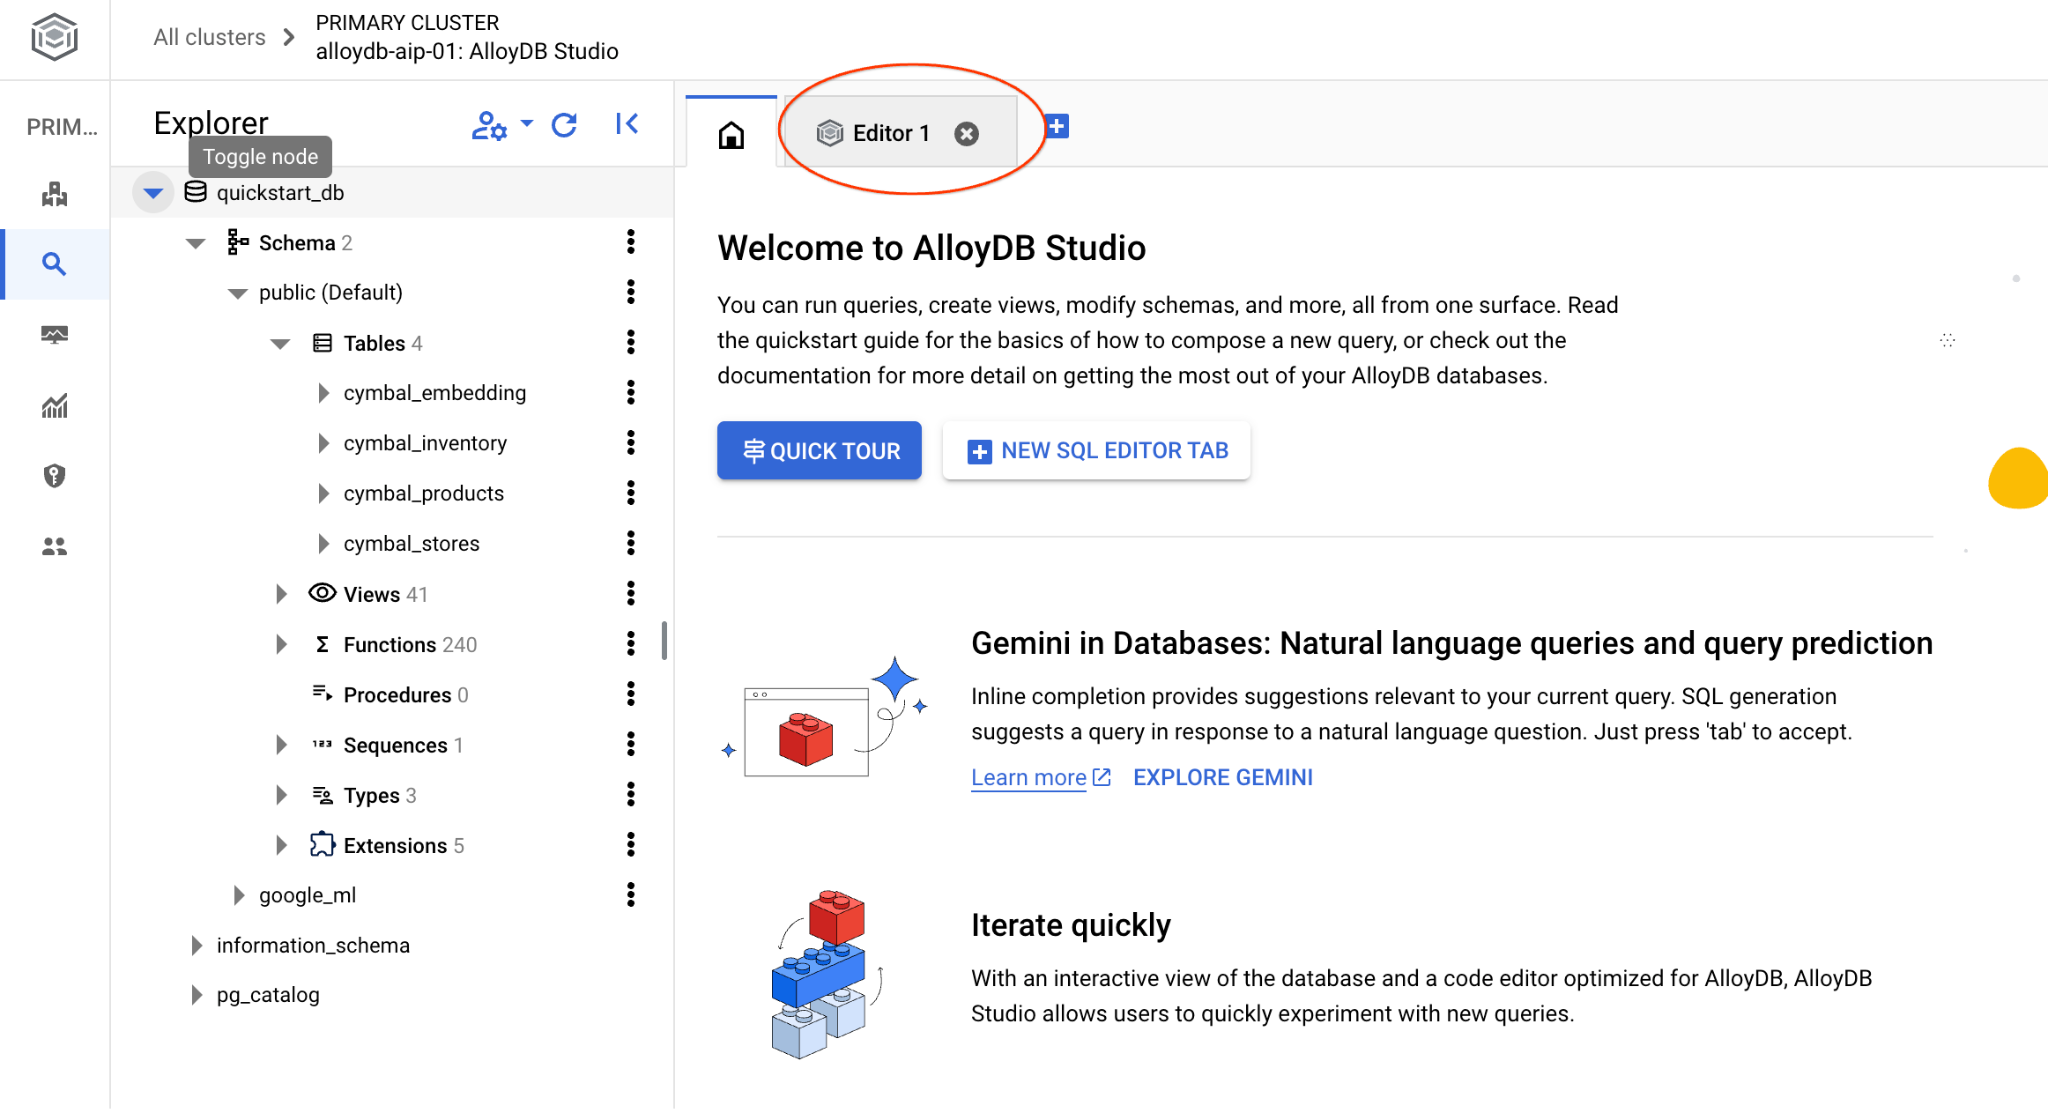
AlloyDB Studio インターフェースが開きます。データベースでコマンドを実行するには、右側の [エディタ 1] タブをクリックします。
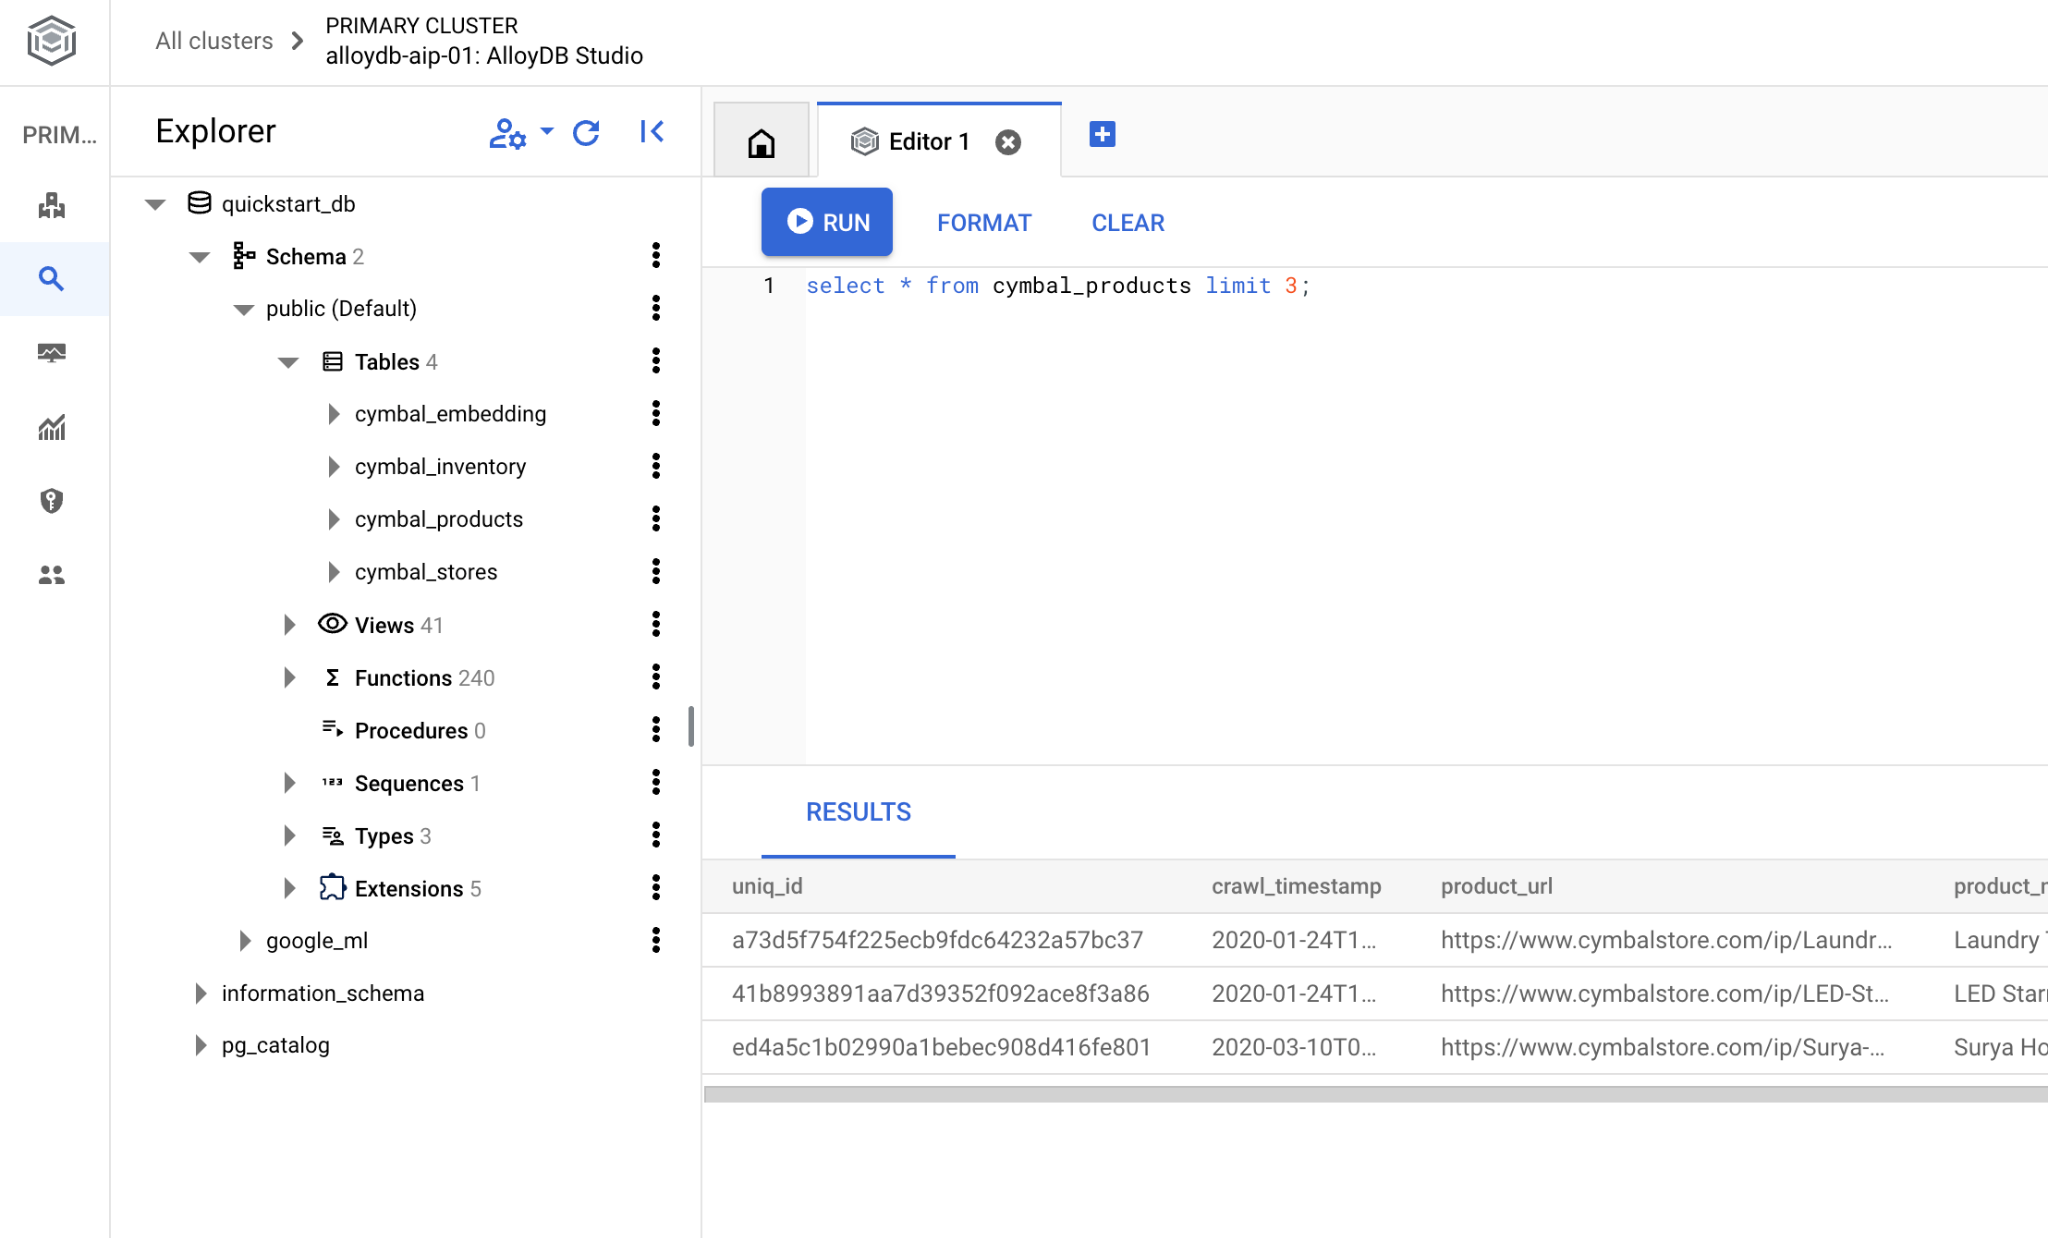
SQL コマンドを実行できるインターフェースが開きます。
コマンドライン psql を使用する場合は、別の方法で、前の章で説明したように VM SSH セッションからデータベースに接続します。
psql から類似性検索を実行する
データベース セッションが切断された場合は、psql または AlloyDB Studio を使用してデータベースに再度接続します。
データベースに接続します。
psql "host=$INSTANCE_IP user=postgres dbname=quickstart_db"
クエリを実行して、クライアントのリクエストに最も関連性の高い利用可能な商品のリストを取得します。ベクトル値を取得するために Vertex AI に渡すリクエストは、「この場所でよく育つ果樹は何ですか?」のようなものです。
リクエストに最適な最初の 10 個のアイテムを選択するために実行できるクエリは次のとおりです。
SELECT
        cp.product_name,
        left(cp.product_description,80) as description,
        cp.sale_price,
        cs.zip_code,
        (cp.embedding <=> embedding('text-embedding-005','What kind of fruit trees grow well here?')::vector) as distance
FROM
        cymbal_products cp
JOIN cymbal_inventory ci on
        ci.uniq_id=cp.uniq_id
JOIN cymbal_stores cs on
        cs.store_id=ci.store_id
        AND ci.inventory>0
        AND cs.store_id = 1583
ORDER BY
        distance ASC
LIMIT 10;
想定される出力は次のとおりです。
quickstart_db=> SELECT
        cp.product_name,
        left(cp.product_description,80) as description,
        cp.sale_price,
        cs.zip_code,
        (cp.embedding <=> embedding('text-embedding-005','What kind of fruit trees grow well here?')::vector) as distance
FROM
        cymbal_products cp
JOIN cymbal_inventory ci on
        ci.uniq_id=cp.uniq_id
JOIN cymbal_stores cs on
        cs.store_id=ci.store_id
        AND ci.inventory>0
        AND cs.store_id = 1583
ORDER BY
        distance ASC
LIMIT 10;
      product_name       |                                   description                                    | sale_price | zip_code |      distance
-------------------------+----------------------------------------------------------------------------------+------------+----------+---------------------
 Cherry Tree             | This is a beautiful cherry tree that will produce delicious cherries. It is an d |      75.00 |    93230 | 0.43922018972266397
 Meyer Lemon Tree        | Meyer Lemon trees are California's favorite lemon tree! Grow your own lemons by  |         34 |    93230 |  0.4685112926118228
 Toyon                   | This is a beautiful toyon tree that can grow to be over 20 feet tall. It is an e |      10.00 |    93230 |  0.4835677149651668
 California Lilac        | This is a beautiful lilac tree that can grow to be over 10 feet tall. It is an d |       5.00 |    93230 |  0.4947204525907498
 California Peppertree   | This is a beautiful peppertree that can grow to be over 30 feet tall. It is an e |      25.00 |    93230 |  0.5054166905547247
 California Black Walnut | This is a beautiful walnut tree that can grow to be over 80 feet tall. It is a d |     100.00 |    93230 |  0.5084219510932597
 California Sycamore     | This is a beautiful sycamore tree that can grow to be over 100 feet tall. It is  |     300.00 |    93230 |  0.5140519790508755
 Coast Live Oak          | This is a beautiful oak tree that can grow to be over 100 feet tall. It is an ev |     500.00 |    93230 |  0.5143126438081371
 Fremont Cottonwood      | This is a beautiful cottonwood tree that can grow to be over 100 feet tall. It i |     200.00 |    93230 |  0.5174774727252058
 Madrone                 | This is a beautiful madrona tree that can grow to be over 80 feet tall. It is an |      50.00 |    93230 |  0.5227400803389093
9. 対応能力を強化
クエリの結果を使用してクライアント アプリケーションへのレスポンスを改善し、指定されたクエリ結果を Vertex AI 生成基盤言語モデルのプロンプトの一部として使用して、意味のある出力を準備できます。
そのため、ベクトル検索の結果を含む JSON を生成し、その生成された JSON を Vertex AI のテキスト LLM モデルのプロンプトに追加して、意味のある出力を生成する予定です。最初の手順で JSON を生成し、次の手順で Vertex AI Studio でテストします。最後の手順では、アプリケーションで使用できる SQL ステートメントに組み込みます。
JSON 形式で出力を生成する
クエリを変更して、JSON 形式で出力を生成し、Vertex AI に渡す行を 1 つだけ返します。
クエリの例を次に示します。
WITH trees as (
SELECT
        cp.product_name,
        left(cp.product_description,80) as description,
        cp.sale_price,
        cs.zip_code,
        cp.uniq_id as product_id
FROM
        cymbal_products cp
JOIN cymbal_inventory ci on
        ci.uniq_id=cp.uniq_id
JOIN cymbal_stores cs on
        cs.store_id=ci.store_id
        AND ci.inventory>0
        AND cs.store_id = 1583
ORDER BY
        (cp.embedding <=> embedding('text-embedding-005','What kind of fruit trees grow well here?')::vector) ASC
LIMIT 1)
SELECT json_agg(trees) FROM trees;
出力で想定される JSON は次のとおりです。
[{"product_name":"Cherry Tree","description":"This is a beautiful cherry tree that will produce delicious cherries. It is an d","sale_price":75.00,"zip_code":93230,"product_id":"d536e9e823296a2eba198e52dd23e712"}]
Vertex AI Studio でプロンプトを実行する
生成された JSON を使用して、Vertex AI Studio の生成 AI テキストモデルのプロンプトの一部として指定できます。
クラウド コンソールで Vertex AI Studio を開きます。
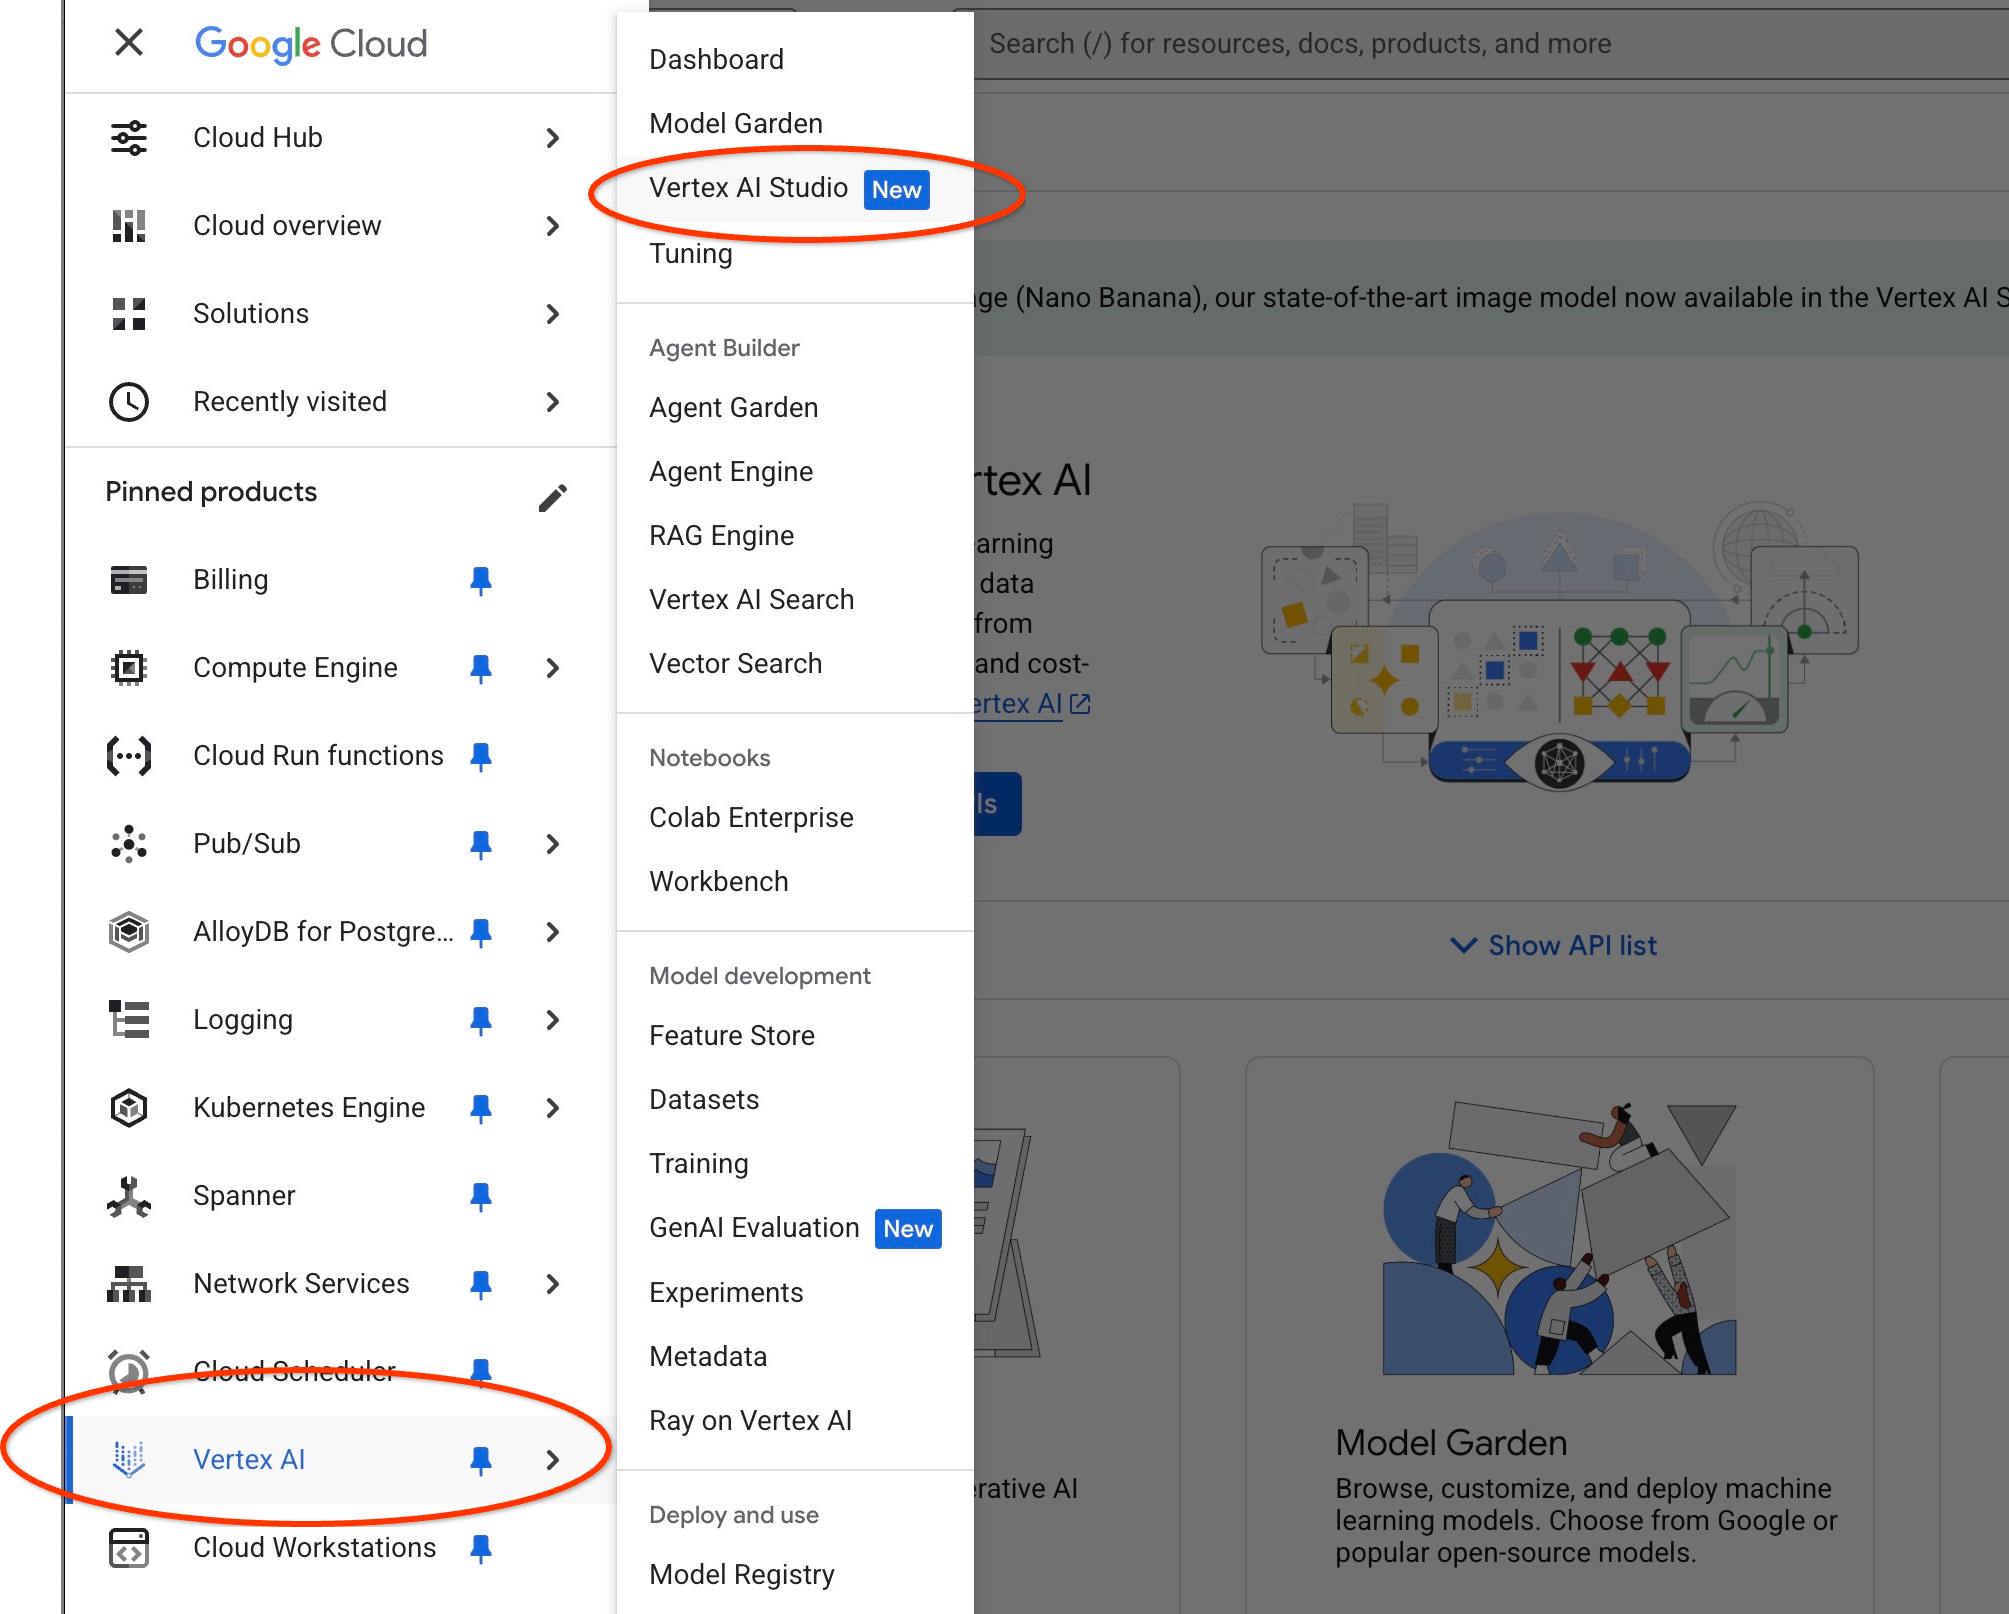
初めて使用する場合は、利用規約への同意を求められることがあります。[同意して続行] ボタンを押します。
インターフェースにプロンプトを入力します。
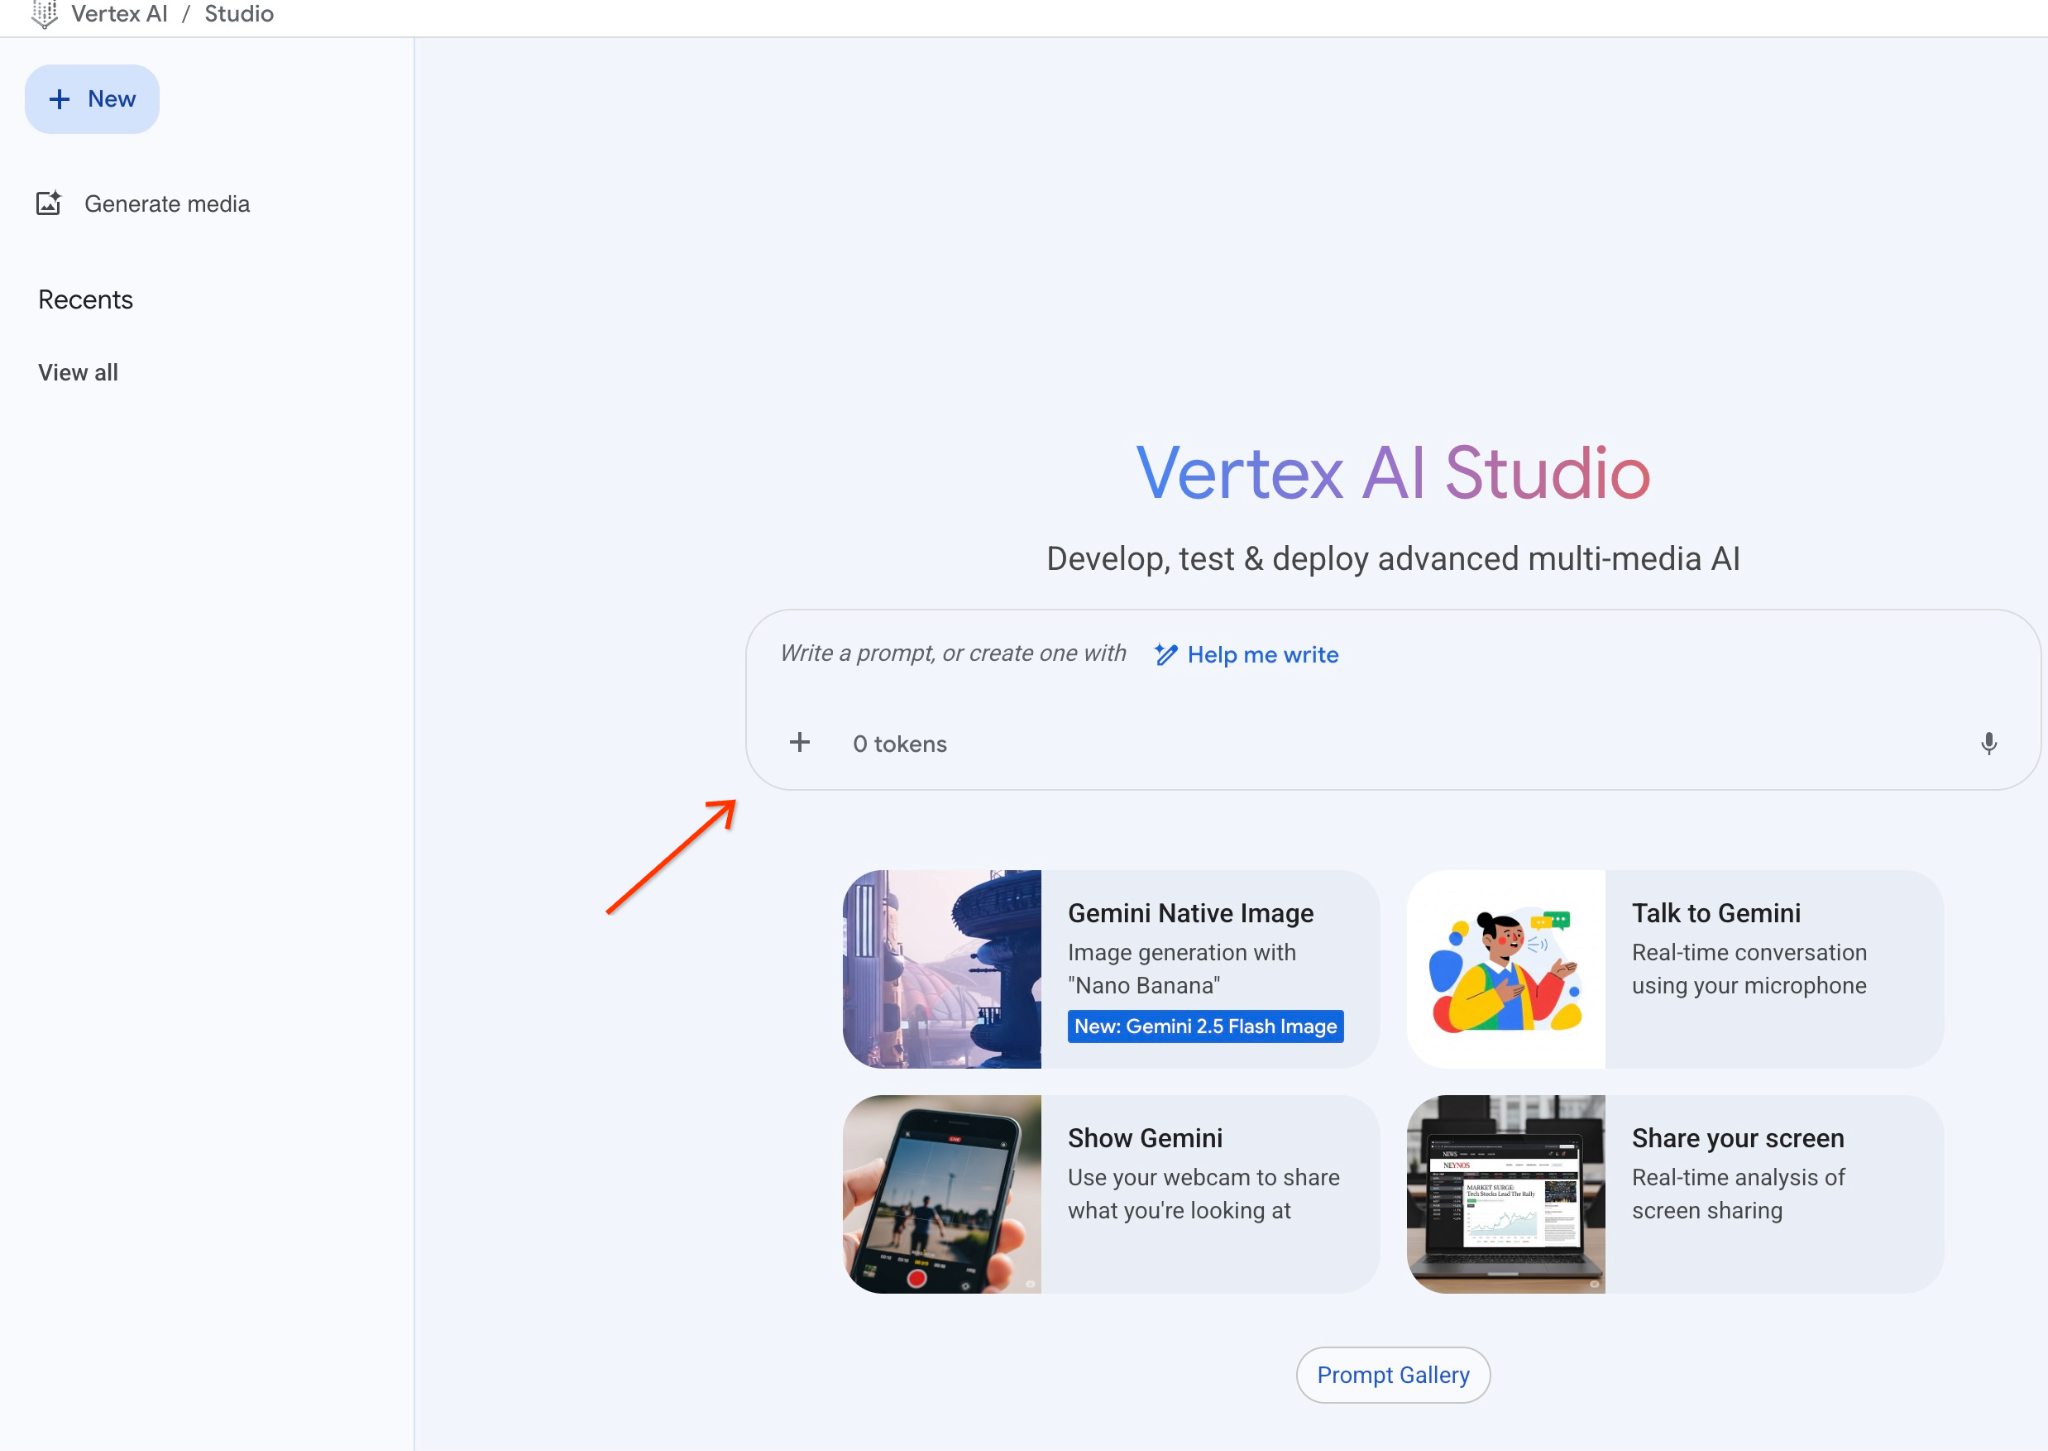
追加の API を有効にするよう求められることがありますが、このリクエストは無視してかまいません。ラボを完了するために追加の API は必要ありません。
以下は、木に関する初期クエリの JSON 出力で使用するプロンプトです。
あなたは、お客様のニーズに基づいて商品を見つけるお手伝いをする、親切なアドバイザーです。
クライアント リクエストに基づいて、検索に密接に関連する商品のリストを読み込みました。
値のリストを含む JSON 形式のリスト({"product_name":"name","description":"some description","sale_price":10,"zip_code": 10234, "produt_id": "02056727942aeb714dc9a2313654e1b0"} など)
製品のリストは次のとおりです。
{"product_name":"Cherry Tree","description":"This is a beautiful cherry tree that will produce delicious cherries. d","sale_price":75.00,"zip_code":93230,"product_id":"d536e9e823296a2eba198e52dd23e712"}
お客様から「この場所で最もよく育つ木は何ですか?」という質問を受けた
商品、価格、補足情報に関する情報を提供する必要があります
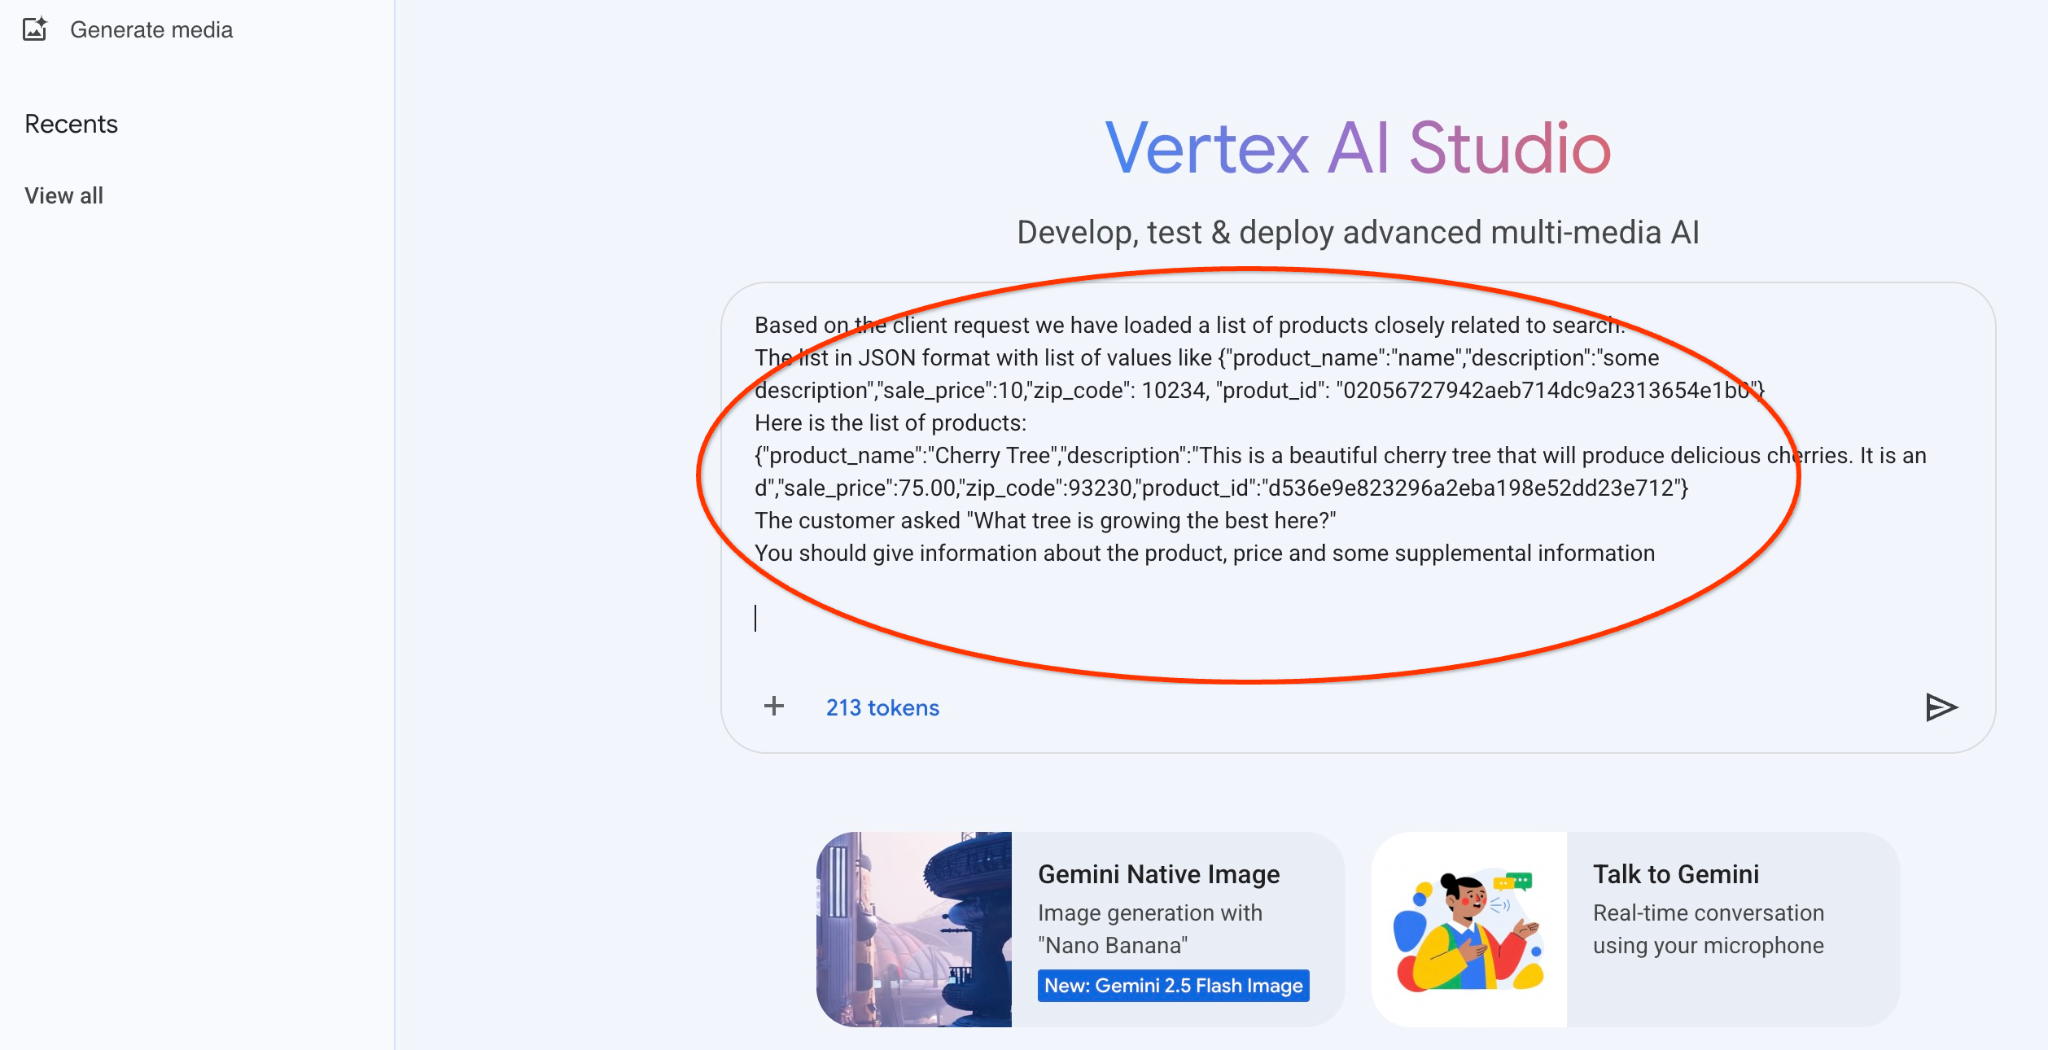
JSON 値を使用して gemini-2.5-flash-light モデルでプロンプトを実行した結果は次のとおりです。
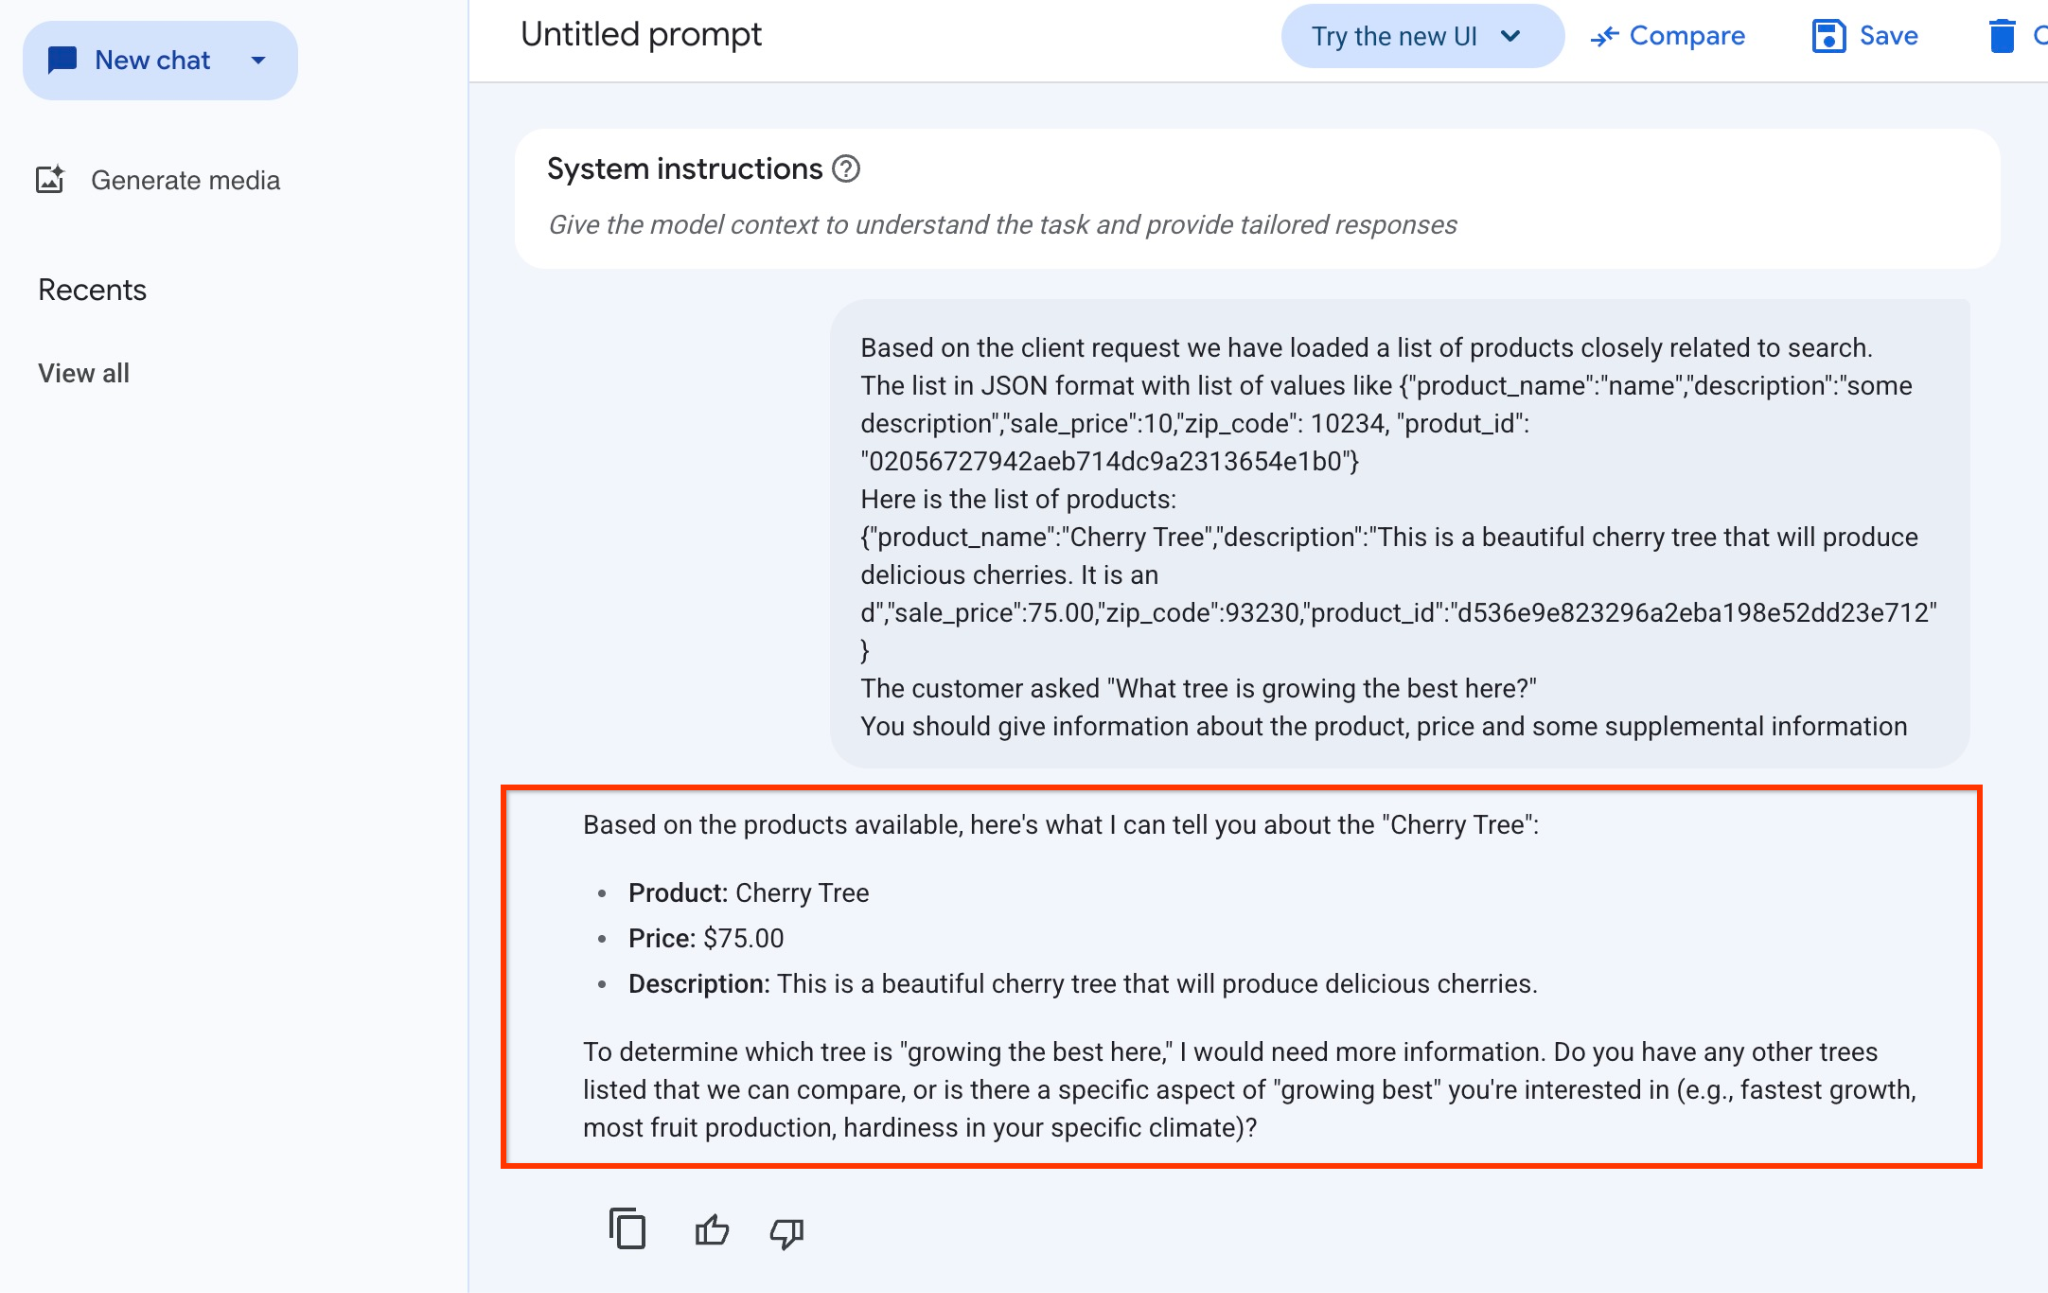
この例でモデルから得られた回答は次のとおりです。モデルとパラメータは時間の経過とともに変化するため、回答が異なる場合があります。
「利用可能な商品に基づいて、チェリー ツリーについてお伝えします。
商品: Cherry Tree
価格: $75.00
説明: おいしいサクランボが実る美しい桜の木です。
「ここで最もよく育つ木」を判断するには、より多くの情報が必要です。比較できる他の木はありますか?それとも、特に興味のある「最もよく育つ」という側面はありますか?(例: 最も成長が早い、最も果実の生産量が多い、特定の気候での耐寒性など)」
PSQL でプロンプトを実行する
AlloyDB AI と Vertex AI の統合を使用すると、データベース内で SQL を使用して生成モデルから同じレスポンスを直接取得できます。ただし、gemini-1.5-flash モデルを使用するには、まず登録する必要があります。
google_ml_integration 拡張機能を確認します。バージョン 1.4.2 以降が必要です。
前に説明したように psql から quickstart_db データベースに接続し(または AlloyDB Studio を使用)、次のコマンドを実行します。
SELECT extversion from pg_extension where extname='google_ml_integration';
google_ml_integration.enable_model_support データベース フラグを確認します。
show google_ml_integration.enable_model_support;
psql セッションの想定される出力は「on」です。
postgres=> show google_ml_integration.enable_model_support;
 google_ml_integration.enable_model_support
--------------------------------------------
 on
(1 row)
[off] と表示されている場合は、google_ml_integration.enable_model_support データベース フラグを [on] に設定する必要があります。これを行うには、AlloyDB ウェブ コンソール インターフェースを使用するか、次の gcloud コマンドを実行します。
PROJECT_ID=$(gcloud config get-value project)
REGION=us-central1
ADBCLUSTER=alloydb-aip-01
gcloud beta alloydb instances update $ADBCLUSTER-pr \
  --database-flags google_ml_integration.enable_faster_embedding_generation=on,google_ml_integration.enable_model_support=on \
  --region=$REGION \
  --cluster=$ADBCLUSTER \
  --project=$PROJECT_ID \
  --update-mode=FORCE_APPLY
このコマンドはバックグラウンドで 1 ~ 3 分ほどで実行されます。その後、フラグを再度確認できます。
クエリには 2 つのモデルが必要です。1 つ目はすでに使用されている text-embedding-005 モデルで、2 つ目は汎用の Google Gemini モデルの 1 つです。
テキスト エンベディング モデルから始めます。psql または AlloyDB Studio でモデル実行を登録するには、次のコードを使用します。
CALL
  google_ml.create_model(
    model_id => 'text-embedding-005',
    model_provider => 'google',
    model_qualified_name => 'text-embedding-005',
    model_type => 'text_embedding',
    model_auth_type => 'alloydb_service_agent_iam',
    model_in_transform_fn => 'google_ml.vertexai_text_embedding_input_transform',
    model_out_transform_fn => 'google_ml.vertexai_text_embedding_output_transform');
次に登録する必要があるモデルは gemini-2.0-flash-001 です。これは、ユーザーフレンドリーな出力を生成するために使用されます。
CALL
  google_ml.create_model(
    model_id => 'gemini-2.5-flash',
    model_request_url => 'publishers/google/models/gemini-2.5-flash:streamGenerateContent',
    model_provider => 'google',
    model_auth_type => 'alloydb_service_agent_iam');
登録済みモデルのリストは、google_ml.model_info_view から情報を選択することでいつでも確認できます。
select model_id,model_type from google_ml.model_info_view;
出力例を次に示します。
quickstart_db=> select model_id,model_type from google_ml.model_info_view;
        model_id         |   model_type
-------------------------+----------------
 textembedding-gecko     | text_embedding
 textembedding-gecko@001 | text_embedding
 text-embedding-005      | text_embedding
 gemini-2.5-flash        | generic
(4 rows)
これで、生成されたサブクエリ JSON を使用して、SQL を使用して生成 AI テキストモデルにプロンプトの一部として提供できます。
データベースへの psql セッションまたは AlloyDB Studio セッションで、クエリを実行します。
WITH trees AS (
SELECT
        cp.product_name,
        cp.product_description AS description,
        cp.sale_price,
        cs.zip_code,
        cp.uniq_id AS product_id
FROM
        cymbal_products cp
JOIN cymbal_inventory ci ON
        ci.uniq_id = cp.uniq_id
JOIN cymbal_stores cs ON
        cs.store_id = ci.store_id
        AND ci.inventory>0
        AND cs.store_id = 1583
ORDER BY
        (cp.embedding <=> embedding('text-embedding-005',
        'What kind of fruit trees grow well here?')::vector) ASC
LIMIT 1),
prompt AS (
SELECT
        'You are a friendly advisor helping to find a product based on the customer''s needs.
Based on the client request we have loaded a list of products closely related to search.
The list in JSON format with list of values like {"product_name":"name","product_description":"some description","sale_price":10}
Here is the list of products:' || json_agg(trees) || 'The customer asked "What kind of fruit trees grow well here?"
You should give information about the product, price and some supplemental information' AS prompt_text
FROM
        trees),
response AS (
SELECT
        json_array_elements(google_ml.predict_row( model_id =>'gemini-2.5-flash',
        request_body => json_build_object('contents',
        json_build_object('role',
        'user',
        'parts',
        json_build_object('text',
        prompt_text)))))->'candidates'->0->'content'->'parts'->0->'text' AS resp
FROM
        prompt)
SELECT
        string_agg(resp::text,
        ' ')
FROM
        response;
想定される出力は次のとおりです。出力は、モデルのバージョンとパラメータによって異なる場合があります。
"Hello there! I can certainly help you with finding a great fruit tree for your area.\n\nBased on what grows well, we have a wonderful **Cherry Tree** that could be a perfect fit!\n\nThis beautiful cherry tree is an excellent choice for producing delicious cherries right in your garden. It's an deciduous tree that typically" " grows to about 15 feet tall. Beyond its fruit, it offers lovely aesthetics with dark green leaves in the summer that transition to a beautiful red in the fall, making it great for shade and privacy too.\n\nCherry trees generally prefer a cool, moist climate and sandy soil, and they are best suited for USDA Zones" " 4-9. Given the zip code you're inquiring about (93230), which is typically in USDA Zone 9, this Cherry Tree should thrive wonderfully!\n\nYou can get this magnificent tree for just **$75.00**.\n\nLet me know if you have any other questions!" "
10. ベクトル インデックスを作成する
データセットはかなり小さく、レスポンス時間は主に AI モデルとのインタラクションに依存します。ただし、ベクトルの数が数百万に達すると、ベクトル検索がレスポンス時間の大部分を占め、システムに大きな負荷がかかる可能性があります。これを改善するために、ベクトル上にインデックスを構築できます。
ScaNN インデックスを作成する
SCANN インデックスを構築するには、もう 1 つの拡張機能を有効にする必要があります。拡張機能 alloydb_scann は、Google ScaNN アルゴリズムを使用して ANN 型のベクトル インデックスを操作するためのインターフェースを提供します。
CREATE EXTENSION IF NOT EXISTS alloydb_scann;
予想される出力:
quickstart_db=> CREATE EXTENSION IF NOT EXISTS alloydb_scann;
CREATE EXTENSION
Time: 27.468 ms
quickstart_db=>
インデックスは MANUAL モードまたは AUTO モードで作成できます。MANUAL モードはデフォルトで有効になっており、他のインデックスと同様にインデックスを作成して維持できます。ただし、AUTO モードを有効にすると、ユーザー側でメンテナンスを必要としないインデックスを作成できます。すべてのオプションの詳細については、ドキュメントをご覧ください。ここでは、自動モードを有効にしてインデックスを作成する方法について説明します。この例では、自動モードでインデックスを作成するのに十分な行がないため、手動で作成します。
次の例では、ほとんどのパラメータをデフォルトのままにして、インデックスのパーティション数(num_leaves)のみを指定しています。
CREATE INDEX cymbal_products_embeddings_scann ON cymbal_products
  USING scann (embedding cosine)
  WITH (num_leaves=31, max_num_levels = 2);
インデックス パラメータのチューニングについては、ドキュメントをご覧ください。
予想される出力:
quickstart_db=> CREATE INDEX cymbal_products_embeddings_scann ON cymbal_products
  USING scann (embedding cosine)
  WITH (num_leaves=31, max_num_levels = 2);
CREATE INDEX
quickstart_db=>
回答を比較
これで、EXPLAIN モードでベクトル検索クエリを実行し、インデックスが使用されたかどうかを確認できます。
EXPLAIN (analyze)
WITH trees as (
SELECT
        cp.product_name,
        left(cp.product_description,80) as description,
        cp.sale_price,
        cs.zip_code,
        cp.uniq_id as product_id
FROM
        cymbal_products cp
JOIN cymbal_inventory ci on
        ci.uniq_id=cp.uniq_id
JOIN cymbal_stores cs on
        cs.store_id=ci.store_id
        AND ci.inventory>0
        AND cs.store_id = 1583
ORDER BY
        (cp.embedding <=> embedding('text-embedding-005','What kind of fruit trees grow well here?')::vector) ASC
LIMIT 1)
SELECT json_agg(trees) FROM trees;
想定される出力(明確にするために記すと秘匿化済み):
...
Aggregate (cost=16.59..16.60 rows=1 width=32) (actual time=2.875..2.877 rows=1 loops=1)
-> Subquery Scan on trees (cost=8.42..16.59 rows=1 width=142) (actual time=2.860..2.862 rows=1 loops=1)
-> Limit (cost=8.42..16.58 rows=1 width=158) (actual time=2.855..2.856 rows=1 loops=1)
-> Nested Loop (cost=8.42..6489.19 rows=794 width=158) (actual time=2.854..2.855 rows=1 loops=1)
-> Nested Loop (cost=8.13..6466.99 rows=794 width=938) (actual time=2.742..2.743 rows=1 loops=1)
-> Index Scan using cymbal_products_embeddings_scann on cymbal_products cp (cost=7.71..111.99 rows=876 width=934) (actual time=2.724..2.724 rows=1 loops=1)
Order By: (embedding <=> '[0.008864171,0.03693164,-0.024245683,-0.00355923,0.0055611245,0.015985578,...<redacted>...5685,-0.03914233,-0.018452475,0.00826032,-0.07372604]'::vector)
-> Index Scan using walmart_inventory_pkey on cymbal_inventory ci (cost=0.42..7.26 rows=1 width=37) (actual time=0.015..0.015 rows=1 loops=1)
Index Cond: ((store_id = 1583) AND (uniq_id = (cp.uniq_id)::text))
...
出力から、クエリが「cymbal_products の cymbal_products_embeddings_scann を使用したインデックス スキャン」を使用していることが明確にわかります。
explain なしでクエリを実行すると、次のようになります。
WITH trees as (
SELECT
        cp.product_name,
        left(cp.product_description,80) as description,
        cp.sale_price,
        cs.zip_code,
        cp.uniq_id as product_id
FROM
        cymbal_products cp
JOIN cymbal_inventory ci on
        ci.uniq_id=cp.uniq_id
JOIN cymbal_stores cs on
        cs.store_id=ci.store_id
        AND ci.inventory>0
        AND cs.store_id = 1583
ORDER BY
        (cp.embedding <=> embedding('text-embedding-005','What kind of fruit trees grow well here?')::vector) ASC
LIMIT 1)
SELECT json_agg(trees) FROM trees;
予想される出力:
[{"product_name":"Cherry Tree","description":"This is a beautiful cherry tree that will produce delicious cherries. It is an d","sale_price":75.00,"zip_code":93230,"product_id":"d536e9e823296a2eba198e52dd23e712"}]
インデックスなしで検索したときと同じく、検索結果の最上位に桜の木が表示されています。場合によっては、同じツリーではなく、上位の他のツリーが返されることがあります。インデックスを使用することで、パフォーマンスが向上し、十分な精度で優れた結果が得られます。
ベクトルで使用できるさまざまなインデックスや、langchain 統合で使用できるその他のラボと例については、ドキュメント ページをご覧ください。
11. 環境をクリーンアップする
ラボの終了時に AlloyDB インスタンスとクラスタを破棄します。
AlloyDB クラスタとすべてのインスタンスを削除する
AlloyDB の試用版を使用した場合。トライアル クラスタを使用して他のラボやリソースをテストする予定がある場合は、トライアル クラスタを削除しないでください。同じプロジェクトに別のトライアル クラスタを作成することはできません。
クラスタは force オプションで破棄され、クラスタに属するすべてのインスタンスも削除されます。
接続が切断され、以前の設定がすべて失われた場合は、Cloud Shell でプロジェクトと環境変数を定義します。
gcloud config set project <your project id>
export REGION=us-central1
export ADBCLUSTER=alloydb-aip-01
export PROJECT_ID=$(gcloud config get-value project)
クラスタを削除します。
gcloud alloydb clusters delete $ADBCLUSTER --region=$REGION --force
想定されるコンソール出力:
student@cloudshell:~ (test-project-001-402417)$ gcloud alloydb clusters delete $ADBCLUSTER --region=$REGION --force
All of the cluster data will be lost when the cluster is deleted.

Do you want to continue (Y/n)?  Y

Operation ID: operation-1697820178429-6082890a0b570-4a72f7e4-4c5df36f
Deleting cluster...done.
AlloyDB バックアップを削除する
クラスタの AlloyDB バックアップをすべて削除します。
for i in $(gcloud alloydb backups list --filter="CLUSTER_NAME: projects/$PROJECT_ID/locations/$REGION/clusters/$ADBCLUSTER" --format="value(name)" --sort-by=~createTime) ; do gcloud alloydb backups delete $(basename $i) --region $REGION --quiet; done
想定されるコンソール出力:
student@cloudshell:~ (test-project-001-402417)$ for i in $(gcloud alloydb backups list --filter="CLUSTER_NAME: projects/$PROJECT_ID/locations/$REGION/clusters/$ADBCLUSTER" --format="value(name)" --sort-by=~createTime) ; do gcloud alloydb backups delete $(basename $i) --region $REGION --quiet; done
Operation ID: operation-1697826266108-60829fb7b5258-7f99dc0b-99f3c35f
Deleting backup...done.
これで、VM を破棄できます。
GCE VM を削除する
Cloud Shell で、次のコマンドを実行します。
export GCEVM=instance-1
export ZONE=us-central1-a
gcloud compute instances delete $GCEVM \
    --zone=$ZONE \
    --quiet
想定されるコンソール出力:
student@cloudshell:~ (test-project-001-402417)$ export GCEVM=instance-1
export ZONE=us-central1-a
gcloud compute instances delete $GCEVM \
    --zone=$ZONE \
    --quiet
Deleted
12. 完了
以上で、この Codelab は完了です。
このラボは、「Google Cloud でのプロダクション レディな AI の開発」学習プログラムの一部です。
- カリキュラム全体を確認して、プロトタイプから本番環境への移行をスムーズに進めましょう。
- ハッシュタグ
#ProductionReadyAIを使用して進捗状況を共有しましょう。
学習した内容
- AlloyDB クラスタとプライマリ インスタンスをデプロイする方法
- Google Compute Engine VM から AlloyDB に接続する方法
- データベースを作成して AlloyDB AI を有効にする方法
- データベースにデータを読み込む方法
- AlloyDB Studio の使用方法
- AlloyDB で Vertex AI エンベディング モデルを使用する方法
- Vertex AI Studio の使用方法
- Vertex AI 生成モデルを使用して結果を拡充する方法
- ベクトル インデックスを使用してパフォーマンスを改善する方法
13. アンケート
出力: