

1. 소개
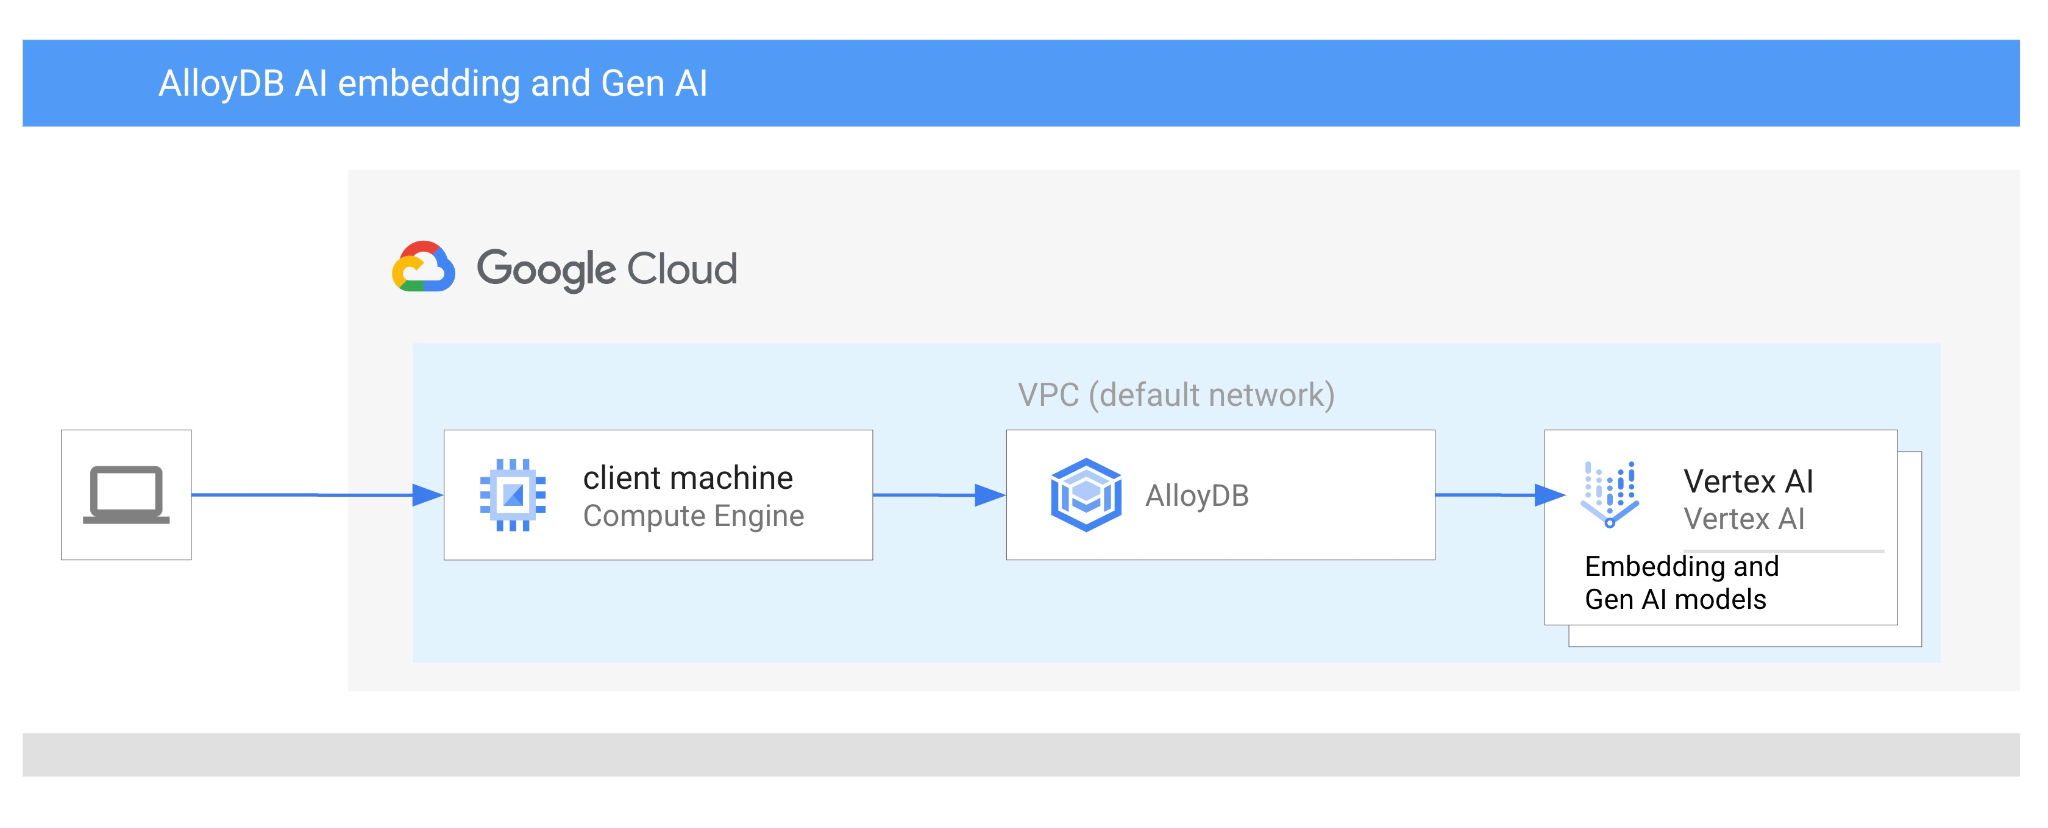
이 Codelab에서는 벡터 검색과 Vertex AI 임베딩을 결합하여 AlloyDB AI를 사용하는 방법을 알아봅니다. 이 실습은 AlloyDB AI 기능을 위한 실습 모음의 일부입니다. 자세한 내용은 문서의 AlloyDB AI 페이지를 참고하세요.
기본 요건
- Google Cloud 콘솔에 관한 기본적인 이해
- 명령줄 인터페이스 및 Google Shell의 기본 기술
학습할 내용
- AlloyDB 클러스터 및 기본 인스턴스를 배포하는 방법
- Google Compute Engine VM에서 AlloyDB에 연결하는 방법
- 데이터베이스를 만들고 AlloyDB AI를 사용 설정하는 방법
- 데이터베이스에 데이터를 로드하는 방법
- AlloyDB Studio 사용 방법
- AlloyDB에서 Vertex AI 임베딩 모델을 사용하는 방법
- Vertex AI Studio 사용 방법
- Vertex AI 생성형 모델을 사용하여 결과를 보강하는 방법
- 벡터 색인을 사용하여 성능을 개선하는 방법
필요한 항목
- Google Cloud 계정 및 Google Cloud 프로젝트
- 웹브라우저(예: Chrome)
2. 설정 및 요구사항
프로젝트 설정
- Google Cloud 콘솔에 로그인합니다. 아직 Gmail이나 Google Workspace 계정이 없는 경우 계정을 만들어야 합니다.
직장 또는 학교 계정 대신 개인 계정을 사용하세요.
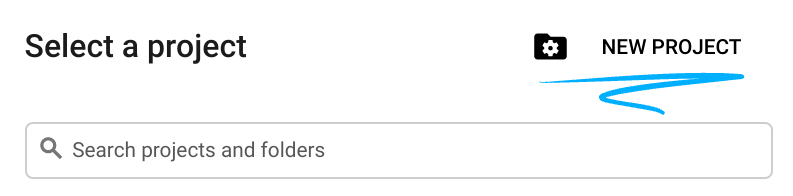
- 새 프로젝트를 만들거나 기존 프로젝트를 재사용합니다. Google Cloud 콘솔에서 새 프로젝트를 만들려면 헤더에서 프로젝트 선택 버튼을 클릭하여 팝업 창을 엽니다.

프로젝트 선택 창에서 새 프로젝트 버튼을 누르면 새 프로젝트 대화상자가 열립니다.
대화상자에서 원하는 프로젝트 이름을 입력하고 위치를 선택합니다.
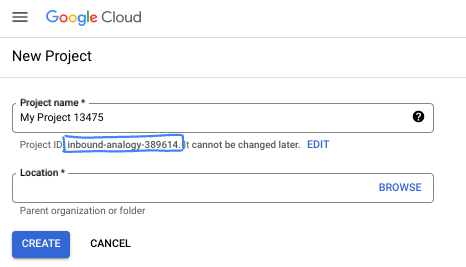
- 프로젝트 이름은 이 프로젝트 참가자의 표시 이름입니다. 프로젝트 이름은 Google API에서 사용되지 않으며 언제든지 변경할 수 있습니다.
- 프로젝트 ID는 모든 Google Cloud 프로젝트에서 고유하며, 변경할 수 없습니다 (설정된 후에는 변경할 수 없음). Google Cloud 콘솔에서 고유 ID를 자동으로 생성하지만 맞춤설정할 수 있습니다. 생성된 ID가 마음에 들지 않으면 다른 임의 ID를 생성하거나 자체 ID를 제공하여 사용 가능 여부를 확인할 수 있습니다. 대부분의 Codelab에서는 프로젝트 ID를 참조해야 합니다. 프로젝트 ID는 일반적으로 PROJECT_ID 자리표시자로 식별됩니다.
- 참고로 세 번째 값은 일부 API에서 사용하는 프로젝트 번호입니다. 이 세 가지 값에 대한 자세한 내용은 문서를 참고하세요.
결제 사용 설정
결제를 사용 설정하는 방법에는 두 가지가 있습니다. 개인 결제 계정을 사용하거나 다음 단계에 따라 크레딧을 사용할 수 있습니다.
Google Cloud 크레딧 사용 (선택사항)
이 워크숍을 진행하려면 크레딧이 있는 결제 계정이 필요합니다. 이 Codelab 상단의 배너에 있는 크레딧을 사용하여 시작하세요. 이미 결제 계정에 연결되어 있다면 이 단계를 건너뛰어도 됩니다.
개인 결제 계정 설정
Google Cloud 크레딧을 사용하여 결제를 설정한 경우 이 단계를 건너뛸 수 있습니다.
개인 결제 계정을 설정하려면 Cloud 콘솔에서 여기에서 결제를 사용 설정하세요.
참고 사항:
- 이 실습을 완료하는 데 드는 Cloud 리소스 비용은 미화 3달러 미만입니다.
- 이 실습이 끝나면 단계에 따라 리소스를 삭제하여 추가 요금이 발생하지 않도록 할 수 있습니다.
- 신규 사용자는 미화$300 상당의 무료 체험판을 이용할 수 있습니다.
Cloud Shell 시작
Google Cloud를 노트북에서 원격으로 실행할 수 있지만, 이 Codelab에서는 Cloud에서 실행되는 명령줄 환경인 Google Cloud Shell을 사용합니다.
Google Cloud Console의 오른쪽 상단 툴바에 있는 Cloud Shell 아이콘을 클릭합니다.

또는 G를 누른 다음 S를 누릅니다. Google Cloud 콘솔에 있거나 이 링크를 사용하는 경우 이 시퀀스를 통해 Cloud Shell이 활성화됩니다.
환경을 프로비저닝하고 연결하는 데 몇 분 정도 소요됩니다. 완료되면 다음과 같이 표시됩니다.

가상 머신에는 필요한 개발 도구가 모두 들어있습니다. 영구적인 5GB 홈 디렉터리를 제공하고 Google Cloud에서 실행되므로 네트워크 성능과 인증이 크게 개선됩니다. 이 Codelab의 모든 작업은 브라우저 내에서 수행할 수 있습니다. 아무것도 설치할 필요가 없습니다.
3. 시작하기 전에
API 사용 설정
출력:
AlloyDB, Compute Engine, 네트워킹 서비스, Vertex AI를 사용하려면 Google Cloud 프로젝트에서 각 API를 사용 설정해야 합니다.
API 사용 설정
터미널의 Cloud Shell 내에 프로젝트 ID가 설정되어 있는지 확인합니다.
gcloud config set project [YOUR-PROJECT-ID]
환경 변수 PROJECT_ID를 설정합니다.
PROJECT_ID=$(gcloud config get-value project)
필요한 모든 API를 사용 설정합니다.
gcloud services enable alloydb.googleapis.com \
                       compute.googleapis.com \
                       cloudresourcemanager.googleapis.com \
                       servicenetworking.googleapis.com \
                       aiplatform.googleapis.com
예상 출력
student@cloudshell:~ (test-project-001-402417)$ gcloud config set project test-project-001-402417
Updated property [core/project].
student@cloudshell:~ (test-project-001-402417)$ PROJECT_ID=$(gcloud config get-value project)
Your active configuration is: [cloudshell-14650]
student@cloudshell:~ (test-project-001-402417)$
student@cloudshell:~ (test-project-001-402417)$ gcloud services enable alloydb.googleapis.com \
                       compute.googleapis.com \
                       cloudresourcemanager.googleapis.com \
                       servicenetworking.googleapis.com \
                       aiplatform.googleapis.com
Operation "operations/acat.p2-4470404856-1f44ebd8-894e-4356-bea7-b84165a57442" finished successfully.
API 소개
- AlloyDB API (
alloydb.googleapis.com)를 사용하면 PostgreSQL용 AlloyDB 클러스터를 만들고, 관리하고, 확장할 수 있습니다. 까다로운 엔터프라이즈 트랜잭션 및 분석 워크로드를 위해 설계된 완전 관리형 PostgreSQL 호환 데이터베이스 서비스를 제공합니다. - Compute Engine API (
compute.googleapis.com)를 사용하면 가상 머신 (VM), 영구 디스크, 네트워크 설정을 만들고 관리할 수 있습니다. 워크로드를 실행하고 여러 관리형 서비스의 기본 인프라를 호스팅하는 데 필요한 핵심 서비스로서의 인프라 (IaaS) 기반을 제공합니다. - Cloud Resource Manager API (
cloudresourcemanager.googleapis.com)를 사용하면 Google Cloud 프로젝트의 메타데이터와 구성을 프로그래매틱 방식으로 관리할 수 있습니다. 이를 통해 리소스를 구성하고, ID 및 액세스 관리 (IAM) 정책을 처리하고, 프로젝트 계층 구조 전반에서 권한을 검증할 수 있습니다. - Service Networking API (
servicenetworking.googleapis.com)를 사용하면 가상 프라이빗 클라우드 (VPC) 네트워크와 Google의 관리형 서비스 간의 비공개 연결 설정을 자동화할 수 있습니다. AlloyDB와 같은 서비스가 다른 리소스와 안전하게 통신할 수 있도록 비공개 IP 액세스를 설정해야 합니다. - Vertex AI API (
aiplatform.googleapis.com)를 사용하면 애플리케이션에서 머신러닝 모델을 빌드, 배포, 확장할 수 있습니다. 생성형 AI 모델 (예: Gemini) 및 맞춤 모델 학습에 대한 액세스를 비롯한 모든 Google Cloud AI 서비스의 통합 인터페이스를 제공합니다.
선택적으로 Vertex AI 임베딩 모델을 사용하도록 기본 리전을 구성할 수 있습니다. Vertex AI에 사용할 수 있는 위치에 대해 자세히 알아보세요. 이 예에서는 us-central1 리전을 사용합니다.
gcloud config set compute/region us-central1
4. AlloyDB 배포
AlloyDB 클러스터를 만들기 전에 향후 AlloyDB 인스턴스에서 사용할 수 있는 비공개 IP 범위가 VPC에 있어야 합니다. 이 계정이 없으면 계정을 만들어 내부 Google 서비스에서 사용하도록 할당해야 클러스터와 인스턴스를 만들 수 있습니다.
비공개 IP 범위 만들기
VPC에서 AlloyDB용 비공개 서비스 액세스 구성을 설정해야 합니다. 여기서는 프로젝트에 '기본' VPC 네트워크가 있고 이 네트워크가 모든 작업에 사용된다고 가정합니다.
비공개 IP 범위를 만듭니다.
gcloud compute addresses create psa-range \
    --global \
    --purpose=VPC_PEERING \
    --prefix-length=24 \
    --description="VPC private service access" \
    --network=default
할당된 IP 범위를 사용하여 비공개 연결을 만듭니다.
gcloud services vpc-peerings connect \
    --service=servicenetworking.googleapis.com \
    --ranges=psa-range \
    --network=default
예상되는 콘솔 출력:
student@cloudshell:~ (test-project-402417)$ gcloud compute addresses create psa-range \
    --global \
    --purpose=VPC_PEERING \
    --prefix-length=24 \
    --description="VPC private service access" \
    --network=default
Created [https://www.googleapis.com/compute/v1/projects/test-project-402417/global/addresses/psa-range].

student@cloudshell:~ (test-project-402417)$ gcloud services vpc-peerings connect \
    --service=servicenetworking.googleapis.com \
    --ranges=psa-range \
    --network=default
Operation "operations/pssn.p24-4470404856-595e209f-19b7-4669-8a71-cbd45de8ba66" finished successfully.

student@cloudshell:~ (test-project-402417)$
AlloyDB 클러스터 만들기
이 섹션에서는 us-central1 리전에 AlloyDB 클러스터를 만듭니다.
postgres 사용자의 비밀번호를 정의합니다. 비밀번호를 직접 정의하거나 무작위 함수를 사용하여 생성할 수 있습니다.
export PGPASSWORD=`openssl rand -hex 12`
예상되는 콘솔 출력:
student@cloudshell:~ (test-project-402417)$ export PGPASSWORD=`openssl rand -hex 12`
나중에 사용할 수 있도록 PostgreSQL 비밀번호를 기록해 둡니다.
echo $PGPASSWORD
나중에 postgres 사용자로 인스턴스에 연결하려면 이 비밀번호가 필요합니다. 나중에 사용할 수 있도록 적어 두거나 어딘가에 복사해 두는 것이 좋습니다.
예상되는 콘솔 출력:
student@cloudshell:~ (test-project-402417)$ echo $PGPASSWORD
bbefbfde7601985b0dee5723
무료 체험판 클러스터 만들기
AlloyDB를 사용해 본 적이 없는 경우 무료 체험판 클러스터를 만들 수 있습니다.
리전과 AlloyDB 클러스터 이름을 정의합니다. us-central1 리전과 alloydb-aip-01을 클러스터 이름으로 사용합니다.
export REGION=us-central1
export ADBCLUSTER=alloydb-aip-01
명령어를 실행하여 클러스터를 만듭니다.
gcloud alloydb clusters create $ADBCLUSTER \
    --password=$PGPASSWORD \
    --network=default \
    --region=$REGION \
    --subscription-type=TRIAL
예상되는 콘솔 출력:
export REGION=us-central1
export ADBCLUSTER=alloydb-aip-01
gcloud alloydb clusters create $ADBCLUSTER \
    --password=$PGPASSWORD \
    --network=default \
    --region=$REGION \
    --subscription-type=TRIAL
Operation ID: operation-1697655441138-6080235852277-9e7f04f5-2012fce4
Creating cluster...done.
동일한 Cloud Shell 세션에서 클러스터의 AlloyDB 기본 인스턴스를 만듭니다. 연결이 해제되면 리전 및 클러스터 이름 환경 변수를 다시 정의해야 합니다.
gcloud alloydb instances create $ADBCLUSTER-pr \
    --instance-type=PRIMARY \
    --cpu-count=8 \
    --region=$REGION \
    --cluster=$ADBCLUSTER
예상되는 콘솔 출력:
student@cloudshell:~ (test-project-402417)$ gcloud alloydb instances create $ADBCLUSTER-pr \
    --instance-type=PRIMARY \
    --cpu-count=8 \
    --region=$REGION \
    --availability-type ZONAL \
    --cluster=$ADBCLUSTER
Operation ID: operation-1697659203545-6080315c6e8ee-391805db-25852721
Creating instance...done.
AlloyDB Standard 클러스터 만들기
프로젝트의 첫 번째 AlloyDB 클러스터가 아닌 경우 표준 클러스터 생성을 진행합니다.
리전과 AlloyDB 클러스터 이름을 정의합니다. us-central1 리전과 alloydb-aip-01을 클러스터 이름으로 사용합니다.
export REGION=us-central1
export ADBCLUSTER=alloydb-aip-01
명령어를 실행하여 클러스터를 만듭니다.
gcloud alloydb clusters create $ADBCLUSTER \
    --password=$PGPASSWORD \
    --network=default \
    --region=$REGION
예상되는 콘솔 출력:
export REGION=us-central1
export ADBCLUSTER=alloydb-aip-01
gcloud alloydb clusters create $ADBCLUSTER \
    --password=$PGPASSWORD \
    --network=default \
    --region=$REGION
Operation ID: operation-1697655441138-6080235852277-9e7f04f5-2012fce4
Creating cluster...done.
동일한 Cloud Shell 세션에서 클러스터의 AlloyDB 기본 인스턴스를 만듭니다. 연결이 해제되면 리전 및 클러스터 이름 환경 변수를 다시 정의해야 합니다.
gcloud alloydb instances create $ADBCLUSTER-pr \
    --instance-type=PRIMARY \
    --cpu-count=2 \
    --region=$REGION \
    --cluster=$ADBCLUSTER
예상되는 콘솔 출력:
student@cloudshell:~ (test-project-402417)$ gcloud alloydb instances create $ADBCLUSTER-pr \
    --instance-type=PRIMARY \
    --cpu-count=2 \
    --region=$REGION \
    --availability-type ZONAL \
    --cluster=$ADBCLUSTER
Operation ID: operation-1697659203545-6080315c6e8ee-391805db-25852721
Creating instance...done.
5. AlloyDB에 연결
AlloyDB는 비공개 전용 연결을 사용하여 배포되므로 데이터베이스와 함께 작동하려면 PostgreSQL 클라이언트가 설치된 VM이 필요합니다.
GCE VM 배포
AlloyDB 클러스터와 동일한 리전 및 VPC에 GCE VM을 만듭니다.
Cloud Shell에서 다음을 실행합니다.
export ZONE=us-central1-a
gcloud compute instances create instance-1 \
    --zone=$ZONE \
    --create-disk=auto-delete=yes,boot=yes,image=projects/debian-cloud/global/images/$(gcloud compute images list --filter="family=debian-12 AND family!=debian-12-arm64" --format="value(name)") \
    --scopes=https://www.googleapis.com/auth/cloud-platform
예상되는 콘솔 출력:
student@cloudshell:~ (test-project-402417)$ export ZONE=us-central1-a
student@cloudshell:~ (test-project-402417)$ export ZONE=us-central1-a
gcloud compute instances create instance-1 \
    --zone=$ZONE \
    --create-disk=auto-delete=yes,boot=yes,image=projects/debian-cloud/global/images/$(gcloud compute images list --filter="family=debian-12 AND family!=debian-12-arm64" --format="value(name)") \
    --scopes=https://www.googleapis.com/auth/cloud-platform

Created [https://www.googleapis.com/compute/v1/projects/test-project-402417/zones/us-central1-a/instances/instance-1].
NAME: instance-1
ZONE: us-central1-a
MACHINE_TYPE: n1-standard-1
PREEMPTIBLE:
INTERNAL_IP: 10.128.0.2
EXTERNAL_IP: 34.71.192.233
STATUS: RUNNING
Postgres 클라이언트 설치
배포된 VM에 PostgreSQL 클라이언트 소프트웨어 설치
VM에 연결합니다.
gcloud compute ssh instance-1 --zone=us-central1-a
예상되는 콘솔 출력:
student@cloudshell:~ (test-project-402417)$ gcloud compute ssh instance-1 --zone=us-central1-a
Updating project ssh metadata...working..Updated [https://www.googleapis.com/compute/v1/projects/test-project-402417].
Updating project ssh metadata...done.
Waiting for SSH key to propagate.
Warning: Permanently added 'compute.5110295539541121102' (ECDSA) to the list of known hosts.
Linux instance-1.us-central1-a.c.gleb-test-short-001-418811.internal 6.1.0-18-cloud-amd64 #1 SMP PREEMPT_DYNAMIC Debian 6.1.76-1 (2024-02-01) x86_64

The programs included with the Debian GNU/Linux system are free software;
the exact distribution terms for each program are described in the
individual files in /usr/share/doc/*/copyright.

Debian GNU/Linux comes with ABSOLUTELY NO WARRANTY, to the extent
permitted by applicable law.
student@instance-1:~$
VM 내에 명령어를 실행할 소프트웨어를 설치합니다.
sudo apt-get update
sudo apt-get install --yes postgresql-client
예상되는 콘솔 출력:
student@instance-1:~$ sudo apt-get update
sudo apt-get install --yes postgresql-client
Get:1 https://packages.cloud.google.com/apt google-compute-engine-bullseye-stable InRelease [5146 B]
Get:2 https://packages.cloud.google.com/apt cloud-sdk-bullseye InRelease [6406 B]
Hit:3 https://deb.debian.org/debian bullseye InRelease
Get:4 https://deb.debian.org/debian-security bullseye-security InRelease [48.4 kB]
Get:5 https://packages.cloud.google.com/apt google-compute-engine-bullseye-stable/main amd64 Packages [1930 B]
Get:6 https://deb.debian.org/debian bullseye-updates InRelease [44.1 kB]
Get:7 https://deb.debian.org/debian bullseye-backports InRelease [49.0 kB]
...redacted...
update-alternatives: using /usr/share/postgresql/13/man/man1/psql.1.gz to provide /usr/share/man/man1/psql.1.gz (psql.1.gz) in auto mode
Setting up postgresql-client (13+225) ...
Processing triggers for man-db (2.9.4-2) ...
Processing triggers for libc-bin (2.31-13+deb11u7) ...
인스턴스에 연결
psql을 사용하여 VM에서 기본 인스턴스에 연결합니다.
instance-1 VM에 대해 SSH 세션이 열린 동일한 Cloud Shell 탭
언급된 AlloyDB 비밀번호 (PGPASSWORD) 값과 AlloyDB 클러스터 ID를 사용하여 GCE VM에서 AlloyDB에 연결합니다.
export PGPASSWORD=<Noted password>
export PROJECT_ID=$(gcloud config get-value project)
export REGION=us-central1
export ADBCLUSTER=alloydb-aip-01
export INSTANCE_IP=$(gcloud alloydb instances describe $ADBCLUSTER-pr --cluster=$ADBCLUSTER --region=$REGION --format="value(ipAddress)")
psql "host=$INSTANCE_IP user=postgres sslmode=require"
예상되는 콘솔 출력:
student@instance-1:~$ export PGPASSWORD=CQhOi5OygD4ps6ty
student@instance-1:~$ ADBCLUSTER=alloydb-aip-01
student@instance-1:~$ REGION=us-central1
student@instance-1:~$ INSTANCE_IP=$(gcloud alloydb instances describe $ADBCLUSTER-pr --cluster=$ADBCLUSTER --region=$REGION --format="value(ipAddress)")
gleb@instance-1:~$ psql "host=$INSTANCE_IP user=postgres sslmode=require"
psql (15.6 (Debian 15.6-0+deb12u1), server 15.5)
SSL connection (protocol: TLSv1.3, cipher: TLS_AES_256_GCM_SHA384, compression: off)
Type "help" for help.

postgres=>
psql 세션을 닫습니다.
exit
6. 데이터베이스 준비
데이터베이스를 만들고, Vertex AI 통합을 사용 설정하고, 데이터베이스 객체를 만들고, 데이터를 가져와야 합니다.
AlloyDB에 필요한 권한 부여
AlloyDB 서비스 에이전트에 Vertex AI 권한을 추가합니다.
맨 위에 있는 '+' 기호를 사용하여 다른 Cloud Shell 탭을 엽니다.
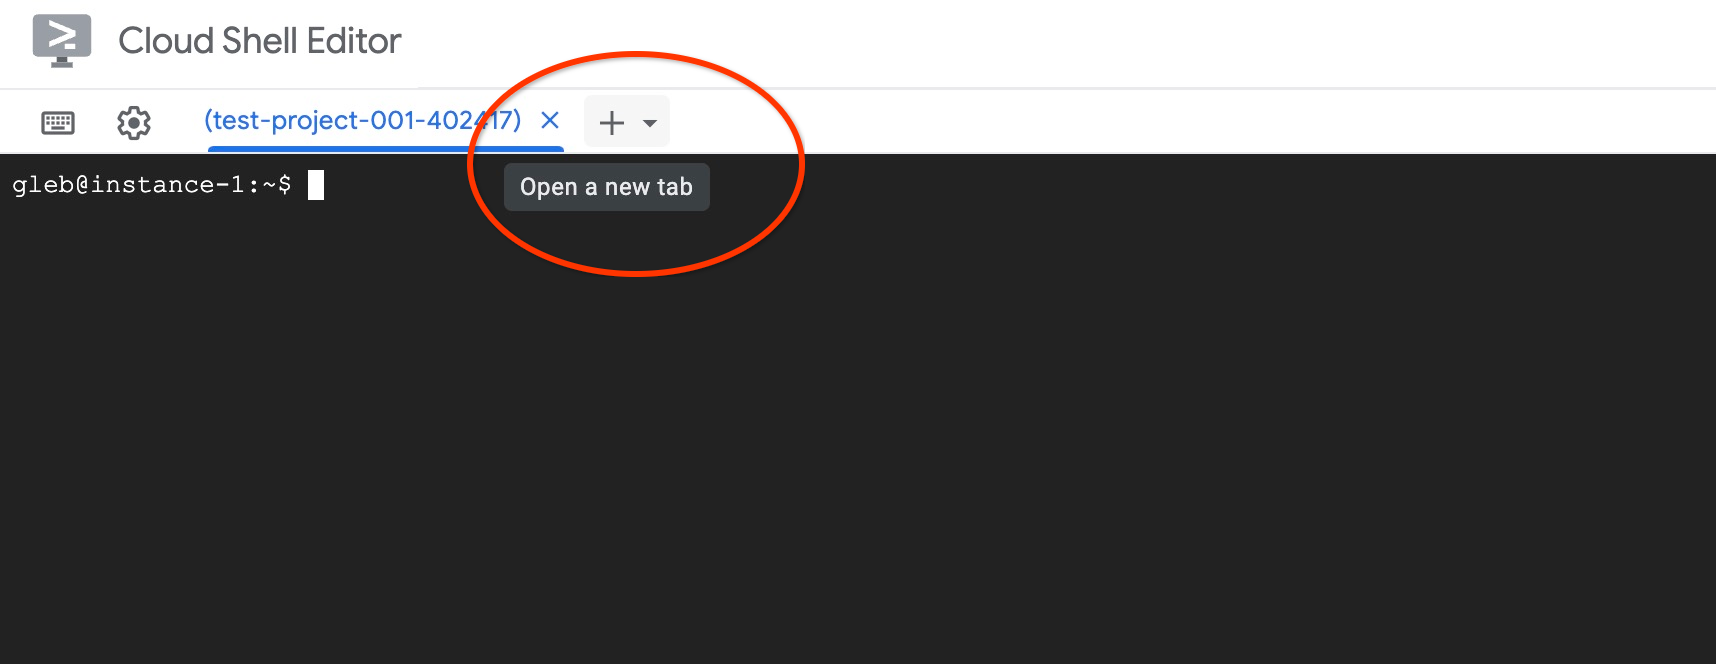
새 Cloud Shell 탭에서 다음을 실행합니다.
PROJECT_ID=$(gcloud config get-value project)
gcloud projects add-iam-policy-binding $PROJECT_ID \
  --member="serviceAccount:service-$(gcloud projects describe $PROJECT_ID --format="value(projectNumber)")@gcp-sa-alloydb.iam.gserviceaccount.com" \
  --role="roles/aiplatform.user"
예상되는 콘솔 출력:
student@cloudshell:~ (test-project-001-402417)$ PROJECT_ID=$(gcloud config get-value project)
Your active configuration is: [cloudshell-11039]
student@cloudshell:~ (test-project-001-402417)$ gcloud projects add-iam-policy-binding $PROJECT_ID \
  --member="serviceAccount:service-$(gcloud projects describe $PROJECT_ID --format="value(projectNumber)")@gcp-sa-alloydb.iam.gserviceaccount.com" \
  --role="roles/aiplatform.user"
Updated IAM policy for project [test-project-001-402417].
bindings:
- members:
  - serviceAccount:service-4470404856@gcp-sa-alloydb.iam.gserviceaccount.com
  role: roles/aiplatform.user
- members:
...
etag: BwYIEbe_Z3U=
version: 1
탭에서 실행 명령어 'exit' 중 하나를 사용하여 탭을 닫습니다.
exit
데이터베이스 만들기
데이터베이스 만들기 빠른 시작
GCE VM 세션에서 다음을 실행합니다.
데이터베이스를 만듭니다.
psql "host=$INSTANCE_IP user=postgres" -c "CREATE DATABASE quickstart_db"
예상되는 콘솔 출력:
student@instance-1:~$ psql "host=$INSTANCE_IP user=postgres" -c "CREATE DATABASE quickstart_db"
CREATE DATABASE
student@instance-1:~$
Vertex AI 통합 사용 설정
데이터베이스에서 Vertex AI 통합 및 pgvector 확장 프로그램을 사용 설정합니다.
GCE VM에서 다음을 실행합니다.
psql "host=$INSTANCE_IP user=postgres dbname=quickstart_db" -c "CREATE EXTENSION IF NOT EXISTS google_ml_integration CASCADE"
psql "host=$INSTANCE_IP user=postgres dbname=quickstart_db" -c "CREATE EXTENSION IF NOT EXISTS vector"
예상되는 콘솔 출력:
student@instance-1:~$ psql "host=$INSTANCE_IP user=postgres dbname=quickstart_db" -c "CREATE EXTENSION IF NOT EXISTS google_ml_integration CASCADE"
psql "host=$INSTANCE_IP user=postgres dbname=quickstart_db" -c "CREATE EXTENSION IF NOT EXISTS vector"
CREATE EXTENSION
CREATE EXTENSION
student@instance-1:~$
데이터 가져오기
준비된 데이터를 다운로드하고 새 데이터베이스로 가져옵니다.
GCE VM에서 다음을 실행합니다.
gcloud storage cat gs://cloud-training/gcc/gcc-tech-004/cymbal_demo_schema.sql |psql "host=$INSTANCE_IP user=postgres dbname=quickstart_db"
gcloud storage cat gs://cloud-training/gcc/gcc-tech-004/cymbal_products.csv |psql "host=$INSTANCE_IP user=postgres dbname=quickstart_db" -c "\copy cymbal_products from stdin csv header"
gcloud storage cat gs://cloud-training/gcc/gcc-tech-004/cymbal_inventory.csv |psql "host=$INSTANCE_IP user=postgres dbname=quickstart_db" -c "\copy cymbal_inventory from stdin csv header"
gcloud storage cat gs://cloud-training/gcc/gcc-tech-004/cymbal_stores.csv |psql "host=$INSTANCE_IP user=postgres dbname=quickstart_db" -c "\copy cymbal_stores from stdin csv header"
예상되는 콘솔 출력:
student@instance-1:~$ gsutil cat gs://cloud-training/gcc/gcc-tech-004/cymbal_demo_schema.sql |psql "host=$INSTANCE_IP user=postgres dbname=quickstart_db"
SET
SET
SET
SET
SET
 set_config
------------

(1 row)
SET
SET
SET
SET
SET
SET
CREATE TABLE
ALTER TABLE
CREATE TABLE
ALTER TABLE
CREATE TABLE
ALTER TABLE
CREATE TABLE
ALTER TABLE
CREATE SEQUENCE
ALTER TABLE
ALTER SEQUENCE
ALTER TABLE
ALTER TABLE
ALTER TABLE
student@instance-1:~$ gsutil cat gs://cloud-training/gcc/gcc-tech-004/cymbal_products.csv |psql "host=$INSTANCE_IP user=postgres dbname=quickstart_db" -c "\copy cymbal_products from stdin csv header"
COPY 941
student@instance-1:~$ gsutil cat gs://cloud-training/gcc/gcc-tech-004/cymbal_inventory.csv |psql "host=$INSTANCE_IP user=postgres dbname=quickstart_db" -c "\copy cymbal_inventory from stdin csv header"
COPY 263861
student@instance-1:~$ gsutil cat gs://cloud-training/gcc/gcc-tech-004/cymbal_stores.csv |psql "host=$INSTANCE_IP user=postgres dbname=quickstart_db" -c "\copy cymbal_stores from stdin csv header"
COPY 4654
student@instance-1:~$
7. 임베딩 계산
데이터를 가져온 후 cymbal_products 테이블에 제품 데이터, cymbal_inventory 테이블에 각 매장에서 구매 가능한 제품 수를 보여주는 인벤토리, cymbal_stores 테이블에 매장 목록이 표시됩니다. 제품 설명을 기반으로 벡터 데이터를 계산해야 하며 이를 위해 embedding 함수를 사용할 예정입니다. 이 함수를 사용하여 Vertex AI 통합을 통해 제품 설명을 기반으로 벡터 데이터를 계산하고 표에 추가합니다. 사용된 기술에 대한 자세한 내용은 문서를 참고하세요.
몇 개의 행에 대해서는 쉽게 생성할 수 있지만 행이 수천 개일 때는 어떻게 효율적으로 만들 수 있을까요? 여기에서는 대규모 테이블의 임베딩을 생성하고 관리하는 방법을 보여드리겠습니다. 가이드에서 다양한 옵션과 기법에 대해 자세히 알아볼 수도 있습니다.
빠른 임베딩 생성 사용 설정
AlloyDB 인스턴스 IP와 postgres 비밀번호를 사용하여 VM에서 psql을 사용하여 데이터베이스에 연결합니다.
psql "host=$INSTANCE_IP user=postgres dbname=quickstart_db"
google_ml_integration 확장 프로그램의 버전을 확인합니다.
SELECT extversion FROM pg_extension WHERE extname = 'google_ml_integration';
버전은 1.5.2 이상이어야 합니다. 출력 예시는 다음과 같습니다.
quickstart_db=> SELECT extversion FROM pg_extension WHERE extname = 'google_ml_integration';
 extversion
------------
 1.5.2
(1 row)
기본 버전은 1.5.2 이상이어야 하지만 인스턴스에 이전 버전이 표시되면 업데이트해야 할 수 있습니다. 인스턴스에 유지보수가 사용 중지되었는지 확인합니다.
그런 다음 데이터베이스 플래그를 확인해야 합니다. google_ml_integration.enable_faster_embedding_generation 플래그가 사용 설정되어 있어야 합니다. 동일한 psql 세션에서 플래그 값을 확인합니다.
show google_ml_integration.enable_faster_embedding_generation;
플래그가 올바른 위치에 있으면 예상 출력은 다음과 같습니다.
quickstart_db=> show google_ml_integration.enable_faster_embedding_generation;
 google_ml_integration.enable_faster_embedding_generation
----------------------------------------------------------
 on
(1 row)
하지만 '사용 안함'으로 표시되면 인스턴스를 업데이트해야 합니다. 문서에 설명된 대로 웹 콘솔 또는 gcloud 명령어를 사용하여 이 작업을 수행할 수 있습니다. 다음은 gcloud 명령어를 사용하여 이 작업을 수행하는 방법을 보여줍니다.
export PROJECT_ID=$(gcloud config get-value project)
export REGION=us-central1
export ADBCLUSTER=alloydb-aip-01
gcloud beta alloydb instances update $ADBCLUSTER-pr \
   --database-flags google_ml_integration.enable_faster_embedding_generation=on \
   --region=$REGION \
   --cluster=$ADBCLUSTER \
   --project=$PROJECT_ID \
   --update-mode=FORCE_APPLY
몇 분 정도 걸릴 수 있지만 결국 플래그 값이 'on'으로 전환됩니다. 그런 다음 다음 단계를 진행할 수 있습니다.
임베딩 열 만들기
psql을 사용하여 데이터베이스에 연결하고 cymbal_products 테이블의 임베딩 함수를 사용하여 벡터 데이터가 포함된 가상 열을 만듭니다. 임베딩 함수는 product_description 열에서 제공된 데이터를 기반으로 Vertex AI에서 벡터 데이터를 반환합니다.
psql "host=$INSTANCE_IP user=postgres dbname=quickstart_db"
데이터베이스에 연결한 후 psql 세션에서 다음을 실행합니다.
ALTER TABLE cymbal_products ADD COLUMN embedding vector(768);
이 명령어를 실행하면 가상 열이 생성되고 벡터 데이터로 채워집니다.
예상되는 콘솔 출력:
quickstart_db=> ALTER TABLE cymbal_products ADD COLUMN embedding vector(768);
ALTER TABLE
quickstart_db=>
이제 각 행이 50개인 배치로 임베딩을 생성할 수 있습니다. 다양한 배치 크기를 실험하여 실행 시간이 달라지는지 확인할 수 있습니다. 동일한 psql 세션에서 다음을 실행합니다.
시간을 측정하여 얼마나 걸리는지 확인하려면 타이밍을 사용 설정하세요.
\timing
다음 명령어를 실행합니다.
CALL ai.initialize_embeddings(
    model_id => 'text-embedding-005',
    table_name => 'cymbal_products',
    content_column => 'product_description',
    embedding_column => 'embedding',
    batch_size => 50
);
콘솔 출력에는 삽입 생성에 2초 미만이 걸린 것으로 표시됩니다.
quickstart_db=> CALL ai.initialize_embeddings(
    model_id => 'text-embedding-005',
    table_name => 'cymbal_products',
    content_column => 'product_description',
    embedding_column => 'embedding',
    batch_size => 50
);
NOTICE:  Initialize embedding completed successfully for table cymbal_products
CALL
Time: 1458.704 ms (00:01.459)
quickstart_db=>
기본적으로 해당 product_description 열이 업데이트되거나 완전히 새로운 행이 삽입되는 경우에도 삽입은 새로고침되지 않습니다. 하지만 incremental_refresh_mode 매개변수를 정의하여 이를 수행할 수 있습니다. 'product_embeddings' 열을 만들고 자동으로 업데이트되도록 설정해 보겠습니다.
ALTER TABLE cymbal_products ADD COLUMN product_embedding vector(768);
CALL ai.initialize_embeddings(
    model_id => 'text-embedding-005',
    table_name => 'cymbal_products',
    content_column => 'product_description',
    embedding_column => 'product_embedding',
    batch_size => 50,
    incremental_refresh_mode => 'transactional'
);
이제 테이블에 새 행을 삽입하면
INSERT INTO "cymbal_products" ("uniq_id", "crawl_timestamp", "product_url", "product_name", "product_description", "list_price", "sale_price", "brand", "item_number", "gtin", "package_size", "category", "postal_code", "available", "product_embedding", "embedding") VALUES ('fd604542e04b470f9e6348e640cff794', NOW(), 'https://example.com/new_product', 'New Cymbal Product', 'This is a new cymbal product description.', 199.99, 149.99, 'Example Brand', 'EB123', '1234567890', 'Single', 'Cymbals', '12345', TRUE, NULL, NULL);
다음 쿼리를 사용하여 열의 차이를 비교할 수 있습니다.
SELECT uniq_id,embedding, (product_embedding::real[])[1:5] as product_embedding FROM cymbal_products WHERE uniq_id='fd604542e04b470f9e6348e640cff794';
출력에서 embedding 열은 비어 있지만 product_embedding 열은 자동으로 업데이트되는 것을 확인할 수 있습니다.
quickstart_db=> SELECT uniq_id,embedding, (product_embedding::real[])[1:5] as product_embedding  FROM cymbal_products WHERE uniq_id='fd604542e04b470f9e6348e640cff794';
             uniq_id              | embedding |                       product_embedding
----------------------------------+-----------+---------------------------------------------------------------
 fd604542e04b470f9e6348e640cff794 |           | {0.015003494,-0.005349732,-0.059790313,-0.0087091,-0.0271452}
(1 row)

Time: 3.295 ms
8. 유사성 검색 실행
이제 설명에 대해 계산된 벡터 값과 요청에 대해 얻은 벡터 값을 기반으로 유사성 검색을 사용하여 검색을 실행할 수 있습니다.
SQL 쿼리는 동일한 psql 명령줄 인터페이스에서 실행하거나 AlloyDB Studio에서 실행할 수 있습니다. 여러 행으로 구성된 복잡한 출력은 AlloyDB Studio에서 더 잘 표시될 수 있습니다.
AlloyDB Studio에 연결
다음 장에서는 데이터베이스에 연결해야 하는 모든 SQL 명령어를 AlloyDB Studio에서 대신 실행할 수 있습니다. 명령어를 실행하려면 기본 인스턴스를 클릭하여 AlloyDB 클러스터의 웹 콘솔 인터페이스를 열어야 합니다.
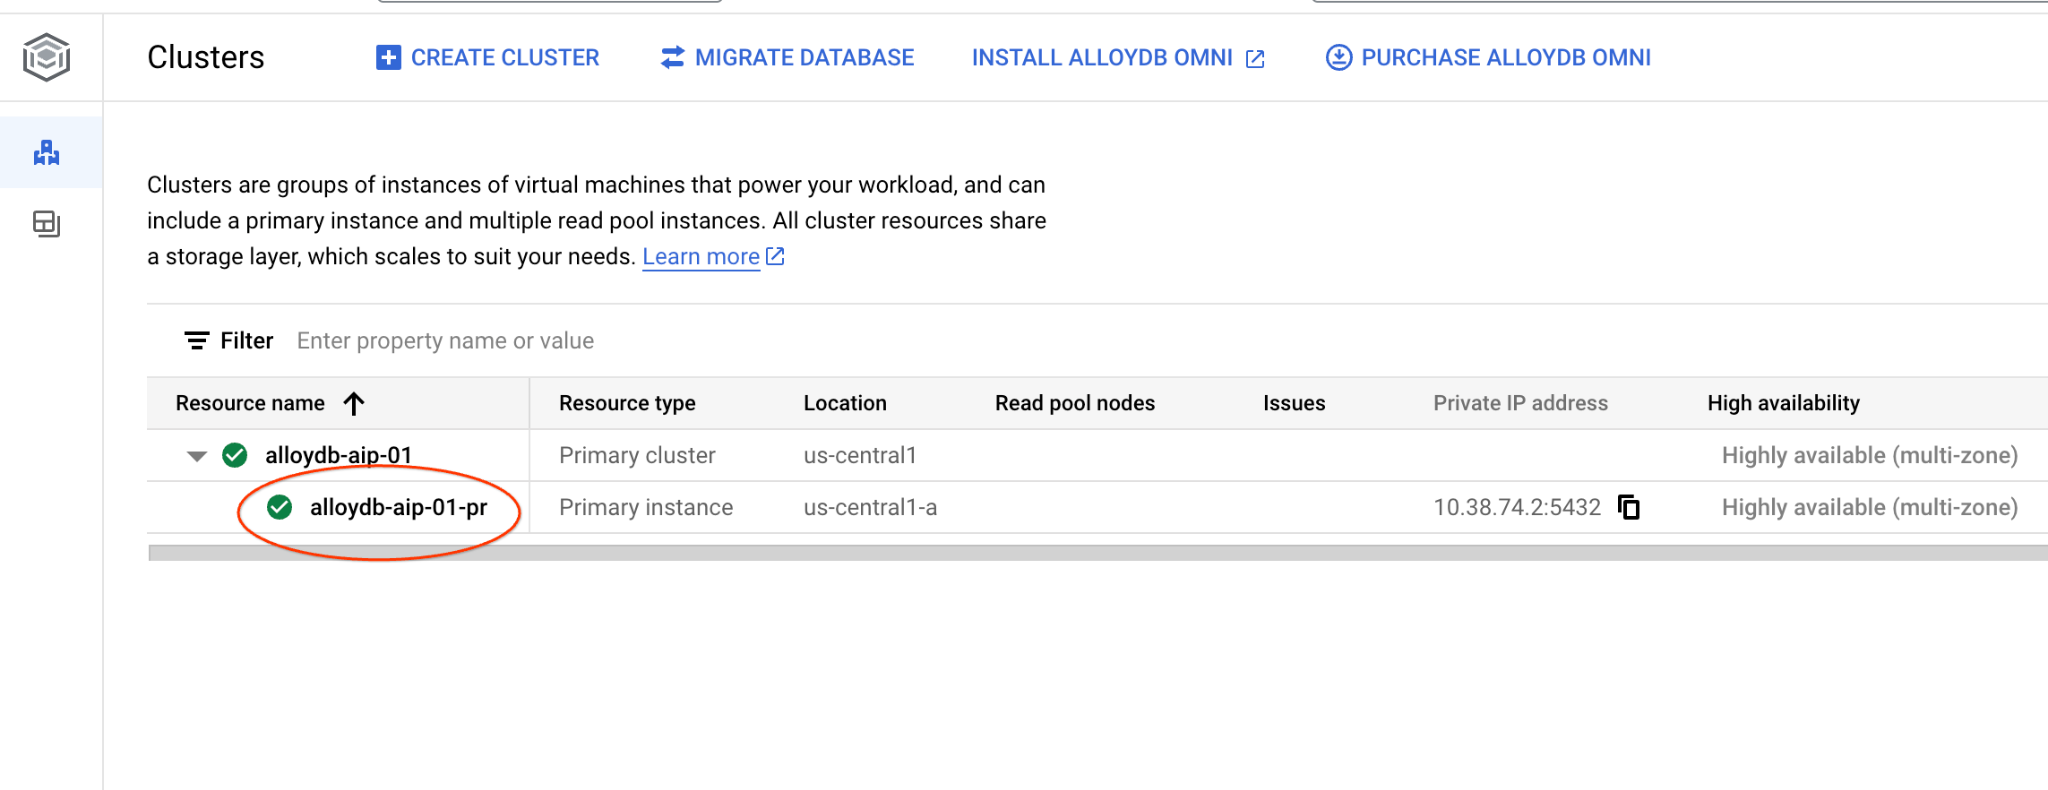
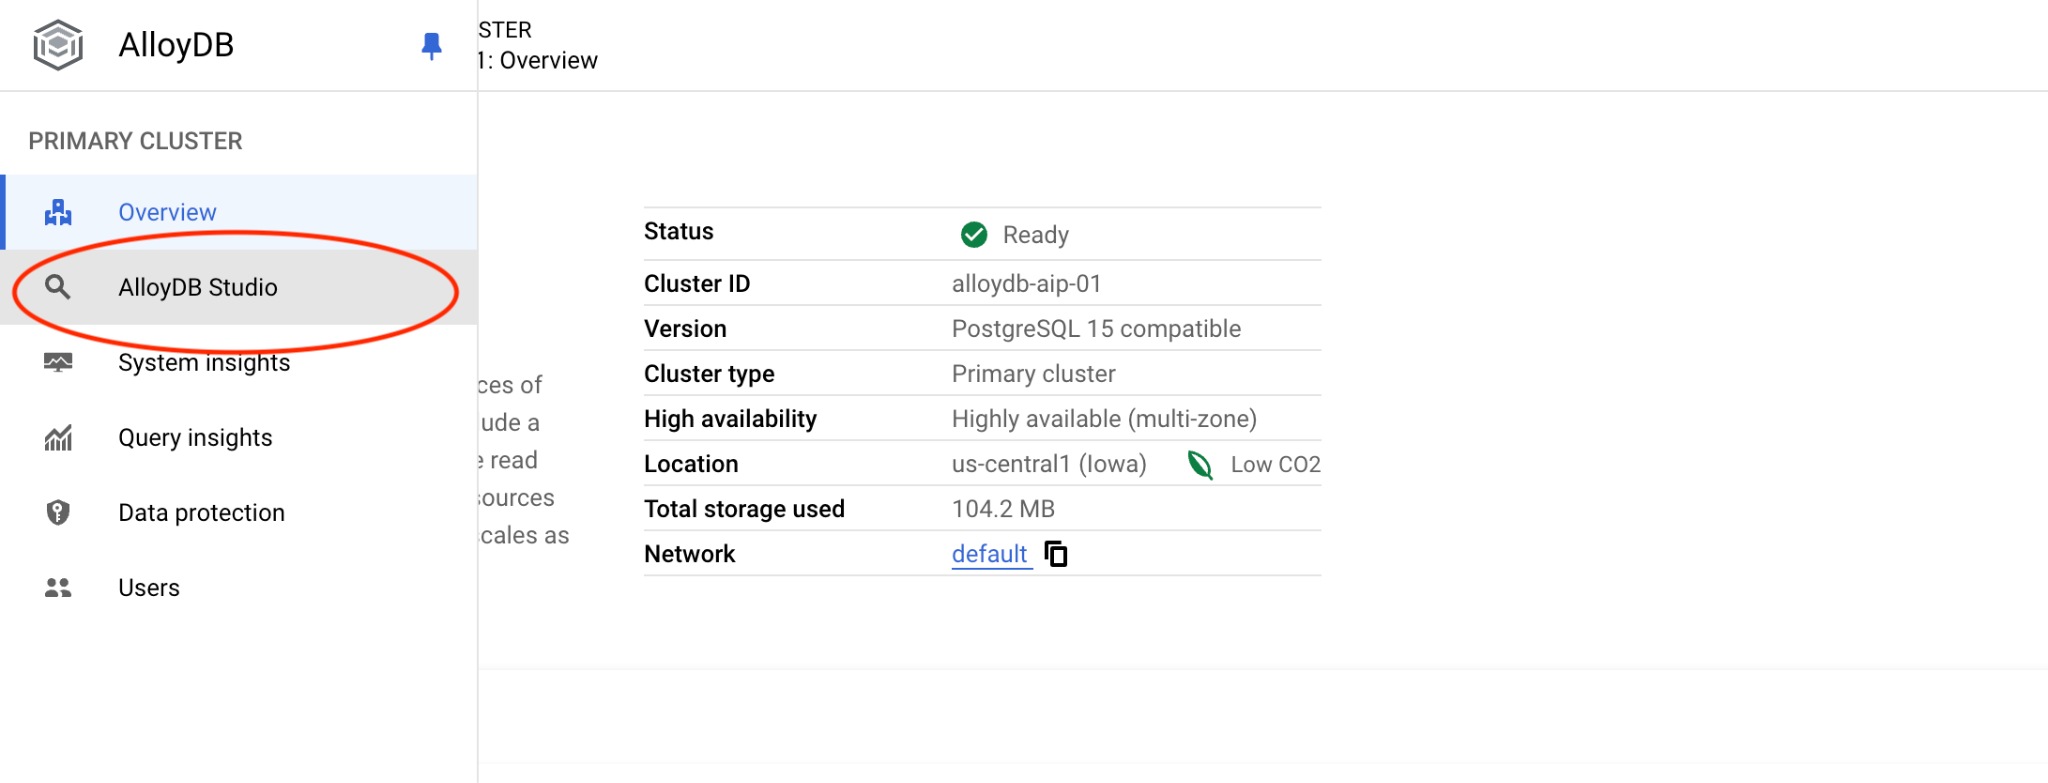
그런 다음 왼쪽에서 AlloyDB Studio를 클릭합니다.
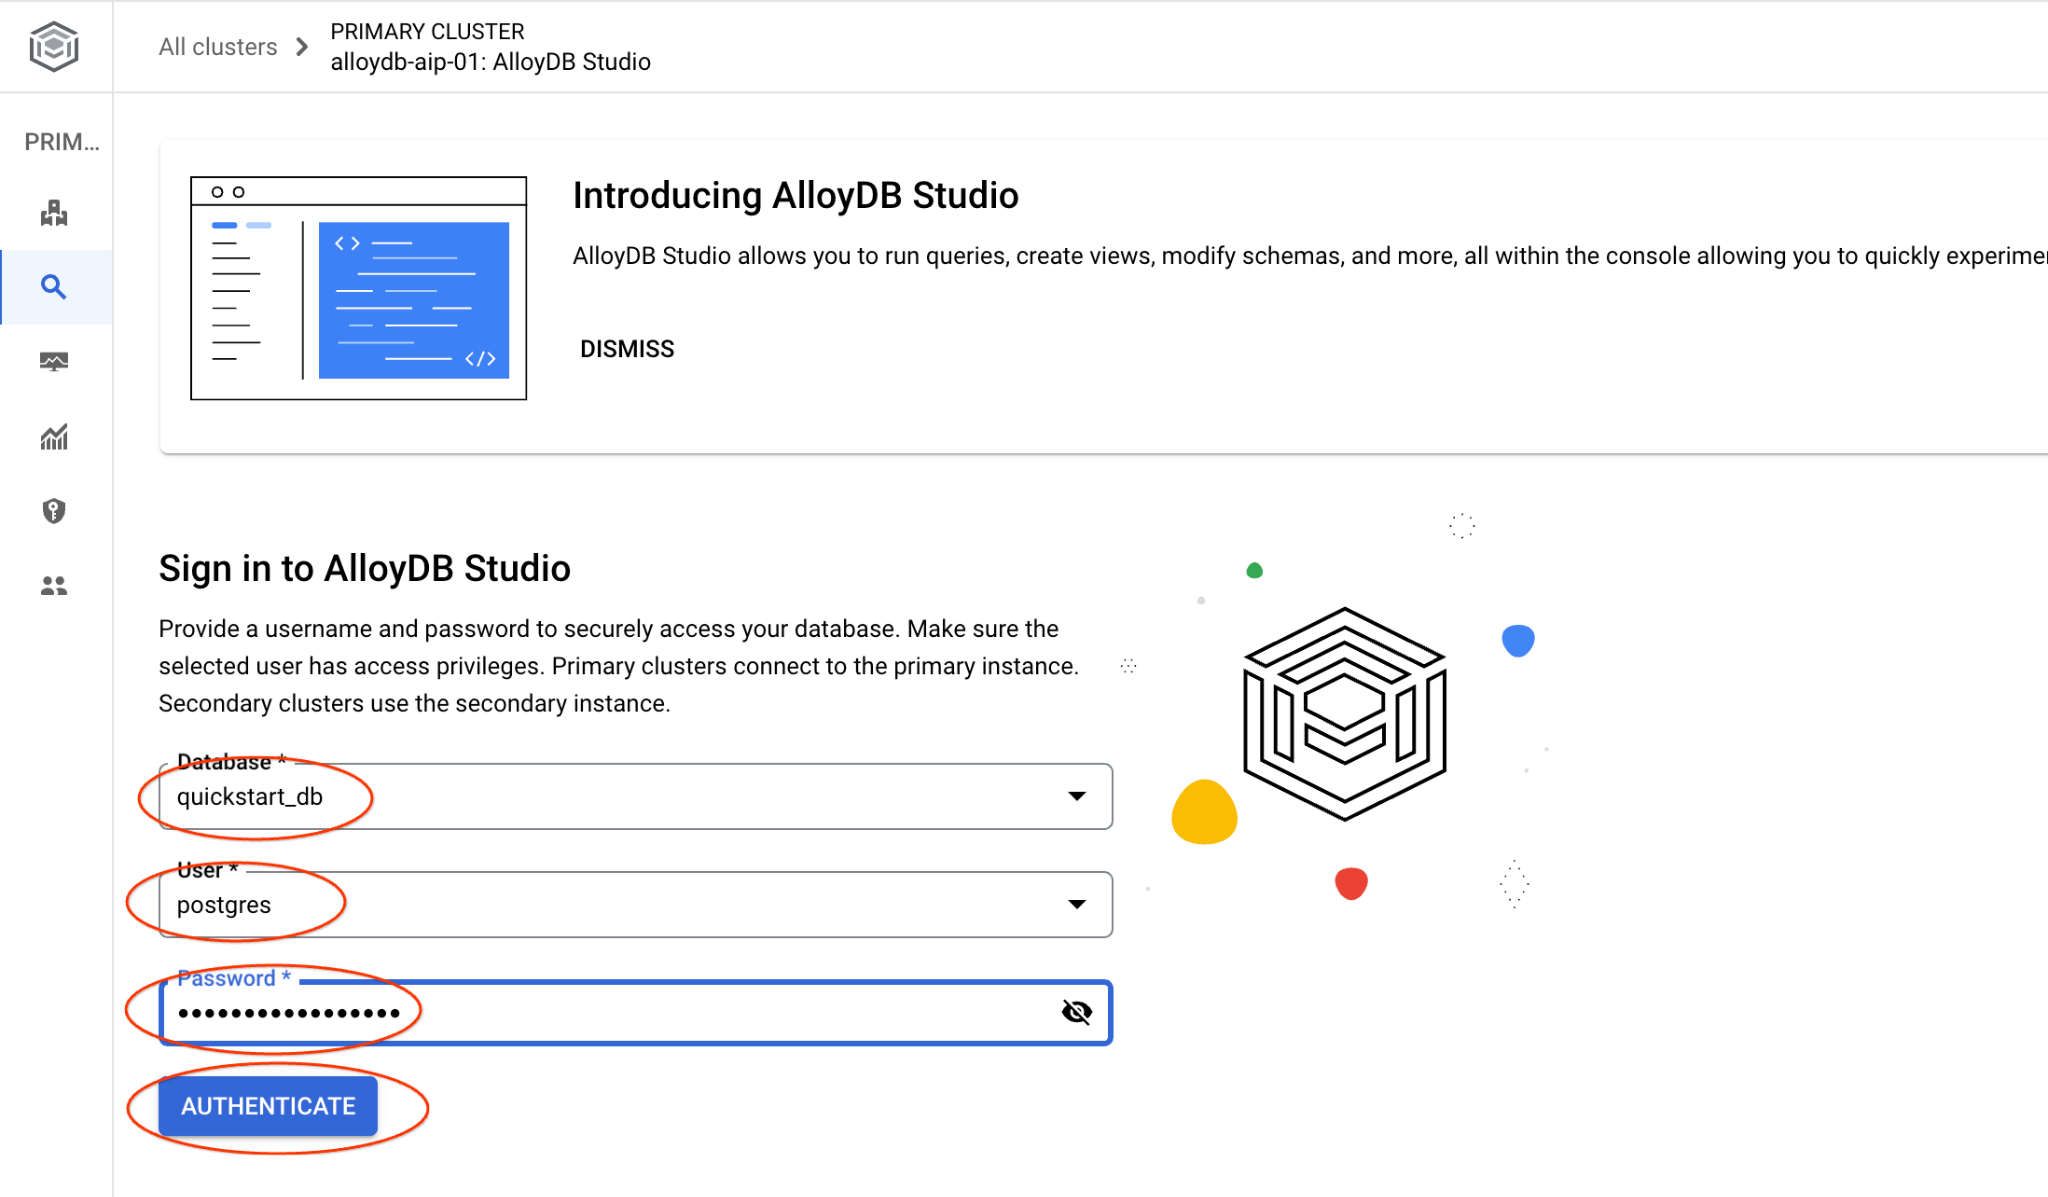
quickstart_db 데이터베이스와 postgres 사용자를 선택하고 클러스터를 만들 때 기록해 둔 비밀번호를 입력합니다. 그런 다음 '인증' 버튼을 클릭합니다.
AlloyDB Studio 인터페이스가 열립니다. 데이터베이스에서 명령어를 실행하려면 오른쪽에 있는 'Editor 1' 탭을 클릭합니다.
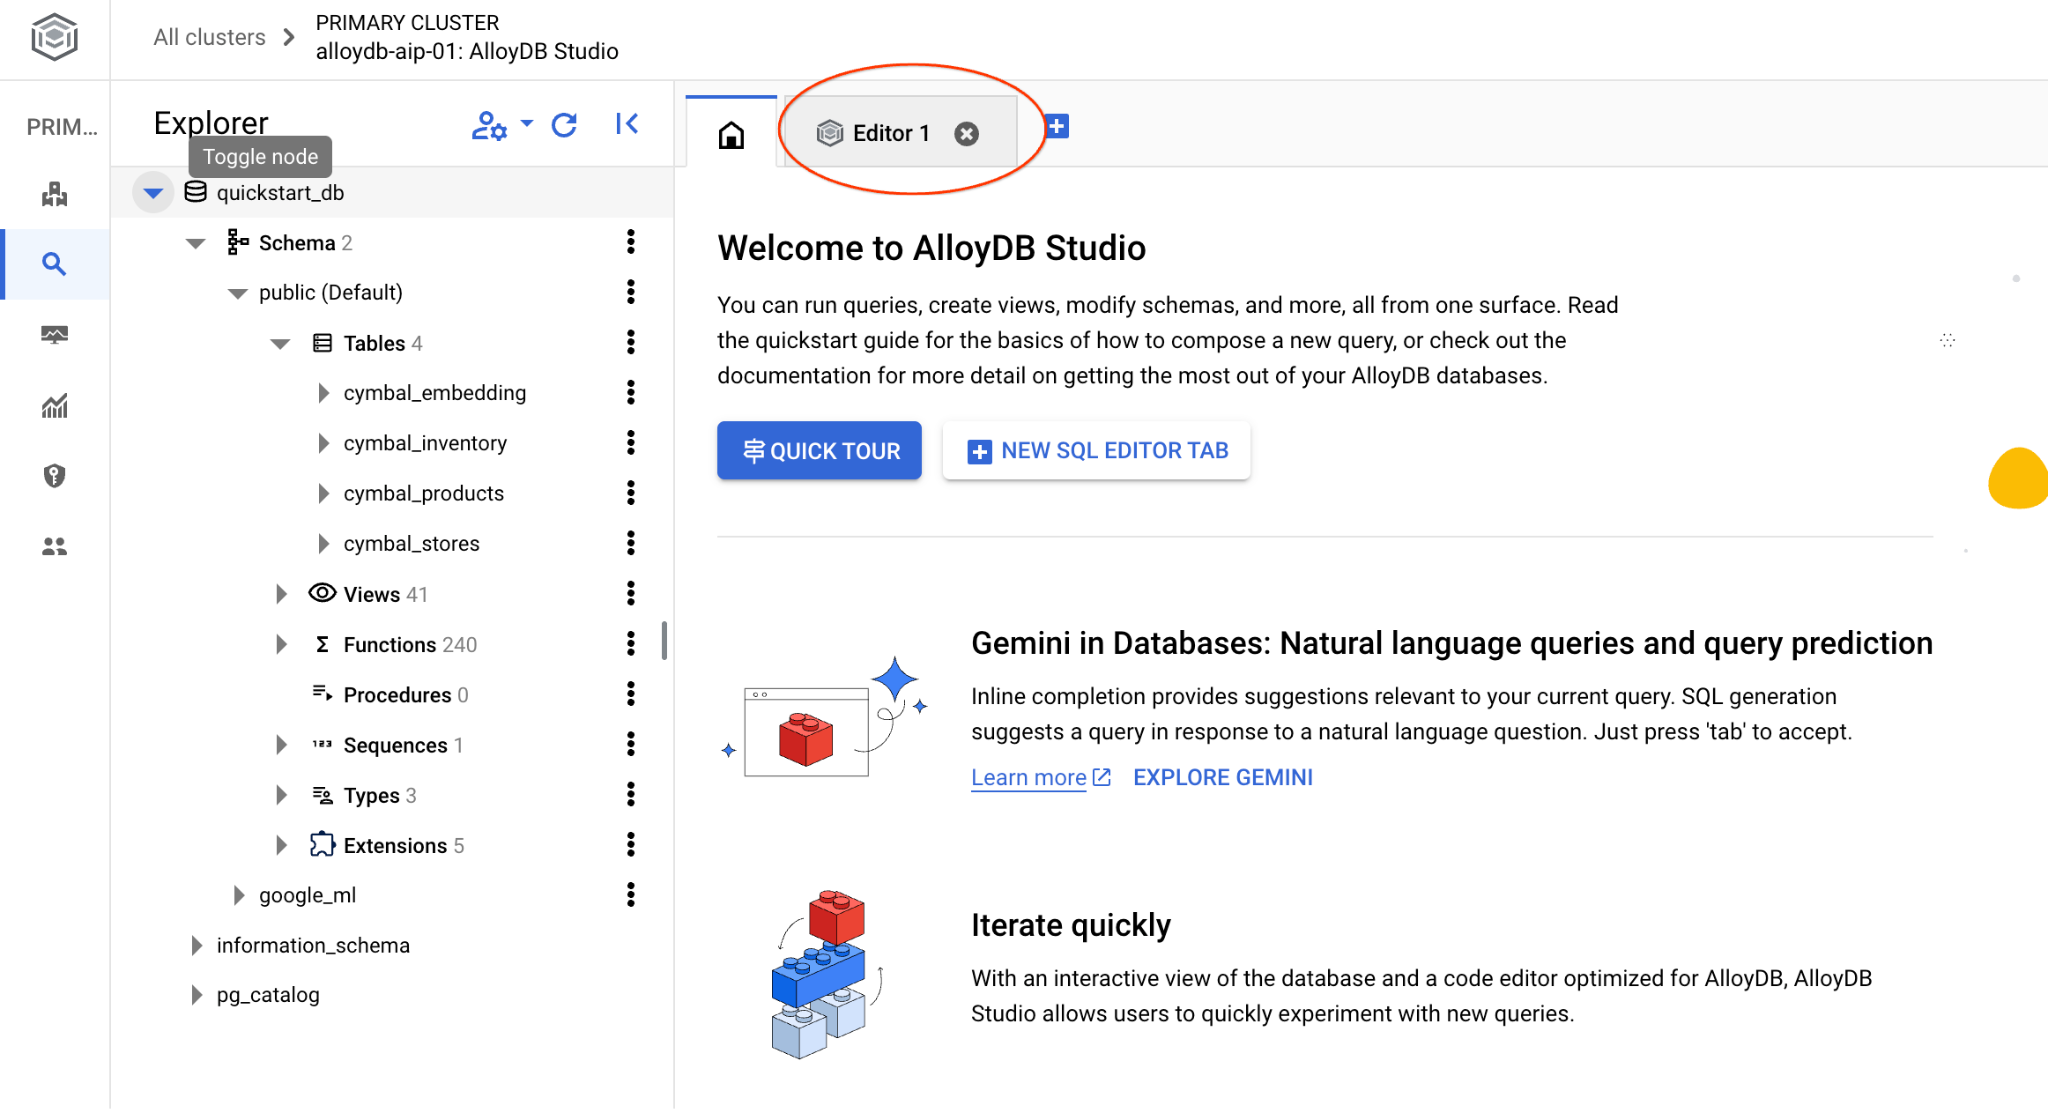
SQL 명령어를 실행할 수 있는 인터페이스가 열립니다.
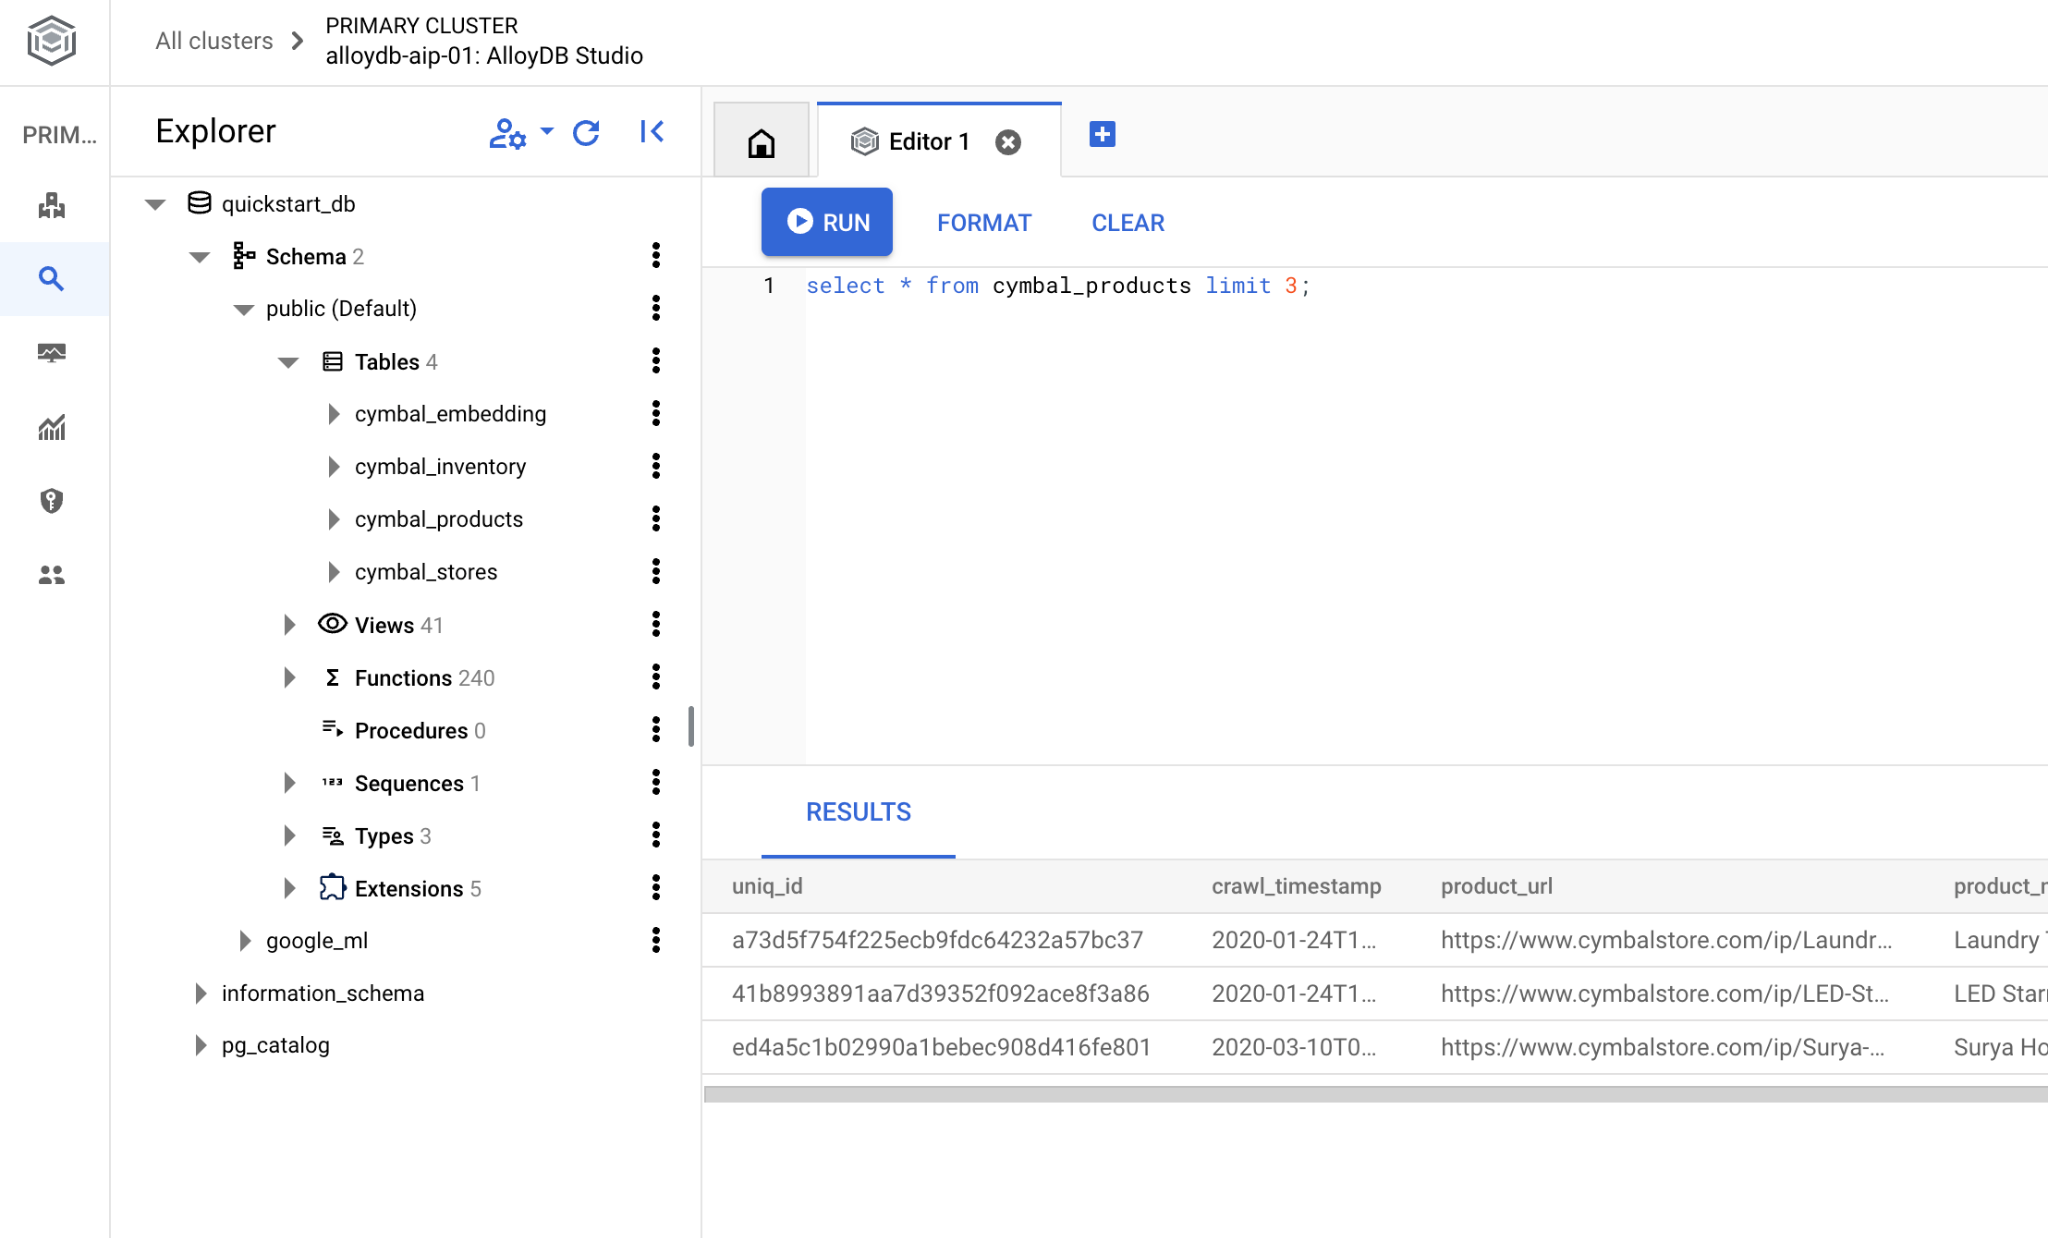
명령줄 psql을 사용하려면 대체 경로를 따라 이전 장에서 설명한 대로 VM SSH 세션에서 데이터베이스에 연결하세요.
psql에서 유사성 검색 실행
데이터베이스 세션이 연결 해제된 경우 psql 또는 AlloyDB Studio를 사용하여 데이터베이스에 다시 연결합니다.
데이터베이스에 연결합니다.
psql "host=$INSTANCE_IP user=postgres dbname=quickstart_db"
클라이언트의 요청과 가장 관련성이 높은 사용 가능한 제품 목록을 가져오는 쿼리를 실행합니다. 벡터 값을 가져오기 위해 Vertex AI에 전달할 요청은 '여기에서 잘 자라는 과일 나무는 무엇인가요?'와 같습니다.
요청에 가장 적합한 상위 10개 항목을 선택하기 위해 실행할 수 있는 쿼리는 다음과 같습니다.
SELECT
        cp.product_name,
        left(cp.product_description,80) as description,
        cp.sale_price,
        cs.zip_code,
        (cp.embedding <=> embedding('text-embedding-005','What kind of fruit trees grow well here?')::vector) as distance
FROM
        cymbal_products cp
JOIN cymbal_inventory ci on
        ci.uniq_id=cp.uniq_id
JOIN cymbal_stores cs on
        cs.store_id=ci.store_id
        AND ci.inventory>0
        AND cs.store_id = 1583
ORDER BY
        distance ASC
LIMIT 10;
예상되는 출력은 다음과 같습니다.
quickstart_db=> SELECT
        cp.product_name,
        left(cp.product_description,80) as description,
        cp.sale_price,
        cs.zip_code,
        (cp.embedding <=> embedding('text-embedding-005','What kind of fruit trees grow well here?')::vector) as distance
FROM
        cymbal_products cp
JOIN cymbal_inventory ci on
        ci.uniq_id=cp.uniq_id
JOIN cymbal_stores cs on
        cs.store_id=ci.store_id
        AND ci.inventory>0
        AND cs.store_id = 1583
ORDER BY
        distance ASC
LIMIT 10;
      product_name       |                                   description                                    | sale_price | zip_code |      distance
-------------------------+----------------------------------------------------------------------------------+------------+----------+---------------------
 Cherry Tree             | This is a beautiful cherry tree that will produce delicious cherries. It is an d |      75.00 |    93230 | 0.43922018972266397
 Meyer Lemon Tree        | Meyer Lemon trees are California's favorite lemon tree! Grow your own lemons by  |         34 |    93230 |  0.4685112926118228
 Toyon                   | This is a beautiful toyon tree that can grow to be over 20 feet tall. It is an e |      10.00 |    93230 |  0.4835677149651668
 California Lilac        | This is a beautiful lilac tree that can grow to be over 10 feet tall. It is an d |       5.00 |    93230 |  0.4947204525907498
 California Peppertree   | This is a beautiful peppertree that can grow to be over 30 feet tall. It is an e |      25.00 |    93230 |  0.5054166905547247
 California Black Walnut | This is a beautiful walnut tree that can grow to be over 80 feet tall. It is a d |     100.00 |    93230 |  0.5084219510932597
 California Sycamore     | This is a beautiful sycamore tree that can grow to be over 100 feet tall. It is  |     300.00 |    93230 |  0.5140519790508755
 Coast Live Oak          | This is a beautiful oak tree that can grow to be over 100 feet tall. It is an ev |     500.00 |    93230 |  0.5143126438081371
 Fremont Cottonwood      | This is a beautiful cottonwood tree that can grow to be over 100 feet tall. It i |     200.00 |    93230 |  0.5174774727252058
 Madrone                 | This is a beautiful madrona tree that can grow to be over 80 feet tall. It is an |      50.00 |    93230 |  0.5227400803389093
9. 대답 개선
쿼리 결과를 사용하여 클라이언트 애플리케이션에 대한 응답을 개선하고 제공된 쿼리 결과를 Vertex AI 생성형 기반 언어 모델에 대한 프롬프트의 일부로 사용하여 의미 있는 출력을 준비할 수 있습니다.
이를 위해 벡터 검색 결과를 포함하는 JSON을 생성한 다음 생성된 JSON을 Vertex AI의 텍스트 LLM 모델 프롬프트에 추가하여 의미 있는 출력을 생성할 계획입니다. 첫 번째 단계에서 JSON을 생성하고, 두 번째 단계에서 Vertex AI Studio에서 테스트하고, 마지막 단계에서 애플리케이션에서 사용할 수 있는 SQL 문에 통합합니다.
JSON 형식으로 출력 생성
JSON 형식으로 출력을 생성하고 Vertex AI에 전달할 행을 하나만 반환하도록 쿼리를 수정합니다.
다음은 쿼리의 예입니다.
WITH trees as (
SELECT
        cp.product_name,
        left(cp.product_description,80) as description,
        cp.sale_price,
        cs.zip_code,
        cp.uniq_id as product_id
FROM
        cymbal_products cp
JOIN cymbal_inventory ci on
        ci.uniq_id=cp.uniq_id
JOIN cymbal_stores cs on
        cs.store_id=ci.store_id
        AND ci.inventory>0
        AND cs.store_id = 1583
ORDER BY
        (cp.embedding <=> embedding('text-embedding-005','What kind of fruit trees grow well here?')::vector) ASC
LIMIT 1)
SELECT json_agg(trees) FROM trees;
출력에서 예상되는 JSON은 다음과 같습니다.
[{"product_name":"Cherry Tree","description":"This is a beautiful cherry tree that will produce delicious cherries. It is an d","sale_price":75.00,"zip_code":93230,"product_id":"d536e9e823296a2eba198e52dd23e712"}]
Vertex AI Studio에서 프롬프트 실행
생성된 JSON을 사용하여 Vertex AI Studio의 생성형 AI 텍스트 모델에 프롬프트의 일부로 제공할 수 있습니다.
클라우드 콘솔에서 Vertex AI Studio를 엽니다.
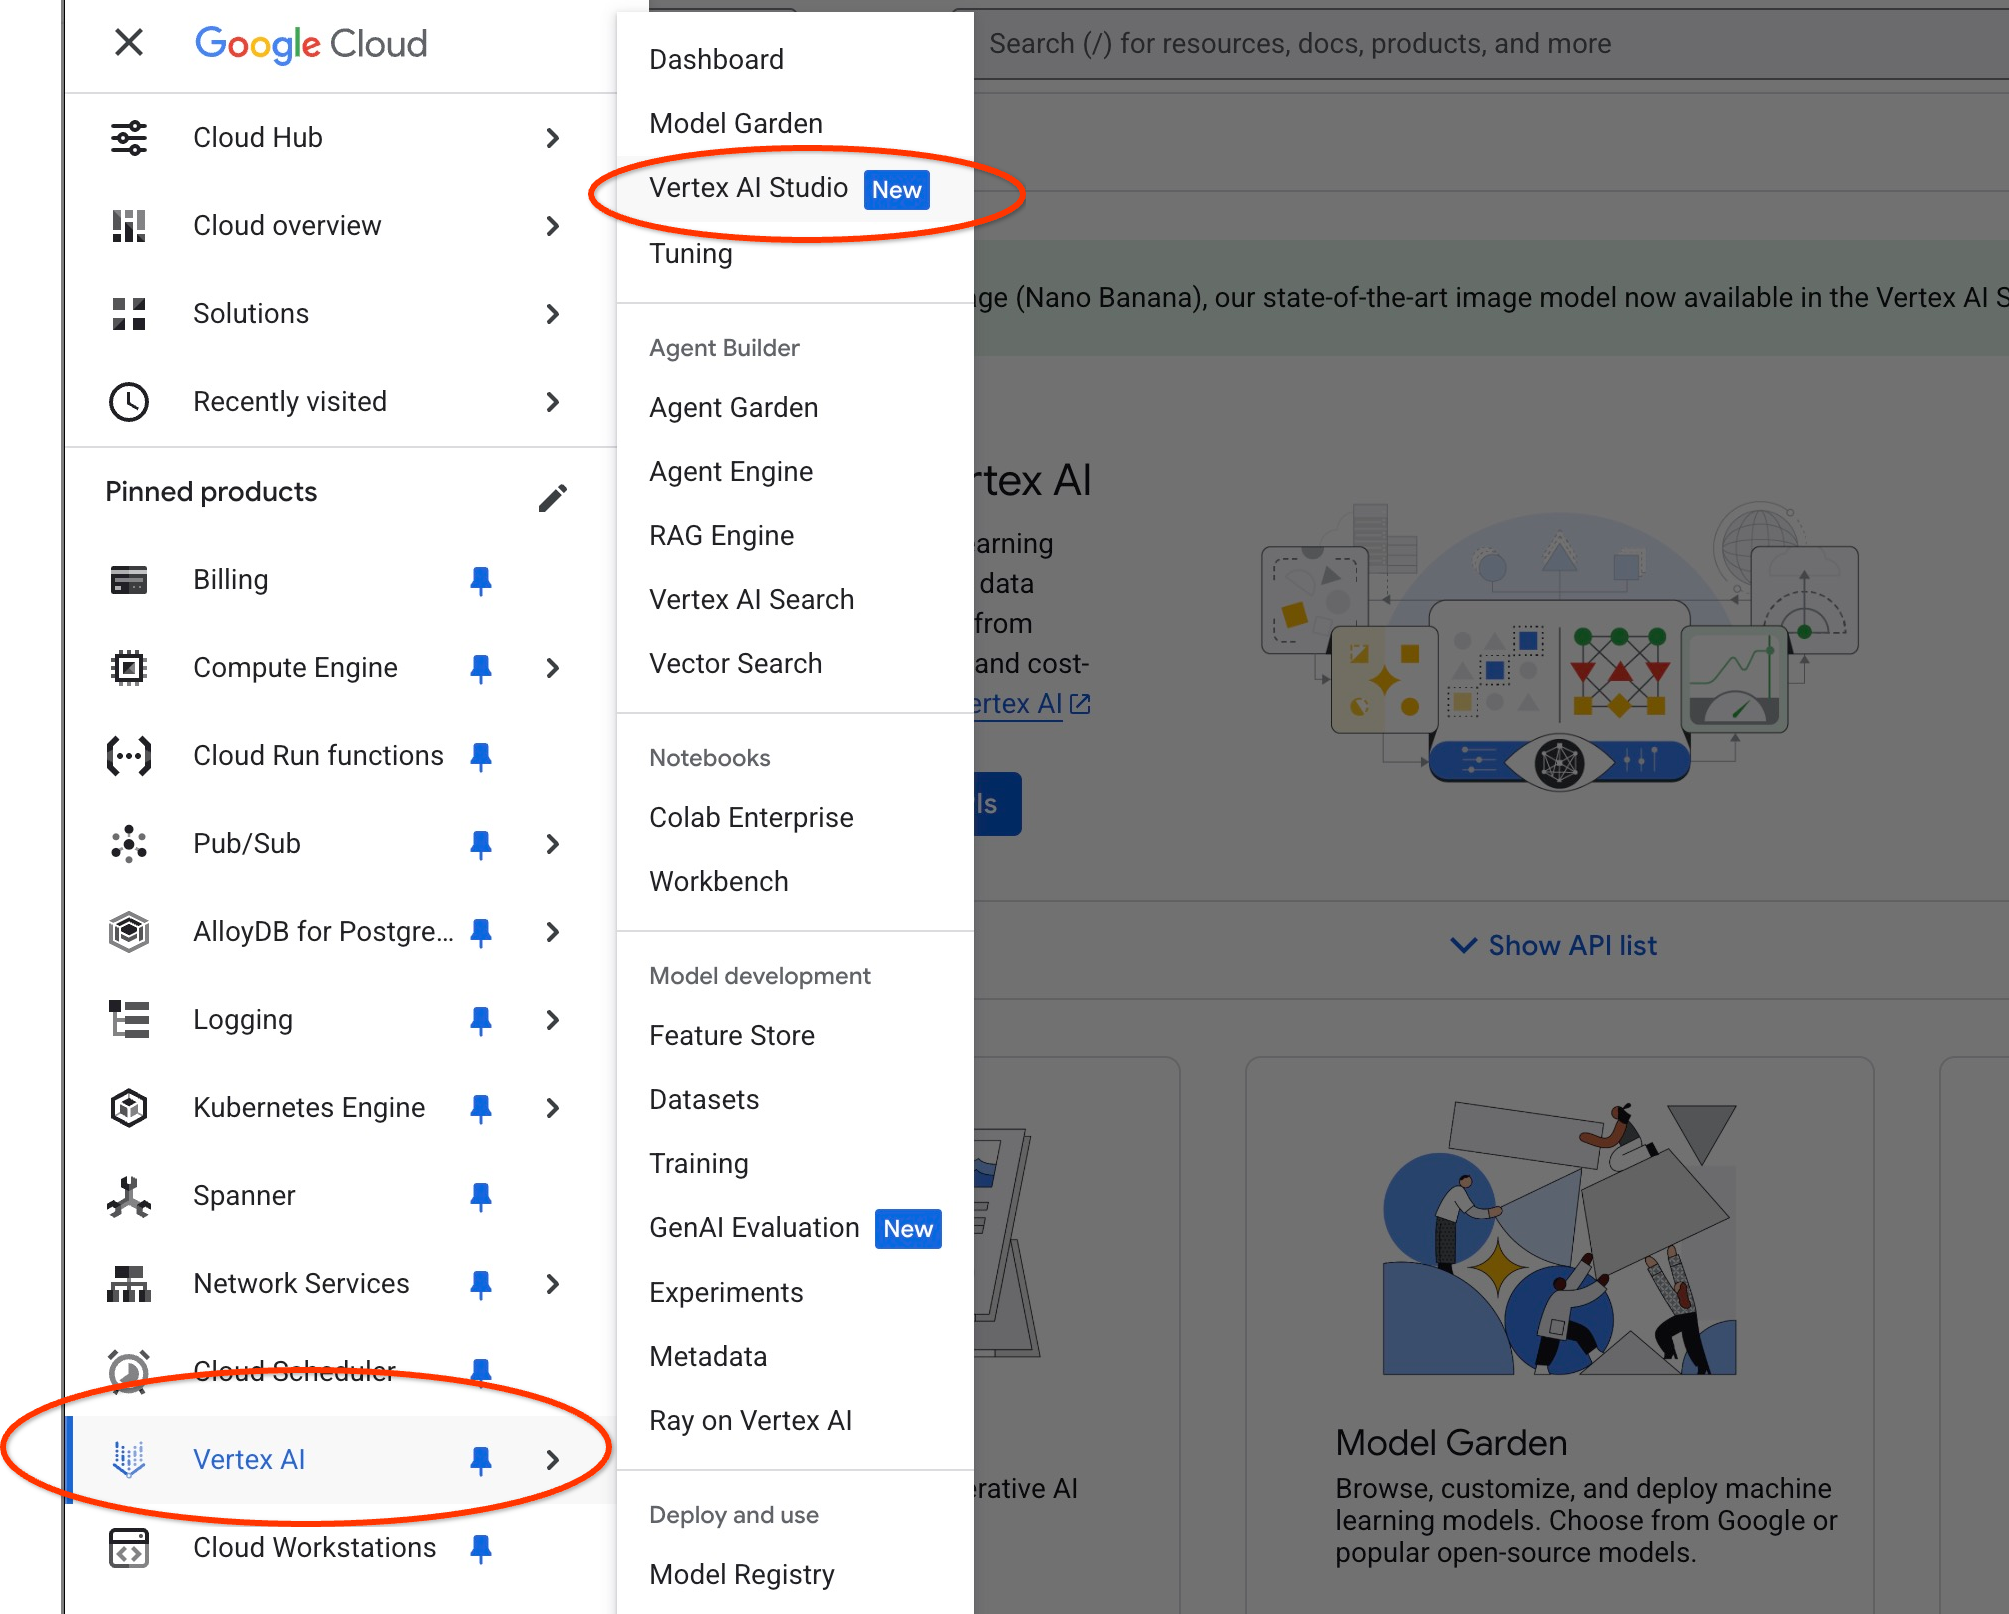
이전에 사용한 적이 없는 경우 사용 약관에 동의하라는 메시지가 표시될 수 있습니다. '동의 및 계속' 버튼을 누릅니다.
인터페이스에 프롬프트를 작성합니다.
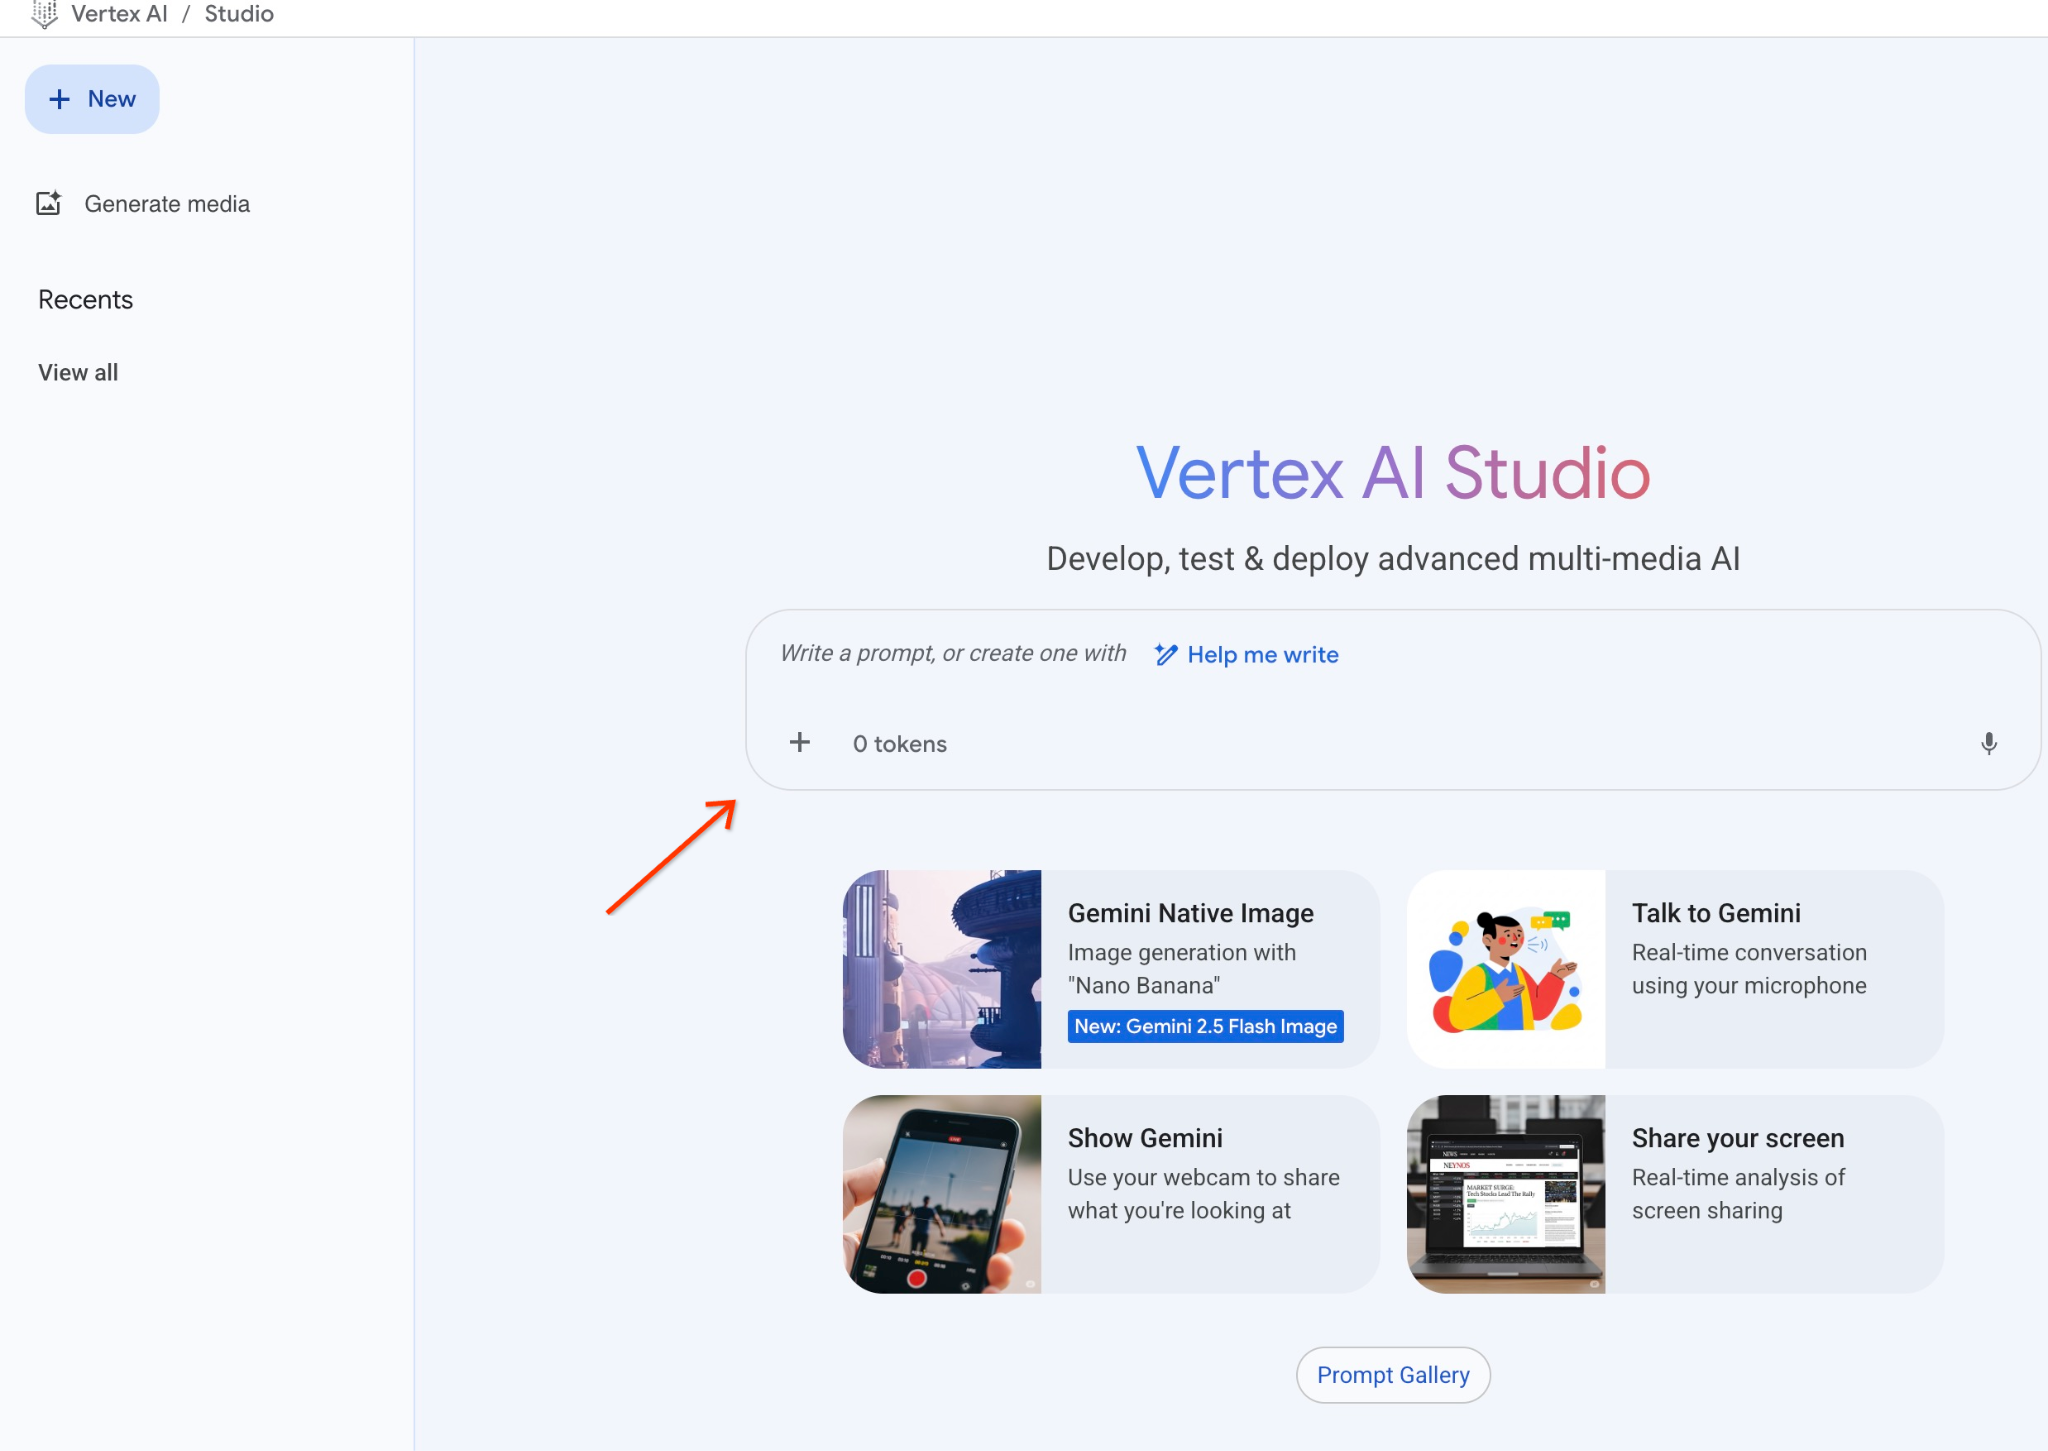
추가 API를 사용 설정하라는 메시지가 표시될 수 있지만 요청을 무시해도 됩니다. 실습을 완료하는 데 추가 API는 필요하지 않습니다.
다음은 나무에 관한 초기 질문의 JSON 출력과 함께 사용할 프롬프트입니다.
고객의 요구사항에 따라 제품을 찾는 데 도움을 주는 친절한 상담사입니다.
고객 요청에 따라 검색과 밀접하게 관련된 제품 목록을 로드했습니다.
JSON 형식의 목록(예: {'product_name':'name','description':'some description','sale_price':10,'zip_code': 10234, 'produt_id': '02056727942aeb714dc9a2313654e1b0'})
제품 목록은 다음과 같습니다.
{"product_name":"Cherry Tree","description":"This is a beautiful cherry tree that will produce delicious cherries. d","sale_price":75.00,"zip_code":93230,"product_id":"d536e9e823296a2eba198e52dd23e712"}
고객이 '여기에서 가장 잘 자라는 나무는 뭐야?'라고 물었습니다.
제품, 가격, 보충 정보에 관한 정보를 제공해야 합니다.
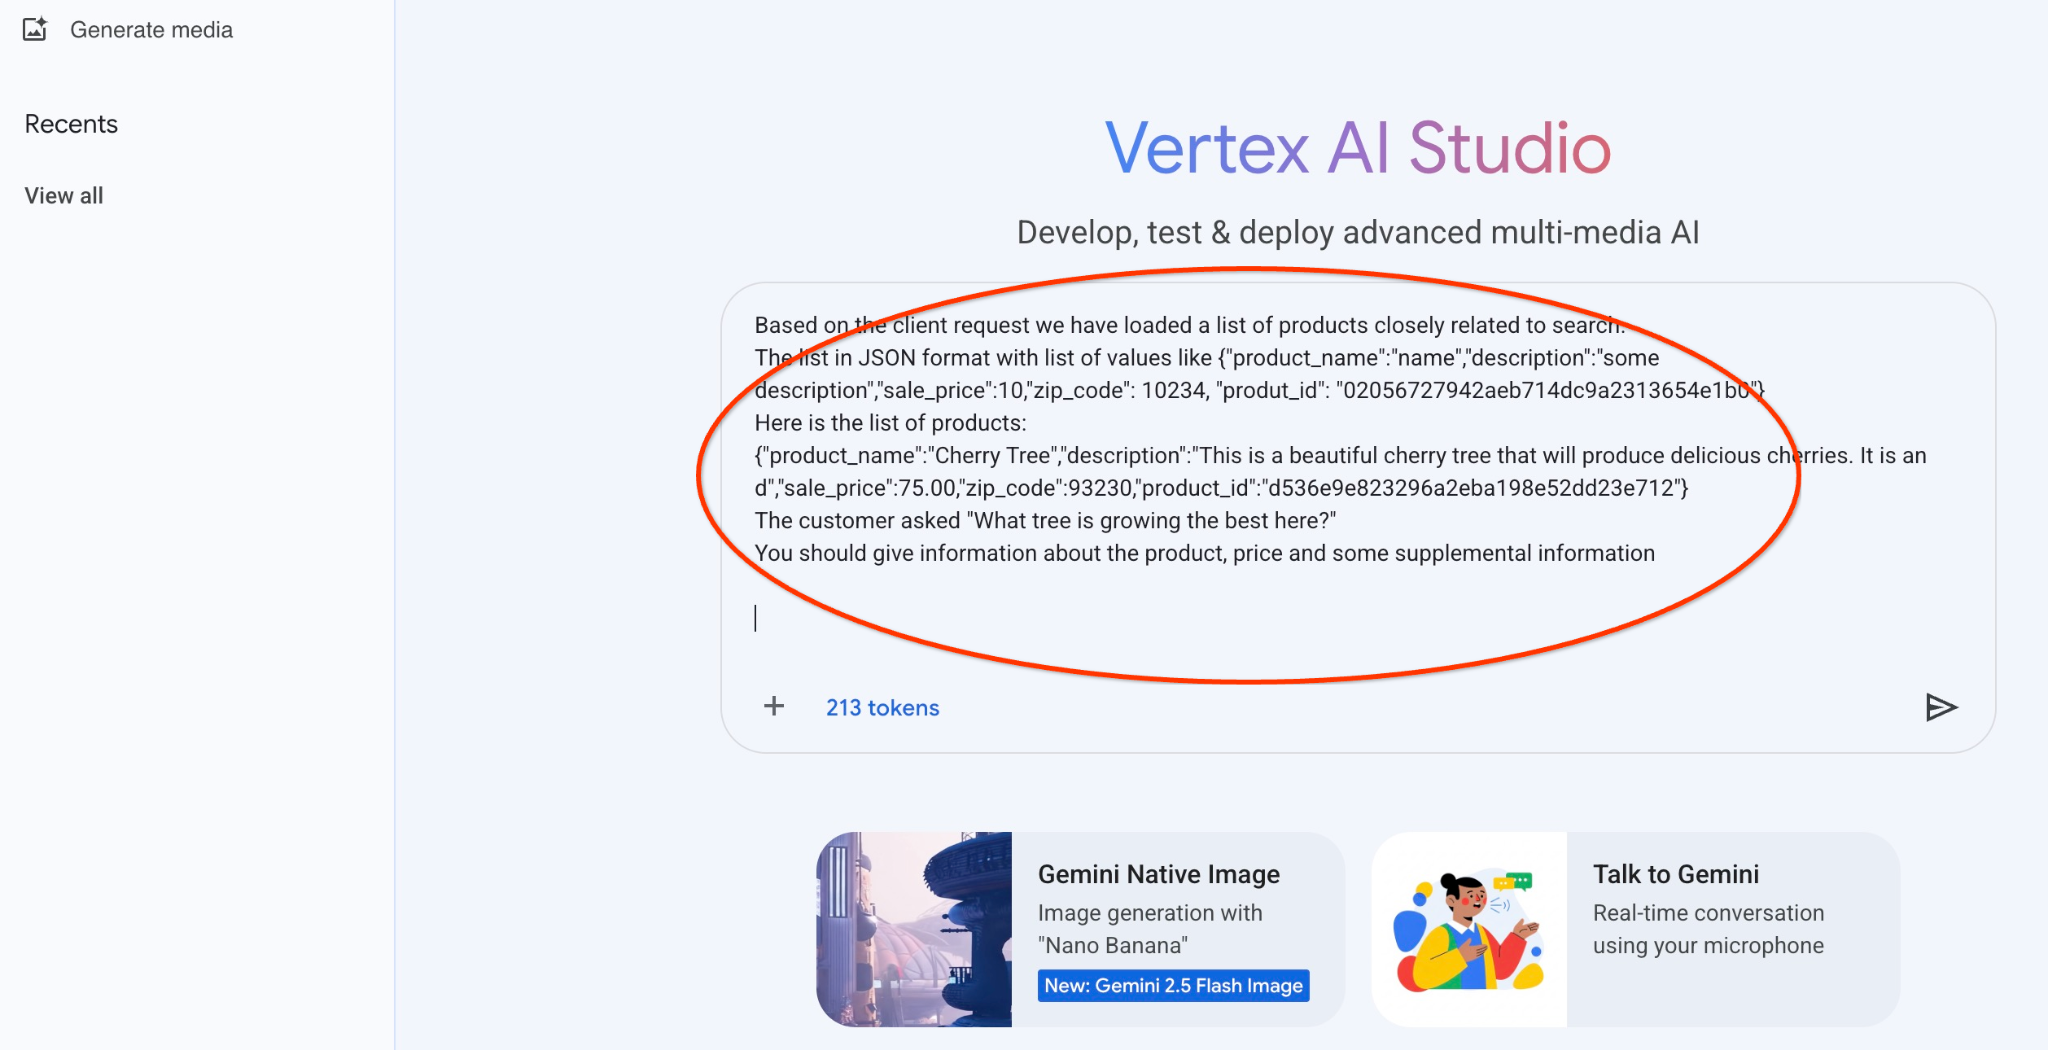
JSON 값을 사용하여 gemini-2.5-flash-light 모델로 프롬프트를 실행한 결과는 다음과 같습니다.
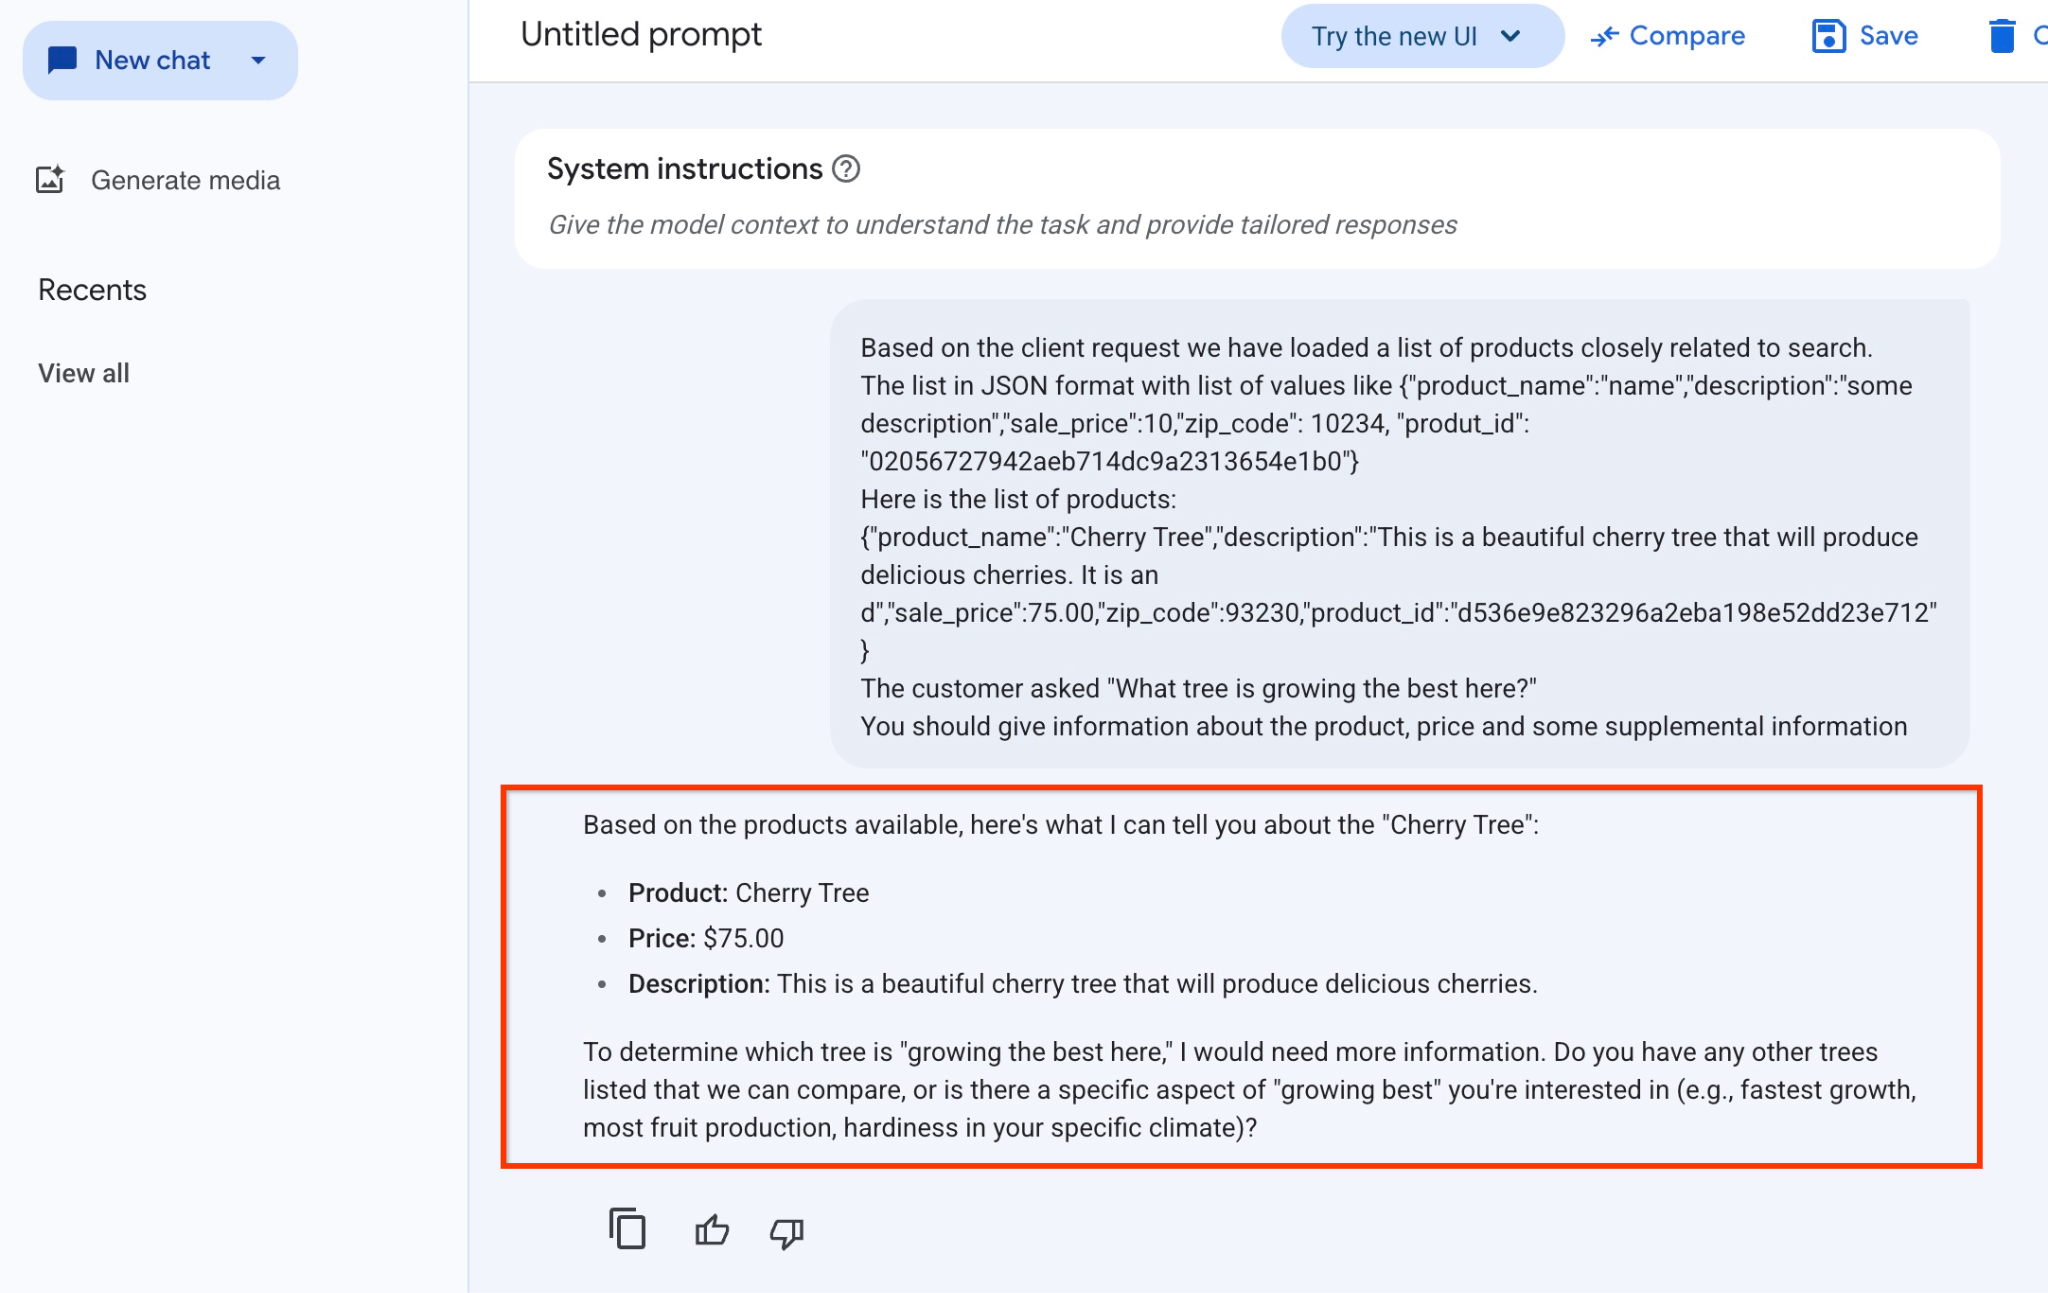
이 예시에서 모델이 제공한 답변은 다음과 같습니다. 시간이 지남에 따라 모델과 매개변수가 변경되므로 답변이 다를 수 있습니다.
"사용 가능한 제품을 바탕으로 '체리 나무'에 대해 알려드릴 수 있는 내용은 다음과 같습니다.
제품: 체리 나무
가격: 75.00달러
설명: 맛있는 체리를 생산하는 아름다운 벚나무입니다.
'여기에서 가장 잘 자라는 나무'를 확인하려면 추가 정보가 필요합니다. 비교할 수 있는 다른 나무가 있나요? 아니면 '가장 잘 자라는' 나무의 특정 측면 (예: 가장 빠른 성장, 가장 많은 열매 생산, 특정 기후에서의 내한성)에 관심이 있으신가요?'
PSQL에서 프롬프트 실행
AlloyDB AI와 Vertex AI의 통합을 사용하면 데이터베이스에서 직접 SQL을 사용하여 생성형 모델로부터 동일한 응답을 얻을 수 있습니다. 하지만 gemini-1.5-flash 모델을 사용하려면 먼저 등록해야 합니다.
google_ml_integration 확장 프로그램을 확인합니다. 버전 1.4.2 이상이어야 합니다.
이전에 표시된 대로 psql에서 quickstart_db 데이터베이스에 연결하고 (또는 AlloyDB Studio 사용) 다음을 실행합니다.
SELECT extversion from pg_extension where extname='google_ml_integration';
google_ml_integration.enable_model_support 데이터베이스 플래그를 확인합니다.
show google_ml_integration.enable_model_support;
psql 세션의 예상 출력은 'on'입니다.
postgres=> show google_ml_integration.enable_model_support;
 google_ml_integration.enable_model_support
--------------------------------------------
 on
(1 row)
'off'로 표시되면 google_ml_integration.enable_model_support 데이터베이스 플래그를 'on'으로 설정해야 합니다. 이를 수행하려면 AlloyDB 웹 콘솔 인터페이스를 사용하거나 다음 gcloud 명령어를 실행하면 됩니다.
PROJECT_ID=$(gcloud config get-value project)
REGION=us-central1
ADBCLUSTER=alloydb-aip-01
gcloud beta alloydb instances update $ADBCLUSTER-pr \
  --database-flags google_ml_integration.enable_faster_embedding_generation=on,google_ml_integration.enable_model_support=on \
  --region=$REGION \
  --cluster=$ADBCLUSTER \
  --project=$PROJECT_ID \
  --update-mode=FORCE_APPLY
명령어를 백그라운드에서 실행하는 데 1~3분 정도 걸립니다. 그런 다음 플래그를 다시 확인할 수 있습니다.
쿼리에는 두 개의 모델이 필요합니다. 첫 번째는 이미 사용한 text-embedding-005 모델이고 두 번째는 일반적인 Google Gemini 모델 중 하나입니다.
텍스트 임베딩 모델부터 시작합니다. 모델을 등록하려면 psql 또는 AlloyDB Studio에서 다음 코드를 실행하세요.
CALL
  google_ml.create_model(
    model_id => 'text-embedding-005',
    model_provider => 'google',
    model_qualified_name => 'text-embedding-005',
    model_type => 'text_embedding',
    model_auth_type => 'alloydb_service_agent_iam',
    model_in_transform_fn => 'google_ml.vertexai_text_embedding_input_transform',
    model_out_transform_fn => 'google_ml.vertexai_text_embedding_output_transform');
등록해야 하는 다음 모델은 사용자 친화적인 출력을 생성하는 데 사용되는 gemini-2.0-flash-001입니다.
CALL
  google_ml.create_model(
    model_id => 'gemini-2.5-flash',
    model_request_url => 'publishers/google/models/gemini-2.5-flash:streamGenerateContent',
    model_provider => 'google',
    model_auth_type => 'alloydb_service_agent_iam');
언제든지 google_ml.model_info_view에서 정보를 선택하여 등록된 모델 목록을 확인할 수 있습니다.
select model_id,model_type from google_ml.model_info_view;
다음은 샘플 출력입니다.
quickstart_db=> select model_id,model_type from google_ml.model_info_view;
        model_id         |   model_type
-------------------------+----------------
 textembedding-gecko     | text_embedding
 textembedding-gecko@001 | text_embedding
 text-embedding-005      | text_embedding
 gemini-2.5-flash        | generic
(4 rows)
이제 생성된 하위 쿼리 JSON을 사용하여 SQL을 통해 생성형 AI 텍스트 모델에 프롬프트의 일부로 제공할 수 있습니다.
데이터베이스에 대한 psql 또는 AlloyDB Studio 세션에서 다음 쿼리를 실행합니다.
WITH trees AS (
SELECT
        cp.product_name,
        cp.product_description AS description,
        cp.sale_price,
        cs.zip_code,
        cp.uniq_id AS product_id
FROM
        cymbal_products cp
JOIN cymbal_inventory ci ON
        ci.uniq_id = cp.uniq_id
JOIN cymbal_stores cs ON
        cs.store_id = ci.store_id
        AND ci.inventory>0
        AND cs.store_id = 1583
ORDER BY
        (cp.embedding <=> embedding('text-embedding-005',
        'What kind of fruit trees grow well here?')::vector) ASC
LIMIT 1),
prompt AS (
SELECT
        'You are a friendly advisor helping to find a product based on the customer''s needs.
Based on the client request we have loaded a list of products closely related to search.
The list in JSON format with list of values like {"product_name":"name","product_description":"some description","sale_price":10}
Here is the list of products:' || json_agg(trees) || 'The customer asked "What kind of fruit trees grow well here?"
You should give information about the product, price and some supplemental information' AS prompt_text
FROM
        trees),
response AS (
SELECT
        json_array_elements(google_ml.predict_row( model_id =>'gemini-2.5-flash',
        request_body => json_build_object('contents',
        json_build_object('role',
        'user',
        'parts',
        json_build_object('text',
        prompt_text)))))->'candidates'->0->'content'->'parts'->0->'text' AS resp
FROM
        prompt)
SELECT
        string_agg(resp::text,
        ' ')
FROM
        response;
예상되는 출력은 다음과 같습니다. 모델 버전과 매개변수에 따라 출력이 다를 수 있습니다.
"Hello there! I can certainly help you with finding a great fruit tree for your area.\n\nBased on what grows well, we have a wonderful **Cherry Tree** that could be a perfect fit!\n\nThis beautiful cherry tree is an excellent choice for producing delicious cherries right in your garden. It's an deciduous tree that typically" " grows to about 15 feet tall. Beyond its fruit, it offers lovely aesthetics with dark green leaves in the summer that transition to a beautiful red in the fall, making it great for shade and privacy too.\n\nCherry trees generally prefer a cool, moist climate and sandy soil, and they are best suited for USDA Zones" " 4-9. Given the zip code you're inquiring about (93230), which is typically in USDA Zone 9, this Cherry Tree should thrive wonderfully!\n\nYou can get this magnificent tree for just **$75.00**.\n\nLet me know if you have any other questions!" "
10. 벡터 색인 만들기
데이터 세트가 매우 작으며 응답 시간은 주로 AI 모델과의 상호작용에 따라 달라집니다. 하지만 벡터가 수백만 개에 달하면 벡터 검색 부분이 응답 시간의 상당 부분을 차지하고 시스템에 높은 부하를 가할 수 있습니다. 이를 통해 벡터 위에 색인을 빌드할 수 있습니다.
ScaNN 색인 만들기
SCANN 색인을 빌드하려면 확장 프로그램을 하나 더 사용 설정해야 합니다. alloydb_scann 확장 프로그램은 Google ScaNN 알고리즘을 사용하여 ANN 유형 벡터 색인으로 작업할 수 있는 인터페이스를 제공합니다.
CREATE EXTENSION IF NOT EXISTS alloydb_scann;
예상 출력:
quickstart_db=> CREATE EXTENSION IF NOT EXISTS alloydb_scann;
CREATE EXTENSION
Time: 27.468 ms
quickstart_db=>
색인은 MANUAL 또는 AUTO 모드로 만들 수 있습니다. MANUAL 모드는 기본적으로 사용 설정되어 있으며 다른 색인과 마찬가지로 색인을 생성하고 유지관리할 수 있습니다. 하지만 AUTO 모드를 사용 설정하면 유지보수가 필요하지 않은 색인을 만들 수 있습니다. 모든 옵션에 대한 자세한 내용은 문서를 참고하세요. 여기에서는 자동 모드를 사용 설정하고 색인을 만드는 방법을 보여드리겠습니다. 이 경우 자동 모드로 색인을 만들기에 충분한 행이 없으므로 수동으로 만듭니다.
다음 예에서는 대부분의 매개변수를 기본값으로 두고 색인의 파티션 수 (num_leaves)만 제공합니다.
CREATE INDEX cymbal_products_embeddings_scann ON cymbal_products
  USING scann (embedding cosine)
  WITH (num_leaves=31, max_num_levels = 2);
색인 매개변수 조정에 대한 자세한 내용은 문서를 참고하세요.
예상 출력:
quickstart_db=> CREATE INDEX cymbal_products_embeddings_scann ON cymbal_products
  USING scann (embedding cosine)
  WITH (num_leaves=31, max_num_levels = 2);
CREATE INDEX
quickstart_db=>
응답 비교
이제 EXPLAIN 모드에서 벡터 검색 쿼리를 실행하고 색인이 사용되었는지 확인할 수 있습니다.
EXPLAIN (analyze)
WITH trees as (
SELECT
        cp.product_name,
        left(cp.product_description,80) as description,
        cp.sale_price,
        cs.zip_code,
        cp.uniq_id as product_id
FROM
        cymbal_products cp
JOIN cymbal_inventory ci on
        ci.uniq_id=cp.uniq_id
JOIN cymbal_stores cs on
        cs.store_id=ci.store_id
        AND ci.inventory>0
        AND cs.store_id = 1583
ORDER BY
        (cp.embedding <=> embedding('text-embedding-005','What kind of fruit trees grow well here?')::vector) ASC
LIMIT 1)
SELECT json_agg(trees) FROM trees;
예상 출력 (명확히 하자면):
...
Aggregate (cost=16.59..16.60 rows=1 width=32) (actual time=2.875..2.877 rows=1 loops=1)
-> Subquery Scan on trees (cost=8.42..16.59 rows=1 width=142) (actual time=2.860..2.862 rows=1 loops=1)
-> Limit (cost=8.42..16.58 rows=1 width=158) (actual time=2.855..2.856 rows=1 loops=1)
-> Nested Loop (cost=8.42..6489.19 rows=794 width=158) (actual time=2.854..2.855 rows=1 loops=1)
-> Nested Loop (cost=8.13..6466.99 rows=794 width=938) (actual time=2.742..2.743 rows=1 loops=1)
-> Index Scan using cymbal_products_embeddings_scann on cymbal_products cp (cost=7.71..111.99 rows=876 width=934) (actual time=2.724..2.724 rows=1 loops=1)
Order By: (embedding <=> '[0.008864171,0.03693164,-0.024245683,-0.00355923,0.0055611245,0.015985578,...<redacted>...5685,-0.03914233,-0.018452475,0.00826032,-0.07372604]'::vector)
-> Index Scan using walmart_inventory_pkey on cymbal_inventory ci (cost=0.42..7.26 rows=1 width=37) (actual time=0.015..0.015 rows=1 loops=1)
Index Cond: ((store_id = 1583) AND (uniq_id = (cp.uniq_id)::text))
...
출력에서 쿼리가 'cymbal_products에서 cymbal_products_embeddings_scann을 사용하는 색인 스캔'을 사용하고 있음을 명확하게 확인할 수 있습니다.
설명 없이 쿼리를 실행하면 다음과 같습니다.
WITH trees as (
SELECT
        cp.product_name,
        left(cp.product_description,80) as description,
        cp.sale_price,
        cs.zip_code,
        cp.uniq_id as product_id
FROM
        cymbal_products cp
JOIN cymbal_inventory ci on
        ci.uniq_id=cp.uniq_id
JOIN cymbal_stores cs on
        cs.store_id=ci.store_id
        AND ci.inventory>0
        AND cs.store_id = 1583
ORDER BY
        (cp.embedding <=> embedding('text-embedding-005','What kind of fruit trees grow well here?')::vector) ASC
LIMIT 1)
SELECT json_agg(trees) FROM trees;
예상 출력:
[{"product_name":"Cherry Tree","description":"This is a beautiful cherry tree that will produce delicious cherries. It is an d","sale_price":75.00,"zip_code":93230,"product_id":"d536e9e823296a2eba198e52dd23e712"}]
색인 없이 검색했을 때 상단에 있던 것과 동일한 체리 나무가 검색 결과로 표시됩니다. 경우에 따라 그렇지 않을 수도 있으며, 대답에서 동일한 트리가 아닌 상위의 다른 트리가 반환될 수 있습니다. 따라서 색인은 성능을 제공하면서도 좋은 결과를 제공할 만큼 정확합니다.
문서 페이지에서 벡터에 사용할 수 있는 다양한 색인과 langchain 통합을 사용한 추가 실험실 및 예시를 확인할 수 있습니다.
11. 환경 정리
실습을 마치면 AlloyDB 인스턴스와 클러스터를 폐기합니다.
AlloyDB 클러스터 및 모든 인스턴스 삭제
AlloyDB 무료 체험판을 사용한 경우 체험 클러스터를 사용하여 다른 실습과 리소스를 테스트할 계획이 있다면 체험 클러스터를 삭제하지 마세요. 동일한 프로젝트에서 다른 체험 클러스터를 만들 수 없습니다.
클러스터는 옵션 강제로 폐기되며, 클러스터에 속한 모든 인스턴스도 삭제됩니다.
연결이 끊어지고 이전 설정이 모두 손실된 경우 Cloud Shell에서 프로젝트와 환경 변수를 정의합니다.
gcloud config set project <your project id>
export REGION=us-central1
export ADBCLUSTER=alloydb-aip-01
export PROJECT_ID=$(gcloud config get-value project)
다음과 같이 클러스터를 삭제합니다.
gcloud alloydb clusters delete $ADBCLUSTER --region=$REGION --force
예상되는 콘솔 출력:
student@cloudshell:~ (test-project-001-402417)$ gcloud alloydb clusters delete $ADBCLUSTER --region=$REGION --force
All of the cluster data will be lost when the cluster is deleted.

Do you want to continue (Y/n)?  Y

Operation ID: operation-1697820178429-6082890a0b570-4a72f7e4-4c5df36f
Deleting cluster...done.
AlloyDB 백업 삭제
클러스터의 모든 AlloyDB 백업을 삭제합니다.
for i in $(gcloud alloydb backups list --filter="CLUSTER_NAME: projects/$PROJECT_ID/locations/$REGION/clusters/$ADBCLUSTER" --format="value(name)" --sort-by=~createTime) ; do gcloud alloydb backups delete $(basename $i) --region $REGION --quiet; done
예상되는 콘솔 출력:
student@cloudshell:~ (test-project-001-402417)$ for i in $(gcloud alloydb backups list --filter="CLUSTER_NAME: projects/$PROJECT_ID/locations/$REGION/clusters/$ADBCLUSTER" --format="value(name)" --sort-by=~createTime) ; do gcloud alloydb backups delete $(basename $i) --region $REGION --quiet; done
Operation ID: operation-1697826266108-60829fb7b5258-7f99dc0b-99f3c35f
Deleting backup...done.
이제 VM을 폐기할 수 있습니다.
GCE VM 삭제
Cloud Shell에서 다음을 실행합니다.
export GCEVM=instance-1
export ZONE=us-central1-a
gcloud compute instances delete $GCEVM \
    --zone=$ZONE \
    --quiet
예상되는 콘솔 출력:
student@cloudshell:~ (test-project-001-402417)$ export GCEVM=instance-1
export ZONE=us-central1-a
gcloud compute instances delete $GCEVM \
    --zone=$ZONE \
    --quiet
Deleted
12. 축하합니다
축하합니다. Codelab을 완료했습니다.
이 실습은 Google Cloud를 사용한 프로덕션 레디 AI 학습 과정의 일부입니다.
- 전체 교육과정을 살펴보고 프로토타입에서 프로덕션으로 전환하세요.
#ProductionReadyAI해시태그를 사용하여 진행 상황을 공유하세요.
학습한 내용
- AlloyDB 클러스터 및 기본 인스턴스를 배포하는 방법
- Google Compute Engine VM에서 AlloyDB에 연결하는 방법
- 데이터베이스를 만들고 AlloyDB AI를 사용 설정하는 방법
- 데이터베이스에 데이터를 로드하는 방법
- AlloyDB Studio 사용 방법
- AlloyDB에서 Vertex AI 임베딩 모델을 사용하는 방법
- Vertex AI Studio 사용 방법
- Vertex AI 생성형 모델을 사용하여 결과를 보강하는 방법
- 벡터 색인을 사용하여 성능을 개선하는 방법
13. 설문조사
결과: