
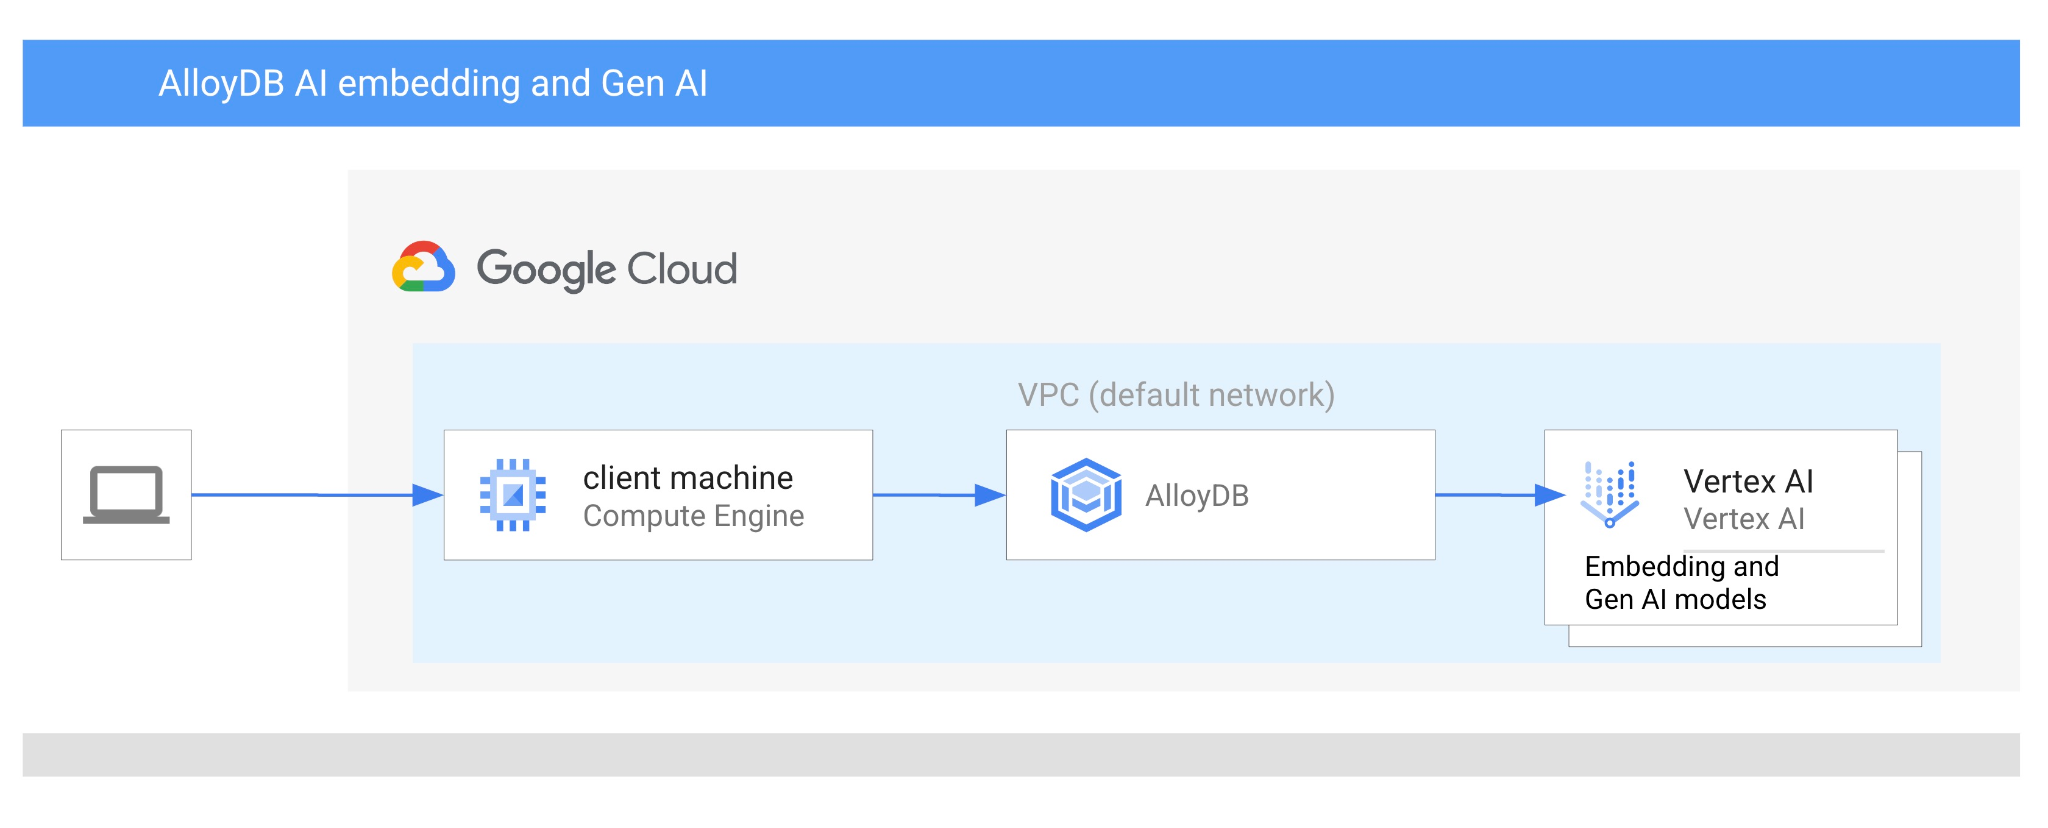
1. บทนำ
ใน Codelab นี้ คุณจะได้เรียนรู้วิธีใช้ AlloyDB AI โดยการรวมการค้นหาแบบเวกเตอร์กับการฝัง Vertex AI ห้องทดลองนี้เป็นส่วนหนึ่งของคอลเล็กชันห้องทดลองที่มุ่งเน้นฟีเจอร์ AlloyDB AI ดูข้อมูลเพิ่มเติมได้ที่หน้า AlloyDB AI ในเอกสารประกอบ
ข้อกำหนดเบื้องต้น
- ความเข้าใจพื้นฐานเกี่ยวกับ Google Cloud Console
- ทักษะพื้นฐานในอินเทอร์เฟซบรรทัดคำสั่งและ Google Shell
สิ่งที่คุณจะได้เรียนรู้
- วิธีติดตั้งใช้งานคลัสเตอร์และอินสแตนซ์หลักของ AlloyDB
- วิธีเชื่อมต่อกับ AlloyDB จาก VM ของ Google Compute Engine
- วิธีสร้างฐานข้อมูลและเปิดใช้ AlloyDB AI
- วิธีโหลดข้อมูลลงในฐานข้อมูล
- วิธีใช้ AlloyDB Studio
- วิธีใช้โมเดลการฝัง Vertex AI ใน AlloyDB
- วิธีใช้ Vertex AI Studio
- วิธีเพิ่มคุณค่าให้กับผลลัพธ์โดยใช้โมเดล Generative AI ของ Vertex AI
- วิธีปรับปรุงประสิทธิภาพโดยใช้ดัชนีเวกเตอร์
สิ่งที่คุณต้องมี
- บัญชี Google Cloud และโปรเจ็กต์ Google Cloud
- เว็บเบราว์เซอร์ เช่น Chrome
2. การตั้งค่าและข้อกำหนด
การตั้งค่าโปรเจ็กต์
- ลงชื่อเข้าใช้ คอนโซล Google Cloud หากยังไม่มีบัญชี Gmail หรือ Google Workspace คุณต้องสร้างบัญชี
ใช้บัญชีส่วนตัวแทนบัญชีงานหรือบัญชีโรงเรียน
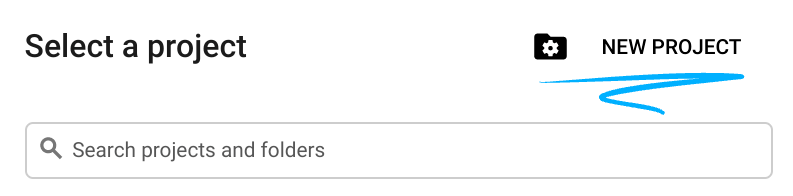
- สร้างโปรเจ็กต์ใหม่หรือนำโปรเจ็กต์ที่มีอยู่มาใช้ซ้ำ หากต้องการสร้างโปรเจ็กต์ใหม่ในคอนโซล Google Cloud ให้คลิกปุ่มเลือกโปรเจ็กต์ในส่วนหัว ซึ่งจะเปิดหน้าต่างป๊อปอัป

ในหน้าต่างเลือกโปรเจ็กต์ ให้กดปุ่มโปรเจ็กต์ใหม่ ซึ่งจะเปิดกล่องโต้ตอบสำหรับโปรเจ็กต์ใหม่
ในกล่องโต้ตอบ ให้ป้อนชื่อโปรเจ็กต์ที่ต้องการและเลือกตำแหน่ง
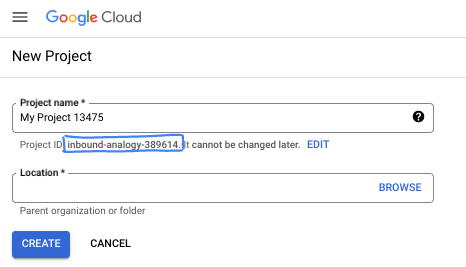
- ชื่อโปรเจ็กต์คือชื่อที่แสดงสำหรับผู้เข้าร่วมโปรเจ็กต์นี้ Google APIs จะไม่ใช้ชื่อโปรเจ็กต์ และคุณเปลี่ยนชื่อได้ทุกเมื่อ
- รหัสโปรเจ็กต์จะไม่ซ้ำกันในโปรเจ็กต์ Google Cloud ทั้งหมดและเปลี่ยนแปลงไม่ได้ (เปลี่ยนไม่ได้หลังจากตั้งค่าแล้ว) คอนโซล Google Cloud จะสร้างรหัสที่ไม่ซ้ำกันโดยอัตโนมัติ แต่คุณสามารถปรับแต่งได้ หากไม่ชอบรหัสที่สร้างขึ้น คุณสามารถสร้างรหัสแบบสุ่มอีกรหัสหนึ่งหรือระบุรหัสของคุณเองเพื่อตรวจสอบความพร้อมใช้งานได้ ใน Codelab ส่วนใหญ่ คุณจะต้องอ้างอิงรหัสโปรเจ็กต์ ซึ่งโดยปกติจะระบุด้วยตัวยึดตำแหน่ง PROJECT_ID
- โปรดทราบว่ายังมีค่าที่ 3 ซึ่งคือหมายเลขโปรเจ็กต์ที่ API บางตัวใช้ ดูข้อมูลเพิ่มเติมเกี่ยวกับค่าทั้ง 3 นี้ได้ในเอกสารประกอบ
เปิดใช้การเรียกเก็บเงิน
คุณมี 2 ตัวเลือกในการเปิดใช้การเรียกเก็บเงิน คุณจะใช้บัญชีสำหรับการเรียกเก็บเงินส่วนตัวหรือแลกสิทธิ์เครดิตได้โดยทำตามขั้นตอนต่อไปนี้
แลกรับเครดิต Google Cloud (ไม่บังคับ)
หากต้องการจัดเวิร์กช็อปนี้ คุณต้องมีบัญชีสำหรับการเรียกเก็บเงินที่มีเครดิตอยู่บ้าง ใช้เครดิตจากแบนเนอร์ที่ด้านบนของ Codelab นี้เพื่อเริ่มต้นใช้งาน หากเชื่อมต่อกับบัญชีสำหรับการเรียกเก็บเงินอยู่แล้ว ให้ข้ามขั้นตอนนี้
ตั้งค่าบัญชีสำหรับการเรียกเก็บเงินส่วนตัว
หากตั้งค่าการเรียกเก็บเงินโดยใช้เครดิต Google Cloud คุณจะข้ามขั้นตอนนี้ได้
หากต้องการตั้งค่าบัญชีสำหรับการเรียกเก็บเงินส่วนตัว ให้ไปที่นี่เพื่อเปิดใช้การเรียกเก็บเงินใน Cloud Console
ข้อควรทราบ
- การทำแล็บนี้ควรมีค่าใช้จ่ายน้อยกว่า $3 USD ในทรัพยากรระบบคลาวด์
- คุณสามารถทำตามขั้นตอนที่ส่วนท้ายของแล็บนี้เพื่อลบทรัพยากรเพื่อหลีกเลี่ยงการเรียกเก็บเงินเพิ่มเติม
- ผู้ใช้ใหม่มีสิทธิ์ใช้ช่วงทดลองใช้ฟรีมูลค่า$300 USD
เริ่มต้น Cloud Shell
แม้ว่าคุณจะใช้งาน Google Cloud จากระยะไกลจากแล็ปท็อปได้ แต่ใน Codelab นี้คุณจะใช้ Google Cloud Shell ซึ่งเป็นสภาพแวดล้อมบรรทัดคำสั่งที่ทำงานในระบบคลาวด์
จาก คอนโซล Google Cloud ให้คลิกไอคอน Cloud Shell ในแถบเครื่องมือด้านขวาบน

หรือจะกด G แล้วตามด้วย S ก็ได้ ลำดับนี้จะเปิดใช้งาน Cloud Shell หากคุณอยู่ในคอนโซล Google Cloud หรือใช้ลิงก์นี้
การจัดสรรและเชื่อมต่อกับสภาพแวดล้อมจะใช้เวลาเพียงไม่กี่นาที เมื่อเสร็จแล้ว คุณควรเห็นข้อความคล้ายกับตัวอย่างต่อไปนี้

เครื่องเสมือนนี้มาพร้อมเครื่องมือพัฒนาซอฟต์แวร์ทั้งหมดที่คุณต้องการ โดยมีไดเรกทอรีหลักแบบถาวรขนาด 5 GB และทำงานบน Google Cloud ซึ่งช่วยเพิ่มประสิทธิภาพเครือข่ายและการตรวจสอบสิทธิ์ได้อย่างมาก คุณสามารถทำงานทั้งหมดใน Codelab นี้ได้ภายในเบราว์เซอร์ คุณไม่จำเป็นต้องติดตั้งอะไร
3. ก่อนเริ่มต้น
เปิดใช้ API
เอาต์พุต:
หากต้องการใช้ AlloyDB, Compute Engine, บริการระบบเครือข่าย และ Vertex AI คุณต้องเปิดใช้ API ที่เกี่ยวข้องในโปรเจ็กต์ที่อยู่ในระบบคลาวด์ของ Google
การเปิดใช้ API
ใน Cloud Shell ในเทอร์มินัล ให้ตรวจสอบว่าได้ตั้งค่ารหัสโปรเจ็กต์แล้ว
gcloud config set project [YOUR-PROJECT-ID]
ตั้งค่าตัวแปรสภาพแวดล้อม PROJECT_ID:
PROJECT_ID=$(gcloud config get-value project)
เปิดใช้ API ที่จำเป็นทั้งหมด
gcloud services enable alloydb.googleapis.com \
                       compute.googleapis.com \
                       cloudresourcemanager.googleapis.com \
                       servicenetworking.googleapis.com \
                       aiplatform.googleapis.com
ผลลัพธ์ที่คาดหวัง
student@cloudshell:~ (test-project-001-402417)$ gcloud config set project test-project-001-402417
Updated property [core/project].
student@cloudshell:~ (test-project-001-402417)$ PROJECT_ID=$(gcloud config get-value project)
Your active configuration is: [cloudshell-14650]
student@cloudshell:~ (test-project-001-402417)$
student@cloudshell:~ (test-project-001-402417)$ gcloud services enable alloydb.googleapis.com \
                       compute.googleapis.com \
                       cloudresourcemanager.googleapis.com \
                       servicenetworking.googleapis.com \
                       aiplatform.googleapis.com
Operation "operations/acat.p2-4470404856-1f44ebd8-894e-4356-bea7-b84165a57442" finished successfully.
ขอแนะนำ API
- AlloyDB API (
alloydb.googleapis.com) ช่วยให้คุณสร้าง จัดการ และปรับขนาดคลัสเตอร์ AlloyDB สำหรับ PostgreSQL ได้ โดยให้บริการฐานข้อมูลที่เข้ากันได้กับ PostgreSQL ซึ่งมีการจัดการครบวงจร ออกแบบมาสำหรับภาระงานด้านการทำธุรกรรมและการวิเคราะห์ขององค์กรที่ต้องการประสิทธิภาพสูง - Compute Engine API (
compute.googleapis.com) ช่วยให้คุณสร้างและจัดการเครื่องเสมือน (VM), Persistent Disk และการตั้งค่าเครือข่ายได้ โดยมีพื้นฐานด้านโครงสร้างพื้นฐานในฐานะบริการ (IaaS) หลักที่จำเป็นต่อการเรียกใช้ภาระงานและโฮสต์โครงสร้างพื้นฐานเบื้องหลังสำหรับบริการที่มีการจัดการจำนวนมาก - Cloud Resource Manager API (
cloudresourcemanager.googleapis.com) ช่วยให้คุณจัดการข้อมูลเมตาและการกำหนดค่าของโปรเจ็กต์ที่อยู่ในระบบคลาวด์ Google แบบเป็นโปรแกรมได้ ซึ่งช่วยให้คุณจัดระเบียบทรัพยากร จัดการนโยบาย Identity and Access Management (IAM) และตรวจสอบสิทธิ์ในลำดับชั้นของโปรเจ็กต์ได้ - Service Networking API (
servicenetworking.googleapis.com) ช่วยให้คุณตั้งค่าการเชื่อมต่อส่วนตัวระหว่างเครือข่าย Virtual Private Cloud (VPC) กับบริการที่มีการจัดการของ Google โดยอัตโนมัติได้ โดยเฉพาะอย่างยิ่งจำเป็นต้องสร้างการเข้าถึง IP ส่วนตัวสำหรับบริการต่างๆ เช่น AlloyDB เพื่อให้สื่อสารกับทรัพยากรอื่นๆ ได้อย่างปลอดภัย - Vertex AI API (
aiplatform.googleapis.com) ช่วยให้แอปพลิเคชันของคุณสร้าง ทำให้ใช้งานได้ และปรับขนาดโมเดลแมชชีนเลิร์นนิงได้ โดยมีอินเทอร์เฟซแบบรวมสำหรับบริการ AI ทั้งหมดของ Google Cloud รวมถึงสิทธิ์เข้าถึงโมเดล Generative AI (เช่น Gemini) และการฝึกโมเดลที่กำหนดเอง
คุณจะกำหนดค่าภูมิภาคเริ่มต้นเพื่อใช้โมเดลการฝัง Vertex AI หรือไม่ก็ได้ อ่านเพิ่มเติมเกี่ยวกับสถานที่ที่ Vertex AI พร้อมให้บริการ ในตัวอย่างนี้ เราใช้ภูมิภาค us-central1
gcloud config set compute/region us-central1
4. ติดตั้งใช้งาน AlloyDB
ก่อนสร้างคลัสเตอร์ AlloyDB เราต้องมีช่วง IP ส่วนตัวที่พร้อมใช้งานใน VPC เพื่อให้อินสแตนซ์ AlloyDB ในอนาคตใช้ หากเราไม่มี เราจะต้องสร้างขึ้น กำหนดให้ใช้โดยบริการภายในของ Google หลังจากนั้นเราจะสร้างคลัสเตอร์และอินสแตนซ์ได้
สร้างช่วง IP ส่วนตัว
เราต้องกำหนดค่าการกำหนดค่าการเข้าถึงบริการส่วนตัวใน VPC สำหรับ AlloyDB สมมติว่าเรามีเครือข่าย VPC "เริ่มต้น" ในโปรเจ็กต์และจะใช้สำหรับการดำเนินการทั้งหมด
สร้างช่วง IP ส่วนตัว
gcloud compute addresses create psa-range \
    --global \
    --purpose=VPC_PEERING \
    --prefix-length=24 \
    --description="VPC private service access" \
    --network=default
สร้างการเชื่อมต่อส่วนตัวโดยใช้ช่วง IP ที่จัดสรร
gcloud services vpc-peerings connect \
    --service=servicenetworking.googleapis.com \
    --ranges=psa-range \
    --network=default
เอาต์พุตของคอนโซลที่คาดไว้
student@cloudshell:~ (test-project-402417)$ gcloud compute addresses create psa-range \
    --global \
    --purpose=VPC_PEERING \
    --prefix-length=24 \
    --description="VPC private service access" \
    --network=default
Created [https://www.googleapis.com/compute/v1/projects/test-project-402417/global/addresses/psa-range].

student@cloudshell:~ (test-project-402417)$ gcloud services vpc-peerings connect \
    --service=servicenetworking.googleapis.com \
    --ranges=psa-range \
    --network=default
Operation "operations/pssn.p24-4470404856-595e209f-19b7-4669-8a71-cbd45de8ba66" finished successfully.

student@cloudshell:~ (test-project-402417)$
สร้างคลัสเตอร์ AlloyDB
ในส่วนนี้ เราจะสร้างคลัสเตอร์ AlloyDB ในภูมิภาค us-central1
กำหนดรหัสผ่านสำหรับผู้ใช้ postgres คุณกำหนดรหัสผ่านเองหรือใช้ฟังก์ชันแบบสุ่มเพื่อสร้างรหัสผ่านก็ได้
export PGPASSWORD=`openssl rand -hex 12`
เอาต์พุตของคอนโซลที่คาดไว้
student@cloudshell:~ (test-project-402417)$ export PGPASSWORD=`openssl rand -hex 12`
จดรหัสผ่าน PostgreSQL ไว้ใช้ในอนาคต
echo $PGPASSWORD
คุณจะต้องใช้รหัสผ่านดังกล่าวในอนาคตเพื่อเชื่อมต่อกับอินสแตนซ์ในฐานะผู้ใช้ postgres ฉันขอแนะนำให้จดไว้หรือคัดลอกไปวางไว้ที่ใดที่หนึ่งเพื่อใช้ในภายหลัง
เอาต์พุตของคอนโซลที่คาดไว้
student@cloudshell:~ (test-project-402417)$ echo $PGPASSWORD
bbefbfde7601985b0dee5723
สร้างคลัสเตอร์ช่วงทดลองใช้ฟรี
หากยังไม่เคยใช้ AlloyDB มาก่อน คุณสามารถสร้างคลัสเตอร์ช่วงทดลองใช้ฟรีได้โดยทำดังนี้
กำหนดชื่อภูมิภาคและคลัสเตอร์ AlloyDB เราจะใช้ภูมิภาค us-central1 และ alloydb-aip-01 เป็นชื่อคลัสเตอร์
export REGION=us-central1
export ADBCLUSTER=alloydb-aip-01
เรียกใช้คำสั่งเพื่อสร้างคลัสเตอร์
gcloud alloydb clusters create $ADBCLUSTER \
    --password=$PGPASSWORD \
    --network=default \
    --region=$REGION \
    --subscription-type=TRIAL
เอาต์พุตของคอนโซลที่คาดไว้
export REGION=us-central1
export ADBCLUSTER=alloydb-aip-01
gcloud alloydb clusters create $ADBCLUSTER \
    --password=$PGPASSWORD \
    --network=default \
    --region=$REGION \
    --subscription-type=TRIAL
Operation ID: operation-1697655441138-6080235852277-9e7f04f5-2012fce4
Creating cluster...done.
สร้างอินสแตนซ์หลักของ AlloyDB สำหรับคลัสเตอร์ในเซสชัน Cloud Shell เดียวกัน หากการเชื่อมต่อถูกตัด คุณจะต้องกำหนดตัวแปรสภาพแวดล้อมของภูมิภาคและชื่อคลัสเตอร์อีกครั้ง
gcloud alloydb instances create $ADBCLUSTER-pr \
    --instance-type=PRIMARY \
    --cpu-count=8 \
    --region=$REGION \
    --cluster=$ADBCLUSTER
เอาต์พุตของคอนโซลที่คาดไว้
student@cloudshell:~ (test-project-402417)$ gcloud alloydb instances create $ADBCLUSTER-pr \
    --instance-type=PRIMARY \
    --cpu-count=8 \
    --region=$REGION \
    --availability-type ZONAL \
    --cluster=$ADBCLUSTER
Operation ID: operation-1697659203545-6080315c6e8ee-391805db-25852721
Creating instance...done.
สร้างคลัสเตอร์ AlloyDB Standard
หากไม่ใช่คลัสเตอร์ AlloyDB แรกในโปรเจ็กต์ ให้สร้างคลัสเตอร์มาตรฐานต่อไป
กำหนดชื่อภูมิภาคและคลัสเตอร์ AlloyDB เราจะใช้ภูมิภาค us-central1 และ alloydb-aip-01 เป็นชื่อคลัสเตอร์
export REGION=us-central1
export ADBCLUSTER=alloydb-aip-01
เรียกใช้คำสั่งเพื่อสร้างคลัสเตอร์
gcloud alloydb clusters create $ADBCLUSTER \
    --password=$PGPASSWORD \
    --network=default \
    --region=$REGION
เอาต์พุตของคอนโซลที่คาดไว้
export REGION=us-central1
export ADBCLUSTER=alloydb-aip-01
gcloud alloydb clusters create $ADBCLUSTER \
    --password=$PGPASSWORD \
    --network=default \
    --region=$REGION
Operation ID: operation-1697655441138-6080235852277-9e7f04f5-2012fce4
Creating cluster...done.
สร้างอินสแตนซ์หลักของ AlloyDB สำหรับคลัสเตอร์ในเซสชัน Cloud Shell เดียวกัน หากการเชื่อมต่อถูกตัด คุณจะต้องกำหนดตัวแปรสภาพแวดล้อมของภูมิภาคและชื่อคลัสเตอร์อีกครั้ง
gcloud alloydb instances create $ADBCLUSTER-pr \
    --instance-type=PRIMARY \
    --cpu-count=2 \
    --region=$REGION \
    --cluster=$ADBCLUSTER
เอาต์พุตของคอนโซลที่คาดไว้
student@cloudshell:~ (test-project-402417)$ gcloud alloydb instances create $ADBCLUSTER-pr \
    --instance-type=PRIMARY \
    --cpu-count=2 \
    --region=$REGION \
    --availability-type ZONAL \
    --cluster=$ADBCLUSTER
Operation ID: operation-1697659203545-6080315c6e8ee-391805db-25852721
Creating instance...done.
5. เชื่อมต่อกับ AlloyDB
AlloyDB ได้รับการติดตั้งใช้งานโดยใช้การเชื่อมต่อแบบส่วนตัวเท่านั้น ดังนั้นเราจึงต้องมี VM ที่ติดตั้งไคลเอ็นต์ PostgreSQL เพื่อทำงานกับฐานข้อมูล
ติดตั้งใช้งาน GCE VM
สร้าง VM ของ GCE ในภูมิภาคและ VPC เดียวกันกับคลัสเตอร์ AlloyDB
ใน Cloud Shell ให้เรียกใช้คำสั่งต่อไปนี้
export ZONE=us-central1-a
gcloud compute instances create instance-1 \
    --zone=$ZONE \
    --create-disk=auto-delete=yes,boot=yes,image=projects/debian-cloud/global/images/$(gcloud compute images list --filter="family=debian-12 AND family!=debian-12-arm64" --format="value(name)") \
    --scopes=https://www.googleapis.com/auth/cloud-platform
เอาต์พุตของคอนโซลที่คาดไว้
student@cloudshell:~ (test-project-402417)$ export ZONE=us-central1-a
student@cloudshell:~ (test-project-402417)$ export ZONE=us-central1-a
gcloud compute instances create instance-1 \
    --zone=$ZONE \
    --create-disk=auto-delete=yes,boot=yes,image=projects/debian-cloud/global/images/$(gcloud compute images list --filter="family=debian-12 AND family!=debian-12-arm64" --format="value(name)") \
    --scopes=https://www.googleapis.com/auth/cloud-platform

Created [https://www.googleapis.com/compute/v1/projects/test-project-402417/zones/us-central1-a/instances/instance-1].
NAME: instance-1
ZONE: us-central1-a
MACHINE_TYPE: n1-standard-1
PREEMPTIBLE:
INTERNAL_IP: 10.128.0.2
EXTERNAL_IP: 34.71.192.233
STATUS: RUNNING
ติดตั้งไคลเอ็นต์ Postgres
ติดตั้งซอฟต์แวร์ไคลเอ็นต์ PostgreSQL ใน VM ที่ติดตั้งใช้งาน
เชื่อมต่อกับ VM โดยใช้คำสั่งต่อไปนี้
gcloud compute ssh instance-1 --zone=us-central1-a
เอาต์พุตของคอนโซลที่คาดไว้
student@cloudshell:~ (test-project-402417)$ gcloud compute ssh instance-1 --zone=us-central1-a
Updating project ssh metadata...working..Updated [https://www.googleapis.com/compute/v1/projects/test-project-402417].
Updating project ssh metadata...done.
Waiting for SSH key to propagate.
Warning: Permanently added 'compute.5110295539541121102' (ECDSA) to the list of known hosts.
Linux instance-1.us-central1-a.c.gleb-test-short-001-418811.internal 6.1.0-18-cloud-amd64 #1 SMP PREEMPT_DYNAMIC Debian 6.1.76-1 (2024-02-01) x86_64

The programs included with the Debian GNU/Linux system are free software;
the exact distribution terms for each program are described in the
individual files in /usr/share/doc/*/copyright.

Debian GNU/Linux comes with ABSOLUTELY NO WARRANTY, to the extent
permitted by applicable law.
student@instance-1:~$
ติดตั้งคำสั่งเรียกใช้ซอฟต์แวร์ภายใน VM โดยทำดังนี้
sudo apt-get update
sudo apt-get install --yes postgresql-client
เอาต์พุตของคอนโซลที่คาดไว้
student@instance-1:~$ sudo apt-get update
sudo apt-get install --yes postgresql-client
Get:1 https://packages.cloud.google.com/apt google-compute-engine-bullseye-stable InRelease [5146 B]
Get:2 https://packages.cloud.google.com/apt cloud-sdk-bullseye InRelease [6406 B]
Hit:3 https://deb.debian.org/debian bullseye InRelease
Get:4 https://deb.debian.org/debian-security bullseye-security InRelease [48.4 kB]
Get:5 https://packages.cloud.google.com/apt google-compute-engine-bullseye-stable/main amd64 Packages [1930 B]
Get:6 https://deb.debian.org/debian bullseye-updates InRelease [44.1 kB]
Get:7 https://deb.debian.org/debian bullseye-backports InRelease [49.0 kB]
...redacted...
update-alternatives: using /usr/share/postgresql/13/man/man1/psql.1.gz to provide /usr/share/man/man1/psql.1.gz (psql.1.gz) in auto mode
Setting up postgresql-client (13+225) ...
Processing triggers for man-db (2.9.4-2) ...
Processing triggers for libc-bin (2.31-13+deb11u7) ...
เชื่อมต่อกับอินสแตนซ์
เชื่อมต่อกับอินสแตนซ์หลักจาก VM โดยใช้ psql
ในแท็บ Cloud Shell เดียวกันกับเซสชัน SSH ที่เปิดไปยัง VM ของอินสแตนซ์-1
ใช้ค่ารหัสผ่าน AlloyDB (PGPASSWORD) ที่จดไว้และรหัสคลัสเตอร์ AlloyDB เพื่อเชื่อมต่อกับ AlloyDB จาก GCE VM โดยทำดังนี้
export PGPASSWORD=<Noted password>
export PROJECT_ID=$(gcloud config get-value project)
export REGION=us-central1
export ADBCLUSTER=alloydb-aip-01
export INSTANCE_IP=$(gcloud alloydb instances describe $ADBCLUSTER-pr --cluster=$ADBCLUSTER --region=$REGION --format="value(ipAddress)")
psql "host=$INSTANCE_IP user=postgres sslmode=require"
เอาต์พุตของคอนโซลที่คาดไว้
student@instance-1:~$ export PGPASSWORD=CQhOi5OygD4ps6ty
student@instance-1:~$ ADBCLUSTER=alloydb-aip-01
student@instance-1:~$ REGION=us-central1
student@instance-1:~$ INSTANCE_IP=$(gcloud alloydb instances describe $ADBCLUSTER-pr --cluster=$ADBCLUSTER --region=$REGION --format="value(ipAddress)")
gleb@instance-1:~$ psql "host=$INSTANCE_IP user=postgres sslmode=require"
psql (15.6 (Debian 15.6-0+deb12u1), server 15.5)
SSL connection (protocol: TLSv1.3, cipher: TLS_AES_256_GCM_SHA384, compression: off)
Type "help" for help.

postgres=>
ปิดเซสชัน psql
exit
6. เตรียมฐานข้อมูล
เราต้องสร้างฐานข้อมูล เปิดใช้การผสานรวม Vertex AI สร้างออบเจ็กต์ฐานข้อมูล และนำเข้าข้อมูล
ให้สิทธิ์ที่จำเป็นแก่ AlloyDB
เพิ่มสิทธิ์ Vertex AI ให้กับตัวแทนบริการของ AlloyDB
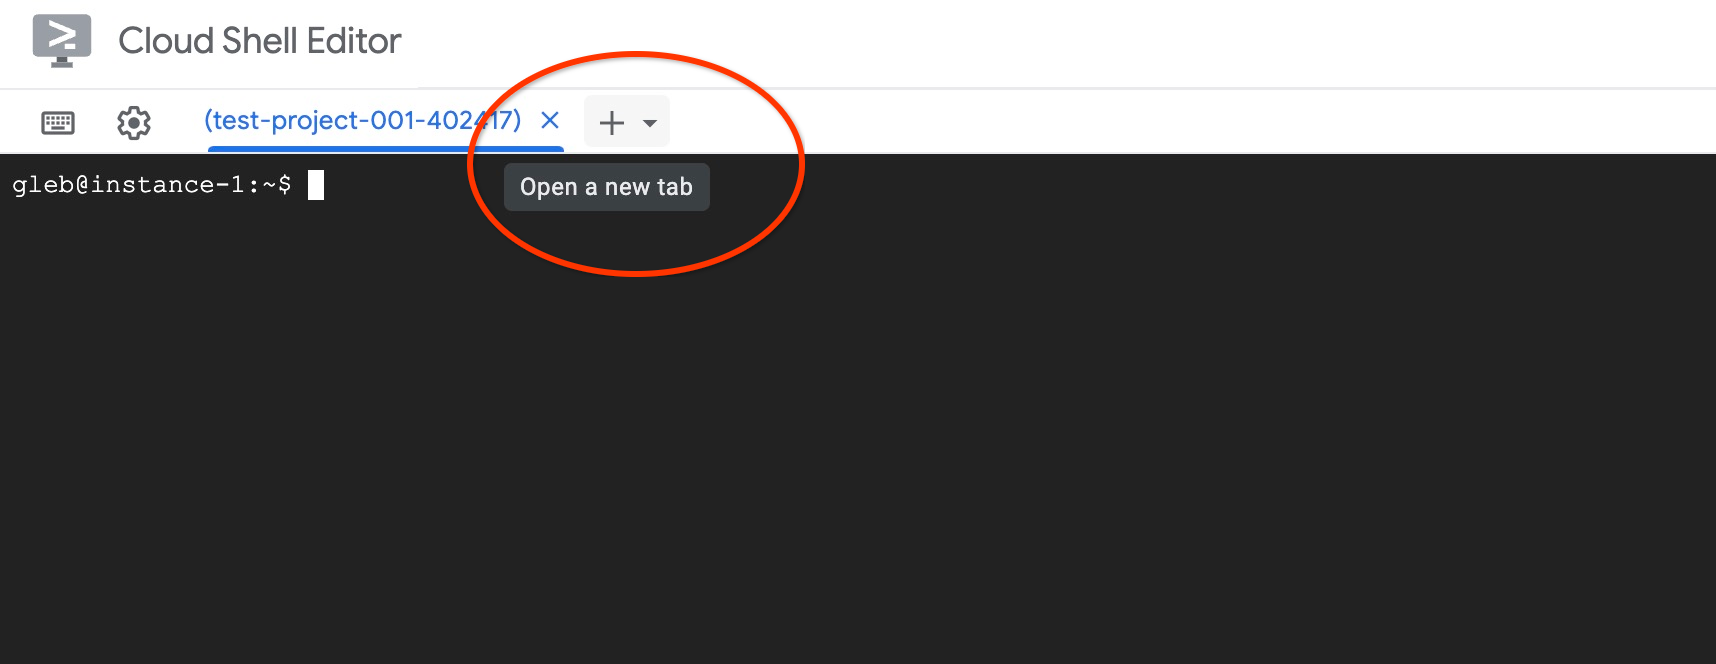
เปิดแท็บ Cloud Shell อีกแท็บโดยใช้เครื่องหมาย "+" ที่ด้านบน
ในแท็บ Cloud Shell ใหม่ ให้เรียกใช้คำสั่งต่อไปนี้
PROJECT_ID=$(gcloud config get-value project)
gcloud projects add-iam-policy-binding $PROJECT_ID \
  --member="serviceAccount:service-$(gcloud projects describe $PROJECT_ID --format="value(projectNumber)")@gcp-sa-alloydb.iam.gserviceaccount.com" \
  --role="roles/aiplatform.user"
เอาต์พุตของคอนโซลที่คาดไว้
student@cloudshell:~ (test-project-001-402417)$ PROJECT_ID=$(gcloud config get-value project)
Your active configuration is: [cloudshell-11039]
student@cloudshell:~ (test-project-001-402417)$ gcloud projects add-iam-policy-binding $PROJECT_ID \
  --member="serviceAccount:service-$(gcloud projects describe $PROJECT_ID --format="value(projectNumber)")@gcp-sa-alloydb.iam.gserviceaccount.com" \
  --role="roles/aiplatform.user"
Updated IAM policy for project [test-project-001-402417].
bindings:
- members:
  - serviceAccount:service-4470404856@gcp-sa-alloydb.iam.gserviceaccount.com
  role: roles/aiplatform.user
- members:
...
etag: BwYIEbe_Z3U=
version: 1
ปิดแท็บโดยใช้คำสั่งดำเนินการ "exit" ในแท็บ
exit
สร้างฐานข้อมูล
เริ่มต้นใช้งานฐานข้อมูลอย่างรวดเร็ว
ในเซสชัน GCE VM ให้เรียกใช้คำสั่งต่อไปนี้
สร้างฐานข้อมูล
psql "host=$INSTANCE_IP user=postgres" -c "CREATE DATABASE quickstart_db"
เอาต์พุตของคอนโซลที่คาดไว้
student@instance-1:~$ psql "host=$INSTANCE_IP user=postgres" -c "CREATE DATABASE quickstart_db"
CREATE DATABASE
student@instance-1:~$
เปิดใช้การผสานรวม Vertex AI
เปิดใช้การผสานรวม Vertex AI และส่วนขยาย pgvector ในฐานข้อมูล
ใน VM ของ GCE ให้ดำเนินการดังนี้
psql "host=$INSTANCE_IP user=postgres dbname=quickstart_db" -c "CREATE EXTENSION IF NOT EXISTS google_ml_integration CASCADE"
psql "host=$INSTANCE_IP user=postgres dbname=quickstart_db" -c "CREATE EXTENSION IF NOT EXISTS vector"
เอาต์พุตของคอนโซลที่คาดไว้
student@instance-1:~$ psql "host=$INSTANCE_IP user=postgres dbname=quickstart_db" -c "CREATE EXTENSION IF NOT EXISTS google_ml_integration CASCADE"
psql "host=$INSTANCE_IP user=postgres dbname=quickstart_db" -c "CREATE EXTENSION IF NOT EXISTS vector"
CREATE EXTENSION
CREATE EXTENSION
student@instance-1:~$
นำเข้าข้อมูล
ดาวน์โหลดข้อมูลที่เตรียมไว้แล้วนำเข้าไปยังฐานข้อมูลใหม่
ใน VM ของ GCE ให้ดำเนินการดังนี้
gcloud storage cat gs://cloud-training/gcc/gcc-tech-004/cymbal_demo_schema.sql |psql "host=$INSTANCE_IP user=postgres dbname=quickstart_db"
gcloud storage cat gs://cloud-training/gcc/gcc-tech-004/cymbal_products.csv |psql "host=$INSTANCE_IP user=postgres dbname=quickstart_db" -c "\copy cymbal_products from stdin csv header"
gcloud storage cat gs://cloud-training/gcc/gcc-tech-004/cymbal_inventory.csv |psql "host=$INSTANCE_IP user=postgres dbname=quickstart_db" -c "\copy cymbal_inventory from stdin csv header"
gcloud storage cat gs://cloud-training/gcc/gcc-tech-004/cymbal_stores.csv |psql "host=$INSTANCE_IP user=postgres dbname=quickstart_db" -c "\copy cymbal_stores from stdin csv header"
เอาต์พุตของคอนโซลที่คาดไว้
student@instance-1:~$ gsutil cat gs://cloud-training/gcc/gcc-tech-004/cymbal_demo_schema.sql |psql "host=$INSTANCE_IP user=postgres dbname=quickstart_db"
SET
SET
SET
SET
SET
 set_config
------------

(1 row)
SET
SET
SET
SET
SET
SET
CREATE TABLE
ALTER TABLE
CREATE TABLE
ALTER TABLE
CREATE TABLE
ALTER TABLE
CREATE TABLE
ALTER TABLE
CREATE SEQUENCE
ALTER TABLE
ALTER SEQUENCE
ALTER TABLE
ALTER TABLE
ALTER TABLE
student@instance-1:~$ gsutil cat gs://cloud-training/gcc/gcc-tech-004/cymbal_products.csv |psql "host=$INSTANCE_IP user=postgres dbname=quickstart_db" -c "\copy cymbal_products from stdin csv header"
COPY 941
student@instance-1:~$ gsutil cat gs://cloud-training/gcc/gcc-tech-004/cymbal_inventory.csv |psql "host=$INSTANCE_IP user=postgres dbname=quickstart_db" -c "\copy cymbal_inventory from stdin csv header"
COPY 263861
student@instance-1:~$ gsutil cat gs://cloud-training/gcc/gcc-tech-004/cymbal_stores.csv |psql "host=$INSTANCE_IP user=postgres dbname=quickstart_db" -c "\copy cymbal_stores from stdin csv header"
COPY 4654
student@instance-1:~$
7. คำนวณการฝัง
หลังจากนำเข้าข้อมูลแล้ว เราจะได้รับข้อมูลสินค้าในตาราง cymbal_products, สินค้าคงคลังที่แสดงจำนวนผลิตภัณฑ์ที่พร้อมจำหน่ายในแต่ละร้านค้าในตาราง cymbal_inventory และรายชื่อร้านค้าในตาราง cymbal_stores เราต้องคำนวณข้อมูลเวกเตอร์ตามคำอธิบายของผลิตภัณฑ์ และจะใช้ฟังก์ชัน embedding สำหรับการคำนวณดังกล่าว การใช้ฟังก์ชันที่เราจะใช้การผสานรวม Vertex AI เพื่อคำนวณข้อมูลเวกเตอร์ตามรายละเอียดผลิตภัณฑ์ของเราและเพิ่มลงในตาราง ดูข้อมูลเพิ่มเติมเกี่ยวกับเทคโนโลยีที่ใช้ได้ในเอกสารประกอบ
การสร้างสำหรับ 2-3 แถวเป็นเรื่องง่าย แต่จะทำให้มีประสิทธิภาพได้อย่างไรหากมีหลายพันแถว ในที่นี้ ฉันจะแสดงวิธีสร้างและจัดการการฝังสำหรับตารางขนาดใหญ่ นอกจากนี้ คุณยังอ่านข้อมูลเพิ่มเติมเกี่ยวกับตัวเลือกและเทคนิคต่างๆ ได้ในคำแนะนำ
เปิดใช้การสร้างการฝังอย่างรวดเร็ว
เชื่อมต่อกับฐานข้อมูลโดยใช้ psql จาก VM โดยใช้ IP ของอินสแตนซ์ AlloyDB และรหัสผ่าน postgres ดังนี้
psql "host=$INSTANCE_IP user=postgres dbname=quickstart_db"
ตรวจสอบเวอร์ชันของส่วนขยาย google_ml_integration
SELECT extversion FROM pg_extension WHERE extname = 'google_ml_integration';
โดยควรเป็นเวอร์ชัน 1.5.2 ขึ้นไป ตัวอย่างเอาต์พุตมีดังนี้
quickstart_db=> SELECT extversion FROM pg_extension WHERE extname = 'google_ml_integration';
 extversion
------------
 1.5.2
(1 row)
เวอร์ชันเริ่มต้นควรเป็น 1.5.2 ขึ้นไป แต่หากอินสแตนซ์แสดงเวอร์ชันเก่ากว่า คุณอาจต้องอัปเดต ตรวจสอบว่ามีการปิดใช้การบำรุงรักษาสำหรับอินสแตนซ์หรือไม่
จากนั้นเราต้องยืนยันค่าสถานะฐานข้อมูล เราต้องเปิดใช้ Flag google_ml_integration.enable_faster_embedding_generation ในเซสชัน psql เดียวกัน ให้ตรวจสอบค่าของแฟล็ก
show google_ml_integration.enable_faster_embedding_generation;
หากวางธงในตำแหน่งที่ถูกต้อง ผลลัพธ์ที่คาดไว้จะมีลักษณะดังนี้
quickstart_db=> show google_ml_integration.enable_faster_embedding_generation;
 google_ml_integration.enable_faster_embedding_generation
----------------------------------------------------------
 on
(1 row)
แต่หากแสดงว่า "ปิด" เราจะต้องอัปเดตอินสแตนซ์ คุณทำได้โดยใช้คอนโซลบนเว็บหรือคำสั่ง gcloud ตามที่อธิบายไว้ในเอกสารประกอบ ในที่นี้ ฉันจะแสดงวิธีดำเนินการโดยใช้คำสั่ง gcloud
export PROJECT_ID=$(gcloud config get-value project)
export REGION=us-central1
export ADBCLUSTER=alloydb-aip-01
gcloud beta alloydb instances update $ADBCLUSTER-pr \
   --database-flags google_ml_integration.enable_faster_embedding_generation=on \
   --region=$REGION \
   --cluster=$ADBCLUSTER \
   --project=$PROJECT_ID \
   --update-mode=FORCE_APPLY
อาจใช้เวลาสักครู่ แต่ในที่สุดค่าสถานะควรเปลี่ยนเป็น "เปิด" หลังจากนั้น คุณจะดำเนินการตามขั้นตอนถัดไปได้
สร้างคอลัมน์การฝัง
เชื่อมต่อกับฐานข้อมูลโดยใช้ psql และสร้างคอลัมน์เสมือนที่มีข้อมูลเวกเตอร์โดยใช้ฟังก์ชันการฝังในตาราง cymbal_products ฟังก์ชันการฝังจะแสดงผลข้อมูลเวกเตอร์จาก Vertex AI โดยอิงตามข้อมูลที่ระบุจากคอลัมน์ product_description
psql "host=$INSTANCE_IP user=postgres dbname=quickstart_db"
ในเซสชัน psql หลังจากเชื่อมต่อกับฐานข้อมูล ให้เรียกใช้คำสั่งต่อไปนี้
ALTER TABLE cymbal_products ADD COLUMN embedding vector(768);
คำสั่งนี้จะสร้างคอลัมน์เสมือนและป้อนข้อมูลเวกเตอร์ลงในคอลัมน์
เอาต์พุตของคอนโซลที่คาดไว้
quickstart_db=> ALTER TABLE cymbal_products ADD COLUMN embedding vector(768);
ALTER TABLE
quickstart_db=>
ตอนนี้เราสร้างการฝังได้โดยใช้แบตช์ที่มี 50 แถวในแต่ละแบตช์ คุณสามารถทดสอบขนาดกลุ่มต่างๆ และดูว่าขนาดกลุ่มเปลี่ยนเวลาในการดำเนินการหรือไม่ ในเซสชัน psql เดียวกัน ให้เรียกใช้คำสั่งต่อไปนี้
เปิดใช้การจับเวลาเพื่อวัดระยะเวลาที่ใช้
\timing
เรียกใช้คำสั่ง
CALL ai.initialize_embeddings(
    model_id => 'text-embedding-005',
    table_name => 'cymbal_products',
    content_column => 'product_description',
    embedding_column => 'embedding',
    batch_size => 50
);
และเอาต์พุตของคอนโซลที่แสดงน้อยกว่า 2 วินาทีสำหรับการสร้างการฝัง
quickstart_db=> CALL ai.initialize_embeddings(
    model_id => 'text-embedding-005',
    table_name => 'cymbal_products',
    content_column => 'product_description',
    embedding_column => 'embedding',
    batch_size => 50
);
NOTICE:  Initialize embedding completed successfully for table cymbal_products
CALL
Time: 1458.704 ms (00:01.459)
quickstart_db=>
โดยค่าเริ่มต้น ระบบจะไม่รีเฟรชการฝังหากคอลัมน์ product_description ที่เกี่ยวข้องได้รับการอัปเดตหรือมีการแทรกแถวใหม่ทั้งหมด แต่คุณทำได้โดยกำหนดพารามิเตอร์ incremental_refresh_mode มาสร้างคอลัมน์ "product_embeddings" และทำให้คอลัมน์นี้อัปเดตได้โดยอัตโนมัติกัน
ALTER TABLE cymbal_products ADD COLUMN product_embedding vector(768);
CALL ai.initialize_embeddings(
    model_id => 'text-embedding-005',
    table_name => 'cymbal_products',
    content_column => 'product_description',
    embedding_column => 'product_embedding',
    batch_size => 50,
    incremental_refresh_mode => 'transactional'
);
และตอนนี้หากเราแทรกแถวใหม่ลงในตาราง
INSERT INTO "cymbal_products" ("uniq_id", "crawl_timestamp", "product_url", "product_name", "product_description", "list_price", "sale_price", "brand", "item_number", "gtin", "package_size", "category", "postal_code", "available", "product_embedding", "embedding") VALUES ('fd604542e04b470f9e6348e640cff794', NOW(), 'https://example.com/new_product', 'New Cymbal Product', 'This is a new cymbal product description.', 199.99, 149.99, 'Example Brand', 'EB123', '1234567890', 'Single', 'Cymbals', '12345', TRUE, NULL, NULL);
เราสามารถเปรียบเทียบความแตกต่างในคอลัมน์ได้โดยใช้การค้นหาต่อไปนี้
SELECT uniq_id,embedding, (product_embedding::real[])[1:5] as product_embedding FROM cymbal_products WHERE uniq_id='fd604542e04b470f9e6348e640cff794';
และในเอาต์พุต เราจะเห็นว่าขณะที่คอลัมน์ embedding ยังคงว่างอยู่ คอลัมน์ product_embedding จะได้รับการอัปเดตโดยอัตโนมัติ
quickstart_db=> SELECT uniq_id,embedding, (product_embedding::real[])[1:5] as product_embedding  FROM cymbal_products WHERE uniq_id='fd604542e04b470f9e6348e640cff794';
             uniq_id              | embedding |                       product_embedding
----------------------------------+-----------+---------------------------------------------------------------
 fd604542e04b470f9e6348e640cff794 |           | {0.015003494,-0.005349732,-0.059790313,-0.0087091,-0.0271452}
(1 row)

Time: 3.295 ms
8. เรียกใช้การค้นหาความคล้ายคลึง
ตอนนี้เราสามารถเรียกใช้การค้นหาโดยใช้การค้นหาความคล้ายกันตามค่าเวกเตอร์ที่คำนวณสำหรับคำอธิบายและค่าเวกเตอร์ที่เราได้รับสำหรับคำขอ
คุณเรียกใช้การค้นหา SQL ได้จากอินเทอร์เฟซบรรทัดคำสั่ง psql เดียวกัน หรือจาก AlloyDB Studio ก็ได้ เอาต์พุตแบบหลายแถวและเอาต์พุตที่ซับซ้อนอาจดูดีกว่าใน AlloyDB Studio
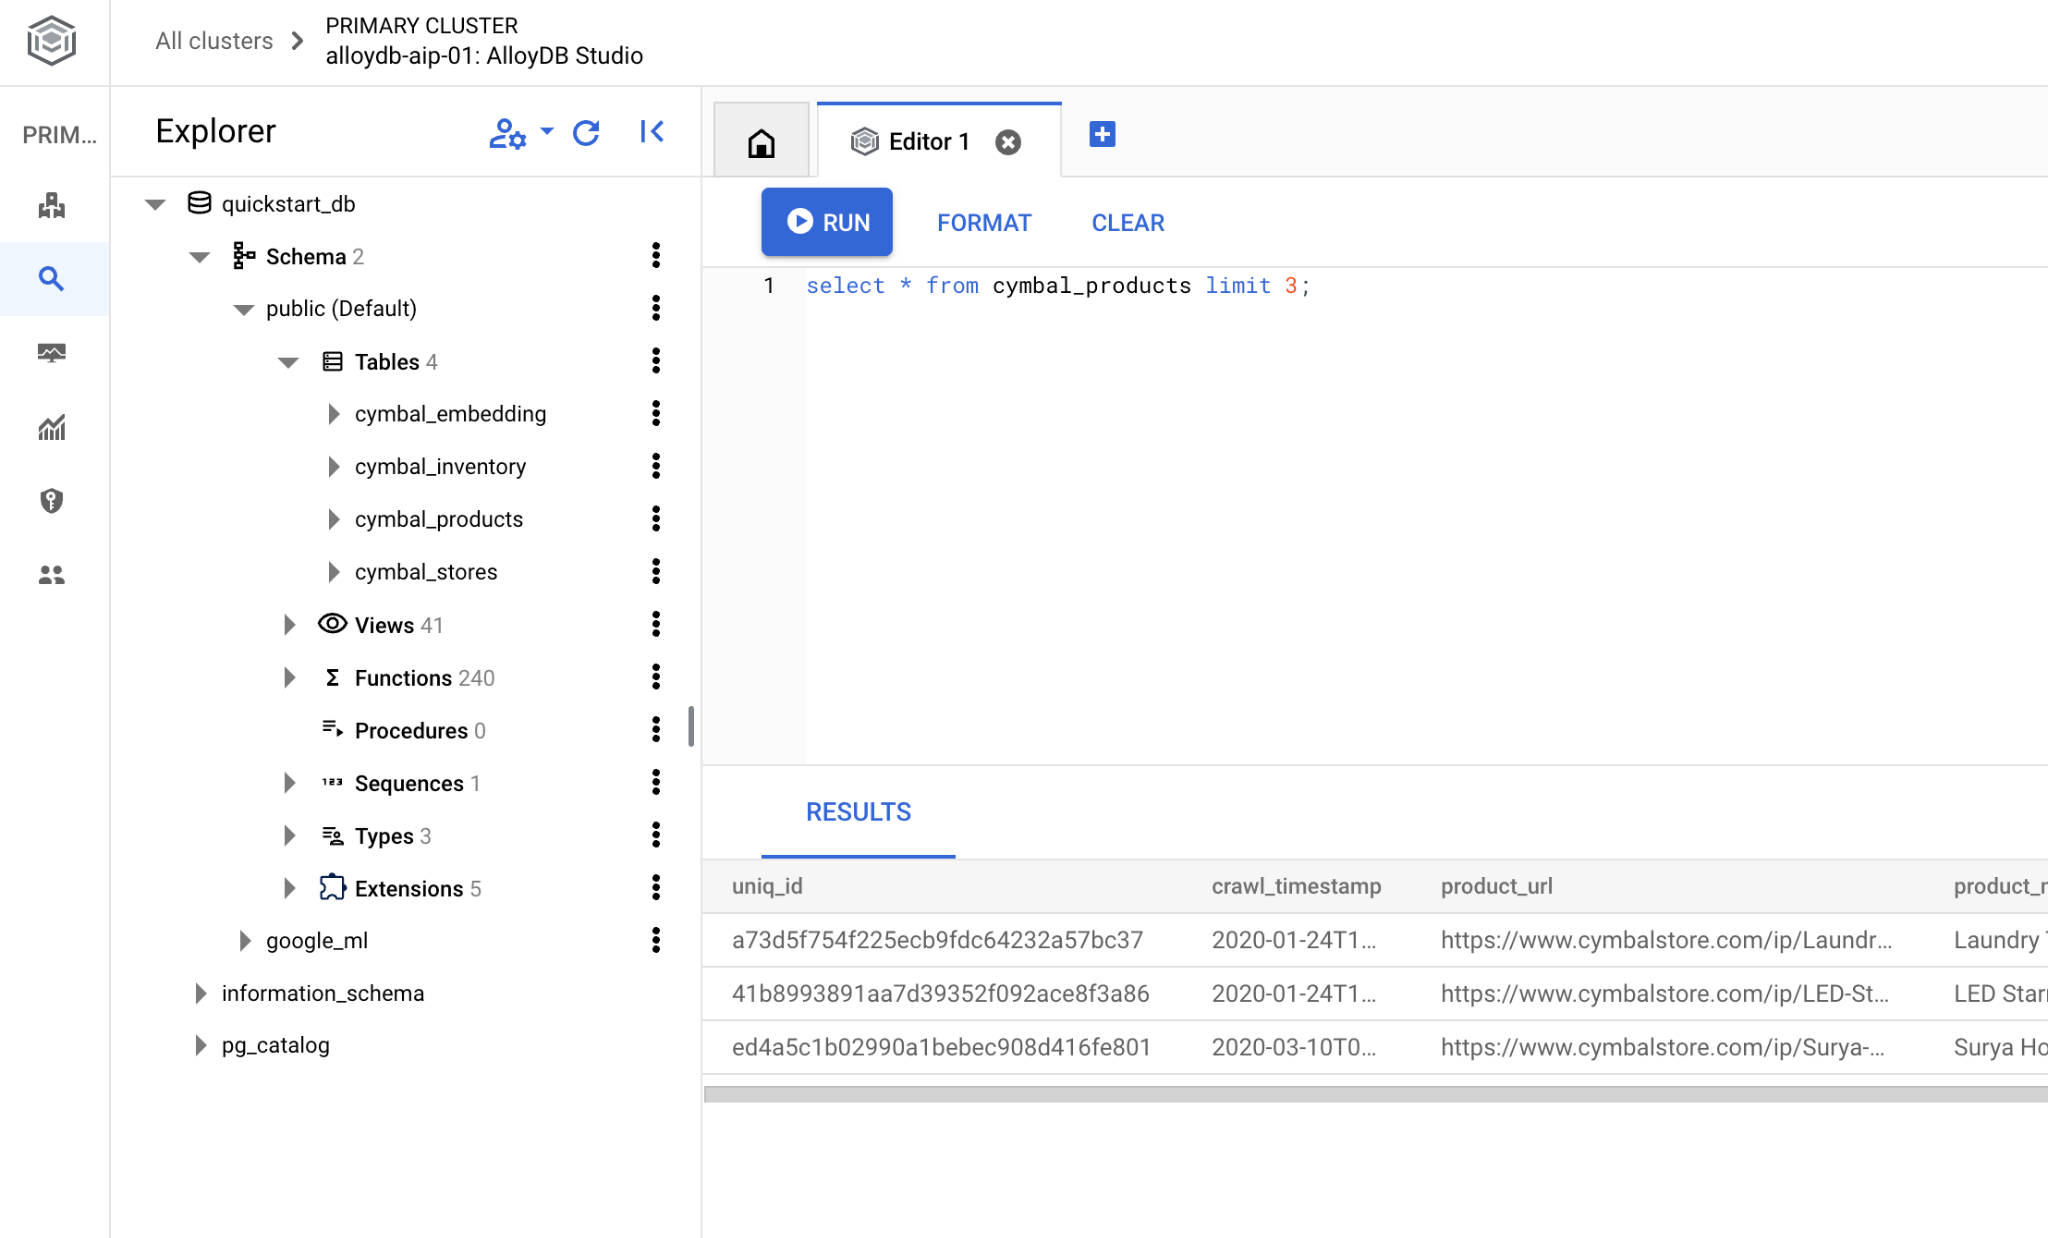
เชื่อมต่อกับ AlloyDB Studio
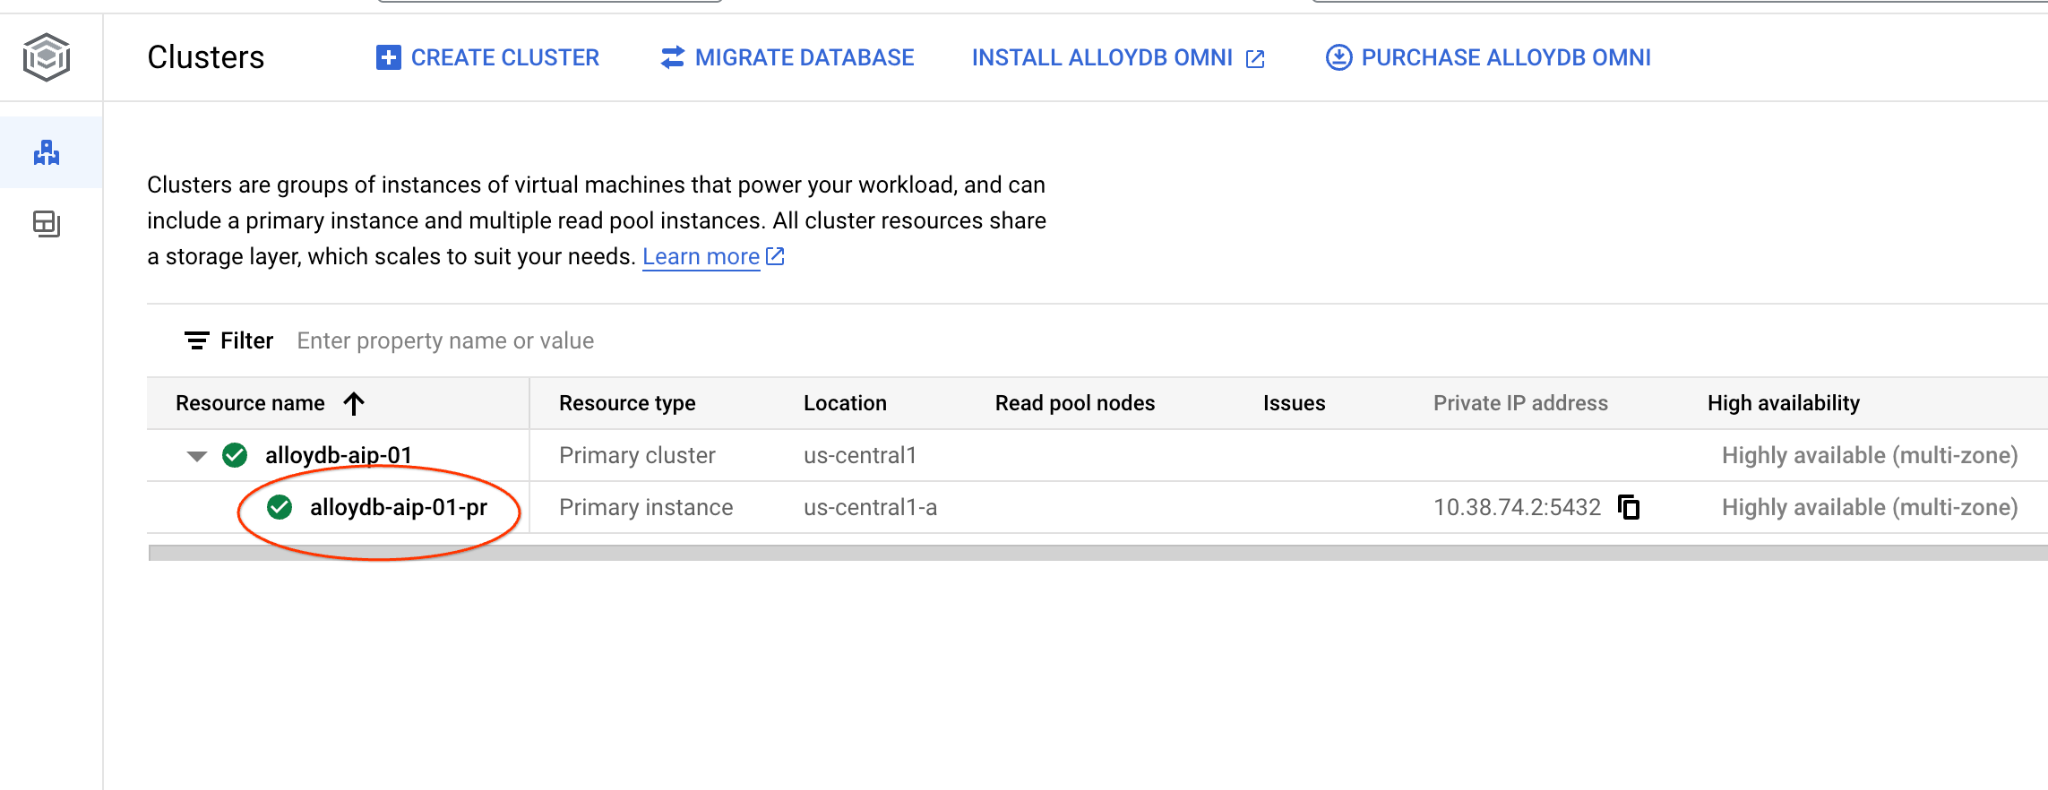
ในบทต่อไปนี้ คุณสามารถเรียกใช้คำสั่ง SQL ทั้งหมดที่ต้องเชื่อมต่อกับฐานข้อมูลใน AlloyDB Studio แทนได้ หากต้องการเรียกใช้คำสั่ง คุณต้องเปิดอินเทอร์เฟซคอนโซลเว็บสำหรับคลัสเตอร์ AlloyDB โดยคลิกอินสแตนซ์หลัก
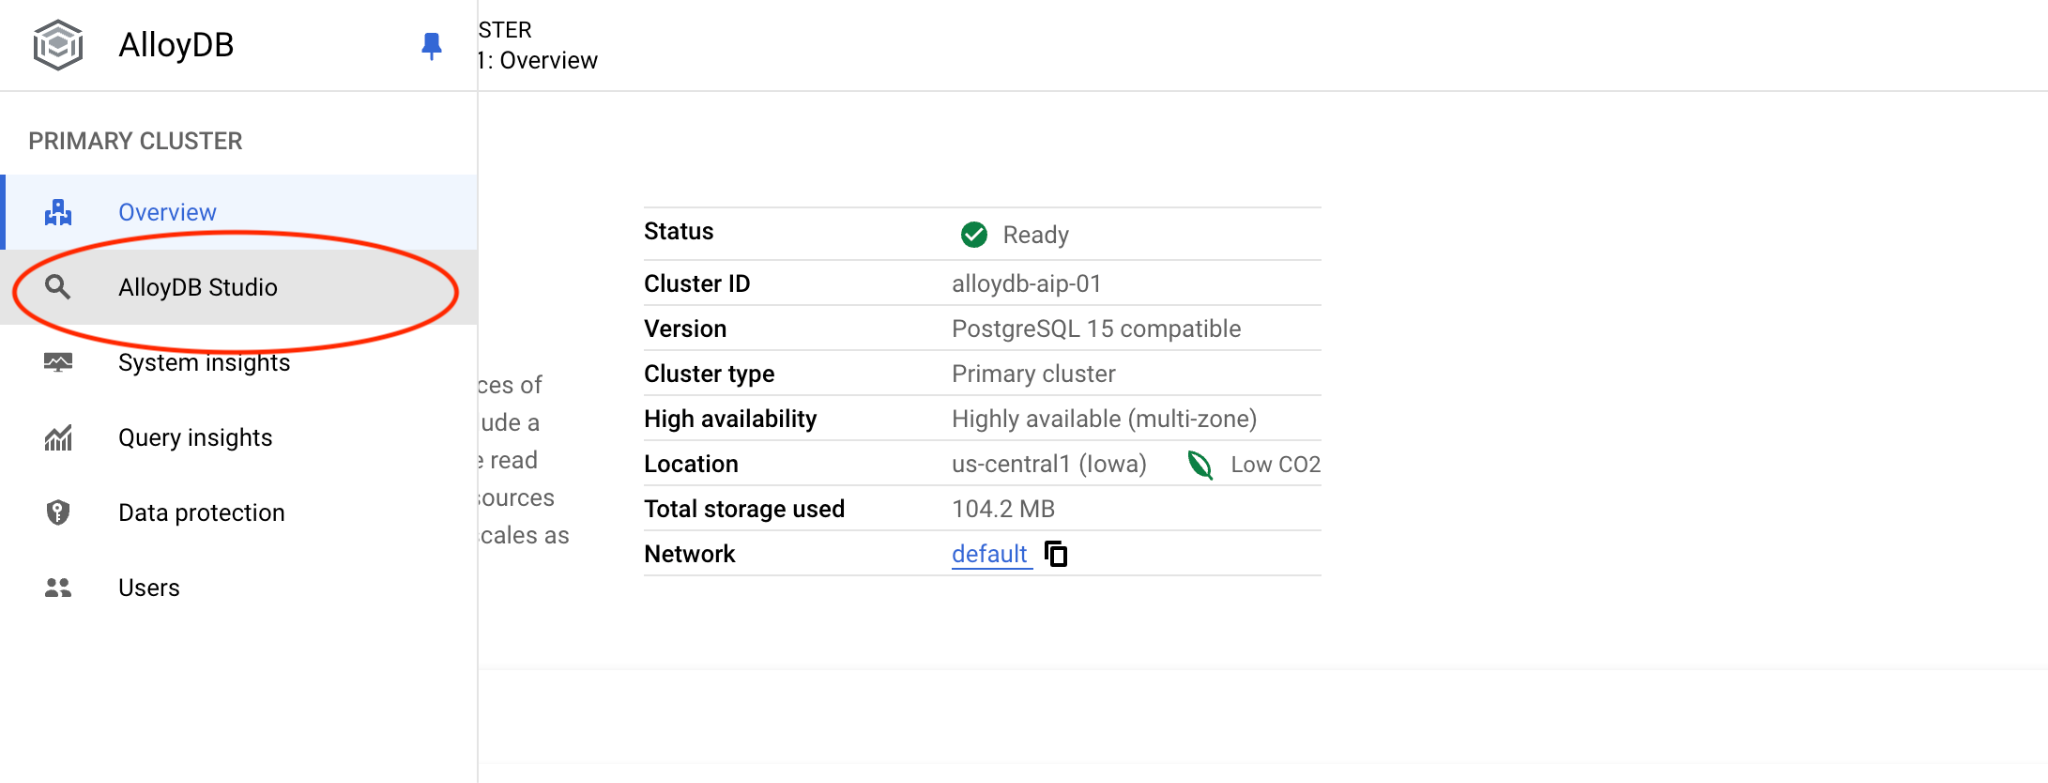
จากนั้นคลิก AlloyDB Studio ทางด้านซ้าย
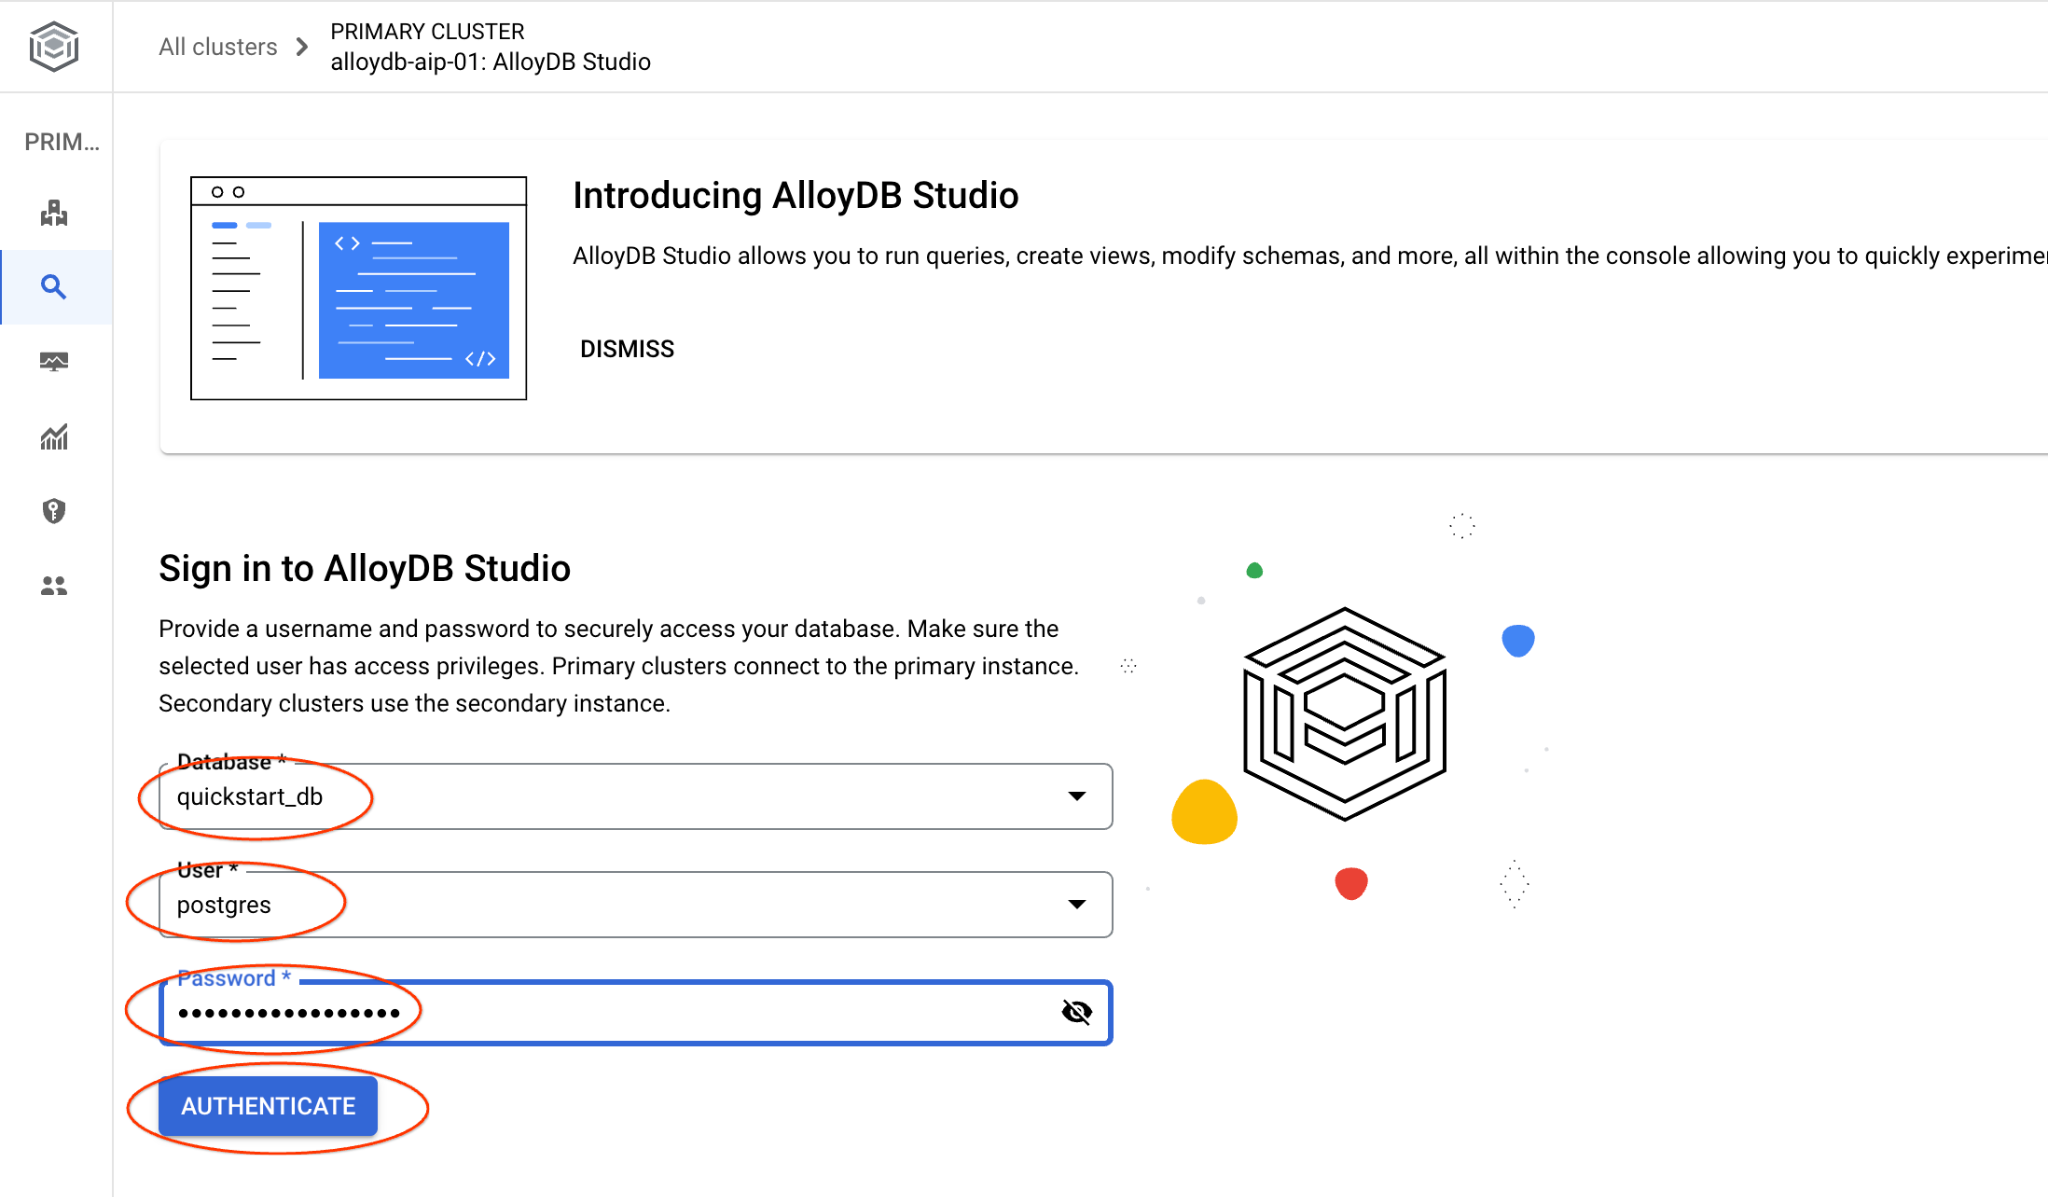
เลือกฐานข้อมูล quickstart_db, ผู้ใช้ postgres และระบุรหัสผ่านที่จดไว้เมื่อเราสร้างคลัสเตอร์ จากนั้นคลิกปุ่ม "ตรวจสอบสิทธิ์"
ซึ่งจะเปิดอินเทอร์เฟซ AlloyDB Studio หากต้องการเรียกใช้คำสั่งในฐานข้อมูล ให้คลิกแท็บ "Editor 1" ทางด้านขวา
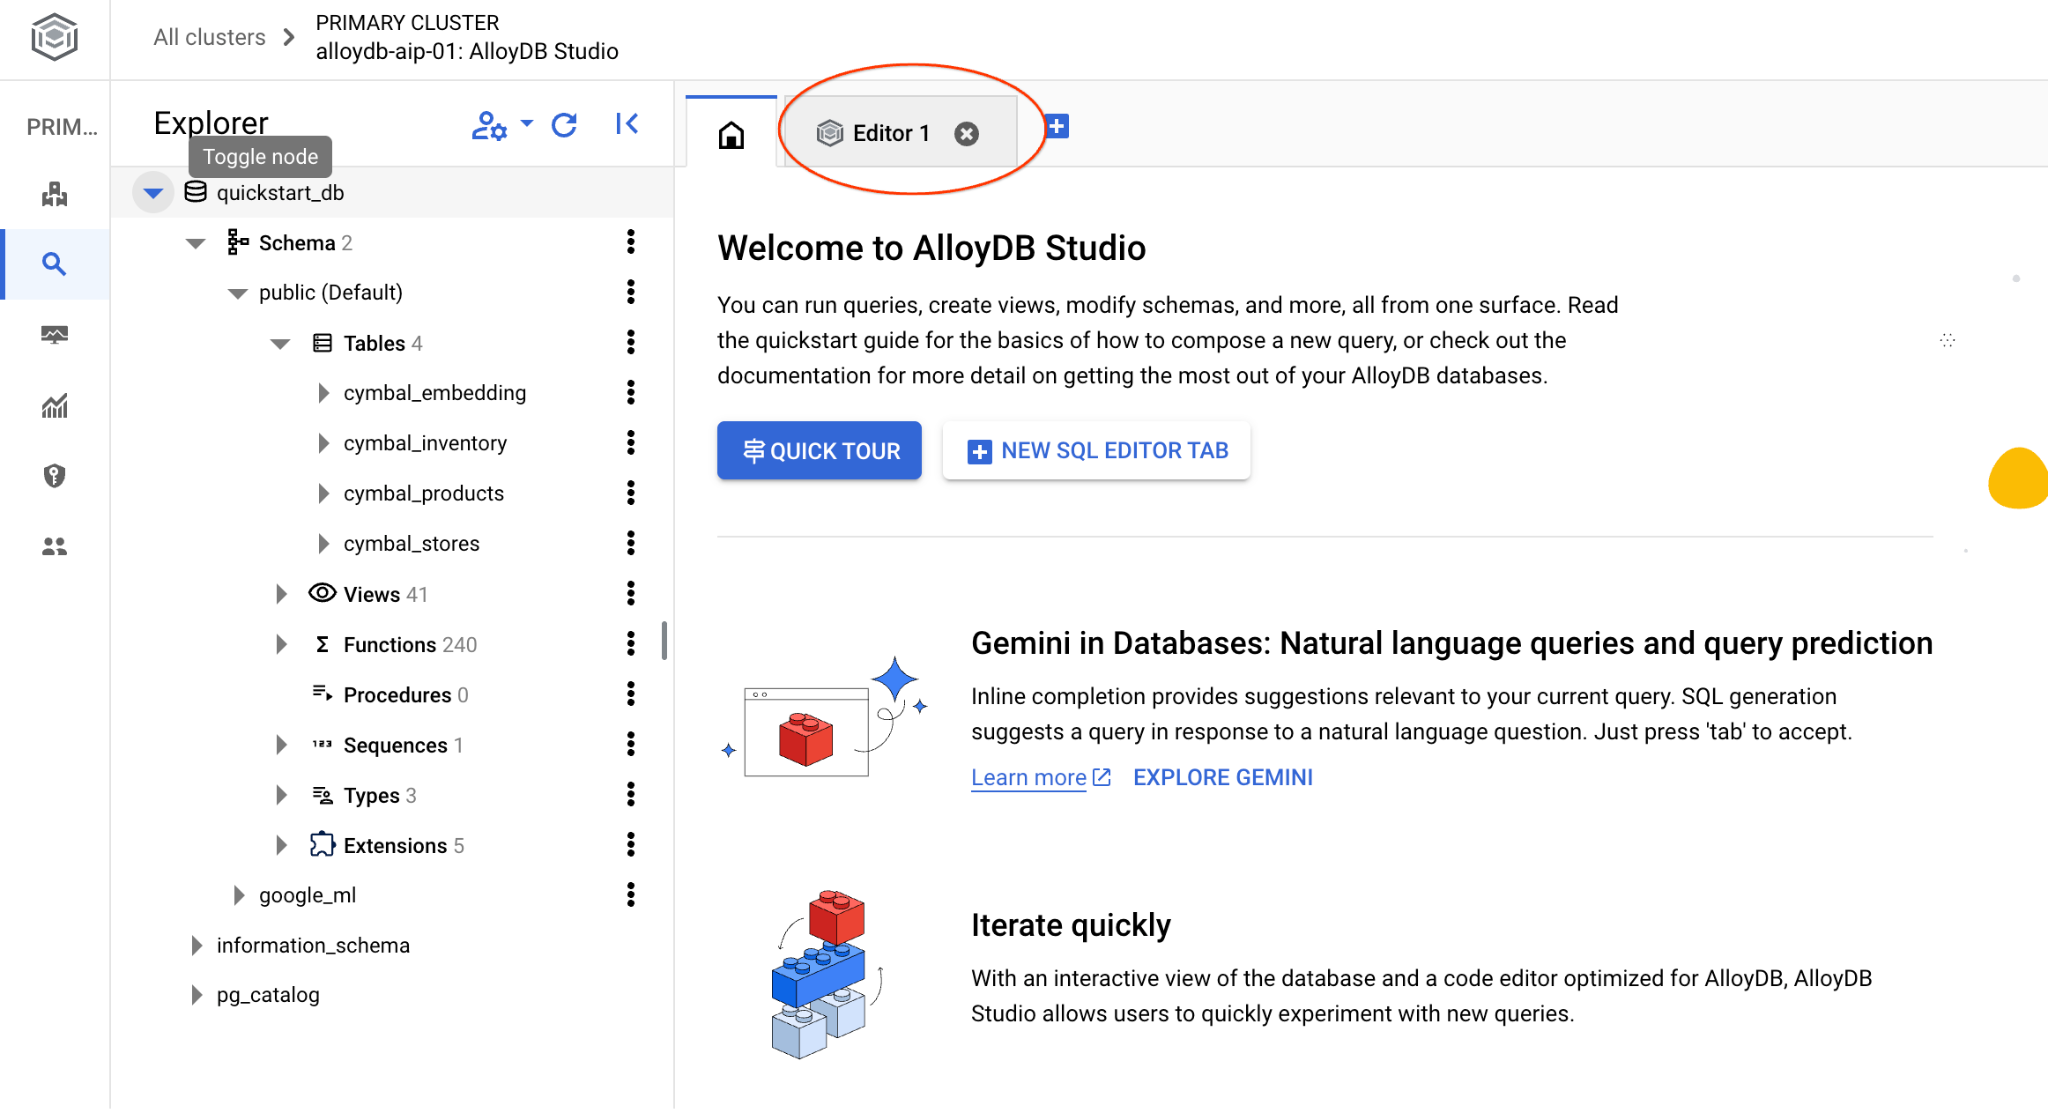
ซึ่งจะเปิดอินเทอร์เฟซที่คุณสามารถเรียกใช้คำสั่ง SQL ได้
หากต้องการใช้ psql ในบรรทัดคำสั่ง ให้ทำตามเส้นทางอื่นและเชื่อมต่อกับฐานข้อมูลจากเซสชัน SSH ของ VM ตามที่อธิบายไว้ในบทก่อนหน้า
เรียกใช้การค้นหาความคล้ายคลึงจาก psql
หากเซสชันฐานข้อมูลถูกยกเลิกการเชื่อมต่อ ให้เชื่อมต่อกับฐานข้อมูลอีกครั้งโดยใช้ psql หรือ AlloyDB Studio
เชื่อมต่อกับฐานข้อมูล
psql "host=$INSTANCE_IP user=postgres dbname=quickstart_db"
เรียกใช้การค้นหาเพื่อดูรายการผลิตภัณฑ์ที่มีอยู่ซึ่งเกี่ยวข้องกับคำขอของลูกค้ามากที่สุด คำขอที่เราจะส่งไปยัง Vertex AI เพื่อรับค่าเวกเตอร์มีลักษณะดังนี้ "ที่นี่ปลูกต้นไม้ผลชนิดใดได้ดี"
นี่คือการค้นหาที่คุณเรียกใช้เพื่อเลือก 10 รายการแรกที่เหมาะสมที่สุดสำหรับคำขอของเรา
SELECT
        cp.product_name,
        left(cp.product_description,80) as description,
        cp.sale_price,
        cs.zip_code,
        (cp.embedding <=> embedding('text-embedding-005','What kind of fruit trees grow well here?')::vector) as distance
FROM
        cymbal_products cp
JOIN cymbal_inventory ci on
        ci.uniq_id=cp.uniq_id
JOIN cymbal_stores cs on
        cs.store_id=ci.store_id
        AND ci.inventory>0
        AND cs.store_id = 1583
ORDER BY
        distance ASC
LIMIT 10;
และนี่คือเอาต์พุตที่คาดไว้
quickstart_db=> SELECT
        cp.product_name,
        left(cp.product_description,80) as description,
        cp.sale_price,
        cs.zip_code,
        (cp.embedding <=> embedding('text-embedding-005','What kind of fruit trees grow well here?')::vector) as distance
FROM
        cymbal_products cp
JOIN cymbal_inventory ci on
        ci.uniq_id=cp.uniq_id
JOIN cymbal_stores cs on
        cs.store_id=ci.store_id
        AND ci.inventory>0
        AND cs.store_id = 1583
ORDER BY
        distance ASC
LIMIT 10;
      product_name       |                                   description                                    | sale_price | zip_code |      distance
-------------------------+----------------------------------------------------------------------------------+------------+----------+---------------------
 Cherry Tree             | This is a beautiful cherry tree that will produce delicious cherries. It is an d |      75.00 |    93230 | 0.43922018972266397
 Meyer Lemon Tree        | Meyer Lemon trees are California's favorite lemon tree! Grow your own lemons by  |         34 |    93230 |  0.4685112926118228
 Toyon                   | This is a beautiful toyon tree that can grow to be over 20 feet tall. It is an e |      10.00 |    93230 |  0.4835677149651668
 California Lilac        | This is a beautiful lilac tree that can grow to be over 10 feet tall. It is an d |       5.00 |    93230 |  0.4947204525907498
 California Peppertree   | This is a beautiful peppertree that can grow to be over 30 feet tall. It is an e |      25.00 |    93230 |  0.5054166905547247
 California Black Walnut | This is a beautiful walnut tree that can grow to be over 80 feet tall. It is a d |     100.00 |    93230 |  0.5084219510932597
 California Sycamore     | This is a beautiful sycamore tree that can grow to be over 100 feet tall. It is  |     300.00 |    93230 |  0.5140519790508755
 Coast Live Oak          | This is a beautiful oak tree that can grow to be over 100 feet tall. It is an ev |     500.00 |    93230 |  0.5143126438081371
 Fremont Cottonwood      | This is a beautiful cottonwood tree that can grow to be over 100 feet tall. It i |     200.00 |    93230 |  0.5174774727252058
 Madrone                 | This is a beautiful madrona tree that can grow to be over 80 feet tall. It is an |      50.00 |    93230 |  0.5227400803389093
9. ปรับปรุงคำตอบ
คุณสามารถปรับปรุงการตอบกลับแอปพลิเคชันไคลเอ็นต์ได้โดยใช้ผลลัพธ์ของการค้นหา และเตรียมเอาต์พุตที่มีประโยชน์โดยใช้ผลลัพธ์ของการค้นหาที่ระบุเป็นส่วนหนึ่งของพรอมต์ไปยังโมเดลภาษาพื้นฐานแบบ Generative AI ของ Vertex AI
เราจึงวางแผนที่จะสร้าง JSON ที่มีผลลัพธ์จากการค้นหาเวกเตอร์ จากนั้นใช้ JSON ที่สร้างขึ้นเป็นส่วนเพิ่มเติมของพรอมต์สำหรับโมเดล LLM แบบข้อความใน Vertex AI เพื่อสร้างเอาต์พุตที่มีความหมาย ในขั้นตอนแรก เราจะสร้าง JSON จากนั้นทดสอบใน Vertex AI Studio และในขั้นตอนสุดท้าย เราจะรวมไว้ในคำสั่ง SQL ซึ่งใช้ในแอปพลิเคชันได้
สร้างเอาต์พุตในรูปแบบ JSON
แก้ไขคําค้นหาเพื่อสร้างเอาต์พุตในรูปแบบ JSON และแสดงผลเพียงแถวเดียวเพื่อส่งไปยัง Vertex AI
ตัวอย่างคำค้นหามีดังนี้
WITH trees as (
SELECT
        cp.product_name,
        left(cp.product_description,80) as description,
        cp.sale_price,
        cs.zip_code,
        cp.uniq_id as product_id
FROM
        cymbal_products cp
JOIN cymbal_inventory ci on
        ci.uniq_id=cp.uniq_id
JOIN cymbal_stores cs on
        cs.store_id=ci.store_id
        AND ci.inventory>0
        AND cs.store_id = 1583
ORDER BY
        (cp.embedding <=> embedding('text-embedding-005','What kind of fruit trees grow well here?')::vector) ASC
LIMIT 1)
SELECT json_agg(trees) FROM trees;
และนี่คือ JSON ที่คาดไว้ในเอาต์พุต
[{"product_name":"Cherry Tree","description":"This is a beautiful cherry tree that will produce delicious cherries. It is an d","sale_price":75.00,"zip_code":93230,"product_id":"d536e9e823296a2eba198e52dd23e712"}]
เรียกใช้พรอมต์ใน Vertex AI Studio
เราสามารถใช้ JSON ที่สร้างขึ้นเพื่อจัดหาเป็นส่วนหนึ่งของพรอมต์ไปยังโมเดลข้อความ Generative AI ใน Vertex AI Studio
เปิด Vertex AI Studio ใน Cloud Console
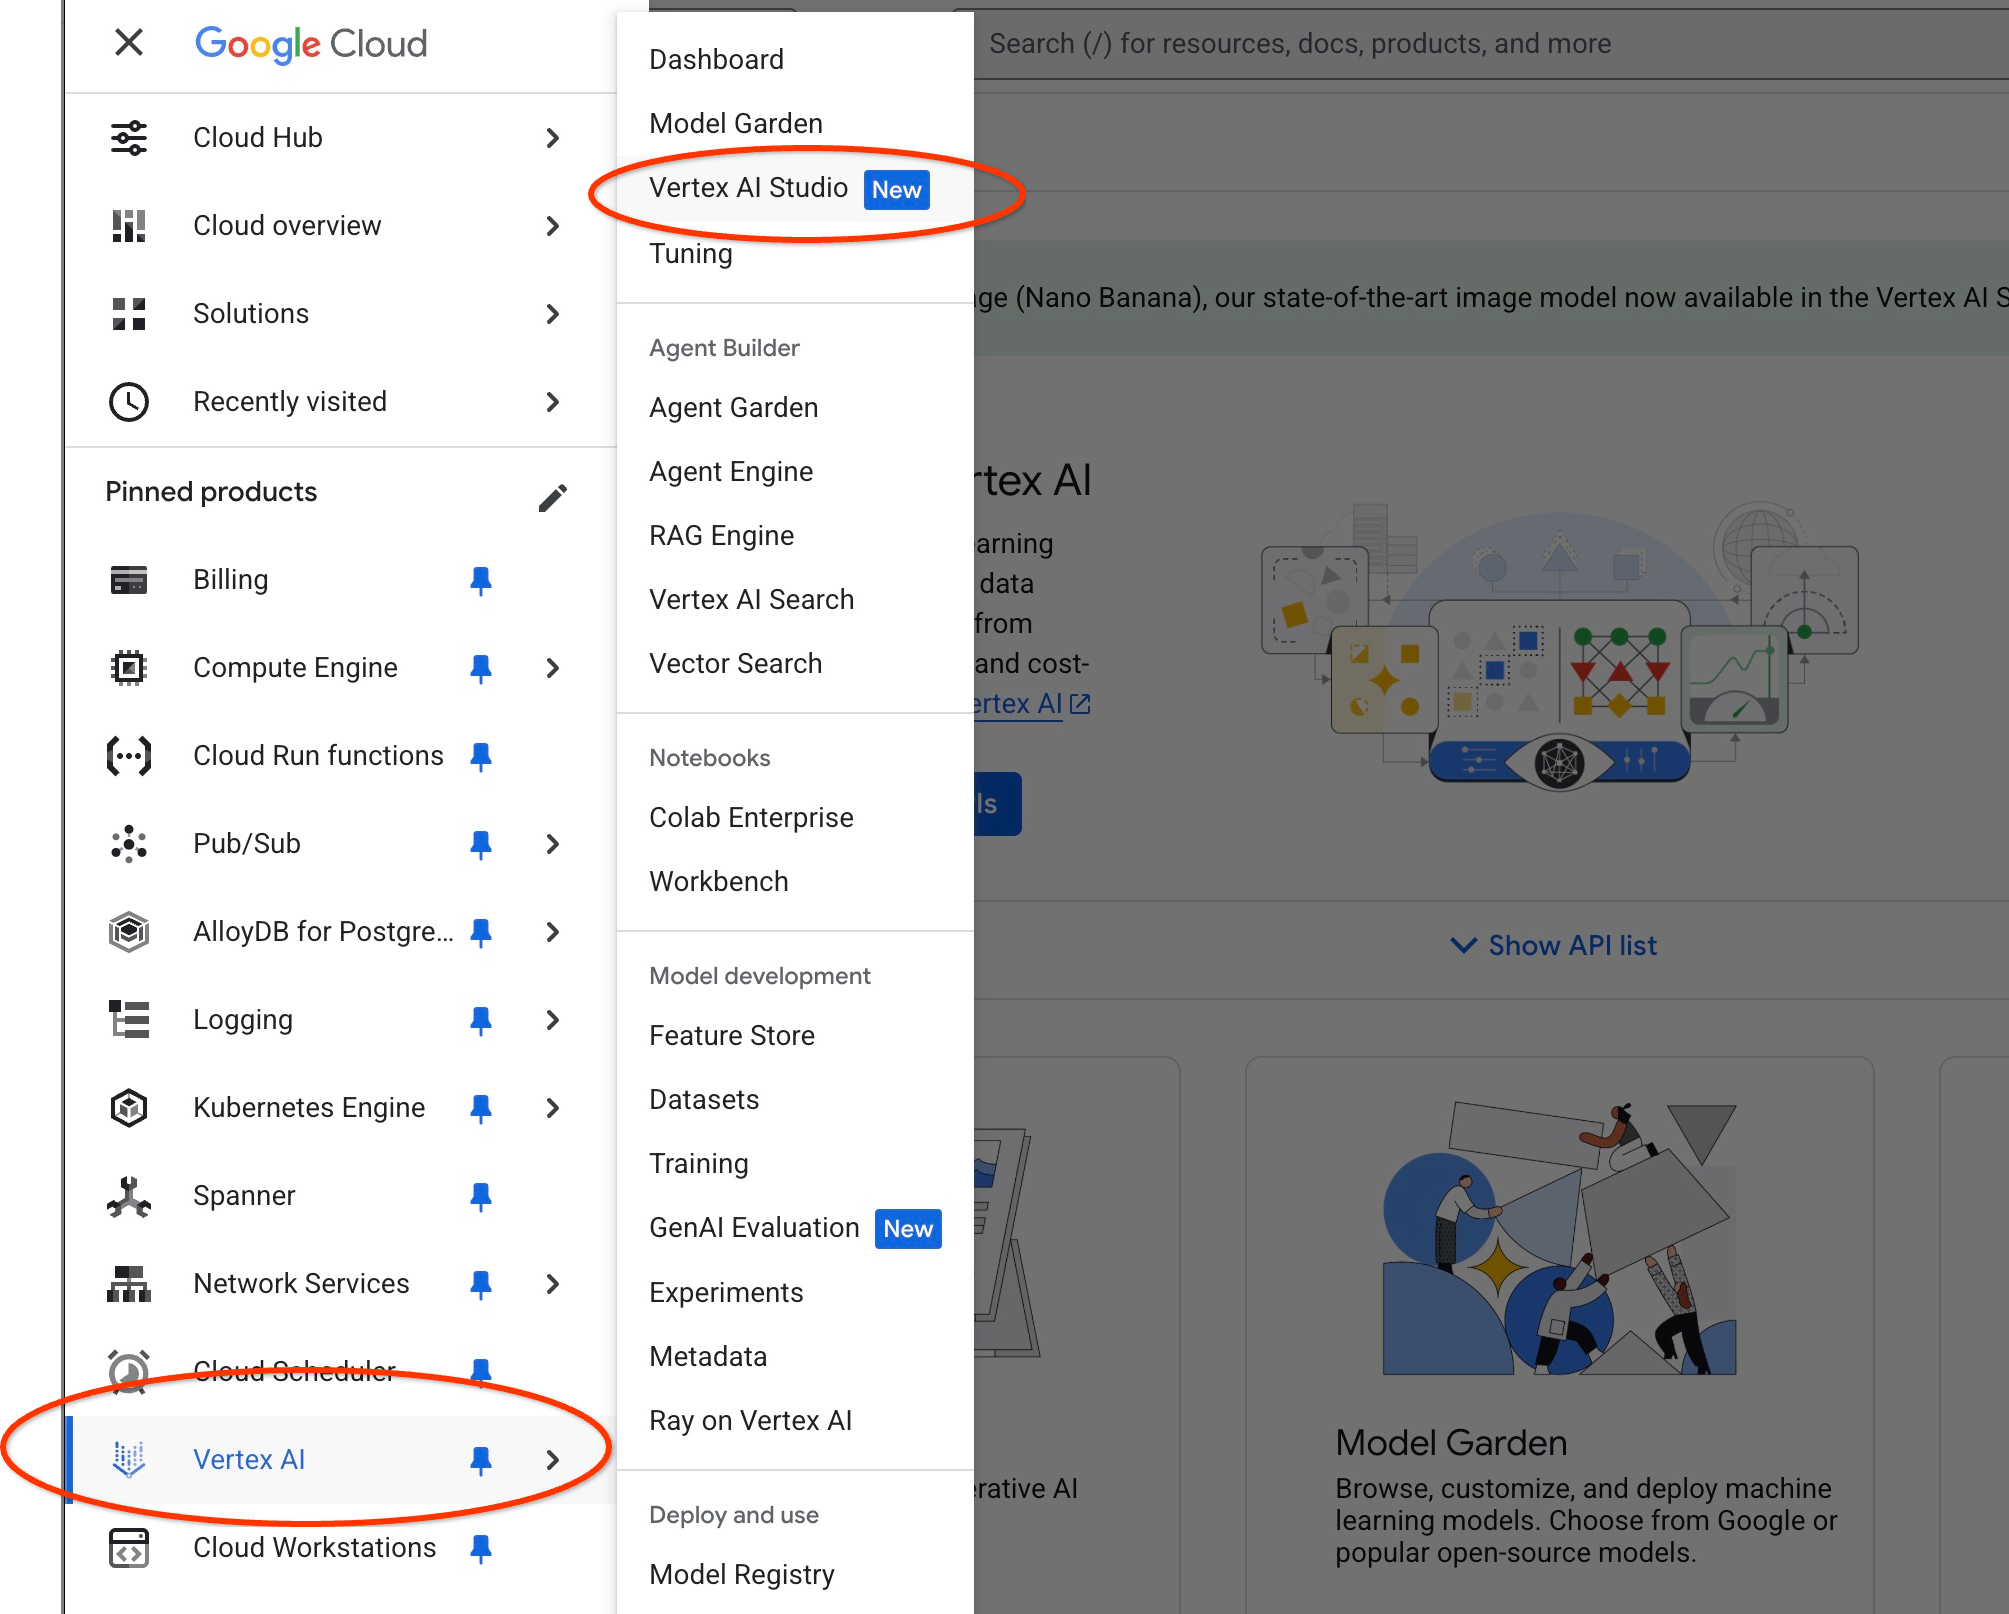
ระบบอาจขอให้คุณยอมรับข้อกำหนดในการใช้งานหากยังไม่เคยใช้มาก่อน กดปุ่ม "ยอมรับและดำเนินการต่อ"
เขียนพรอมต์ในอินเทอร์เฟซ
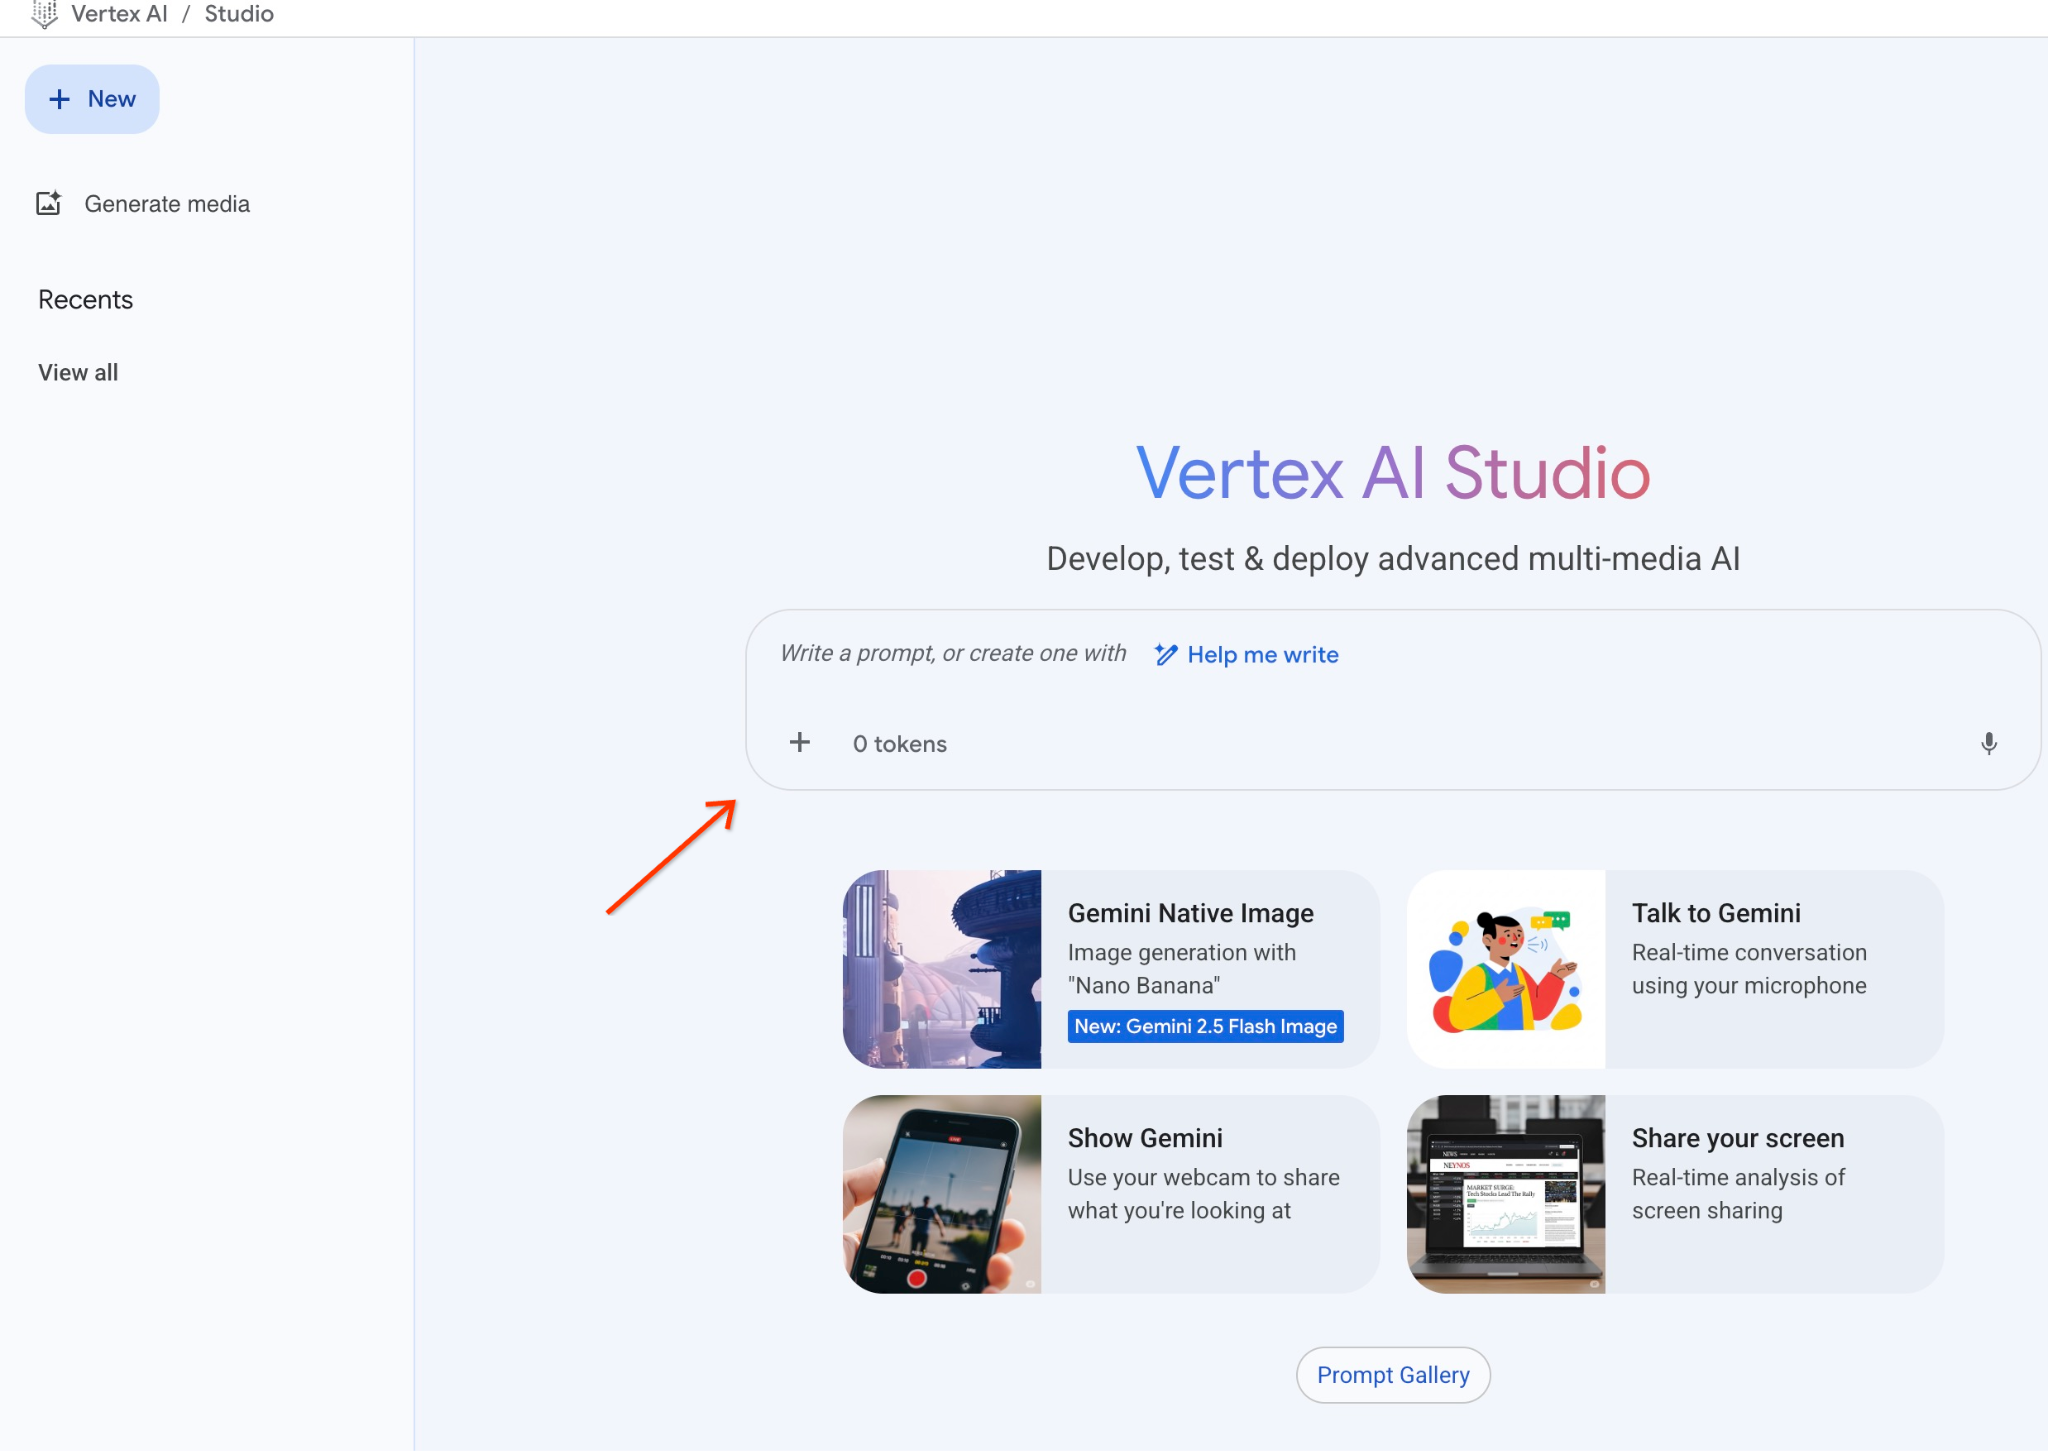
โดยอาจขอให้คุณเปิดใช้ API เพิ่มเติม แต่คุณสามารถเพิกเฉยต่อคำขอนี้ได้ เราไม่จำเป็นต้องใช้ API เพิ่มเติมเพื่อทำแล็บให้เสร็จ
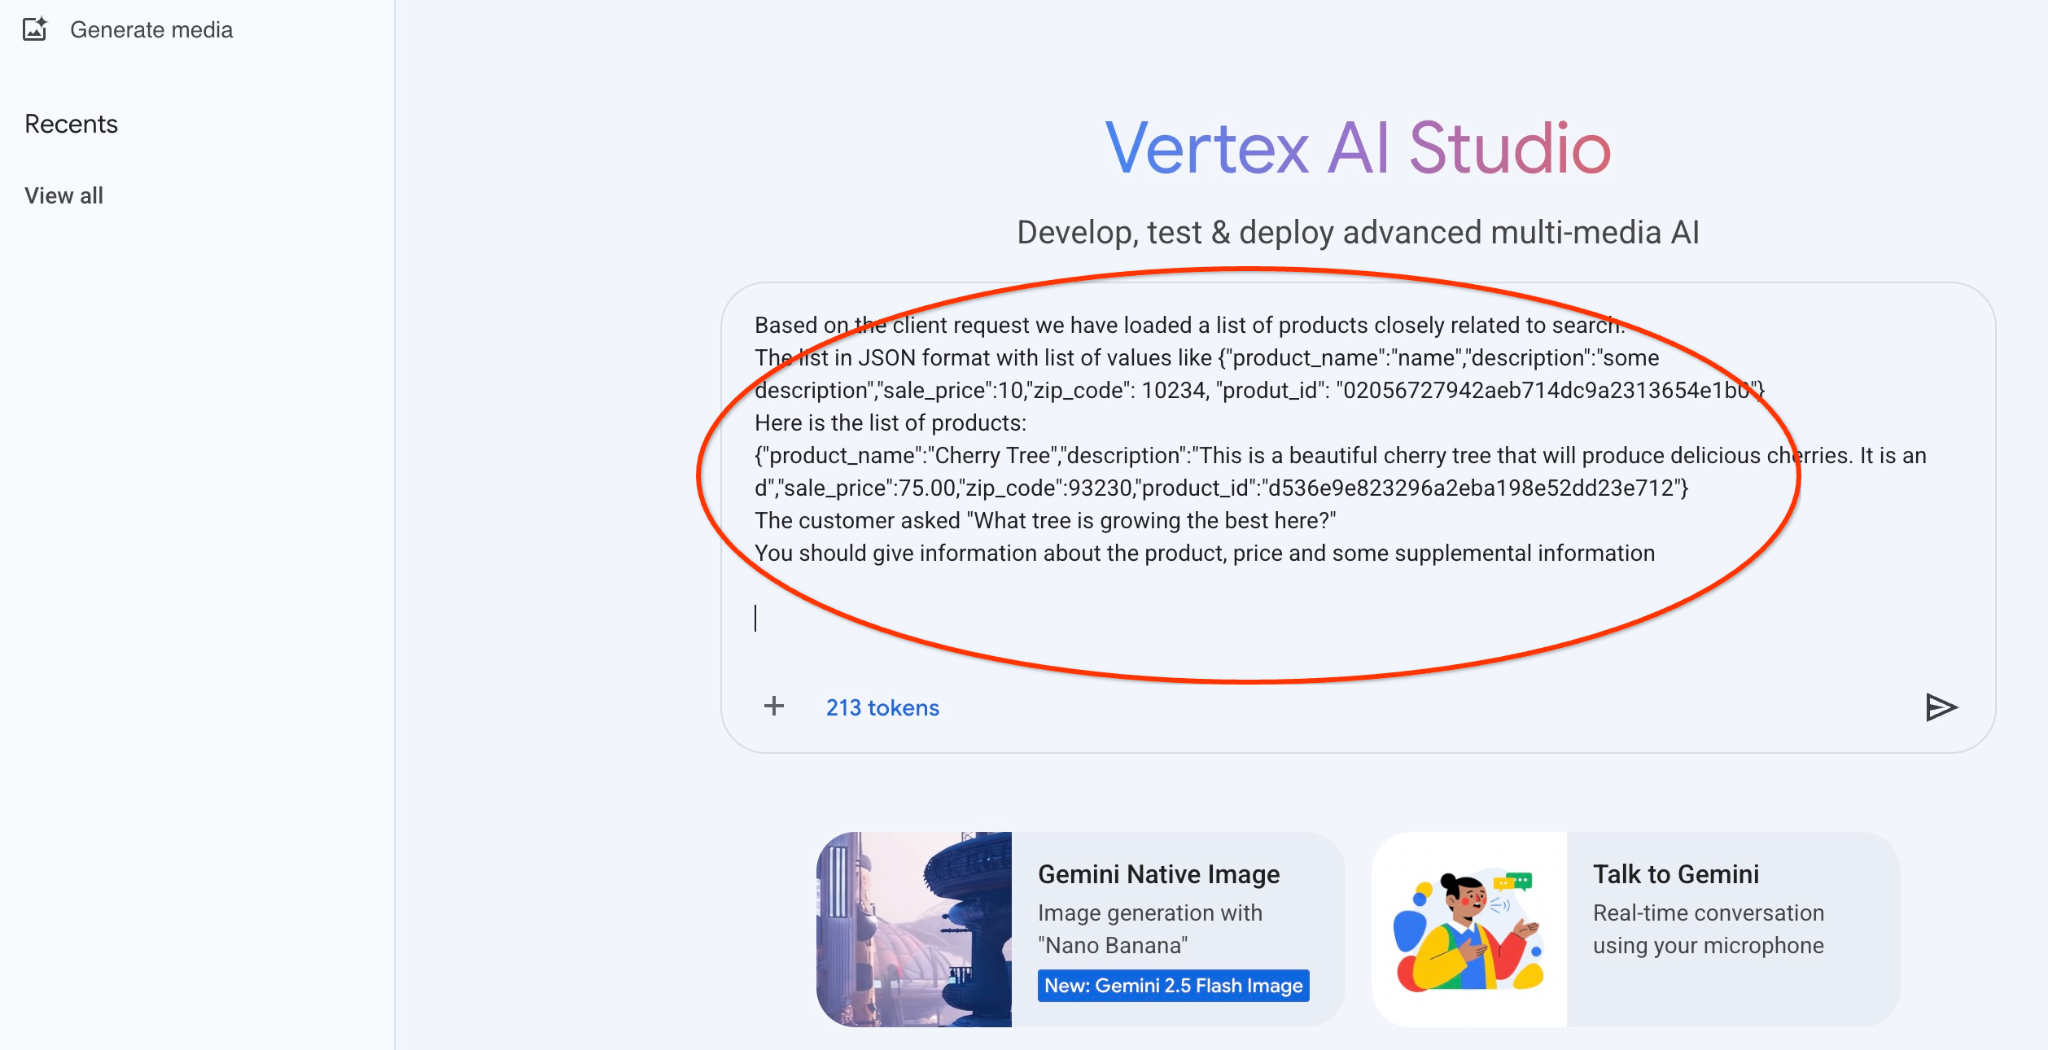
ต่อไปนี้คือพรอมต์ที่เราจะใช้กับเอาต์พุต JSON ของคำค้นหาช่วงแรกเกี่ยวกับต้นไม้
คุณเป็นที่ปรึกษาที่เป็นมิตรซึ่งช่วยค้นหาผลิตภัณฑ์ตามความต้องการของลูกค้า
ตามคำขอของไคลเอ็นต์ เราได้โหลดรายการผลิตภัณฑ์ที่เกี่ยวข้องกับการค้นหาอย่างใกล้ชิด
รายการในรูปแบบ JSON พร้อมรายการค่า เช่น {"product_name":"name","description":"some description","sale_price":10,"zip_code": 10234, "produt_id": "02056727942aeb714dc9a2313654e1b0"}
รายการผลิตภัณฑ์มีดังนี้
{"product_name":"ต้นเชอร์รี","description":"นี่คือต้นเชอร์รีที่สวยงามซึ่งจะให้ผลเชอร์รีแสนอร่อย {"d","sale_price":75.00,"zip_code":93230,"product_id":"d536e9e823296a2eba198e52dd23e712"}
ลูกค้าถามว่า "ต้นไม้ชนิดใดที่เติบโตได้ดีที่สุดที่นี่"
คุณควรให้ข้อมูลเกี่ยวกับผลิตภัณฑ์ ราคา และข้อมูลเสริมบางอย่าง
และนี่คือผลลัพธ์เมื่อเราเรียกใช้พรอมต์ด้วยค่า JSON และใช้โมเดล gemini-2.5-flash-light
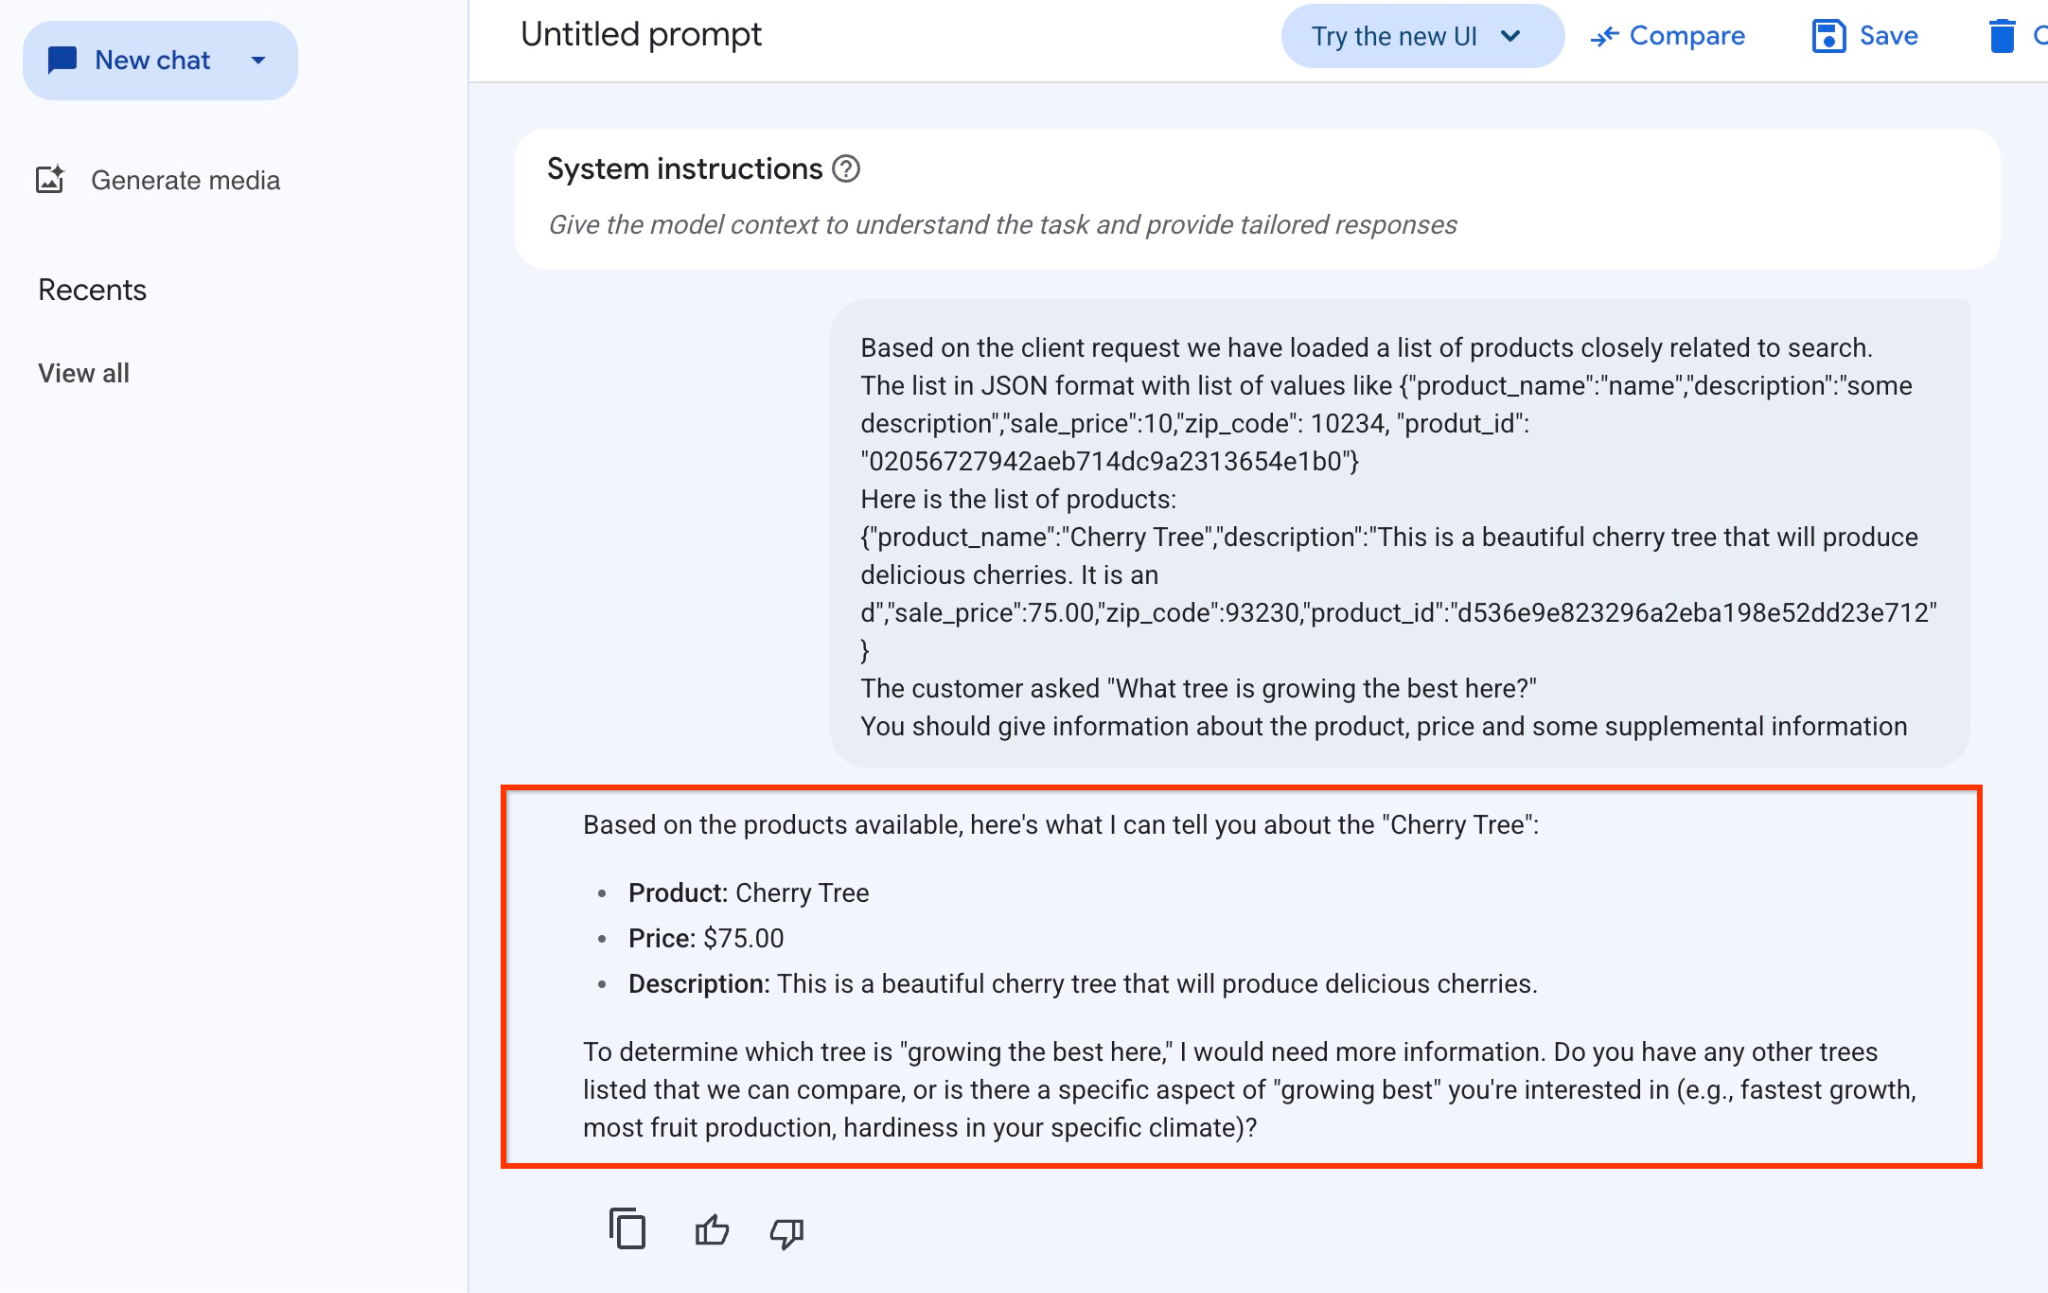
คำตอบที่เราได้รับจากโมเดลในตัวอย่างนี้มีดังนี้ โปรดทราบว่าคำตอบของคุณอาจแตกต่างกันเนื่องจากการเปลี่ยนแปลงโมเดลและพารามิเตอร์เมื่อเวลาผ่านไป
"จากผลิตภัณฑ์ที่มี ฉันบอกคุณเกี่ยวกับ "Cherry Tree" ได้ดังนี้
ผลิตภัณฑ์: Cherry Tree
ราคา: $75.00
คำอธิบาย: นี่คือต้นเชอร์รีที่สวยงามซึ่งจะให้ผลเชอร์รีแสนอร่อย
หากต้องการทราบว่าต้นไม้ต้นใด "เติบโตได้ดีที่สุดที่นี่" ฉันจะต้องมีข้อมูลเพิ่มเติม คุณมีต้นไม้อื่นๆ ที่เราสามารถเปรียบเทียบได้ไหม หรือมีลักษณะเฉพาะของ "เติบโตได้ดีที่สุด" ที่คุณสนใจไหม (เช่น เติบโตเร็วที่สุด ผลิตผลไม้มากที่สุด ทนทานต่อสภาพอากาศเฉพาะของคุณ)
เรียกใช้พรอมต์ใน PSQL
เราสามารถใช้การผสานรวม AlloyDB AI กับ Vertex AI เพื่อรับคำตอบเดียวกันจากโมเดล Generative โดยใช้ SQL ในฐานข้อมูลได้โดยตรง แต่หากต้องการใช้โมเดล gemini-1.5-flash เราต้องลงทะเบียนโมเดลก่อน
ยืนยันส่วนขยาย google_ml_integration โดยควรเป็นเวอร์ชัน 1.4.2 ขึ้นไป
เชื่อมต่อกับฐานข้อมูล quickstart_db จาก psql ตามที่แสดงก่อนหน้านี้ (หรือใช้ AlloyDB Studio) แล้วเรียกใช้คำสั่งต่อไปนี้
SELECT extversion from pg_extension where extname='google_ml_integration';
ตรวจสอบแฟล็กฐานข้อมูล google_ml_integration.enable_model_support
show google_ml_integration.enable_model_support;
เอาต์พุตที่คาดไว้จากเซสชัน psql คือ "on"
postgres=> show google_ml_integration.enable_model_support;
 google_ml_integration.enable_model_support
--------------------------------------------
 on
(1 row)
หากแสดงเป็น "ปิด" เราจะต้องตั้งค่าสถานะฐานข้อมูล google_ml_integration.enable_model_support เป็น "เปิด" หากต้องการดำเนินการดังกล่าว คุณสามารถใช้อินเทอร์เฟซเว็บคอนโซลของ AlloyDB หรือเรียกใช้คำสั่ง gcloud ต่อไปนี้
PROJECT_ID=$(gcloud config get-value project)
REGION=us-central1
ADBCLUSTER=alloydb-aip-01
gcloud beta alloydb instances update $ADBCLUSTER-pr \
  --database-flags google_ml_integration.enable_faster_embedding_generation=on,google_ml_integration.enable_model_support=on \
  --region=$REGION \
  --cluster=$ADBCLUSTER \
  --project=$PROJECT_ID \
  --update-mode=FORCE_APPLY
คำสั่งนี้จะใช้เวลาประมาณ 1-3 นาทีในการดำเนินการในเบื้องหลัง จากนั้นคุณจะยืนยันการแจ้งอีกครั้งได้
เราต้องใช้โมเดล 2 โมเดลสำหรับคำค้นหา โมเดลแรกคือโมเดล text-embedding-005 ที่ใช้ไปแล้ว และโมเดลที่ 2 คือโมเดล Gemini ทั่วไปของ Google
เราเริ่มต้นจากโมเดลการฝังข้อความ หากต้องการลงทะเบียนการเรียกใช้โมเดลใน psql หรือ AlloyDB Studio ให้ใช้โค้ดต่อไปนี้
CALL
  google_ml.create_model(
    model_id => 'text-embedding-005',
    model_provider => 'google',
    model_qualified_name => 'text-embedding-005',
    model_type => 'text_embedding',
    model_auth_type => 'alloydb_service_agent_iam',
    model_in_transform_fn => 'google_ml.vertexai_text_embedding_input_transform',
    model_out_transform_fn => 'google_ml.vertexai_text_embedding_output_transform');
และโมเดลถัดไปที่เราต้องลงทะเบียนคือ gemini-2.0-flash-001 ซึ่งจะใช้เพื่อสร้างเอาต์พุตที่ใช้งานง่าย
CALL
  google_ml.create_model(
    model_id => 'gemini-2.5-flash',
    model_request_url => 'publishers/google/models/gemini-2.5-flash:streamGenerateContent',
    model_provider => 'google',
    model_auth_type => 'alloydb_service_agent_iam');
คุณตรวจสอบรายการโมเดลที่ลงทะเบียนได้ทุกเมื่อโดยเลือกข้อมูลจาก google_ml.model_info_view
select model_id,model_type from google_ml.model_info_view;
ตัวอย่างเอาต์พุต
quickstart_db=> select model_id,model_type from google_ml.model_info_view;
        model_id         |   model_type
-------------------------+----------------
 textembedding-gecko     | text_embedding
 textembedding-gecko@001 | text_embedding
 text-embedding-005      | text_embedding
 gemini-2.5-flash        | generic
(4 rows)
ตอนนี้เราสามารถใช้ JSON ที่สร้างขึ้นในคำสั่งย่อยเพื่อจัดหาเป็นส่วนหนึ่งของพรอมต์ไปยังโมเดลข้อความ Generative AI โดยใช้ SQL
ในเซสชัน psql หรือ AlloyDB Studio ไปยังฐานข้อมูล ให้เรียกใช้การค้นหา
WITH trees AS (
SELECT
        cp.product_name,
        cp.product_description AS description,
        cp.sale_price,
        cs.zip_code,
        cp.uniq_id AS product_id
FROM
        cymbal_products cp
JOIN cymbal_inventory ci ON
        ci.uniq_id = cp.uniq_id
JOIN cymbal_stores cs ON
        cs.store_id = ci.store_id
        AND ci.inventory>0
        AND cs.store_id = 1583
ORDER BY
        (cp.embedding <=> embedding('text-embedding-005',
        'What kind of fruit trees grow well here?')::vector) ASC
LIMIT 1),
prompt AS (
SELECT
        'You are a friendly advisor helping to find a product based on the customer''s needs.
Based on the client request we have loaded a list of products closely related to search.
The list in JSON format with list of values like {"product_name":"name","product_description":"some description","sale_price":10}
Here is the list of products:' || json_agg(trees) || 'The customer asked "What kind of fruit trees grow well here?"
You should give information about the product, price and some supplemental information' AS prompt_text
FROM
        trees),
response AS (
SELECT
        json_array_elements(google_ml.predict_row( model_id =>'gemini-2.5-flash',
        request_body => json_build_object('contents',
        json_build_object('role',
        'user',
        'parts',
        json_build_object('text',
        prompt_text)))))->'candidates'->0->'content'->'parts'->0->'text' AS resp
FROM
        prompt)
SELECT
        string_agg(resp::text,
        ' ')
FROM
        response;
และนี่คือเอาต์พุตที่คาดไว้ เอาต์พุตอาจแตกต่างกันไปตามเวอร์ชันของโมเดลและพารามิเตอร์
"Hello there! I can certainly help you with finding a great fruit tree for your area.\n\nBased on what grows well, we have a wonderful **Cherry Tree** that could be a perfect fit!\n\nThis beautiful cherry tree is an excellent choice for producing delicious cherries right in your garden. It's an deciduous tree that typically" " grows to about 15 feet tall. Beyond its fruit, it offers lovely aesthetics with dark green leaves in the summer that transition to a beautiful red in the fall, making it great for shade and privacy too.\n\nCherry trees generally prefer a cool, moist climate and sandy soil, and they are best suited for USDA Zones" " 4-9. Given the zip code you're inquiring about (93230), which is typically in USDA Zone 9, this Cherry Tree should thrive wonderfully!\n\nYou can get this magnificent tree for just **$75.00**.\n\nLet me know if you have any other questions!" "
10. สร้างดัชนีเวกเตอร์
ชุดข้อมูลของเรามีขนาดเล็กมาก และเวลาในการตอบสนองส่วนใหญ่ขึ้นอยู่กับการโต้ตอบกับโมเดล AI แต่เมื่อมีเวกเตอร์หลายล้านรายการ ส่วนการค้นหาเวกเตอร์อาจใช้เวลาตอบกลับของเราเป็นส่วนสำคัญและทำให้ระบบมีภาระงานสูง เพื่อปรับปรุงส่วนนี้ เราสามารถสร้างดัชนีบนเวกเตอร์ได้
สร้างดัชนี ScaNN
หากต้องการสร้างดัชนี SCANN เราต้องเปิดใช้อีก 1 ส่วนขยาย ส่วนขยาย alloydb_scann มีอินเทอร์เฟซสำหรับทำงานกับดัชนีเวกเตอร์ประเภท ANN โดยใช้อัลกอริทึม ScaNN ของ Google
CREATE EXTENSION IF NOT EXISTS alloydb_scann;
ผลลัพธ์ที่คาดไว้
quickstart_db=> CREATE EXTENSION IF NOT EXISTS alloydb_scann;
CREATE EXTENSION
Time: 27.468 ms
quickstart_db=>
คุณสร้างดัชนีได้ในโหมด MANUAL หรือ AUTO โหมด MANUAL จะเปิดใช้โดยค่าเริ่มต้น และคุณสามารถสร้างดัชนีและดูแลรักษาได้เช่นเดียวกับดัชนีอื่นๆ แต่หากเปิดใช้โหมดอัตโนมัติ คุณจะสร้างดัชนีได้โดยไม่ต้องมีการบำรุงรักษาจากฝั่งคุณ คุณสามารถอ่านรายละเอียดเกี่ยวกับตัวเลือกทั้งหมดได้ในเอกสารประกอบ และที่นี่ฉันจะแสดงวิธีเปิดใช้โหมดอัตโนมัติและสร้างดัชนี ในกรณีของเรา เรามีแถวไม่เพียงพอที่จะสร้างดัชนีในโหมดอัตโนมัติ ดังนั้นเราจะสร้างเป็นโหมดแมนนวล
ในตัวอย่างต่อไปนี้ ฉันจะปล่อยให้พารามิเตอร์ส่วนใหญ่เป็นค่าเริ่มต้นและระบุเฉพาะจำนวนพาร์ติชัน (num_leaves) สำหรับดัชนี
CREATE INDEX cymbal_products_embeddings_scann ON cymbal_products
  USING scann (embedding cosine)
  WITH (num_leaves=31, max_num_levels = 2);
คุณอ่านเกี่ยวกับการปรับพารามิเตอร์ดัชนีได้ในเอกสารประกอบ
ผลลัพธ์ที่คาดไว้
quickstart_db=> CREATE INDEX cymbal_products_embeddings_scann ON cymbal_products
  USING scann (embedding cosine)
  WITH (num_leaves=31, max_num_levels = 2);
CREATE INDEX
quickstart_db=>
เปรียบเทียบคำตอบ
ตอนนี้เราสามารถเรียกใช้การค้นหาเวกเตอร์ในโหมด EXPLAIN และตรวจสอบว่ามีการใช้ดัชนีหรือไม่
EXPLAIN (analyze)
WITH trees as (
SELECT
        cp.product_name,
        left(cp.product_description,80) as description,
        cp.sale_price,
        cs.zip_code,
        cp.uniq_id as product_id
FROM
        cymbal_products cp
JOIN cymbal_inventory ci on
        ci.uniq_id=cp.uniq_id
JOIN cymbal_stores cs on
        cs.store_id=ci.store_id
        AND ci.inventory>0
        AND cs.store_id = 1583
ORDER BY
        (cp.embedding <=> embedding('text-embedding-005','What kind of fruit trees grow well here?')::vector) ASC
LIMIT 1)
SELECT json_agg(trees) FROM trees;
ผลลัพธ์ที่คาดหวัง (แก้ไขเพื่อความชัดเจน)
...
Aggregate (cost=16.59..16.60 rows=1 width=32) (actual time=2.875..2.877 rows=1 loops=1)
-> Subquery Scan on trees (cost=8.42..16.59 rows=1 width=142) (actual time=2.860..2.862 rows=1 loops=1)
-> Limit (cost=8.42..16.58 rows=1 width=158) (actual time=2.855..2.856 rows=1 loops=1)
-> Nested Loop (cost=8.42..6489.19 rows=794 width=158) (actual time=2.854..2.855 rows=1 loops=1)
-> Nested Loop (cost=8.13..6466.99 rows=794 width=938) (actual time=2.742..2.743 rows=1 loops=1)
-> Index Scan using cymbal_products_embeddings_scann on cymbal_products cp (cost=7.71..111.99 rows=876 width=934) (actual time=2.724..2.724 rows=1 loops=1)
Order By: (embedding <=> '[0.008864171,0.03693164,-0.024245683,-0.00355923,0.0055611245,0.015985578,...<redacted>...5685,-0.03914233,-0.018452475,0.00826032,-0.07372604]'::vector)
-> Index Scan using walmart_inventory_pkey on cymbal_inventory ci (cost=0.42..7.26 rows=1 width=37) (actual time=0.015..0.015 rows=1 loops=1)
Index Cond: ((store_id = 1583) AND (uniq_id = (cp.uniq_id)::text))
...
จากเอาต์พุต เราจะเห็นได้อย่างชัดเจนว่าคําค้นหาใช้ "Index Scan using cymbal_products_embeddings_scann on cymbal_products"
และหากเราเรียกใช้การค้นหาโดยไม่มีคำอธิบาย
WITH trees as (
SELECT
        cp.product_name,
        left(cp.product_description,80) as description,
        cp.sale_price,
        cs.zip_code,
        cp.uniq_id as product_id
FROM
        cymbal_products cp
JOIN cymbal_inventory ci on
        ci.uniq_id=cp.uniq_id
JOIN cymbal_stores cs on
        cs.store_id=ci.store_id
        AND ci.inventory>0
        AND cs.store_id = 1583
ORDER BY
        (cp.embedding <=> embedding('text-embedding-005','What kind of fruit trees grow well here?')::vector) ASC
LIMIT 1)
SELECT json_agg(trees) FROM trees;
ผลลัพธ์ที่คาดไว้
[{"product_name":"Cherry Tree","description":"This is a beautiful cherry tree that will produce delicious cherries. It is an d","sale_price":75.00,"zip_code":93230,"product_id":"d536e9e823296a2eba198e52dd23e712"}]
เราจะเห็นว่าผลลัพธ์คือต้นเชอร์รีต้นเดียวกันกับที่อยู่ด้านบนในการค้นหาของเราโดยไม่มีดัชนี บางครั้งก็อาจไม่เป็นเช่นนั้น และการตอบกลับอาจแสดงโครงสร้างแบบต้นไม้ที่ไม่ใช่โครงสร้างเดียวกัน แต่เป็นโครงสร้างแบบต้นไม้อื่นๆ จากด้านบน ดังนั้นดัชนีจึงให้ประสิทธิภาพแก่เรา แต่ก็ยังแม่นยำเพียงพอที่จะให้ผลลัพธ์ที่ดี
คุณลองใช้ดัชนีต่างๆ ที่พร้อมใช้งานสำหรับเวกเตอร์ รวมถึงห้องทดลองและตัวอย่างเพิ่มเติมที่มีการผสานรวม Langchain ได้ในหน้าเอกสารประกอบ
11. ล้างสภาพแวดล้อม
ทำลายอินสแตนซ์และคลัสเตอร์ AlloyDB เมื่อคุณทำแล็บเสร็จแล้ว
ลบคลัสเตอร์ AlloyDB และอินสแตนซ์ทั้งหมด
หากคุณเคยใช้ AlloyDB เวอร์ชันทดลองใช้ อย่าลบคลัสเตอร์ทดลองหากคุณวางแผนที่จะทดสอบห้องทดลองและทรัพยากรอื่นๆ โดยใช้คลัสเตอร์ทดลอง คุณจะสร้างคลัสเตอร์ทดลองอื่นในโปรเจ็กต์เดียวกันไม่ได้
คลัสเตอร์จะถูกทำลายด้วยตัวเลือก force ซึ่งจะลบอินสแตนซ์ทั้งหมดที่เป็นของคลัสเตอร์ด้วย
ใน Cloud Shell ให้กำหนดตัวแปรโปรเจ็กต์และตัวแปรสภาพแวดล้อมหากคุณถูกตัดการเชื่อมต่อและสูญเสียการตั้งค่าก่อนหน้านี้ทั้งหมด
gcloud config set project <your project id>
export REGION=us-central1
export ADBCLUSTER=alloydb-aip-01
export PROJECT_ID=$(gcloud config get-value project)
ลบคลัสเตอร์
gcloud alloydb clusters delete $ADBCLUSTER --region=$REGION --force
เอาต์พุตของคอนโซลที่คาดไว้
student@cloudshell:~ (test-project-001-402417)$ gcloud alloydb clusters delete $ADBCLUSTER --region=$REGION --force
All of the cluster data will be lost when the cluster is deleted.

Do you want to continue (Y/n)?  Y

Operation ID: operation-1697820178429-6082890a0b570-4a72f7e4-4c5df36f
Deleting cluster...done.
ลบข้อมูลสำรองของ AlloyDB
ลบข้อมูลสำรอง AlloyDB ทั้งหมดสำหรับคลัสเตอร์
for i in $(gcloud alloydb backups list --filter="CLUSTER_NAME: projects/$PROJECT_ID/locations/$REGION/clusters/$ADBCLUSTER" --format="value(name)" --sort-by=~createTime) ; do gcloud alloydb backups delete $(basename $i) --region $REGION --quiet; done
เอาต์พุตของคอนโซลที่คาดไว้
student@cloudshell:~ (test-project-001-402417)$ for i in $(gcloud alloydb backups list --filter="CLUSTER_NAME: projects/$PROJECT_ID/locations/$REGION/clusters/$ADBCLUSTER" --format="value(name)" --sort-by=~createTime) ; do gcloud alloydb backups delete $(basename $i) --region $REGION --quiet; done
Operation ID: operation-1697826266108-60829fb7b5258-7f99dc0b-99f3c35f
Deleting backup...done.
ตอนนี้เราสามารถทำลาย VM ได้แล้ว
ลบ VM ใน GCE
ใน Cloud Shell ให้เรียกใช้คำสั่งต่อไปนี้
export GCEVM=instance-1
export ZONE=us-central1-a
gcloud compute instances delete $GCEVM \
    --zone=$ZONE \
    --quiet
เอาต์พุตของคอนโซลที่คาดไว้
student@cloudshell:~ (test-project-001-402417)$ export GCEVM=instance-1
export ZONE=us-central1-a
gcloud compute instances delete $GCEVM \
    --zone=$ZONE \
    --quiet
Deleted
12. ขอแสดงความยินดี
ขอแสดงความยินดีที่ทำ Codelab นี้เสร็จสมบูรณ์
แล็บนี้เป็นส่วนหนึ่งของเส้นทางการเรียนรู้ AI พร้อมใช้งานจริงด้วย Google Cloud
- สำรวจหลักสูตรทั้งหมดเพื่อเชื่อมช่องว่างจากต้นแบบไปสู่การผลิต
- แชร์ความคืบหน้าของคุณด้วยแฮชแท็ก
#ProductionReadyAI
สิ่งที่เราได้พูดถึง
- วิธีติดตั้งใช้งานคลัสเตอร์และอินสแตนซ์หลักของ AlloyDB
- วิธีเชื่อมต่อกับ AlloyDB จาก VM ของ Google Compute Engine
- วิธีสร้างฐานข้อมูลและเปิดใช้ AlloyDB AI
- วิธีโหลดข้อมูลลงในฐานข้อมูล
- วิธีใช้ AlloyDB Studio
- วิธีใช้โมเดลการฝัง Vertex AI ใน AlloyDB
- วิธีใช้ Vertex AI Studio
- วิธีเพิ่มคุณค่าให้กับผลลัพธ์โดยใช้โมเดล Generative AI ของ Vertex AI
- วิธีปรับปรุงประสิทธิภาพโดยใช้ดัชนีเวกเตอร์
13. แบบสำรวจ
เอาต์พุต: