
About this codelab
1. Introduction
In this codelab you'll learn how you migrate Dagger to Hilt for dependency injection (DI) in an Android app. This codelab migrates the Using Dagger in your Android app codelab to Hilt. This codelab aims to show you how to plan your migration and keep Dagger and Hilt working side by side during the migration by keeping the app functional while you migrate each Dagger component to Hilt.
Dependency injection helps with reusability of code, ease of refactoring and ease of testing. Hilt is built on top of the popular DI library Dagger to benefit from the compile time correctness, runtime performance, scalability, and Android Studio support that Dagger provides.
Since many Android framework classes are instantiated by the OS itself, there's an associated boilerplate when using Dagger in Android apps. Hilt removes most of this boilerplate by automatically generating and providing:
- Components for integrating Android framework classes with Dagger that you would otherwise need to create by hand.
- Scope annotations for the components that Hilt generates automatically.
- Predefined bindings and qualifiers.
Best of all, as Dagger and Hilt can coexist together, apps can be migrated on an as-needed basis.
If you run into any issues (code bugs, grammatical errors, unclear wording, etc.) as you work through this codelab, please report the issue via the Report a mistake link in the lower left corner of the codelab.
Prerequisites
- Experience with Kotlin syntax.
- Experience with Dagger.
What you'll learn
- How to add Hilt to your Android app.
- How to plan your migration strategy.
- How to migrate components to Hilt and keep the existing Dagger code working.
- How to migrate scoped components.
- How to test your app using Hilt.
What you'll need
- Android Studio 4.0 or higher.
2. Getting set up
Get the code
Get the codelab code from GitHub:
$ git clone https://github.com/android/codelab-android-dagger-to-hilt
Alternatively you can download the repository as a Zip file:
Open Android Studio
If you need to download Android Studio, you can do so here.
Project set up
The project is built in multiple GitHub branches:
masteris the branch you checked out or downloaded. The codelab's starting point.interopis the Dagger and Hilt interop branch.solutioncontains the solution to this codelab including testing and ViewModels.
We recommend you to follow the codelab step by step at your own pace starting with the master branch.
During the codelab, you'll be presented with snippets of code that you'll have to add to the project. In some places, you'll also have to remove code that will be explicitly mentioned in comments on the code snippets.
As checkpoints, you have the intermediate branches available in case you need help with a particular step.
To get the solution branch using git, use this command:
$ git clone -b solution https://github.com/android/codelab-android-dagger-to-hilt
Or download the solution code from here:
Frequently asked questions
Running the sample app
First, let's see what the starting sample app looks like. Follow these instructions to open the sample app in Android Studio.
- If you downloaded the zip archive, unzip the file locally.
- Open the project in Android Studio.
- Click the
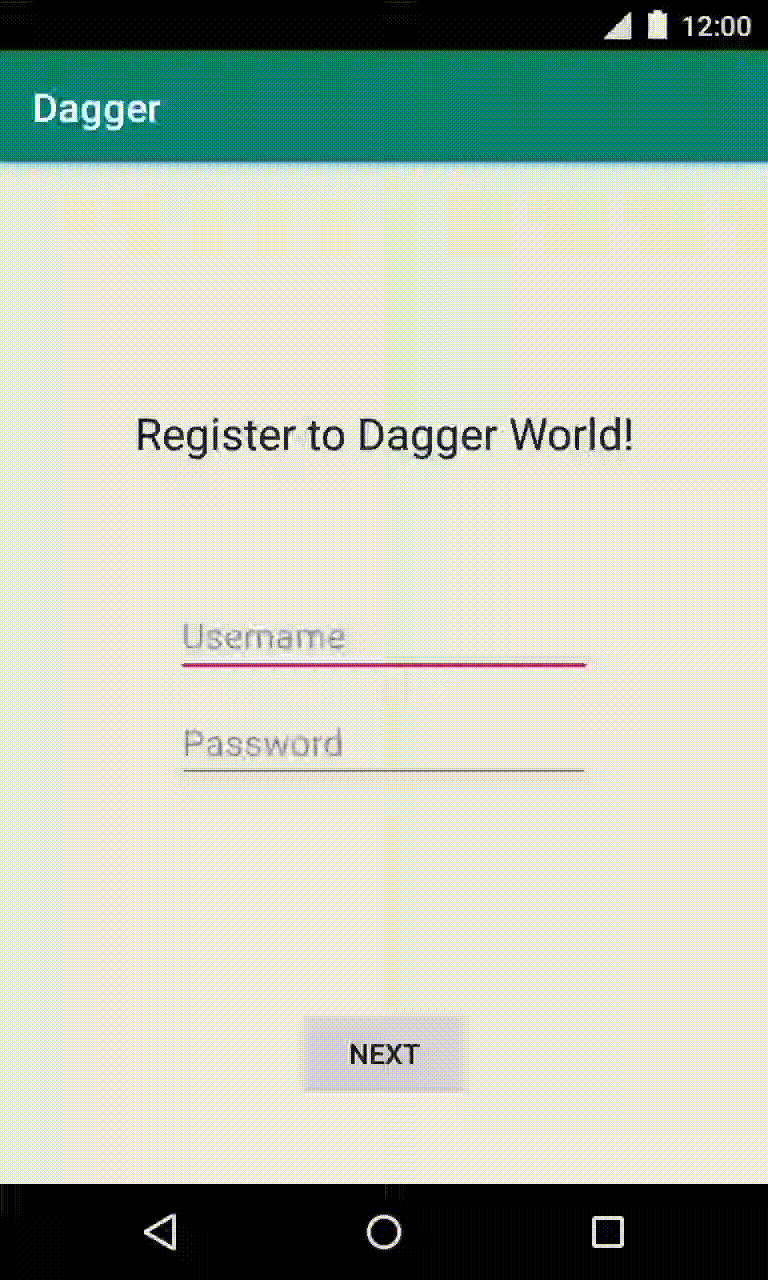
 Run button, and either choose an emulator or connect your Android device. The Registration screen should appear.
The app consists of 4 different flows working with Dagger (implemented as Activities):
- Registration: The user can register by entering username, password and accepting our terms and conditions.
- Login: The user can log in using the credentials added during the registration flow and can also unregister from the app.
- Home: The user is welcomed and can see how many unread notifications they have.
- Settings: The user can log out and refresh the number of unread notifications (which produces a random number of notifications).
The project follows a typical MVVM pattern where all the complexity of the View is deferred to a ViewModel. Take a moment to familiarize yourself with the structure of the project.
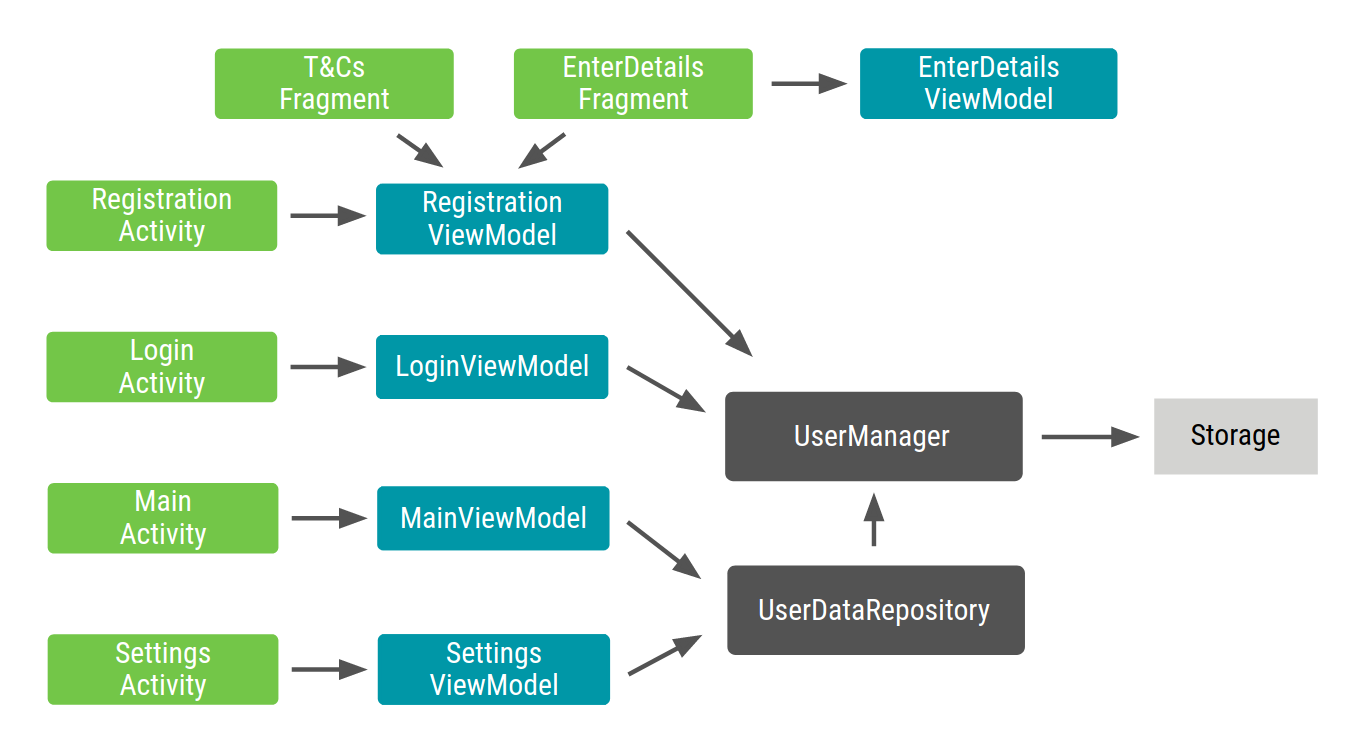
The arrows represent dependencies between objects. This is what we call the application graph: all the classes of the app and the dependencies between them.
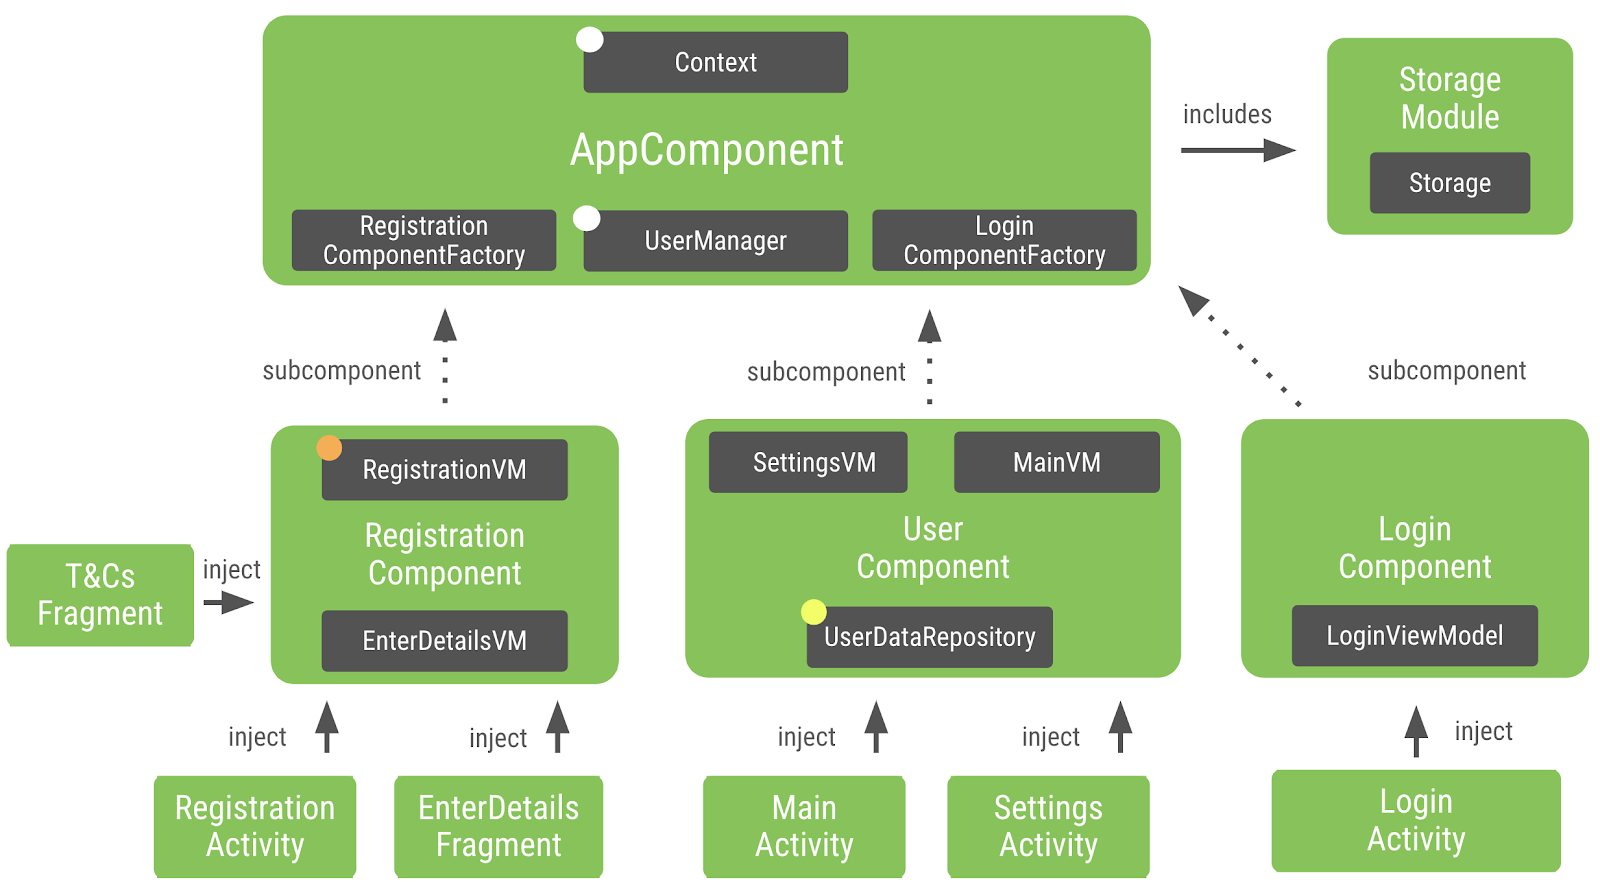
The code in the master branch uses Dagger to inject dependencies. Instead of creating Components by hand, we will refactor the app to use Hilt to generate Components and other Dagger related code.
Dagger is set up in the app as shown in the following diagram. The dot on certain types means that the type is scoped to the Component that provides it:
3. Adding Hilt to the project
To keep things simple, Hilt dependencies are already added to this project in the master branch that you downloaded initially. You don't need to add the following code to your project as it's already done for you. Nonetheless, let's see what's needed to use Hilt in an Android app.
Apart from the library dependencies, Hilt uses a Gradle plugin that is configured in the project. Open the root (project level) build.gradle file and find the following Hilt dependency in the classpath:
buildscript {
    ...
    ext.hilt_version = '2.35'
    dependencies {
        ...
        classpath "com.google.dagger:hilt-android-gradle-plugin:$hilt_version"
    }
}
Open app/build.gradle and check Hilt gradle plugin declaration on the top just below the kotlin-kapt plugin.
...
apply plugin: 'kotlin-kapt'
apply plugin: 'dagger.hilt.android.plugin'

android {
    ...
}
Lastly, Hilt dependencies and annotation processor are included in our project in the same app/build.gradle file:
...
dependencies {
    implementation "com.google.dagger:hilt-android:$hilt_version"
    kapt "com.google.dagger:hilt-android-compiler:$hilt_version"
}
All libraries, including Hilt, get downloaded when you build and sync the project. Let's start using Hilt!
4. Planning the migration
You might be tempted to migrate everything to Hilt at once but in a real world project you want the app building and running without errors while you are migrating to Hilt in steps.
When migrating to Hilt, you'll want to organize your work into steps. The recommended approach is to start with migrating your Application or @Singleton component and later migrate activities and fragments.
In the codelab, you'll migrate the AppComponent first and then each flow of the app starting with Registration, then Login, and lastly Main and Settings.
During the migration, you'll remove all @Component and @Subcomponent interfaces and annotate all modules with @InstallIn.
After the migration, all Application/Activity/Fragment/View/Service/BroadcastReceiver classes should be annotated with @AndroidEntryPoint and any code instantiating or propagating components should also be removed.
To plan the migration, let's start with AppComponent.kt to understand component hierarchy.
@Singleton
// Definition of a Dagger component that adds info from the different modules to the graph
@Component(modules = [StorageModule::class, AppSubcomponents::class])
interface AppComponent {

    // Factory to create instances of the AppComponent
    @Component.Factory
    interface Factory {
        // With @BindsInstance, the Context passed in will be available in the graph
        fun create(@BindsInstance context: Context): AppComponent
    }

    // Types that can be retrieved from the graph
    fun registrationComponent(): RegistrationComponent.Factory
    fun loginComponent(): LoginComponent.Factory
    fun userManager(): UserManager
}
AppComponent is annotated with @Component and includes two modules, StorageModule and AppSubcomponents.
AppSubcomponents has three components, RegistrationComponent, LoginComponent, and UserComponent.
LoginComponentis injected intoLoginActivityRegistrationComponentis injected intoRegistrationActivity,EnterDetailsFragmentandTermsAndConditionsFragment. Also this component is scoped toRegistrationActivity.
UserComponent is injected in MainActivity and SettingsActivity.
References to AppComponent can be replaced by the Hilt-generated SingletonComponent (link to all generated components) that maps to the Component you're migrating in your app.
5. Migrating the Application component
In this section you'll migrate the AppComponent. You will need to do some groundwork to keep existing Dagger code working while in the following steps you migrate each component to Hilt.
To initialize Hilt and start the code generation, you need to annotate your Application class with Hilt annotations.
Open MyApplication.kt and add the @HiltAndroidApp annotation to the class. These annotations tell Hilt to trigger the code generation that Dagger will pick up and use in its annotation processor.
MyApplication.kt
package com.example.android.dagger

import android.app.Application
import dagger.hilt.android.HiltAndroidApp


@HiltAndroidApp
open class MyApplication : Application() {

    // Instance of the AppComponent that will be used by all the Activities in the project
    val appComponent: AppComponent by lazy {
        initializeComponent()
    }

    open fun initializeComponent(): AppComponent {
        // Creates an instance of AppComponent using its Factory constructor
        // We pass the applicationContext that will be used as Context in the graph
        return DaggerAppComponent.factory().create(applicationContext)
    }
}
1. Migrate Component modules
To start, open AppComponent.kt. The AppComponent has two modules (StorageModule and AppSubcomponents) added in the @Component annotation. The first thing you need to do is to migrate these 2 modules, so that Hilt adds them into the generated SingletonComponent.
To do that, open AppSubcomponents.kt and annotate the class with @InstallInannotation. @InstallIn annotation takes a parameter to add the module to the right component. In this case, as you're migrating the application level component, you want the bindings to be generated in SingletonComponent.
AppSubcomponents.kt
// This module tells a Component which are its subcomponents
// Install this module in Hilt-generated SingletonComponent
@InstallIn(SingletonComponent::class)
@Module(
    subcomponents = [
        RegistrationComponent::class,
        LoginComponent::class,
        UserComponent::class
    ]
)
class AppSubcomponents
You need to make the same change in StorageModule. Open StorageModule.kt and add the @InstallIn annotation as you did in the previous step.
StorageModule.kt
// Tells Dagger this is a Dagger module
// Install this module in Hilt-generated SingletonComponent
@InstallIn(SingletonComponent::class)
@Module
abstract class StorageModule {

    // Makes Dagger provide SharedPreferencesStorage when a Storage type is requested
    @Binds
    abstract fun provideStorage(storage: SharedPreferencesStorage): Storage
}
With @InstallIn annotation, once again you told Hilt to add the module to the Hilt-generated SingletonComponent.
Now let's go back and check AppComponent.kt. AppComponent provides dependencies for RegistrationComponent, LoginComponent and UserManager. In the next steps you'll prepare these components for migration.
2. Migrate exposed types
While you migrate the app fully to Hilt, Hilt let's you manually ask for dependencies from Dagger via using entry points. By using entry points you can keep the app working while migrating every Dagger component. In this step you will replace each Dagger component with a manual dependency lookup in the SingletonComponent generated by Hilt.
To get the RegistrationComponent.Factory for RegistrationActivity.kt from the Hilt generated SingletonComponent, you need to create a new EntryPoint interface annotated with @InstallIn. InstallIn annotation tells Hilt where to grab the binding from. To access an entry point, use the appropriate static method from EntryPointAccessors. The parameter should be either the component instance or the @AndroidEntryPoint object that acts as the component holder.
RegistrationActivity.kt
class RegistrationActivity : AppCompatActivity() {

    @InstallIn(SingletonComponent::class)
    @EntryPoint
    interface RegistrationEntryPoint {
        fun registrationComponent(): RegistrationComponent.Factory
    }

    ...
}
Now you need to replace Dagger related code with the RegistrationEntryPoint. Change the initialization of registrationComponent to use the RegistrationEntryPoint. With this change RegistrationActivity can access its dependencies over Hilt generated code until it is migrated to use Hilt.
RegistrationActivity.kt
        // Creates an instance of Registration component by grabbing the factory from the app graph
        val entryPoint = EntryPointAccessors.fromApplication(applicationContext, RegistrationEntryPoint::class.java)
        registrationComponent = entryPoint.registrationComponent().create()
Next, you need to do the same groundwork for all the other exposed types of Components. Let's continue with the LoginComponent.Factory. Open LoginActivity and create a LoginEntryPoint interface annotated with @InstallIn and @EntryPoint as you did before but exposing what LoginActivity needs from the Hilt component.
LoginActivity.kt
    @InstallIn(SingletonComponent::class)
    @EntryPoint
    interface LoginEntryPoint {
        fun loginComponent(): LoginComponent.Factory
    }
Now that Hilt knows how to provide the LoginComponent, replace the old inject() call with the EntryPoint's loginComponent().
LoginActivity.kt
        val entryPoint = EntryPointAccessors.fromApplication(applicationContext, LoginEntryPoint::class.java)
        entryPoint.loginComponent().create().inject(this)
Two of the three exposed types from AppComponent are replaced to work with Hilt EntryPoints. Next, you need to make a similar change for UserManager. Unlike RegistrationComponent and LoginComponent, UserManager is used in both MainActivity and SettingsActivity. You only need to create an EntryPoint interface only once. The annotated EntryPoint interface can be used in both Activities. To keep this simple, declare the Interface in MainActivity.
To create a UserManagerEntryPoint interface open MainActivity.kt and annotate it with @InstallIn and @EntryPoint.
MainActivity.kt
    @InstallIn(SingletonComponent::class)
    @EntryPoint
    interface UserManagerEntryPoint {
        fun userManager(): UserManager
    }
Now change UserManager to use the UserManagerEntryPoint.
MainActivity.kt
        val entryPoint = EntryPointAccessors.fromApplication(applicationContext, UserManagerEntryPoint::class.java)
        val userManager = entryPoint.userManager()
You need to do the same change in SettingsActivity. Open SettingsActivity.kt and replace how UserManager is injected.
SettingsActivity.kt
    val entryPoint = EntryPointAccessors.fromApplication(applicationContext, MainActivity.UserManagerEntryPoint::class.java)
    val userManager = entryPoint.userManager()
3. Remove Component Factory
Passing Context to a Dagger component using @BindsInstance is a common pattern. This is not needed in Hilt as Context is already available as a predefined binding.
Context is usually needed to access resources, databases, shared preferences, and etc. Hilt simplifies injecting to context by using the Qualifier @ApplicationContext and @ActivityContext.
While migrating your app, check which types require Context as a dependency and replace them with the ones Hilt provides.
In this case, SharedPreferencesStorage has Context as a dependency. In order to tell Hilt to inject the context, open SharedPreferencesStorage.kt. SharedPreferences requires application's Context, so add @ApplicationContext annotation to the context parameter.
SharedPreferencesStorage.kt
class SharedPreferencesStorage @Inject constructor(
    @ApplicationContext context: Context
) : Storage {

//...
4. Migrate inject methods
Next, you need to check the component code for inject() methods and annotate the corresponding classes with @AndroidEntryPoint. In our case, AppComponent doesn't have any inject() methods so you don't need to do anything.
5. Remove the AppComponent class
Since you already added EntryPoints for all the components listed in AppComponent.kt, you can delete AppComponent.kt.
6. Remove the code that uses the Component to migrate
You don't need the code to initialize the custom AppComponent in the application class anymore, instead, the Application class uses Hilt-generated SingletonComponent. Remove all the code inside the class body. The end code should look like the code listing below.
MyApplication.kt
package com.example.android.dagger

import android.app.Application
import dagger.hilt.android.HiltAndroidApp


@HiltAndroidApp
open class MyApplication : Application()
With this, you've successfully added Hilt to your Application, removed the AppComponent and changed the Dagger code to inject dependencies over the AppComponent generated by Hilt. When you build and try the app on a device or emulator, the app should be working just like it used to. In the following sections, we will migrate each Activity and Fragment to use Hilt.
6. Migrating an Activity component
Now that you migrated the Application component and laid out the groundwork, you can migrate each Component to Hilt one by one.
Let's start migrating the login flow. Instead of creating the LoginComponent manually and using it in the LoginActivity, you want Hilt to do that for you.
You can follow the same steps you used in the previous section but this time using the Hilt-generated ActivityComponent as we'll be migrating a Component that is managed by an Activity.
To start with Open LoginComponent.kt. LoginComponent doesn't have any modules so you don't need to do anything. To make Hilt generate a component for the LoginActivity and inject it, you need to annotate the activity with @AndroidEntryPoint.
LoginActivity.kt
@AndroidEntryPoint
class LoginActivity : AppCompatActivity() {

    //...
}
This is all the code you need to add to migrate LoginActivity to Hilt. Since Hilt will generate the Dagger related code, all you need to do is some cleanup. Delete the LoginEntryPoint interface.
LoginActivity.kt
    //Remove
    //@InstallIn(SingletonComponent::class)
    //@EntryPoint
    //interface LoginEntryPoint {
    //    fun loginComponent(): LoginComponent.Factory
    //}
Next, remove the EntryPoint code in onCreate().
LoginActivity.kt
override fun onCreate(savedInstanceState: Bundle?) {
   //Remove
   //val entryPoint = EntryPoints.get(applicationContext, LoginActivity.LoginEntryPoint::class.java)
   //entryPoint.loginComponent().create().inject(this)

    super.onCreate(savedInstanceState)

    ...
}
Since Hilt will generate the component, find and delete LoginComponent.kt.
LoginComponent is currently listed as a subcomponent in AppSubcomponents.kt. You can safely delete LoginComponent from subcomponents list since Hilt will generate the bindings for you.
AppSubcomponents.kt
// This module tells a Component which are its subcomponents
@InstallIn(SingletonComponent::class)
@Module(
    subcomponents = [
        RegistrationComponent::class,
        UserComponent::class
    ]
)
class AppSubcomponents
This is all you need to migrate LoginActivity to use Hilt. In this section you deleted much more code than you added which is great! You are not only typing less code when using Hilt but also this means less code to maintain and introduce bugs.
7. Migrating an Activity and Fragment components
In this section you will migrate the registration flow. To plan the migration let's take a look at RegistrationComponent. Open RegistrationComponent.kt and scroll down to the inject() function. RegistrationComponent is responsible for injecting dependencies to RegistrationActivity, EnterDetailsFragment, and TermsAndConditionsFragment.
Let's start with migrating the RegistrationActivity. Open RegistrationActivity.kt and annotate the class with @AndroidEntryPoint.
RegistrationActivity.kt
@AndroidEntryPoint
class RegistrationActivity : AppCompatActivity() {
    //...
}
Now that the RegistrationActivity is registered to Hilt, you can remove the RegistrationEntryPoint Interface and the EntryPoint related code from onCreate() function.
RegistrationActivity.kt
//Remove
//@InstallIn(SingletonComponent::class)
//@EntryPoint
//interface RegistrationEntryPoint {
//    fun registrationComponent(): RegistrationComponent.Factory
//}


override fun onCreate(savedInstanceState: Bundle?) {
    //Remove
    //val entryPoint = EntryPoints.get(applicationContext, RegistrationEntryPoint::class.java)
    //registrationComponent = entryPoint.registrationComponent().create()

    registrationComponent.inject(this)
    super.onCreate(savedInstanceState)
    //..
}
Hilt is responsible for generating the component and injecting dependencies so you can remove the registrationComponent variable and the inject call on the deleted Dagger component.
RegistrationActivity.kt
// Remove
// lateinit var registrationComponent: RegistrationComponent


override fun onCreate(savedInstanceState: Bundle?) {
    //Remove
    //registrationComponent.inject(this)
    super.onCreate(savedInstanceState)

    //..
}
Next, open EnterDetailsFragment.kt. Annotate the EnterDetailsFragment with @AndroidEntryPoint, similar to what you did in RegistrationActivity.
EnterDetailsFragment.kt
@AndroidEntryPoint
class EnterDetailsFragment : Fragment() {

    //...
}
Since Hilt is providing the dependencies, the inject() call on the deleted Dagger component is not needed. Delete onAttach() function.
The next step is to migrate the TermsAndConditionsFragment. Open TermsAndConditionsFragment.kt, annotate the class and remove the onAttach() function as you did in the previous step. The end code should look like this.
TermsAndConditionsFragment.kt
@AndroidEntryPoint
class TermsAndConditionsFragment : Fragment() {

    @Inject
    lateinit var registrationViewModel: RegistrationViewModel

    //override fun onAttach(context: Context) {
    //    super.onAttach(context)
    //
    //    // Grabs the registrationComponent from the Activity and injects this Fragment
    //    (activity as RegistrationActivity).registrationComponent.inject(this)
    //}

    override fun onCreateView(
        inflater: LayoutInflater,
        container: ViewGroup?,
        savedInstanceState: Bundle?
    ): View? {
        val view = inflater.inflate(R.layout.fragment_terms_and_conditions, container, false)

        view.findViewById<Button>(R.id.next).setOnClickListener {
            registrationViewModel.acceptTCs()
            (activity as RegistrationActivity).onTermsAndConditionsAccepted()
        }

        return view
    }
}
With this change, you migrated all activities and fragments listed in the RegistrationComponent so you can delete RegistrationComponent.kt.
Once you delete RegistrationComponent, you need to remove its reference from the subcomponents list in AppSubcomponents.
AppSubcomponents.kt
@InstallIn(SingletonComponent::class)
// This module tells a Component which are its subcomponents
@Module(
    subcomponents = [
        UserComponent::class
    ]
)
class AppSubcomponents
There is one thing left to finish migrating the Registration flow. Registration flow declares and uses its own scope, ActivityScope. Scopes control the lifecycle of dependencies. In this case, ActivityScope tells Dagger to inject the same instance of RegistrationViewModel within the flow started with RegistrationActivity. Hilt provides built in lifecycle scopes to support this.
Open RegistrationViewModel change @ActivityScope annotation with the @ActivityScoped provided by Hilt.
RegistrationViewModel.kt
@ActivityScoped
class RegistrationViewModel @Inject constructor(val userManager: UserManager) {

    //...
}
Since ActivityScope is not used anywhere else. you can safely delete ActivityScope.kt.
Now run the app and try out the Registration flow. You can use your current username and password to login or unregister and reregister with a new account to confirm the flow works just like it used to.
Right now, Dagger and Hilt are working together in the app. Hilt is injecting all dependencies except for UserManager. In the next section you'll fully migrate to Hilt from Dagger by migrating the UserManager.
8. Migrating another scoped component
So far in this codelab, you've successfully migrated most of the sample app to Hilt except one component, UserComponent. UserComponent is annotated with a custom scope, @LoggedUserScope. This means, UserComponent will inject the same instance of UserManager to classes which are annotated with @LoggedUserScope.
UserComponent doesn't map to any of the available Hilt components as its lifecycle is not managed by an Android class. Since adding a custom component in the middle of the generated Hilt hierarchy is not supported, you have two options:
- Leave Hilt and Dagger side by side in the state the project is currently in.
- Migrate the scoped component to the closest available Hilt component (
SingletonComponentin this case) and use nullability when needed.
You've already achieved #1 in the previous step. In this step, you'll follow #2 to have the application fully migrated to Hilt. However, in a real app, you are free to choose whichever suits better your specific use case.
In this step, UserComponent will be migrated to be part of Hilt's SingletonComponent. If there are any modules in that component, those should be installed in SingletonComponent as well.
The only scoped type in UserComponent is UserDataRepository - that is annotated with @LoggedUserScope. As UserComponent will converge with Hilt's SingletonComponent, UserDataRepository will be annotated with @Singleton and you'll change the logic to make it null when the user is logged out.
UserManager is already annotated with @Singleton which means you can provide the same instance throughout the app and, with some changes, you can achieve the same functionality with Hilt. Let's start with changing how UserManager and UserDataRepository works, as you need to do some groundwork first.
Open UserManager.kt and apply the following changes.
- Replace
UserComponent.Factoryparameter withUserDataRepositoryin the constructor as you don't need to create an instance ofUserComponentanymore. It hasUserDataRepositoryas a dependency instead - Since Hilt will be generating the component code, delete
UserComponentand its setter. - Change
isUserLoggedIn()function to check username fromuserRepositoryinstead of checkinguserComponent. - Add the username as a parameter to
userJustLoggedIn()function. - Change
userJustLoggedIn()function body to callinitDatawithuserNameonuserDataRepository. Instead ofuserComponentwhich you will be deleting during migration. - Add
usernametouserJustLoggedIn()call inregisterUser()andloginUser()functions. - Remove
userComponentfromlogout()function and replace it with a call touserDataRepository.initData(username).
When you are done the final code for UserManager.kt should look like this.
UserManager.kt
@Singleton
class UserManager @Inject constructor(
    private val storage: Storage,
    // Since UserManager will be in charge of managing the UserComponent lifecycle,
    // it needs to know how to create instances of it
    private val userDataRepository: UserDataRepository
) {

    val username: String
        get() = storage.getString(REGISTERED_USER)

    fun isUserLoggedIn() = userDataRepository.username != null

    fun isUserRegistered() = storage.getString(REGISTERED_USER).isNotEmpty()

    fun registerUser(username: String, password: String) {
        storage.setString(REGISTERED_USER, username)
        storage.setString("$username$PASSWORD_SUFFIX", password)
        userJustLoggedIn(username)
    }

    fun loginUser(username: String, password: String): Boolean {
        val registeredUser = this.username
        if (registeredUser != username) return false

        val registeredPassword = storage.getString("$username$PASSWORD_SUFFIX")
        if (registeredPassword != password) return false

        userJustLoggedIn(username)
        return true
    }

    fun logout() {
        userDataRepository.cleanUp()
    }

    fun unregister() {
        val username = storage.getString(REGISTERED_USER)
        storage.setString(REGISTERED_USER, "")
        storage.setString("$username$PASSWORD_SUFFIX", "")
        logout()
    }

    private fun userJustLoggedIn(username: String) {
        // When the user logs in, we create populate data in UserComponent
        userDataRepository.initData(username)
    }
}
Now that you are done with UserManager, you need to make some changes in UserDataRepository. Open UserDataRepository.kt and apply the following changes.
- Remove
@LoggedUserScopesince this dependency will be managed by Hilt. UserDataRepositoryis already injected inUserManagerso to avoid a cyclic dependency, remove theUserManagerparameter from the constructor ofUserDataRepository.- Change
unreadNotificationsto nullable and make the setter private. - Add a new nullable variable,
usernameand make the setter private. - Add a new function
initData()which sets theusernameand theunreadNotificationsto a random number. - Add a new function
cleanUp()to resetusernameandunreadNotificationscount. Set theusernameto null andunreadNotificationsto -1. - Finally, move the
randomInt()function inside the class body.
When you are done, the end code should look like this.
UserDataRepository.kt
@Singleton
class UserDataRepository @Inject constructor() {

    var username: String? = null
        private set

    var unreadNotifications: Int? = null
        private set

    init {
        unreadNotifications = randomInt()
    }

    fun refreshUnreadNotifications() {
        unreadNotifications = randomInt()
    }
    fun initData(username: String) {
        this.username = username
        unreadNotifications = randomInt()
    }

    fun cleanUp() {
        username = null
        unreadNotifications = -1
    }

    private fun randomInt(): Int {
        return Random.nextInt(until = 100)
    }
}
To finish migrating the UserComponent, open UserComponent.kt and scroll down to inject() methods. This dependency is used in MainActivity and SettingsActivity. Let's start with migrating the MainActivity. Open MainActivity.kt and annotate the class with @AndroidEntryPoint.
MainActivity.kt
@AndroidEntryPoint
class MainActivity : AppCompatActivity() {

    //...
}
Remove the UserManagerEntryPoint interface and also remove entry point related code from onCreate().
MainActivity.kt
//@InstallIn(SingletonComponent::class)
//@EntryPoint
//interface UserManagerEntryPoint {
//    fun userManager(): UserManager
//}

override fun onCreate(savedInstanceState: Bundle?) {
    //val entryPoint = EntryPoints.get(applicationContext, UserManagerEntryPoint::class.java)
    //val userManager = entryPoint.userManager()
    super.onCreate(savedInstanceState)

    //...
}
Declare a lateinit var for UserManager and annotate it with @Inject annotation so that Hilt can inject the dependency.
MainActivity.kt
@Inject
lateinit var userManager: UserManager
Since UserManager will be injected by Hilt, remove the inject() call on UserComponent.
MainActivity.kt
        //Remove
        //userManager.userComponent!!.inject(this)
        setupViews()
    }
}
This is all you need to do for MainActivity. Now, you can perform the similar changes to migrate SettingsActivity. Open SettingsActivity and annotate it with @AndroidEntryPoint.
SettingsActivity.kt
@AndroidEntryPoint
class SettingsActivity : AppCompatActivity() {
    //...
}
Create a lateinit var for UserManager and annotate it with @Inject.
SettingsActivity.kt
    @Inject
    lateinit var userManager: UserManager
Remove entry point code and the inject call on userComponent(). When you are done, onCreate() function should look like this.
SettingsActivity.kt
    override fun onCreate(savedInstanceState: Bundle?) {

        super.onCreate(savedInstanceState)
        setContentView(R.layout.activity_settings)

        setupViews()
    }
Now you can clean up the unused resources to finish the migration. Delete the LoggedUserScope.kt, UserComponent.kt and finally the AppSubcomponent.kt classes.
Now run and try the app again. The app should be functioning just like it used to with Dagger.
9. Testing
There is one crucial step left before you finish migrating the app to Hilt. So far you've migrated all the app code but not the tests. Hilt injects dependencies in tests just like it does in the app code. Testing with Hilt requires no maintenance because Hilt automatically generates a new set of components for each test.
Unit tests
Let's start with the Unit tests. You don't need to use Hilt for unit tests since you can directly call the target class's constructor passing in fake or mock dependencies just as you would if the constructor weren't annotated.
If you run the unit tests, you'd see UserManagerTest is failing. You've done a lot of work and changes in UserManager, including it's constructor parameters in the previous sections. Open UserManagerTest.kt which still depends on UserComponent and UserComponentFactory. Since you already changed the parameters of UserManager, change the UserComponent.Factory parameter with a new instance of UserDataRepository.
UserManagerTest.kt
    @Before
    fun setup() {
        storage = FakeStorage()
        userManager = UserManager(storage, UserDataRepository())
    }
This is it! Run the tests again and all unit tests should be passing.
Adding Testing Dependencies
Before you dive in, open app/build.gradle and confirm the following Hilt dependencies exist. Hilt uses hilt-android-testing for testing-specific annotations. Additionally, as Hilt needs to generate code for classes in the androidTest folder, its annotation processor must also be able to run there.
app/build.gradle
    // Hilt testing dependencies
    androidTestImplementation "com.google.dagger:hilt-android-testing:$hilt_version"
    kaptAndroidTest "com.google.dagger:hilt-android-compiler:$hilt_version"
UI Tests
Hilt generates test components and a test Application automatically for each test. To start, open TestAppComponent.kt to plan the migration. TestAppComponent has 2 modules, TestStorageModule and AppSubcomponents. You've already migrated and deleted AppSubcomponents, you can continue with migrating TestStorageModule.
In this step, you'll use @TestInstallIn annotation to replace the StorageModule with the TestStorageModule. @TestInstallIn annotation takes two parameters, the component(s) this module will be installed in and the module(s) this module is replacing.
Open TestStorageModule.kt and annotate the class with @TestInstallIn annotation. You want to install this module into the SingletonComponent where the StorageModule is installed in the app. Add SingletonComponent::class as the component to install this module in and StorageModule::class as the module to be replaced by this module. Once you do this, all tests in this folder will be injected with the fake dependencies instead.
TestStorageModule.kt
@TestInstallIn(
    components = [SingletonComponent::class],
    replaces = [StorageModule::class]
)
@Module
abstract class TestStorageModule {
    //...
Since you finished migrating all modules, go ahead and delete TestAppComponent.
Next let's add Hilt to ApplicationTest. You must annotate any UI test that uses Hilt with @HiltAndroidTest. This annotation is responsible for generating the Hilt components for each test.
Open ApplicationTest.kt and add the following:
@HiltAndroidTestto tell Hilt to generate components for this test.- You also need to add an
HiltAndroidRuletoApplicationTest. This test rule manages the components' state and is used to perform injection on your test. The end code should look like this.
ApplicationTest.kt
@HiltAndroidTest
class ApplicationTest {

    @get:Rule
    var hiltRule = HiltAndroidRule(this)

    //...
As Hilt generates a new Application for every instrumentation test, we need to specify that the Hilt generated Application should be used when running UI tests. To do this we need a custom test runner.
The codelab app already has a custom test runner. Open MyCustomTestRunner.kt
Hilt already comes with an Application you can use for tests named HiltTestApplication. You need to change MyTestApplication::class.java with HiltTestApplication::class.java in the newApplication() function body.
MyCustomTestRunner.kt
class MyCustomTestRunner : AndroidJUnitRunner() {

    override fun newApplication(cl: ClassLoader?, name: String?, context: Context?): Application {

        return super.newApplication(cl, HiltTestApplication::class.java.name, context)
    }
}
With this change it is now safe to delete MyTestApplication.kt file. Now go ahead and run the tests. All tests should be passing.
10. [Optional] Migrate ViewModels
Hilt includes extensions for providing classes from other Jetpack libraries such as WorkManager and ViewModel. The ViewModels in the codelab project are plain classes which do not extend ViewModel from Architecture Components. Before adding Hilt support for ViewModels, let's migrate the ViewModels in the app to the Architecture Components ones.
To migrate a plain class to ViewModel, you need to extend ViewModel().
Open MainViewModel.kt and add : ViewModel(). This is enough to migrate to Architecture Components ViewModels but you also need to tell Hilt how to provide instances of the ViewModel. To do that, add the @HiltViewModel annotation to ViewModel class.
MainViewModel.kt
@HiltViewModel
class MainViewModel @Inject constructor(
    private val userDataRepository: UserDataRepository
): ViewModel() {
//...
}
Next, open LoginViewModel and do the same changes. The end code should look like this.
LoginViewModel.kt
@HiltViewModel
class LoginViewModel @Inject constructor(
    private val userManager: UserManager
): ViewModel() {
//...
}
Similarly open RegistrationViewModel.kt and migrate to ViewModel() and add the Hilt annotation. You don't need the @ActivityScoped annotation since with the extension methods viewModels() and activityViewModels(), you can control the scope of this ViewModel.
RegistrationViewModel.kt
@HiltViewModel
class RegistrationViewModel @Inject constructor(
    val userManager: UserManager
) : ViewModel() {
Do the same changes to migrate EnterDetailsViewModel and SettingViewModel. The end code for these two classes should look like this.
EnterDetailsViewModel.kt
@HiltViewModel
class EnterDetailsViewModel @Inject constructor() : ViewModel() {
SettingViewModel.kt
@HiltViewModel
class SettingsViewModel @Inject constructor(
     private val userDataRepository: UserDataRepository,
     private val userManager: UserManager
) : ViewModel() {
Now that all the ViewModels are migrated to Architecture Component Viewmodels and annotated with Hilt annotations, you can migrate how they are injected.
Next, you need to change how the ViewModels are initialised in the View layer. ViewModels are created by the OS and the way to get them is using the by viewModels() delegate function.
Open MainActivity.kt, replace the @Inject annotation with the Jetpack extensions. Note, you also need to remove the lateinit, change var to val and mark the field private.
MainActivity.kt
//    @Inject
//    lateinit var mainViewModel: MainViewModel
    private val mainViewModel: MainViewModel by viewModels()
Similarly, open LoginActivity.kt and change how the ViewModel is obtained.
LoginActivity.kt
//    @Inject
//    lateinit var loginViewModel: LoginViewModel
    private val loginViewModel: LoginViewModel by viewModels()
Next, open RegistrationActivity.kt and apply the similar changes to obtain the registrationViewModel.
RegistrationActivity.kt
//    @Inject
//    lateinit var registrationViewModel: RegistrationViewModel
    private val registrationViewModel: RegistrationViewModel by viewModels()
Open EnterDetailsFragment.kt. Replace how EnterDetailsViewModel is obtained.
EnterDetailsFragment.kt
private val enterDetailsViewModel: EnterDetailsViewModel by viewModels()
Similarly, replace how registrationViewModel is obtained but this time use activityViewModels() delegate function instead of viewModels(). When the registrationViewModel is injected, Hilt will inject the activity level scoped ViewModel.
EnterDetailsFragment.kt
private val registrationViewModel: RegistrationViewModel by activityViewModels()
Open TermsAndConditionsFragment.kt and once again use activityViewModels() extension function instead of viewModels() to obtain registrationViewModel.
TermsAndConditionsFragment.kt
private val registrationViewModel: RegistrationViewModel by activityViewModels()
Finally, open SettingsActivity.kt and migrate how settingsViewModel is obtained.
SettingsActivity.kt
private val settingsViewModel: SettingsViewModel by viewModels()
Now run the app and confirm everything works as expected.
11. Congratulations!
Congratulations! You've successfully migrated an app to use Hilt! Not only you completed the migration but you also kept the application working while migrating Dagger components one by one.
In this codelab you've learned how to start with the Application component and build the groundwork necessary to make Hilt work with existing Dagger components. From there you migrated each Dagger Component to Hilt by using Hilt Annotations on Activities and Fragments and removing Dagger related code. Each time you finished migrating a component, the app worked and functioned as expected. You also migrated Context and ApplicationContext dependencies with the Hilt provided @ActivityContext and @ApplicationContext annotations. You've migrated other Android components. Finally, you've migrated the tests and finish migrating to Hilt.
Further reading
To learn more about migrating your app to Hilt, check out the Migrating to Hilt documentation. Apart from more information about migrating Dagger to Hilt, you also have information about migrating a dagger.android app.