
1. Overview
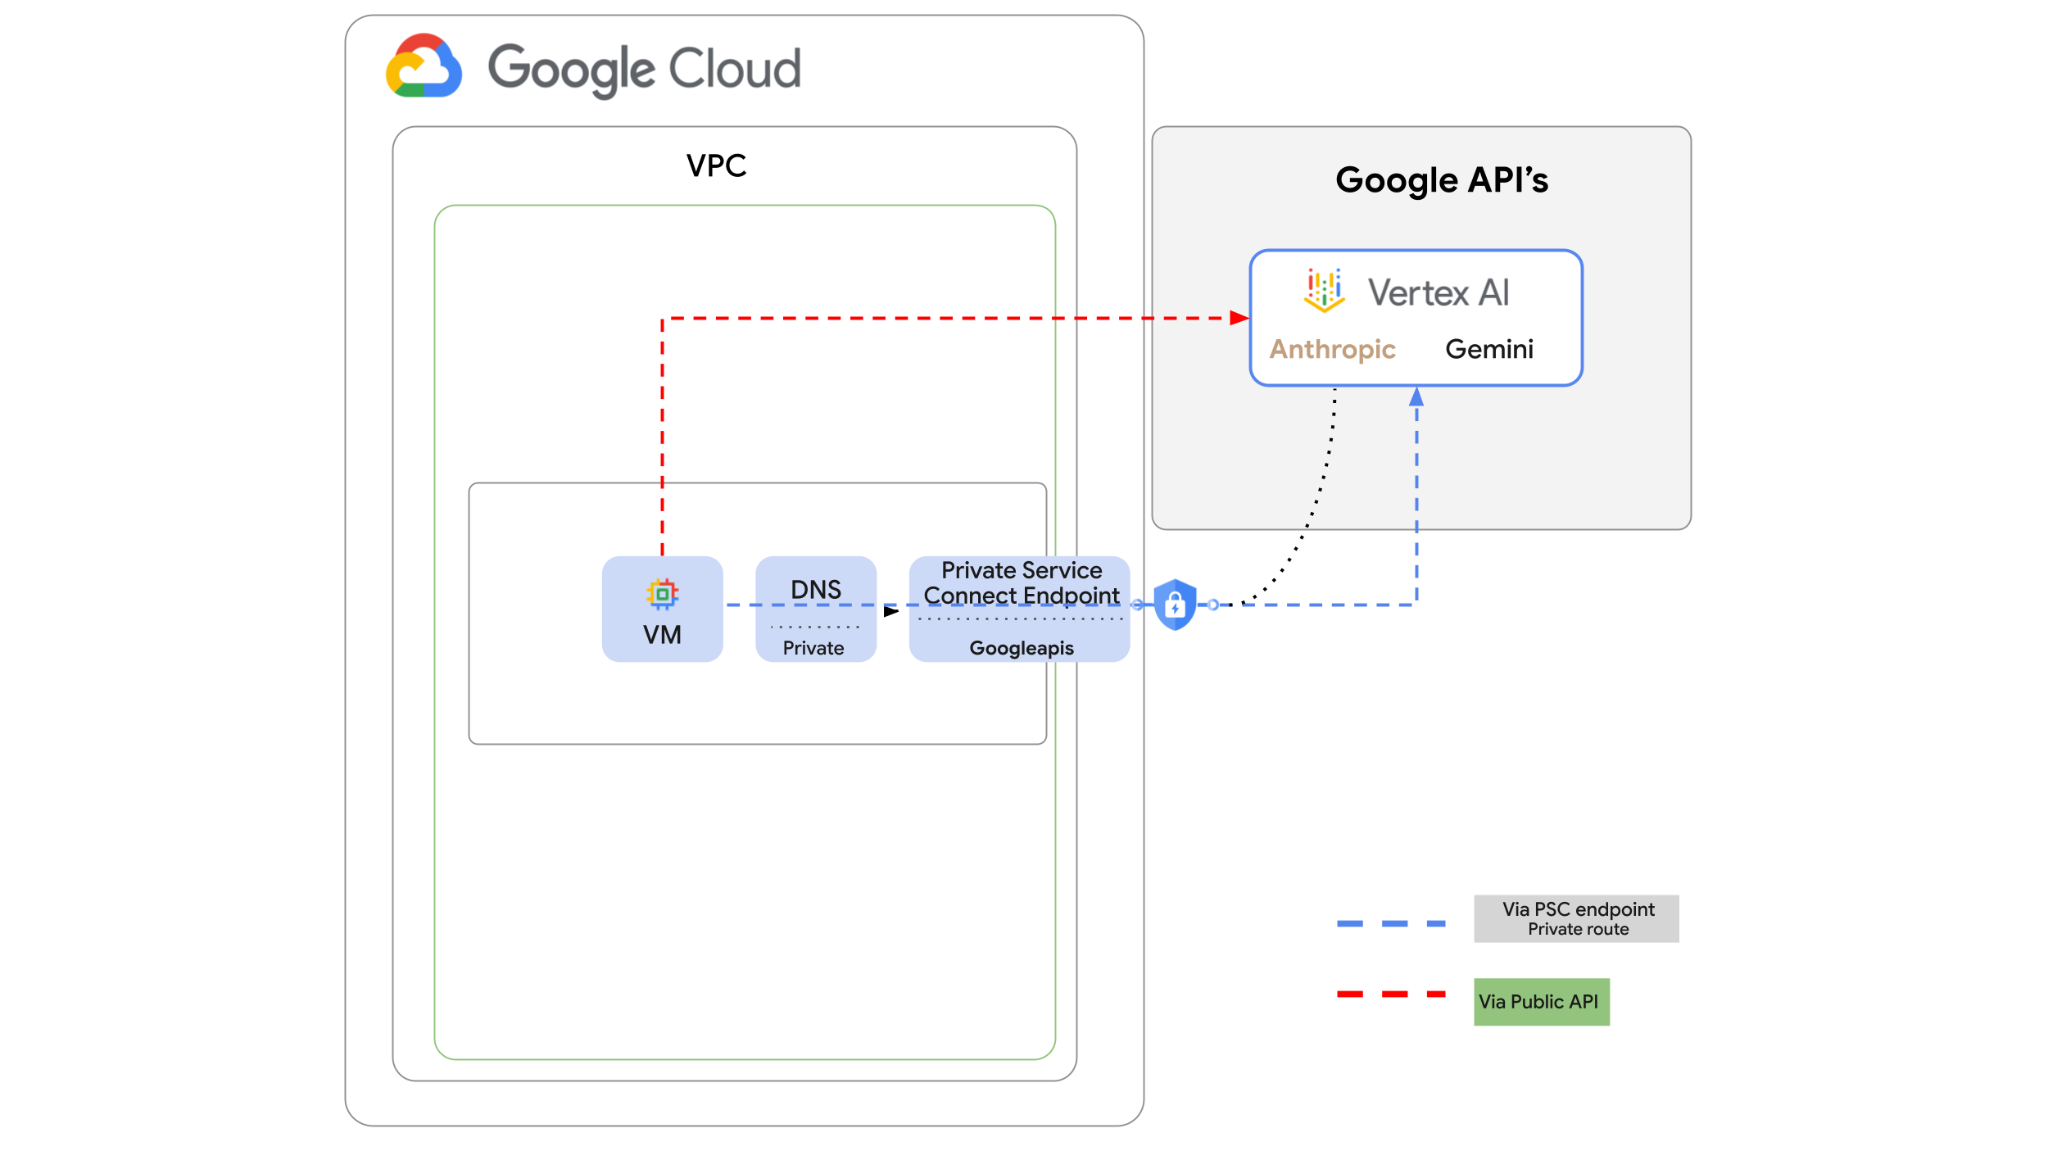
Vertex AI API can be accessed over the internet, however, in your enterprise you may want to access the Vertex AI API's privately without going over the internet. In this lab you will first access the Anthropic Claude Opus 4.6 and Gemini 3.1Pro on Vertex via python sdk running on a VM instance via public internet.
Then you will create a Private Service Connect endpoint to Googleapis, and change the traffic flow to use the private endpoint to connect to the Vertex API.
The python code sample will take the input questions, pass it to Claude Opus to generate an answer, that output will be passed to Gemini 3 to create a text summary and generate an image.
In this lab, you're going to be creating the following pattern.
Figure1.
2. Objectives
In this lab you will learn how to perform the following task:
- Set up VM instance to use python sdk
- Enable Anthropic model card in Vertex AI
- Connect to Anthropic Claude Opus 4.6 and Gemini 3.1 Pro via python script
- Configure PSC endpoint to connect to Googleapis
- Configure manual DNS entries
- Verify connectivity path to Googleais
- Execute python script to query the models
Lab setup
Self-paced environment setup
- Sign-in to the Google Cloud Console and create a new project or reuse an existing one. If you don't already have a Gmail or Google Workspace account, you must create one.

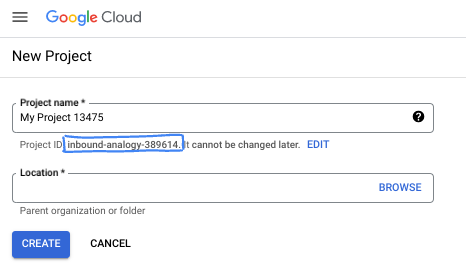
- The Project name is the display name for this project's participants. It is a character string not used by Google APIs. You can always update it.
- The Project ID is unique across all Google Cloud projects and is immutable (cannot be changed after it has been set). The Cloud Console auto-generates a unique string; usually you don't care what it is. In most codelabs, you'll need to reference your Project ID (typically identified as
PROJECT_ID). If you don't like the generated ID, you might generate another random one. Alternatively, you can try your own, and see if it's available. It can't be changed after this step and remains for the duration of the project. - For your information, there is a third value, a Project Number, which some APIs use. Learn more about all three of these values in the documentation.
- Next, you'll need to enable billing in the Cloud Console to use Cloud resources/APIs. Running through this codelab won't cost much, if anything at all. To shut down resources to avoid incurring billing beyond this tutorial, you can delete the resources you created or delete the project. New Google Cloud users are eligible for the $300 USD Free Trial program.
Start Cloud Shell
While Google Cloud can be operated remotely from your laptop, in this codelab you will be using Google Cloud Shell, a command line environment running in the Cloud.
From the Google Cloud Console, click the Cloud Shell icon on the top right toolbar:

It should only take a few moments to provision and connect to the environment. When it is finished, you should see something like this:

This virtual machine is loaded with all the development tools you'll need. It offers a persistent 5GB home directory, and runs on Google Cloud, greatly enhancing network performance and authentication. All of your work in this codelab can be done within a browser. You do not need to install anything.
3. Setup Environment
We will create a custom VPC with Firewall rules. If you have a VPC and Project already you can skip this part.
Open Cloud Shell located at the top of your console on the right. And configure as follows: 
- Enable some of the apis we will use in this lab
gcloud services enable dns.googleapis.com
gcloud services enable aiplatform.googleapis.com
gcloud services enable servicedirectory.googleapis.com
- Set some variables. These variables are the Project ID and Network ID of the custom VPC (you will create the VPC in step 4).
projectid=$(gcloud config get-value project)
networkid=anthropic-net
echo $projectid
echo $networkid
- Now create a custom VPC (anthropic-net), subnet (vm1-subnet) and firewall rules
gcloud compute networks create $networkid \
--project=$projectid \
--subnet-mode=custom \
--mtu=1460 \
--bgp-routing-mode=global

gcloud compute networks subnets create vm-subnet \
--project=$projectid --range=10.0.88.0/24 \
--stack-type=IPV4_ONLY --network=$networkid \
--region=us-east1

gcloud compute firewall-rules create $networkid-allow-icmp --project=$projectid \
--network=$networkid \
--description="Allows ICMP connections from any source to any instance on the network." \
--direction=INGRESS \
--priority=65534 \
--source-ranges=0.0.0.0/0 \
--action=ALLOW \
--rules=icmp

gcloud compute firewall-rules create $networkid-allow-ssh \
--project=$projectid \
--network=$networkid \
--description="Allows TCP connections from any source to any instance on the network using port 22." \
--direction=INGRESS --priority=65534 \
--source-ranges=0.0.0.0/0 --action=ALLOW \
--rules=tcp:22

gcloud compute firewall-rules create $networkid-allow-web \
--project=$projectid \
--network=$networkid \
--description="Allows TCP connections on port 8080." \
--direction=INGRESS --priority=1000 \
--source-ranges=0.0.0.0/0 --action=ALLOW \
--rules=tcp:8080
4. Enable Anthropic in Vertex model garden
We need to grant outbound external access to the internet so lets create a Cloud NAT gateway and attach it.
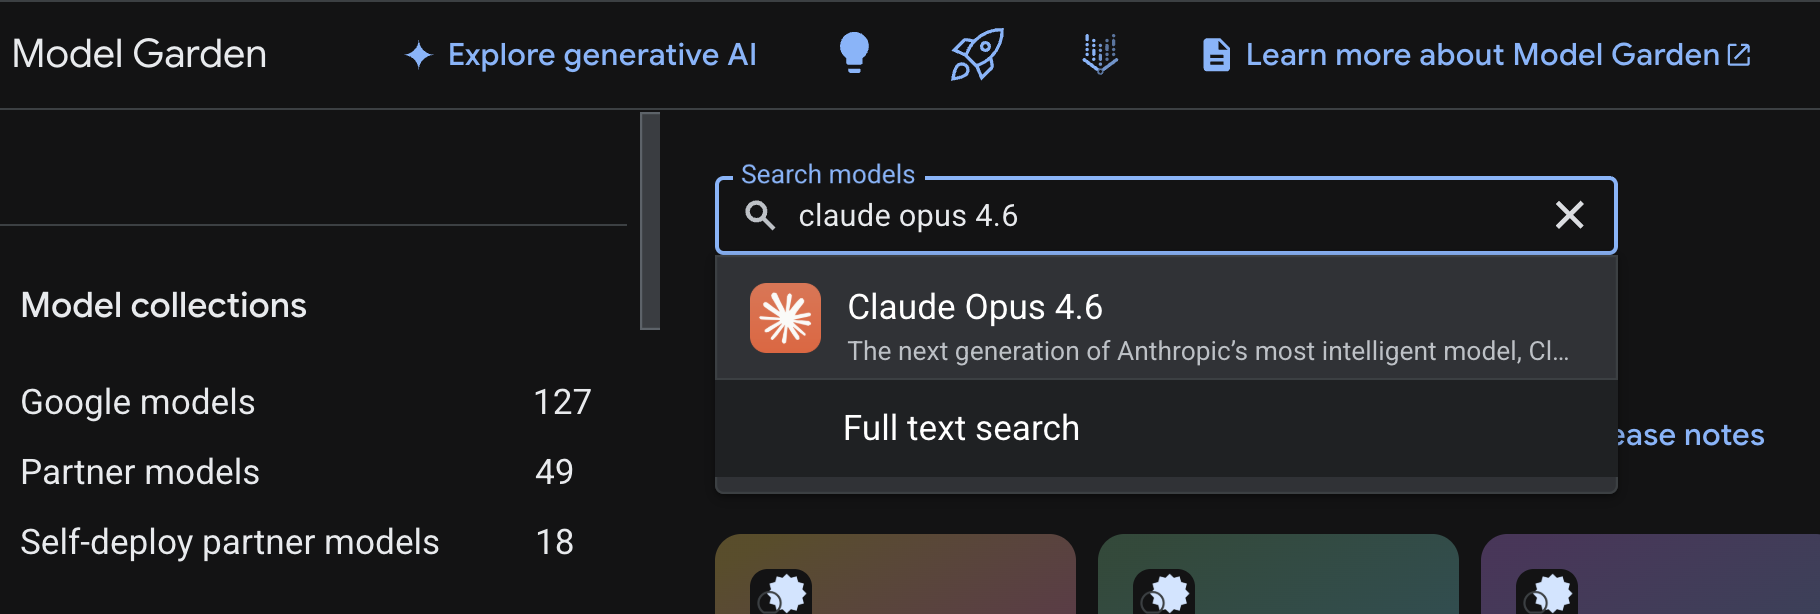
- Go to Vertex AI dashboard and select Model Garden
- Search for Anthropic and select Claude Opus 4.6
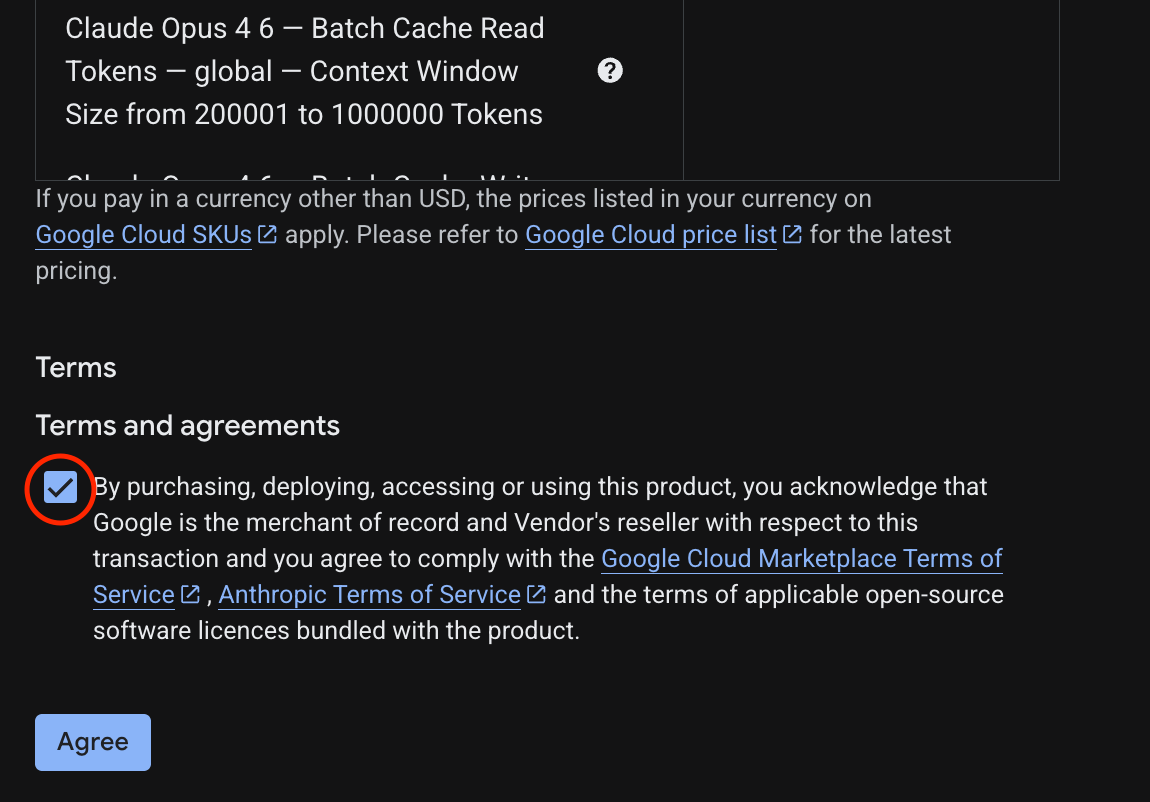
- Select Enable, you will be required to fill out some info. Fill out form an select Next
- On the final page select Agree to enable Claude 4.6 Opus
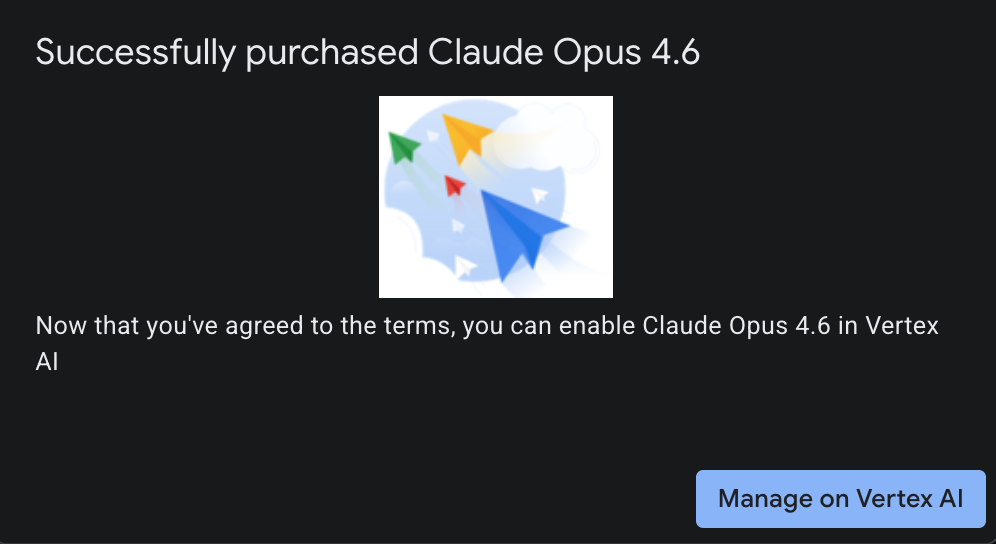
- You should see the success page.
5. Create NAT gateway and VMs
We need to grant outbound external access to the internet so lets create a Cloud NAT gateway and attach it.
In Cloud Shell use the following commands
- Create the Cloud NAT and Cloud NAT gateway
gcloud compute routers create anthro-out-nat \
    --network $networkid \
    --region us-east1

gcloud compute routers nats create anthro-out-nat-gw \
    --router-region us-east1 \
    --router anthro-out-nat \
    --nat-all-subnet-ip-ranges \
    --auto-allocate-nat-external-ips
Now let's create one VMs to access the Anthropic on Vertex AI via Python SDK.
- In the same Cloud Shell session create anthro-vm using the following. (Please allow 3-4 minutes for the VM to be active while the startup script is installing)
gcloud compute instances create anthro-vm \
--project=$projectid \
--zone=us-east1-b \
--network-interface=stack-type=IPV4_ONLY,subnet=vm-subnet,no-address,network=$networkid \
--metadata startup-script="#! /bin/bash
      apt-get update
      apt-get install python3 python3-dev python3-venv tcpdump dnsutils -y
      python3 -m venv /opt/py-anthro-env
      /opt/py-anthro-env/bin/pip install -U google-genai 'anthropic[vertex]' rich
      chmod -R 777 /opt/py-anthro-env"
You should see a VM created with no public IP addresses. Now let's configure the VM's
6. Configure VM and test
- In Google Cloud Shell lets SSH into the new VM called anthro-vm. (You may need to wait 3 minutes to ensure the VM completely set-up)
gcloud compute ssh anthro-vm \
    --project=$projectid \
    --zone=us-east1-b \
    --tunnel-through-iap \
    -- -L 8080:localhost:8080
- Once connected let's do a quick test to see if we can connect to the Vertex Gemini API.
dig *-aiplatform.googleapis.com
- You should see something similar (the addresses will differ). Note the path is via public IP addresses since the API is a public API.
; <<>> DiG 9.18.39-0ubuntu0.24.04.2-Ubuntu <<>> *-aiplatform.googleapis.com
;; global options: +cmd
;; Got answer:
;; ->>HEADER<<- opcode: QUERY, status: NOERROR, id: 3728
;; flags: qr rd ra; QUERY: 1, ANSWER: 16, AUTHORITY: 0, ADDITIONAL: 1

;; OPT PSEUDOSECTION:
; EDNS: version: 0, flags:; udp: 512
;; QUESTION SECTION:
;*-aiplatform.googleapis.com.   IN      A

;; ANSWER SECTION:
*-aiplatform.googleapis.com. 300 IN     A       172.217.204.95
*-aiplatform.googleapis.com. 300 IN     A       172.217.203.95
*-aiplatform.googleapis.com. 300 IN     A       173.194.215.95
*-aiplatform.googleapis.com. 300 IN     A       142.250.98.95
*-aiplatform.googleapis.com. 300 IN     A       173.194.217.95
*-aiplatform.googleapis.com. 300 IN     A       142.251.107.95
*-aiplatform.googleapis.com. 300 IN     A       74.125.196.95
- Now activate your venv environment:
source /opt/py-anthro-env/bin/activate
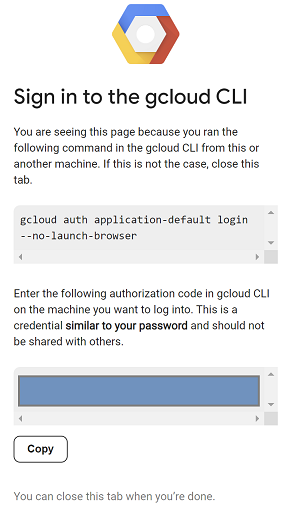
- Now let's authenticate this to do some testing later on. Run the following command in the VM, press y when prompted.
gcloud auth application-default login
- Next copy the url which appears in the starting with https:// open a new tab in your lab browser window and paste the url. Accept the prompts.
- When you see the following select copy, switch back to the vm anthro-vm session and for Enter authorization code: paste the code you copied and press enter to authenticate.
- Now let's use python in our
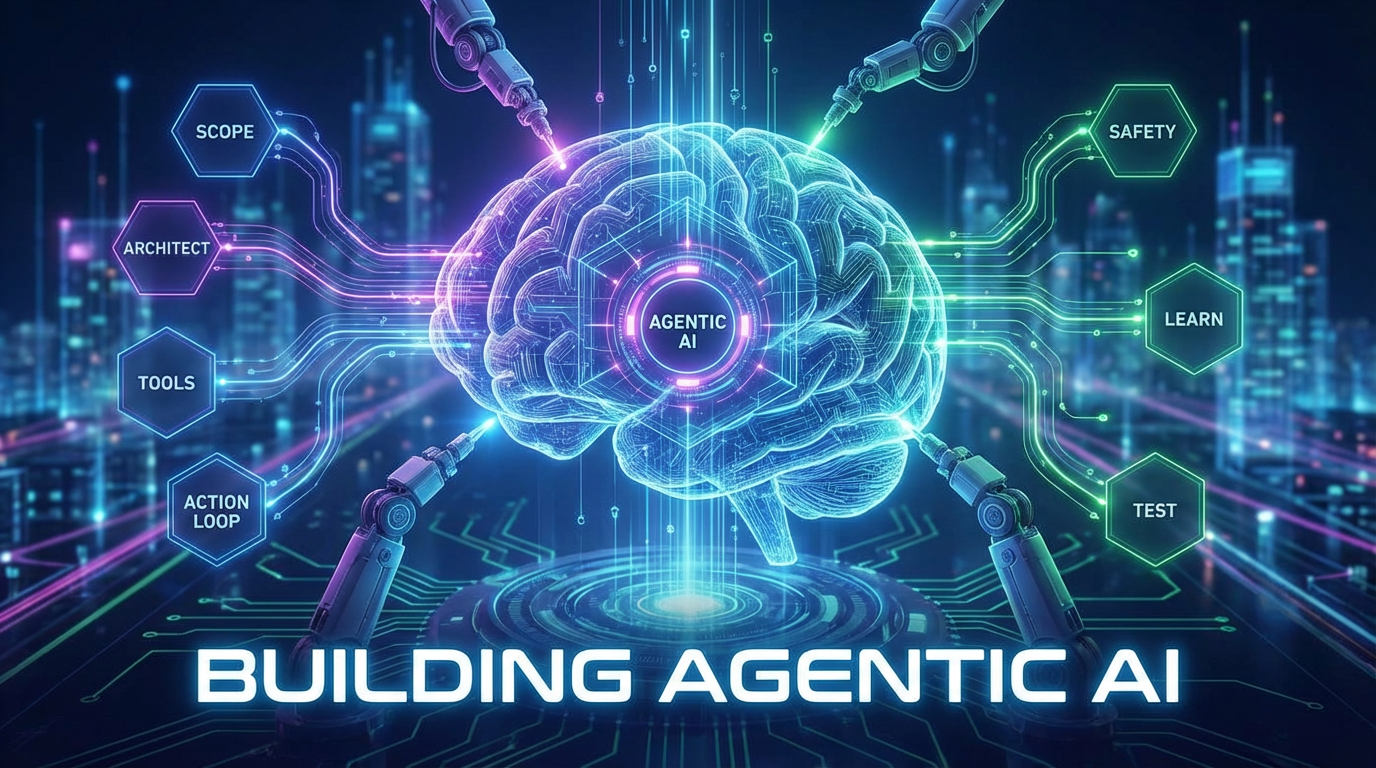
env. This creates a python filesuper-gen-ai.pythat asks Claude Opus 4.6 "What are the key steps to building Agentic AI?" then takes the output and passes it to Gemini 3.1 pro which creates a summary and then Gemini 3 pro image generates an image which it saves on the VM.
Copy and paste the following.
cat << 'EOF' > super-gen-ai.py
import os
import subprocess
import google.auth
from google import genai
from google.genai import types
from anthropic import AnthropicVertex
from rich.console import Console
from rich.panel import Panel
from rich.spinner import SPINNERS
from rich.text import Text

# Custom Super Me Animation Spinner - Now with moving power-up!
SPINNERS["super_me"] = {
    "interval": 120,
    "frames": [
        "🧱🦖          🍄",
        "🧱 🦖        🍄 ",
        "🧱  🦖      🍄  ",
        "🧱   🦕    🍄   ",
        "🧱    🦖  🍄    ",
        "🧱     🦖🍄     ",
        "🧱      🌟      ",
        "🧱       🌟     ",
        "🧱        🌟    ",
        "🧱         🌟   ",
        "🧱        🌟    ",
        "🧱       🌟     ",
        "🧱      🌟      ",
        "🧱     🌟       ",
        "🧱    🌟        ",
        "🧱   🌟         ",
        "🧱  🌟          ",
        "🧱 🌟           ",
        "🧱🌟            "
    ]
}

console = Console()

def print_super_me_header():
    super_me_art = """
[bold red]   _____                       [/bold red][bold green]  __  __      _ [/bold green]
[bold red]  / ____|                      [/bold red][bold green] |  \/  |    | |[/bold green]
[bold red] | (___  _   _ _ __   ___ _ __ [/bold red][bold green] | \  / | ___| |[/bold green]
[bold red]  \___ \| | | | '_ \ / _ \ '__|[/bold red][bold green] | |\/| |/ _ \ |[/bold green]
[bold red]  ____) | |_| | |_) |  __/ |   [/bold red][bold green] | |  | |  __/_|[/bold green]
[bold red] |_____/ \__,_| .__/ \___|_|   [/bold red][bold green] |_|  |_|\___(_)[/bold green]
[bold red]              | |              [/bold red][bold green]                 [/bold green]
[bold red]              |_|              [/bold red][bold green]                 [/bold green]
    """
    console.print(super_me_art)
    console.rule("[bold gold1]⭐ LEVEL 1-1: Vertex AI Orchestrator ⭐[/bold gold1]")

def main():
    os.system('clear')  # Clears the terminal for a clean UI
    print_super_me_header()

    # Create the images directory
    os.makedirs("images", exist_ok=True)

    with console.status("[bold yellow]🪙  Collecting Coins (Authenticating)...[/bold yellow]", spinner="super_me"):
        try:
            creds, project_id = google.auth.default()
            LOCATION = "global"
        except Exception as e:
            console.print(f"[bold red]💥 GAME OVER! Authentication failed:[/bold red] {e}")
            return

    with console.status(f"[bold green]🍄 Powering up Clients for {project_id}...[/bold green]", spinner="super_me"):
        google_client = genai.Client(vertexai=True, location=LOCATION, project=project_id)
        claude_client = AnthropicVertex(region=LOCATION, project_id=project_id)

    console.print("\n[bold cyan]The Kingdom needs a strategy![/bold cyan]")

    # Auto-run prompt without user interaction
    question = "What are the key steps to building Agentic AI?"

    console.print(Panel(question, title="[bold green]Green Dino (Claude Opus) is entering the pipe...[/bold green]", border_style="green"))

    with console.status("[bold green]🟢 Green Dino is clearing the level...\n[/bold green]", spinner="super_me"):
        try:
            msg = claude_client.messages.create(
                model="claude-opus-4-6",
                max_tokens=2048,
                messages=[{"role": "user", "content": question}]
            )
            claude_text = msg.content[0].text
            console.print(f"[bold green]✓ Level Cleared! Green Dino generated {len(claude_text)} bytes of strategy.[/bold green]\n")
        except Exception as e:
            console.print(f"[bold red]💥 BOSS ATTACK (Claude API Error):[/bold red] {e}")
            return

    with console.status("[bold red]🔴 Red Hero (Gemini 3.1 Pro Preview) is summarizing the map...\n[/bold red]", spinner="super_me"):
        text_prompt = f"""
        I am providing you with a response generated by Claude.
        1. READ the text below.
        2. GENERATE a concise, bulleted executive summary.

        --- INPUT TEXT ---
        {claude_text}
        """

        try:
            text_response = google_client.models.generate_content(
                model="gemini-3.1-pro-preview",
                contents=text_prompt,
                config=types.GenerateContentConfig(temperature=0.7)
            )
            console.print("[bold red]✓ Super Me! Text Summary Complete.[/bold red]")
        except Exception as e:
            console.print(f"[bold red]💥 CHOMPER PLANT (Gemini Text Error):[/bold red] {e}")
            return

    with console.status("[bold blue]🔵 Mushroom Friend (Gemini 3 Pro Image) is painting the castle...\n[/bold blue]", spinner="super_me"):
        image_prompt = f"""
        CREATE a high-quality, futuristic illustration of autonomous AI agents for a tech blog header (16:9 aspect ratio).
        Base the image directly on the following text summary:

        {text_response.text}
        """

        try:
            image_response = google_client.models.generate_content(
                model="gemini-3-pro-image-preview",
                contents=image_prompt,
                config=types.GenerateContentConfig(
                    response_modalities=['TEXT', 'IMAGE'],
                    temperature=0.7
                )
            )
            console.print("[bold blue]✓ Masterpiece Complete![/bold blue]\n")
        except Exception as e:
            console.print(f"[bold red]💥 FALLING BLOCK (Gemini Image Error):[/bold red] {e}")
            return

    console.rule("[bold gold1]🚩 COURSE CLEAR! 🚩[/bold gold1]")

    if text_response.text:
        console.print(Panel(text_response.text.strip(),
                            title="[bold gold1]Gemini 3.1 Pro Summary[/bold gold1]",
                            border_style="gold1"))

    for part in image_response.parts:
        if image := part.as_image():
            # Save inside the images folder with the focus-specific name
            filename = "images/building-agentic.png"
            image.save(filename)
            console.print(f"\n[bold green]✓ REWARD SAVED:[/bold green] [underline]{os.path.abspath(filename)}[/underline]")

    console.rule("[bold red]Web Server Warp Pipe[/bold red]")
    with console.status("[bold yellow]Opening the warp pipe (HTTP server)...[/bold yellow]", spinner="super_me"):
        # Kill any existing server first so it doesn't crash on port binding
        os.system('pkill -f "http.server" > /dev/null 2>&1')

        # Start the server with the root directory set specifically to 'images'
        subprocess.Popen(
            ["python3", "-m", "http.server", "8080", "--directory", "images"],
            stdout=subprocess.DEVNULL,
            stderr=subprocess.DEVNULL
        )

    console.print("[bold green]✓ Warp Pipe is open in the background![/bold green]")
    console.print("[bold magenta]View your files here (Click Web Preview -> Preview on port 8080):[/bold magenta] [underline]http://localhost:8080/[/underline]\n")

if __name__ == "__main__":
    main()
EOF

python3 super-gen-ai.py
The script runs in a fun interface and launches a web server so you can view the image output. To run the script again type python3 super-gen-ai.py.
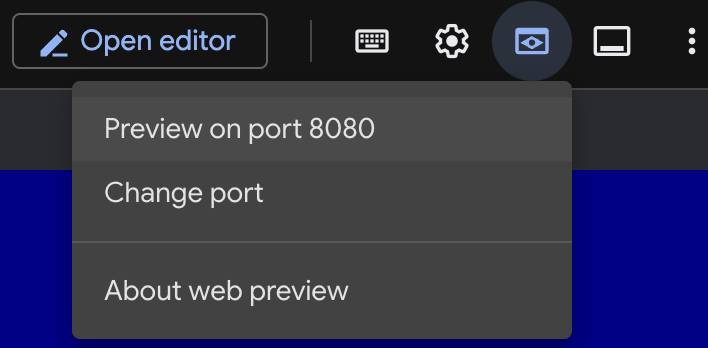
- To web preview option in Cloud Shell, select preview on port 8080
- In the open web session select the building_agentic.png to view the image generated. (Sample image below generated by AI)
- In Cloud Shell to exit the web server run the following.
pkill -f "http.server"
- Next type
exitto get back to the Cloud Shell home. Once complete let's continue.
7. Create the PSC endpoint to googleapis
To enable private connectivity to our Vertex API endpoint we will create a Private Service Connect endpoint for googleapis. This will allow us to use a private IP address we assign to route traffic to the googleapis we need, in this case Vertex Gemini.
- Open Cloud Shell if not open already. We will create an IP for the PSC endpoint and create the Private Service Connect endpoint. We will use 192.168.255.230 in this case.
projectid=$(gcloud config get-value project)
networkid=anthropic-net

gcloud compute addresses create anthro-ip \
    --global \
    --purpose=PRIVATE_SERVICE_CONNECT \
    --addresses=192.168.255.230 \
    --network=$networkid

gcloud compute forwarding-rules create pscanthrovertex \
    --global \
    --network=$networkid \
    --address=anthro-ip \
    --target-google-apis-bundle=all-apis
- Verify
gcloud compute addresses list --filter="name=( 'anthro-ip' ...)"

gcloud compute forwarding-rules describe pscanthrovertex --global
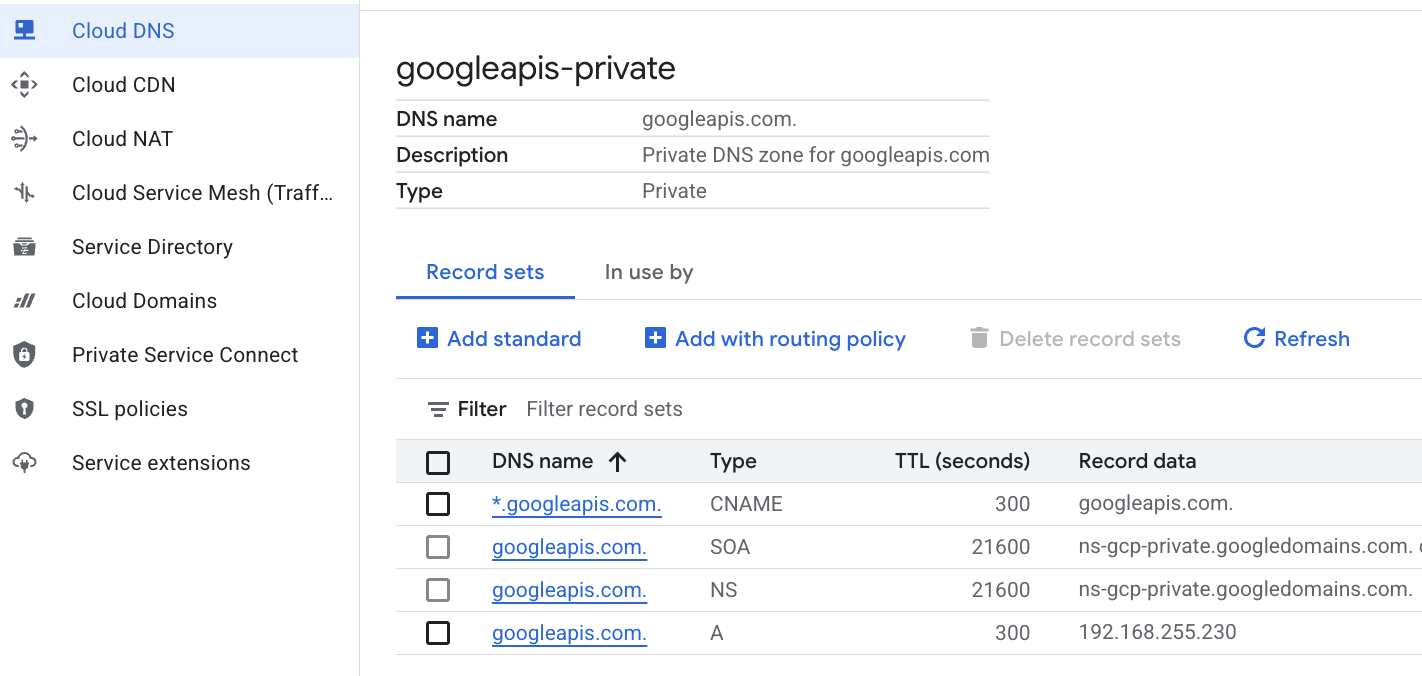
8. Create Manual DNS entry to googleapis
You can create a manual DNS entry to point to the PSC endpoint using private DNS. This would affect all the networks you assign to it. You will now create the following
- A private DNS zone for googleapis.com and attach it to the anthropic-net network.
- An A record mapping the root domain to the Private Service Connect endpoint IP (192.168.255.230)
- A wildcard CNAME record to redirect all subdomains (e.g., aiplatform.googleapis.com) to the root A record
- Run the following commands in Cloud Shell.
gcloud dns managed-zones create googleapis-private \
    --description="Private DNS zone for googleapis.com" \
    --dns-name="googleapis.com." \
    --visibility="private" \
    --networks="anthropic-net"

gcloud dns record-sets create "googleapis.com." \
    --zone="googleapis-private" \
    --type="A" \
    --ttl="300" \
    --rrdatas="192.168.255.230"

gcloud dns record-sets create "*.googleapis.com." \
    --zone="googleapis-private" \
    --type="CNAME" \
    --ttl="300" \
    --rrdatas="googleapis.com."
- List the record sets in the zone to confirm the A record and CNAME have been created correctly.
gcloud dns record-sets list --zone="googleapis-private"
- In the console view it should look like this. You should see a set up with an A record and CNAME like this see
- Next we verify connectivity with these changes on anthro-vm
9. Verify endpoint connectivity via IP address
Let's connect using the private endpoint to connect to Gemini.
- In Google Cloud Shell lets SSH into the new VM called anthro-vm.
gcloud compute ssh anthro-vm \
    --project=$projectid \
    --zone=us-east1-b \
    --tunnel-through-iap \
    -- -L 8080:localhost:8080
- In your VM check the connectivity path to aiplatform-pscanthrovertex.p.googleapis.com using the
digcommand. You should see the IP of the PSC endpoint192.168.255.230
dig aiplatform-pscanthrovertex.p.googleapis.com +noall +answer
Let's connect using the private endpoint to connect to Gemini.
- Now let's do a
digto see if we can connect to the Vertex Gemini API.
dig *-aiplatform.googleapis.com
- You should see something similar (the address will differ). Note the path is via the PSC endpoint IP addresses.
; <<>> DiG 9.18.41-1~deb12u1-Debian <<>> *-aiplatform.googleapis.com
;; global options: +cmd
;; Got answer:
;; ->>HEADER<<- opcode: QUERY, status: NOERROR, id: 33703
;; flags: qr rd ra; QUERY: 1, ANSWER: 2, AUTHORITY: 0, ADDITIONAL: 1

;; OPT PSEUDOSECTION:
; EDNS: version: 0, flags:; udp: 512
;; QUESTION SECTION:
;*-aiplatform.googleapis.com.   IN      A

;; ANSWER SECTION:
*-aiplatform.googleapis.com. 300 IN     CNAME   googleapis.com.
googleapis.com.         300     IN      A       192.168.255.230

;; Query time: 8 msec
;; SERVER: 169.254.169.254#53(169.254.169.254) (UDP)
;; WHEN: Sat Nov 29 15:19:15 UTC 2025
;; MSG SIZE  rcvd: 86
- Using the
pingcommand. We can do a quick test. Note: this IP is a PSC endpoint and your pings will be unsuccessful.
ping -c 2 aiplatform.googleapis.com
- Now activate your venv environment:
source /opt/py-anthro-env/bin/activate
- Now let's use python in our
env. This creates a python filestar-me.pythat asks Claude Opus 4.6 "Give me a step by step recipe to make a roti for a beginner?" then takes the output and passes it to Gemini 3.1 pro which creates a summary and Gemini 3 pro image generates and image which it saves on the VM
cat << 'EOF' > star-me.py
import os
import subprocess
import google.auth
from google import genai
from google.genai import types
from anthropic import AnthropicVertex
from rich.console import Console
from rich.panel import Panel
from rich.spinner import SPINNERS
from rich.text import Text

# Custom Star Me Animation Spinner - Directional Flight!
SPINNERS["star_me"] = {
    "interval": 120,
    "frames": [
        "🌌 🚀              🛸 ",
        "🌌  🚀            🛸  ",
        "🌌   🚀          🛸   ",
        "🌌    🚀        🛸    ",
        "🌌     🚀      🛸     ",
        "🌌      🚀    🛸      ",
        "🌌       🚀  🛸       ",
        "🌌        🚀🛸        ",
        "🌌         💥         ",
        "🌌        ✨ ✨       ",
        "🌌       ✨   ✨      ",
        "🌌      ✨     ✨     ",
        "🌌     ✨       ✨    ",
        "🌌                    "
    ]
}

console = Console()

def print_star_me_header():
    star_me_art = """
[bold cyan]   _____ _______       _____    __  __ ______ [/bold cyan]
[bold cyan]  / ____|__   __|/\   |  __ \  |  \/  |  ____|[/bold cyan]
[bold cyan] | (___    | |  /  \  | |__) | | \  / | |__   [/bold cyan]
[bold cyan]  \___ \   | | / /\ \ |  _  /  | |\/| |  __|  [/bold cyan]
[bold cyan]  ____) |  | |/ ____ \| | \ \  | |  | | |____ [/bold cyan]
[bold cyan] |_____/   |_/_/    \_\_|  \_\ |_|  |_|______|[/bold cyan]
    """
    console.print(star_me_art)
    console.rule("[bold gold1]⭐ EPISODE I: The AI Awakening ⭐[/bold gold1]")

def main():
    os.system('clear')  # Clears the terminal for a clean UI
    print_star_me_header()

    # Create the images directory
    os.makedirs("images", exist_ok=True)

    with console.status("[bold yellow]🪙  Bypassing Security (Authenticating)...[/bold yellow]", spinner="star_me"):
        try:
            creds, project_id = google.auth.default()
            LOCATION = "global"
        except Exception as e:
            console.print(f"[bold red]💥 COMM LINK SEVERED! Authentication failed:[/bold red] {e}")
            return

    with console.status(f"[bold cyan]📡 Establishing secure connection for {project_id}...[/bold cyan]", spinner="star_me"):
        google_client = genai.Client(vertexai=True, location=LOCATION, project=project_id)
        claude_client = AnthropicVertex(region=LOCATION, project_id=project_id)

    console.print("\n[bold cyan]The Galaxy needs sustenance![/bold cyan]")

    # Auto-run prompt for the recipe
    question = "Give me a step by step recipe to make a roti for a beginner?"

    console.print(Panel(question, title="[bold green]Space Master (Claude Opus) is searching the archives...[/bold green]", border_style="green"))

    with console.status("[bold green]🟢 Space Master is compiling the ancient texts...\n[/bold green]", spinner="star_me"):
        try:
            msg = claude_client.messages.create(
                model="claude-opus-4-6",
                max_tokens=2048,
                messages=[{"role": "user", "content": question}]
            )
            claude_text = msg.content[0].text
            console.print(f"[bold green]✓ Archives Retrieved! Space Master generated a {len(claude_text)}-character Holocron.[/bold green]\n")
        except Exception as e:
            console.print(f"[bold red]💥 INTERFERENCE DETECTED (Claude API Error):[/bold red] {e}")
            return

    with console.status("[bold gold1]🟡 Protocol Bot (Gemini 3.1 Pro Preview) is translating the recipe...\n[/bold gold1]", spinner="star_me"):
        text_prompt = f"""
        I am providing you with a response generated by a Space Master.
        1. READ the text below.
        2. GENERATE a concise, bulleted executive summary.

        --- INPUT TEXT ---
        {claude_text}
        """

        try:
            text_response = google_client.models.generate_content(
                model="gemini-3.1-pro-preview",
                contents=text_prompt,
                config=types.GenerateContentConfig(temperature=0.7)
            )
            console.print("[bold gold1]✓ Translation Complete! The Protocol Bot has summarized the steps.[/bold gold1]")
        except Exception as e:
            console.print(f"[bold red]💥 SYSTEM FAILURE (Gemini Text Error):[/bold red] {e}")
            return

    with console.status("[bold blue]🔵 Astro Bot (Gemini 3 Pro Image) is projecting the hologram...\n[/bold blue]", spinner="star_me"):
        image_prompt = f"""
        CREATE a high-quality, beautiful illustration for a blog header (16:9 aspect ratio) of someone making roti, but with a subtle sci-fi, cinematic lighting aesthetic.
        Base the image directly on the following text summary:

        {text_response.text}
        """

        try:
            image_response = google_client.models.generate_content(
                model="gemini-3-pro-image-preview",
                contents=image_prompt,
                config=types.GenerateContentConfig(
                    response_modalities=['TEXT', 'IMAGE'],
                    temperature=0.7
                )
            )
            console.print("[bold blue]✓ Hologram Projection Ready![/bold blue]\n")
        except Exception as e:
            console.print(f"[bold red]💥 BAD COMPRESSOR (Gemini Image Error):[/bold red] {e}")
            return

    console.rule("[bold cyan]🚩 MISSION ACCOMPLISHED 🚩[/bold cyan]")

    if text_response.text:
        console.print(Panel(text_response.text.strip(),
                            title="[bold gold1]Protocol Bot Recipe Summary[/bold gold1]",
                            border_style="gold1"))

    for part in image_response.parts:
        if image := part.as_image():
            # Save inside the images folder with the focus-specific name
            filename = "images/cookingroti.png"
            image.save(filename)
            console.print(f"\n[bold green]✓ DATA SECURED:[/bold green] [underline]{os.path.abspath(filename)}[/underline]")

    console.rule("[bold cyan]Hyperlink Uplink[/bold cyan]")
    with console.status("[bold yellow]Opening the frequencies (HTTP server)...[/bold yellow]", spinner="star_me"):
        # Kill any existing server first so it doesn't crash on port binding
        os.system('pkill -f "http.server" > /dev/null 2>&1')

        # Start the server with the root directory set specifically to 'images'
        subprocess.Popen(
            ["python3", "-m", "http.server", "8080", "--directory", "images"],
            stdout=subprocess.DEVNULL,
            stderr=subprocess.DEVNULL
        )

    console.print("[bold green]✓ Transmitting on Port 8080![/bold green]")
    console.print("[bold magenta]View your files here (Click Web Preview -> Preview on port 8080):[/bold magenta] [underline]http://localhost:8080/[/underline]\n")

if __name__ == "__main__":
    main()
EOF

python3 star-me.py
The script runs in a fun interface and launches a web server so you can view the image output. To run the script again type python3 star-me.py
- Now go to web preview option in Cloud Shell, select preview on port 8080
- Select the cookingroti.png to view the image generated. (Sample below generated by AI)

- In Cloud Shell to exit the web server and go back to the VM run the following.
pkill -f "http.server"
- Next type
exitto get back to the Cloud Shell home.
10. Congratulations
Congratulations, you've had some fun and successfully connected to Anthropic Claude Opus 4.6 & Gemini 3.1 Pro on Vertex using both public API address and privately using Private Service Connect Endpoint for Googleapis. This functionality can extend private API connectivity into your on-prem/other cloud environment which are connected via (Interconnect, Cross-Cloud Interconnect and VPC).
Clean up
gcloud compute instances delete anthro-vm --zone=us-east1-b --quiet

gcloud compute routers nats delete anthro-out-nat-gw --router=anthro-out-nat --region=us-east1 --quiet

gcloud compute routers delete anthro-out-nat --region=us-east1 --quiet

gcloud compute firewall-rules delete anthropic-net-allow-icmp anthropic-net-allow-ssh anthropic-net-allow-web --quiet

gcloud compute forwarding-rules delete pscanthrovertex --global --quiet

gcloud dns record-sets delete googleapis.com. --zone googleapis-private --type A --quiet

gcloud dns record-sets delete *.googleapis.com --zone googleapis-private --type CNAME --quiet

gcloud dns managed-zones delete googleapis-private --quiet

gcloud compute addresses delete anthro-ip --global --quiet

gcloud compute networks subnets delete vm-subnet --region=us-east1 --quiet

gcloud compute networks delete anthropic-net --quiet
Next steps / Learn more
You can read more about Vertex AI networking
Codelab: Access Gemini 3 Pro chat using python sdk via Private Service Connect endpoint
Codelab: Building AI Agents with ADK:The Foundation
Take your next lab
Continue your quest with Google Cloud, and check out these other Google Cloud Skills Boost labs: