
1. نظرة عامة
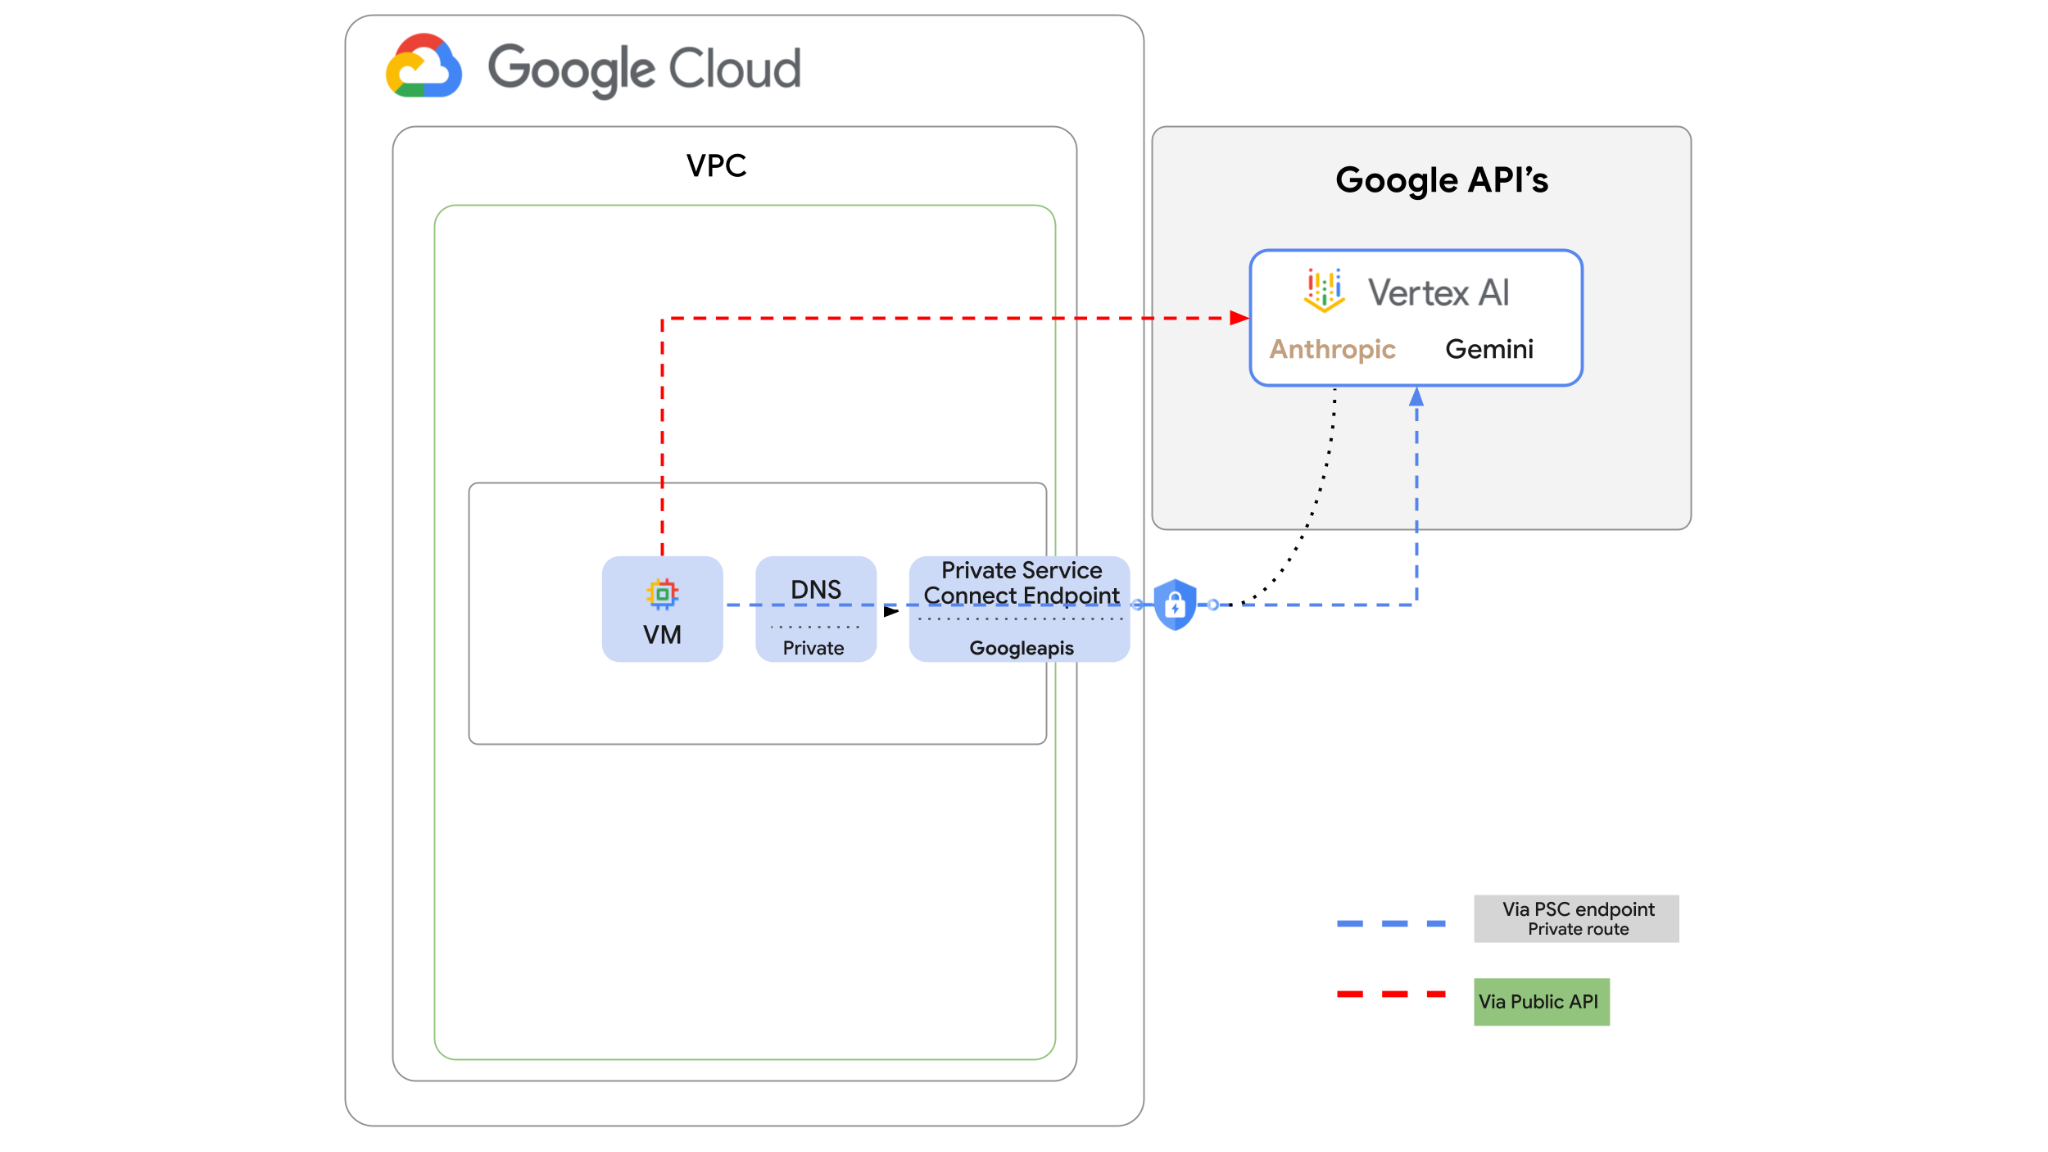
يمكن الوصول إلى واجهة برمجة التطبيقات Vertex AI API عبر الإنترنت، ولكن في مؤسستك، قد تحتاج إلى الوصول إلى واجهة برمجة التطبيقات Vertex AI API بشكل خاص بدون استخدام الإنترنت. في هذا المختبر، ستتمكّن أولاً من الوصول إلى Anthropic Claude Opus 4.6 وGemini 3.1Pro على Vertex من خلال حزمة تطوير البرامج (SDK) للغة Python التي تعمل على مثيل آلة افتراضية عبر الإنترنت المتاح للجميع.
بعد ذلك، ستنشئ نقطة نهاية Private Service Connect إلى Googleapis، وتغيّر مسار نقل البيانات لاستخدام نقطة النهاية الخاصة للاتصال بواجهة Vertex API.
سيأخذ نموذج عينة تعليمات برمجية Python الأسئلة المُدخَلة، ثم يمرّرها إلى Claude Opus لإنشاء إجابة، وسيتم تمرير هذا الناتج إلى Gemini 3 لإنشاء ملخّص نصي وإنشاء صورة.
في هذا التمرين العملي، ستنشئ النمط التالي.
الشكل 1.
2. الأهداف
في هذه الميزة الاختبارية، ستتعرّف على كيفية تنفيذ المهمة التالية:
- إعداد مثيل الجهاز الافتراضي لاستخدام حزمة تطوير البرامج (SDK) في Python
- تفعيل بطاقة نموذج Anthropic في Vertex AI
- الربط بـ Anthropic Claude Opus 4.6 وGemini 3.1 Pro من خلال نص برمجي بلغة Python
- ضبط نقطة نهاية PSC للاتصال بـ Googleapis
- ضبط إدخالات نظام أسماء النطاقات اليدوية
- التحقّق من مسار الاتصال بـ Googleais
- تنفيذ نص برمجي بلغة Python لطلب البحث في النماذج
إعداد الدرس التطبيقي
إعداد البيئة بالسرعة التي تناسبك
- سجِّل الدخول إلى Google Cloud Console وأنشِئ مشروعًا جديدًا أو أعِد استخدام مشروع حالي. إذا لم يكن لديك حساب على Gmail أو Google Workspace، عليك إنشاء حساب.


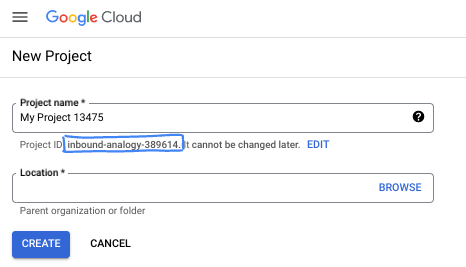
- اسم المشروع هو الاسم المعروض للمشاركين في هذا المشروع. وهي سلسلة أحرف لا تستخدمها Google APIs. ويمكنك تعديلها في أي وقت.
- رقم تعريف المشروع هو معرّف فريد في جميع مشاريع Google Cloud ولا يمكن تغييره بعد ضبطه. تنشئ Cloud Console تلقائيًا سلسلة فريدة، ولا يهمّك عادةً ما هي. في معظم دروس البرمجة، عليك الرجوع إلى رقم تعريف مشروعك (يُشار إليه عادةً باسم
PROJECT_ID). إذا لم يعجبك رقم التعريف الذي تم إنشاؤه، يمكنك إنشاء رقم تعريف عشوائي آخر. يمكنك بدلاً من ذلك تجربة اسم من اختيارك ومعرفة ما إذا كان متاحًا. لا يمكن تغيير هذا الخيار بعد هذه الخطوة وسيظل ساريًا طوال مدة المشروع. - للعلم، هناك قيمة ثالثة، وهي رقم المشروع، تستخدمها بعض واجهات برمجة التطبيقات. يمكنك الاطّلاع على مزيد من المعلومات حول هذه القيم الثلاث في المستندات.
- بعد ذلك، عليك تفعيل الفوترة في Cloud Console لاستخدام موارد/واجهات برمجة تطبيقات Cloud. لن تكلفك تجربة هذا الدرس التطبيقي حول الترميز الكثير، إن وُجدت أي تكلفة على الإطلاق. لإيقاف الموارد وتجنُّب تحمّل تكاليف فوترة تتجاوز هذا البرنامج التعليمي، يمكنك حذف الموارد التي أنشأتها أو حذف المشروع. يمكن لمستخدمي Google Cloud الجدد الاستفادة من برنامج الفترة التجريبية المجانية بقيمة 300 دولار أمريكي.
بدء Cloud Shell
على الرغم من إمكانية تشغيل Google Cloud عن بُعد من الكمبيوتر المحمول، ستستخدم في هذا الدرس التطبيقي حول الترميز Google Cloud Shell، وهي بيئة سطر أوامر تعمل في السحابة الإلكترونية.
من Google Cloud Console، انقر على رمز Cloud Shell في شريط الأدوات أعلى يسار الصفحة:

لن يستغرق توفير البيئة والاتصال بها سوى بضع لحظات. عند الانتهاء، من المفترض أن يظهر لك ما يلي:

يتم تحميل هذه الآلة الافتراضية مزوّدة بكل أدوات التطوير التي ستحتاج إليها. توفّر هذه الخدمة دليلًا منزليًا ثابتًا بسعة 5 غيغابايت، وتعمل على Google Cloud، ما يؤدي إلى تحسين أداء الشبكة والمصادقة بشكل كبير. يمكن إكمال جميع المهام في هذا الدرس العملي ضمن المتصفّح. لست بحاجة إلى تثبيت أي تطبيق.
3- إعداد البيئة
سننشئ سحابة VPC مخصّصة تتضمّن قواعد جدار الحماية. إذا كان لديك شبكة VPC ومشروع حاليًا، يمكنك تخطّي هذا الجزء.
افتح Cloud Shell في أعلى وحدة التحكّم على يسار الصفحة. اضبط الإعدادات على النحو التالي: 
- تفعيل بعض واجهات برمجة التطبيقات التي سنستخدمها في هذا الدرس التطبيقي
gcloud services enable dns.googleapis.com
gcloud services enable aiplatform.googleapis.com
gcloud services enable servicedirectory.googleapis.com
- اضبط بعض المتغيرات. هذه المتغيّرات هي رقم تعريف المشروع ورقم تعريف الشبكة لشبكة VPC المخصّصة (ستنشئ شبكة VPC في الخطوة 4).
projectid=$(gcloud config get-value project)
networkid=anthropic-net
echo $projectid
echo $networkid
- الآن، أنشئ شبكة VPC مخصّصة (anthropic-net) وشبكة فرعية (vm1-subnet) وقواعد جدار الحماية.
gcloud compute networks create $networkid \
--project=$projectid \
--subnet-mode=custom \
--mtu=1460 \
--bgp-routing-mode=global

gcloud compute networks subnets create vm-subnet \
--project=$projectid --range=10.0.88.0/24 \
--stack-type=IPV4_ONLY --network=$networkid \
--region=us-east1

gcloud compute firewall-rules create $networkid-allow-icmp --project=$projectid \
--network=$networkid \
--description="Allows ICMP connections from any source to any instance on the network." \
--direction=INGRESS \
--priority=65534 \
--source-ranges=0.0.0.0/0 \
--action=ALLOW \
--rules=icmp

gcloud compute firewall-rules create $networkid-allow-ssh \
--project=$projectid \
--network=$networkid \
--description="Allows TCP connections from any source to any instance on the network using port 22." \
--direction=INGRESS --priority=65534 \
--source-ranges=0.0.0.0/0 --action=ALLOW \
--rules=tcp:22

gcloud compute firewall-rules create $networkid-allow-web \
--project=$projectid \
--network=$networkid \
--description="Allows TCP connections on port 8080." \
--direction=INGRESS --priority=1000 \
--source-ranges=0.0.0.0/0 --action=ALLOW \
--rules=tcp:8080
4. تفعيل Anthropic في مكتبة النماذج في Vertex
علينا منح إذن بالوصول الخارجي إلى الإنترنت، لذا لننشئ بوابة Cloud NAT ونرفقها.
- انتقِل إلى لوحة بيانات Vertex AI واختَر Model Garden.
- ابحث عن Anthropic واختَر Claude Opus 4.6
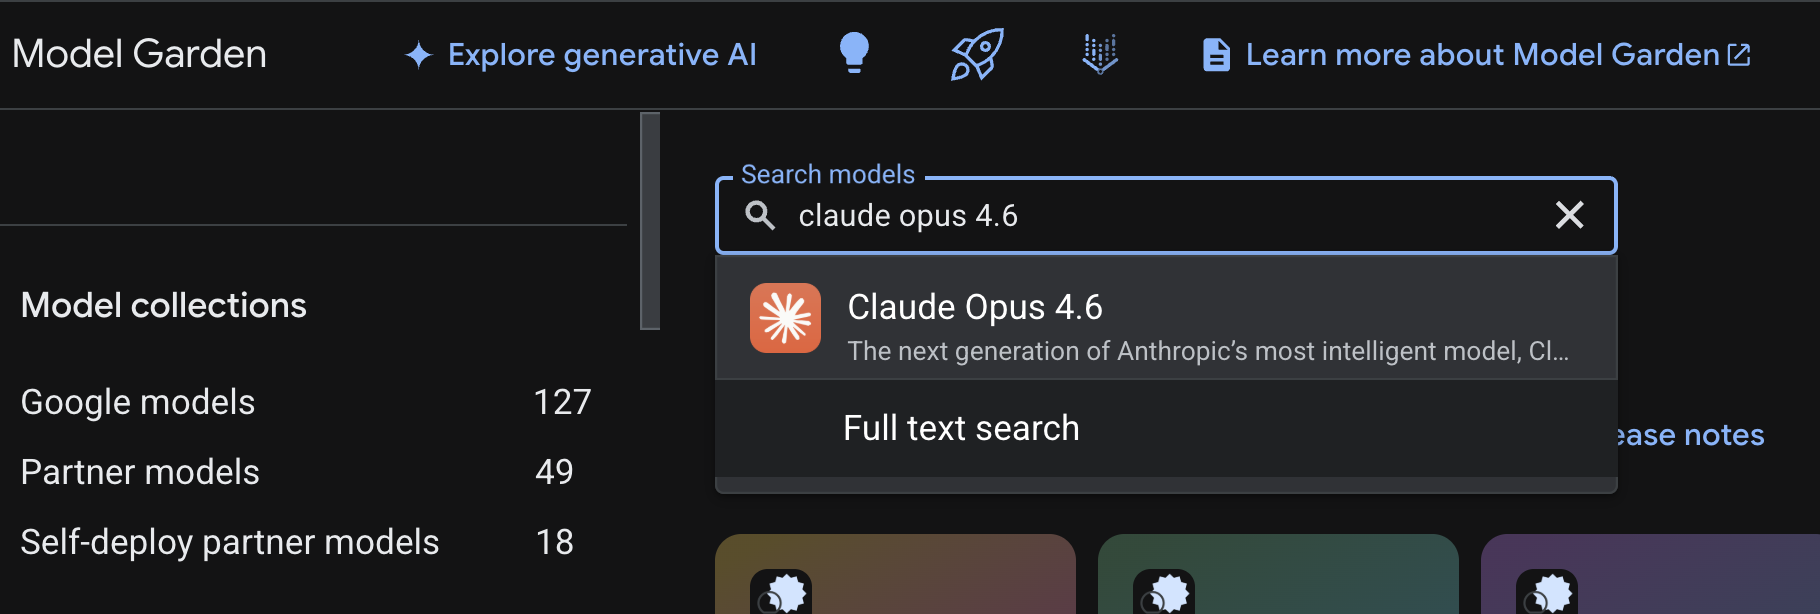
- انقر على تفعيل، وسيُطلب منك ملء بعض المعلومات. املأ النموذج وانقر على التالي.
- في الصفحة الأخيرة، انقر على موافقة لتفعيل Claude 4.6 Opus.
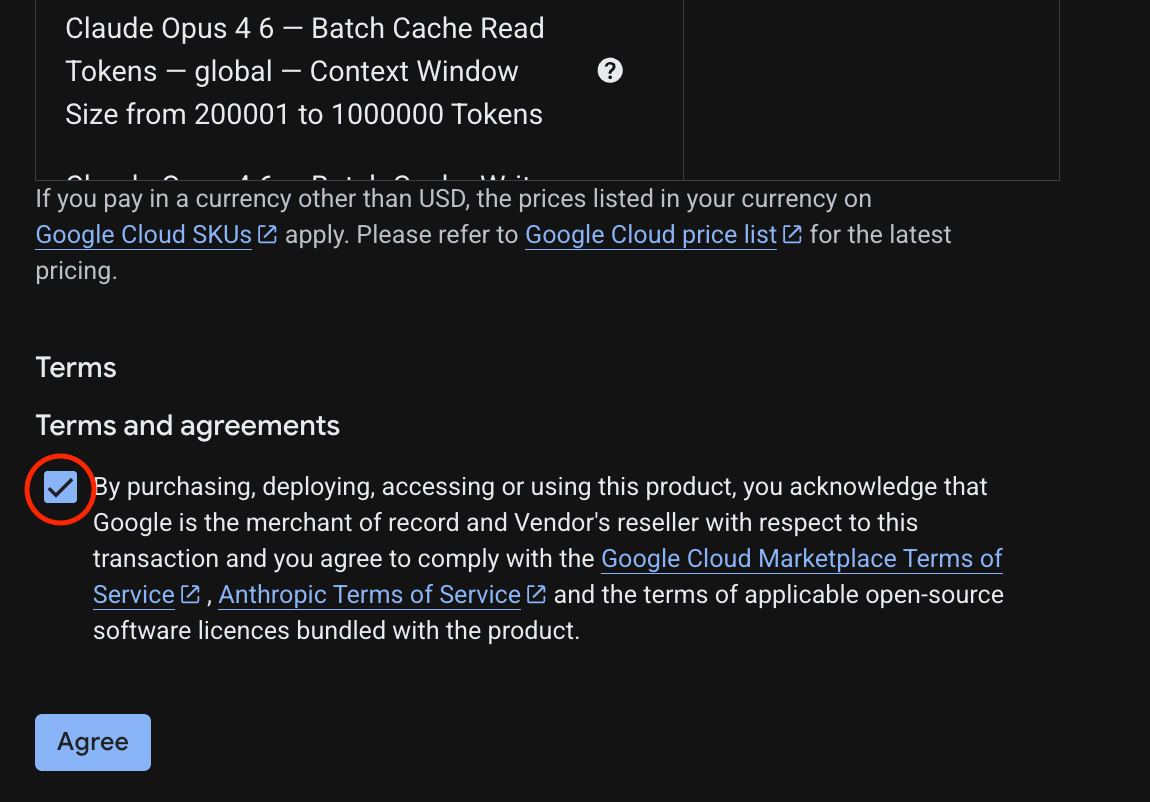
- من المفترض أن تظهر لك صفحة النجاح.

5- إنشاء بوابة NAT وأجهزة افتراضية
علينا منح إذن بالوصول الخارجي إلى الإنترنت، لذا لننشئ بوابة Cloud NAT ونرفقها.
في Cloud Shell، استخدِم الأوامر التالية
- إنشاء Cloud NAT وبوابة Cloud NAT
gcloud compute routers create anthro-out-nat \
    --network $networkid \
    --region us-east1

gcloud compute routers nats create anthro-out-nat-gw \
    --router-region us-east1 \
    --router anthro-out-nat \
    --nat-all-subnet-ip-ranges \
    --auto-allocate-nat-external-ips
لننشئ الآن آلة افتراضية واحدة للوصول إلى Anthropic على Vertex AI من خلال حزمة تطوير البرامج (SDK) للغة Python.
- في جلسة Cloud Shell نفسها، أنشئ anthro-vm باستخدام ما يلي. (يُرجى الانتظار لمدة 3 إلى 4 دقائق حتى تصبح الآلة الافتراضية نشطة أثناء تثبيت نص برمجي للتشغيل)
gcloud compute instances create anthro-vm \
--project=$projectid \
--zone=us-east1-b \
--network-interface=stack-type=IPV4_ONLY,subnet=vm-subnet,no-address,network=$networkid \
--metadata startup-script="#! /bin/bash
      apt-get update
      apt-get install python3 python3-dev python3-venv tcpdump dnsutils -y
      python3 -m venv /opt/py-anthro-env
      /opt/py-anthro-env/bin/pip install -U google-genai 'anthropic[vertex]' rich
      chmod -R 777 /opt/py-anthro-env"
يجب أن يظهر لك جهاز افتراضي تم إنشاؤه بدون عناوين IP علنية. لنضبط الآن إعدادات الجهاز الافتراضي
6. ضبط الجهاز الافتراضي واختباره
- في Google Cloud Shell، يمكنك استخدام SSH لتسجيل الدخول إلى الجهاز الظاهري الجديد الذي يحمل الاسم anthro-vm. (قد تحتاج إلى الانتظار لمدة 3 دقائق للتأكّد من إعداد الجهاز الافتراضي بالكامل)
gcloud compute ssh anthro-vm \
    --project=$projectid \
    --zone=us-east1-b \
    --tunnel-through-iap \
    -- -L 8080:localhost:8080
- بعد الربط، لنُجرِ اختبارًا سريعًا لمعرفة ما إذا كان بإمكاننا الاتصال بواجهة Vertex Gemini API.
dig *-aiplatform.googleapis.com
- من المفترض أن يظهر لك شيء مشابه (ستختلف العناوين). يُرجى العِلم أنّ المسار يتم عبر عناوين IP العامة لأنّ واجهة برمجة التطبيقات هي واجهة برمجة تطبيقات عامة.
; <<>> DiG 9.18.39-0ubuntu0.24.04.2-Ubuntu <<>> *-aiplatform.googleapis.com
;; global options: +cmd
;; Got answer:
;; ->>HEADER<<- opcode: QUERY, status: NOERROR, id: 3728
;; flags: qr rd ra; QUERY: 1, ANSWER: 16, AUTHORITY: 0, ADDITIONAL: 1

;; OPT PSEUDOSECTION:
; EDNS: version: 0, flags:; udp: 512
;; QUESTION SECTION:
;*-aiplatform.googleapis.com.   IN      A

;; ANSWER SECTION:
*-aiplatform.googleapis.com. 300 IN     A       172.217.204.95
*-aiplatform.googleapis.com. 300 IN     A       172.217.203.95
*-aiplatform.googleapis.com. 300 IN     A       173.194.215.95
*-aiplatform.googleapis.com. 300 IN     A       142.250.98.95
*-aiplatform.googleapis.com. 300 IN     A       173.194.217.95
*-aiplatform.googleapis.com. 300 IN     A       142.251.107.95
*-aiplatform.googleapis.com. 300 IN     A       74.125.196.95
- الآن، فعِّل بيئة venv:
source /opt/py-anthro-env/bin/activate
- لنثبت الآن صحة هذا الإعداد لإجراء بعض الاختبارات لاحقًا. نفِّذ الأمر التالي في الجهاز الظاهري، واضغط على y عند المطالبة بذلك.
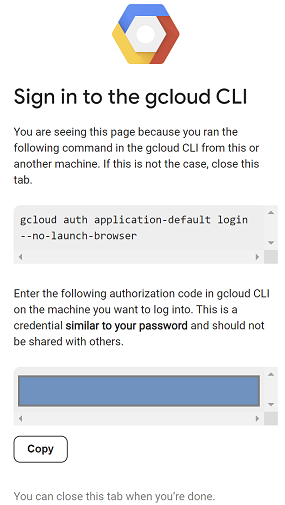
gcloud auth application-default login
- بعد ذلك، انسخ عنوان URL الذي يظهر في البداية مع https://، وافتح علامة تبويب جديدة في نافذة متصفّح المختبر والصِق عنوان URL. قبول الطلبات
- عند ظهور الخيار "اختيار النسخ"، ارجع إلى جلسة anthro-vm في الجهاز الافتراضي، ثم الصِق الرمز الذي نسخته في أدخِل رمز التفويض: واضغط على Enter للمصادقة.
- لنستخدم الآن لغة Python في
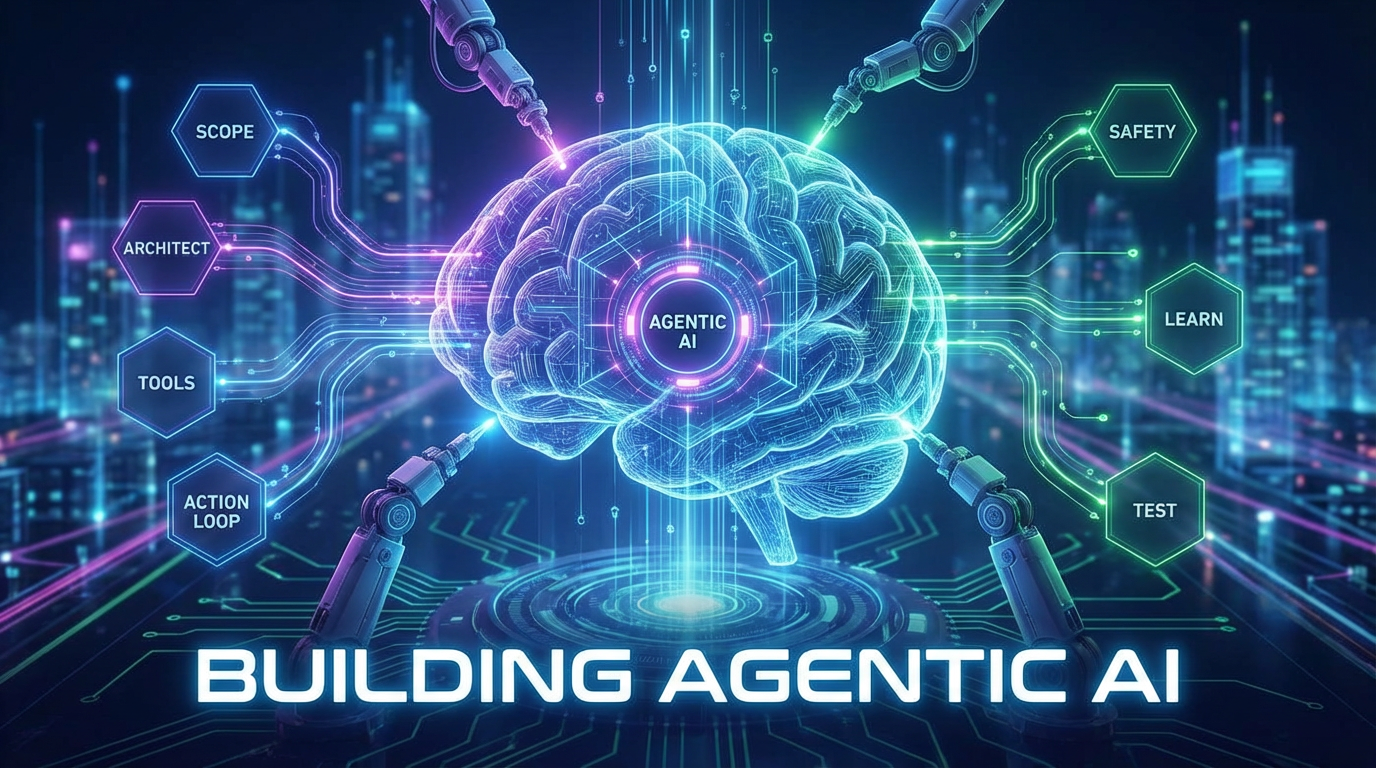
env. سيؤدي ذلك إلى إنشاء ملف Pythonsuper-gen-ai.pyيطرح السؤال التالي على Claude Opus 4.6: "ما هي الخطوات الرئيسية لإنشاء الذكاء الاصطناعي الوكيل؟" ثم يأخذ الناتج ويمرّره إلى Gemini 3.1 Pro الذي ينشئ ملخّصًا، وبعد ذلك ينشئ Gemini 3 Pro Image صورة يتم حفظها على الجهاز الظاهري.
انسخ ما يلي وألصِقه.
cat << 'EOF' > super-gen-ai.py
import os
import subprocess
import google.auth
from google import genai
from google.genai import types
from anthropic import AnthropicVertex
from rich.console import Console
from rich.panel import Panel
from rich.spinner import SPINNERS
from rich.text import Text

# Custom Super Me Animation Spinner - Now with moving power-up!
SPINNERS["super_me"] = {
    "interval": 120,
    "frames": [
        "🧱🦖          🍄",
        "🧱 🦖        🍄 ",
        "🧱  🦖      🍄  ",
        "🧱   🦕    🍄   ",
        "🧱    🦖  🍄    ",
        "🧱     🦖🍄     ",
        "🧱      🌟      ",
        "🧱       🌟     ",
        "🧱        🌟    ",
        "🧱         🌟   ",
        "🧱        🌟    ",
        "🧱       🌟     ",
        "🧱      🌟      ",
        "🧱     🌟       ",
        "🧱    🌟        ",
        "🧱   🌟         ",
        "🧱  🌟          ",
        "🧱 🌟           ",
        "🧱🌟            "
    ]
}

console = Console()

def print_super_me_header():
    super_me_art = """
[bold red]   _____                       [/bold red][bold green]  __  __      _ [/bold green]
[bold red]  / ____|                      [/bold red][bold green] |  \/  |    | |[/bold green]
[bold red] | (___  _   _ _ __   ___ _ __ [/bold red][bold green] | \  / | ___| |[/bold green]
[bold red]  \___ \| | | | '_ \ / _ \ '__|[/bold red][bold green] | |\/| |/ _ \ |[/bold green]
[bold red]  ____) | |_| | |_) |  __/ |   [/bold red][bold green] | |  | |  __/_|[/bold green]
[bold red] |_____/ \__,_| .__/ \___|_|   [/bold red][bold green] |_|  |_|\___(_)[/bold green]
[bold red]              | |              [/bold red][bold green]                 [/bold green]
[bold red]              |_|              [/bold red][bold green]                 [/bold green]
    """
    console.print(super_me_art)
    console.rule("[bold gold1]⭐ LEVEL 1-1: Vertex AI Orchestrator ⭐[/bold gold1]")

def main():
    os.system('clear')  # Clears the terminal for a clean UI
    print_super_me_header()

    # Create the images directory
    os.makedirs("images", exist_ok=True)

    with console.status("[bold yellow]🪙  Collecting Coins (Authenticating)...[/bold yellow]", spinner="super_me"):
        try:
            creds, project_id = google.auth.default()
            LOCATION = "global"
        except Exception as e:
            console.print(f"[bold red]💥 GAME OVER! Authentication failed:[/bold red] {e}")
            return

    with console.status(f"[bold green]🍄 Powering up Clients for {project_id}...[/bold green]", spinner="super_me"):
        google_client = genai.Client(vertexai=True, location=LOCATION, project=project_id)
        claude_client = AnthropicVertex(region=LOCATION, project_id=project_id)

    console.print("\n[bold cyan]The Kingdom needs a strategy![/bold cyan]")

    # Auto-run prompt without user interaction
    question = "What are the key steps to building Agentic AI?"

    console.print(Panel(question, title="[bold green]Green Dino (Claude Opus) is entering the pipe...[/bold green]", border_style="green"))

    with console.status("[bold green]🟢 Green Dino is clearing the level...\n[/bold green]", spinner="super_me"):
        try:
            msg = claude_client.messages.create(
                model="claude-opus-4-6",
                max_tokens=2048,
                messages=[{"role": "user", "content": question}]
            )
            claude_text = msg.content[0].text
            console.print(f"[bold green]✓ Level Cleared! Green Dino generated {len(claude_text)} bytes of strategy.[/bold green]\n")
        except Exception as e:
            console.print(f"[bold red]💥 BOSS ATTACK (Claude API Error):[/bold red] {e}")
            return

    with console.status("[bold red]🔴 Red Hero (Gemini 3.1 Pro Preview) is summarizing the map...\n[/bold red]", spinner="super_me"):
        text_prompt = f"""
        I am providing you with a response generated by Claude.
        1. READ the text below.
        2. GENERATE a concise, bulleted executive summary.

        --- INPUT TEXT ---
        {claude_text}
        """

        try:
            text_response = google_client.models.generate_content(
                model="gemini-3.1-pro-preview",
                contents=text_prompt,
                config=types.GenerateContentConfig(temperature=0.7)
            )
            console.print("[bold red]✓ Super Me! Text Summary Complete.[/bold red]")
        except Exception as e:
            console.print(f"[bold red]💥 CHOMPER PLANT (Gemini Text Error):[/bold red] {e}")
            return

    with console.status("[bold blue]🔵 Mushroom Friend (Gemini 3 Pro Image) is painting the castle...\n[/bold blue]", spinner="super_me"):
        image_prompt = f"""
        CREATE a high-quality, futuristic illustration of autonomous AI agents for a tech blog header (16:9 aspect ratio).
        Base the image directly on the following text summary:

        {text_response.text}
        """

        try:
            image_response = google_client.models.generate_content(
                model="gemini-3-pro-image-preview",
                contents=image_prompt,
                config=types.GenerateContentConfig(
                    response_modalities=['TEXT', 'IMAGE'],
                    temperature=0.7
                )
            )
            console.print("[bold blue]✓ Masterpiece Complete![/bold blue]\n")
        except Exception as e:
            console.print(f"[bold red]💥 FALLING BLOCK (Gemini Image Error):[/bold red] {e}")
            return

    console.rule("[bold gold1]🚩 COURSE CLEAR! 🚩[/bold gold1]")

    if text_response.text:
        console.print(Panel(text_response.text.strip(),
                            title="[bold gold1]Gemini 3.1 Pro Summary[/bold gold1]",
                            border_style="gold1"))

    for part in image_response.parts:
        if image := part.as_image():
            # Save inside the images folder with the focus-specific name
            filename = "images/building-agentic.png"
            image.save(filename)
            console.print(f"\n[bold green]✓ REWARD SAVED:[/bold green] [underline]{os.path.abspath(filename)}[/underline]")

    console.rule("[bold red]Web Server Warp Pipe[/bold red]")
    with console.status("[bold yellow]Opening the warp pipe (HTTP server)...[/bold yellow]", spinner="super_me"):
        # Kill any existing server first so it doesn't crash on port binding
        os.system('pkill -f "http.server" > /dev/null 2>&1')

        # Start the server with the root directory set specifically to 'images'
        subprocess.Popen(
            ["python3", "-m", "http.server", "8080", "--directory", "images"],
            stdout=subprocess.DEVNULL,
            stderr=subprocess.DEVNULL
        )

    console.print("[bold green]✓ Warp Pipe is open in the background![/bold green]")
    console.print("[bold magenta]View your files here (Click Web Preview -> Preview on port 8080):[/bold magenta] [underline]http://localhost:8080/[/underline]\n")

if __name__ == "__main__":
    main()
EOF

python3 super-gen-ai.py
يتم تشغيل النص البرمجي في واجهة ممتعة ويتم إطلاق خادم ويب حتى تتمكّن من عرض ناتج الصورة. لتشغيل النص البرمجي مرة أخرى، اكتب python3 super-gen-ai.py.
- للوصول إلى خيار معاينة الويب في Cloud Shell، انقر على "معاينة على المنفذ 8080"
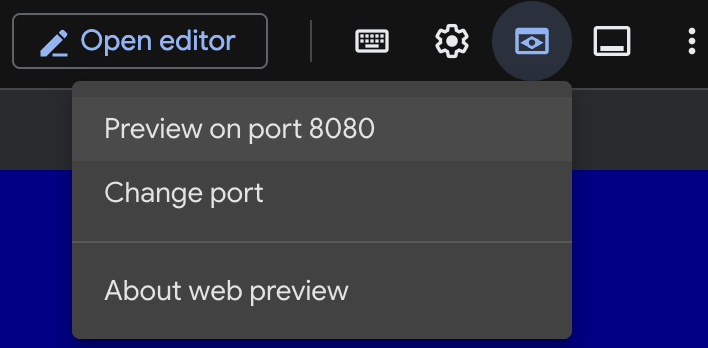
- في جلسة الويب المفتوحة، اختَر building_agentic.png لعرض الصورة التي تم إنشاؤها. (الصورة النموذجية أدناه من إنشاء الذكاء الاصطناعي)
- في Cloud Shell، نفِّذ الأمر التالي للخروج من خادم الويب.
pkill -f "http.server"
- بعد ذلك، اكتب
exitللرجوع إلى صفحة Cloud Shell الرئيسية. بعد الانتهاء، لنتابع.
7. إنشاء نقطة نهاية PSC في googleapis
لتفعيل الاتصال الخاص بنقطة نهاية Vertex API، سننشئ نقطة نهاية Private Service Connect لـ googleapis. سيسمح لنا ذلك باستخدام عنوان IP خاص نخصّصه لتوجيه الزيارات إلى googleapis التي نحتاجها، وفي هذه الحالة Vertex Gemini.
- افتح Cloud Shell إذا لم يكن مفتوحًا من قبل. سننشئ عنوان IP لنقطة نهاية Private Service Connect وننشئ نقطة نهاية Private Service Connect. سنستخدم 192.168.255.230 في هذه الحالة.
projectid=$(gcloud config get-value project)
networkid=anthropic-net

gcloud compute addresses create anthro-ip \
    --global \
    --purpose=PRIVATE_SERVICE_CONNECT \
    --addresses=192.168.255.230 \
    --network=$networkid

gcloud compute forwarding-rules create pscanthrovertex \
    --global \
    --network=$networkid \
    --address=anthro-ip \
    --target-google-apis-bundle=all-apis
- تأكيد
gcloud compute addresses list --filter="name=( 'anthro-ip' ...)"

gcloud compute forwarding-rules describe pscanthrovertex --global
8. إنشاء إدخال نظام أسماء نطاقات يدوي إلى googleapis
يمكنك إنشاء إدخال يدوي لنظام أسماء النطاقات (DNS) للإشارة إلى نقطة نهاية Private Service Connect (PSC) باستخدام نظام أسماء النطاقات الخاص. سيؤثّر ذلك في جميع الشبكات التي تحدّدها له. عليك الآن إنشاء ما يلي
- منطقة نظام أسماء نطاقات خاص لـ googleapis.com وربطها بشبكة anthropic-net
- سجلّ A يربط النطاق الجذر بعنوان IP لنقطة نهاية Private Service Connect (192.168.255.230)
- سجلّ CNAME لحرف بدل لإعادة توجيه جميع النطاقات الفرعية (مثل aiplatform.googleapis.com) إلى سجلّ A الجذر
- نفِّذ الأوامر التالية في Cloud Shell.
gcloud dns managed-zones create googleapis-private \
    --description="Private DNS zone for googleapis.com" \
    --dns-name="googleapis.com." \
    --visibility="private" \
    --networks="anthropic-net"

gcloud dns record-sets create "googleapis.com." \
    --zone="googleapis-private" \
    --type="A" \
    --ttl="300" \
    --rrdatas="192.168.255.230"

gcloud dns record-sets create "*.googleapis.com." \
    --zone="googleapis-private" \
    --type="CNAME" \
    --ttl="300" \
    --rrdatas="googleapis.com."
- أدرِج مجموعات السجلات في المنطقة للتأكّد من إنشاء سجلّ A وسجلّ CNAME بشكل صحيح.
gcloud dns record-sets list --zone="googleapis-private"
- في عرض وحدة التحكّم، من المفترض أن يظهر على النحو التالي. من المفترض أن يظهر لك إعداد يتضمّن سجلّ A وسجلّ CNAME على النحو التالي:

- بعد ذلك، نتحقّق من الاتصال بهذه التغييرات على anthro-vm.
9- تأكيد إمكانية الاتصال بنقطة النهاية من خلال عنوان IP
لنربط حسابك باستخدام نقطة النهاية الخاصة للاتصال بـ Gemini.
- في Google Cloud Shell، يمكنك استخدام SSH للدخول إلى الجهاز الظاهري الجديد الذي يحمل الاسم anthro-vm.
gcloud compute ssh anthro-vm \
    --project=$projectid \
    --zone=us-east1-b \
    --tunnel-through-iap \
    -- -L 8080:localhost:8080
- في جهازك الافتراضي، تحقَّق من مسار الاتصال بـ aiplatform-pscanthrovertex.p.googleapis.com باستخدام الأمر
dig. يجب أن يظهر لك عنوان IP لنقطة نهاية PSC192.168.255.230
dig aiplatform-pscanthrovertex.p.googleapis.com +noall +answer
لنربط حسابك باستخدام نقطة النهاية الخاصة للاتصال بـ Gemini.
- لننفّذ الآن عملية
digلمعرفة ما إذا كان بإمكاننا الاتصال بواجهة Vertex Gemini API.
dig *-aiplatform.googleapis.com
- من المفترض أن يظهر لك شيء مشابه (سيختلف العنوان). يُرجى العِلم أنّ المسار يمرّ عبر عناوين IP لنقاط نهاية PSC.
; <<>> DiG 9.18.41-1~deb12u1-Debian <<>> *-aiplatform.googleapis.com
;; global options: +cmd
;; Got answer:
;; ->>HEADER<<- opcode: QUERY, status: NOERROR, id: 33703
;; flags: qr rd ra; QUERY: 1, ANSWER: 2, AUTHORITY: 0, ADDITIONAL: 1

;; OPT PSEUDOSECTION:
; EDNS: version: 0, flags:; udp: 512
;; QUESTION SECTION:
;*-aiplatform.googleapis.com.   IN      A

;; ANSWER SECTION:
*-aiplatform.googleapis.com. 300 IN     CNAME   googleapis.com.
googleapis.com.         300     IN      A       192.168.255.230

;; Query time: 8 msec
;; SERVER: 169.254.169.254#53(169.254.169.254) (UDP)
;; WHEN: Sat Nov 29 15:19:15 UTC 2025
;; MSG SIZE  rcvd: 86
- استخدام الأمر
pingيمكننا إجراء اختبار سريع. ملاحظة: عنوان IP هذا هو نقطة نهاية PSC، ولن تنجح عمليات اختبار الاتصال.
ping -c 2 aiplatform.googleapis.com
- الآن، فعِّل بيئة venv:
source /opt/py-anthro-env/bin/activate
- لنستخدم الآن لغة Python في
env. يؤدي ذلك إلى إنشاء ملف Pythonstar-me.pyيطلب من Claude Opus 4.6 "أريد وصفة مفصّلة لصنع خبز الروتي للمبتدئين". ثم تأخذ النتيجة وتمرّرها إلى Gemini 3.1 pro الذي ينشئ ملخّصًا، بينما ينشئ Gemini 3 pro image صورة ويحفظها على الجهاز الظاهري.
cat << 'EOF' > star-me.py
import os
import subprocess
import google.auth
from google import genai
from google.genai import types
from anthropic import AnthropicVertex
from rich.console import Console
from rich.panel import Panel
from rich.spinner import SPINNERS
from rich.text import Text

# Custom Star Me Animation Spinner - Directional Flight!
SPINNERS["star_me"] = {
    "interval": 120,
    "frames": [
        "🌌 🚀              🛸 ",
        "🌌  🚀            🛸  ",
        "🌌   🚀          🛸   ",
        "🌌    🚀        🛸    ",
        "🌌     🚀      🛸     ",
        "🌌      🚀    🛸      ",
        "🌌       🚀  🛸       ",
        "🌌        🚀🛸        ",
        "🌌         💥         ",
        "🌌        ✨ ✨       ",
        "🌌       ✨   ✨      ",
        "🌌      ✨     ✨     ",
        "🌌     ✨       ✨    ",
        "🌌                    "
    ]
}

console = Console()

def print_star_me_header():
    star_me_art = """
[bold cyan]   _____ _______       _____    __  __ ______ [/bold cyan]
[bold cyan]  / ____|__   __|/\   |  __ \  |  \/  |  ____|[/bold cyan]
[bold cyan] | (___    | |  /  \  | |__) | | \  / | |__   [/bold cyan]
[bold cyan]  \___ \   | | / /\ \ |  _  /  | |\/| |  __|  [/bold cyan]
[bold cyan]  ____) |  | |/ ____ \| | \ \  | |  | | |____ [/bold cyan]
[bold cyan] |_____/   |_/_/    \_\_|  \_\ |_|  |_|______|[/bold cyan]
    """
    console.print(star_me_art)
    console.rule("[bold gold1]⭐ EPISODE I: The AI Awakening ⭐[/bold gold1]")

def main():
    os.system('clear')  # Clears the terminal for a clean UI
    print_star_me_header()

    # Create the images directory
    os.makedirs("images", exist_ok=True)

    with console.status("[bold yellow]🪙  Bypassing Security (Authenticating)...[/bold yellow]", spinner="star_me"):
        try:
            creds, project_id = google.auth.default()
            LOCATION = "global"
        except Exception as e:
            console.print(f"[bold red]💥 COMM LINK SEVERED! Authentication failed:[/bold red] {e}")
            return

    with console.status(f"[bold cyan]📡 Establishing secure connection for {project_id}...[/bold cyan]", spinner="star_me"):
        google_client = genai.Client(vertexai=True, location=LOCATION, project=project_id)
        claude_client = AnthropicVertex(region=LOCATION, project_id=project_id)

    console.print("\n[bold cyan]The Galaxy needs sustenance![/bold cyan]")

    # Auto-run prompt for the recipe
    question = "Give me a step by step recipe to make a roti for a beginner?"

    console.print(Panel(question, title="[bold green]Space Master (Claude Opus) is searching the archives...[/bold green]", border_style="green"))

    with console.status("[bold green]🟢 Space Master is compiling the ancient texts...\n[/bold green]", spinner="star_me"):
        try:
            msg = claude_client.messages.create(
                model="claude-opus-4-6",
                max_tokens=2048,
                messages=[{"role": "user", "content": question}]
            )
            claude_text = msg.content[0].text
            console.print(f"[bold green]✓ Archives Retrieved! Space Master generated a {len(claude_text)}-character Holocron.[/bold green]\n")
        except Exception as e:
            console.print(f"[bold red]💥 INTERFERENCE DETECTED (Claude API Error):[/bold red] {e}")
            return

    with console.status("[bold gold1]🟡 Protocol Bot (Gemini 3.1 Pro Preview) is translating the recipe...\n[/bold gold1]", spinner="star_me"):
        text_prompt = f"""
        I am providing you with a response generated by a Space Master.
        1. READ the text below.
        2. GENERATE a concise, bulleted executive summary.

        --- INPUT TEXT ---
        {claude_text}
        """

        try:
            text_response = google_client.models.generate_content(
                model="gemini-3.1-pro-preview",
                contents=text_prompt,
                config=types.GenerateContentConfig(temperature=0.7)
            )
            console.print("[bold gold1]✓ Translation Complete! The Protocol Bot has summarized the steps.[/bold gold1]")
        except Exception as e:
            console.print(f"[bold red]💥 SYSTEM FAILURE (Gemini Text Error):[/bold red] {e}")
            return

    with console.status("[bold blue]🔵 Astro Bot (Gemini 3 Pro Image) is projecting the hologram...\n[/bold blue]", spinner="star_me"):
        image_prompt = f"""
        CREATE a high-quality, beautiful illustration for a blog header (16:9 aspect ratio) of someone making roti, but with a subtle sci-fi, cinematic lighting aesthetic.
        Base the image directly on the following text summary:

        {text_response.text}
        """

        try:
            image_response = google_client.models.generate_content(
                model="gemini-3-pro-image-preview",
                contents=image_prompt,
                config=types.GenerateContentConfig(
                    response_modalities=['TEXT', 'IMAGE'],
                    temperature=0.7
                )
            )
            console.print("[bold blue]✓ Hologram Projection Ready![/bold blue]\n")
        except Exception as e:
            console.print(f"[bold red]💥 BAD COMPRESSOR (Gemini Image Error):[/bold red] {e}")
            return

    console.rule("[bold cyan]🚩 MISSION ACCOMPLISHED 🚩[/bold cyan]")

    if text_response.text:
        console.print(Panel(text_response.text.strip(),
                            title="[bold gold1]Protocol Bot Recipe Summary[/bold gold1]",
                            border_style="gold1"))

    for part in image_response.parts:
        if image := part.as_image():
            # Save inside the images folder with the focus-specific name
            filename = "images/cookingroti.png"
            image.save(filename)
            console.print(f"\n[bold green]✓ DATA SECURED:[/bold green] [underline]{os.path.abspath(filename)}[/underline]")

    console.rule("[bold cyan]Hyperlink Uplink[/bold cyan]")
    with console.status("[bold yellow]Opening the frequencies (HTTP server)...[/bold yellow]", spinner="star_me"):
        # Kill any existing server first so it doesn't crash on port binding
        os.system('pkill -f "http.server" > /dev/null 2>&1')

        # Start the server with the root directory set specifically to 'images'
        subprocess.Popen(
            ["python3", "-m", "http.server", "8080", "--directory", "images"],
            stdout=subprocess.DEVNULL,
            stderr=subprocess.DEVNULL
        )

    console.print("[bold green]✓ Transmitting on Port 8080![/bold green]")
    console.print("[bold magenta]View your files here (Click Web Preview -> Preview on port 8080):[/bold magenta] [underline]http://localhost:8080/[/underline]\n")

if __name__ == "__main__":
    main()
EOF

python3 star-me.py
يتم تشغيل النص البرمجي في واجهة ممتعة ويتم إطلاق خادم ويب حتى تتمكّن من عرض ناتج الصورة. لتشغيل النص البرمجي مرة أخرى، اكتب python3 star-me.py
- انتقِل الآن إلى خيار معاينة الويب في Cloud Shell، واختَر "معاينة على المنفذ 8080".
- انقر على cookingroti.png لعرض الصورة التي تم إنشاؤها. (العيّنة أدناه من إنشاء الذكاء الاصطناعي)

- في Cloud Shell، للخروج من خادم الويب والرجوع إلى الجهاز الافتراضي، نفِّذ ما يلي.
pkill -f "http.server"
- بعد ذلك، اكتب
exitللرجوع إلى صفحة Cloud Shell الرئيسية.
10. تهانينا
تهانينا، لقد استمتعت ونجحت في الاتصال بـ Anthropic Claude Opus 4.6 وGemini 3.1 Pro على Vertex باستخدام عنوان واجهة برمجة التطبيقات العامة والخاص باستخدام نقطة نهاية Private Service Connect لـ Googleapis. يمكن أن توسّع هذه الوظيفة إمكانية الاتصال الخاص بواجهات برمجة التطبيقات إلى بيئة السحابة الإلكترونية المحلية أو غير التابعة لـ Google Cloud المرتبطة من خلال (Interconnect وCross-Cloud Interconnect وVPC).
تَنظيم
gcloud compute instances delete anthro-vm --zone=us-east1-b --quiet

gcloud compute routers nats delete anthro-out-nat-gw --router=anthro-out-nat --region=us-east1 --quiet

gcloud compute routers delete anthro-out-nat --region=us-east1 --quiet

gcloud compute firewall-rules delete anthropic-net-allow-icmp anthropic-net-allow-ssh anthropic-net-allow-web --quiet

gcloud compute forwarding-rules delete pscanthrovertex --global --quiet

gcloud dns record-sets delete googleapis.com. --zone googleapis-private --type A --quiet

gcloud dns record-sets delete *.googleapis.com --zone googleapis-private --type CNAME --quiet

gcloud dns managed-zones delete googleapis-private --quiet

gcloud compute addresses delete anthro-ip --global --quiet

gcloud compute networks subnets delete vm-subnet --region=us-east1 --quiet

gcloud compute networks delete anthropic-net --quiet
الخطوات التالية / مزيد من المعلومات
يمكنك الاطّلاع على مزيد من المعلومات حول شبكات Vertex AI.
Codelab: إنشاء وكلاء الذكاء الاصطناعي باستخدام حزمة ADK:الأساسيات
بدء الدرس التطبيقي التالي
يمكنك مواصلة رحلتك التعليمية مع Google Cloud، والاطّلاع على هذه الدروس التطبيقية الأخرى من Google Cloud Skills Boost: