
۱. مرور کلی
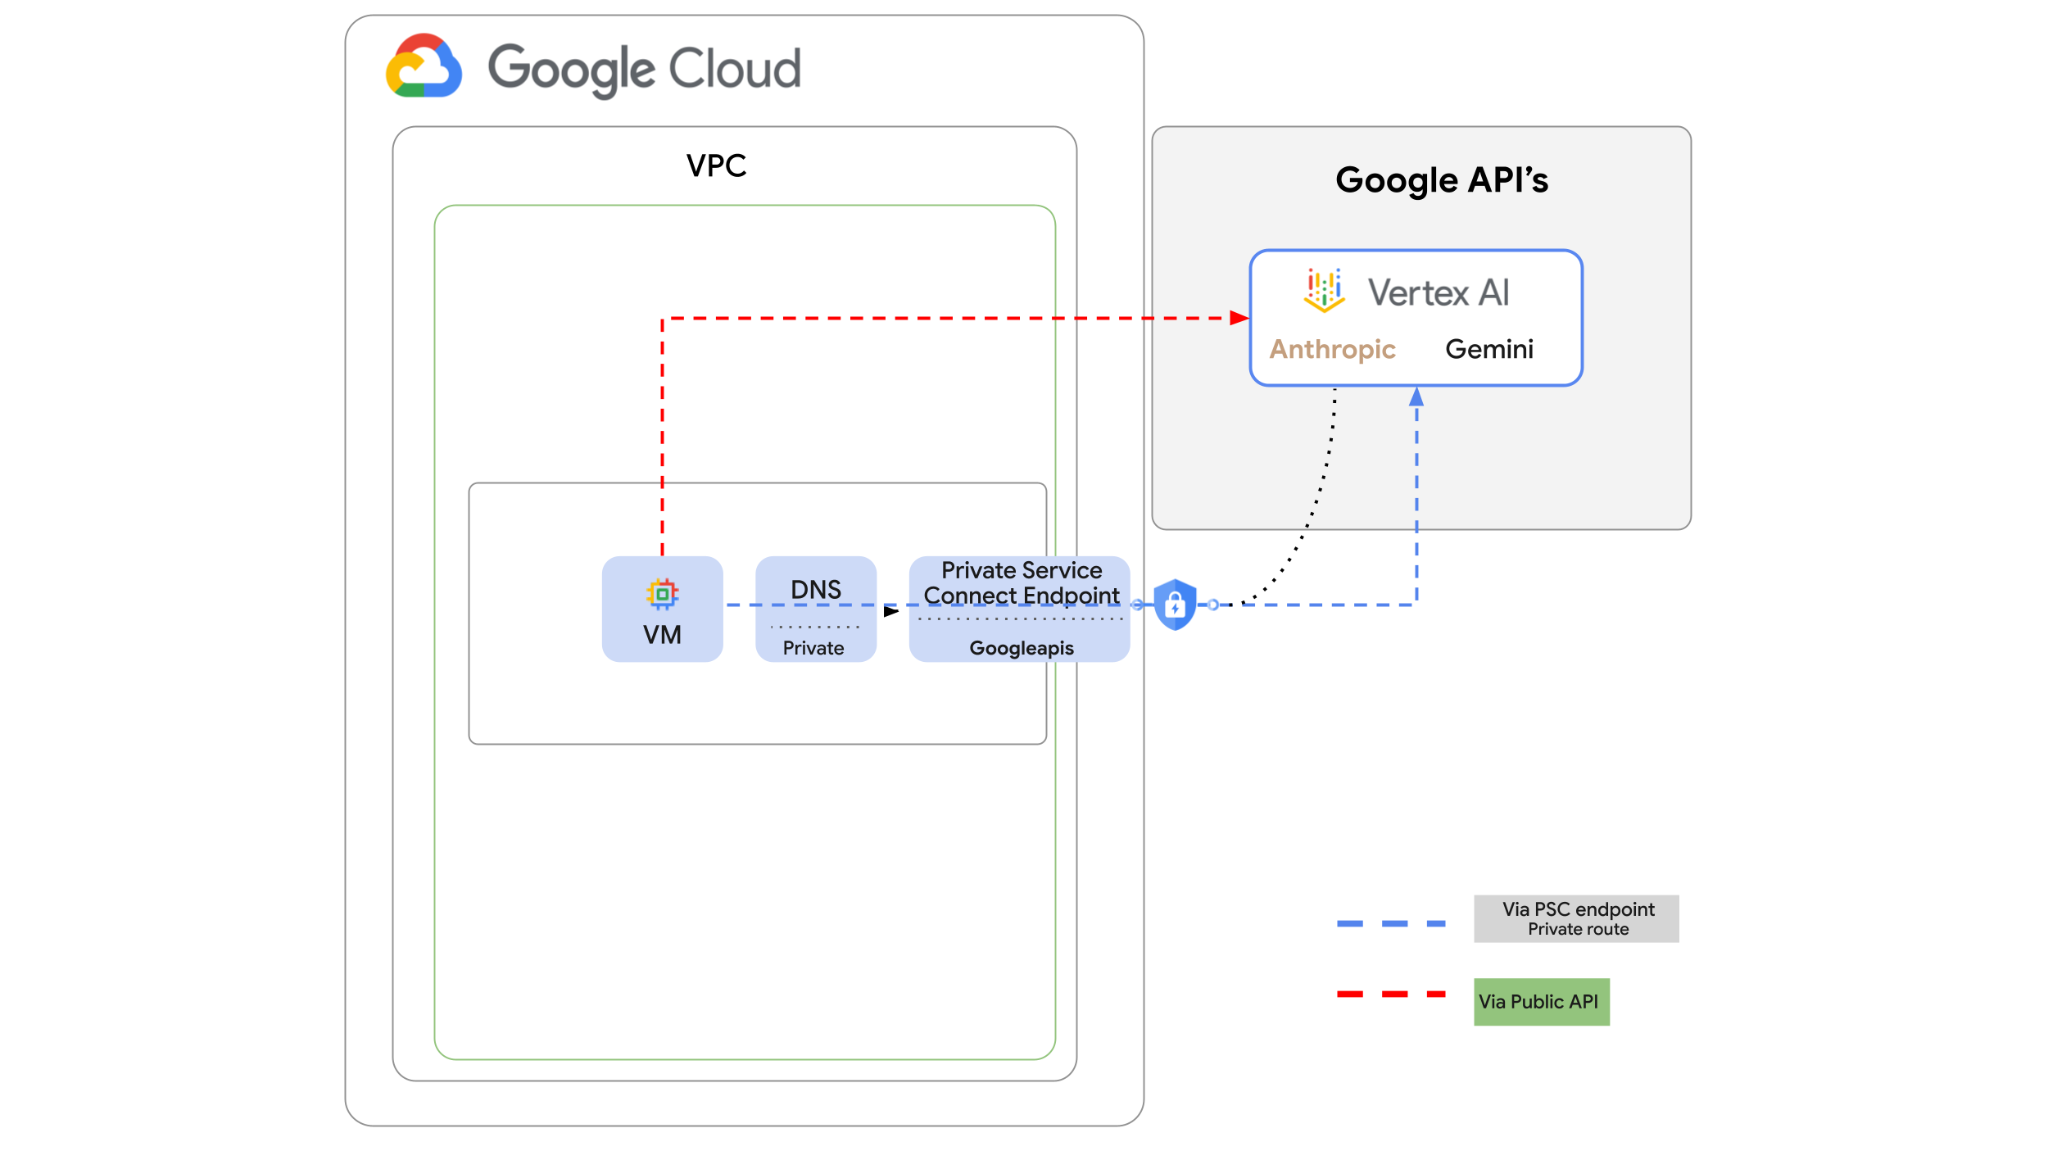
API هوش مصنوعی Vertex از طریق اینترنت قابل دسترسی است، با این حال، در شرکت شما ممکن است بخواهید بدون نیاز به اینترنت به APIهای هوش مصنوعی Vertex به صورت خصوصی دسترسی داشته باشید. در این آزمایشگاه ابتدا از طریق sdk پایتون که روی یک ماشین مجازی از طریق اینترنت عمومی اجرا میشود، به Anthropic Claude Opus 4.6 و Gemini 3.1Pro روی Vertex دسترسی خواهید داشت.
سپس یک نقطه پایانی Private Service Connect برای Googleapis ایجاد خواهید کرد و جریان ترافیک را طوری تغییر میدهید که از نقطه پایانی خصوصی برای اتصال به Vertex API استفاده کند.
نمونه کد پایتون، سوالات ورودی را دریافت میکند، آن را به Claude Opus منتقل میکند تا پاسخی تولید کند ، آن خروجی به Gemini 3 منتقل میشود تا خلاصهای از متن ایجاد شود و تصویری تولید شود.
در این آزمایش، شما قرار است الگوی زیر را ایجاد کنید.
شکل ۱.
۲. اهداف
در این آزمایشگاه یاد خواهید گرفت که چگونه وظایف زیر را انجام دهید:
- راهاندازی نمونه ماشین مجازی برای استفاده از python sdk
- فعال کردن کارت مدل انسانمحور در Vertex AI
- از طریق اسکریپت پایتون به Anthropic Claude Opus 4.6 و Gemini 3.1 Pro متصل شوید
- پیکربندی نقطه پایانی PSC برای اتصال به Googleapis
- پیکربندی ورودیهای DNS دستی
- مسیر اتصال به Googleais را تأیید کنید
- اجرای اسکریپت پایتون برای پرس و جو از مدلها
راه اندازی آزمایشگاه
تنظیم محیط خودتنظیم
- وارد کنسول گوگل کلود شوید و یک پروژه جدید ایجاد کنید یا از یک پروژه موجود دوباره استفاده کنید. اگر از قبل حساب جیمیل یا گوگل ورک اسپیس ندارید، باید یکی ایجاد کنید .

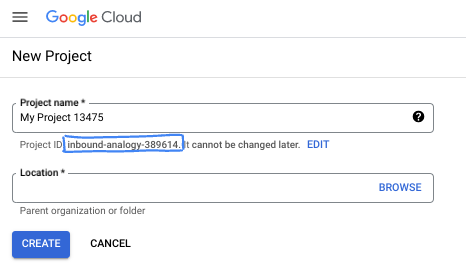
- نام پروژه، نام نمایشی برای شرکتکنندگان این پروژه است. این یک رشته کاراکتری است که توسط APIهای گوگل استفاده نمیشود. شما همیشه میتوانید آن را بهروزرسانی کنید.
- شناسه پروژه در تمام پروژههای گوگل کلود منحصر به فرد است و تغییرناپذیر است (پس از تنظیم، قابل تغییر نیست). کنسول کلود به طور خودکار یک رشته منحصر به فرد تولید میکند؛ معمولاً برای شما مهم نیست که چیست. در اکثر آزمایشگاههای کد، باید شناسه پروژه خود را (که معمولاً با عنوان
PROJECT_IDشناخته میشود) ارجاع دهید. اگر شناسه تولید شده را دوست ندارید، میتوانید یک شناسه تصادفی دیگر ایجاد کنید. به عنوان یک جایگزین، میتوانید شناسه خودتان را امتحان کنید و ببینید که آیا در دسترس است یا خیر. پس از این مرحله قابل تغییر نیست و در طول پروژه باقی میماند. - برای اطلاع شما، یک مقدار سوم، شماره پروژه ، وجود دارد که برخی از APIها از آن استفاده میکنند. برای کسب اطلاعات بیشتر در مورد هر سه این مقادیر، به مستندات مراجعه کنید.
- در مرحله بعد، برای استفاده از منابع/API های ابری، باید پرداخت صورتحساب را در کنسول ابری فعال کنید . اجرای این آزمایشگاه کد هزینه زیادی نخواهد داشت، اگر اصلاً هزینهای داشته باشد. برای خاموش کردن منابع به منظور جلوگیری از پرداخت صورتحساب پس از این آموزش، میتوانید منابعی را که ایجاد کردهاید یا پروژه را حذف کنید. کاربران جدید Google Cloud واجد شرایط برنامه آزمایشی رایگان ۳۰۰ دلاری هستند.
شروع پوسته ابری
اگرچه میتوان از راه دور و از طریق لپتاپ، گوگل کلود را مدیریت کرد، اما در این آزمایشگاه کد، از گوگل کلود شل ، یک محیط خط فرمان که در فضای ابری اجرا میشود، استفاده خواهید کرد.
از کنسول گوگل کلود ، روی آیکون Cloud Shell در نوار ابزار بالا سمت راست کلیک کنید:

آمادهسازی و اتصال به محیط فقط چند لحظه طول میکشد. وقتی تمام شد، باید چیزی شبیه به این را ببینید:

این ماشین مجازی با تمام ابزارهای توسعهای که نیاز دارید، مجهز شده است. این ماشین مجازی یک دایرکتوری خانگی پایدار ۵ گیگابایتی ارائه میدهد و روی فضای ابری گوگل اجرا میشود که عملکرد شبکه و احراز هویت را تا حد زیادی بهبود میبخشد. تمام کارهای شما در این آزمایشگاه کد را میتوان در یک مرورگر انجام داد. نیازی به نصب چیزی ندارید.
۳. محیط راهاندازی
ما یک VPC سفارشی با قوانین فایروال ایجاد خواهیم کرد. اگر از قبل VPC و پروژه دارید، میتوانید از این بخش صرف نظر کنید.
Cloud Shell را که در بالای کنسول شما در سمت راست قرار دارد، باز کنید و به صورت زیر پیکربندی کنید: 
- فعال کردن برخی از APIهایی که در این آزمایش استفاده خواهیم کرد
gcloud services enable dns.googleapis.com
gcloud services enable aiplatform.googleapis.com
gcloud services enable servicedirectory.googleapis.com
- چند متغیر تنظیم کنید. این متغیرها عبارتند از شناسه پروژه و شناسه شبکه VPC سفارشی (شما VPC را در مرحله ۴ ایجاد خواهید کرد).
projectid=$(gcloud config get-value project)
networkid=anthropic-net
echo $projectid
echo $networkid
- حالا یک VPC (anthropic-net)، زیرشبکه (vm1-subnet) و قوانین فایروال سفارشی ایجاد کنید.
gcloud compute networks create $networkid \
--project=$projectid \
--subnet-mode=custom \
--mtu=1460 \
--bgp-routing-mode=global

gcloud compute networks subnets create vm-subnet \
--project=$projectid --range=10.0.88.0/24 \
--stack-type=IPV4_ONLY --network=$networkid \
--region=us-east1

gcloud compute firewall-rules create $networkid-allow-icmp --project=$projectid \
--network=$networkid \
--description="Allows ICMP connections from any source to any instance on the network." \
--direction=INGRESS \
--priority=65534 \
--source-ranges=0.0.0.0/0 \
--action=ALLOW \
--rules=icmp

gcloud compute firewall-rules create $networkid-allow-ssh \
--project=$projectid \
--network=$networkid \
--description="Allows TCP connections from any source to any instance on the network using port 22." \
--direction=INGRESS --priority=65534 \
--source-ranges=0.0.0.0/0 --action=ALLOW \
--rules=tcp:22

gcloud compute firewall-rules create $networkid-allow-web \
--project=$projectid \
--network=$networkid \
--description="Allows TCP connections on port 8080." \
--direction=INGRESS --priority=1000 \
--source-ranges=0.0.0.0/0 --action=ALLOW \
--rules=tcp:8080
۴. فعال کردن آنتروپیک در مدل باغ Vertex
ما باید دسترسی خارجی خروجی به اینترنت را فراهم کنیم، بنابراین بیایید یک دروازه Cloud NAT ایجاد کنیم و آن را وصل کنیم.
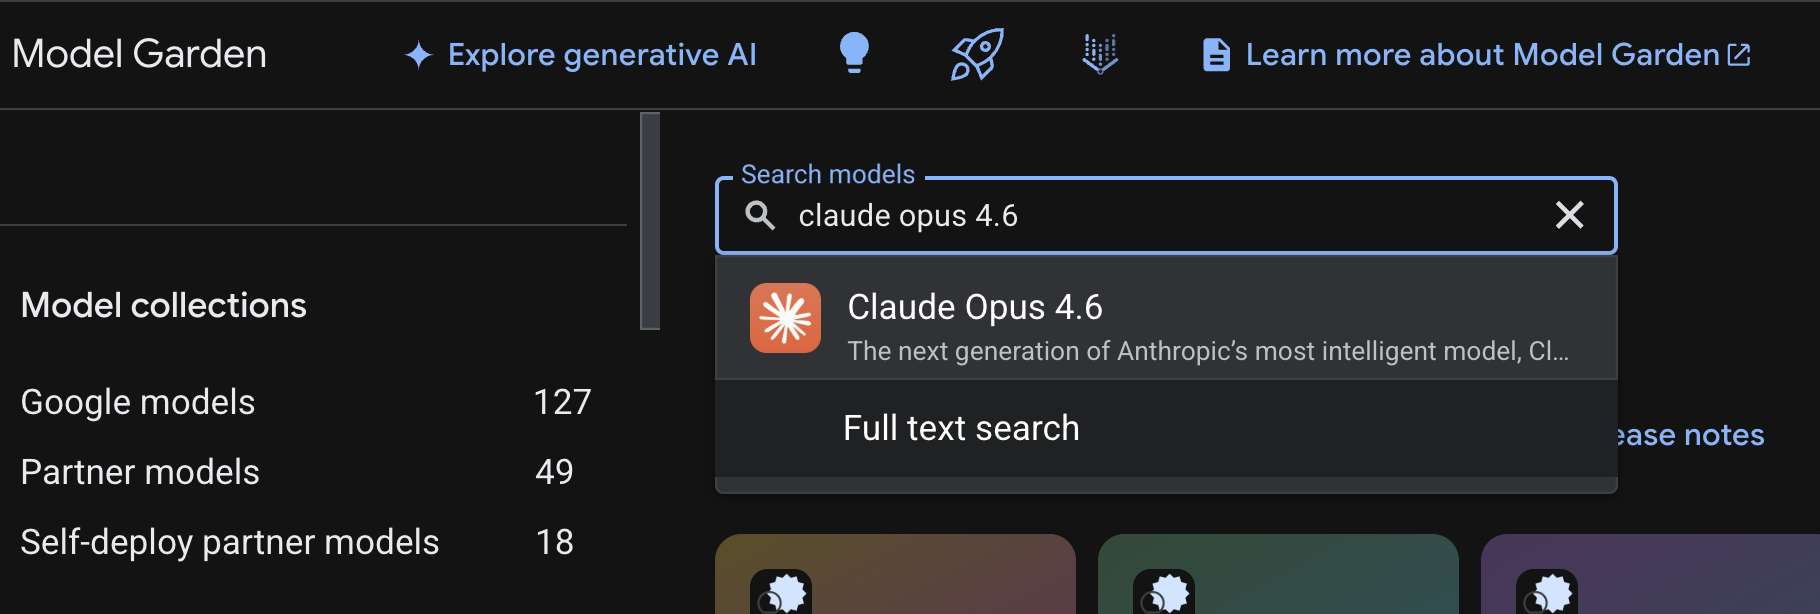
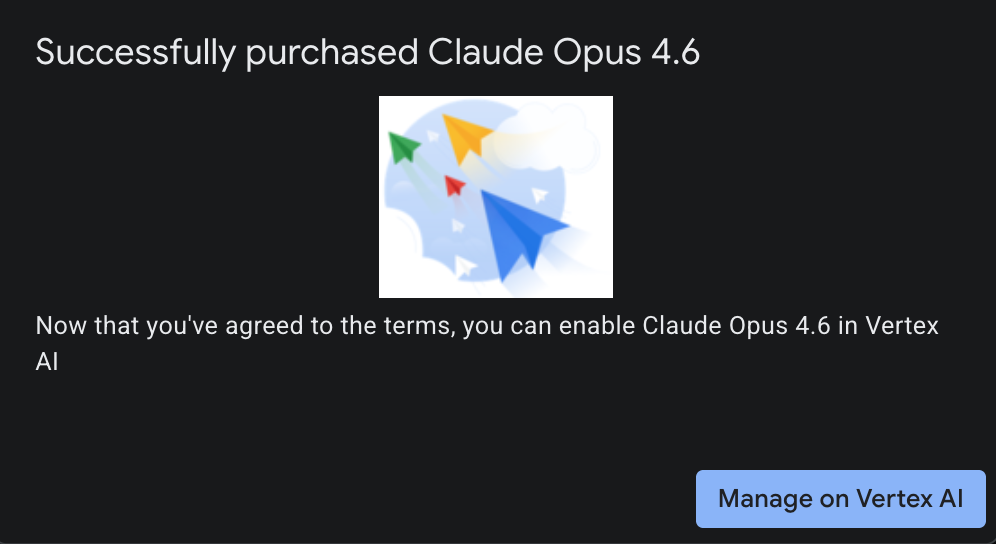
- به داشبورد Vertex AI بروید و Model Garden را انتخاب کنید.
- عبارت Anthropic را جستجو کنید و Claude Opus 4.6 را انتخاب کنید.
- فعال کردن را انتخاب کنید، از شما خواسته میشود اطلاعاتی را پر کنید. فرم را پر کنید و گزینه بعدی را انتخاب کنید.
- در صفحه آخر، گزینه «موافقت برای فعالسازی Claude 4.6 Opus» را انتخاب کنید.
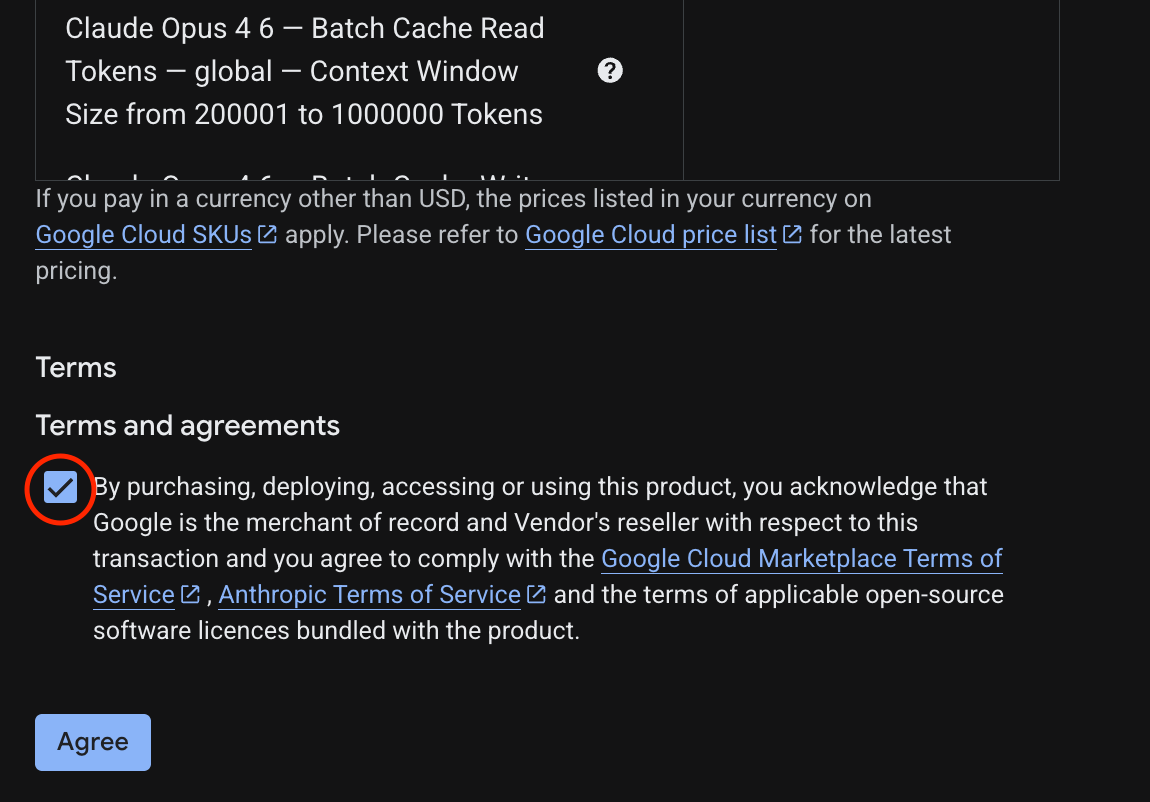
- شما باید صفحه موفقیت را ببینید.
۵. ایجاد دروازه NAT و ماشینهای مجازی
ما باید دسترسی خارجی خروجی به اینترنت را فراهم کنیم، بنابراین بیایید یک دروازه Cloud NAT ایجاد کنیم و آن را وصل کنیم.
در Cloud Shell از دستورات زیر استفاده کنید
- ایجاد Cloud NAT و Cloud NAT gateway
gcloud compute routers create anthro-out-nat \
    --network $networkid \
    --region us-east1

gcloud compute routers nats create anthro-out-nat-gw \
    --router-region us-east1 \
    --router anthro-out-nat \
    --nat-all-subnet-ip-ranges \
    --auto-allocate-nat-external-ips
حالا بیایید یک ماشین مجازی برای دسترسی به Anthropic روی Vertex AI از طریق Python SDK ایجاد کنیم.
- در همان جلسه Cloud Shell، anthro-vm را با استفاده از موارد زیر ایجاد کنید. (لطفاً ۳-۴ دقیقه به ماشین مجازی اجازه دهید تا فعال شود در حالی که اسکریپت راهاندازی در حال نصب است)
gcloud compute instances create anthro-vm \
--project=$projectid \
--zone=us-east1-b \
--network-interface=stack-type=IPV4_ONLY,subnet=vm-subnet,no-address,network=$networkid \
--metadata startup-script="#! /bin/bash
      apt-get update
      apt-get install python3 python3-dev python3-venv tcpdump dnsutils -y
      python3 -m venv /opt/py-anthro-env
      /opt/py-anthro-env/bin/pip install -U google-genai 'anthropic[vertex]' rich
      chmod -R 777 /opt/py-anthro-env"
شما باید یک ماشین مجازی بدون هیچ آدرس IP عمومی ایجاد شده را ببینید. حالا بیایید ماشین مجازی را پیکربندی کنیم.
۶. ماشین مجازی را پیکربندی و آزمایش کنید
- در گوگل کلود شل، امکان SSH به ماشین مجازی جدید به نام anthro-vm فراهم شده است. (ممکن است لازم باشد ۳ دقیقه صبر کنید تا از راهاندازی کامل ماشین مجازی اطمینان حاصل شود)
gcloud compute ssh anthro-vm \
    --project=$projectid \
    --zone=us-east1-b \
    --tunnel-through-iap \
    -- -L 8080:localhost:8080
- پس از اتصال، بیایید یک آزمایش سریع انجام دهیم تا ببینیم آیا میتوانیم به API مربوط به Vertex Gemini متصل شویم یا خیر.
dig *-aiplatform.googleapis.com
- شما باید چیزی مشابه را ببینید ( آدرسها متفاوت خواهند بود ). توجه داشته باشید که مسیر از طریق آدرسهای IP عمومی است زیرا API یک API عمومی است.
; <<>> DiG 9.18.39-0ubuntu0.24.04.2-Ubuntu <<>> *-aiplatform.googleapis.com
;; global options: +cmd
;; Got answer:
;; ->>HEADER<<- opcode: QUERY, status: NOERROR, id: 3728
;; flags: qr rd ra; QUERY: 1, ANSWER: 16, AUTHORITY: 0, ADDITIONAL: 1

;; OPT PSEUDOSECTION:
; EDNS: version: 0, flags:; udp: 512
;; QUESTION SECTION:
;*-aiplatform.googleapis.com.   IN      A

;; ANSWER SECTION:
*-aiplatform.googleapis.com. 300 IN     A       172.217.204.95
*-aiplatform.googleapis.com. 300 IN     A       172.217.203.95
*-aiplatform.googleapis.com. 300 IN     A       173.194.215.95
*-aiplatform.googleapis.com. 300 IN     A       142.250.98.95
*-aiplatform.googleapis.com. 300 IN     A       173.194.217.95
*-aiplatform.googleapis.com. 300 IN     A       142.251.107.95
*-aiplatform.googleapis.com. 300 IN     A       74.125.196.95
- اکنون محیط venv خود را فعال کنید:
source /opt/py-anthro-env/bin/activate
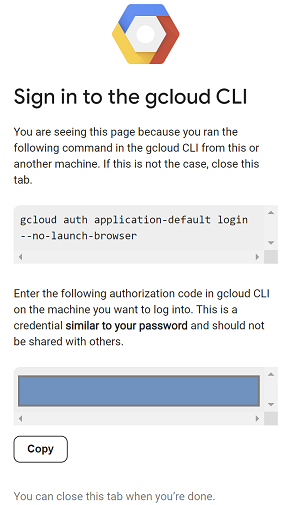
- حالا بیایید این را احراز هویت کنیم تا بعداً آزمایشهایی انجام دهیم. دستور زیر را در ماشین مجازی اجرا کنید، وقتی از شما خواسته شد، کلید y را فشار دهید.
gcloud auth application-default login
- سپس آدرس اینترنتی (url) که با https:// شروع میشود را کپی کنید. یک تب جدید در پنجره مرورگر آزمایشگاه خود باز کنید و آدرس اینترنتی را جایگذاری کنید. دستورالعملها را بپذیرید (یا بپذیرید).
- وقتی کپی انتخابشدهی زیر را مشاهده کردید، به جلسهی vm anthro-vm برگردید و برای Enter authorization code: کدی را که کپی کردهاید، جایگذاری کنید و برای تأیید اعتبار، enter را فشار دهید.
- حالا بیایید از پایتون در
envخود استفاده کنیم. این کار یک فایل پایتونsuper-gen-ai.pyایجاد میکند که از Claude Opus 4.6 میپرسد « مراحل کلیدی برای ساخت هوش مصنوعی Agentic چیست؟ » سپس خروجی را میگیرد و آن را به Gemini 3.1 pro ارسال میکند که خلاصهای ایجاد میکند و سپس Gemini 3 pro image تصویری تولید میکند که در ماشین مجازی ذخیره میشود.
موارد زیر را کپی و جایگذاری کنید.
cat << 'EOF' > super-gen-ai.py
import os
import subprocess
import google.auth
from google import genai
from google.genai import types
from anthropic import AnthropicVertex
from rich.console import Console
from rich.panel import Panel
from rich.spinner import SPINNERS
from rich.text import Text

# Custom Super Me Animation Spinner - Now with moving power-up!
SPINNERS["super_me"] = {
    "interval": 120,
    "frames": [
        "🧱🦖          🍄",
        "🧱 🦖        🍄 ",
        "🧱  🦖      🍄  ",
        "🧱   🦕    🍄   ",
        "🧱    🦖  🍄    ",
        "🧱     🦖🍄     ",
        "🧱      🌟      ",
        "🧱       🌟     ",
        "🧱        🌟    ",
        "🧱         🌟   ",
        "🧱        🌟    ",
        "🧱       🌟     ",
        "🧱      🌟      ",
        "🧱     🌟       ",
        "🧱    🌟        ",
        "🧱   🌟         ",
        "🧱  🌟          ",
        "🧱 🌟           ",
        "🧱🌟            "
    ]
}

console = Console()

def print_super_me_header():
    super_me_art = """
[bold red]   _____                       [/bold red][bold green]  __  __      _ [/bold green]
[bold red]  / ____|                      [/bold red][bold green] |  \/  |    | |[/bold green]
[bold red] | (___  _   _ _ __   ___ _ __ [/bold red][bold green] | \  / | ___| |[/bold green]
[bold red]  \___ \| | | | '_ \ / _ \ '__|[/bold red][bold green] | |\/| |/ _ \ |[/bold green]
[bold red]  ____) | |_| | |_) |  __/ |   [/bold red][bold green] | |  | |  __/_|[/bold green]
[bold red] |_____/ \__,_| .__/ \___|_|   [/bold red][bold green] |_|  |_|\___(_)[/bold green]
[bold red]              | |              [/bold red][bold green]                 [/bold green]
[bold red]              |_|              [/bold red][bold green]                 [/bold green]
    """
    console.print(super_me_art)
    console.rule("[bold gold1]⭐ LEVEL 1-1: Vertex AI Orchestrator ⭐[/bold gold1]")

def main():
    os.system('clear')  # Clears the terminal for a clean UI
    print_super_me_header()

    # Create the images directory
    os.makedirs("images", exist_ok=True)

    with console.status("[bold yellow]🪙  Collecting Coins (Authenticating)...[/bold yellow]", spinner="super_me"):
        try:
            creds, project_id = google.auth.default()
            LOCATION = "global"
        except Exception as e:
            console.print(f"[bold red]💥 GAME OVER! Authentication failed:[/bold red] {e}")
            return

    with console.status(f"[bold green]🍄 Powering up Clients for {project_id}...[/bold green]", spinner="super_me"):
        google_client = genai.Client(vertexai=True, location=LOCATION, project=project_id)
        claude_client = AnthropicVertex(region=LOCATION, project_id=project_id)

    console.print("\n[bold cyan]The Kingdom needs a strategy![/bold cyan]")

    # Auto-run prompt without user interaction
    question = "What are the key steps to building Agentic AI?"

    console.print(Panel(question, title="[bold green]Green Dino (Claude Opus) is entering the pipe...[/bold green]", border_style="green"))

    with console.status("[bold green]🟢 Green Dino is clearing the level...\n[/bold green]", spinner="super_me"):
        try:
            msg = claude_client.messages.create(
                model="claude-opus-4-6",
                max_tokens=2048,
                messages=[{"role": "user", "content": question}]
            )
            claude_text = msg.content[0].text
            console.print(f"[bold green]✓ Level Cleared! Green Dino generated {len(claude_text)} bytes of strategy.[/bold green]\n")
        except Exception as e:
            console.print(f"[bold red]💥 BOSS ATTACK (Claude API Error):[/bold red] {e}")
            return

    with console.status("[bold red]🔴 Red Hero (Gemini 3.1 Pro Preview) is summarizing the map...\n[/bold red]", spinner="super_me"):
        text_prompt = f"""
        I am providing you with a response generated by Claude.
        1. READ the text below.
        2. GENERATE a concise, bulleted executive summary.

        --- INPUT TEXT ---
        {claude_text}
        """

        try:
            text_response = google_client.models.generate_content(
                model="gemini-3.1-pro-preview",
                contents=text_prompt,
                config=types.GenerateContentConfig(temperature=0.7)
            )
            console.print("[bold red]✓ Super Me! Text Summary Complete.[/bold red]")
        except Exception as e:
            console.print(f"[bold red]💥 CHOMPER PLANT (Gemini Text Error):[/bold red] {e}")
            return

    with console.status("[bold blue]🔵 Mushroom Friend (Gemini 3 Pro Image) is painting the castle...\n[/bold blue]", spinner="super_me"):
        image_prompt = f"""
        CREATE a high-quality, futuristic illustration of autonomous AI agents for a tech blog header (16:9 aspect ratio).
        Base the image directly on the following text summary:

        {text_response.text}
        """

        try:
            image_response = google_client.models.generate_content(
                model="gemini-3-pro-image-preview",
                contents=image_prompt,
                config=types.GenerateContentConfig(
                    response_modalities=['TEXT', 'IMAGE'],
                    temperature=0.7
                )
            )
            console.print("[bold blue]✓ Masterpiece Complete![/bold blue]\n")
        except Exception as e:
            console.print(f"[bold red]💥 FALLING BLOCK (Gemini Image Error):[/bold red] {e}")
            return

    console.rule("[bold gold1]🚩 COURSE CLEAR! 🚩[/bold gold1]")

    if text_response.text:
        console.print(Panel(text_response.text.strip(),
                            title="[bold gold1]Gemini 3.1 Pro Summary[/bold gold1]",
                            border_style="gold1"))

    for part in image_response.parts:
        if image := part.as_image():
            # Save inside the images folder with the focus-specific name
            filename = "images/building-agentic.png"
            image.save(filename)
            console.print(f"\n[bold green]✓ REWARD SAVED:[/bold green] [underline]{os.path.abspath(filename)}[/underline]")

    console.rule("[bold red]Web Server Warp Pipe[/bold red]")
    with console.status("[bold yellow]Opening the warp pipe (HTTP server)...[/bold yellow]", spinner="super_me"):
        # Kill any existing server first so it doesn't crash on port binding
        os.system('pkill -f "http.server" > /dev/null 2>&1')

        # Start the server with the root directory set specifically to 'images'
        subprocess.Popen(
            ["python3", "-m", "http.server", "8080", "--directory", "images"],
            stdout=subprocess.DEVNULL,
            stderr=subprocess.DEVNULL
        )

    console.print("[bold green]✓ Warp Pipe is open in the background![/bold green]")
    console.print("[bold magenta]View your files here (Click Web Preview -> Preview on port 8080):[/bold magenta] [underline]http://localhost:8080/[/underline]\n")

if __name__ == "__main__":
    main()
EOF

python3 super-gen-ai.py
اسکریپت در یک رابط کاربری جذاب اجرا میشود و یک وب سرور را راهاندازی میکند تا بتوانید خروجی تصویر را مشاهده کنید. برای اجرای مجدد اسکریپت python3 super-gen-ai.py را تایپ کنید .
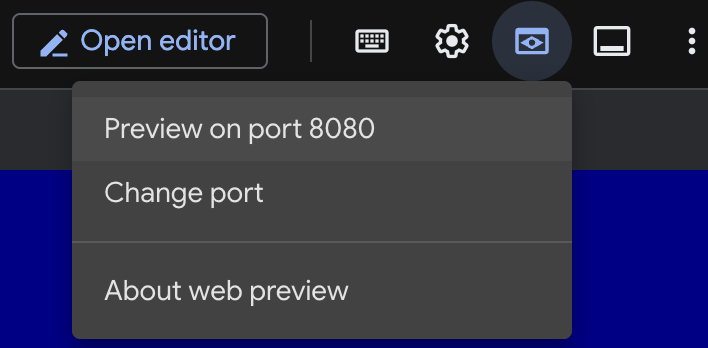
- برای گزینه پیشنمایش وب در Cloud Shell، پیشنمایش روی پورت ۸۰۸۰ را انتخاب کنید.
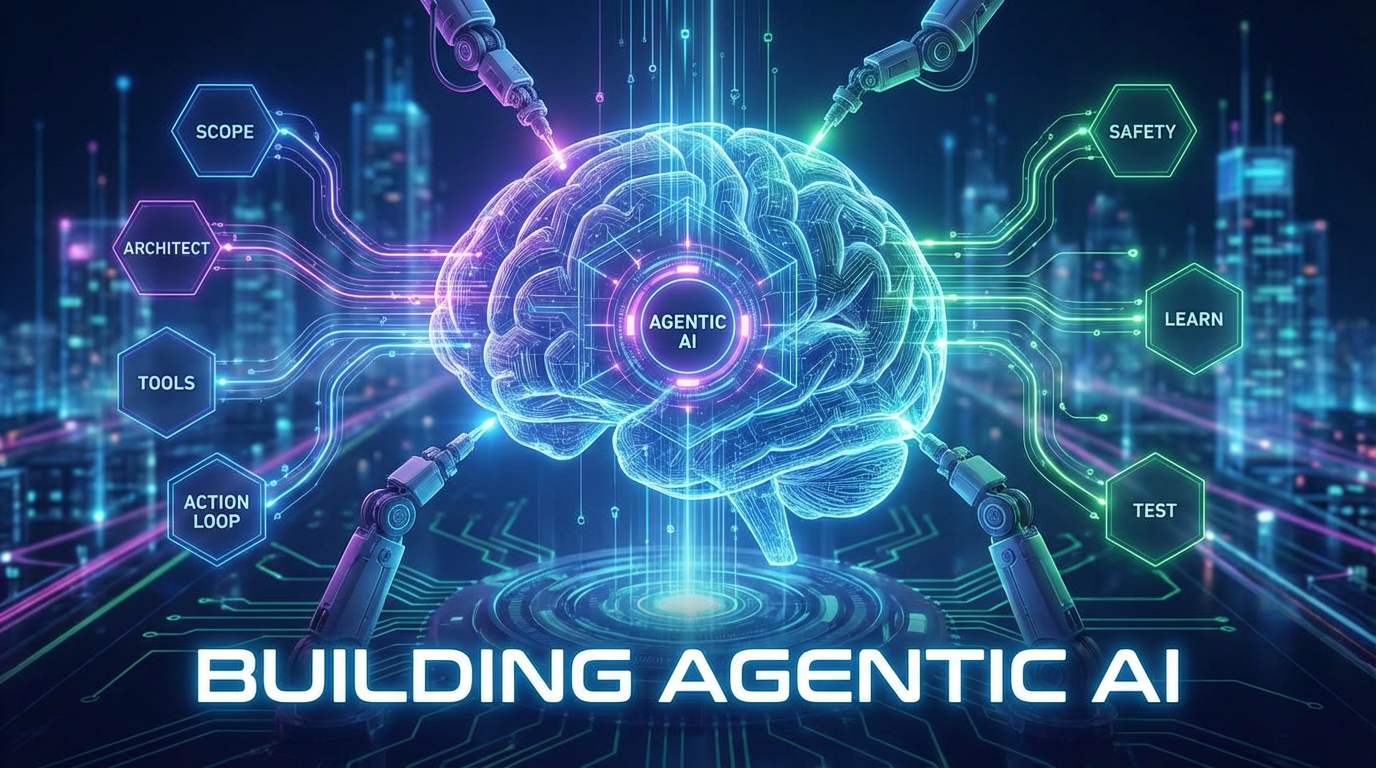
- در جلسه وب باز، فایل building_agentic.png را انتخاب کنید تا تصویر تولید شده را مشاهده کنید. (نمونه تصویر زیر که توسط هوش مصنوعی تولید شده است)
- در Cloud Shell برای خروج از وب سرور، دستور زیر را اجرا کنید.
pkill -f "http.server"
- برای بازگشت به خانهی پوستهی ابری،
exitتایپ کنید. پس از اتمام کار، ادامه میدهیم.
۷. ایجاد نقطه پایانی PSC برای googleapis
برای فعال کردن اتصال خصوصی به نقطه پایانی Vertex API خود، یک نقطه پایانی Private Service Connect برای googleapis ایجاد خواهیم کرد. این به ما امکان میدهد از یک آدرس IP خصوصی که برای مسیریابی ترافیک به googleapis مورد نیازمان، در این مورد Vertex Gemini، اختصاص میدهیم، استفاده کنیم.
- اگر Cloud Shell از قبل باز نیست، آن را باز کنید. ما یک IP برای نقطه پایانی PSC ایجاد خواهیم کرد و نقطه پایانی Private Service Connect را ایجاد خواهیم کرد. در این مورد از 192.168.255.230 استفاده خواهیم کرد.
projectid=$(gcloud config get-value project)
networkid=anthropic-net

gcloud compute addresses create anthro-ip \
    --global \
    --purpose=PRIVATE_SERVICE_CONNECT \
    --addresses=192.168.255.230 \
    --network=$networkid

gcloud compute forwarding-rules create pscanthrovertex \
    --global \
    --network=$networkid \
    --address=anthro-ip \
    --target-google-apis-bundle=all-apis
- تأیید
gcloud compute addresses list --filter="name=( 'anthro-ip' ...)"

gcloud compute forwarding-rules describe pscanthrovertex --global
۸. ایجاد ورودی DNS دستی به googleapis
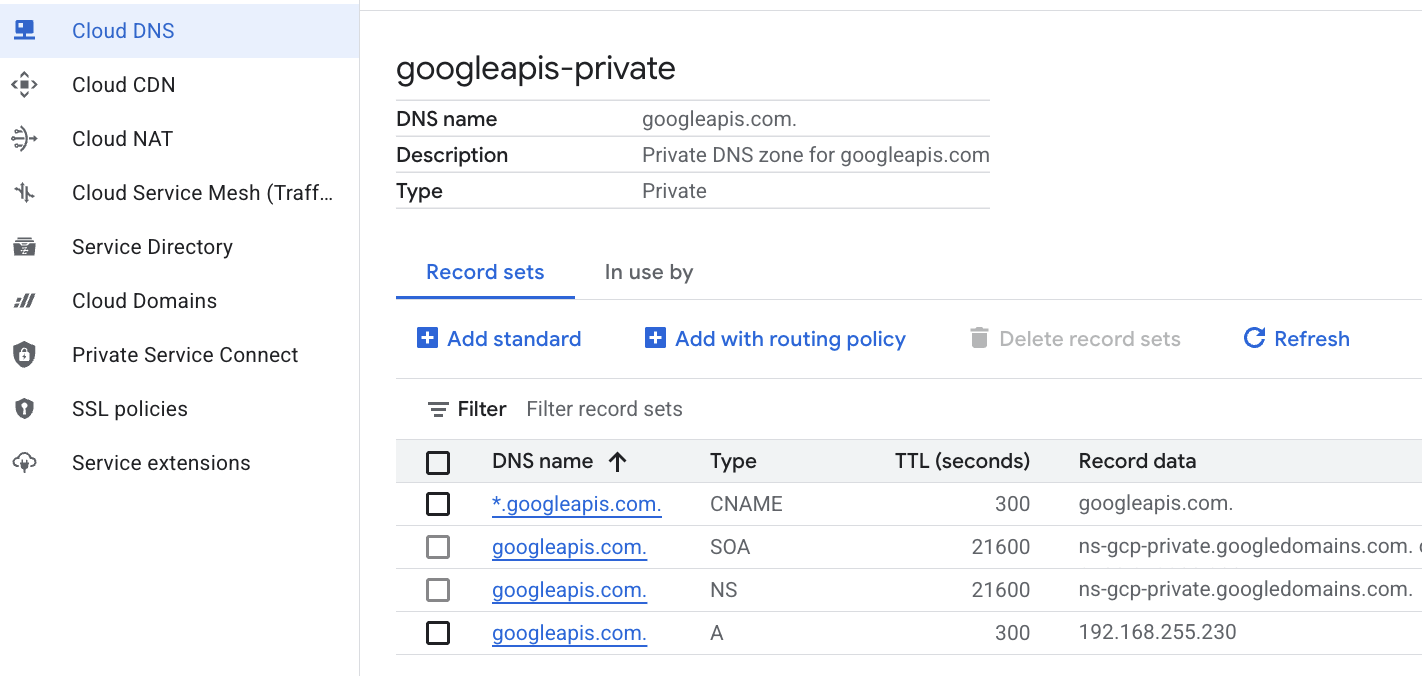
شما میتوانید یک ورودی DNS دستی ایجاد کنید تا با استفاده از DNS خصوصی به نقطه پایانی PSC اشاره کند. این کار بر تمام شبکههایی که به آن اختصاص میدهید تأثیر میگذارد. اکنون موارد زیر را ایجاد خواهید کرد.
- یک منطقه DNS خصوصی برای googleapis.com و اتصال آن به شبکه آنتروپیک-نت.
- یک رکورد A که دامنه ریشه را به IP نقطه پایانی Private Service Connect (192.168.255.230) نگاشت میکند.
- یک رکورد CNAME با کاراکترهای خاص برای هدایت تمام زیر دامنهها (مثلاً aiplatform.googleapis.com) به رکورد A ریشه
- دستورات زیر را در Cloud Shell اجرا کنید.
gcloud dns managed-zones create googleapis-private \
    --description="Private DNS zone for googleapis.com" \
    --dns-name="googleapis.com." \
    --visibility="private" \
    --networks="anthropic-net"

gcloud dns record-sets create "googleapis.com." \
    --zone="googleapis-private" \
    --type="A" \
    --ttl="300" \
    --rrdatas="192.168.255.230"

gcloud dns record-sets create "*.googleapis.com." \
    --zone="googleapis-private" \
    --type="CNAME" \
    --ttl="300" \
    --rrdatas="googleapis.com."
- مجموعه رکوردهای موجود در منطقه را فهرست کنید تا تأیید شود که رکورد A و CNAME به درستی ایجاد شدهاند.
gcloud dns record-sets list --zone="googleapis-private"
- در نمای کنسول باید به این شکل باشد. باید تنظیماتی با یک رکورد A و CNAME مانند این را ببینید.
- در مرحله بعد، اتصال را با این تغییرات در anthro-vm تأیید میکنیم.
۹. اتصال نقطه پایانی را از طریق آدرس IP تأیید کنید
بیایید با استفاده از نقطه پایانی خصوصی به Gemini متصل شویم.
- در گوگل کلود شل، SSH به ماشین مجازی جدیدی به نام anthro-vm اجازه ورود میدهد.
gcloud compute ssh anthro-vm \
    --project=$projectid \
    --zone=us-east1-b \
    --tunnel-through-iap \
    -- -L 8080:localhost:8080
- در ماشین مجازی خود، مسیر اتصال به aiplatform-pscanthrovertex.p.googleapis.com را با استفاده از دستور
digبررسی کنید. باید IP نقطه پایانی PSC را192.168.255.230ببینید.
dig aiplatform-pscanthrovertex.p.googleapis.com +noall +answer
بیایید با استفاده از نقطه پایانی خصوصی به Gemini متصل شویم.
- حالا بیایید
digکنیم که آیا میتوانیم به API مربوط به Vertex Gemini متصل شویم یا خیر.
dig *-aiplatform.googleapis.com
- شما باید چیزی مشابه را ببینید (آدرس متفاوت خواهد بود). توجه داشته باشید که مسیر از طریق آدرسهای IP نقطه پایانی PSC است.
; <<>> DiG 9.18.41-1~deb12u1-Debian <<>> *-aiplatform.googleapis.com
;; global options: +cmd
;; Got answer:
;; ->>HEADER<<- opcode: QUERY, status: NOERROR, id: 33703
;; flags: qr rd ra; QUERY: 1, ANSWER: 2, AUTHORITY: 0, ADDITIONAL: 1

;; OPT PSEUDOSECTION:
; EDNS: version: 0, flags:; udp: 512
;; QUESTION SECTION:
;*-aiplatform.googleapis.com.   IN      A

;; ANSWER SECTION:
*-aiplatform.googleapis.com. 300 IN     CNAME   googleapis.com.
googleapis.com.         300     IN      A       192.168.255.230

;; Query time: 8 msec
;; SERVER: 169.254.169.254#53(169.254.169.254) (UDP)
;; WHEN: Sat Nov 29 15:19:15 UTC 2025
;; MSG SIZE  rcvd: 86
- با استفاده از دستور
ping. میتوانیم یک آزمایش سریع انجام دهیم. توجه: این IP یک نقطه پایانی PSC است و پینگهای شما ناموفق خواهند بود.
ping -c 2 aiplatform.googleapis.com
- اکنون محیط venv خود را فعال کنید:
source /opt/py-anthro-env/bin/activate
- حالا بیایید از پایتون در
envاستفاده کنیم. این یک فایل پایتونstar-me.pyایجاد میکند که از Claude Opus 4.6 میپرسد: « یک دستور پخت گام به گام برای درست کردن روتی برای یک مبتدی به من بدهید؟ » سپس خروجی را میگیرد و آن را به Gemini 3.1 pro ارسال میکند که خلاصهای ایجاد میکند و Gemini 3 pro image را تولید میکند و آن را در ماشین مجازی ذخیره میکند.
cat << 'EOF' > star-me.py
import os
import subprocess
import google.auth
from google import genai
from google.genai import types
from anthropic import AnthropicVertex
from rich.console import Console
from rich.panel import Panel
from rich.spinner import SPINNERS
from rich.text import Text

# Custom Star Me Animation Spinner - Directional Flight!
SPINNERS["star_me"] = {
    "interval": 120,
    "frames": [
        "🌌 🚀              🛸 ",
        "🌌  🚀            🛸  ",
        "🌌   🚀          🛸   ",
        "🌌    🚀        🛸    ",
        "🌌     🚀      🛸     ",
        "🌌      🚀    🛸      ",
        "🌌       🚀  🛸       ",
        "🌌        🚀🛸        ",
        "🌌         💥         ",
        "🌌        ✨ ✨       ",
        "🌌       ✨   ✨      ",
        "🌌      ✨     ✨     ",
        "🌌     ✨       ✨    ",
        "🌌                    "
    ]
}

console = Console()

def print_star_me_header():
    star_me_art = """
[bold cyan]   _____ _______       _____    __  __ ______ [/bold cyan]
[bold cyan]  / ____|__   __|/\   |  __ \  |  \/  |  ____|[/bold cyan]
[bold cyan] | (___    | |  /  \  | |__) | | \  / | |__   [/bold cyan]
[bold cyan]  \___ \   | | / /\ \ |  _  /  | |\/| |  __|  [/bold cyan]
[bold cyan]  ____) |  | |/ ____ \| | \ \  | |  | | |____ [/bold cyan]
[bold cyan] |_____/   |_/_/    \_\_|  \_\ |_|  |_|______|[/bold cyan]
    """
    console.print(star_me_art)
    console.rule("[bold gold1]⭐ EPISODE I: The AI Awakening ⭐[/bold gold1]")

def main():
    os.system('clear')  # Clears the terminal for a clean UI
    print_star_me_header()

    # Create the images directory
    os.makedirs("images", exist_ok=True)

    with console.status("[bold yellow]🪙  Bypassing Security (Authenticating)...[/bold yellow]", spinner="star_me"):
        try:
            creds, project_id = google.auth.default()
            LOCATION = "global"
        except Exception as e:
            console.print(f"[bold red]💥 COMM LINK SEVERED! Authentication failed:[/bold red] {e}")
            return

    with console.status(f"[bold cyan]📡 Establishing secure connection for {project_id}...[/bold cyan]", spinner="star_me"):
        google_client = genai.Client(vertexai=True, location=LOCATION, project=project_id)
        claude_client = AnthropicVertex(region=LOCATION, project_id=project_id)

    console.print("\n[bold cyan]The Galaxy needs sustenance![/bold cyan]")

    # Auto-run prompt for the recipe
    question = "Give me a step by step recipe to make a roti for a beginner?"

    console.print(Panel(question, title="[bold green]Space Master (Claude Opus) is searching the archives...[/bold green]", border_style="green"))

    with console.status("[bold green]🟢 Space Master is compiling the ancient texts...\n[/bold green]", spinner="star_me"):
        try:
            msg = claude_client.messages.create(
                model="claude-opus-4-6",
                max_tokens=2048,
                messages=[{"role": "user", "content": question}]
            )
            claude_text = msg.content[0].text
            console.print(f"[bold green]✓ Archives Retrieved! Space Master generated a {len(claude_text)}-character Holocron.[/bold green]\n")
        except Exception as e:
            console.print(f"[bold red]💥 INTERFERENCE DETECTED (Claude API Error):[/bold red] {e}")
            return

    with console.status("[bold gold1]🟡 Protocol Bot (Gemini 3.1 Pro Preview) is translating the recipe...\n[/bold gold1]", spinner="star_me"):
        text_prompt = f"""
        I am providing you with a response generated by a Space Master.
        1. READ the text below.
        2. GENERATE a concise, bulleted executive summary.

        --- INPUT TEXT ---
        {claude_text}
        """

        try:
            text_response = google_client.models.generate_content(
                model="gemini-3.1-pro-preview",
                contents=text_prompt,
                config=types.GenerateContentConfig(temperature=0.7)
            )
            console.print("[bold gold1]✓ Translation Complete! The Protocol Bot has summarized the steps.[/bold gold1]")
        except Exception as e:
            console.print(f"[bold red]💥 SYSTEM FAILURE (Gemini Text Error):[/bold red] {e}")
            return

    with console.status("[bold blue]🔵 Astro Bot (Gemini 3 Pro Image) is projecting the hologram...\n[/bold blue]", spinner="star_me"):
        image_prompt = f"""
        CREATE a high-quality, beautiful illustration for a blog header (16:9 aspect ratio) of someone making roti, but with a subtle sci-fi, cinematic lighting aesthetic.
        Base the image directly on the following text summary:

        {text_response.text}
        """

        try:
            image_response = google_client.models.generate_content(
                model="gemini-3-pro-image-preview",
                contents=image_prompt,
                config=types.GenerateContentConfig(
                    response_modalities=['TEXT', 'IMAGE'],
                    temperature=0.7
                )
            )
            console.print("[bold blue]✓ Hologram Projection Ready![/bold blue]\n")
        except Exception as e:
            console.print(f"[bold red]💥 BAD COMPRESSOR (Gemini Image Error):[/bold red] {e}")
            return

    console.rule("[bold cyan]🚩 MISSION ACCOMPLISHED 🚩[/bold cyan]")

    if text_response.text:
        console.print(Panel(text_response.text.strip(),
                            title="[bold gold1]Protocol Bot Recipe Summary[/bold gold1]",
                            border_style="gold1"))

    for part in image_response.parts:
        if image := part.as_image():
            # Save inside the images folder with the focus-specific name
            filename = "images/cookingroti.png"
            image.save(filename)
            console.print(f"\n[bold green]✓ DATA SECURED:[/bold green] [underline]{os.path.abspath(filename)}[/underline]")

    console.rule("[bold cyan]Hyperlink Uplink[/bold cyan]")
    with console.status("[bold yellow]Opening the frequencies (HTTP server)...[/bold yellow]", spinner="star_me"):
        # Kill any existing server first so it doesn't crash on port binding
        os.system('pkill -f "http.server" > /dev/null 2>&1')

        # Start the server with the root directory set specifically to 'images'
        subprocess.Popen(
            ["python3", "-m", "http.server", "8080", "--directory", "images"],
            stdout=subprocess.DEVNULL,
            stderr=subprocess.DEVNULL
        )

    console.print("[bold green]✓ Transmitting on Port 8080![/bold green]")
    console.print("[bold magenta]View your files here (Click Web Preview -> Preview on port 8080):[/bold magenta] [underline]http://localhost:8080/[/underline]\n")

if __name__ == "__main__":
    main()
EOF

python3 star-me.py
اسکریپت در یک رابط کاربری جذاب اجرا میشود و یک وب سرور را راهاندازی میکند تا بتوانید خروجی تصویر را مشاهده کنید. برای اجرای مجدد اسکریپت python3 star-me.py را تایپ کنید.
- حالا به گزینه پیشنمایش وب در Cloud Shell بروید، پیشنمایش روی پورت ۸۰۸۰ را انتخاب کنید
- برای مشاهده تصویر تولید شده، فایل cookingroti.png را انتخاب کنید. (نمونه زیر توسط هوش مصنوعی تولید شده است)

- در Cloud Shell برای خروج از وب سرور و بازگشت به ماشین مجازی، دستور زیر را اجرا کنید.
pkill -f "http.server"
- برای بازگشت به خانهی پوستهی ابری،
exitتایپ کنید.
۱۰. تبریک
تبریک میگوییم، شما با موفقیت به Anthropic Claude Opus 4.6 و Gemini 3.1 Pro روی Vertex با استفاده از آدرس API عمومی و به صورت خصوصی با استفاده از Private Service Connect Endpoint برای Googleapis متصل شدید. این قابلیت میتواند اتصال Private API را به محیط ابری On-Premium/دیگر محیطهای ابری شما که از طریق (Interconnect، Cross-Cloud Interconnect و VPC) متصل هستند، گسترش دهد.
تمیز کردن
gcloud compute instances delete anthro-vm --zone=us-east1-b --quiet

gcloud compute routers nats delete anthro-out-nat-gw --router=anthro-out-nat --region=us-east1 --quiet

gcloud compute routers delete anthro-out-nat --region=us-east1 --quiet

gcloud compute firewall-rules delete anthropic-net-allow-icmp anthropic-net-allow-ssh anthropic-net-allow-web --quiet

gcloud compute forwarding-rules delete pscanthrovertex --global --quiet

gcloud dns record-sets delete googleapis.com. --zone googleapis-private --type A --quiet

gcloud dns record-sets delete *.googleapis.com --zone googleapis-private --type CNAME --quiet

gcloud dns managed-zones delete googleapis-private --quiet

gcloud compute addresses delete anthro-ip --global --quiet

gcloud compute networks subnets delete vm-subnet --region=us-east1 --quiet

gcloud compute networks delete anthropic-net --quiet
مراحل بعدی / اطلاعات بیشتر
میتوانید درباره شبکه هوش مصنوعی Vertex بیشتر بخوانید
Codelab : دسترسی به چت Gemini 3 Pro با استفاده از python sdk از طریق نقطه پایانی Private Service Connect
Codelab : ساخت عاملهای هوش مصنوعی با ADK:The Foundation
آزمایشگاه بعدی خود را انجام دهید
به تلاش خود با Google Cloud ادامه دهید و این آزمایشگاههای دیگر Google Cloud Skills Boost را بررسی کنید: