
1. ก่อนเริ่มต้น
ARCore เป็นแพลตฟอร์มสำหรับสร้างแอป Augmented Reality (AR) บนอุปกรณ์เคลื่อนที่ ARCore ใช้ API ต่างๆ เพื่อให้อุปกรณ์ของผู้ใช้สังเกตและรับข้อมูลเกี่ยวกับสภาพแวดล้อมของตนเอง รวมถึงโต้ตอบกับข้อมูลนั้นได้
ในโค้ดแล็บนี้ คุณจะได้เรียนรู้ขั้นตอนการสร้างแอปที่เปิดใช้ AR แบบง่ายๆ ซึ่งใช้ ARCore Depth API
ข้อกำหนดเบื้องต้น
Codelab นี้เขียนขึ้นสำหรับนักพัฒนาแอปที่มีความรู้เกี่ยวกับแนวคิดพื้นฐานของ AR
สิ่งที่คุณจะสร้าง

คุณจะสร้างแอปที่ใช้รูปภาพเชิงลึกสำหรับแต่ละเฟรมเพื่อแสดงภาพเรขาคณิตของฉากและเพื่อดำเนินการบดบังในชิ้นงานเสมือนที่วางไว้ คุณจะต้องทำตามขั้นตอนต่อไปนี้
- การตรวจสอบว่าโทรศัพท์รองรับ Depth API หรือไม่
- ดึงข้อมูลรูปภาพความลึกของแต่ละเฟรม
- แสดงข้อมูลความลึกได้หลายวิธี (ดูภาพเคลื่อนไหวด้านบน)
- การใช้ความลึกเพื่อเพิ่มความสมจริงของแอปที่มีการบดบัง
- ดูวิธีจัดการโทรศัพท์ที่ไม่รองรับ Depth API อย่างเหมาะสม
สิ่งที่คุณต้องมี
ข้อกำหนดเกี่ยวกับฮาร์ดแวร์
- อุปกรณ์ ARCore ที่รองรับซึ่งเชื่อมต่อผ่านสาย USB กับคอมพิวเตอร์สำหรับการพัฒนาซอฟต์แวร์ อุปกรณ์นี้ต้องรองรับ Depth API ด้วย โปรดดูรายการอุปกรณ์ที่รองรับนี้ Depth API พร้อมใช้งานใน Android เท่านั้น
- เปิดใช้การแก้ไขข้อบกพร่อง USB สำหรับอุปกรณ์นี้
ข้อกำหนดของซอฟต์แวร์
- ARCore SDK 1.31.0 ขึ้นไป
- เครื่องพัฒนาซอฟต์แวร์ที่มี Android Studio (v3.0 ขึ้นไป)
2. ARCore และ Depth API
Depth API ใช้กล้อง RGB ของอุปกรณ์ที่รองรับเพื่อสร้างแผนที่ความลึก (หรือที่เรียกว่ารูปภาพความลึก) คุณสามารถใช้ข้อมูลที่ได้จากแผนที่ความลึกเพื่อทำให้วัตถุเสมือนปรากฏอย่างถูกต้องทั้งด้านหน้าหรือด้านหลังวัตถุในโลกจริง ซึ่งจะช่วยให้ผู้ใช้ได้รับประสบการณ์การใช้งานที่สมจริงและดื่มด่ำ
Depth API ของ ARCore ช่วยให้เข้าถึงรูปภาพเชิงลึกที่ตรงกับแต่ละเฟรมที่ Session ของ ARCore ให้ไว้ พิกเซลแต่ละพิกเซลจะให้การวัดระยะทางจากกล้องไปยังสภาพแวดล้อม ซึ่งช่วยเพิ่มความสมจริงให้กับแอป AR
ความสามารถหลักที่อยู่เบื้องหลัง Depth API คือการบดบัง ซึ่งเป็นความสามารถของออบเจ็กต์ดิจิทัลในการปรากฏอย่างถูกต้องเมื่อเทียบกับออบเจ็กต์ในโลกแห่งความเป็นจริง ซึ่งจะทำให้วัตถุดูเหมือนอยู่ในสภาพแวดล้อมเดียวกับผู้ใช้จริงๆ
Codelab นี้จะแนะนำขั้นตอนการสร้างแอปที่เปิดใช้ AR แบบง่ายซึ่งใช้รูปภาพเชิงลึกเพื่อทำการบดบังออบเจ็กต์เสมือนที่อยู่ด้านหลังพื้นผิวในโลกจริง และแสดงภาพเรขาคณิตของพื้นที่ที่ตรวจพบ
3. ตั้งค่า
ตั้งค่าเครื่องที่ใช้พัฒนา
- เชื่อมต่ออุปกรณ์ ARCore กับคอมพิวเตอร์ผ่านสาย USB ตรวจสอบว่าอุปกรณ์อนุญาตการแก้ไขข้อบกพร่องผ่าน USB
- เปิดเทอร์มินัลแล้วเรียกใช้
adb devicesดังที่แสดงด้านล่าง
adb devices

List of devices attached
<DEVICE_SERIAL_NUMBER>    device
<DEVICE_SERIAL_NUMBER> จะเป็นสตริงที่ไม่ซ้ำกันสำหรับอุปกรณ์ของคุณ โปรดตรวจสอบว่าคุณเห็นอุปกรณ์ 1 เครื่องเท่านั้นก่อนดำเนินการต่อ
ดาวน์โหลดและติดตั้ง Code
- คุณจะโคลนที่เก็บได้โดยทำดังนี้
git clone https://github.com/googlecodelabs/arcore-depth
หรือดาวน์โหลดไฟล์ ZIP แล้วแตกไฟล์โดยทำดังนี้
- เปิด Android Studio แล้วคลิกเปิดโปรเจ็กต์ Android Studio ที่มีอยู่
- ค้นหาไดเรกทอรีที่คุณแตกไฟล์ ZIP ที่ดาวน์โหลดไว้ข้างต้น แล้วเปิดไดเรกทอรี
depth_codelab_io2020
นี่คือโปรเจ็กต์ Gradle เดียวที่มีหลายโมดูล หากแผงโปรเจ็กต์ที่ด้านซ้ายบนของ Android Studio ยังไม่แสดงในแผงโปรเจ็กต์ ให้คลิกโปรเจ็กต์จากเมนูแบบเลื่อนลง
ผลลัพธ์ควรมีลักษณะดังนี้
| โปรเจ็กต์นี้มีโมดูลต่อไปนี้
|

คุณจะทำงานในโมดูล part0_work นอกจากนี้ยังมีโซลูชันที่สมบูรณ์สำหรับแต่ละส่วนของ Codelab แต่ละโมดูลคือแอปที่สร้างได้
4. เรียกใช้แอปเริ่มต้น
- คลิกเรียกใช้ > เรียกใช้... > ‘part0_work' ในกล่องโต้ตอบเลือกเป้าหมายการติดตั้งใช้งานที่แสดง อุปกรณ์ของคุณควรแสดงอยู่ในส่วนอุปกรณ์ที่เชื่อมต่อ
- เลือกอุปกรณ์ แล้วคลิกตกลง Android Studio จะสร้างแอปเริ่มต้นและเรียกใช้ในอุปกรณ์
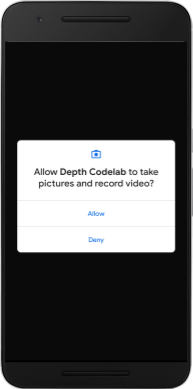
- แอปจะขอสิทธิ์เข้าถึงกล้อง แตะอนุญาตเพื่อดำเนินการต่อ
| วิธีใช้แอป
|
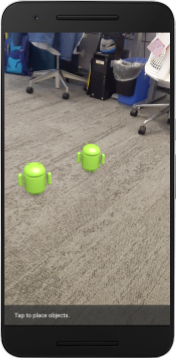
ปัจจุบันแอปของคุณมีความเรียบง่ายมากและไม่ทราบเกี่ยวกับรูปทรงของฉากในโลกแห่งความเป็นจริง
เช่น หากคุณวางหุ่นยนต์ Android ไว้ด้านหลังเก้าอี้ การแสดงผลจะปรากฏลอยอยู่ด้านหน้า เนื่องจากแอปพลิเคชันไม่ทราบว่ามีเก้าอี้อยู่และควรซ่อนหุ่นยนต์ Android
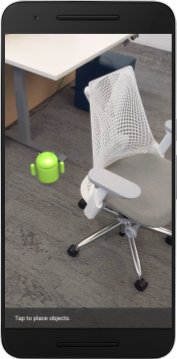

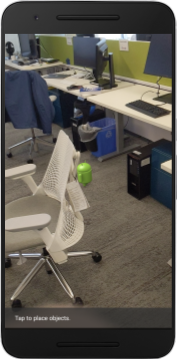
เราจะใช้ Depth API เพื่อปรับปรุงความสมจริงและความสมจริงในแอปนี้เพื่อแก้ไขปัญหานี้
5. ตรวจสอบว่ารองรับ Depth API หรือไม่ (ส่วนที่ 1)
Depth API ของ ARCore จะทำงานในอุปกรณ์ที่รองรับบางส่วนเท่านั้น ก่อนที่จะผสานรวมฟังก์ชันการทำงานเข้ากับแอปโดยใช้รูปภาพความลึกเหล่านี้ คุณต้องตรวจสอบก่อนว่าแอปทำงานบนอุปกรณ์ที่รองรับ
เพิ่มสมาชิกส่วนตัวใหม่ไปยัง DepthCodelabActivity ซึ่งทำหน้าที่เป็นค่าสถานะที่จัดเก็บว่าอุปกรณ์ปัจจุบันรองรับความลึกหรือไม่
private boolean isDepthSupported;
เราสามารถป้อนข้อมูลใน Flag นี้จากภายในฟังก์ชัน onResume() ซึ่งจะสร้างเซสชันใหม่
ค้นหารหัสที่มีอยู่
// Creates the ARCore session.
session = new Session(/* context= */ this);
อัปเดตรหัสเป็น
// Creates the ARCore session.
session = new Session(/* context= */ this);
Config config = session.getConfig();
isDepthSupported = session.isDepthModeSupported(Config.DepthMode.AUTOMATIC);
if (isDepthSupported) {
  config.setDepthMode(Config.DepthMode.AUTOMATIC);
} else {
  config.setDepthMode(Config.DepthMode.DISABLED);
}
session.configure(config);
ตอนนี้ระบบได้กำหนดค่า AR Session อย่างเหมาะสมแล้ว และแอปของคุณจะทราบว่าใช้ฟีเจอร์ที่อิงตามความลึกได้หรือไม่
นอกจากนี้ คุณควรแจ้งให้ผู้ใช้ทราบด้วยว่าเซสชันนี้ใช้ความลึกหรือไม่
เพิ่มข้อความอื่นลงใน Snackbar โดยจะปรากฏที่ด้านล่างของหน้าจอ
// Add this line at the top of the file, with the other messages.
private static final String DEPTH_NOT_AVAILABLE_MESSAGE = "[Depth not supported on this device]";
คุณสามารถแสดงข้อความนี้ได้ตามต้องการภายใน onDrawFrame()
// Add this if-statement above messageSnackbarHelper.showMessage(this, messageToShow).
if (!isDepthSupported) {
  messageToShow += "\n" + DEPTH_NOT_AVAILABLE_MESSAGE;
}
หากแอปทำงานบนอุปกรณ์ที่ไม่รองรับความลึก ข้อความที่คุณเพิ่งเพิ่มจะปรากฏที่ด้านล่าง

จากนั้นคุณจะอัปเดตแอปเพื่อเรียกใช้ Depth API และดึงข้อมูลรูปภาพเชิงลึกสำหรับแต่ละเฟรม
6. ดึงข้อมูลรูปภาพระยะชัดลึก (ส่วนที่ 2)
Depth API จะบันทึกการสังเกตการณ์สภาพแวดล้อมของอุปกรณ์ในรูปแบบ 3 มิติ และส่งคืนรูปภาพเชิงลึกพร้อมข้อมูลดังกล่าวไปยังแอปของคุณ พิกเซลแต่ละพิกเซลในรูปภาพเชิงลึกแสดงถึงการวัดระยะทางจากกล้องของอุปกรณ์ไปยังสภาพแวดล้อมจริง
ตอนนี้คุณจะใช้รูปภาพความลึกเหล่านี้เพื่อปรับปรุงการแสดงผลและการแสดงภาพในแอป ขั้นตอนแรกคือการดึงรูปภาพความลึกสำหรับแต่ละเฟรมและเชื่อมโยงพื้นผิวดังกล่าวเพื่อให้ GPU ใช้
ก่อนอื่น ให้เพิ่มคลาสใหม่ลงในโปรเจ็กต์DepthTextureHandler มีหน้าที่ดึงข้อมูลรูปภาพเชิงลึกสำหรับเฟรม ARCore ที่กำหนด
เพิ่มไฟล์นี้
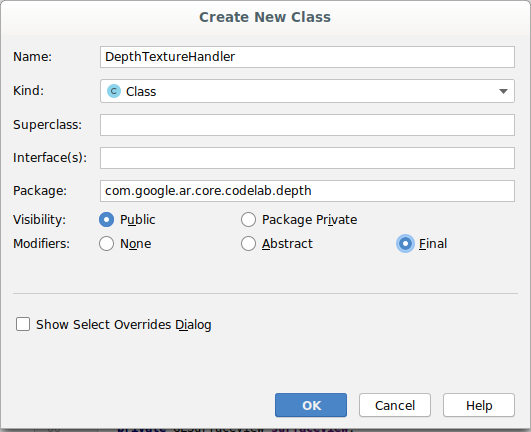
src/main/java/com/google/ar/core/codelab/depth/DepthTextureHandler.java
package com.google.ar.core.codelab.depth;

import static android.opengl.GLES20.GL_CLAMP_TO_EDGE;
import static android.opengl.GLES20.GL_TEXTURE_2D;
import static android.opengl.GLES20.GL_TEXTURE_MAG_FILTER;
import static android.opengl.GLES20.GL_TEXTURE_MIN_FILTER;
import static android.opengl.GLES20.GL_TEXTURE_WRAP_S;
import static android.opengl.GLES20.GL_TEXTURE_WRAP_T;
import static android.opengl.GLES20.GL_UNSIGNED_BYTE;
import static android.opengl.GLES20.glBindTexture;
import static android.opengl.GLES20.glGenTextures;
import static android.opengl.GLES20.glTexImage2D;
import static android.opengl.GLES20.glTexParameteri;
import static android.opengl.GLES30.GL_LINEAR;
import static android.opengl.GLES30.GL_RG;
import static android.opengl.GLES30.GL_RG8;

import android.media.Image;
import com.google.ar.core.Frame;
import com.google.ar.core.exceptions.NotYetAvailableException;

/** Handle RG8 GPU texture containing a DEPTH16 depth image. */
public final class DepthTextureHandler {

  private int depthTextureId = -1;
  private int depthTextureWidth = -1;
  private int depthTextureHeight = -1;

  /**
   * Creates and initializes the depth texture. This method needs to be called on a
   * thread with a EGL context attached.
   */
  public void createOnGlThread() {
    int[] textureId = new int[1];
    glGenTextures(1, textureId, 0);
    depthTextureId = textureId[0];
    glBindTexture(GL_TEXTURE_2D, depthTextureId);
    glTexParameteri(GL_TEXTURE_2D, GL_TEXTURE_WRAP_S, GL_CLAMP_TO_EDGE);
    glTexParameteri(GL_TEXTURE_2D, GL_TEXTURE_WRAP_T, GL_CLAMP_TO_EDGE);
    glTexParameteri(GL_TEXTURE_2D, GL_TEXTURE_MIN_FILTER, GL_LINEAR);
    glTexParameteri(GL_TEXTURE_2D, GL_TEXTURE_MAG_FILTER, GL_LINEAR);
  }

  /**
   * Updates the depth texture with the content from acquireDepthImage16Bits().
   * This method needs to be called on a thread with an EGL context attached.
   */
  public void update(final Frame frame) {
    try {
      Image depthImage = frame.acquireDepthImage16Bits();
      depthTextureWidth = depthImage.getWidth();
      depthTextureHeight = depthImage.getHeight();
      glBindTexture(GL_TEXTURE_2D, depthTextureId);
      glTexImage2D(
          GL_TEXTURE_2D,
          0,
          GL_RG8,
          depthTextureWidth,
          depthTextureHeight,
          0,
          GL_RG,
          GL_UNSIGNED_BYTE,
          depthImage.getPlanes()[0].getBuffer());
      depthImage.close();
    } catch (NotYetAvailableException e) {
      // This normally means that depth data is not available yet.
    }
  }

  public int getDepthTexture() {
    return depthTextureId;
  }

  public int getDepthWidth() {
    return depthTextureWidth;
  }

  public int getDepthHeight() {
    return depthTextureHeight;
  }
}
ตอนนี้คุณจะเพิ่มอินสแตนซ์ของคลาสนี้ลงใน DepthCodelabActivity เพื่อให้มั่นใจว่าคุณจะมีสำเนาของรูปภาพความลึกที่เข้าถึงได้ง่ายสำหรับทุกเฟรม
ใน DepthCodelabActivity.java ให้เพิ่มอินสแตนซ์ของคลาสใหม่เป็นตัวแปรสมาชิกส่วนตัว
private final DepthTextureHandler depthTexture = new DepthTextureHandler();
จากนั้นอัปเดตเมธอด onSurfaceCreated() เพื่อเริ่มต้นพื้นผิวนี้ เพื่อให้เชดเดอร์ GPU ของเราใช้งานได้
// Put this at the top of the "try" block in onSurfaceCreated().
depthTexture.createOnGlThread();
สุดท้าย คุณจะต้องป้อนข้อมูลพื้นผิวนี้ในทุกเฟรมด้วยรูปภาพความลึกล่าสุด ซึ่งทำได้โดยเรียกใช้เมธอด update() ที่คุณสร้างไว้ข้างต้นในเฟรมล่าสุดที่ดึงมาจาก session
เนื่องจากแอปนี้รองรับความลึกแบบไม่บังคับ ให้ใช้การเรียกนี้เฉพาะในกรณีที่คุณใช้ความลึก
// Add this just after "frame" is created inside onDrawFrame().
if (isDepthSupported) {
  depthTexture.update(frame);
}
ตอนนี้คุณมีรูปภาพความลึกที่อัปเดตทุกเฟรมแล้ว พร้อมให้เชเดอร์ของคุณใช้งานแล้ว
อย่างไรก็ตาม พฤติกรรมของแอปยังไม่มีการเปลี่ยนแปลงใดๆ ตอนนี้คุณจะใช้รูปภาพความลึกเพื่อปรับปรุงแอป
7. แสดงผลรูปภาพความลึก (ส่วนที่ 3)
ตอนนี้คุณมีรูปภาพระยะชัดลึกให้ใช้งานแล้ว คุณคงอยากรู้ว่ารูปภาพจะมีลักษณะเป็นอย่างไร ในส่วนนี้ คุณจะเพิ่มปุ่มลงในแอปเพื่อแสดงผลความลึกของแต่ละเฟรม
เพิ่ม Shader ใหม่
คุณดูรูปภาพระยะชัดได้หลายวิธี Shader ต่อไปนี้แสดงภาพการแมปสีอย่างง่าย
| เพิ่มเชเดอร์ .vert ใหม่ใน Android Studio ให้ทำดังนี้
|
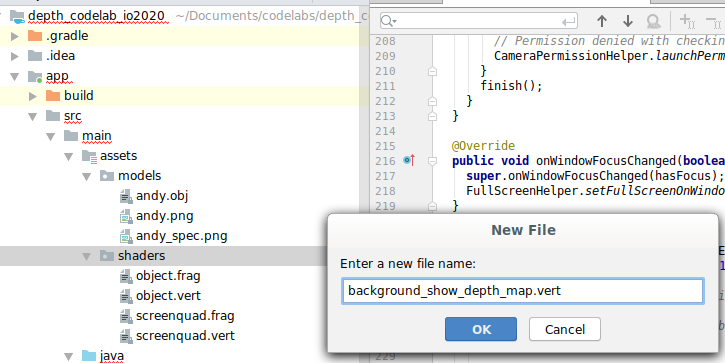

เพิ่มโค้ดต่อไปนี้ในไฟล์ใหม่
src/main/assets/shaders/background_show_depth_map.vert
attribute vec4 a_Position;
attribute vec2 a_TexCoord;

varying vec2 v_TexCoord;

void main() {
   v_TexCoord = a_TexCoord;
   gl_Position = a_Position;
}
ทำซ้ำขั้นตอนด้านบนเพื่อสร้าง Fragment Shader ในไดเรกทอรีเดียวกัน และตั้งชื่อเป็น background_show_depth_map.frag
เพิ่มโค้ดต่อไปนี้ลงในไฟล์ใหม่นี้
src/main/assets/shaders/background_show_depth_map.frag
precision mediump float;
uniform sampler2D u_Depth;
varying vec2 v_TexCoord;
const highp float kMaxDepth = 20000.0; // In millimeters.

float GetDepthMillimeters(vec4 depth_pixel_value) {
  return 255.0 * (depth_pixel_value.r + depth_pixel_value.g * 256.0);
}

// Returns an interpolated color in a 6 degree polynomial interpolation.
vec3 GetPolynomialColor(in float x,
  in vec4 kRedVec4, in vec4 kGreenVec4, in vec4 kBlueVec4,
  in vec2 kRedVec2, in vec2 kGreenVec2, in vec2 kBlueVec2) {
  // Moves the color space a little bit to avoid pure red.
  // Removes this line for more contrast.
  x = clamp(x * 0.9 + 0.03, 0.0, 1.0);
  vec4 v4 = vec4(1.0, x, x * x, x * x * x);
  vec2 v2 = v4.zw * v4.z;
  return vec3(
    dot(v4, kRedVec4) + dot(v2, kRedVec2),
    dot(v4, kGreenVec4) + dot(v2, kGreenVec2),
    dot(v4, kBlueVec4) + dot(v2, kBlueVec2)
  );
}

// Returns a smooth Percept colormap based upon the Turbo colormap.
vec3 PerceptColormap(in float x) {
  const vec4 kRedVec4 = vec4(0.55305649, 3.00913185, -5.46192616, -11.11819092);
  const vec4 kGreenVec4 = vec4(0.16207513, 0.17712472, 15.24091500, -36.50657960);
  const vec4 kBlueVec4 = vec4(-0.05195877, 5.18000081, -30.94853351, 81.96403246);
  const vec2 kRedVec2 = vec2(27.81927491, -14.87899417);
  const vec2 kGreenVec2 = vec2(25.95549545, -5.02738237);
  const vec2 kBlueVec2 = vec2(-86.53476570, 30.23299484);
  const float kInvalidDepthThreshold = 0.01;
  return step(kInvalidDepthThreshold, x) *
         GetPolynomialColor(x, kRedVec4, kGreenVec4, kBlueVec4,
                            kRedVec2, kGreenVec2, kBlueVec2);
}

void main() {
  vec4 packed_depth = texture2D(u_Depth, v_TexCoord.xy);
  highp float depth_mm = GetDepthMillimeters(packed_depth);
  highp float normalized_depth = depth_mm / kMaxDepth;
  vec4 depth_color = vec4(PerceptColormap(normalized_depth), 1.0);
  gl_FragColor = depth_color;
}
จากนั้นอัปเดตคลาส BackgroundRenderer เพื่อใช้ Shader ใหม่เหล่านี้ ซึ่งอยู่ใน src/main/java/com/google/ar/core/codelab/common/rendering/BackgroundRenderer.java
เพิ่มเส้นทางไฟล์ไปยัง Shader ที่ด้านบนของคลาส
// Add these under the other shader names at the top of the class.
private static final String DEPTH_VERTEX_SHADER_NAME = "shaders/background_show_depth_map.vert";
private static final String DEPTH_FRAGMENT_SHADER_NAME = "shaders/background_show_depth_map.frag";
เพิ่มตัวแปรสมาชิกเพิ่มเติมลงในคลาส BackgroundRenderer เนื่องจากจะเรียกใช้ Shader 2 รายการ
// Add to the top of file with the rest of the member variables.
private int depthProgram;
private int depthTextureParam;
private int depthTextureId = -1;
private int depthQuadPositionParam;
private int depthQuadTexCoordParam;
เพิ่มวิธีใหม่เพื่อป้อนข้อมูลในช่องเหล่านี้
// Add this method below createOnGlThread().
public void createDepthShaders(Context context, int depthTextureId) throws IOException {
  int vertexShader =
      ShaderUtil.loadGLShader(
          TAG, context, GLES20.GL_VERTEX_SHADER, DEPTH_VERTEX_SHADER_NAME);
  int fragmentShader =
      ShaderUtil.loadGLShader(
          TAG, context, GLES20.GL_FRAGMENT_SHADER, DEPTH_FRAGMENT_SHADER_NAME);

  depthProgram = GLES20.glCreateProgram();
  GLES20.glAttachShader(depthProgram, vertexShader);
  GLES20.glAttachShader(depthProgram, fragmentShader);
  GLES20.glLinkProgram(depthProgram);
  GLES20.glUseProgram(depthProgram);
  ShaderUtil.checkGLError(TAG, "Program creation");

  depthTextureParam = GLES20.glGetUniformLocation(depthProgram, "u_Depth");
  ShaderUtil.checkGLError(TAG, "Program parameters");

  depthQuadPositionParam = GLES20.glGetAttribLocation(depthProgram, "a_Position");
  depthQuadTexCoordParam = GLES20.glGetAttribLocation(depthProgram, "a_TexCoord");

  this.depthTextureId = depthTextureId;
}
เพิ่มเมธอดนี้ซึ่งใช้ในการวาดด้วยเชดเดอร์เหล่านี้ในแต่ละเฟรม
// Put this at the bottom of the file.
public void drawDepth(@NonNull Frame frame) {
  if (frame.hasDisplayGeometryChanged()) {
    frame.transformCoordinates2d(
        Coordinates2d.OPENGL_NORMALIZED_DEVICE_COORDINATES,
        quadCoords,
        Coordinates2d.TEXTURE_NORMALIZED,
        quadTexCoords);
  }

  if (frame.getTimestamp() == 0 || depthTextureId == -1) {
    return;
  }

  // Ensure position is rewound before use.
  quadTexCoords.position(0);

  // No need to test or write depth, the screen quad has arbitrary depth, and is expected
  // to be drawn first.
  GLES20.glDisable(GLES20.GL_DEPTH_TEST);
  GLES20.glDepthMask(false);

  GLES20.glActiveTexture(GLES20.GL_TEXTURE0);
  GLES20.glBindTexture(GLES20.GL_TEXTURE_2D, depthTextureId);
  GLES20.glUseProgram(depthProgram);
  GLES20.glUniform1i(depthTextureParam, 0);

  // Set the vertex positions and texture coordinates.
  GLES20.glVertexAttribPointer(
        depthQuadPositionParam, COORDS_PER_VERTEX, GLES20.GL_FLOAT, false, 0, quadCoords);
  GLES20.glVertexAttribPointer(
        depthQuadTexCoordParam, TEXCOORDS_PER_VERTEX, GLES20.GL_FLOAT, false, 0, quadTexCoords);

  // Draws the quad.
  GLES20.glEnableVertexAttribArray(depthQuadPositionParam);
  GLES20.glEnableVertexAttribArray(depthQuadTexCoordParam);
  GLES20.glDrawArrays(GLES20.GL_TRIANGLE_STRIP, 0, 4);
  GLES20.glDisableVertexAttribArray(depthQuadPositionParam);
  GLES20.glDisableVertexAttribArray(depthQuadTexCoordParam);

  // Restore the depth state for further drawing.
  GLES20.glDepthMask(true);
  GLES20.glEnable(GLES20.GL_DEPTH_TEST);

  ShaderUtil.checkGLError(TAG, "BackgroundRendererDraw");
}
เพิ่มปุ่มเปิด/ปิด
เมื่อมีความสามารถในการแสดงผลแผนที่แสดงความลึกแล้ว ก็ให้ใช้ความสามารถนั้น เพิ่มปุ่มที่เปิดและปิดการแสดงผลนี้
ที่ด้านบนของDepthCodelabActivityไฟล์ ให้เพิ่มการนำเข้าสำหรับปุ่มที่จะใช้
import android.widget.Button;
อัปเดตคลาสเพื่อเพิ่มสมาชิกบูลีนที่ระบุว่ามีการเปิด/ปิดการแสดงผลเชิงลึกหรือไม่ (ปิดอยู่โดยค่าเริ่มต้น)
private boolean showDepthMap = false;
จากนั้นเพิ่มปุ่มที่ควบคุม showDepthMap บูลีนที่ส่วนท้ายของเมธอด onCreate()
final Button toggleDepthButton = (Button) findViewById(R.id.toggle_depth_button);
    toggleDepthButton.setOnClickListener(
        view -> {
          if (isDepthSupported) {
            showDepthMap = !showDepthMap;
            toggleDepthButton.setText(showDepthMap ? R.string.hide_depth : R.string.show_depth);
          } else {
            showDepthMap = false;
            toggleDepthButton.setText(R.string.depth_not_available);
          }
        });
เพิ่มสตริงต่อไปนี้ลงใน res/values/strings.xml
<string translatable="false" name="show_depth">Show Depth</string>
<string translatable="false" name="hide_depth">Hide Depth</string>
<string translatable="false" name="depth_not_available">Depth Not Available</string>
เพิ่มปุ่มนี้ที่ด้านล่างของเลย์เอาต์แอปใน res/layout/activity_main.xml โดยทำดังนี้
<Button
    android:id="@+id/toggle_depth_button"
    android:layout_width="wrap_content"
    android:layout_height="wrap_content"
    android:layout_margin="20dp"
    android:gravity="center"
    android:text="@string/show_depth"
    android:layout_alignParentRight="true"
    android:layout_alignParentTop="true"/>
ตอนนี้ปุ่มจะควบคุมค่าของบูลีน showDepthMap ใช้ Flag นี้เพื่อควบคุมว่าจะแสดงผลแผนที่ความลึกหรือไม่
กลับไปที่เมธอด onDrawFrame() ใน DepthCodelabActivity แล้วเพิ่มข้อมูลต่อไปนี้
// Add this snippet just under backgroundRenderer.draw(frame);
if (showDepthMap) {
  backgroundRenderer.drawDepth(frame);
}
ส่งต่อเท็กซ์เจอร์ความลึกไปยัง backgroundRenderer โดยเพิ่มบรรทัดต่อไปนี้ใน onSurfaceCreated()
// Add to onSurfaceCreated() after backgroundRenderer.createonGlThread(/*context=*/ this);
backgroundRenderer.createDepthShaders(/*context=*/ this, depthTexture.getDepthTexture());
ตอนนี้คุณดูภาพความลึกของแต่ละเฟรมได้โดยกดปุ่มที่ด้านขวาบนของหน้าจอ
|
| ||
การเรียกใช้โดยไม่รองรับ Depth API | การเรียกใช้ด้วยการรองรับ Depth API | ||

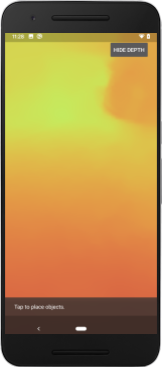
[ไม่บังคับ] ภาพเคลื่อนไหวแสดงความลึกที่สวยงาม
ปัจจุบันแอปจะแสดงแผนที่ความลึกโดยตรง พิกเซลสีแดงแสดงพื้นที่ที่อยู่ใกล้ พิกเซลสีน้ำเงินแสดงถึงพื้นที่ที่อยู่ไกล
|
|


คุณสื่อข้อมูลเชิงลึกได้หลายวิธี ในส่วนนี้ คุณจะแก้ไข Shader เพื่อให้ความลึกพัลส์เป็นระยะๆ โดยการแก้ไข Shader ให้แสดงเฉพาะความลึกภายในแถบที่เคลื่อนที่ออกจากกล้องซ้ำๆ
เริ่มต้นด้วยการเพิ่มตัวแปรต่อไปนี้ที่ด้านบนของ background_show_depth_map.frag
uniform float u_DepthRangeToRenderMm;
const float kDepthWidthToRenderMm = 350.0;
- จากนั้นใช้ค่าเหล่านี้เพื่อกรองพิกเซลที่จะครอบคลุมด้วยค่าความลึกในฟังก์ชัน
main()ของ Shader
// Add this line at the end of main().
gl_FragColor.a = clamp(1.0 - abs((depth_mm - u_DepthRangeToRenderMm) / kDepthWidthToRenderMm), 0.0, 1.0);
จากนั้น ให้อัปเดต BackgroundRenderer.java เพื่อรักษาพารามิเตอร์ของ Shader เหล่านี้ เพิ่มฟิลด์ต่อไปนี้ที่ด้านบนของคลาส
private static final float MAX_DEPTH_RANGE_TO_RENDER_MM = 20000.0f;
private float depthRangeToRenderMm = 0.0f;
private int depthRangeToRenderMmParam;
ในcreateDepthShaders()เมธอด ให้เพิ่มรายการต่อไปนี้เพื่อให้พารามิเตอร์เหล่านี้ตรงกับโปรแกรม Shader
depthRangeToRenderMmParam = GLES20.glGetUniformLocation(depthProgram, "u_DepthRangeToRenderMm");
- สุดท้าย คุณสามารถควบคุมช่วงนี้ได้เมื่อเวลาผ่านไปภายในเมธอด
drawDepth()เพิ่มโค้ดต่อไปนี้ ซึ่งจะเพิ่มช่วงนี้ทุกครั้งที่มีการวาดเฟรม
// Enables alpha blending.
GLES20.glEnable(GLES20.GL_BLEND);
GLES20.glBlendFunc(GLES20.GL_SRC_ALPHA, GLES20.GL_ONE_MINUS_SRC_ALPHA);

// Updates range each time draw() is called.
depthRangeToRenderMm += 50.0f;
if (depthRangeToRenderMm > MAX_DEPTH_RANGE_TO_RENDER_MM) {
  depthRangeToRenderMm = 0.0f;
}

// Passes latest value to the shader.
GLES20.glUniform1f(depthRangeToRenderMmParam, depthRangeToRenderMm);
ตอนนี้ระบบจะแสดงภาพความลึกเป็นชีพจรเคลื่อนไหวที่ไหลผ่านฉาก
คุณสามารถเปลี่ยนค่าที่ระบุไว้ที่นี่เพื่อทำให้พัลส์ช้าลง เร็วขึ้น กว้างขึ้น แคบลง ฯลฯ ได้ตามต้องการ นอกจากนี้ คุณยังลองหาวิธีใหม่ๆ ในการเปลี่ยนเชเดอร์เพื่อแสดงข้อมูลความลึกได้ด้วย
8. ใช้ Depth API สำหรับการบดบัง (ตอนที่ 4)
ตอนนี้คุณจะจัดการการบดบังออบเจ็กต์ในแอปได้แล้ว
การบดบังหมายถึงสิ่งที่เกิดขึ้นเมื่อแสดงผลออบเจ็กต์เสมือนจริงได้ไม่เต็มที่ เนื่องจากมีออบเจ็กต์จริงอยู่ระหว่างออบเจ็กต์เสมือนจริงกับกล้อง การจัดการการบดบังเป็นสิ่งสำคัญเพื่อให้ประสบการณ์ AR สมจริง
การแสดงผลออบเจ็กต์เสมือนอย่างเหมาะสมแบบเรียลไทม์จะช่วยเพิ่มความสมจริงและความน่าเชื่อถือของฉากที่เพิ่มความเป็นจริง ดูตัวอย่างเพิ่มเติมได้ที่วิดีโอเกี่ยวกับการผสานความเป็นจริงด้วย Depth API
ในส่วนนี้ คุณจะอัปเดตแอปให้รวมออบเจ็กต์เสมือนเฉพาะในกรณีที่มีข้อมูลเชิงลึก
การเพิ่ม Shader ของออบเจ็กต์ใหม่
เช่นเดียวกับในส่วนก่อนหน้า คุณจะเพิ่ม Shader ใหม่เพื่อรองรับข้อมูลความลึก คราวนี้คุณสามารถคัดลอกเชเดอร์ออบเจ็กต์ที่มีอยู่และเพิ่มฟังก์ชันการทำงานของการบดบังได้
คุณควรเก็บทั้ง 2 เวอร์ชันของเชดเดอร์ออบเจ็กต์ไว้เพื่อให้แอปตัดสินใจในรันไทม์ได้ว่าจะรองรับความลึกหรือไม่
ทำสำเนาไฟล์ Shader object.vert และ object.frag ในไดเรกทอรี src/main/assets/shaders
|
|

ใน occlusion_object.vert ให้เพิ่มตัวแปรต่อไปนี้เหนือ main()
varying vec3 v_ScreenSpacePosition;
ตั้งค่าตัวแปรนี้ที่ด้านล่างของ main() ดังนี้
v_ScreenSpacePosition = gl_Position.xyz / gl_Position.w;
อัปเดต occlusion_object.frag โดยเพิ่มตัวแปรเหล่านี้เหนือ main() ที่ด้านบนของไฟล์
varying vec3 v_ScreenSpacePosition;

uniform sampler2D u_Depth;
uniform mat3 u_UvTransform;
uniform float u_DepthTolerancePerMm;
uniform float u_OcclusionAlpha;
uniform float u_DepthAspectRatio;
- เพิ่มฟังก์ชันตัวช่วยเหล่านี้ไว้เหนือ
main()ใน Shader เพื่อให้จัดการข้อมูลความลึกได้ง่ายขึ้น
float GetDepthMillimeters(in vec2 depth_uv) {
  // Depth is packed into the red and green components of its texture.
  // The texture is a normalized format, storing millimeters.
  vec3 packedDepthAndVisibility = texture2D(u_Depth, depth_uv).xyz;
  return dot(packedDepthAndVisibility.xy, vec2(255.0, 256.0 * 255.0));
}

// Returns linear interpolation position of value between min and max bounds.
// E.g., InverseLerp(1100, 1000, 2000) returns 0.1.
float InverseLerp(in float value, in float min_bound, in float max_bound) {
  return clamp((value - min_bound) / (max_bound - min_bound), 0.0, 1.0);
}

// Returns a value between 0.0 (not visible) and 1.0 (completely visible)
// Which represents how visible or occluded is the pixel in relation to the
// depth map.
float GetVisibility(in vec2 depth_uv, in float asset_depth_mm) {
  float depth_mm = GetDepthMillimeters(depth_uv);

  // Instead of a hard z-buffer test, allow the asset to fade into the
  // background along a 2 * u_DepthTolerancePerMm * asset_depth_mm
  // range centered on the background depth.
  float visibility_occlusion = clamp(0.5 * (depth_mm - asset_depth_mm) /
    (u_DepthTolerancePerMm * asset_depth_mm) + 0.5, 0.0, 1.0);

  // Depth close to zero is most likely invalid, do not use it for occlusions.
  float visibility_depth_near = 1.0 - InverseLerp(
      depth_mm, /*min_depth_mm=*/150.0, /*max_depth_mm=*/200.0);

  // Same for very high depth values.
  float visibility_depth_far = InverseLerp(
      depth_mm, /*min_depth_mm=*/17500.0, /*max_depth_mm=*/20000.0);

  float visibility =
    max(max(visibility_occlusion, u_OcclusionAlpha),
      max(visibility_depth_near, visibility_depth_far));

  return visibility;
}
ตอนนี้ให้อัปเดต main() ใน occlusion_object.frag เพื่อให้รับรู้ถึงความลึกและใช้การบดบัง เพิ่มบรรทัดต่อไปนี้ที่ด้านล่างของไฟล์
const float kMToMm = 1000.0;
float asset_depth_mm = v_ViewPosition.z * kMToMm * -1.;
vec2 depth_uvs = (u_UvTransform * vec3(v_ScreenSpacePosition.xy, 1)).xy;
gl_FragColor.a *= GetVisibility(depth_uvs, asset_depth_mm);
ตอนนี้คุณมีเชเดอร์ออบเจ็กต์เวอร์ชันใหม่แล้ว จึงแก้ไขโค้ดโปรแกรมแสดงผลได้
การแสดงผลการซ้อนทับกันของวัตถุ
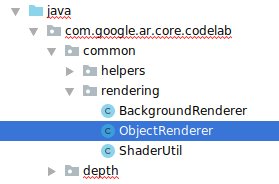
ทำสำเนาObjectRendererชั้นเรียนถัดไปsrc/main/java/com/google/ar/core/codelab/common/rendering/ObjectRenderer.java
- เลือก
ObjectRendererชั้นเรียน - คลิกขวา > คัดลอก
- เลือกโฟลเดอร์การเรนเดอร์
- คลิกขวา > วาง
- เปลี่ยนชื่อชั้นเรียนเป็น
OcclusionObjectRenderer

ตอนนี้คลาสใหม่ที่เปลี่ยนชื่อแล้วควรปรากฏในโฟลเดอร์เดียวกัน

เปิด OcclusionObjectRenderer.java ที่สร้างขึ้นใหม่ แล้วเปลี่ยนเส้นทางของ Shader ที่ด้านบนของไฟล์
private static final String VERTEX_SHADER_NAME = "shaders/occlusion_object.vert";
private static final String FRAGMENT_SHADER_NAME = "shaders/occlusion_object.frag";
- เพิ่มตัวแปรสมาชิกที่เกี่ยวข้องกับความลึกเหล่านี้พร้อมกับตัวแปรอื่นๆ ที่ด้านบนของคลาส ตัวแปรจะปรับความคมชัดของเส้นขอบการบดบัง
// Shader location: depth texture
private int depthTextureUniform;

// Shader location: transform to depth uvs
private int depthUvTransformUniform;

// Shader location: depth tolerance property
private int depthToleranceUniform;

// Shader location: maximum transparency for the occluded part.
private int occlusionAlphaUniform;

private int depthAspectRatioUniform;

private float[] uvTransform = null;
private int depthTextureId;
สร้างตัวแปรสมาชิกเหล่านี้ด้วยค่าเริ่มต้นที่ด้านบนของคลาส
// These values will be changed each frame based on the distance to the object.
private float depthAspectRatio = 0.0f;
private final float depthTolerancePerMm = 0.015f;
private final float occlusionsAlpha = 0.0f;
เริ่มต้นพารามิเตอร์แบบสม่ำเสมอสำหรับ Shader ในเมธอด createOnGlThread() ดังนี้
// Occlusions Uniforms.  Add these lines before the first call to ShaderUtil.checkGLError
// inside the createOnGlThread() method.
depthTextureUniform = GLES20.glGetUniformLocation(program, "u_Depth");
depthUvTransformUniform = GLES20.glGetUniformLocation(program, "u_UvTransform");
depthToleranceUniform = GLES20.glGetUniformLocation(program, "u_DepthTolerancePerMm");
occlusionAlphaUniform = GLES20.glGetUniformLocation(program, "u_OcclusionAlpha");
depthAspectRatioUniform = GLES20.glGetUniformLocation(program, "u_DepthAspectRatio");
- โปรดตรวจสอบว่าค่าเหล่านี้ได้รับการอัปเดตทุกครั้งที่มีการเรียกเก็บเงินโดยอัปเดตวิธีการชำระเงิน
draw()ดังนี้
// Add after other GLES20.glUniform calls inside draw().
GLES20.glActiveTexture(GLES20.GL_TEXTURE1);
GLES20.glBindTexture(GLES20.GL_TEXTURE_2D, depthTextureId);
GLES20.glUniform1i(depthTextureUniform, 1);
GLES20.glUniformMatrix3fv(depthUvTransformUniform, 1, false, uvTransform, 0);
GLES20.glUniform1f(depthToleranceUniform, depthTolerancePerMm);
GLES20.glUniform1f(occlusionAlphaUniform, occlusionsAlpha);
GLES20.glUniform1f(depthAspectRatioUniform, depthAspectRatio);
เพิ่มบรรทัดต่อไปนี้ภายใน draw() เพื่อเปิดใช้โหมดผสมในการแสดงผลเพื่อให้ใช้ความโปร่งใสกับออบเจ็กต์เสมือนได้เมื่อมีการบดบัง
// Add these lines just below the code-block labeled "Enable vertex arrays"
GLES20.glEnable(GLES20.GL_BLEND);
GLES20.glBlendFunc(GLES20.GL_SRC_ALPHA, GLES20.GL_ONE_MINUS_SRC_ALPHA);
// Add these lines just above the code-block labeled "Disable vertex arrays"
GLES20.glDisable(GLES20.GL_BLEND);
GLES20.glDepthMask(true);
- เพิ่มวิธีการต่อไปนี้เพื่อให้ผู้โทรของ
OcclusionObjectRendererระบุข้อมูลความลึกได้
// Add these methods at the bottom of the OcclusionObjectRenderer class.
public void setUvTransformMatrix(float[] transform) {
  uvTransform = transform;
}

public void setDepthTexture(int textureId, int width, int height) {
  depthTextureId = textureId;
  depthAspectRatio = (float) width / (float) height;
}
การควบคุมการซ้อนทับกันของวัตถุ
เมื่อมี OcclusionObjectRenderer ใหม่แล้ว คุณสามารถเพิ่มลงใน DepthCodelabActivity และเลือกเวลาและวิธีใช้การแสดงผลการบดบังได้
เปิดใช้ตรรกะนี้โดยเพิ่มอินสแตนซ์ของ OcclusionObjectRenderer ลงในกิจกรรม เพื่อให้ทั้ง ObjectRenderer และ OcclusionObjectRenderer เป็นสมาชิกของ DepthCodelabActivity
// Add this include at the top of the file.
import com.google.ar.core.codelab.common.rendering.OcclusionObjectRenderer;
// Add this member just below the existing "virtualObject", so both are present.
private final OcclusionObjectRenderer occludedVirtualObject = new OcclusionObjectRenderer();
- จากนั้นคุณจะควบคุมได้ว่าเมื่อใดที่จะใช้
occludedVirtualObjectนี้ โดยพิจารณาว่าอุปกรณ์ปัจจุบันรองรับ Depth API หรือไม่ เพิ่มบรรทัดต่อไปนี้ภายในเมธอดonSurfaceCreatedใต้ตำแหน่งที่กำหนดค่าvirtualObject
if (isDepthSupported) {
  occludedVirtualObject.createOnGlThread(/*context=*/ this, "models/andy.obj", "models/andy.png");
  occludedVirtualObject.setDepthTexture(
     depthTexture.getDepthTexture(),
     depthTexture.getDepthWidth(),
     depthTexture.getDepthHeight());
  occludedVirtualObject.setMaterialProperties(0.0f, 2.0f, 0.5f, 6.0f);
}
ในอุปกรณ์ที่ไม่รองรับความลึก ระบบจะสร้างอินสแตนซ์ occludedVirtualObject แต่ไม่ได้ใช้ ในโทรศัพท์ที่มีความลึก ระบบจะเริ่มต้นทั้ง 2 เวอร์ชัน และจะตัดสินใจในขณะรันไทม์ว่าจะใช้เวอร์ชันใดของเครื่องมือแสดงผลเมื่อวาด
ในonDrawFrame()เมธอด ให้ค้นหาโค้ดที่มีอยู่
virtualObject.updateModelMatrix(anchorMatrix, scaleFactor);
virtualObject.draw(viewmtx, projmtx, colorCorrectionRgba, OBJECT_COLOR);
แทนที่โค้ดนี้ด้วยโค้ดต่อไปนี้
if (isDepthSupported) {
  occludedVirtualObject.updateModelMatrix(anchorMatrix, scaleFactor);
  occludedVirtualObject.draw(viewmtx, projmtx, colorCorrectionRgba, OBJECT_COLOR);
} else {
  virtualObject.updateModelMatrix(anchorMatrix, scaleFactor);
  virtualObject.draw(viewmtx, projmtx, colorCorrectionRgba, OBJECT_COLOR);
}
สุดท้าย ตรวจสอบว่าได้แมปรูปภาพความลึกกับการแสดงผลเอาต์พุตอย่างถูกต้อง เนื่องจากรูปภาพความลึกมีความละเอียดและอาจมีสัดส่วนภาพที่แตกต่างจากหน้าจอ พิกัดพื้นผิวจึงอาจแตกต่างกันระหว่างรูปภาพความลึกกับรูปภาพจากกล้อง
- เพิ่มเมธอดตัวช่วย
getTextureTransformMatrix()ที่ด้านล่างของไฟล์ เมธอดนี้จะแสดงผลเมทริกซ์การเปลี่ยนรูปแบบ ซึ่งเมื่อใช้แล้วจะทำให้ UV ในพื้นที่หน้าจอตรงกับพิกัดพื้นผิวของรูปสี่เหลี่ยมอย่างถูกต้อง ซึ่งใช้ในการแสดงผลฟีดกล้อง รวมถึงจะพิจารณาการวางแนวอุปกรณ์ด้วย
private static float[] getTextureTransformMatrix(Frame frame) {
  float[] frameTransform = new float[6];
  float[] uvTransform = new float[9];
  // XY pairs of coordinates in NDC space that constitute the origin and points along the two
  // principal axes.
  float[] ndcBasis = {0, 0, 1, 0, 0, 1};

  // Temporarily store the transformed points into outputTransform.
  frame.transformCoordinates2d(
      Coordinates2d.OPENGL_NORMALIZED_DEVICE_COORDINATES,
      ndcBasis,
      Coordinates2d.TEXTURE_NORMALIZED,
      frameTransform);

  // Convert the transformed points into an affine transform and transpose it.
  float ndcOriginX = frameTransform[0];
  float ndcOriginY = frameTransform[1];
  uvTransform[0] = frameTransform[2] - ndcOriginX;
  uvTransform[1] = frameTransform[3] - ndcOriginY;
  uvTransform[2] = 0;
  uvTransform[3] = frameTransform[4] - ndcOriginX;
  uvTransform[4] = frameTransform[5] - ndcOriginY;
  uvTransform[5] = 0;
  uvTransform[6] = ndcOriginX;
  uvTransform[7] = ndcOriginY;
  uvTransform[8] = 1;

  return uvTransform;
}
getTextureTransformMatrix() ต้องมีการนำเข้าต่อไปนี้ที่ด้านบนของไฟล์
import com.google.ar.core.Coordinates2d;
คุณต้องการคำนวณการแปลงระหว่างพิกัดเท็กซ์เจอร์เหล่านี้ทุกครั้งที่เท็กซ์เจอร์ของหน้าจอเปลี่ยนแปลง (เช่น หากหน้าจอหมุน) ฟังก์ชันนี้ต้องมีสิทธิ์เข้าถึง
เพิ่มแฟล็กต่อไปนี้ที่ด้านบนของไฟล์
// Add this member at the top of the file.
private boolean calculateUVTransform = true;
- ใน
onDrawFrame()ให้ตรวจสอบว่าต้องคำนวณการเปลี่ยนรูปแบบที่จัดเก็บใหม่หลังจากสร้างเฟรมและกล้องหรือไม่
// Add these lines inside onDrawFrame() after frame.getCamera().
if (frame.hasDisplayGeometryChanged() || calculateUVTransform) {
  calculateUVTransform = false;
  float[] transform = getTextureTransformMatrix(frame);
  occludedVirtualObject.setUvTransformMatrix(transform);
}
เมื่อทำการเปลี่ยนแปลงเหล่านี้แล้ว คุณจะเรียกใช้แอปที่มีการปิดทับวัตถุเสมือนได้
ตอนนี้แอปควรทำงานได้อย่างราบรื่นในโทรศัพท์ทุกรุ่น และใช้ความลึกสำหรับการบดบังโดยอัตโนมัติเมื่อรองรับ
|
| ||
การเรียกใช้แอปที่รองรับ Depth API | การเรียกใช้แอปโดยไม่รองรับ Depth API | ||

9. [ไม่บังคับ] ปรับปรุงคุณภาพการบดบัง
วิธีการสำหรับการบดบังตามความลึกที่ใช้ข้างต้นจะให้การบดบังที่มีขอบเขตคมชัด เมื่อกล้องเคลื่อนที่ห่างจากวัตถุมากขึ้น การวัดความลึกอาจมีความแม่นยำน้อยลง ซึ่งอาจส่งผลให้เกิดอาร์ติแฟกต์ภาพ
เราสามารถลดปัญหานี้ได้โดยการเพิ่มความเบลอในการทดสอบการบดบัง ซึ่งจะทำให้ขอบของออบเจ็กต์เสมือนที่ซ่อนอยู่มีความเรียบเนียนมากขึ้น
occlusion_object.frag
เพิ่มตัวแปรแบบเดียวกันต่อไปนี้ที่ด้านบนของ occlusion_object.frag
uniform float u_OcclusionBlurAmount;
เพิ่มฟังก์ชันตัวช่วยนี้เหนือ main() ใน Shader ซึ่งใช้การเบลอเคอร์เนลกับการสุ่มตัวอย่างการบดบัง
float GetBlurredVisibilityAroundUV(in vec2 uv, in float asset_depth_mm) {
  // Kernel used:
  // 0   4   7   4   0
  // 4   16  26  16  4
  // 7   26  41  26  7
  // 4   16  26  16  4
  // 0   4   7   4   0
  const float kKernelTotalWeights = 269.0;
  float sum = 0.0;

  vec2 blurriness = vec2(u_OcclusionBlurAmount,
                         u_OcclusionBlurAmount * u_DepthAspectRatio);

  float current = 0.0;

  current += GetVisibility(uv + vec2(-1.0, -2.0) * blurriness, asset_depth_mm);
  current += GetVisibility(uv + vec2(+1.0, -2.0) * blurriness, asset_depth_mm);
  current += GetVisibility(uv + vec2(-1.0, +2.0) * blurriness, asset_depth_mm);
  current += GetVisibility(uv + vec2(+1.0, +2.0) * blurriness, asset_depth_mm);
  current += GetVisibility(uv + vec2(-2.0, +1.0) * blurriness, asset_depth_mm);
  current += GetVisibility(uv + vec2(+2.0, +1.0) * blurriness, asset_depth_mm);
  current += GetVisibility(uv + vec2(-2.0, -1.0) * blurriness, asset_depth_mm);
  current += GetVisibility(uv + vec2(+2.0, -1.0) * blurriness, asset_depth_mm);
  sum += current * 4.0;

  current = 0.0;
  current += GetVisibility(uv + vec2(-2.0, -0.0) * blurriness, asset_depth_mm);
  current += GetVisibility(uv + vec2(+2.0, +0.0) * blurriness, asset_depth_mm);
  current += GetVisibility(uv + vec2(+0.0, +2.0) * blurriness, asset_depth_mm);
  current += GetVisibility(uv + vec2(-0.0, -2.0) * blurriness, asset_depth_mm);
  sum += current * 7.0;

  current = 0.0;
  current += GetVisibility(uv + vec2(-1.0, -1.0) * blurriness, asset_depth_mm);
  current += GetVisibility(uv + vec2(+1.0, -1.0) * blurriness, asset_depth_mm);
  current += GetVisibility(uv + vec2(-1.0, +1.0) * blurriness, asset_depth_mm);
  current += GetVisibility(uv + vec2(+1.0, +1.0) * blurriness, asset_depth_mm);
  sum += current * 16.0;

  current = 0.0;
  current += GetVisibility(uv + vec2(+0.0, +1.0) * blurriness, asset_depth_mm);
  current += GetVisibility(uv + vec2(-0.0, -1.0) * blurriness, asset_depth_mm);
  current += GetVisibility(uv + vec2(-1.0, -0.0) * blurriness, asset_depth_mm);
  current += GetVisibility(uv + vec2(+1.0, +0.0) * blurriness, asset_depth_mm);
  sum += current * 26.0;

  sum += GetVisibility(uv , asset_depth_mm) * 41.0;

  return sum / kKernelTotalWeights;
}
แทนที่บรรทัดที่มีอยู่ใน main() ด้วยบรรทัดต่อไปนี้
gl_FragColor.a *= GetVisibility(depth_uvs, asset_depth_mm);
ด้วยบรรทัดนี้
gl_FragColor.a *= GetBlurredVisibilityAroundUV(depth_uvs, asset_depth_mm);
อัปเดตโปรแกรมแสดงผลเพื่อใช้ประโยชน์จากฟังก์ชันการทำงานของ Shader ใหม่นี้
OcclusionObjectRenderer.java
เพิ่มตัวแปรสมาชิกต่อไปนี้ที่ด้านบนของคลาส
private int occlusionBlurUniform;
private final float occlusionsBlur = 0.01f;
เพิ่มรายการต่อไปนี้ภายในเมธอด createOnGlThread
// Add alongside the other calls to GLES20.glGetUniformLocation.
occlusionBlurUniform = GLES20.glGetUniformLocation(program, "u_OcclusionBlurAmount");
เพิ่มรายการต่อไปนี้ภายในเมธอด draw
// Add alongside the other calls to GLES20.glUniform1f.
GLES20.glUniform1f(occlusionBlurUniform, occlusionsBlur);
| การเปรียบเทียบภาพตอนนี้ขอบเขตการบดบังควรจะราบรื่นขึ้นด้วยการเปลี่ยนแปลงเหล่านี้ |

10. สร้าง-เรียกใช้-ทดสอบ
สร้างและเรียกใช้แอป
- เสียบอุปกรณ์ Android ผ่าน USB
- เลือกไฟล์ > สร้างและเรียกใช้
- บันทึกเป็น: ARCodeLab.apk
- รอให้แอปสร้างและติดตั้งใช้งานในอุปกรณ์
ครั้งแรกที่คุณพยายามติดตั้งใช้งานแอปในอุปกรณ์ ให้ทำดังนี้
- คุณจะต้องอนุญาตการแก้ไขข้อบกพร่องผ่าน USB ในอุปกรณ์ เลือก "ตกลง" เพื่อดำเนินการต่อ
- ระบบจะถามว่าแอปมีสิทธิ์ใช้กล้องของอุปกรณ์หรือไม่ อนุญาตให้เข้าถึงเพื่อใช้ฟังก์ชัน AR ต่อไป
การทดสอบแอป
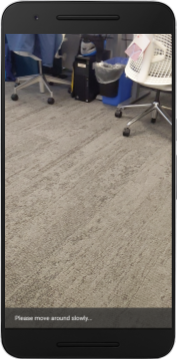
เมื่อเรียกใช้แอป คุณจะทดสอบลักษณะการทำงานพื้นฐานของแอปได้โดยถืออุปกรณ์ เคลื่อนที่ไปรอบๆ พื้นที่ และสแกนพื้นที่อย่างช้าๆ พยายามรวบรวมข้อมูลอย่างน้อย 10 วินาทีและสแกนพื้นที่จากหลายทิศทางก่อนไปยังขั้นตอนถัดไป
การแก้ปัญหา
การตั้งค่าอุปกรณ์ Android สำหรับการพัฒนา
- เชื่อมต่ออุปกรณ์กับคอมพิวเตอร์สำหรับการพัฒนาซอฟต์แวร์ด้วยสาย USB หากพัฒนาโดยใช้ Windows คุณอาจต้องติดตั้งไดรเวอร์ USB ที่เหมาะสมสำหรับอุปกรณ์
- ทำตามขั้นตอนต่อไปนี้เพื่อเปิดใช้การแก้ไขข้อบกพร่อง USB ในหน้าต่างตัวเลือกสำหรับนักพัฒนาแอป
- เปิดแอปการตั้งค่า
- หากอุปกรณ์ใช้ Android v8.0 ขึ้นไป ให้เลือกระบบ หรือหากระบบไม่ขอ ให้ดำเนินการต่อในขั้นตอนถัดไป
- เลื่อนไปด้านล่างแล้วเลือกเกี่ยวกับโทรศัพท์
- เลื่อนไปด้านล่างสุด แล้วแตะหมายเลขบิลด์ 7 ครั้ง
- กลับไปที่หน้าจอก่อนหน้า เลื่อนไปที่ด้านล่าง แล้วแตะตัวเลือกสำหรับนักพัฒนาแอป
- ในหน้าต่างตัวเลือกสำหรับนักพัฒนาแอป ให้เลื่อนลงเพื่อค้นหาและเปิดใช้การแก้ไขข้อบกพร่อง USB
ดูข้อมูลเพิ่มเติมโดยละเอียดเกี่ยวกับกระบวนการนี้ได้ในเว็บไซต์นักพัฒนาแอป Android ของ Google
การสร้างล้มเหลวที่เกี่ยวข้องกับใบอนุญาต

หากพบว่าการสร้างล้มเหลวเนื่องจากใบอนุญาต (ติดตั้งแพ็กเกจ Android SDK ต่อไปนี้ไม่สำเร็จเนื่องจากยังไม่ได้ยอมรับใบอนุญาตบางรายการ) คุณสามารถใช้คำสั่งต่อไปนี้เพื่อตรวจสอบและยอมรับใบอนุญาตเหล่านี้
cd <path to Android SDK>
tools/bin/sdkmanager --licenses
11. ขอแสดงความยินดี
ขอแสดงความยินดี คุณสร้างและเรียกใช้แอป Augmented Reality แอปแรกที่อิงตามความลึกโดยใช้ Depth API ของ ARCore จาก Google ได้สำเร็จแล้ว