
1. Introduction
ARCore is a platform for building Augmented Reality (AR) apps on mobile devices. Google's ARCore Depth API provides access to a depth image for each frame in an ARCore session. Each pixel in the depth image supplies a distance measurement from the camera to the environment.
The Raw Depth API gives depth images that are not passed through screen-space filtering operations designed to smooth and interpolate the results. These values are more geometrically accurate but may contain missing data and be less aligned with the associated camera image.
This codelab showcases how to use Raw Depth API to perform 3D geometry analysis of the scene. You will build a simple AR-enabled app that uses raw depth data to detect and visualize geometry of the world.
The Depth and Raw Depth APIs are only supported on a subset of ARCore enabled devices. The Depth API is only available on Android.
What you'll build
In this codelab, you will build an app that uses raw depth images for each frame to perform geometric analysis of the world around you. This app will:
- Check whether the target device supports Depth.
- Retrieve the raw depth image for each camera frame.
- Reproject raw depth images into 3D points and filter those points based on confidence and geometry.
- Use the raw depth point cloud to segment 3D objects of interest.
|
Sneak preview of what you'll build. |

Note: If you run into issues along the way, jump to the last section for some troubleshooting tips.
2. Prerequisites
You'll need specific hardware and software to complete this codelab.
Hardware requirements
- An ARCore supported device with USB debugging enabled, connected via a USB cable to your development machine. This device also must support the Depth API.
Software requirements
- ARCore SDK 1.31.0 or later.
- A development machine with Android Studio (v4.0.1 or later) installed.
3. Set up
Set up the development machine
Connect your ARCore device to your computer via the USB cable. Make sure that your device allows USB debugging. Open a terminal and run adb devices, as shown below:
adb devices

List of devices attached
<DEVICE_SERIAL_NUMBER>    device
The <DEVICE_SERIAL_NUMBER> will be a string unique to your device. Make sure that you see exactly one device before continuing.
Download and install the code
You can either clone the repository:
git clone https://github.com/googlecodelabs/arcore-rawdepthapi
Or download a ZIP file and extract it:
Follow these steps to begin working with the code.
- Launch Android Studio and choose Open an existing Android Studio project.
- Navigate to the local directory where you stored the Raw Depth ZIP file.
- Double-click on the
arcore_rawdepthapi_codelabdirectory.
The arcore_rawdepthapi_codelab directory is a single Gradle project with multiple modules. If the Project pane on the top left of Android Studio isn't already displayed in the Project pane, click Projects from the drop-down menu.
The result should look like this:
| This project contains the following modules:
|

You will work in the part0_work module. There are also complete solutions for each part of the codelab. Each module is a buildable app.
4. Run the starter app
Follow these steps to run the Raw Depth starter app.
- Navigate to Run > Run... > ‘part0_work'.
- In the Select Deployment Target dialog, select your device from the Connected Devices list and click OK.
Android Studio will build the initial app and run it on your device.
| When you run the app for the first time, it will request the CAMERA permission. Tap Allow to continue. |

| Currently, the app doesn't do anything.This is the most basic AR application, showing a camera view of your scene, but not doing anything else.The existing code is similar to the Hello AR sample published with the ARCore SDK. |

Next, you will use the Raw Depth API to retrieve the geometry of the scene around you.
5. Set up the Raw Depth API (Part 1)
Ensure that the target device supports Depth
Not all ARCore supported devices can run the Depth API. Ensure that the target device supports Depth before adding functionality to your app inside the onResume() function of RawDepthCodelabActivity.java, where a new Session is created.
Find the existing code:
// Create the ARCore session.
session = new Session(/* context= */ this);
Update it to ensure that the application only runs on devices that can support the Depth API.
// Create the ARCore session.
session = new Session(/* context= */ this);
if (!session.isDepthModeSupported(Config.DepthMode.RAW_DEPTH_ONLY)) {
  message =
     "This device does not support the ARCore Raw Depth API. See" +
     "https://developers.google.com/ar/devices for
     a list of devices that do.";
}
Enable Raw Depth
The Raw Depth API provides an unsmoothed depth image and a corresponding confidence image containing depth confidence for each pixel in the raw depth image. Enable Raw Depth by updating the following code under the try-catch statement you just modified.
try {
  // ************ New code to add ***************
  // Enable raw depth estimation and auto focus mode while ARCore is running.
  Config config = session.getConfig();
  config.setDepthMode(Config.DepthMode.RAW_DEPTH_ONLY);
  config.setFocusMode(Config.FocusMode.AUTO);
  session.configure(config);
  // ************ End new code to add ***************
  session.resume();
} catch (CameraNotAvailableException e) {
  messageSnackbarHelper.showError(this, "Camera not available. Try restarting the app.");
  session = null;
  return;
}
Now the AR Session is configured appropriately, and the app can use depth-based features.
Call the Depth API
Next, call the Depth API to retrieve depth images for each frame. Encapsulate the depth data into a new class by creating a new file. Right-click on the rawdepth folder and select New > Java Class. This creates a blank file. Add the following to this class:
src/main/java/com/google/ar/core/codelab/rawdepth/DepthData.java
package com.google.ar.core.codelab.rawdepth;

import android.media.Image;
import android.opengl.Matrix;

import com.google.ar.core.Anchor;
import com.google.ar.core.CameraIntrinsics;
import com.google.ar.core.Frame;
import com.google.ar.core.exceptions.NotYetAvailableException;

import java.nio.ByteBuffer;
import java.nio.ByteOrder;
import java.nio.FloatBuffer;
import java.nio.ShortBuffer;

/**
 * Convert depth data from ARCore depth images to 3D pointclouds. Points are added by calling the
 * Raw Depth API, and reprojected into 3D space.
 */
public class DepthData {
    public static final int FLOATS_PER_POINT = 4; // X,Y,Z,confidence.

}
This class is used to convert depth images to pointclouds. Pointclouds represent the scene geometry with a list of points that each have a 3D coordinate (x, y, z) and a confidence value in the range 0 to 1.
Add calls to populate these values using the Raw Depth API by adding a create()method at the bottom of the class. This method queries the latest depth and confidence images, storing the resulting pointcloud. The depth and confidence images will have matching data.
public static FloatBuffer create(Frame frame, Anchor cameraPoseAnchor) {
    try {
        Image depthImage = frame.acquireRawDepthImage16Bits();
        Image confidenceImage = frame.acquireRawDepthConfidenceImage();

        // Retrieve the intrinsic camera parameters corresponding to the depth image to
        // transform 2D depth pixels into 3D points. See more information about the depth values
        // at
        // https://developers.google.com/ar/develop/java/depth/overview#understand-depth-values.

        final CameraIntrinsics intrinsics = frame.getCamera().getTextureIntrinsics();
        float[] modelMatrix = new float[16];
        cameraPoseAnchor.getPose().toMatrix(modelMatrix, 0);
        final FloatBuffer points = convertRawDepthImagesTo3dPointBuffer(
                depthImage, confidenceImage, intrinsics, modelMatrix);

        depthImage.close();
        confidenceImage.close();

        return points;
    } catch (NotYetAvailableException e) {
        // This normally means that depth data is not available yet.
        // This is normal, so you don't have to spam the logcat with this.
    }
    return null;
}
|
|
|
|
|
|
|
|


The code also stores the camera anchor at this time, so that the depth information can be transformed into world coordinates by calling a helper method convertRawDepthImagesTo3dPointBuffer(). This helper method takes each pixel in the depth image and uses the camera intrinsics to unproject the depth into a 3D point relative to the camera. Then the camera anchor is used to convert the point's position into world coordinates. Each pixel that exists is converted to a 3D point (in units of meters) and stored alongside its confidence.
Add the following helper method to DepthData.java:
/** Apply camera intrinsics to convert depth image into a 3D pointcloud. */
    private static FloatBuffer convertRawDepthImagesTo3dPointBuffer(
            Image depth, Image confidence, CameraIntrinsics cameraTextureIntrinsics, float[] modelMatrix) {
        // Java uses big endian so change the endianness to ensure
        // that the depth data is in the correct byte order.
        final Image.Plane depthImagePlane = depth.getPlanes()[0];
        ByteBuffer depthByteBufferOriginal = depthImagePlane.getBuffer();
        ByteBuffer depthByteBuffer = ByteBuffer.allocate(depthByteBufferOriginal.capacity());
        depthByteBuffer.order(ByteOrder.LITTLE_ENDIAN);
        while (depthByteBufferOriginal.hasRemaining()) {
            depthByteBuffer.put(depthByteBufferOriginal.get());
        }
        depthByteBuffer.rewind();
        ShortBuffer depthBuffer = depthByteBuffer.asShortBuffer();

        final Image.Plane confidenceImagePlane = confidence.getPlanes()[0];
        ByteBuffer confidenceBufferOriginal = confidenceImagePlane.getBuffer();
        ByteBuffer confidenceBuffer = ByteBuffer.allocate(confidenceBufferOriginal.capacity());
        confidenceBuffer.order(ByteOrder.LITTLE_ENDIAN);
        while (confidenceBufferOriginal.hasRemaining()) {
            confidenceBuffer.put(confidenceBufferOriginal.get());
        }
        confidenceBuffer.rewind();

        // To transform 2D depth pixels into 3D points, retrieve the intrinsic camera parameters
        // corresponding to the depth image. See more information about the depth values at
        // https://developers.google.com/ar/develop/java/depth/overview#understand-depth-values.
        final int[] intrinsicsDimensions = cameraTextureIntrinsics.getImageDimensions();
        final int depthWidth = depth.getWidth();
        final int depthHeight = depth.getHeight();
        final float fx =
                cameraTextureIntrinsics.getFocalLength()[0] * depthWidth / intrinsicsDimensions[0];
        final float fy =
                cameraTextureIntrinsics.getFocalLength()[1] * depthHeight / intrinsicsDimensions[1];
        final float cx =
                cameraTextureIntrinsics.getPrincipalPoint()[0] * depthWidth / intrinsicsDimensions[0];
        final float cy =
                cameraTextureIntrinsics.getPrincipalPoint()[1] * depthHeight / intrinsicsDimensions[1];

        // Allocate the destination point buffer. If the number of depth pixels is larger than
        // `maxNumberOfPointsToRender` we uniformly subsample. The raw depth image may have
        // different resolutions on different devices.
        final float maxNumberOfPointsToRender = 20000;
        int step = (int) Math.ceil(Math.sqrt(depthWidth * depthHeight / maxNumberOfPointsToRender));

        FloatBuffer points = FloatBuffer.allocate(depthWidth / step * depthHeight / step * FLOATS_PER_POINT);
        float[] pointCamera = new float[4];
        float[] pointWorld = new float[4];

        for (int y = 0; y < depthHeight; y += step) {
            for (int x = 0; x < depthWidth; x += step) {
                // Depth images are tightly packed, so it's OK to not use row and pixel strides.
                int depthMillimeters = depthBuffer.get(y * depthWidth + x); // Depth image pixels are in mm.
                if (depthMillimeters == 0) {
                    // Pixels with value zero are invalid, meaning depth estimates are missing from
                    // this location.
                    continue;
                }
                final float depthMeters = depthMillimeters / 1000.0f; // Depth image pixels are in mm.

                // Retrieve the confidence value for this pixel.
                final byte confidencePixelValue =
                        confidenceBuffer.get(
                                y * confidenceImagePlane.getRowStride()
                                        + x * confidenceImagePlane.getPixelStride());
                final float confidenceNormalized = ((float) (confidencePixelValue & 0xff)) / 255.0f;

                // Unproject the depth into a 3D point in camera coordinates.
                pointCamera[0] = depthMeters * (x - cx) / fx;
                pointCamera[1] = depthMeters * (cy - y) / fy;
                pointCamera[2] = -depthMeters;
                pointCamera[3] = 1;

                // Apply model matrix to transform point into world coordinates.
                Matrix.multiplyMV(pointWorld, 0, modelMatrix, 0, pointCamera, 0);
                points.put(pointWorld[0]); // X.
                points.put(pointWorld[1]); // Y.
                points.put(pointWorld[2]); // Z.
                points.put(confidenceNormalized);
            }
        }

        points.rewind();
        return points;
    }
Get the latest Raw Depth data for each frame
Modify the app to retrieve depth information and align it to world coordinates for each pose.
In RawDepthCodelabActivity.java, in the method onDrawFrame(), find the existing lines:
Frame frame = session.update();
Camera camera = frame.getCamera();

// If the frame is ready, render the camera preview image to the GL surface.
backgroundRenderer.draw(frame);
Add the following lines just below it:
// Retrieve the depth data for this frame.
FloatBuffer points = DepthData.create(frame, session.createAnchor(camera.getPose()));
if (points == null) {
  return;
}

if (messageSnackbarHelper.isShowing() && points != null) {
  messageSnackbarHelper.hide(this);
}
6. Render the depth data (Part 2)
Now that you have a depth pointcloud to play with, it's time to see what the data looks like rendered on-screen.
Add a renderer to visualize depth points
Add a renderer to visualize the depth points.
First, add a new class to contain the rendering logic. This class performs the OpenGL operations to initialize shaders to visualize the depth pointcloud.
| Add DepthRenderer class
|

Populate this class with the following code:
src/main/java/com/google/ar/core/codelab/common/rendering/DepthRenderer.java
package com.google.ar.core.codelab.common.rendering;

import android.content.Context;
import android.opengl.GLES20;
import android.opengl.Matrix;

import com.google.ar.core.Camera;
import com.google.ar.core.codelab.rawdepth.DepthData;

import java.io.IOException;
import java.nio.FloatBuffer;

public class DepthRenderer {
    private static final String TAG = DepthRenderer.class.getSimpleName();

    // Shader names.
    private static final String VERTEX_SHADER_NAME = "shaders/depth_point_cloud.vert";
    private static final String FRAGMENT_SHADER_NAME = "shaders/depth_point_cloud.frag";

    public static final int BYTES_PER_FLOAT = Float.SIZE / 8;
    private static final int BYTES_PER_POINT = BYTES_PER_FLOAT * DepthData.FLOATS_PER_POINT;
    private static final int INITIAL_BUFFER_POINTS = 1000;

    private int arrayBuffer;
    private int arrayBufferSize;

    private int programName;
    private int positionAttribute;
    private int modelViewProjectionUniform;
    private int pointSizeUniform;

    private int numPoints = 0;

    public DepthRenderer() {}

    public void createOnGlThread(Context context) throws IOException {
        ShaderUtil.checkGLError(TAG, "Bind");

        int[] buffers = new int[1];
        GLES20.glGenBuffers(1, buffers, 0);
        arrayBuffer = buffers[0];
        GLES20.glBindBuffer(GLES20.GL_ARRAY_BUFFER, arrayBuffer);

        arrayBufferSize = INITIAL_BUFFER_POINTS * BYTES_PER_POINT;
        GLES20.glBufferData(GLES20.GL_ARRAY_BUFFER, arrayBufferSize, null, GLES20.GL_DYNAMIC_DRAW);
        GLES20.glBindBuffer(GLES20.GL_ARRAY_BUFFER, 0);

        ShaderUtil.checkGLError(TAG, "Create");

        int vertexShader =
                ShaderUtil.loadGLShader(TAG, context, GLES20.GL_VERTEX_SHADER, VERTEX_SHADER_NAME);
        int fragmentShader =
                ShaderUtil.loadGLShader(TAG, context, GLES20.GL_FRAGMENT_SHADER, FRAGMENT_SHADER_NAME);

        programName = GLES20.glCreateProgram();
        GLES20.glAttachShader(programName, vertexShader);
        GLES20.glAttachShader(programName, fragmentShader);
        GLES20.glLinkProgram(programName);
        GLES20.glUseProgram(programName);

        ShaderUtil.checkGLError(TAG, "Program");

        positionAttribute = GLES20.glGetAttribLocation(programName, "a_Position");
        modelViewProjectionUniform = GLES20.glGetUniformLocation(programName, "u_ModelViewProjection");
        // Sets the point size, in pixels.
        pointSizeUniform = GLES20.glGetUniformLocation(programName, "u_PointSize");

        ShaderUtil.checkGLError(TAG, "Init complete");
    }
}
Render the depth data
Next, provide the source for the rendering shaders. Add the following update()method at the bottom of the DepthRenderer class. This method takes the latest depth information as input and copies the pointcloud data to the GPU.
    /**
     * Update the OpenGL buffer contents to the provided point. Repeated calls with the same point
     * cloud will be ignored.
     */
    public void update(FloatBuffer points) {
        ShaderUtil.checkGLError(TAG, "Update");
        GLES20.glBindBuffer(GLES20.GL_ARRAY_BUFFER, arrayBuffer);

        // If the array buffer is not large enough to fit the new point cloud, resize it.
        points.rewind();
        numPoints = points.remaining() / DepthData.FLOATS_PER_POINT;
        if (numPoints * BYTES_PER_POINT > arrayBufferSize) {
            while (numPoints * BYTES_PER_POINT > arrayBufferSize) {
                arrayBufferSize *= 2;
            }
            GLES20.glBufferData(GLES20.GL_ARRAY_BUFFER, arrayBufferSize, null, GLES20.GL_DYNAMIC_DRAW);
        }

        GLES20.glBufferSubData(
                GLES20.GL_ARRAY_BUFFER, 0, numPoints * BYTES_PER_POINT, points);
        GLES20.glBindBuffer(GLES20.GL_ARRAY_BUFFER, 0);

        ShaderUtil.checkGLError(TAG, "Update complete");
    }
Draw the latest data to the screen by adding a draw() method to the bottom of the DepthRenderer class. This method takes the 3D pointcloud information and projects it back to the camera view so that it can be rendered on the screen.
    /** Render the point cloud. The ARCore point cloud is given in world space. */
    public void draw(Camera camera) {
        float[] projectionMatrix = new float[16];
        camera.getProjectionMatrix(projectionMatrix, 0, 0.1f, 100.0f);
        float[] viewMatrix = new float[16];
        camera.getViewMatrix(viewMatrix, 0);
        float[] viewProjection = new float[16];
        Matrix.multiplyMM(viewProjection, 0, projectionMatrix, 0, viewMatrix, 0);

        ShaderUtil.checkGLError(TAG, "Draw");

        GLES20.glUseProgram(programName);
        GLES20.glEnableVertexAttribArray(positionAttribute);
        GLES20.glBindBuffer(GLES20.GL_ARRAY_BUFFER, arrayBuffer);
        GLES20.glVertexAttribPointer(positionAttribute, 4, GLES20.GL_FLOAT, false, BYTES_PER_POINT, 0);
        GLES20.glUniformMatrix4fv(modelViewProjectionUniform, 1, false, viewProjection, 0);
        // Set point size to 5 pixels.
        GLES20.glUniform1f(pointSizeUniform, 5.0f);

        GLES20.glDrawArrays(GLES20.GL_POINTS, 0, numPoints);
        GLES20.glDisableVertexAttribArray(positionAttribute);
        GLES20.glBindBuffer(GLES20.GL_ARRAY_BUFFER, 0);

        ShaderUtil.checkGLError(TAG, "Draw complete");
    }
You can set the point size to different sizes,in pixels, using the pointSizeUniform variable. pointSizeUniform is set to 5 pixels in the sample app.
Add new shaders
There are many ways to view depth and display depth data in your app. Here, you will add a few shaders and create a simple color mapping visualization.
Add new .vert and .frag shaders into the src/main/assets/shaders/ directory.
| Adding new .vert shaderIn Android Studio:
|

In the new .vert file, add the following code:
src/main/assets/shaders/depth_point_cloud.vert
uniform mat4 u_ModelViewProjection;
uniform float u_PointSize;

attribute vec4 a_Position;

varying vec4 v_Color;

// Return an interpolated color in a 6 degree polynomial interpolation.
vec3 GetPolynomialColor(in float x,
  in vec4 kRedVec4, in vec4 kGreenVec4, in vec4 kBlueVec4,
  in vec2 kRedVec2, in vec2 kGreenVec2, in vec2 kBlueVec2) {
  // Moves the color space a little bit to avoid pure red.
  // Removes this line for more contrast.
  x = clamp(x * 0.9 + 0.03, 0.0, 1.0);
  vec4 v4 = vec4(1.0, x, x * x, x * x * x);
  vec2 v2 = v4.zw * v4.z;
  return vec3(
    dot(v4, kRedVec4) + dot(v2, kRedVec2),
    dot(v4, kGreenVec4) + dot(v2, kGreenVec2),
    dot(v4, kBlueVec4) + dot(v2, kBlueVec2)
  );
}

// Return a smooth Percept colormap based upon the Turbo colormap.
vec3 PerceptColormap(in float x) {
  const vec4 kRedVec4 = vec4(0.55305649, 3.00913185, -5.46192616, -11.11819092);
  const vec4 kGreenVec4 = vec4(0.16207513, 0.17712472, 15.24091500, -36.50657960);
  const vec4 kBlueVec4 = vec4(-0.05195877, 5.18000081, -30.94853351, 81.96403246);
  const vec2 kRedVec2 = vec2(27.81927491, -14.87899417);
  const vec2 kGreenVec2 = vec2(25.95549545, -5.02738237);
  const vec2 kBlueVec2 = vec2(-86.53476570, 30.23299484);
  const float kInvalidDepthThreshold = 0.01;
  return step(kInvalidDepthThreshold, x) *
         GetPolynomialColor(x, kRedVec4, kGreenVec4, kBlueVec4,
                            kRedVec2, kGreenVec2, kBlueVec2);
}

void main() {
   // Color the pointcloud by height.
   float kMinHeightMeters = -2.0f;
   float kMaxHeightMeters = 2.0f;
   float normalizedHeight = clamp((a_Position.y - kMinHeightMeters) / (kMaxHeightMeters - kMinHeightMeters), 0.0, 1.0);
   v_Color = vec4(PerceptColormap(normalizedHeight), 1.0);
   gl_Position = u_ModelViewProjection * vec4(a_Position.xyz, 1.0);
   gl_PointSize = u_PointSize;
}
This shader uses the Turbo colormap for improved visualization. It performs the following steps:
- Retrieves the elevation of each point (y-axis in world coordinates).
- Computes a color associated with that elevation (red=low, blue=high).
- Computes the screen position of each point.
- Sets the size (in pixels) for each point, as defined in the
DepthRenderer.update()method.
Create a fragment shader in the same directory and name it depth_point_cloud.frag, repeating the same steps in this section.
Then add the following code to this new file to render each point as a single vertex of uniform color, as defined in the vertex shader.
src/main/assets/shaders/depth_point_cloud.frag
precision mediump float;
varying vec4 v_Color;

void main() {
    gl_FragColor = v_Color;
}
To apply this rendering, add calls to the DepthRenderer class inside your RawDepthCodelabActivity.
src/main/java/com/google/ar/core/codelab/common/rendering/RawDepthCodelabActivity.java
import com.google.ar.core.codelab.common.rendering.DepthRenderer;
At the top of the class, add a private member next to backgroundRenderer.
private final DepthRenderer depthRenderer = new DepthRenderer();
The depthRenderer needs to be initialized inside RawDepthCodelabActivity.onSurfaceCreated(), just like the existing backgroundRenderer.
depthRenderer.createOnGlThread(/*context=*/ this);
Add the following code at the end of the try-catch block inside onDrawFrame to show the latest depth for the current frame.
// Visualize depth points.
depthRenderer.update(points);
depthRenderer.draw(camera);
With these changes, the app should now build successfully and show the depth pointcloud.
| Example raw depth pointcloud visualization
|


7. Analyze 3D point clouds (Part 3)
You can analyze depth data once you verify that it exists in an AR session. An important tool for analyzing depth is the confidence value for each pixel. Use confidence values to analyze 3D point clouds.
Invalidate low-confidence pixels
You have retrieved the confidence value for each depth pixel and saved it alongside each point inside DepthData, but you haven't used it yet.
Values of confidenceNormalized range from 0 to 1, with 0 indicating low confidence, and 1 indicating full confidence. Modify the convertRawDepthImagesTo3dPointBuffer() method in the DepthData class to avoid saving pixels whose confidence is too low to be useful.
final float confidenceNormalized = ((float) (confidencePixelValue & 0xff)) / 255.0f;

// ******** New code to add ************
if (confidenceNormalized < 0.3) {
   // Ignores "low-confidence" pixels.
   continue;
}
// ******** End of new code to add *********
Try out different thresholds for the confidence level to see how many depth points are kept at each level.
|
|
|
|
|
Confidence >= 0.1 | Confidence >= 0.3 | Confidence >= 0.5 | Confidence >= 0.7 | Confidence >= 0.9 |


Filter pixels by distance
You can also filter depth pixels by distance. These next steps deal with geometry close to the camera. For performance optimization, you can ignore points that are too far away.
Update the confidence-checking code you just added with the following:
src/main/java/com/google/ar/core/codelab/rawdepth/DepthData.java
if (confidenceNormalized < 0.3 || depthMeters > 1.5) {
    // Ignore "low-confidence" pixels or depth that is too far away.
   continue;
 }
Now you will only see high-confidence and close points.
| Distance filteringLimits the pointcloud to be within 1.5 meters of the camera. |

Compare 3D points and planes
You can compare the geometry 3D points and planes and use them to filter each other, such as removing points that are close to observed AR planes.
This step will leave only "non-planar" points that tend to represent surfaces on objects in the environment. Add the filterUsingPlanes() method to the bottom of the DepthData class. This method iterates through the existing points, checks each point against each plane, and invalidates any point that is too close to an AR plane, leaving non-planar areas that highlight objects in the scene.
src/main/java/com/google/ar/core/codelab/rawdepth/DepthData.java
    public static void filterUsingPlanes(FloatBuffer points, Collection<Plane> allPlanes) {
        float[] planeNormal = new float[3];

        // Allocate the output buffer.
        int numPoints = points.remaining() / DepthData.FLOATS_PER_POINT;

        // Check each plane against each point.
        for (Plane plane : allPlanes) {
            if (plane.getTrackingState() != TrackingState.TRACKING || plane.getSubsumedBy() != null) {
                continue;
            }

            // Compute the normal vector of the plane.
            Pose planePose = plane.getCenterPose();
            planePose.getTransformedAxis(1, 1.0f, planeNormal, 0);

            // Filter points that are too close to the plane.
            for (int index = 0; index < numPoints; ++index) {
                // Retrieves the next point.
                final float x = points.get(FLOATS_PER_POINT * index);
                final float y = points.get(FLOATS_PER_POINT * index + 1);
                final float z = points.get(FLOATS_PER_POINT * index + 2);

                // Transform point to be in world coordinates, to match plane info.
                float distance = (x - planePose.tx()) * planeNormal[0]
                        + (y - planePose.ty()) * planeNormal[1]
                        + (z - planePose.tz()) * planeNormal[2];
                // Controls the size of objects detected.
                // Smaller values mean smaller objects will be kept.
                // Larger values will only allow detection of larger objects, but also helps reduce noise.
                if (Math.abs(distance) > 0.03) {
                    continue;  // Keep this point, since it's far enough away from the plane.
                }

                // Invalidate points that are too close to planar surfaces.
                points.put(FLOATS_PER_POINT * index, 0);
                points.put(FLOATS_PER_POINT * index + 1, 0);
                points.put(FLOATS_PER_POINT * index + 2, 0);
                points.put(FLOATS_PER_POINT * index + 3, 0);
            }
        }
    }
You can add this method to the RawDepthCodelabActivity in the onDrawFrame method:
//  ********** New code to add ************
  // Filter the depth data.
  DepthData.filterUsingPlanes(points, session.getAllTrackables(Plane.class));
//  ********** End new code to add *******

  // Visualize depth points.
  depthRenderer.update(points);
  depthRenderer.draw(camera);
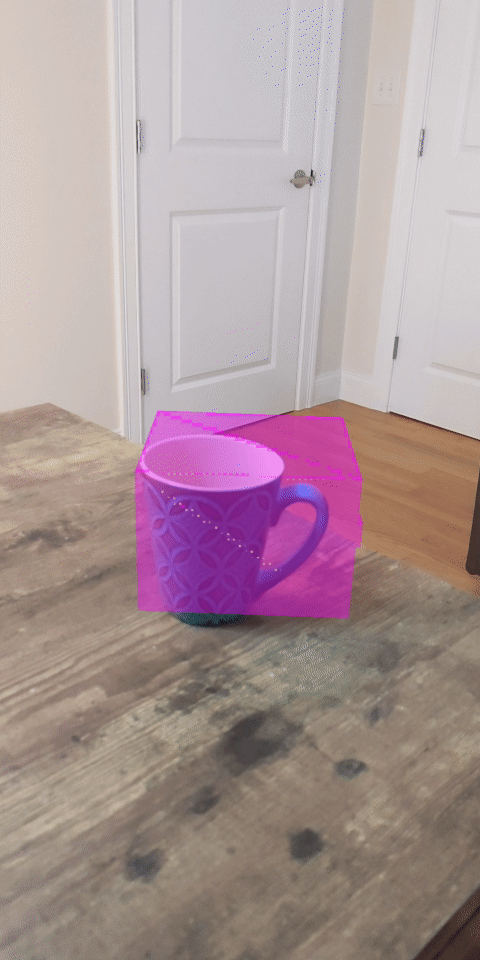
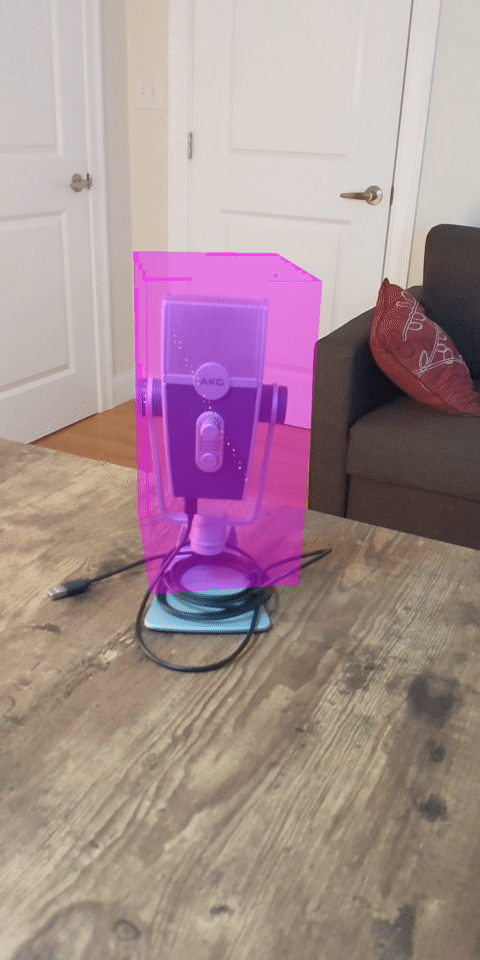
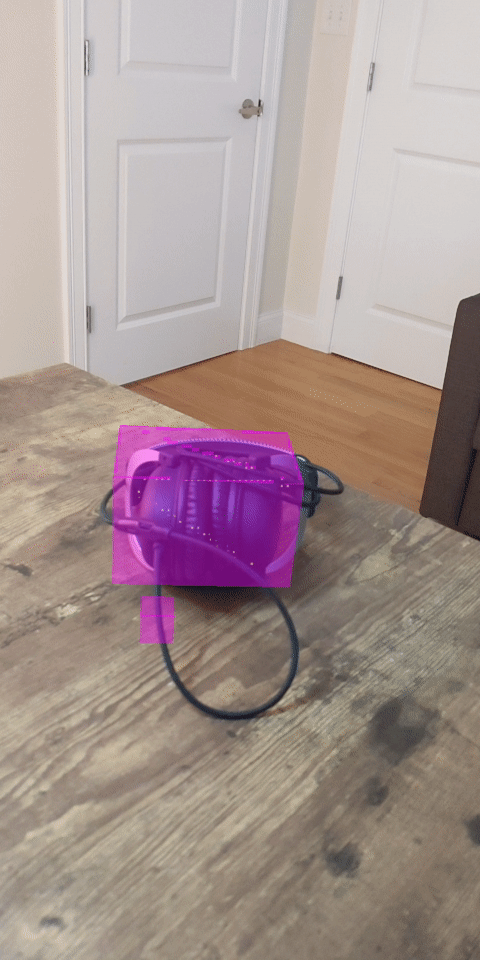
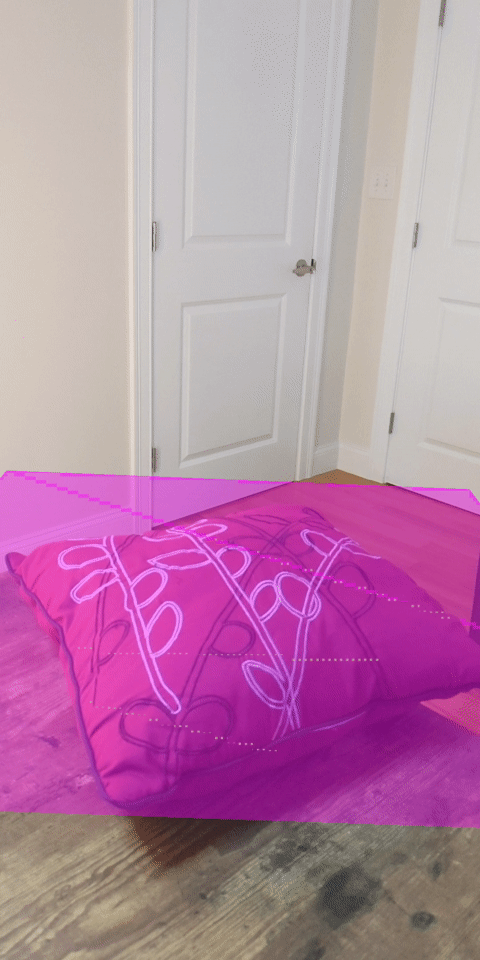
Running the codelab now results in a subset of points being rendered. These points represent the objects in the scene, while ignoring the flat surfaces on which the objects rest. You can use these data to estimate the size and position of objects by clustering points together.
|
|
|
|
Cup of Tea | Microphone | Headphones | Pillow |


Cluster points
This codelab contains a very simplistic pointcloud clustering algorithm. Update the codelab to group the retrieved pointclouds into clusters defined by axis-aligned bounding boxes.
src/main/java/com/google/ar/core/codelab/rawdepth/RawDepthCodelabActivity.java
import com.google.ar.core.codelab.common.helpers.AABB;
import com.google.ar.core.codelab.common.helpers.PointClusteringHelper;
import com.google.ar.core.codelab.common.rendering.BoxRenderer;
import java.util.List;
Add a BoxRenderer to this class at the top of the file, with the other renderers.
private final BoxRenderer boxRenderer = new BoxRenderer();
And inside the onSurfaceCreated() method, add the following alongside the other renderers:
boxRenderer.createOnGlThread(/*context=*/this);
Finally, add the following lines to onDrawFrame() inside RawDepthCodelabActivity to group the retrieved pointclouds into clusters and render the results as axis-aligned bounding boxes.
      // Visualize depth points.
      depthRenderer.update(points);
      depthRenderer.draw(camera);

// ************ New code to add ***************

      // Draw boxes around clusters of points.
      PointClusteringHelper clusteringHelper = new PointClusteringHelper(points);
      List<AABB> clusters = clusteringHelper.findClusters();
      for (AABB aabb : clusters) {
        boxRenderer.draw(aabb, camera);
      }

// ************ End new code to add ***************
|
|
|
|
Cup of Tea | Microphone | Headphones | Pillow |
You are now able to retrieve Raw Depth through an ARCore session, convert the depth information into 3D pointclouds, and perform basic filtering and rendering operations on those points.
8. Build-Run-Test
Build, run, and test your app.
Build and run your app
Follow these steps to build and run your app:
- Plug in an ARCore supported device via USB.
- Run your project with the ► button in the menu bar.
- Wait for the app to build and deploy to your device.
The first time you attempt to deploy the app to your device you will need to
Allow USB debugging
on the device. Select OK to continue.
The first time you run your app on the device, you will be asked if the app has permission to use your device camera. You must allow access to continue using AR functionality.
Testing your app
When you run your app, you can test its basic behavior by holding your device, moving around your space, and slowly scanning an area. Try to collect at least 10 seconds of data and scan the area from several directions before moving to the next step.
9. Congratulations
Congratulations, you've successfully built and run your first depth-based Augmented Reality app using Google's ARCore Raw Depth API. We are excited to see what you'll build!
10. Troubleshooting
Setting up your Android device for development
- Connect your device to your development machine with a USB cable. If you develop using Windows, you might need to install the appropriate USB driver for your device.
- Perform the following steps to enable USB debugging in the Developer options window:
- Open the Settings app.
- If your device uses Android v8.0 or higher, select System.
- Scroll to the bottom and select About phone.
- Scroll to the bottom and tap the Build number seven times.
- Return to the previous screen, scroll to the bottom, and tap Developer options.
- In the Developer options window, scroll down to find and enable USB debugging.
You can find more detailed information about this process on Google's android developer website.
Build failures related to licenses
If you encounter a build failure related to licenses (Failed to install the following Android SDK packages as some licences have not been accepted), you can use the following commands to review and accept these licenses:
cd <path to Android SDK>
tools/bin/sdkmanager --licenses