
1. บทนำ
ARCore เป็นแพลตฟอร์มสำหรับสร้างแอป Augmented Reality (AR) บนอุปกรณ์เคลื่อนที่ Depth API ของ ARCore จาก Google ช่วยให้เข้าถึงรูปภาพเชิงลึกสำหรับแต่ละเฟรมในเซสชัน ARCore ได้ พิกเซลแต่ละพิกเซลในรูปภาพความลึกจะให้การวัดระยะทางจากกล้องไปยังสภาพแวดล้อม
Raw Depth API จะให้ภาพความลึกที่ไม่ได้ผ่านการดำเนินการกรองในพื้นที่หน้าจอซึ่งออกแบบมาเพื่อปรับผลลัพธ์ให้เรียบเนียนและประมาณค่า ค่าเหล่านี้มีความแม่นยำทางเรขาคณิตมากกว่า แต่อาจมีข้อมูลขาดหายไปและอาจไม่สอดคล้องกับรูปภาพจากกล้องที่เชื่อมโยง
Codelab นี้แสดงวิธีใช้ Raw Depth API เพื่อวิเคราะห์เรขาคณิต 3 มิติของฉาก คุณจะสร้างแอปที่เปิดใช้ AR แบบง่ายๆ ซึ่งใช้ข้อมูลความลึกดิบเพื่อตรวจหาและแสดงภาพเรขาคณิตของโลก
API ความลึกและความลึกดิบรองรับเฉพาะในอุปกรณ์บางส่วนที่เปิดใช้ ARCore Depth API พร้อมใช้งานใน Android เท่านั้น
สิ่งที่คุณจะสร้าง
ใน Codelab นี้ คุณจะได้สร้างแอปที่ใช้รูปภาพความลึกดิบสำหรับแต่ละเฟรมเพื่อทำการวิเคราะห์เชิงเรขาคณิตของโลกรอบตัว แอปนี้จะทำสิ่งต่อไปนี้
- ตรวจสอบว่าอุปกรณ์เป้าหมายรองรับความลึกหรือไม่
- ดึงข้อมูลรูปภาพความลึกดิบสำหรับแต่ละเฟรมของกล้อง
- ฉายภาพความลึกดิบซ้ำเป็นจุด 3 มิติ และกรองจุดเหล่านั้นตามความน่าเชื่อถือและเรขาคณิต
- ใช้กลุ่มจุดความลึกดิบเพื่อแบ่งกลุ่มออบเจ็กต์ 3 มิติที่สนใจ
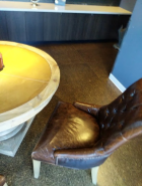
|
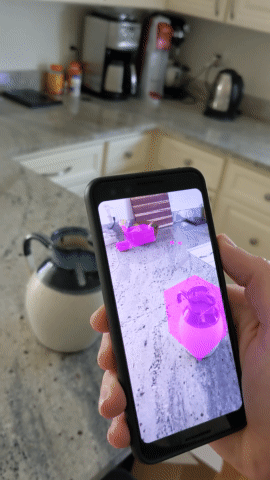
ตัวอย่างคร่าวๆ ของสิ่งที่คุณจะสร้าง |
หมายเหตุ: หากพบปัญหาในระหว่างดำเนินการ ให้ไปที่ส่วนสุดท้ายเพื่อดูเคล็ดลับการแก้ปัญหา
2. ข้อกำหนดเบื้องต้น
คุณต้องมีฮาร์ดแวร์และซอฟต์แวร์ที่เฉพาะเจาะจงเพื่อทำ Codelab นี้ให้เสร็จสมบูรณ์
ข้อกำหนดเกี่ยวกับฮาร์ดแวร์
- อุปกรณ์ที่รองรับ ARCore ที่เปิดใช้การแก้ไขข้อบกพร่องผ่าน USB และเชื่อมต่อผ่านสาย USB กับคอมพิวเตอร์สำหรับการพัฒนาซอฟต์แวร์ อุปกรณ์นี้ต้องรองรับ Depth API ด้วย
ข้อกำหนดของซอฟต์แวร์
- ARCore SDK 1.31.0 ขึ้นไป
- เครื่องพัฒนาที่มี Android Studio (v4.0.1 ขึ้นไป) ติดตั้งไว้
3. ตั้งค่า
ตั้งค่าเครื่องที่ใช้พัฒนา
เชื่อมต่ออุปกรณ์ ARCore กับคอมพิวเตอร์ผ่านสาย USB ตรวจสอบว่าอุปกรณ์อนุญาตการแก้ไขข้อบกพร่องผ่าน USB เปิดเทอร์มินัลแล้วเรียกใช้ adb devices ดังที่แสดงด้านล่าง
adb devices

List of devices attached
<DEVICE_SERIAL_NUMBER>    device
<DEVICE_SERIAL_NUMBER> จะเป็นสตริงที่ไม่ซ้ำกันสำหรับอุปกรณ์ของคุณ โปรดตรวจสอบว่าคุณเห็นอุปกรณ์ 1 เครื่องเท่านั้นก่อนดำเนินการต่อ
ดาวน์โหลดและติดตั้งโค้ด
คุณจะโคลนที่เก็บได้โดยทำดังนี้
git clone https://github.com/googlecodelabs/arcore-rawdepthapi
หรือดาวน์โหลดไฟล์ ZIP แล้วแตกไฟล์โดยทำดังนี้
ทำตามขั้นตอนต่อไปนี้เพื่อเริ่มทำงานกับโค้ด
- เปิด Android Studio แล้วเลือกเปิดโปรเจ็กต์ Android Studio ที่มีอยู่
- ไปที่ไดเรกทอรีในเครื่องที่คุณจัดเก็บไฟล์ ZIP ของข้อมูลเชิงลึกดิบ
- ดับเบิลคลิกที่ไดเรกทอรี
arcore_rawdepthapi_codelab
arcore_rawdepthapi_codelab เป็นโปรเจ็กต์ Gradle เดียวที่มีหลายโมดูล หากแผงโปรเจ็กต์ที่ด้านซ้ายบนของ Android Studio ยังไม่แสดงในแผงโปรเจ็กต์ ให้คลิกโปรเจ็กต์จากเมนูแบบเลื่อนลง
ผลลัพธ์ควรมีลักษณะดังนี้
| โปรเจ็กต์นี้มีโมดูลต่อไปนี้
|
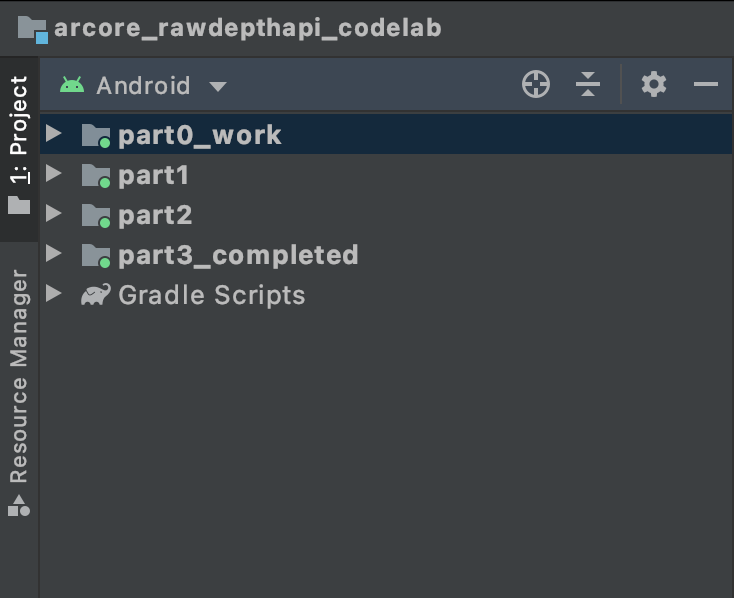
คุณจะทำงานในโมดูล part0_work นอกจากนี้ยังมีโซลูชันที่สมบูรณ์สำหรับแต่ละส่วนของ Codelab แต่ละโมดูลคือแอปที่สร้างได้
4. เรียกใช้แอปเริ่มต้น
ทำตามขั้นตอนต่อไปนี้เพื่อเรียกใช้แอปเริ่มต้นของ Raw Depth
- ไปที่ Run > Run... > ‘part0_work'
- ในกล่องโต้ตอบเลือกเป้าหมายการติดตั้งใช้งาน ให้เลือกอุปกรณ์จากรายการอุปกรณ์ที่เชื่อมต่อ แล้วคลิกตกลง
Android Studio จะสร้างแอปเริ่มต้นและเรียกใช้ในอุปกรณ์
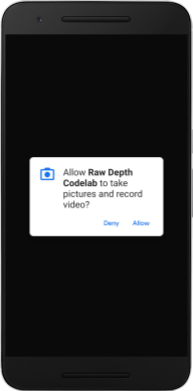
| เมื่อคุณเรียกใช้แอปเป็นครั้งแรก แอปจะขอสิทธิ์เข้าถึงกล้อง แตะอนุญาตเพื่อดำเนินการต่อ |
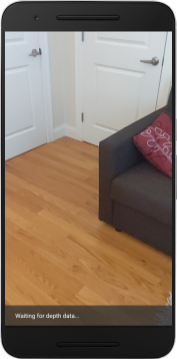
| ปัจจุบันแอปยังไม่มีฟังก์ชันการทำงานใดๆ นี่คือแอปพลิเคชัน AR ขั้นพื้นฐานที่สุด ซึ่งแสดงมุมมองกล้องของฉาก แต่ไม่มีฟังก์ชันการทำงานอื่นๆ โค้ดที่มีอยู่คล้ายกับตัวอย่าง Hello AR ที่เผยแพร่พร้อมกับ ARCore SDK |
จากนั้นคุณจะใช้ Raw Depth API เพื่อดึงข้อมูลเรขาคณิตของฉากรอบตัว
5. ตั้งค่า Raw Depth API (ตอนที่ 1)
ตรวจสอบว่าอุปกรณ์เป้าหมายรองรับความลึก
อุปกรณ์ที่รองรับ ARCore บางรุ่นไม่สามารถเรียกใช้ Depth API ได้ ตรวจสอบว่าอุปกรณ์เป้าหมายรองรับความลึกก่อนที่จะเพิ่มฟังก์ชันการทำงานลงในแอปภายในonResume()ฟังก์ชันของ RawDepthCodelabActivity.java ซึ่งจะสร้างเซสชันใหม่
ค้นหารหัสที่มีอยู่
// Create the ARCore session.
session = new Session(/* context= */ this);
อัปเดตเพื่อตรวจสอบว่าแอปพลิเคชันจะทำงานในอุปกรณ์ที่รองรับ Depth API เท่านั้น
// Create the ARCore session.
session = new Session(/* context= */ this);
if (!session.isDepthModeSupported(Config.DepthMode.RAW_DEPTH_ONLY)) {
  message =
     "This device does not support the ARCore Raw Depth API. See" +
     "https://developers.google.com/ar/devices for
     a list of devices that do.";
}
เปิดใช้ความลึกดิบ
Raw Depth API จะให้ภาพความลึกที่ไม่ได้ปรับเรียบและภาพความเชื่อมั่นที่สอดคล้องกันซึ่งมีความเชื่อมั่นด้านความลึกสำหรับแต่ละพิกเซลในภาพความลึกดิบ เปิดใช้ความลึกดิบโดยอัปเดตโค้ดต่อไปนี้ภายใต้คำสั่ง try-catch ที่คุณเพิ่งแก้ไข
try {
  // ************ New code to add ***************
  // Enable raw depth estimation and auto focus mode while ARCore is running.
  Config config = session.getConfig();
  config.setDepthMode(Config.DepthMode.RAW_DEPTH_ONLY);
  config.setFocusMode(Config.FocusMode.AUTO);
  session.configure(config);
  // ************ End new code to add ***************
  session.resume();
} catch (CameraNotAvailableException e) {
  messageSnackbarHelper.showError(this, "Camera not available. Try restarting the app.");
  session = null;
  return;
}
ตอนนี้ระบบได้กำหนดค่าเซสชัน AR อย่างเหมาะสมแล้ว และแอปสามารถใช้ฟีเจอร์ที่อิงตามความลึกได้
เรียกใช้ Depth API
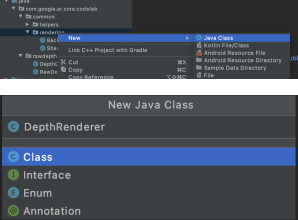
จากนั้นเรียกใช้ Depth API เพื่อดึงข้อมูลรูปภาพความลึกสำหรับแต่ละเฟรม ห่อหุ้มข้อมูลความลึกไว้ในคลาสใหม่โดยการสร้างไฟล์ใหม่ คลิกขวาที่โฟลเดอร์ rawdepth แล้วเลือก New > Java Class ซึ่งจะสร้างไฟล์เปล่า เพิ่มรายการต่อไปนี้ไปยังชั้นเรียนนี้
src/main/java/com/google/ar/core/codelab/rawdepth/DepthData.java
package com.google.ar.core.codelab.rawdepth;

import android.media.Image;
import android.opengl.Matrix;

import com.google.ar.core.Anchor;
import com.google.ar.core.CameraIntrinsics;
import com.google.ar.core.Frame;
import com.google.ar.core.exceptions.NotYetAvailableException;

import java.nio.ByteBuffer;
import java.nio.ByteOrder;
import java.nio.FloatBuffer;
import java.nio.ShortBuffer;

/**
 * Convert depth data from ARCore depth images to 3D pointclouds. Points are added by calling the
 * Raw Depth API, and reprojected into 3D space.
 */
public class DepthData {
    public static final int FLOATS_PER_POINT = 4; // X,Y,Z,confidence.

}
คลาสนี้ใช้เพื่อแปลงรูปภาพเชิงลึกเป็นกลุ่มจุด พอยต์คลาวด์แสดงเรขาคณิตของฉากด้วยรายการจุด ซึ่งแต่ละจุดมีพิกัด 3 มิติ (x, y, z) และค่าความเชื่อมั่นในช่วง 0 ถึง 1
เพิ่มการเรียกเพื่อป้อนค่าเหล่านี้โดยใช้ Raw Depth API โดยการเพิ่มcreate()เมธอดที่ด้านล่างของคลาส วิธีนี้จะค้นหาภาพความลึกและความมั่นใจล่าสุด แล้วจัดเก็บพอยต์คลาวด์ที่ได้ รูปภาพความลึกและความน่าเชื่อถือจะมีข้อมูลที่ตรงกัน
public static FloatBuffer create(Frame frame, Anchor cameraPoseAnchor) {
    try {
        Image depthImage = frame.acquireRawDepthImage16Bits();
        Image confidenceImage = frame.acquireRawDepthConfidenceImage();

        // Retrieve the intrinsic camera parameters corresponding to the depth image to
        // transform 2D depth pixels into 3D points. See more information about the depth values
        // at
        // https://developers.google.com/ar/develop/java/depth/overview#understand-depth-values.

        final CameraIntrinsics intrinsics = frame.getCamera().getTextureIntrinsics();
        float[] modelMatrix = new float[16];
        cameraPoseAnchor.getPose().toMatrix(modelMatrix, 0);
        final FloatBuffer points = convertRawDepthImagesTo3dPointBuffer(
                depthImage, confidenceImage, intrinsics, modelMatrix);

        depthImage.close();
        confidenceImage.close();

        return points;
    } catch (NotYetAvailableException e) {
        // This normally means that depth data is not available yet.
        // This is normal, so you don't have to spam the logcat with this.
    }
    return null;
}
|
|
|
|
|
|
|
|

โค้ดยังจัดเก็บจุดยึดกล้องในเวลานี้ด้วย เพื่อให้สามารถแปลงข้อมูลเชิงลึกเป็นพิกัดโลกได้โดยการเรียกใช้เมธอดตัวช่วย convertRawDepthImagesTo3dPointBuffer() เมธอดตัวช่วยนี้จะใช้แต่ละพิกเซลในรูปภาพเชิงลึกและใช้พารามิเตอร์ภายในของกล้องเพื่อยกเลิกการฉายภาพเชิงลึกเป็นจุด 3 มิติที่สัมพันธ์กับกล้อง จากนั้นจะใช้สมอของกล้องเพื่อแปลงตำแหน่งของจุดเป็นพิกัดโลก ระบบจะแปลงแต่ละพิกเซลที่มีอยู่เป็นจุด 3 มิติ (ในหน่วยเมตร) และจัดเก็บไว้พร้อมกับความน่าเชื่อถือ
เพิ่มเมธอดตัวช่วยต่อไปนี้ลงใน DepthData.java
/** Apply camera intrinsics to convert depth image into a 3D pointcloud. */
    private static FloatBuffer convertRawDepthImagesTo3dPointBuffer(
            Image depth, Image confidence, CameraIntrinsics cameraTextureIntrinsics, float[] modelMatrix) {
        // Java uses big endian so change the endianness to ensure
        // that the depth data is in the correct byte order.
        final Image.Plane depthImagePlane = depth.getPlanes()[0];
        ByteBuffer depthByteBufferOriginal = depthImagePlane.getBuffer();
        ByteBuffer depthByteBuffer = ByteBuffer.allocate(depthByteBufferOriginal.capacity());
        depthByteBuffer.order(ByteOrder.LITTLE_ENDIAN);
        while (depthByteBufferOriginal.hasRemaining()) {
            depthByteBuffer.put(depthByteBufferOriginal.get());
        }
        depthByteBuffer.rewind();
        ShortBuffer depthBuffer = depthByteBuffer.asShortBuffer();

        final Image.Plane confidenceImagePlane = confidence.getPlanes()[0];
        ByteBuffer confidenceBufferOriginal = confidenceImagePlane.getBuffer();
        ByteBuffer confidenceBuffer = ByteBuffer.allocate(confidenceBufferOriginal.capacity());
        confidenceBuffer.order(ByteOrder.LITTLE_ENDIAN);
        while (confidenceBufferOriginal.hasRemaining()) {
            confidenceBuffer.put(confidenceBufferOriginal.get());
        }
        confidenceBuffer.rewind();

        // To transform 2D depth pixels into 3D points, retrieve the intrinsic camera parameters
        // corresponding to the depth image. See more information about the depth values at
        // https://developers.google.com/ar/develop/java/depth/overview#understand-depth-values.
        final int[] intrinsicsDimensions = cameraTextureIntrinsics.getImageDimensions();
        final int depthWidth = depth.getWidth();
        final int depthHeight = depth.getHeight();
        final float fx =
                cameraTextureIntrinsics.getFocalLength()[0] * depthWidth / intrinsicsDimensions[0];
        final float fy =
                cameraTextureIntrinsics.getFocalLength()[1] * depthHeight / intrinsicsDimensions[1];
        final float cx =
                cameraTextureIntrinsics.getPrincipalPoint()[0] * depthWidth / intrinsicsDimensions[0];
        final float cy =
                cameraTextureIntrinsics.getPrincipalPoint()[1] * depthHeight / intrinsicsDimensions[1];

        // Allocate the destination point buffer. If the number of depth pixels is larger than
        // `maxNumberOfPointsToRender` we uniformly subsample. The raw depth image may have
        // different resolutions on different devices.
        final float maxNumberOfPointsToRender = 20000;
        int step = (int) Math.ceil(Math.sqrt(depthWidth * depthHeight / maxNumberOfPointsToRender));

        FloatBuffer points = FloatBuffer.allocate(depthWidth / step * depthHeight / step * FLOATS_PER_POINT);
        float[] pointCamera = new float[4];
        float[] pointWorld = new float[4];

        for (int y = 0; y < depthHeight; y += step) {
            for (int x = 0; x < depthWidth; x += step) {
                // Depth images are tightly packed, so it's OK to not use row and pixel strides.
                int depthMillimeters = depthBuffer.get(y * depthWidth + x); // Depth image pixels are in mm.
                if (depthMillimeters == 0) {
                    // Pixels with value zero are invalid, meaning depth estimates are missing from
                    // this location.
                    continue;
                }
                final float depthMeters = depthMillimeters / 1000.0f; // Depth image pixels are in mm.

                // Retrieve the confidence value for this pixel.
                final byte confidencePixelValue =
                        confidenceBuffer.get(
                                y * confidenceImagePlane.getRowStride()
                                        + x * confidenceImagePlane.getPixelStride());
                final float confidenceNormalized = ((float) (confidencePixelValue & 0xff)) / 255.0f;

                // Unproject the depth into a 3D point in camera coordinates.
                pointCamera[0] = depthMeters * (x - cx) / fx;
                pointCamera[1] = depthMeters * (cy - y) / fy;
                pointCamera[2] = -depthMeters;
                pointCamera[3] = 1;

                // Apply model matrix to transform point into world coordinates.
                Matrix.multiplyMV(pointWorld, 0, modelMatrix, 0, pointCamera, 0);
                points.put(pointWorld[0]); // X.
                points.put(pointWorld[1]); // Y.
                points.put(pointWorld[2]); // Z.
                points.put(confidenceNormalized);
            }
        }

        points.rewind();
        return points;
    }
รับข้อมูลความลึกดิบล่าสุดสำหรับแต่ละเฟรม
แก้ไขแอปเพื่อดึงข้อมูลความลึกและจัดแนวให้ตรงกับพิกัดโลกสำหรับท่าทางแต่ละท่า
ใน RawDepthCodelabActivity.java ในเมธอด onDrawFrame() ให้ค้นหาบรรทัดที่มีอยู่
Frame frame = session.update();
Camera camera = frame.getCamera();

// If the frame is ready, render the camera preview image to the GL surface.
backgroundRenderer.draw(frame);
เพิ่มบรรทัดต่อไปนี้ใต้บรรทัดดังกล่าว
// Retrieve the depth data for this frame.
FloatBuffer points = DepthData.create(frame, session.createAnchor(camera.getPose()));
if (points == null) {
  return;
}

if (messageSnackbarHelper.isShowing() && points != null) {
  messageSnackbarHelper.hide(this);
}
6. แสดงผลข้อมูลความลึก (ตอนที่ 2)
ตอนนี้คุณมีพอยต์คลาวด์เชิงลึกให้ลองใช้แล้ว ก็ถึงเวลาดูว่าข้อมูลที่แสดงบนหน้าจอมีลักษณะอย่างไร
เพิ่มโปรแกรมแสดงผลเพื่อแสดงภาพจุดความลึก
เพิ่มโปรแกรมแสดงผลเพื่อแสดงภาพจุดความลึก
ก่อนอื่น ให้เพิ่มคลาสใหม่เพื่อเก็บตรรกะการแสดงผล คลาสนี้จะดำเนินการ OpenGL เพื่อเริ่มต้น Shader เพื่อแสดงภาพ Point Cloud ของความลึก
| เพิ่มคลาส DepthRenderer
|
ป้อนข้อมูลต่อไปนี้ลงในคลาสนี้
src/main/java/com/google/ar/core/codelab/common/rendering/DepthRenderer.java
package com.google.ar.core.codelab.common.rendering;

import android.content.Context;
import android.opengl.GLES20;
import android.opengl.Matrix;

import com.google.ar.core.Camera;
import com.google.ar.core.codelab.rawdepth.DepthData;

import java.io.IOException;
import java.nio.FloatBuffer;

public class DepthRenderer {
    private static final String TAG = DepthRenderer.class.getSimpleName();

    // Shader names.
    private static final String VERTEX_SHADER_NAME = "shaders/depth_point_cloud.vert";
    private static final String FRAGMENT_SHADER_NAME = "shaders/depth_point_cloud.frag";

    public static final int BYTES_PER_FLOAT = Float.SIZE / 8;
    private static final int BYTES_PER_POINT = BYTES_PER_FLOAT * DepthData.FLOATS_PER_POINT;
    private static final int INITIAL_BUFFER_POINTS = 1000;

    private int arrayBuffer;
    private int arrayBufferSize;

    private int programName;
    private int positionAttribute;
    private int modelViewProjectionUniform;
    private int pointSizeUniform;

    private int numPoints = 0;

    public DepthRenderer() {}

    public void createOnGlThread(Context context) throws IOException {
        ShaderUtil.checkGLError(TAG, "Bind");

        int[] buffers = new int[1];
        GLES20.glGenBuffers(1, buffers, 0);
        arrayBuffer = buffers[0];
        GLES20.glBindBuffer(GLES20.GL_ARRAY_BUFFER, arrayBuffer);

        arrayBufferSize = INITIAL_BUFFER_POINTS * BYTES_PER_POINT;
        GLES20.glBufferData(GLES20.GL_ARRAY_BUFFER, arrayBufferSize, null, GLES20.GL_DYNAMIC_DRAW);
        GLES20.glBindBuffer(GLES20.GL_ARRAY_BUFFER, 0);

        ShaderUtil.checkGLError(TAG, "Create");

        int vertexShader =
                ShaderUtil.loadGLShader(TAG, context, GLES20.GL_VERTEX_SHADER, VERTEX_SHADER_NAME);
        int fragmentShader =
                ShaderUtil.loadGLShader(TAG, context, GLES20.GL_FRAGMENT_SHADER, FRAGMENT_SHADER_NAME);

        programName = GLES20.glCreateProgram();
        GLES20.glAttachShader(programName, vertexShader);
        GLES20.glAttachShader(programName, fragmentShader);
        GLES20.glLinkProgram(programName);
        GLES20.glUseProgram(programName);

        ShaderUtil.checkGLError(TAG, "Program");

        positionAttribute = GLES20.glGetAttribLocation(programName, "a_Position");
        modelViewProjectionUniform = GLES20.glGetUniformLocation(programName, "u_ModelViewProjection");
        // Sets the point size, in pixels.
        pointSizeUniform = GLES20.glGetUniformLocation(programName, "u_PointSize");

        ShaderUtil.checkGLError(TAG, "Init complete");
    }
}
แสดงผลข้อมูลความลึก
จากนั้นระบุแหล่งที่มาของเชเดอร์การแสดงผล เพิ่มupdate()เมธอดต่อไปนี้ที่ด้านล่างของคลาส DepthRenderer วิธีนี้จะใช้ข้อมูลความลึกล่าสุดเป็นอินพุตและคัดลอกข้อมูล Point Cloud ไปยัง GPU
    /**
     * Update the OpenGL buffer contents to the provided point. Repeated calls with the same point
     * cloud will be ignored.
     */
    public void update(FloatBuffer points) {
        ShaderUtil.checkGLError(TAG, "Update");
        GLES20.glBindBuffer(GLES20.GL_ARRAY_BUFFER, arrayBuffer);

        // If the array buffer is not large enough to fit the new point cloud, resize it.
        points.rewind();
        numPoints = points.remaining() / DepthData.FLOATS_PER_POINT;
        if (numPoints * BYTES_PER_POINT > arrayBufferSize) {
            while (numPoints * BYTES_PER_POINT > arrayBufferSize) {
                arrayBufferSize *= 2;
            }
            GLES20.glBufferData(GLES20.GL_ARRAY_BUFFER, arrayBufferSize, null, GLES20.GL_DYNAMIC_DRAW);
        }

        GLES20.glBufferSubData(
                GLES20.GL_ARRAY_BUFFER, 0, numPoints * BYTES_PER_POINT, points);
        GLES20.glBindBuffer(GLES20.GL_ARRAY_BUFFER, 0);

        ShaderUtil.checkGLError(TAG, "Update complete");
    }
วาดข้อมูลล่าสุดลงในหน้าจอโดยเพิ่มdraw()เมธอดที่ด้านล่างของคลาส DepthRenderer วิธีนี้จะใช้ข้อมูลพอยต์คลาวด์ 3 มิติและฉายกลับไปยังมุมมองกล้องเพื่อให้แสดงผลบนหน้าจอได้
    /** Render the point cloud. The ARCore point cloud is given in world space. */
    public void draw(Camera camera) {
        float[] projectionMatrix = new float[16];
        camera.getProjectionMatrix(projectionMatrix, 0, 0.1f, 100.0f);
        float[] viewMatrix = new float[16];
        camera.getViewMatrix(viewMatrix, 0);
        float[] viewProjection = new float[16];
        Matrix.multiplyMM(viewProjection, 0, projectionMatrix, 0, viewMatrix, 0);

        ShaderUtil.checkGLError(TAG, "Draw");

        GLES20.glUseProgram(programName);
        GLES20.glEnableVertexAttribArray(positionAttribute);
        GLES20.glBindBuffer(GLES20.GL_ARRAY_BUFFER, arrayBuffer);
        GLES20.glVertexAttribPointer(positionAttribute, 4, GLES20.GL_FLOAT, false, BYTES_PER_POINT, 0);
        GLES20.glUniformMatrix4fv(modelViewProjectionUniform, 1, false, viewProjection, 0);
        // Set point size to 5 pixels.
        GLES20.glUniform1f(pointSizeUniform, 5.0f);

        GLES20.glDrawArrays(GLES20.GL_POINTS, 0, numPoints);
        GLES20.glDisableVertexAttribArray(positionAttribute);
        GLES20.glBindBuffer(GLES20.GL_ARRAY_BUFFER, 0);

        ShaderUtil.checkGLError(TAG, "Draw complete");
    }
คุณตั้งค่าขนาดจุดเป็นขนาดต่างๆ ในหน่วยพิกเซลได้โดยใช้ตัวแปร pointSizeUniform pointSizeUniform ตั้งค่าเป็น 5 พิกเซลในแอปตัวอย่าง
เพิ่มเชเดอร์ใหม่
คุณดูข้อมูลความลึกและแสดงข้อมูลความลึกในแอปได้หลายวิธี ในที่นี้ คุณจะเพิ่มเชเดอร์ 2-3 รายการและสร้างภาพข้อมูลการแมปสีอย่างง่าย
เพิ่มเชดเดอร์ใหม่ .vert และ .frag ลงในไดเรกทอรี src/main/assets/shaders/
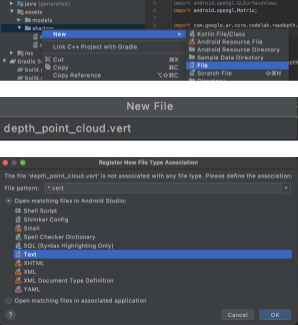
| เพิ่มเชเดอร์ .vert ใหม่ใน Android Studio ให้ทำดังนี้
|
เพิ่มโค้ดต่อไปนี้ในไฟล์ .vert ใหม่
src/main/assets/shaders/depth_point_cloud.vert
uniform mat4 u_ModelViewProjection;
uniform float u_PointSize;

attribute vec4 a_Position;

varying vec4 v_Color;

// Return an interpolated color in a 6 degree polynomial interpolation.
vec3 GetPolynomialColor(in float x,
  in vec4 kRedVec4, in vec4 kGreenVec4, in vec4 kBlueVec4,
  in vec2 kRedVec2, in vec2 kGreenVec2, in vec2 kBlueVec2) {
  // Moves the color space a little bit to avoid pure red.
  // Removes this line for more contrast.
  x = clamp(x * 0.9 + 0.03, 0.0, 1.0);
  vec4 v4 = vec4(1.0, x, x * x, x * x * x);
  vec2 v2 = v4.zw * v4.z;
  return vec3(
    dot(v4, kRedVec4) + dot(v2, kRedVec2),
    dot(v4, kGreenVec4) + dot(v2, kGreenVec2),
    dot(v4, kBlueVec4) + dot(v2, kBlueVec2)
  );
}

// Return a smooth Percept colormap based upon the Turbo colormap.
vec3 PerceptColormap(in float x) {
  const vec4 kRedVec4 = vec4(0.55305649, 3.00913185, -5.46192616, -11.11819092);
  const vec4 kGreenVec4 = vec4(0.16207513, 0.17712472, 15.24091500, -36.50657960);
  const vec4 kBlueVec4 = vec4(-0.05195877, 5.18000081, -30.94853351, 81.96403246);
  const vec2 kRedVec2 = vec2(27.81927491, -14.87899417);
  const vec2 kGreenVec2 = vec2(25.95549545, -5.02738237);
  const vec2 kBlueVec2 = vec2(-86.53476570, 30.23299484);
  const float kInvalidDepthThreshold = 0.01;
  return step(kInvalidDepthThreshold, x) *
         GetPolynomialColor(x, kRedVec4, kGreenVec4, kBlueVec4,
                            kRedVec2, kGreenVec2, kBlueVec2);
}

void main() {
   // Color the pointcloud by height.
   float kMinHeightMeters = -2.0f;
   float kMaxHeightMeters = 2.0f;
   float normalizedHeight = clamp((a_Position.y - kMinHeightMeters) / (kMaxHeightMeters - kMinHeightMeters), 0.0, 1.0);
   v_Color = vec4(PerceptColormap(normalizedHeight), 1.0);
   gl_Position = u_ModelViewProjection * vec4(a_Position.xyz, 1.0);
   gl_PointSize = u_PointSize;
}
Shader นี้ใช้ colormap Turbo เพื่อการแสดงภาพที่ดีขึ้น โดยจะดำเนินการตามขั้นตอนต่อไปนี้
- ดึงข้อมูลระดับความสูงของแต่ละจุด (แกน y ในพิกัดโลก)
- คำนวณสีที่เชื่อมโยงกับระดับความสูงนั้น (แดง=ต่ำ น้ำเงิน=สูง)
- คำนวณตำแหน่งบนหน้าจอของแต่ละจุด
- กำหนดขนาด (เป็นพิกเซล) สำหรับแต่ละจุดตามที่กำหนดไว้ใน
DepthRenderer.update()เมธอด
สร้าง Fragment Shader ในไดเรกทอรีเดียวกันและตั้งชื่อเป็น depth_point_cloud.frag โดยทำตามขั้นตอนเดียวกันในส่วนนี้
จากนั้นเพิ่มโค้ดต่อไปนี้ลงในไฟล์ใหม่นี้เพื่อแสดงแต่ละจุดเป็นจุดยอดเดียวที่มีสีสม่ำเสมอตามที่กำหนดไว้ใน Vertex Shader
src/main/assets/shaders/depth_point_cloud.frag
precision mediump float;
varying vec4 v_Color;

void main() {
    gl_FragColor = v_Color;
}
หากต้องการใช้การแสดงผลนี้ ให้เพิ่มการเรียกไปยังคลาส DepthRenderer ภายใน RawDepthCodelabActivity
src/main/java/com/google/ar/core/codelab/common/rendering/RawDepthCodelabActivity.java
import com.google.ar.core.codelab.common.rendering.DepthRenderer;
ที่ด้านบนของชั้นเรียน ให้เพิ่มสมาชิกแบบส่วนตัวข้าง backgroundRenderer
private final DepthRenderer depthRenderer = new DepthRenderer();
ต้องเริ่มต้น depthRenderer ภายใน RawDepthCodelabActivity.onSurfaceCreated() เช่นเดียวกับ backgroundRenderer ที่มีอยู่
depthRenderer.createOnGlThread(/*context=*/ this);
เพิ่มโค้ดต่อไปนี้ที่ส่วนท้ายของบล็อก try-catch ภายใน onDrawFrame เพื่อแสดงความลึกล่าสุดของเฟรมปัจจุบัน
// Visualize depth points.
depthRenderer.update(points);
depthRenderer.draw(camera);
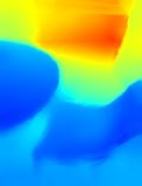
การเปลี่ยนแปลงเหล่านี้จะช่วยให้แอปสร้างได้สำเร็จและแสดง Point Cloud ของความลึก
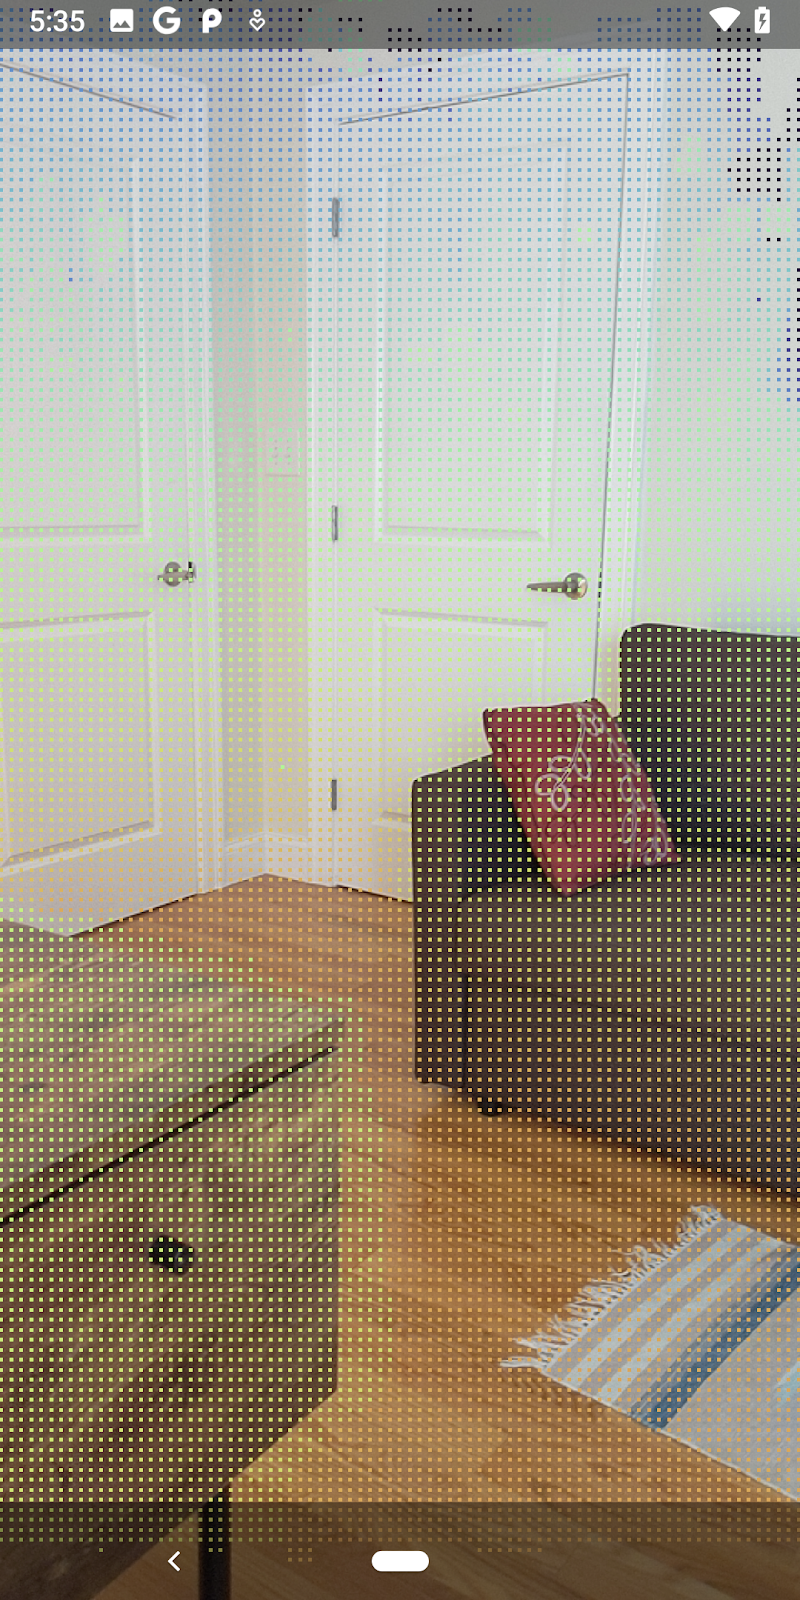
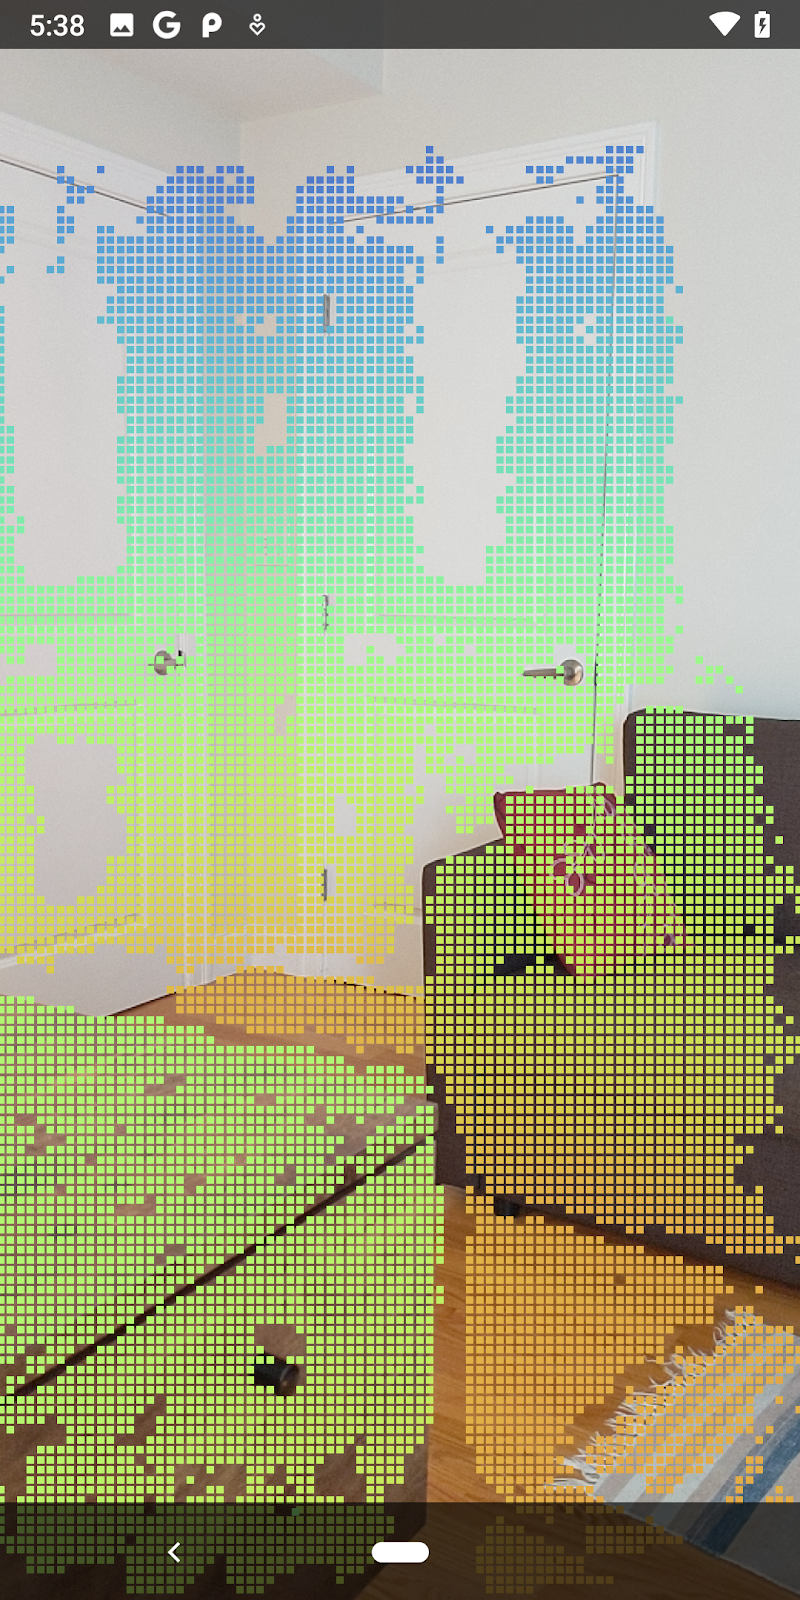
| ตัวอย่างการแสดงภาพ Point Cloud ของความลึกดิบ
|
7. วิเคราะห์กลุ่มจุด 3 มิติ (ตอนที่ 3)
คุณจะวิเคราะห์ข้อมูลเชิงลึกได้เมื่อยืนยันว่ามีข้อมูลดังกล่าวในเซสชัน AR เครื่องมือสำคัญในการวิเคราะห์ความลึกคือค่าความมั่นใจสำหรับแต่ละพิกเซล ใช้ค่าความเชื่อมั่นเพื่อวิเคราะห์กลุ่มจุด 3 มิติ
ทําให้พิกเซลที่มีความเชื่อมั่นต่ำไม่ถูกต้อง
คุณดึงค่าความเชื่อมั่นสำหรับแต่ละพิกเซลความลึกและบันทึกไว้ข้างแต่ละจุดภายใน DepthData แต่ยังไม่ได้ใช้
ค่าของ confidenceNormalized อยู่ในช่วง 0 ถึง 1 โดย 0 หมายถึงความน่าเชื่อถือต่ำ และ 1 หมายถึงความน่าเชื่อถือสูง แก้ไขเมธอด convertRawDepthImagesTo3dPointBuffer() ในคลาส DepthData เพื่อหลีกเลี่ยงการบันทึกพิกเซลที่มีความน่าเชื่อถือต่ำเกินไปจนไม่เป็นประโยชน์
final float confidenceNormalized = ((float) (confidencePixelValue & 0xff)) / 255.0f;

// ******** New code to add ************
if (confidenceNormalized < 0.3) {
   // Ignores "low-confidence" pixels.
   continue;
}
// ******** End of new code to add *********
ลองใช้เกณฑ์ที่แตกต่างกันสำหรับระดับความเชื่อมั่นเพื่อดูว่าระบบจะเก็บจุดความลึกไว้กี่จุดในแต่ละระดับ
|
|
|
|
|
ความเชื่อมั่น >= 0.1 | ความเชื่อมั่น >= 0.3 | ความเชื่อมั่น >= 0.5 | ความเชื่อมั่น >= 0.7 | ความเชื่อมั่น >= 0.9 |
กรองพิกเซลตามระยะทาง
นอกจากนี้ คุณยังกรองพิกเซลความลึกตามระยะทางได้ด้วย ขั้นตอนถัดไปนี้เกี่ยวข้องกับรูปทรงเรขาคณิตที่อยู่ใกล้กล้อง คุณสามารถละเว้นจุดที่อยู่ไกลเกินไปเพื่อเพิ่มประสิทธิภาพได้
อัปเดตรหัสการตรวจสอบความเชื่อมั่นที่คุณเพิ่งเพิ่มด้วยรหัสดังนี้
src/main/java/com/google/ar/core/codelab/rawdepth/DepthData.java
if (confidenceNormalized < 0.3 || depthMeters > 1.5) {
    // Ignore "low-confidence" pixels or depth that is too far away.
   continue;
 }
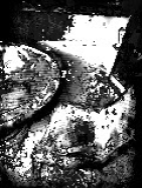
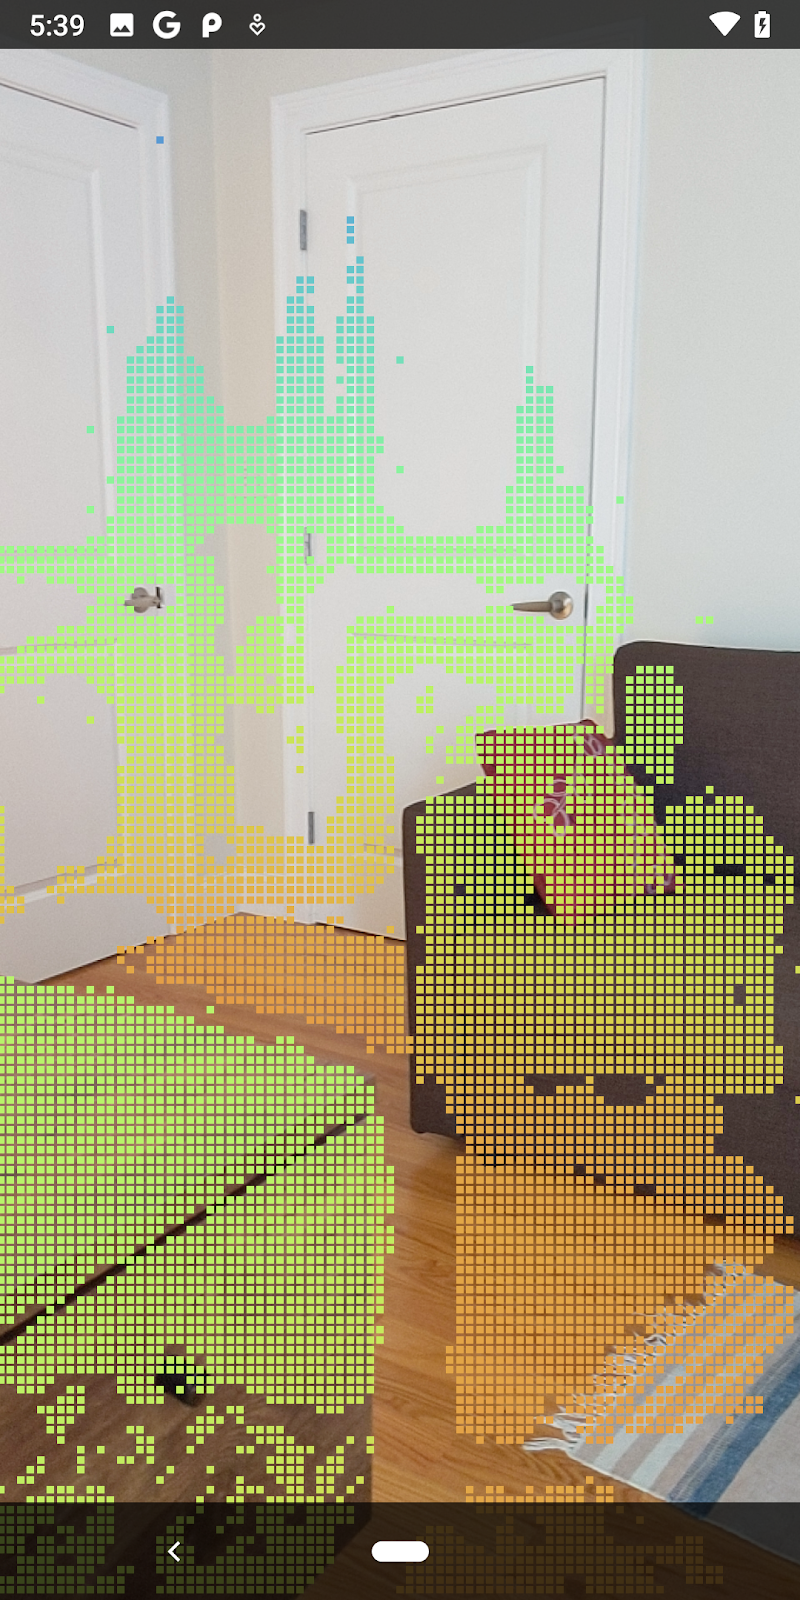
ตอนนี้คุณจะเห็นเฉพาะจุดที่มีความเชื่อมั่นสูงและจุดที่อยู่ใกล้
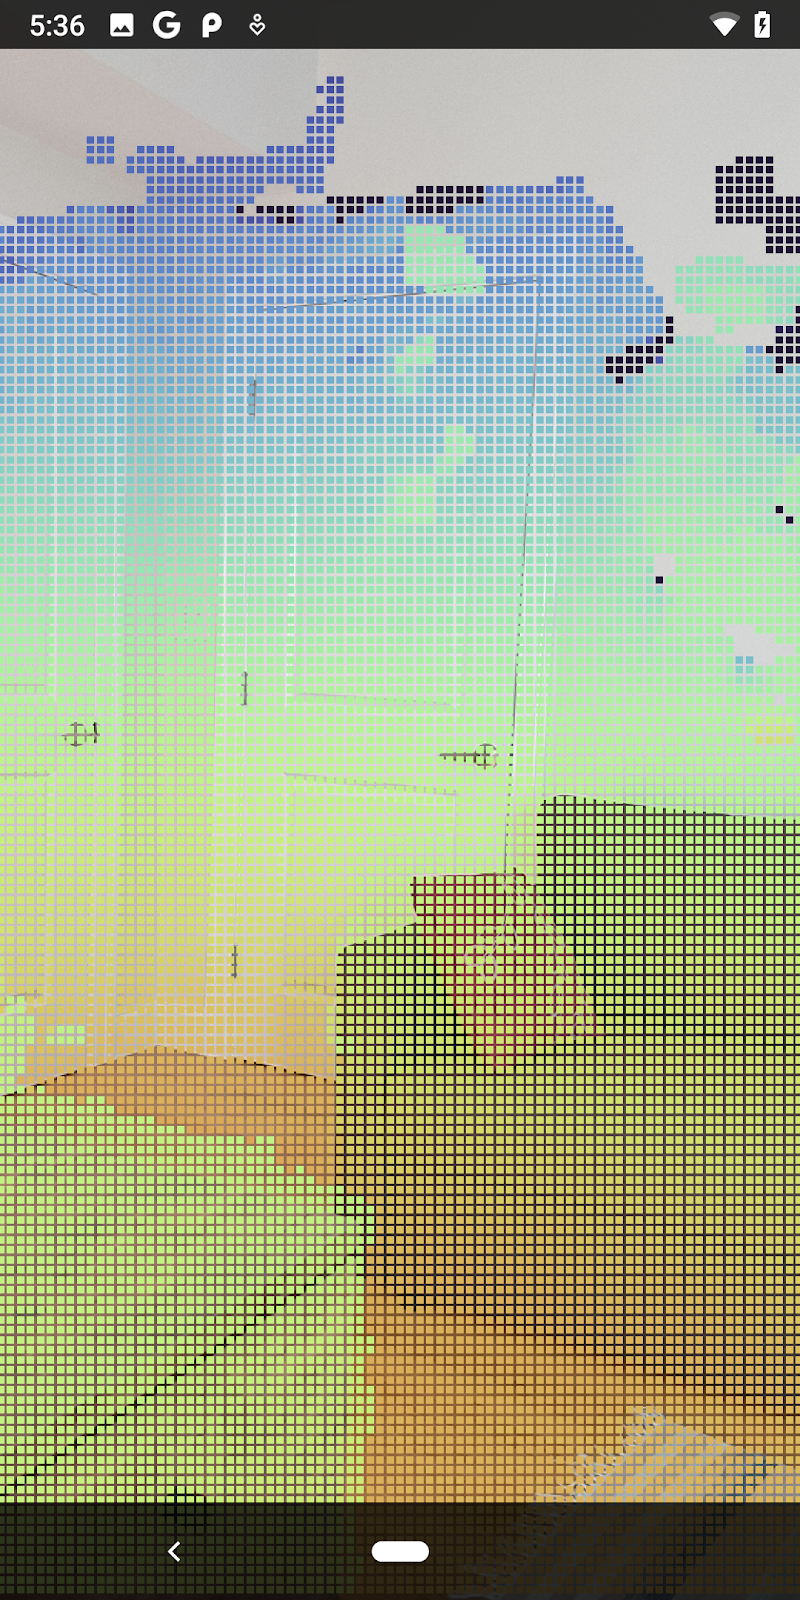
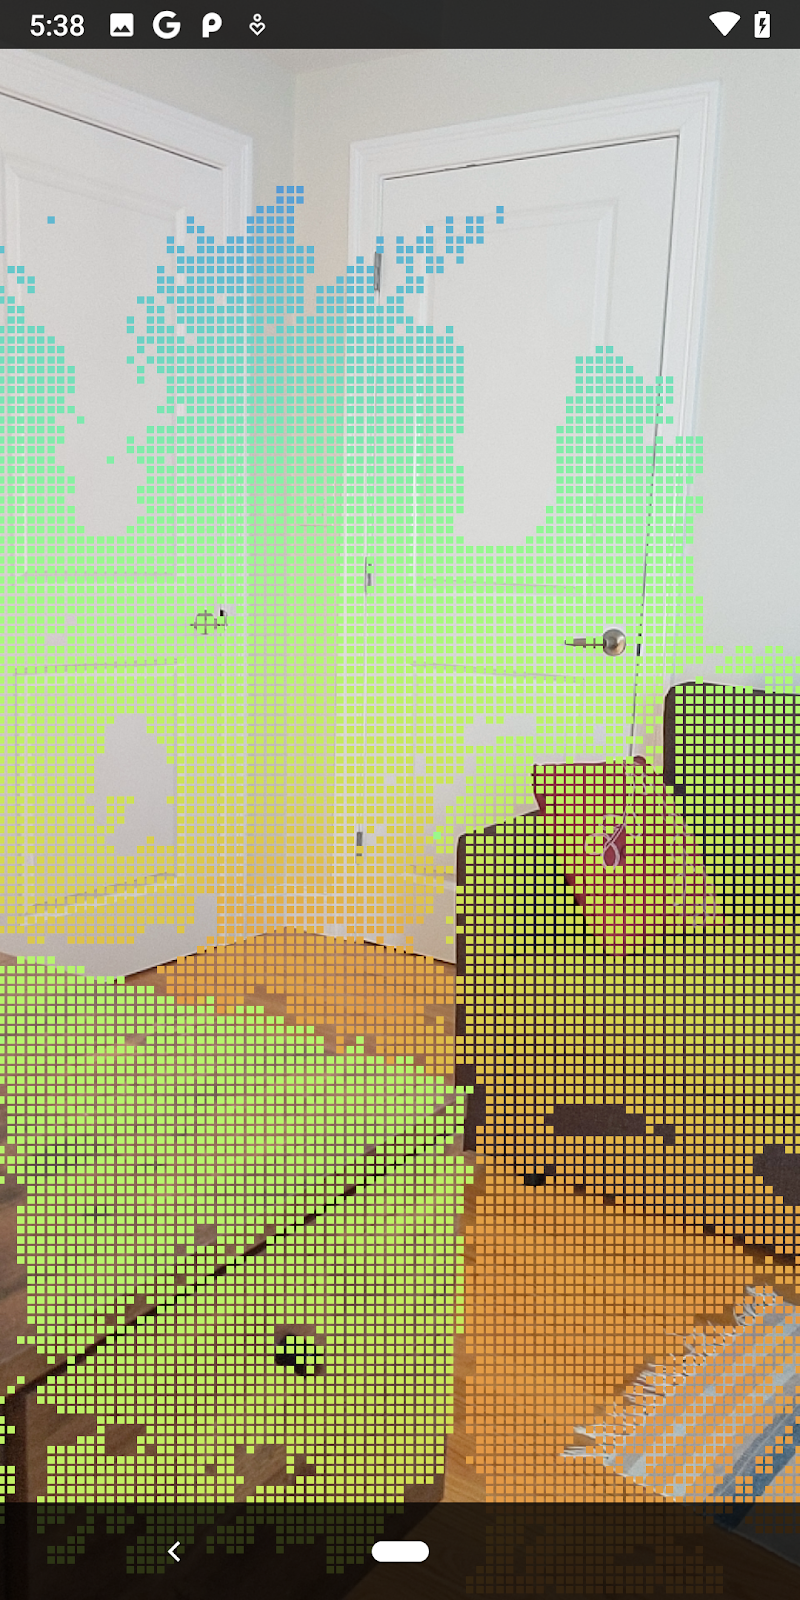
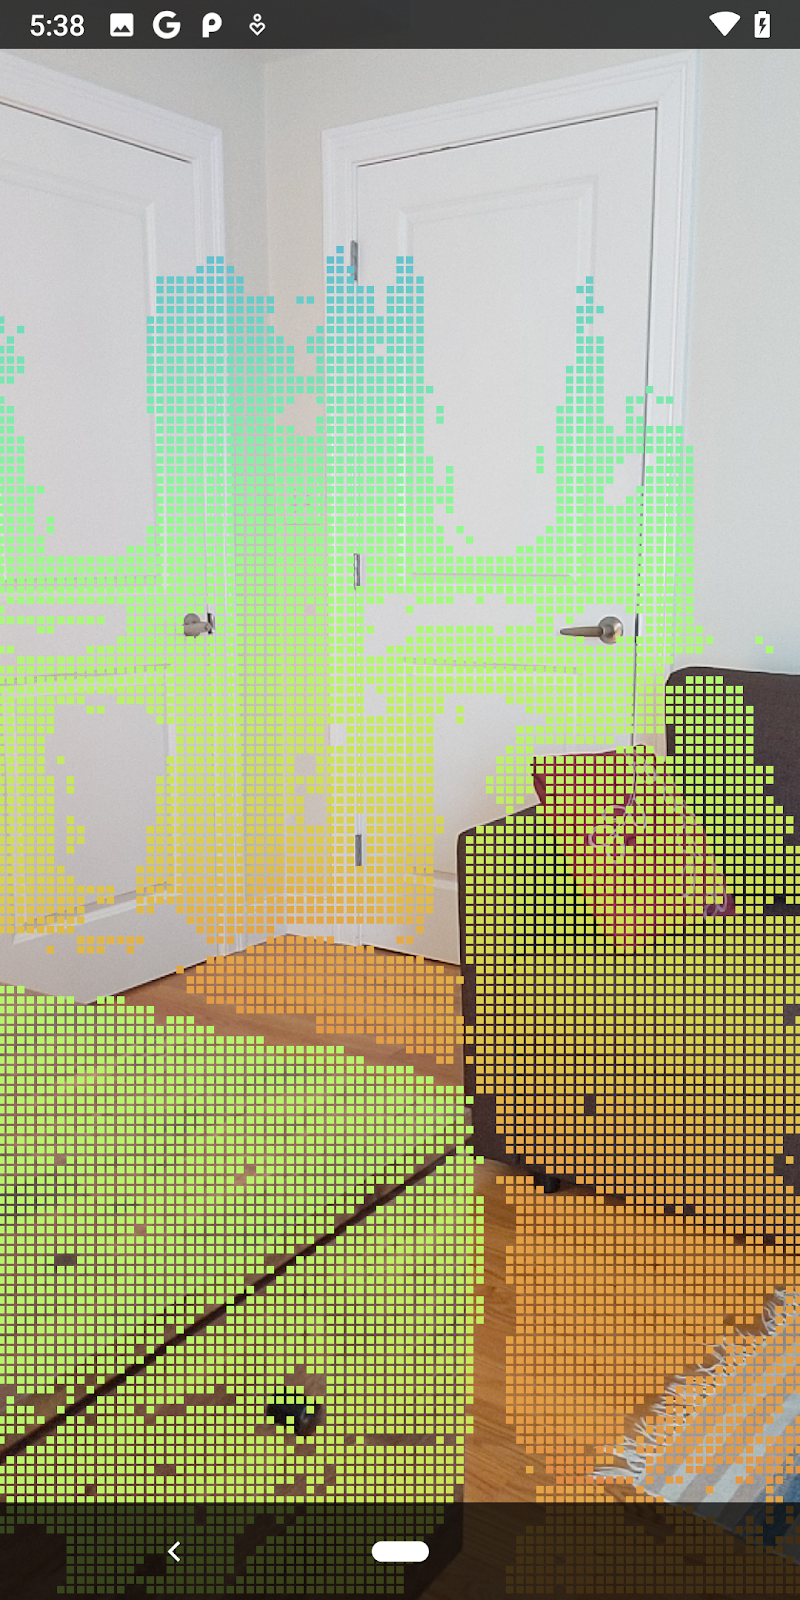
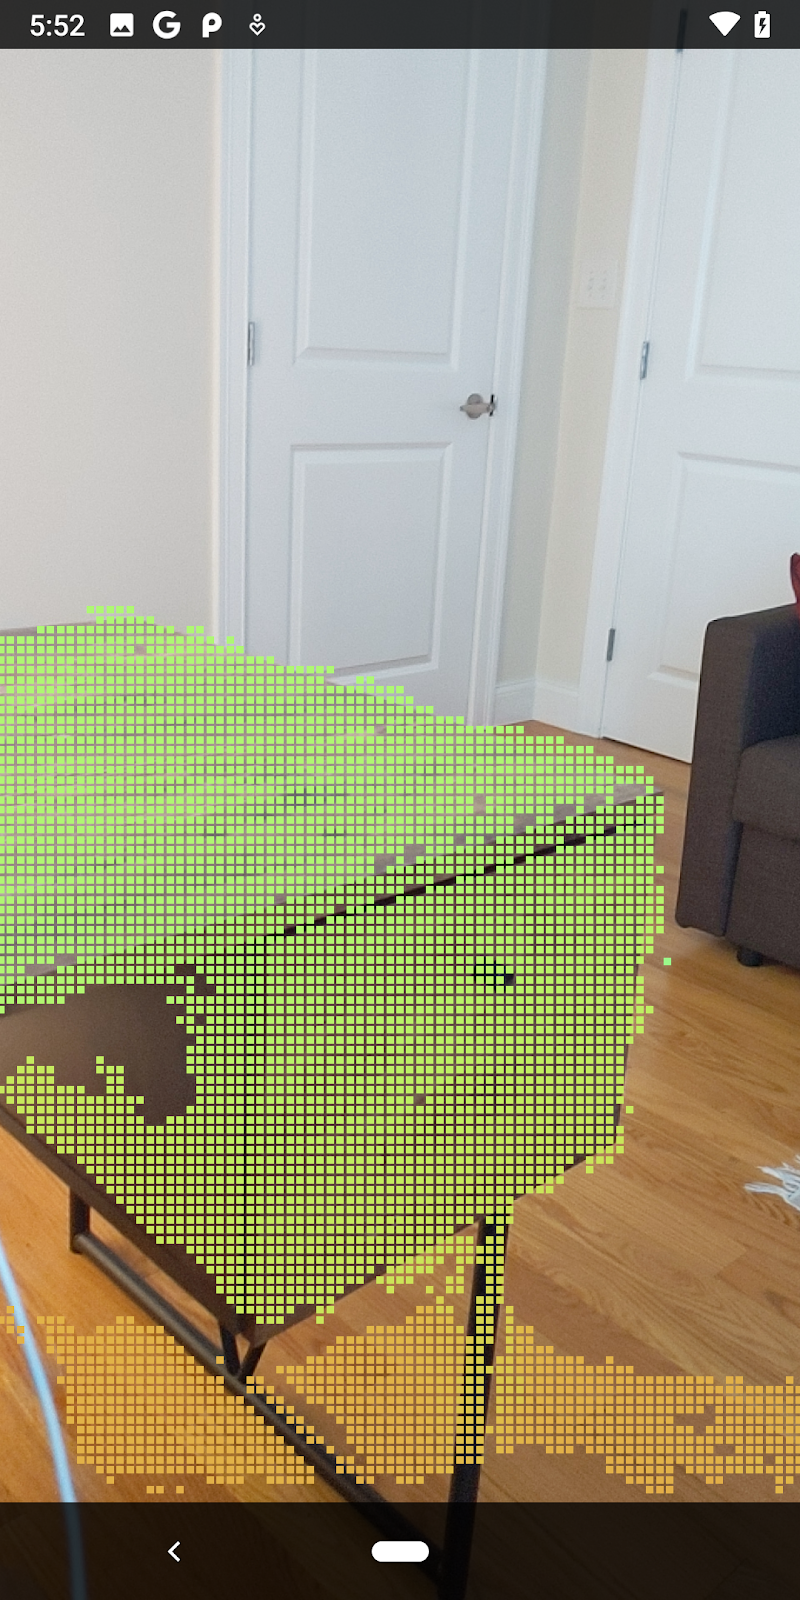
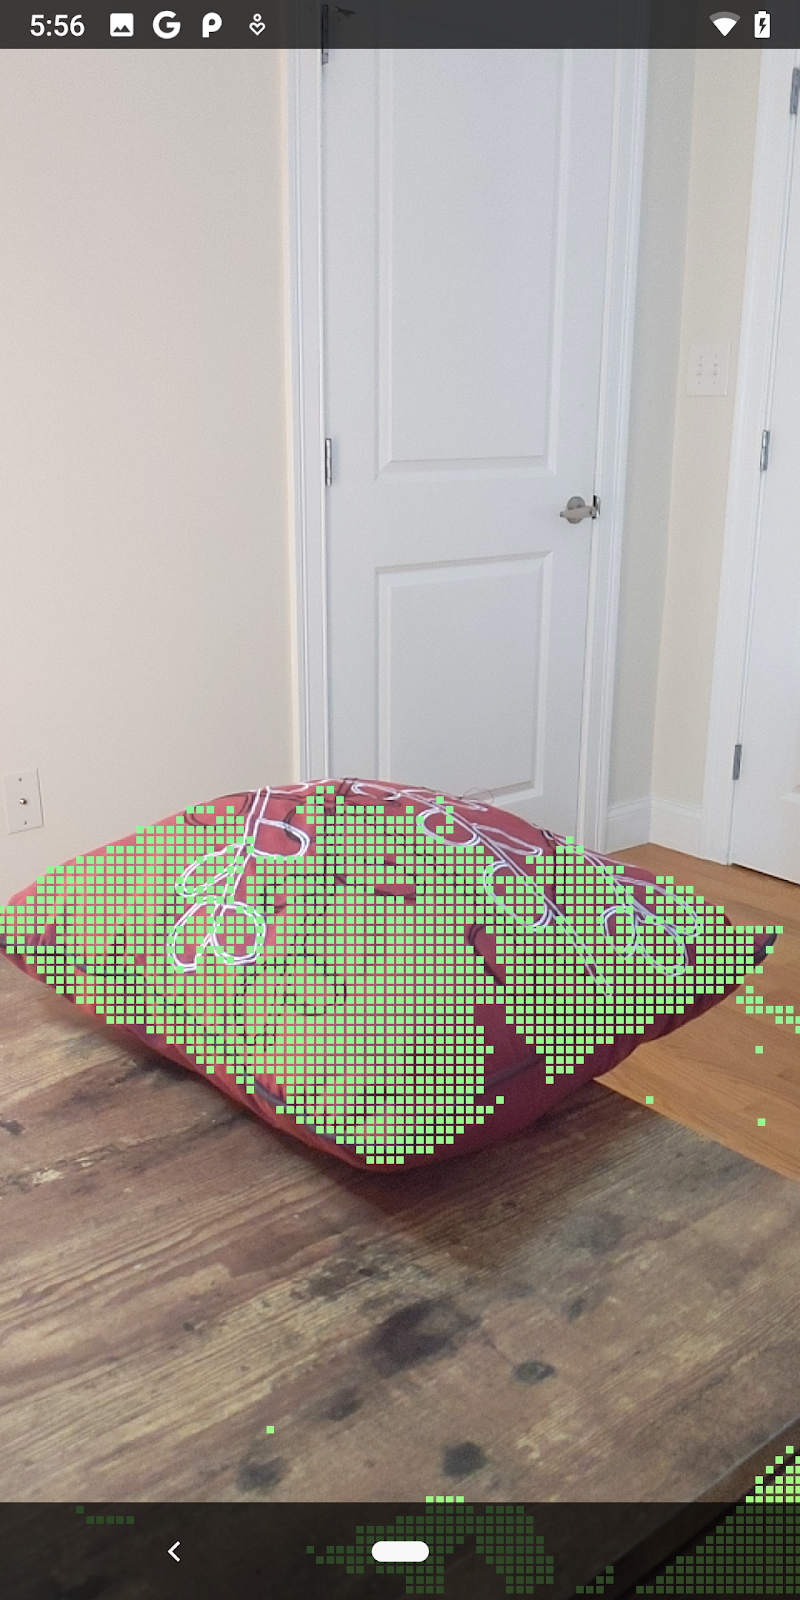
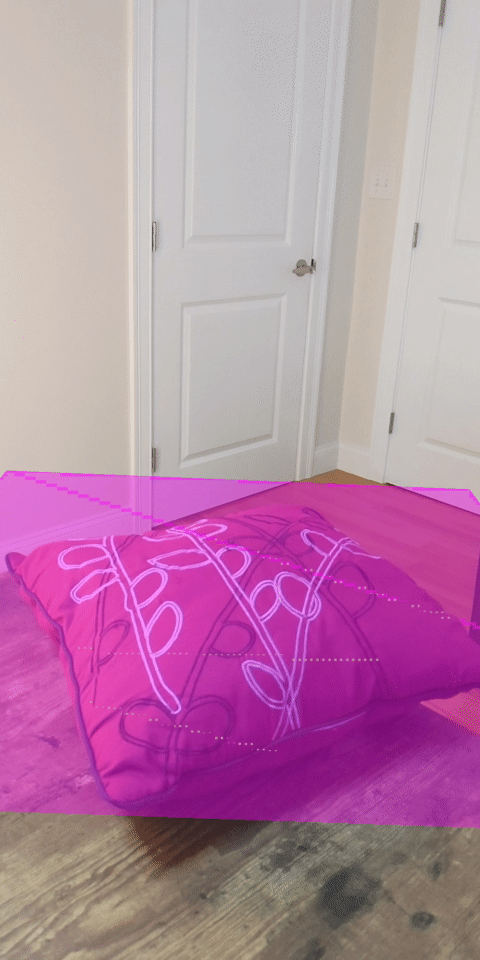
| การกรองระยะทางจำกัดพอยต์คลาวด์ให้อยู่ภายใน 1.5 เมตรจากกล้อง |
เปรียบเทียบจุดและระนาบ 3 มิติ
คุณสามารถเปรียบเทียบจุดและระนาบ 3 มิติของรูปทรงเรขาคณิต และใช้เพื่อกรองซึ่งกันและกันได้ เช่น การนำจุดที่อยู่ใกล้กับระนาบ AR ที่สังเกตออก
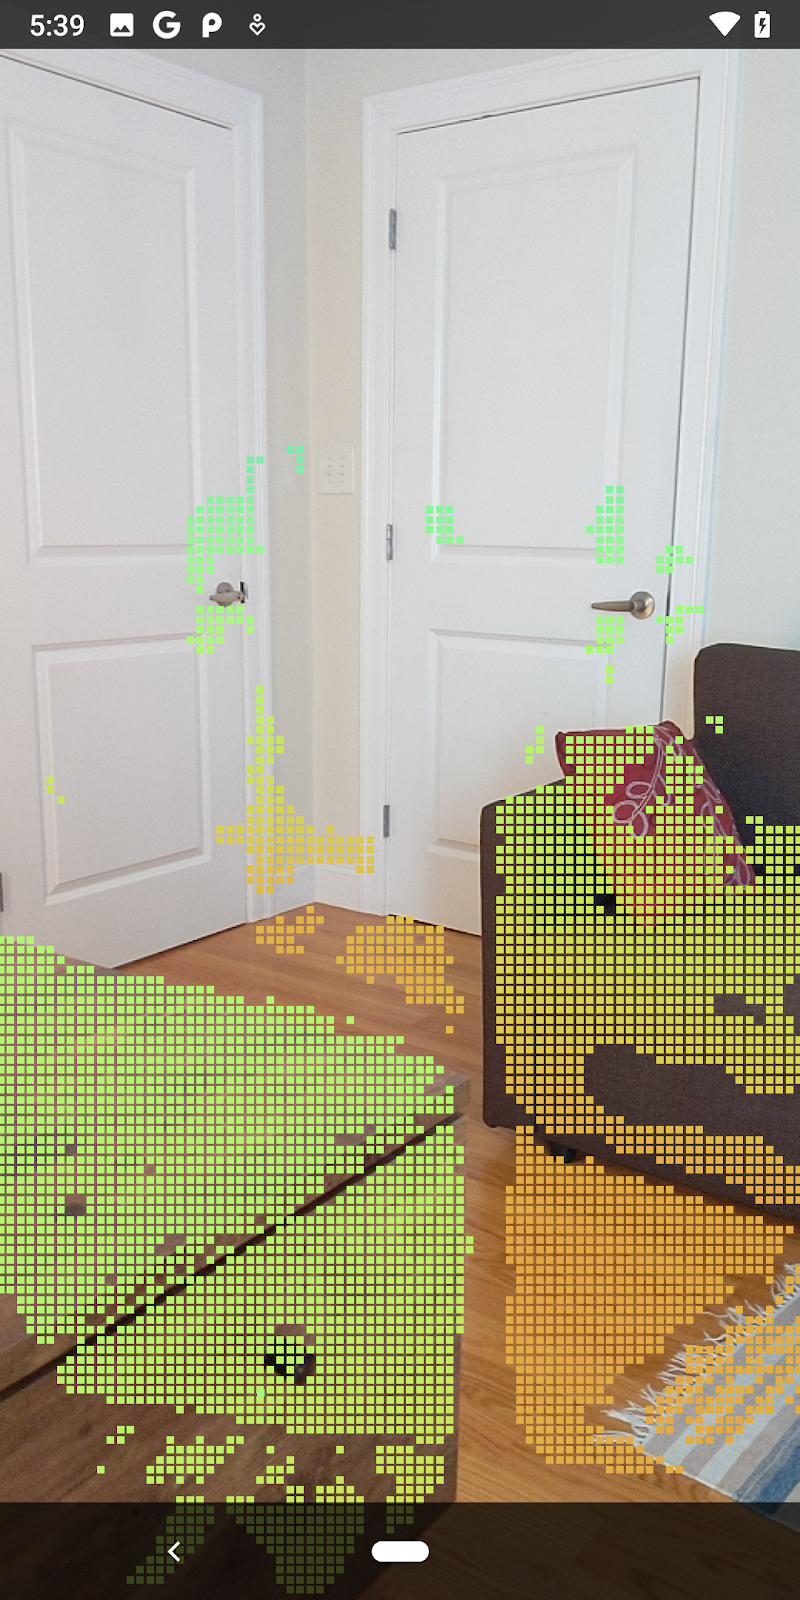
ขั้นตอนนี้จะเหลือเฉพาะจุด "ที่ไม่ใช่ระนาบ" ซึ่งมักจะแสดงพื้นผิวบนออบเจ็กต์ในสภาพแวดล้อม เพิ่มเมธอด filterUsingPlanes() ไปที่ด้านล่างของคลาส DepthData วิธีนี้จะวนซ้ำผ่านจุดที่มีอยู่ ตรวจสอบแต่ละจุดกับแต่ละระนาบ และทำให้จุดที่อยู่ใกล้กับระนาบ AR มากเกินไปไม่ถูกต้อง ซึ่งจะเหลือพื้นที่ที่ไม่ใช่ระนาบที่ไฮไลต์ออบเจ็กต์ในฉาก
src/main/java/com/google/ar/core/codelab/rawdepth/DepthData.java
    public static void filterUsingPlanes(FloatBuffer points, Collection<Plane> allPlanes) {
        float[] planeNormal = new float[3];

        // Allocate the output buffer.
        int numPoints = points.remaining() / DepthData.FLOATS_PER_POINT;

        // Check each plane against each point.
        for (Plane plane : allPlanes) {
            if (plane.getTrackingState() != TrackingState.TRACKING || plane.getSubsumedBy() != null) {
                continue;
            }

            // Compute the normal vector of the plane.
            Pose planePose = plane.getCenterPose();
            planePose.getTransformedAxis(1, 1.0f, planeNormal, 0);

            // Filter points that are too close to the plane.
            for (int index = 0; index < numPoints; ++index) {
                // Retrieves the next point.
                final float x = points.get(FLOATS_PER_POINT * index);
                final float y = points.get(FLOATS_PER_POINT * index + 1);
                final float z = points.get(FLOATS_PER_POINT * index + 2);

                // Transform point to be in world coordinates, to match plane info.
                float distance = (x - planePose.tx()) * planeNormal[0]
                        + (y - planePose.ty()) * planeNormal[1]
                        + (z - planePose.tz()) * planeNormal[2];
                // Controls the size of objects detected.
                // Smaller values mean smaller objects will be kept.
                // Larger values will only allow detection of larger objects, but also helps reduce noise.
                if (Math.abs(distance) > 0.03) {
                    continue;  // Keep this point, since it's far enough away from the plane.
                }

                // Invalidate points that are too close to planar surfaces.
                points.put(FLOATS_PER_POINT * index, 0);
                points.put(FLOATS_PER_POINT * index + 1, 0);
                points.put(FLOATS_PER_POINT * index + 2, 0);
                points.put(FLOATS_PER_POINT * index + 3, 0);
            }
        }
    }
คุณเพิ่มวิธีการนี้ไปยังRawDepthCodelabActivityในวิธีการonDrawFrameได้
//  ********** New code to add ************
  // Filter the depth data.
  DepthData.filterUsingPlanes(points, session.getAllTrackables(Plane.class));
//  ********** End new code to add *******

  // Visualize depth points.
  depthRenderer.update(points);
  depthRenderer.draw(camera);
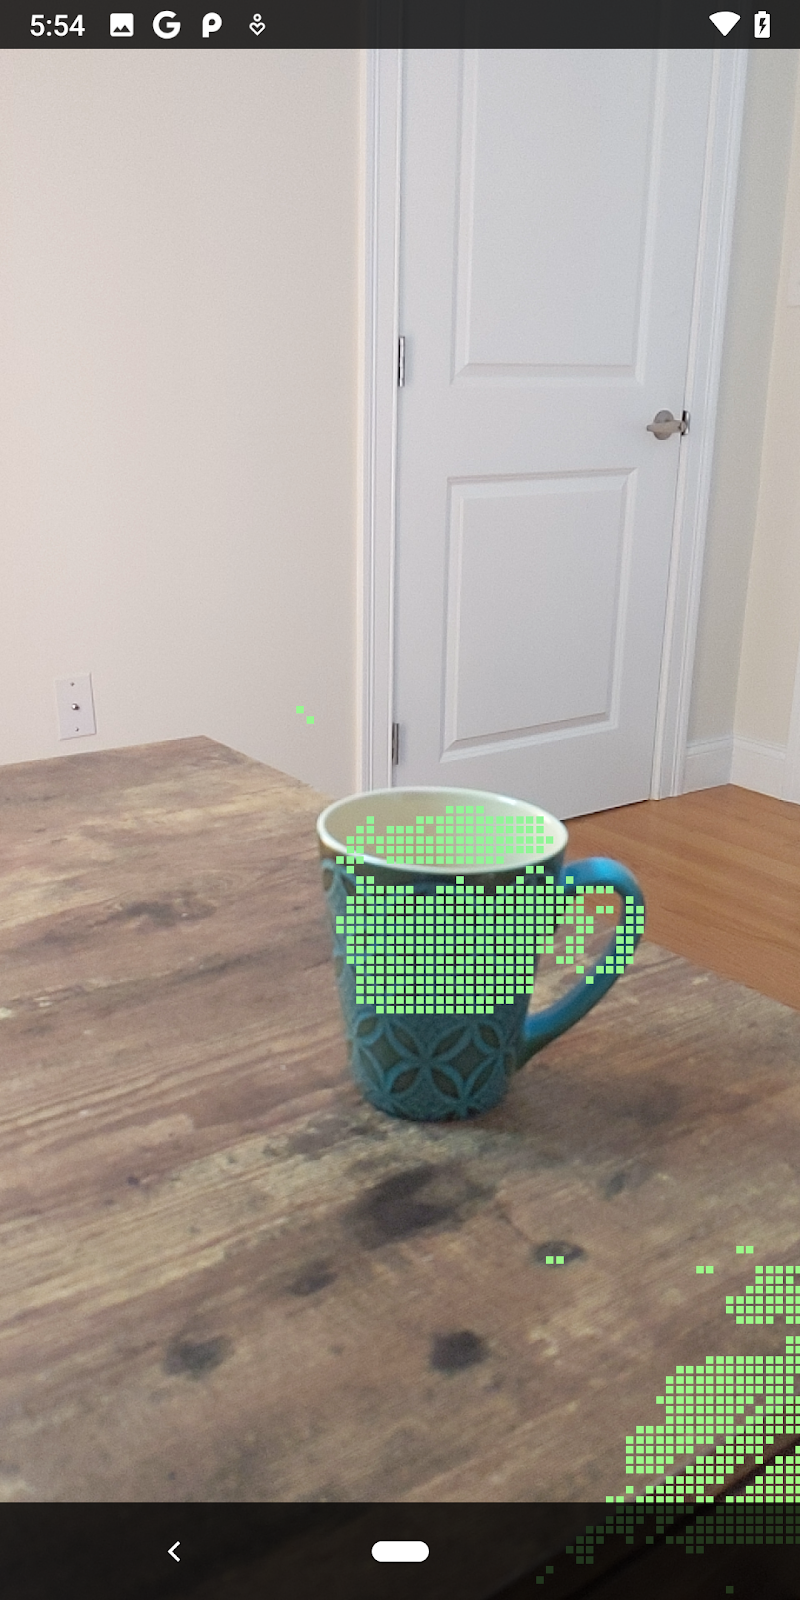
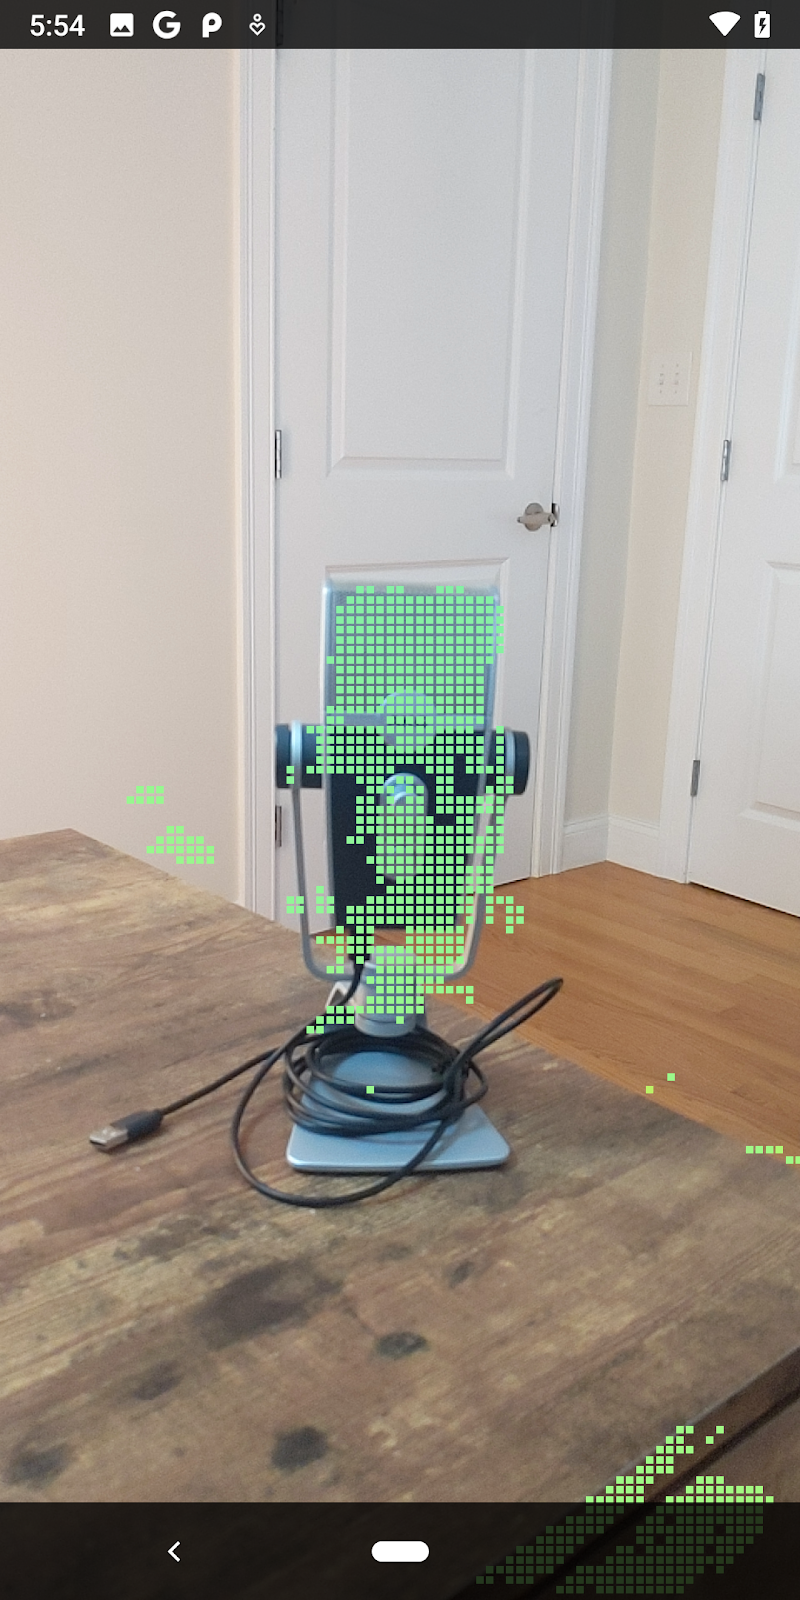
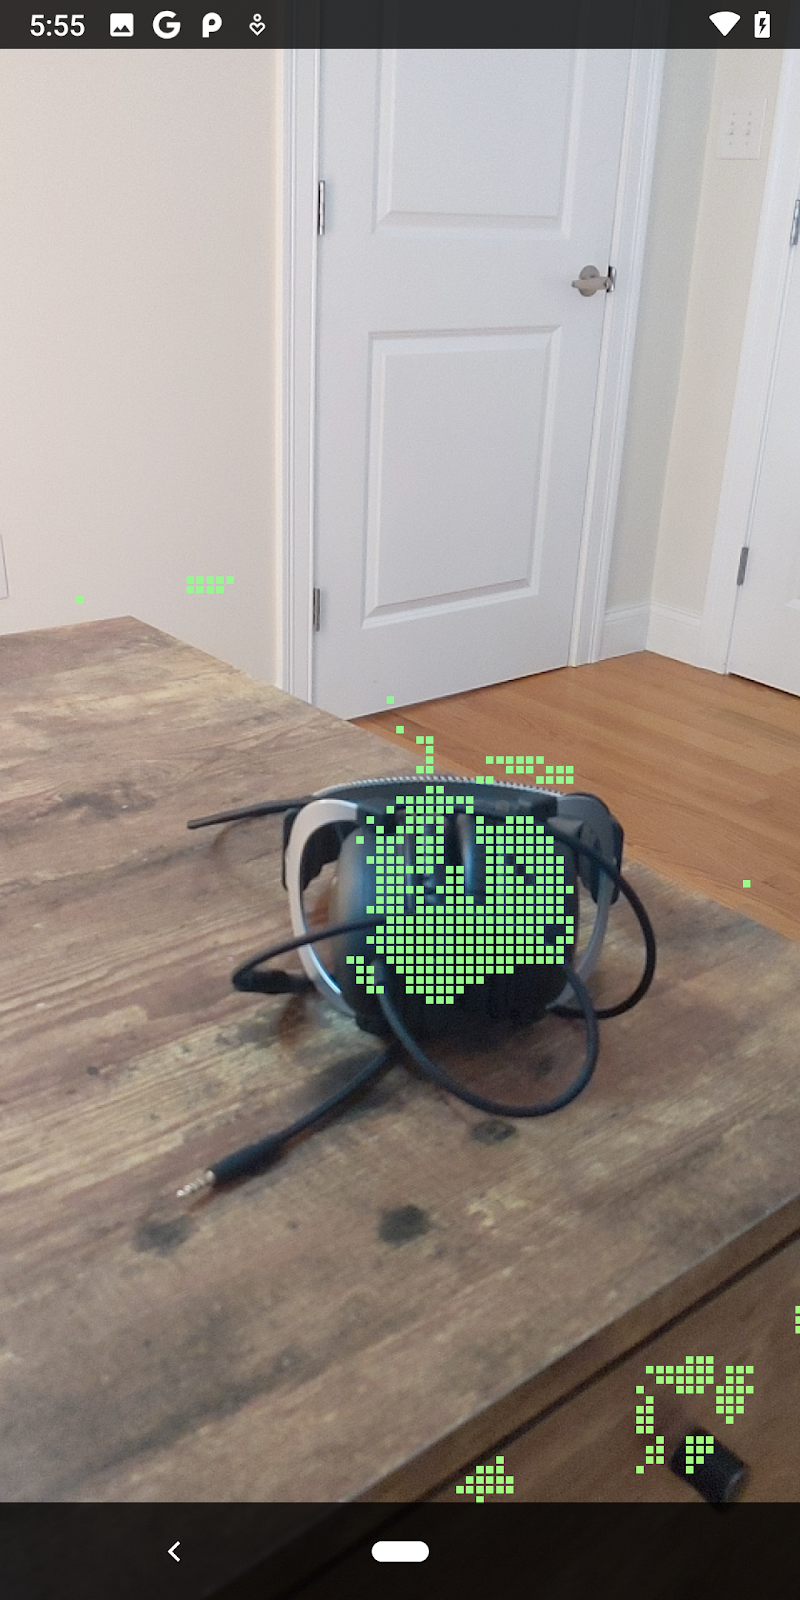
การเรียกใช้ Codelab ในตอนนี้จะทำให้ระบบแสดงจุดย่อย จุดเหล่านี้แสดงถึงออบเจ็กต์ในฉาก โดยไม่สนใจพื้นผิวเรียบที่ออบเจ็กต์วางอยู่ คุณสามารถใช้ข้อมูลนี้เพื่อประมาณขนาดและตำแหน่งของออบเจ็กต์ได้โดยการจัดกลุ่มจุดต่างๆ เข้าด้วยกัน
|
|
|
|
ถ้วยชา | ไมโครโฟน | หูฟัง | หมอน |
จุดคลัสเตอร์
โค้ดแล็บนี้มีอัลกอริทึมการจัดกลุ่ม Point Cloud ที่เรียบง่ายมาก อัปเดตโค้ดแล็บเพื่อจัดกลุ่ม Point Cloud ที่ดึงข้อมูลมาเป็นคลัสเตอร์ที่กำหนดโดยกล่องขอบเขตที่สอดคล้องกับแกน
src/main/java/com/google/ar/core/codelab/rawdepth/RawDepthCodelabActivity.java
import com.google.ar.core.codelab.common.helpers.AABB;
import com.google.ar.core.codelab.common.helpers.PointClusteringHelper;
import com.google.ar.core.codelab.common.rendering.BoxRenderer;
import java.util.List;
เพิ่ม BoxRenderer ไปยังคลาสนี้ที่ด้านบนของไฟล์พร้อมกับตัวแสดงผลอื่นๆ
private final BoxRenderer boxRenderer = new BoxRenderer();
และภายในonSurfaceCreated()เมธอด ให้เพิ่มโค้ดต่อไปนี้ข้างๆ ตัวแสดงผลอื่นๆ
boxRenderer.createOnGlThread(/*context=*/this);
สุดท้าย ให้เพิ่มบรรทัดต่อไปนี้ลงใน onDrawFrame() ภายใน RawDepthCodelabActivity เพื่อจัดกลุ่ม Point Cloud ที่ดึงข้อมูลมาเป็นคลัสเตอร์ และแสดงผลลัพธ์เป็นกล่องขอบเขตที่สอดคล้องกับแกน
      // Visualize depth points.
      depthRenderer.update(points);
      depthRenderer.draw(camera);

// ************ New code to add ***************

      // Draw boxes around clusters of points.
      PointClusteringHelper clusteringHelper = new PointClusteringHelper(points);
      List<AABB> clusters = clusteringHelper.findClusters();
      for (AABB aabb : clusters) {
        boxRenderer.draw(aabb, camera);
      }

// ************ End new code to add ***************
|
|
|
|
ถ้วยชา | ไมโครโฟน | หูฟัง | หมอน |
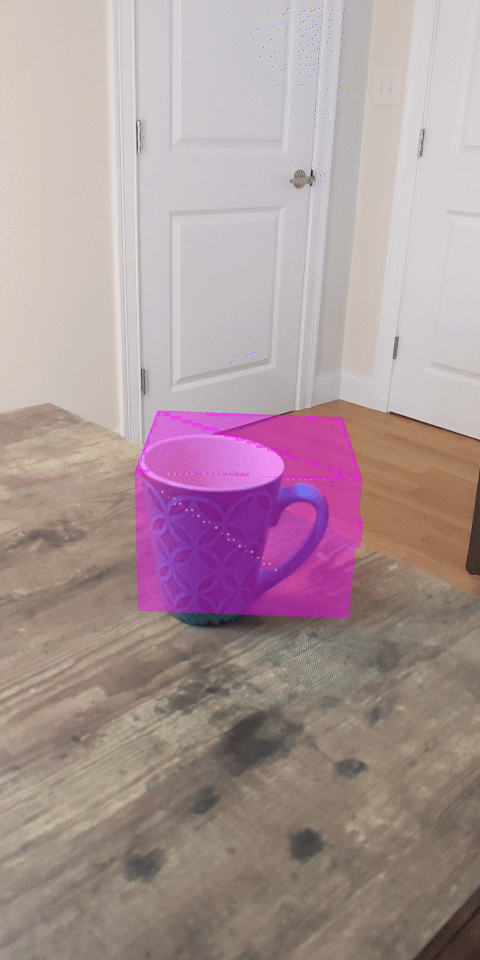
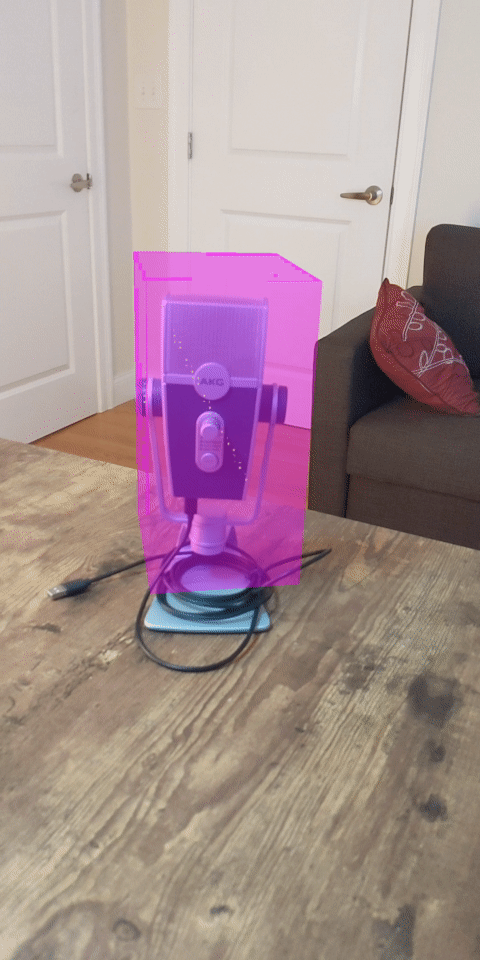

ตอนนี้คุณสามารถดึงข้อมูลความลึกดิบผ่านเซสชัน ARCore แปลงข้อมูลความลึกเป็นพอยต์คลาวด์ 3 มิติ และดำเนินการกรองและการแสดงผลพื้นฐานในจุดเหล่านั้นได้แล้ว
8. สร้าง-เรียกใช้-ทดสอบ
สร้าง เรียกใช้ และทดสอบแอป
สร้างและเรียกใช้แอป
ทำตามขั้นตอนต่อไปนี้เพื่อสร้างและเรียกใช้แอป
- เสียบอุปกรณ์ที่รองรับ ARCore ผ่าน USB
- เรียกใช้โปรเจ็กต์ด้วยปุ่ม ► ในแถบเมนู
- รอให้แอปสร้างและติดตั้งใช้งานในอุปกรณ์
ครั้งแรกที่คุณพยายามติดตั้งใช้งานแอปในอุปกรณ์ คุณจะต้อง
อนุญาตให้แก้ไขข้อบกพร่อง USB
ในอุปกรณ์ เลือก "ตกลง" เพื่อดำเนินการต่อ
เมื่อเรียกใช้แอปในอุปกรณ์เป็นครั้งแรก ระบบจะถามว่าแอปมีสิทธิ์ใช้กล้องของอุปกรณ์หรือไม่ คุณต้องอนุญาตการเข้าถึงเพื่อใช้ฟังก์ชัน AR ต่อไป
การทดสอบแอปของคุณ
เมื่อเรียกใช้แอป คุณจะทดสอบลักษณะการทำงานพื้นฐานของแอปได้โดยถืออุปกรณ์ เคลื่อนที่ไปรอบๆ พื้นที่ และสแกนพื้นที่อย่างช้าๆ พยายามรวบรวมข้อมูลอย่างน้อย 10 วินาทีและสแกนพื้นที่จากหลายทิศทางก่อนไปยังขั้นตอนถัดไป
9. ขอแสดงความยินดี
ขอแสดงความยินดี คุณสร้างและเรียกใช้แอป Augmented Reality แอปแรกที่อิงตามความลึกโดยใช้ Raw Depth API ของ ARCore จาก Google ได้สำเร็จแล้ว เราตื่นเต้นที่จะได้เห็นผลงานของคุณ
10. การแก้ปัญหา
การตั้งค่าอุปกรณ์ Android สำหรับการพัฒนา
- เชื่อมต่ออุปกรณ์กับคอมพิวเตอร์สำหรับการพัฒนาซอฟต์แวร์ด้วยสาย USB หากพัฒนาโดยใช้ Windows คุณอาจต้องติดตั้งไดรเวอร์ USB ที่เหมาะสมสำหรับอุปกรณ์
- ทำตามขั้นตอนต่อไปนี้เพื่อเปิดใช้การแก้ไขข้อบกพร่อง USB ในหน้าต่างตัวเลือกสำหรับนักพัฒนาแอป
- เปิดแอปการตั้งค่า
- หากอุปกรณ์ใช้ Android v8.0 ขึ้นไป ให้เลือกระบบ
- เลื่อนไปด้านล่างแล้วเลือกเกี่ยวกับโทรศัพท์
- เลื่อนไปด้านล่างสุด แล้วแตะหมายเลขบิลด์ 7 ครั้ง
- กลับไปที่หน้าจอก่อนหน้า เลื่อนไปที่ด้านล่าง แล้วแตะตัวเลือกสำหรับนักพัฒนาแอป
- ในหน้าต่างตัวเลือกสำหรับนักพัฒนาแอป ให้เลื่อนลงเพื่อค้นหาและเปิดใช้การแก้ไขข้อบกพร่อง USB
ดูข้อมูลเพิ่มเติมโดยละเอียดเกี่ยวกับกระบวนการนี้ได้ในเว็บไซต์นักพัฒนาแอป Android ของ Google
การสร้างล้มเหลวที่เกี่ยวข้องกับใบอนุญาต
หากพบว่าการสร้างล้มเหลวเนื่องจากใบอนุญาต (Failed to install the following Android SDK packages as some licences have not been accepted) คุณสามารถใช้คำสั่งต่อไปนี้เพื่อตรวจสอบและยอมรับใบอนุญาตเหล่านี้
cd <path to Android SDK>
tools/bin/sdkmanager --licenses