
1. Overview
In this lab, you will:
- Create a managed dataset
- Import data from a Google Cloud Storage Bucket
- Update the column metadata for appropriate use with AutoML
- Train a model using options such as a budget and optimization objective
- Make online batch predictions
2. Review Data
This lab uses data from the Iowa Liquor Sales dataset from BigQuery Public Datasets. This dataset consists of wholesale liquor purchases in the US state of Iowa since 2012.
You can look at the original raw data by selecting View Dataset. To access the table, navigate in the left navigation bar to the bigquery-public-datasets project, then the iowa_liquor_sales dataset, and then the sales table. You can select Preview to see a selection of rows from the dataset.
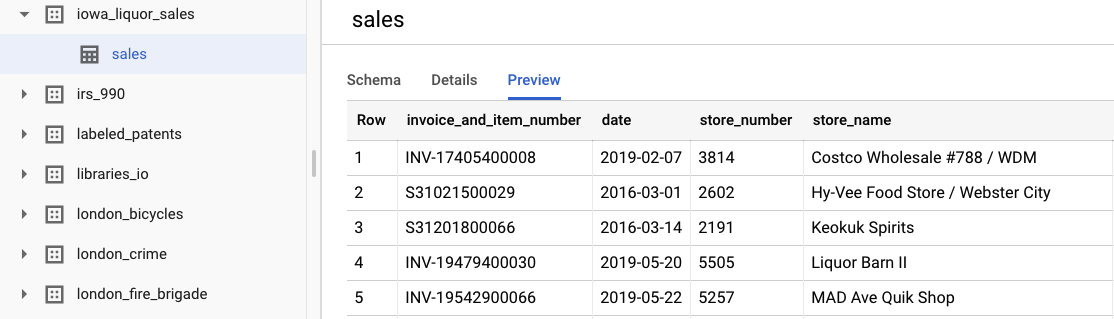
For the purposes of this lab, we've already done some basic data pre-processing to group the purchases by day. We'll use a CSV extract from the BigQuery table. The columns in the CSV file are:
- ds: The date
- y: The sum of all purchases that day in dollars
- holiday: A boolean whether the date is a US holiday
- id: A time-series identifier (to support multiple time-series, e.g. by store or by product). In this case, we are simply going to forecast overall purchases in one time-series, so id is set to 0 for each row.
3. Import Data
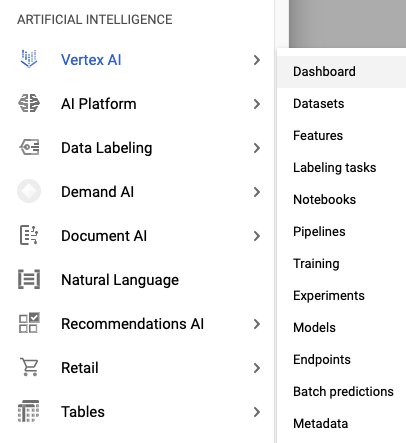
Step 1: Navigate to Vertex AI Datasets
Access Datasets in the Vertex AI menu from the left navigation bar of the Cloud Console.
Step 2: Create Dataset
Create a new Dataset, selecting Tabular Data, and then the Forecasting problem type. Choose the name iowa_daily or something else you prefer.

Step 3: Import Data
The next step is to import data into the dataset. Choose the option to Select a CSV from Cloud Storage. Then, navigate to the CSV file in the AutoML Demo Alpha bucket and paste in automl-demo-240614-lcm/iowa_liquor/iowa_daily.csv.
4. Train Model
Step 1: Configure Model Features
After a few minutes, AutoML will notify you that the import has been completed. At that point, you can configure the model features.
- Select the Time series identifier column to be id. We only have one time-series in our dataset, so this is a formality.
- Select the Time column to be ds.
Then, select Generate Statistics. After the process has completed, you will see the Missing % and Distinct values statistics. This process might take a few minutes, so you can proceed if you'd like to the next step.
Step 2: Train the Model
Select Train the Model to begin the training process. Ensure that AutoML is selected, and Continue.

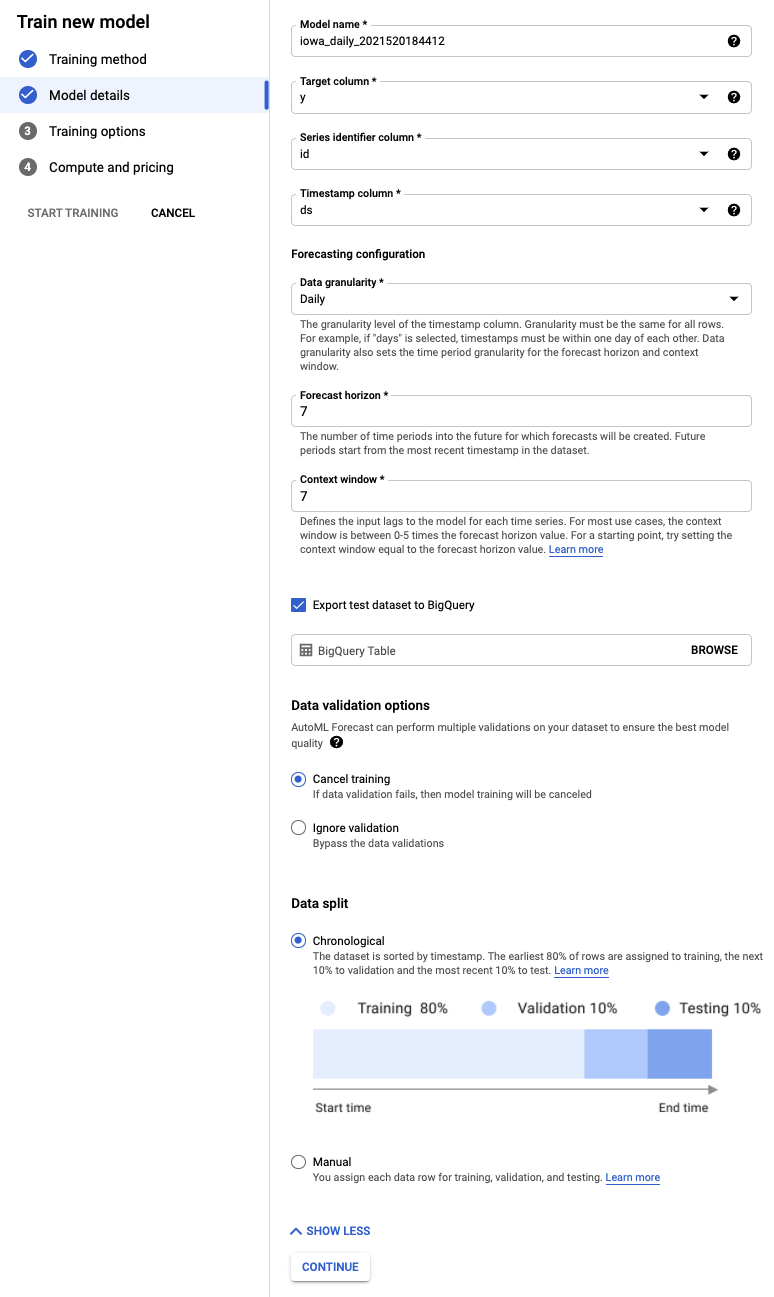
Step 3: Define the Model
- Select the Target column to be y. That's the value we are predicting.
- If not already set earlier, set the Series identifier column to id and the Timestamp column to ds.
- Set the Data Granularity to Days and the Forecast horizon to 7. This field specifies the number of periods that the model can predict into the future.
- Set the Context window to 7 days. The model will use data from the previous 30 days to make a prediction. There are trade-offs between shorter and longer windows, and generally selecting a value between 1-10x the forecasting horizon is recommended.
- Check the box to Export test dataset to BigQuery. You can leave it blank, and it will automatically create a dataset and table in your project (or specify a location of your choice).
- Select Continue.
Step 4: Set Training Options
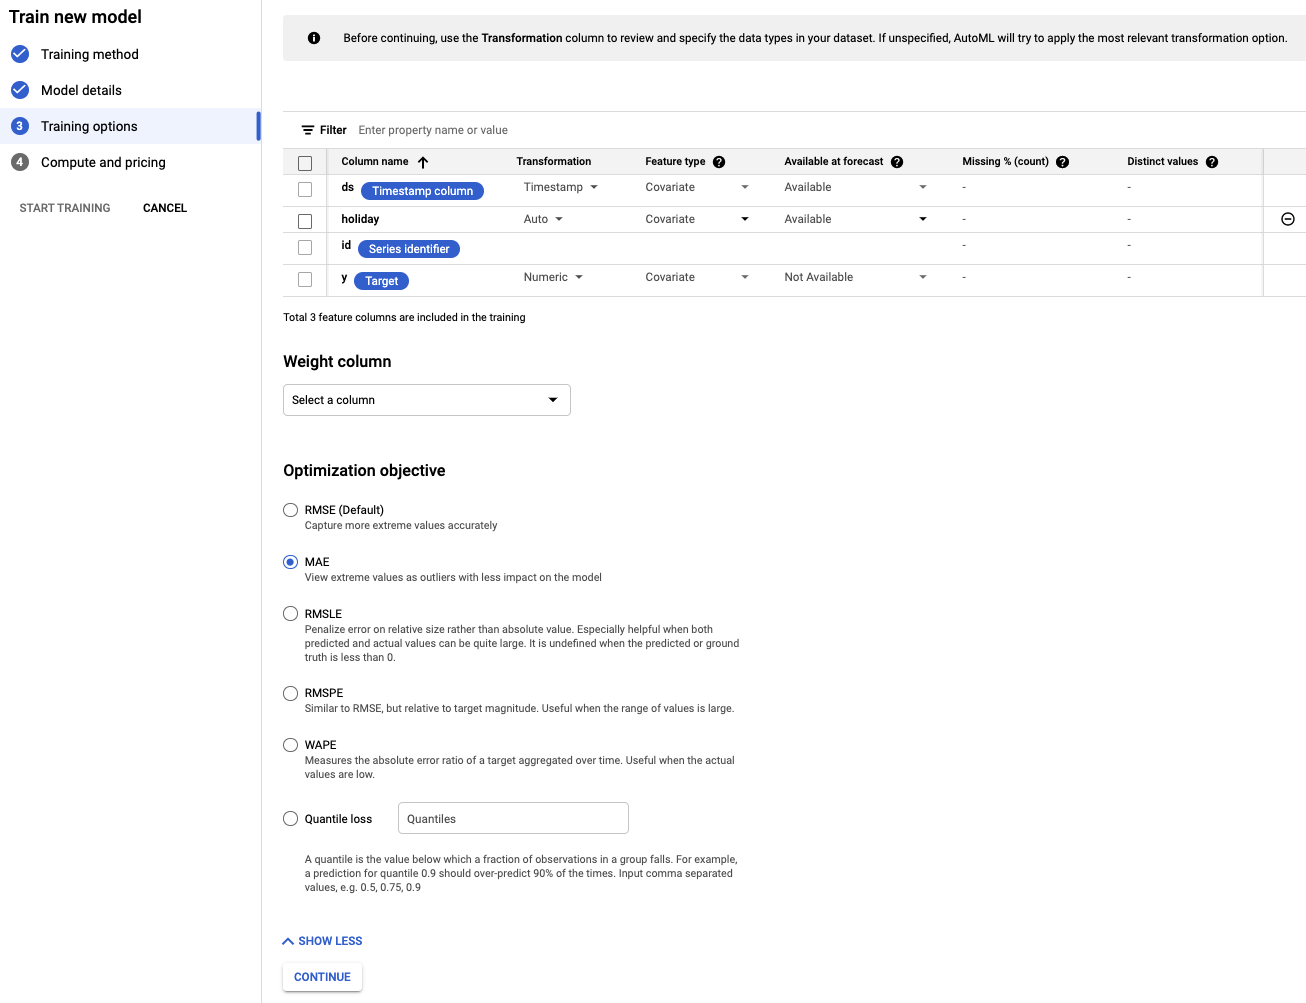
In this step, you can specify more details about how you'd like to train the model.
- Set the holiday column to be Available at prediction, because we know whether a given date is a holiday in advance.
- Change the Optimization Objective to MAE. MAE, or mean average error, is more resilient to outliers relative to mean squared error. Because we are working with daily purchase data that can have wild fluctuations, MAE is an appropriate metric to use.
- Select Continue.
Step 5: Initiate Training
Set a budget of your choice. In this case, 1 node hour is sufficient to train the model. Then, begin the training process.
Step 6: Evaluate Model
The training process may take 1-2 hours to complete (including any additional setup time). You'll get an email when training completes. When it is ready, you can view the accuracy of the model you created.
5. Predict
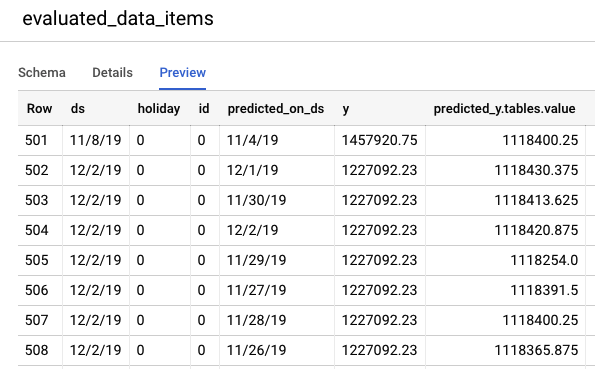
Step 1: Review predictions on test data
Navigate to the BigQuery console to view the predictions on test data. Inside of your project, a new dataset is automatically created with the naming scheme: export_evaluated_data_items + <model name> + <timestamp>. Inside of that dataset, you will find the evaluated_data_items table to review the predictions.
This table has a couple new columns:
- predicted_on_[date column]: The date that the prediction was made. For instance, if predicted_on_ds is 11/4 and ds is 11/8, we are predicting 4 days ahead.
- predicted_[target column].tables.value: The predicted value
Step 2: Perform batch predictions
Finally, you'll want to use your model to make predictions.
The input file contains empty values for the dates to be predicted, along with historical data:
ds | holiday | id | y |
5/15/20 | 0 | 0 | 1751315.43 |
5/16/20 | 0 | 0 | 0 |
5/17/20 | 0 | 0 | 0 |
5/18/20 | 0 | 0 | 1612066.43 |
5/19/20 | 0 | 0 | 1773885.17 |
5/20/20 | 0 | 0 | 1487270.92 |
5/21/20 | 0 | 0 | 1024051.76 |
5/22/20 | 0 | 0 | 1471736.31 |
5/23/20 | 0 | 0 | <empty> |
5/24/20 | 0 | 0 | <empty> |
5/25/20 | 1 | 0 | <empty> |
5/26/20 | 0 | 0 | <empty> |
5/27/20 | 0 | 0 | <empty> |
5/28/20 | 0 | 0 | <empty> |
5/29/20 | 0 | 0 | <empty> |
From the Batch Predictions item in the AI Platform (Unified) left navigation bar, you can create a new batch prediction.
An example input file is created for you here in a storage bucket: automl-demo-240614-lcm/iowa_liquor/iowa_daily_automl_predict.csv
You can provide this source file location. Then you can choose to either export your predictions to a cloud storage location as a CSV, or to BigQuery. For the purposes of this lab, select BigQuery and choose your Google Cloud project ID.
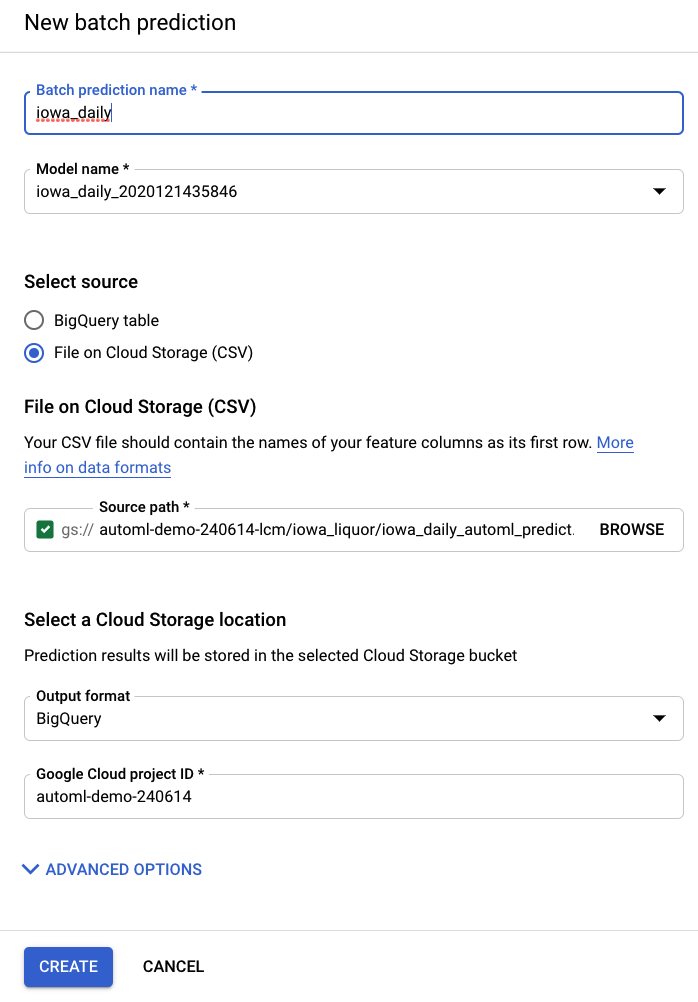
The batch prediction process will take several minutes. After it is complete, you can click on the batch prediction job to view the details, including the Export Location. In BigQuery, you will need to navigate to the project / dataset / table in the left navigation bar to access the predictions.
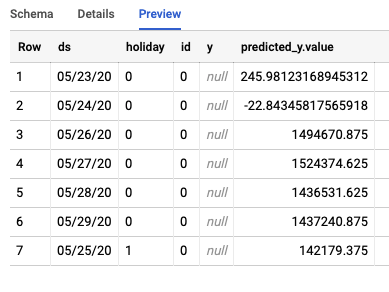
The job will create two different tables in BigQuery. One will contain any rows with errors, and the other will contain the predictions. Here's an example of the output from the Predictions table:
Step 3: Conclusion
Congratulations, you have successfully built and trained a forecasting model with AutoML. In this lab, we've covered importing data, model building, and making predictions.
You're ready to build your own forecasting model!