1. Overview
Actions on Google is a developer platform that lets you create software to extend the functionality of Google Assistant, Google's virtual personal assistant, across more than 1 billion devices, including smart speakers, phones, cars, TVs, headphones, and more. Users engage Google Assistant in conversation to get things done, like buying groceries or booking a ride; for a complete list of what's possible now, see the Actions directory. As a developer, you can use Actions on Google to easily create and manage delightful and useful conversational experiences between users and your own third-party service.
This codelab is an advanced module intended for readers who already have some experience building Actions for Google Assistant. If you don't have any prior development experience with Actions on Google, familiarize yourself with the platform by following the introductory codelabs ( Level 1 and Level 2). These modules will guide you through a series of features that can help you expand your Action's functionality and grow your audience.
In this codelab, you use Interactive Canvas, a framework built on Google Assistant, to add a full-screen game to a Conversational Action. The game is an interactive web app that Assistant sends as a response to the user in conversation. The user can then play the game through either voice or text input on smart displays and Android mobile devices.
Instead of building an entire game yourself, you deploy a partially prebuilt game called Snow Pal and add the game's logic as you progress through the codelab. Snow Pal is a variation of the traditional Hangman game; the game presents you with a number of blank spaces representing a word, and you guess letters that you think may be in the word. With each incorrect guess, your Snow Pal melts a bit more. You win the game if you can figure out the word before your Snow Pal melts completely.
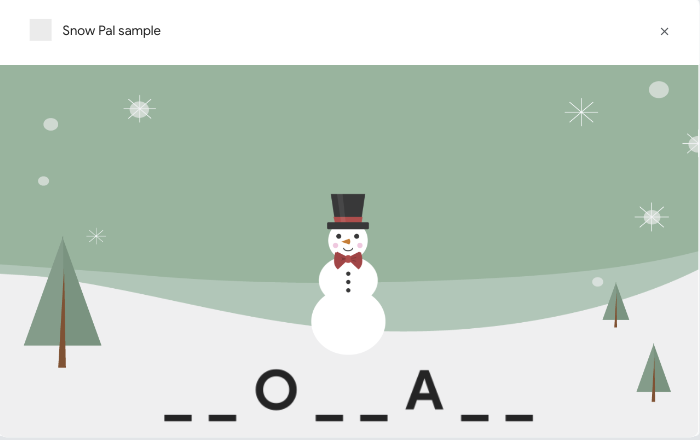
Figure 1. A partially completed Snow Pal game
What you'll build
In this codelab, you build an Action that uses Interactive Canvas. Your Action will have the following features:
- A full-screen word game users can play through voice
- A button users can press to start the game
- A button users can press to play the game again
When you've finished this codelab, your completed Action will have the following conversational flow:
Assistant: Welcome to Snow Pal! Would you like to start playing the game?
User: Yes.
Assistant: Try guessing a letter in the word or guessing the word.
User: I guess the letter E.
Assistant: Let's see if your guess is there...E is right. Right on! Good guess.
The user continues guessing letters, or guessing the unknown word itself, until the game ends.
What you'll learn
- How to build and deploy an Interactive Canvas Action
- How to update the word game based on a user's voice and touch input
- How to pass data to the web app using different methods
- How to debug your Interactive Canvas Action
What you'll need
The prerequisites for this codelab include the following:
- A web browser, such as Google Chrome
- An IDE or text editor of your choice
- Node.js, npm, and git installed on your machine
Familiarity with JavaScript (ES6) is strongly recommended to help you understand the code used in this codelab.
Optional: Get the full sample code
In this codelab, you build the sample step-by-step from an incomplete version. If you prefer, you can also get the completed sample from the GitHub repository.
2. Interactive Canvas introduction
Interactive Canvas is a framework built on top of Google Assistant that allows you to add full-screen visuals and animations to your Conversational Action.
An Action that uses Interactive Canvas works similarly to a regular Conversational Action. However, an Interactive Canvas Action has the additional capability to send a response to the device that opens a full-screen web app.
The user provides input to the web app through either voice or touch until the conversation is over.
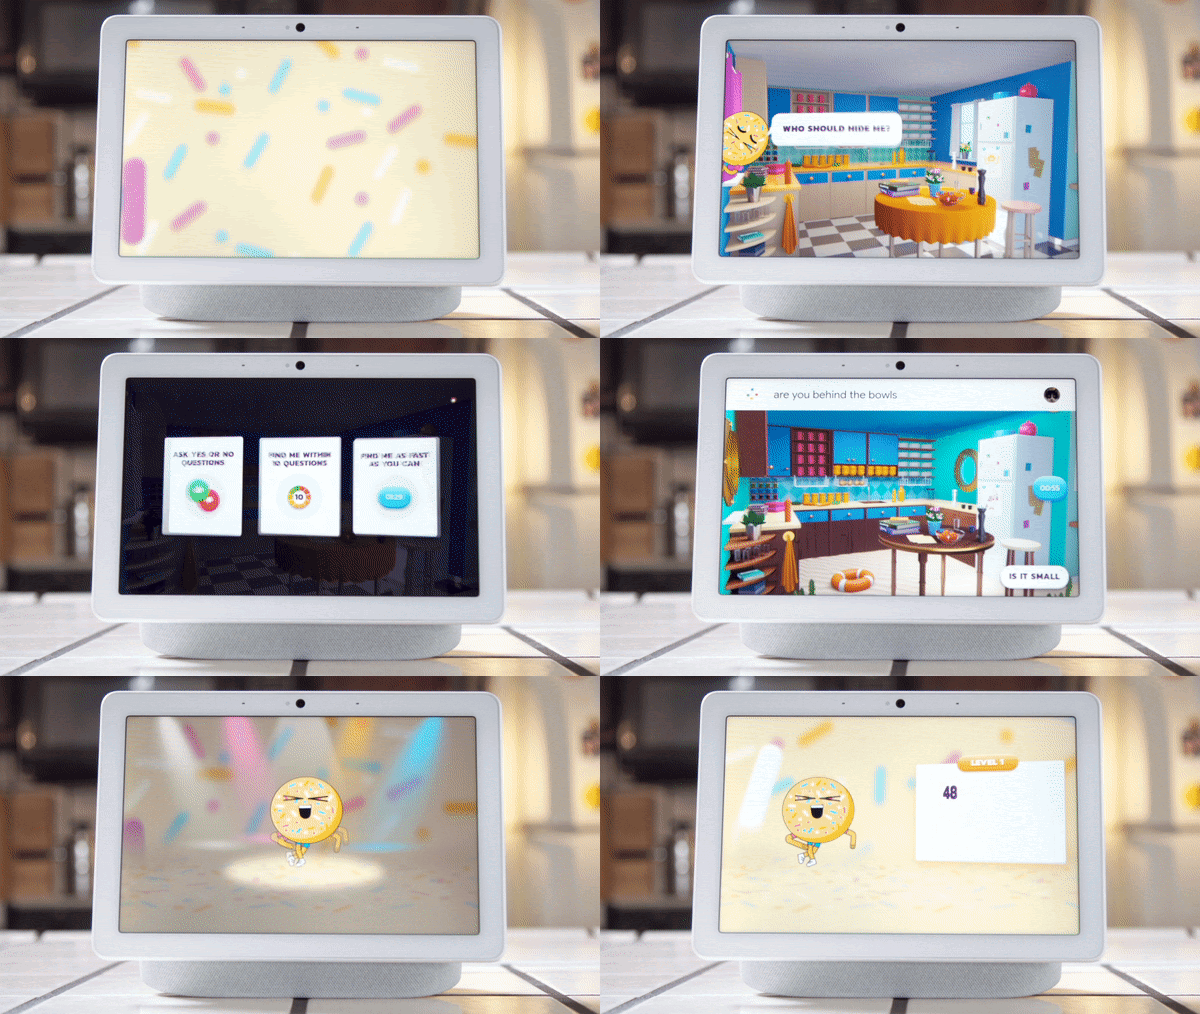
Figure 2. An Action built with Interactive Canvas.
In this codelab, your project is organized into the following three main parts:
- Web app: The web app files contain the code for your web app's visuals and animations, as well as logic to update the web app based on a user's input.
- Conversational Action: The Conversational Action contains your conversation logic, which recognizes, processes, and responds to the user's input.
- Webhook: The webhook handles the logic of the game. For this codelab, you can think of the webhook as your game server.
For each section of this codelab, you modify the web app, Conversational Action, and webhook to add functionality to your Interactive Canvas Action.
At a high level, the Conversational Action, webhook, and web app in the Snow Pal Action work in the following way:
- The Conversational Action prompts the user to guess a letter in the word or guess the whole word.
- The user says "I guess the letter i" to the Snow Pal web app on a smart display.
- The user's input is routed to your Conversational Action, which is defined in your Actions Builder and/or Actions SDK project.
- The Conversational Action processes the user's input and, depending on what the input is, either triggers logic in the webhook that updates the web app or sends metadata to update the web app directly.
- The web app updates to show where the letter appears in the word, and the user is asked to guess again.
You'll learn more about how Interactive Canvas works in the Understand the Interactive Canvas infrastructure section. Now that you know the basics, you can begin setting up your environment for this codelab.
3. Set up
Check your Google permission settings
To test the Action that you build for this codelab, you need to enable the necessary permissions so the Actions console simulator can access your Action. To enable permissions, follow these steps:
- Go to Activity controls.
- If necessary, sign in with your Google Account.
- Enable the following permissions:
- Web & App Activity
- Under Web & App Activity, select the Include Chrome history and activity from sites, apps, and devices that use Google services checkbox.
Install the gactions command-line interface
In this codelab, you use the gactions command-line interface (CLI) tool to synchronize your Actions project between the Actions console and your local file system.
To install the gactions CLI, follow the instructions in the Install the gactions command-line tool section.
Install the Firebase command-line interface
The Firebase command-line interface (CLI) allows you to deploy your Actions project to Cloud Functions and host your web app.
This codelab uses npm to install the Firebase CLI. Make sure to install npm, which typically comes with Node.js.
- To install or upgrade the CLI, open a terminal and run the following
npmcommand:
npm install -g firebase-tools
- To verify that the CLI has been installed correctly, run the following command:
firebase --version
Make sure the version of the Firebase CLI is 8 or higher so that it has all the latest features required for Cloud Functions. If it's not, run npm install -g firebase-tools to upgrade.
- To log into Firebase, run the following command:
firebase login
When you log in to Firebase, make sure that you use the same Google Account that you used to create your Actions project.
Clone the repository
In this section, you clone the files you need for this codelab. To get these files, follow these steps:
- Open a terminal and change to a directory where you usually store coding projects. If you don't have one, change to your home directory.
- To clone this repository, run the following command in your terminal:
git clone https://github.com/actions-on-google/actions-builder-canvas-codelab-nodejs
Open the start/ directory. This repository contains the following important directories that you'll be working with:
public/: This directory contains the HTML, CSS, and JavaScript code for your web app.sdk/custom/: This directory contains the logic for your Conversational Action (scenes, intents, and types).sdk/webhooks/: This directory is your webhook and contains the game logic.
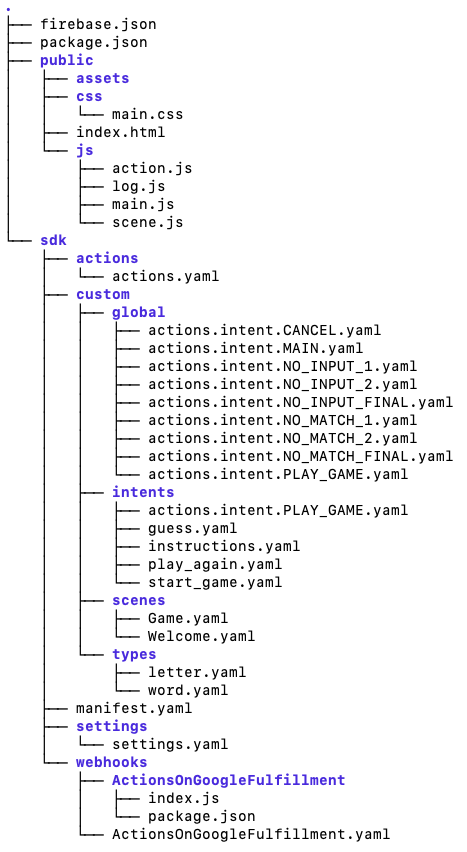
Figure 3. The structure of the start directory code.
4. Set up your Actions project
In this section, you create and configure your Actions project, push the code from the cloned repository to the Actions console with the gactions CLI, and deploy your web app and webhook.
Create an Actions project
Your Actions project is a container for your Action. To create your Actions project for this codelab, follow these steps:
- Open the Actions console.
- Click New project.
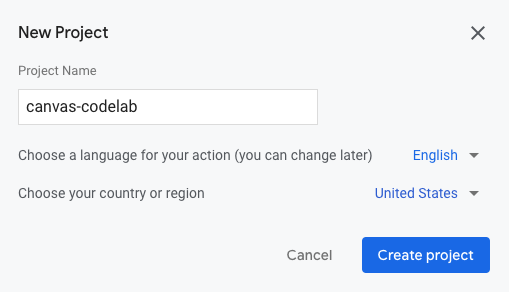
- Type in a Project name, such as
canvas-codelab. This name is for your internal reference. Later, you can set an external name for your project.
- Click Create project.
- In the What kind of Action do you want to build? screen, select the Game card.
- Click Next.
- Select the Blank project card.
- Click Start building.
Save the Project ID for your Action
The Project ID is a unique identifier for your Action. You'll need your Project ID for several steps in this codelab.
To retrieve your Project ID, follow these steps:
- In the Actions console, click the three vertical dots > Project settings.
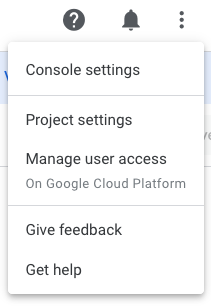
- Copy the Project ID.
Associate a billing account
To deploy your fulfillment later in this codelab using Cloud Functions, you must associate a billing account with your project in Google Cloud. If you already have a billing account, you can ignore the following steps.
To associate a billing account with your project, follow these steps:
- Go to the Google Cloud Platform billing page.
- Click Add billing account or Create Account.
- Fill out your payment information.
- Click Start my free trial or Submit and enable billing.
- Go to the Google Cloud billing page.
- Click the My Projects tab.
- Click the three dots > Change billing.
- In the drop-down menu, select the billing account you configured.
- Click Set account.
To avoid incurring charges, follow the steps in the Clean up your project section.
Deploy web app
In this section, you deploy your web app (the Snow Pal game) using the Firebase CLI. Once you deploy, you can retrieve the URL for the web app and see how the game looks in a browser.
To deploy your web app, follow these steps:
- In the terminal, navigate to the
start/directory. - Run the following command, replacing
{PROJECT_ID}with your project ID:
firebase deploy --project {PROJECT_ID} --only hosting
After a few minutes, you should see "Deploy complete!", which indicates that you've successfully deployed the Snow Pal web app to Firebase.
To view the Snow Pal game in a browser, follow these steps:
- Retrieve the hosting URL provided in the output of your terminal. The URL should be in the following form: https://<PROJECT_ID>.web.app
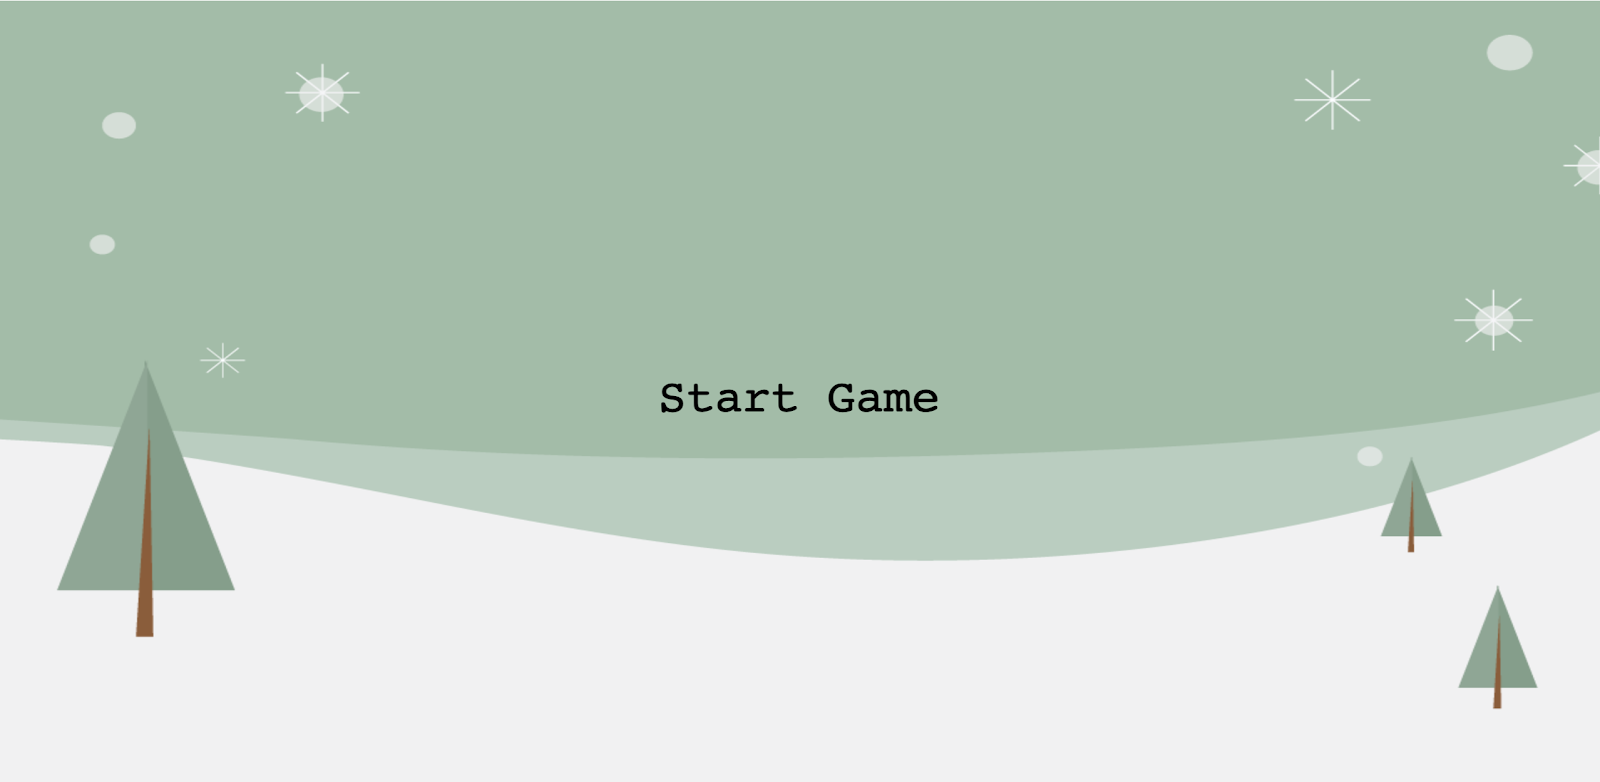
- Paste the URL in a browser. You should see the Snow Pal game starting screen with a Start Game button:
Add web app URL and project ID to Actions project
Next, add your web app URL and project ID to the actions.intent.MAIN.yaml file. Adding the web app URL lets the Conversational Action know which URL to send data to, while adding the project ID in settings.yaml allows you to push the downloaded files to the correct project in the Actions console.
To add your web app URL and project ID, follow these steps:
- Open the
start/sdk/custom/global/actions.intent.MAIN.yamlfile in your text editor. - In the URL field, replace the placeholder string with your web app URL.
- Open the
start/sdk/settings/settings.yamlfile in your text editor. - In the projectId field, replace the placeholder string with your project ID.
Push project to Actions console
To update the Actions console with your local project, you need to push your Actions project to the Actions console. To do so, follow these steps:
- Change to the
sdkdirectory:
cd sdk/
- To copy the configuration of your local file system to the Actions console, run the following command:
gactions push
Deploy webhook
When you ran gactions push, you imported the starting webhook code into the Actions console. For the rest of this codelab, you can edit your webhook code within the Actions console. At this point, you can deploy the webhook from the Actions console.
To deploy your webhook, follow these steps:
- In the Actions console, click Develop in the navigation bar.
- Click the Webhook tab in the navigation bar.
- Click Deploy Fulfillment.
It may take a few minutes for Cloud Functions to provision and deploy your fulfillment. You should see a Cloud Function deployment in progress... message. When the code deploys successfully, the message updates to Your Cloud Function deployment is up to date.
Test in the simulator
At this point, your Action is linked to the web app. You can use the Actions console simulator to ensure that the web app appears when you invoke your Action.
To test your Action, follow these steps:
- In the Actions console navigation bar, click Test.
- Type
Talk to Snow Pal samplein the Input field and pressEnter. - Type
Yesin the Input field and pressEnter. Alternatively, click Start game.
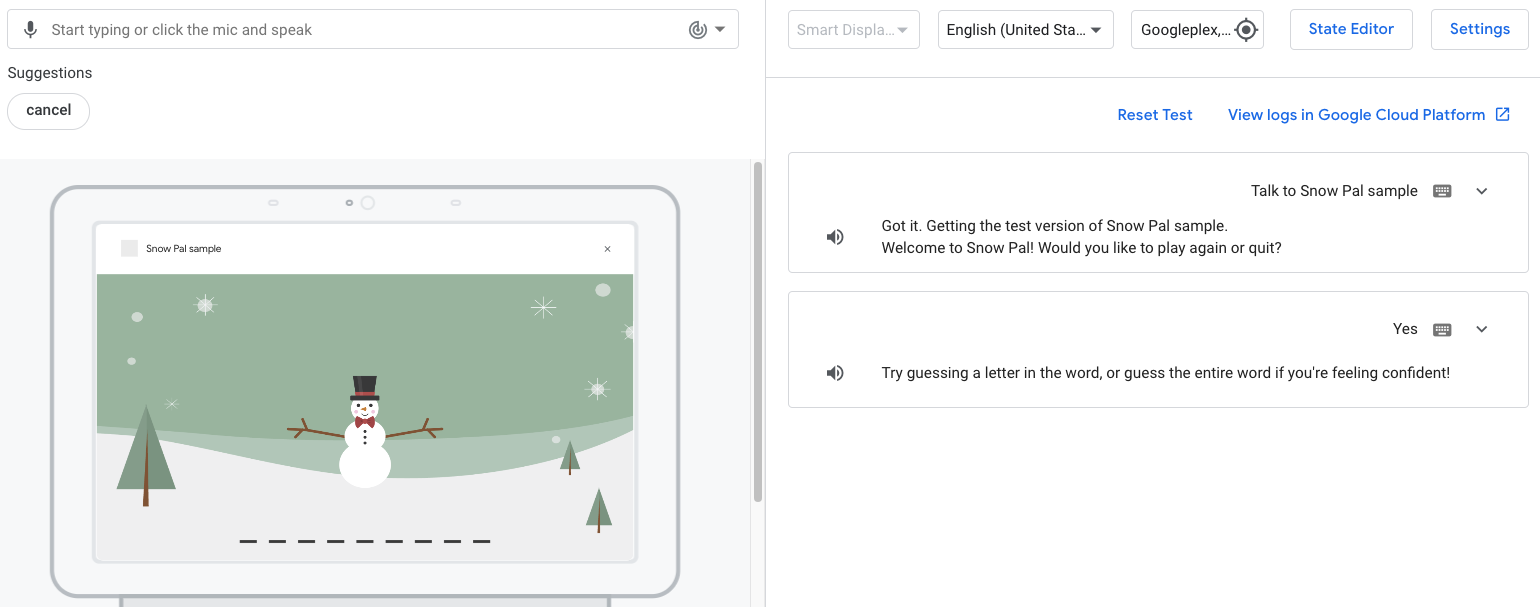
You have not yet configured the logic for guessing a letter or guessing the word, so if you guess a word or letter, you receive the response, "...Incorrect. Keep on trying! It looks like we need to add more functionality to have this work properly."
5. Understand the Interactive Canvas infrastructure
For this project, the functionality is organized into three main components: the Conversational Action, the web app, and the webhook. Note that this is one model for how you can set up your Action and is organized in this way to highlight the core functionality of Interactive Canvas.
The following sections go into more detail about how the Conversational Action, webhook, and web app work together, as well as other important Interactive Canvas elements.
Conversational Action
The Conversational Action component of your Action handles recognizing the user's input, processing it, and sending it to the appropriate scene, where a response to the user is constructed. For example, if a user says "I guess the letter e" in the Snow Pal game, your Conversational Action extracts the letter as an intent parameter and passes it to the appropriate game logic, which determines whether the guess is correct and updates the web app accordingly. You can view and modify this conversational logic within Actions Builder, a web-based IDE in the Actions console. The following screenshot shows part of your Conversational Action within Actions Builder:
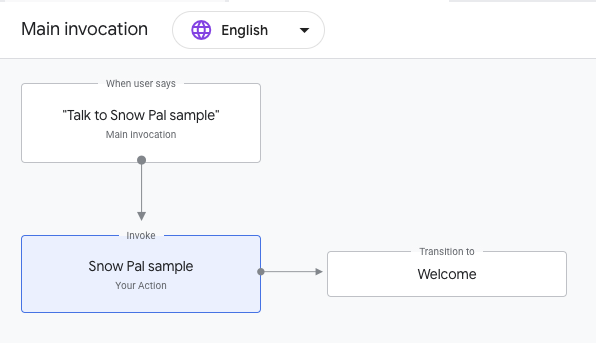
Figure 4. A visualization of the Main invocation in Actions Builder.
This screenshot shows the Main invocation for your Action, which users match when they say a phrase like "Hey Google, talk to Snow Pal sample". When the user invokes your Action, the Main invocation sends a prompt with a canvas response, which contains the URL of your web app.
The first canvas response in your Action must include the web app URL. This response tells Assistant to render the web app at that address on the user's device. Additional canvas responses in Actions Builder can include a field, send_state_data_to_canvas_app, that is set to true. This field sends the intent name and any parameter values to the web app when the intent is matched, and the web app updates based on this data from the user's input.
Webhook
For this codelab, your webhook contains the game logic (you can think of your webhook as being like a game server). The game logic includes elements like determining if a user's guess is correct or incorrect, or if the user has won or lost, and constructing a response based on the outcome. You can modify your webhook within Actions Builder.
When your Action needs to execute game logic, Actions Builder makes a call to the webhook. For example, the guess intent in the Game scene makes a webhook call to the guess handler, which then executes logic to determine if the user's guess is correct or not. The webhook can include Canvas responses within the handlers that map to web app files and update the web appropriately.
Web app
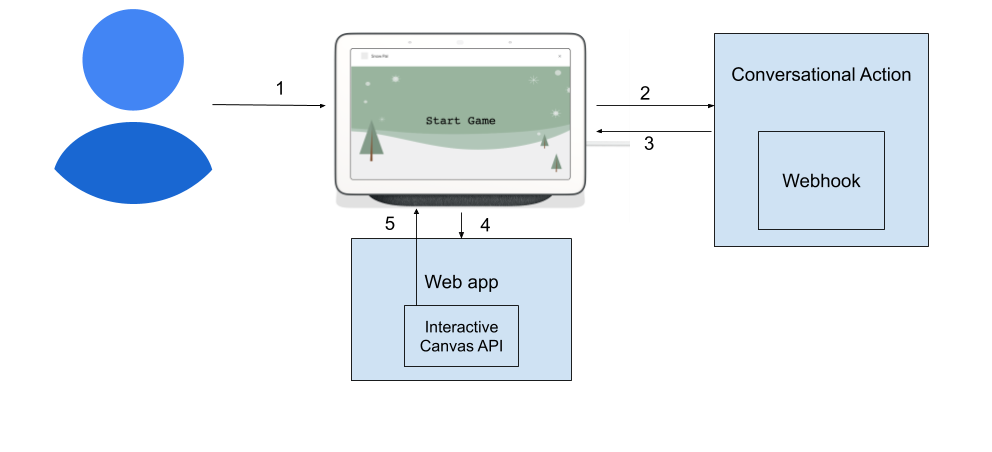
Figure 5. A visual representation of the interaction between the Conversational Action, webhook, and web app in an Interactive Canvas Action.
The web app files contain the code for your web app's visuals and animations, as well as logic to update the web app based on a user's input. You modify your web app files in your text editor and deploy these changes using the Firebase CLI.
Communicating between Conversational Action and web app
You need to enable communication between your Conversational Action and web app so that your web app can update based on user input. For example, if a user says "I guess the letter f",
the Conversational Action needs to provide the web app with the letter f so the web app can update accordingly. To pass the user's input from the Conversational Action to the web app, you must load in the Interactive Canvas API.
The script for this API is included in /public/index.html, which is the main HTML file for the Snow Pal game. This file defines how your UI looks and loads in several scripts:
index.html
<!-- Load Assistant Interactive Canvas API -->
 <script type="text/javascript" src="https://www.gstatic.com/assistant/interactivecanvas/api/interactive_canvas.min.js"></script>
To update the web app based on the user's input, you must also register and configure callbacks in your web app file. Callbacks allow your web app to respond to information or requests from the Conversational Action.
In /public/js/action.js, there is a preconfigured class called Action for declaring and registering callbacks. The Action class is a wrapper around the Interactive Canvas API. When the web app is created with the create() function in scene.js, a new Action instance is created and setCallbacks() is called, as shown in the following snippet:
scene.js
// Set Assistant at game level.
this.assistant = new Action(this);
// Call setCallbacks to register Assistant Action callbacks.
this.assistant.setCallbacks();
The setCallbacks() function is defined in the Action class of /public/js/action.js. This function declares callbacks and registers them with the Interactive Canvas API upon game creation:
  setCallbacks() {
    // Declare the Interactive Canvas Action callbacks.
    const callbacks = {
      onUpdate: (data) => {
     ...
    // Called by the Interactive Canvas web app once web app has loaded to
    // register callbacks.
    this.canvas.ready(callbacks);
  }
The setCallbacks() function declares the onUpdate() callback, which is called each time you send a Canvas response.
The next section describes how the specific code for this project is configured to pass data from the Conversational Action to the web app.
Updating the web app based on user's input
In this codelab, you use a command map to update the web app based on a user's input. For example, when the start_game intent is matched in the Welcome scene, the canvas response included in the prompt is sent to the web app. onUpdate() parses the metadata from the canvas response and calls the START_GAME command, which, in turn, calls the start() function in scene.js and updates the web app to begin a new game session.
The start() function in scene.js also calls a function, updateCanvasState(), that uses a method called setCanvasState() to add state data that your webhook can access.
The updateCanvasState() method is called at the end of every command (you'll be adding these commands throughout the codelab) and updates the web app's state. Each time updateCanvasState() is called, the values for displayedWord and incorrectGuesses are updated based on the current state:
scene.js
...
  updateCanvasState() {
    window.interactiveCanvas.setCanvasState({
      correctWord: this.word.text,
      displayedWord: this.word.displayText.text,
      incorrectGuesses: this.incorrectGuesses,
    });
The updated state is then available for the next conversational turn. You can access this state in the webhook through conv.context.canvas.state, as shown in the following code snippet:
index.js
...
  let displayedWord = conv.context.canvas.state.displayedWord;
...
6. Add guess functionality
In this section, you add the guess functionality to your Action, which enables the user to guess letters within the word or the word itself.
Conversational Action
In the Test in the simulator section, you received a response that included, "It looks like we need to add more functionality to have this work properly." Now, you can delete that prompt in the Actions console so that you're only calling the webhook (in the Game scene, the guess intent is already configured to make a webhook call when it's matched).
To remove the static prompt when the guess intent is matched, follow these steps:
- In the Actions console, click Scenes in the navigation bar.
- Click Game to go to the
Gamescene. - Click When guess is matched under User intent handling. Clear Send prompts to remove the prompt.
- Click Save.
Webhook
In this section, you update your webhook with logic that maps a user's correct or incorrect guess to logic in a web app file, which then updates the web app accordingly. The guess intent handler is already configured for you in the webhook, so you only need to add Canvas responses to this intent to trigger logic that updates the web app.
To update your webhook, follow these steps:
- In the Actions console, click Webhook in the navigation bar.
- Add the following code to
index.jsunder theguesshandler:
index.js (Section A):
// Add Section A `conv.add(new Canvas({` content here.
conv.add(new Canvas({
  data: {
    command: 'CORRECT_ANSWER',
    displayedWord: displayedWord
  },
}));
index.js (Section B):
// Add Section B `conv.add(new Canvas({` content here.
conv.add(new Canvas({
  data: {
    command: 'INCORRECT_ANSWER',
  },
}));
- Click Save Fulfillment.
- Click Deploy Fulfillment. When deployment is complete, a message reads Your Cloud Function deployment is up to date.
Web app
You can now configure your web app to handle the CORRECT_ANSWER and INCORRECT_ANSWER commands.
- Open
public/js/action.jsin your text editor. - Update the web app to handle the
CORRECT_ANSWERandINCORRECT_ANSWERcommands:
action.js (Section C):
// Add Section C `CORRECT_ANSWER: (params) => {` content here.
      CORRECT_ANSWER: (params) => {
        this.gameScene.correctAnswer(params);
      },
      INCORRECT_ANSWER: (params) => {
        this.gameScene.incorrectAnswer();
      },
- Run the following command to update the web app:
firebase deploy --project {PROJECT_ID} --only hosting
Test your Action in the simulator
At this point, your Action can recognize whether a guess is correct or incorrect and update the web app accordingly.
To test your Action, follow these steps:
- In the navigation bar, click Test.
- Type
Talk to Snow Pal samplein the Input field and pressEnter. - Type
Yesin the Input field and pressEnter. Alternatively, click the Yes button. - Type the letter you want to guess in the Input field and press
Enter.
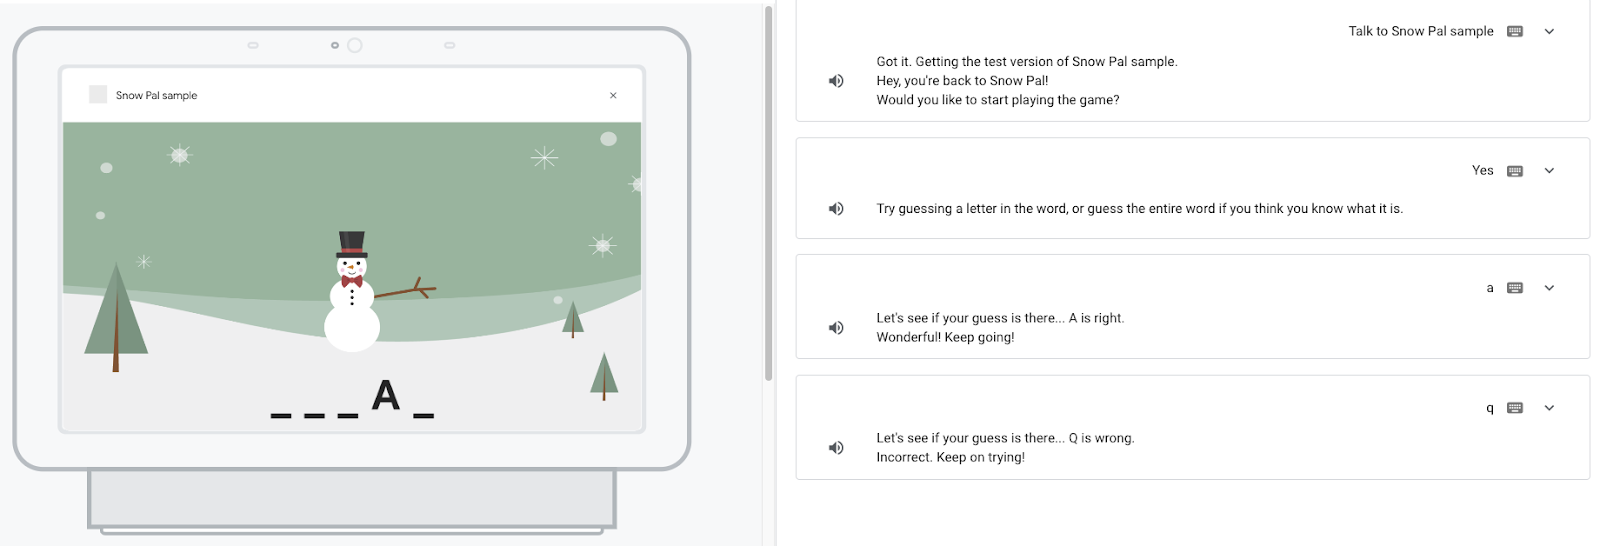
Understand the code
In the previous section, you added code that allows users to guess letters in your game and see those guesses reflected in either the word or the Snow Pal. At a high level, you make a webhook call in Actions Builder when the guess intent is matched, which passes data to your web app to update it accordingly. For example, if the user guesses a letter in the Snow Pal game that exists in the word, the web app updates to show the letter in the correct position in the word.
For Actions that use Interactive Canvas, the general flow for how data is passed from the webhook to the web app is the following:
- The user's input matches an intent that includes a
Canvasresponse. - The Conversational Action or webhook sends the
Canvasresponse, which triggers theonUpdate()callback. - The
onUpdate()callback maps to custom logic that updates the web app accordingly.
For this particular project, the code works in the following way:
- When the user matches the
guessintent, Actions Builder extracts the letter from the user's input as a parameter. - Actions Builder calls the
guesshandler in your webhook, which contains logic to determine whether the letter the user guessed appears in the word. - The
guesshandler contains twoCanvasresponses— one that executes when the letter is correct, and one that executes when the letter is incorrect. EachCanvasresponse passes the appropriate data (theCORRECT_ANSWERorINCORRECT_ANSWERcommand) to the web app. - The data contained within the
datafield of theCanvasresponse is passed to theonUpdate()method inaction.js.onUpdate()calls the appropriate command in the command map inscene.js. - The command map maps to the
correctAnswer()andincorrectAnswer()functions inscene.js. These functions update the web app appropriately to reflect the user's guess and callsetCanvasState()to send state data from your web app to your webhook.
7. Add win/loss functionality
In this section, you add the winning and losing functionality to your Action, which includes logic that determines whether the user has won or lost and logic to update the web app image based on the user's outcome.
Conversational Action
The functionality that handles the user winning or losing the game will be configured within the guess intent, so you don't have to do any additional configuration in Actions Builder.
Webhook
In this section, you update your webhook with logic that handles when a user has won or lost the game, and maps to web app logic that updates the game with the appropriate winning or losing screen.
To update your webhook, follow these steps:
- In the Actions console, click Webhook in the navigation bar.
- Add the following code to
index.jsunder theguesshandler:
index.js (Section D):
// Add Section D `if (userHasWon)` content here.
    if (userHasWon) {
      conv.add(`<speak>Let's see if your guess is there...<break
        time='2500ms'/> ${guess} is right. That spells ${correctWord}!
        ${randomArrayItem(WIN_RESPONSES)}</speak>`);
      conv.add(new Canvas({
        data: {
          command: 'WIN_GAME',
          displayedWord: displayedWord
        },
      }));
      conv.add(`<speak>${PLAY_AGAIN_INSTRUCTIONS}</speak>`);
    } else {
index.js (Section E):
// Add Section E `}` here.
}
index.js (Section F):
// Add Section F `Check if the user has exceeded the maximum` content here.
// Check if the user has exceeded the maximum amount of max guesses allowed.
    const userHasLost = conv.context.canvas.state.incorrectGuesses + 1 >= MAX_INCORRECT_GUESSES;
    if (userHasLost) {
      conv.add(`<speak>Let's see if your guess is there...<break
      time='2500ms'/> ${guess} is wrong. Sorry you lost. The word is ${correctWord}!</speak>`);
      conv.add(new Canvas({
        data: {
          command: 'LOSE_GAME',
        },
      }));
      conv.add(`<speak>${PLAY_AGAIN_INSTRUCTIONS}</speak>`);
    } else {
index.js (Section G):
// Add Section G `}` here.
}
- Click Save Fulfillment.
- Click Deploy Fulfillment. When deployment is complete, a message reads Your Cloud Function deployment is up to date.
Here, you added two Canvas responses with the WIN_GAME and LOSE_GAME commands to handle when users win or lose the game. In the next section, you add functionality that updates the web app based on whether the user won or lost.
Web app
You can now configure your web app to update based on whether the user won or lost. To update your web app, follow these steps:
- Open
public/js/action.jsin your text editor. - Update your web app to handle the
WIN_GAMEandLOSE_GAMEcommands:
action.js (Section H):
// Add Section H `WIN_GAME: (params) => {` content here.
      WIN_GAME: (params) => {
        this.gameScene.winGame(params);
      },
      LOSE_GAME: (params) => {
        this.gameScene.loseGame();
      },
- Run the following command to update the web app:
firebase deploy --project {PROJECT_ID} --only hosting
Test your Action in the simulator
At this point, your Action can handle when the user wins or loses the game, and presents the appropriate screen for each outcome.
To test your Action, follow these steps:
- In the Actions console navigation bar, click Test.
- Type
Talk to Snow Pal samplein the Input field and pressEnter. - Type
Yesin the Input field and pressEnter. Alternatively, click the Start game button. - Guess letters and words until you either win or lose.
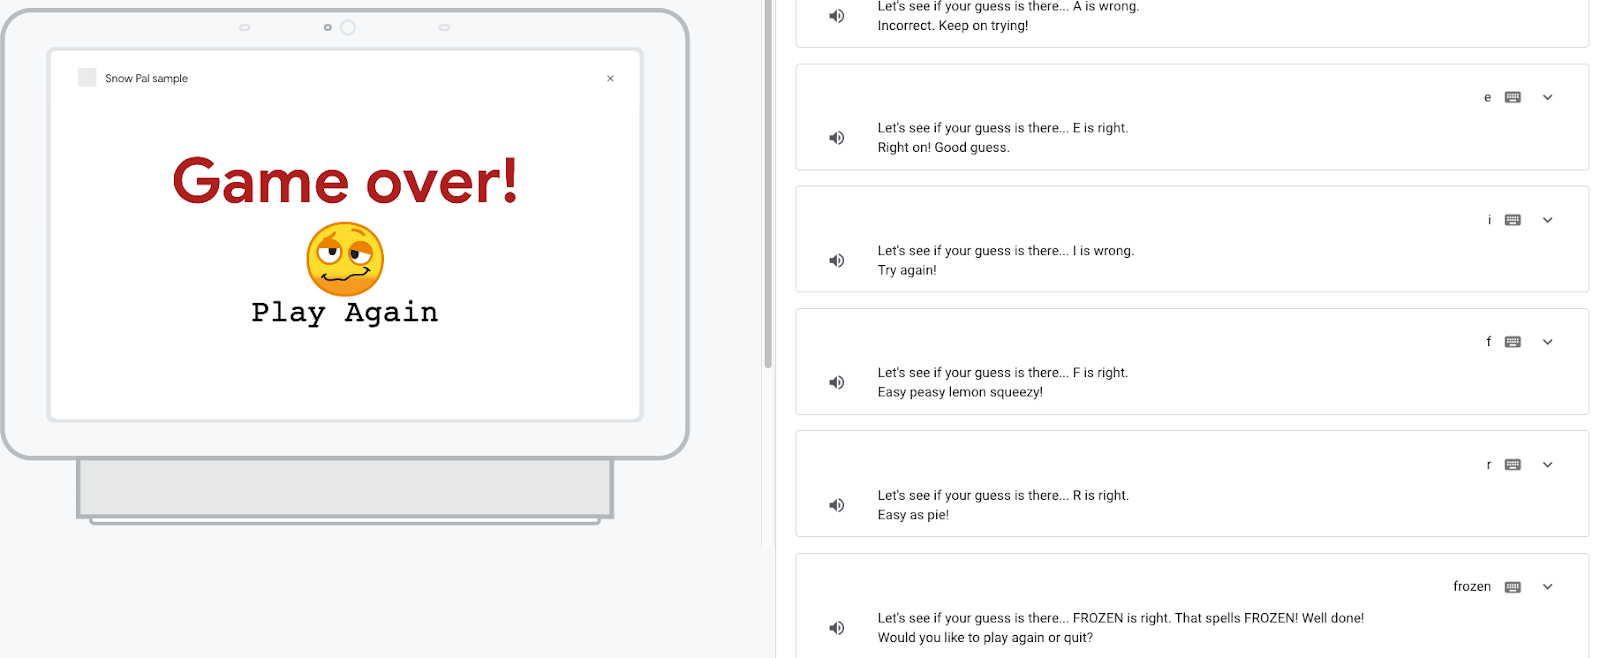
If you ask to play again, you receive a message indicating that the necessary functionality for playing again hasn't been added yet. You add this functionality in the next section.
Understand the code
The win and loss functionality works in the same way as the guessing functionality—the user matches the guess intent, and your webhook evaluates the user's guess. If their guess is correct, the code checks if the user has won; if they have, the WIN_GAME command is sent to the web app. If their guess is wrong, the code checks if they've lost; if they have, the LOSE_GAME command is sent to the web app. These commands trigger the winGame() and loseGame() functions in scene.js, which update the web app to present the winning or losing screen and update the game's state.
8. Add play-again functionality
In this section, you add functionality that allows the user to either say "Play again" or click the Play Again button in the web app to begin a new game. You modify the play_again intent in Actions Builder to send a canvas response that updates the web app appropriately, and add logic that triggers the play_again intent when the user clicks the Play Again button.
Conversational Action
When you tested your Action in the previous section, you received the following prompt if you tried to play the game again: "That would be great, but we will build this functionality in a later section. For now, just reset the Action." You can now delete this prompt and replace it with one that replies to the user when they request another game ("Okay, here's another game!") and includes a canvas response to trigger the web app to start a new game.
To update the prompt when the user wants to play again, follow these steps:
- In the Actions console, click the Scene drop-down menu.
- Click the Game scene.
- Click When play_again is matched under User intent handling.
- Replace the prompt with the following:
candidates:
  - first_simple:
      variants:
        - speech: 'Okay, here''s another game!'
    canvas:
      sendStateDataToCanvasApp: true
- Click Save.
Webhook
In this codelab, the webhook manages the game logic. Because the play-again functionality does not require any kind of logic validation, you don't need to call the webhook; instead, you can send a canvas response directly from Actions Builder to pass the necessary data to the web app (you configured this in the previous section).
Web app
You can now modify your web app files to update appropriately when the user asks to play again. To add this functionality, follow these steps:
- Open
public/js/action.jsin your text editor. - Update the web app to handle the
PLAY_AGAINcommand:
action.js (Section I):
// Add Section I `PLAY_AGAIN: (params) => {` content here.
      PLAY_AGAIN: (params) => {
        this.gameScene.start();
      },
- Open
public/js/scene.jsin your text editor. - Update the web app to start a new game session when the user clicks the ‘Play Again' button:
scene.js (Section J):
// Add Section J `sendTextQuery` content here.
     window.interactiveCanvas.sendTextQuery('Play again');
- Run the following command to update the web app:
firebase deploy --project {PROJECT_ID} --only hosting
Test your Action in the simulator
Your Action can now start a new game session when the user says "Play again" or clicks the Play Again button.
To test your Action, follow these steps:
- In the navigation bar, click Test.
- Type
Talk to Snow Pal samplein the Input field and pressEnter. - Type
Yesin the Input field and pressEnter. Alternatively, click the Start game button. - Guess letters and words until you either win or lose.
- Type
Play againin the Input field and pressEnter. Alternatively, click the Play again button.
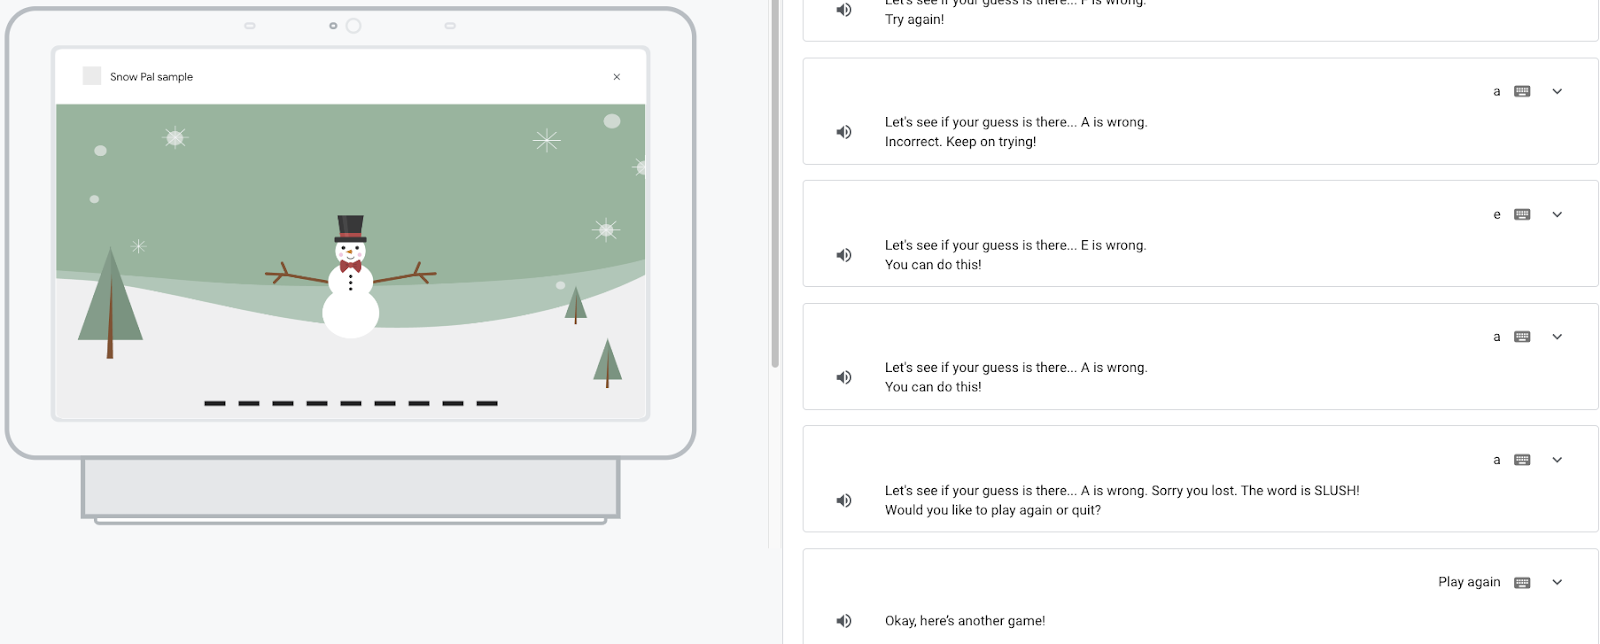
Understand the code
When you tested your Action, you could start a new game through either voice input ("Play again") or touch input (click the Play again button).
For the voice input option, when the user says "Play again" or some variation of that, the play_again intent is matched and adds a prompt ("Okay, here's another game!") to the prompt queue. The canvas response included in the prompt sends the intent name and other metadata to the web app. The intent name is passed to the onUpdate() callback, which maps the corresponding command, PLAY_AGAIN, to the command map in action.js. The PLAY_AGAIN command triggers the start() function in scene.js and updates the web app with a new game session.
For the touch input option, you use sendTextQuery(), an Interactive Canvas API that allows you to trigger an intent through touch input, to make the button work.
In this codelab, you use sendTextQuery() to invoke the play_again intent when a user clicks the Play again button. The Play again argument matches a training phrase in the play_again intent and triggers this intent in the same way a user saying "Play again" does. The play_again intent then triggers logic that updates the web app and begins a new game session.
9. Update PLAY_GAME built-in intent
In this section, you update the PLAY_GAME built-in intent.
The PLAY_GAME built-in intent allows users to invoke your Action when they make a general request, such as "I want to play a game."
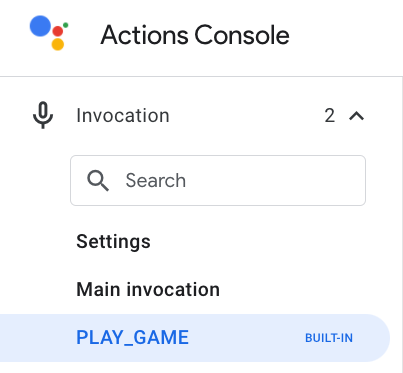
The source code contains the PLAY_GAME built-in intent, which is located at /sdk/custom/global/actions.intent.PLAY_GAME.yaml. This is reflected in the console in the Invocation section as PLAY_GAME, as shown in the following screenshot:
To enable users to invoke your Action through this built-in intent, you need to add a canvas response with the web app URL to the PLAY_GAME built-in intent. To do so, follow these steps:
- In the Actions console, click PLAY_GAME in the navigation bar.
- Update the prompt to include your web app URL, as shown in the following snippet:
candidates:
  - canvas:
      url: 'https://<PROJECT_ID>.web.app'
- Click Save.
Test your Action in the simulator
Your Action now supports the PLAY_GAME built-in intent.
To test your Action, follow these steps:
- In the navigation bar, click Test.
- Click Test built-in intent handling.
- Click Invoke Action.
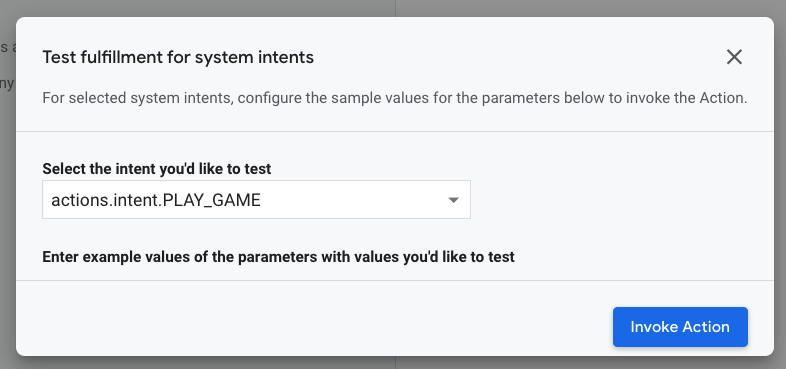
Your Action should be invoked in the simulator.
10. Appendix: Troubleshooting the Interactive Canvas Action
In this section, you learn how to debug your Interactive Canvas Action when it's not working properly. The Snow Pal project comes pre-packaged with a debugging overlay that you can enable. The overlay displays all console.log() and console.error() output to the bottom right of the display, as shown in the following screenshot:
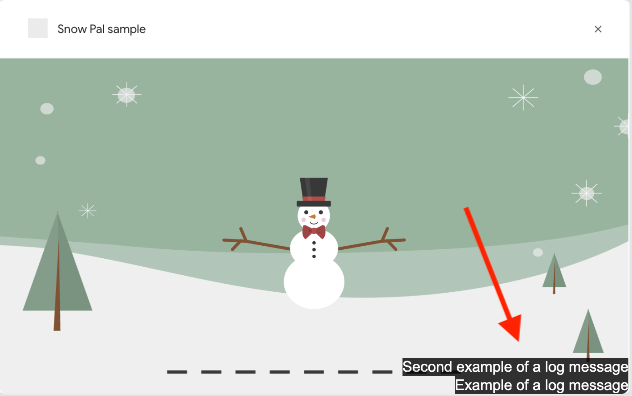
To enable this overlay, open the /public/css/main.css file and comment the line display: none !important;, as shown in the following snippet:
main.css
.debug {
 display: flex;
 flex-direction: column;

/* Comment below to view debug overlay */
/* display: none !important; */

 width: 500px;
 height: 150px;
 right: 0;
 bottom: 0;
 position: absolute;
}
Clean up your project [recommended]
To avoid incurring possible charges, it is recommended to remove projects that you don't intend to use. To delete the projects you created in this codelab, follow these steps:
- To delete the Google Cloud Project and resources, complete the steps listed in the Shutting down (deleting) projects section.
- Optional: To immediately remove your project from the Actions console, complete the steps listed in the Delete a project section. If you don't complete this step, your project will automatically be removed after approximately 30 days.
11. Congratulations!
You've completed the introductory Interactive Canvas codelab and now have the skills necessary to build your own Interactive Canvas Action.
What you've learned
- How to build, deploy, and test an Interactive Canvas Action
- How to use
Canvasresponses to update the web app - How to use different methods to enhance your Action, like
sendTextQuery()andsetCanvasState() - How to debug your Action
Learn more
Check out the following resources to learn more about Interactive Canvas:
- Interactive Canvas documentation: The official Actions on Google documentation for Interactive Canvas.
- Interactive Canvas sample: The code for a simple Interactive Canvas game that lets you spin a triangle and modify its colors.
- Games portal: The guidelines for building games on Google Assistant.
Feedback survey
Before you go, please fill out a brief survey about your experience.
