1. はじめに
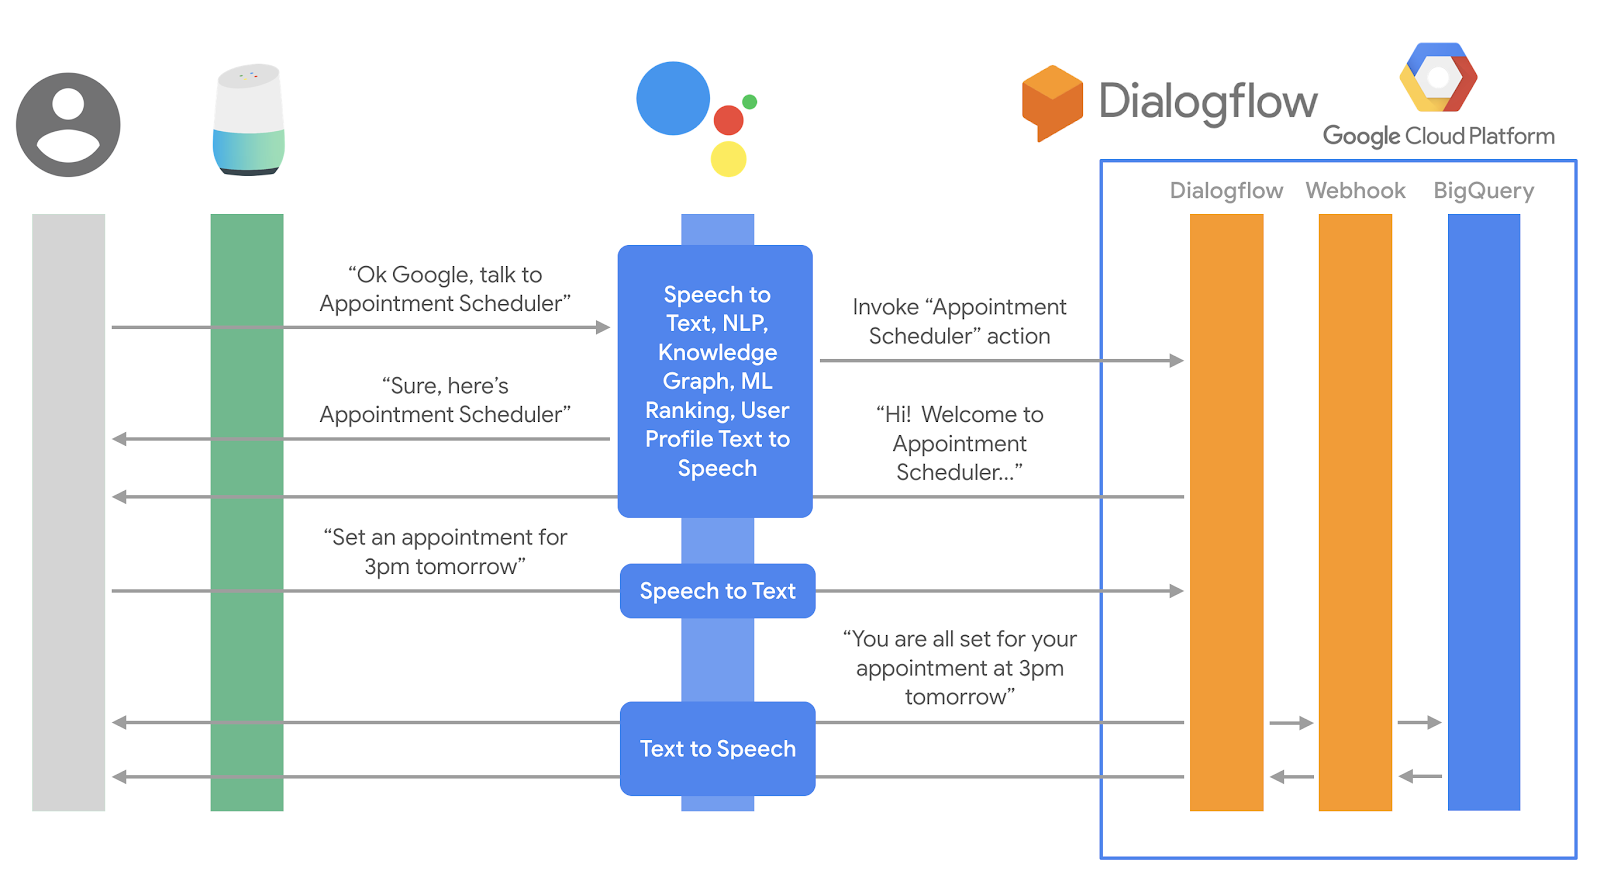
この記事では、Dialogflow が BigQuery と接続し、会話エクスペリエンス中に収集された情報を保存する方法について説明します。ここでは、以前のラボ「予約スケジューラ」で作成したエージェントを使用します。エージェントの GCP プロジェクトで、BigQuery にデータセットとテーブルを作成します。次に、BigQuery データセットとテーブルの ID を使用して元のフルフィルメントを編集します。最後に、インタラクションが BigQuery に記録されているかどうかをテストします。
ユーザーからフルフィルメントと BigQuery までのイベントのシーケンス図は次のとおりです。
学習内容
- BigQuery でデータセットとテーブルを作成する方法
- Dialogflow フルフィルメントで BigQuery 接続の詳細を設定する方法。
- フルフィルメントをテストする方法
前提条件
- Dialogflow の基本コンセプトと構成。基本的な会話設計について説明する Dialogflow の入門チュートリアル動画については、次の動画をご覧ください。
- Dialogflow を使用して予約スケジューラ チャットボットを構築します。
- Dialogflow のエンティティについて。
- フルフィルメント: Dialogflow を Google カレンダーと統合します。
2. BigQuery でデータセットとテーブルを作成する
- Google Cloud コンソールに移動します。
- Cloud コンソールで、メニュー アイコン ☰ > [ビッグデータ] > [BigQuery] に移動します。
- 左側のペインの [リソース] でプロジェクト ID をクリックします。選択すると、右側に [データセットを作成] が表示されます。
- [データセットを作成] をクリックして、名前を付けます。
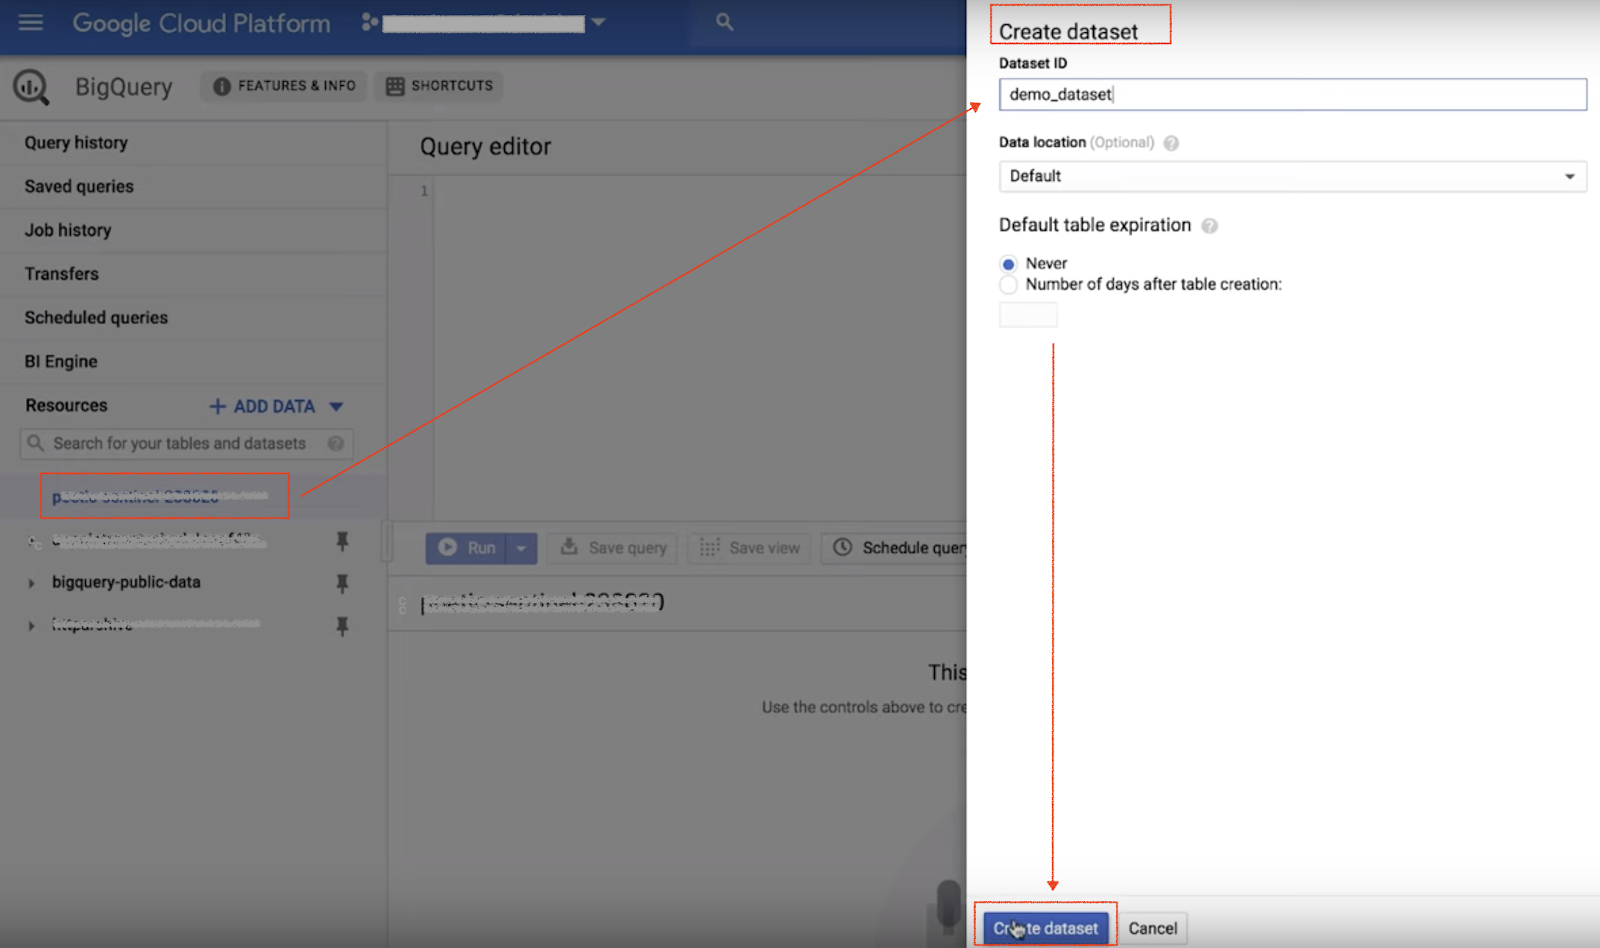
- データセットが作成されたら、左側のパネルでデータセットをクリックします。右側に CREATE TABLE が表示されます。
- [CREATE TABLE] をクリックし、テーブル名を指定して、画面下部の [テーブルを作成] をクリックします。
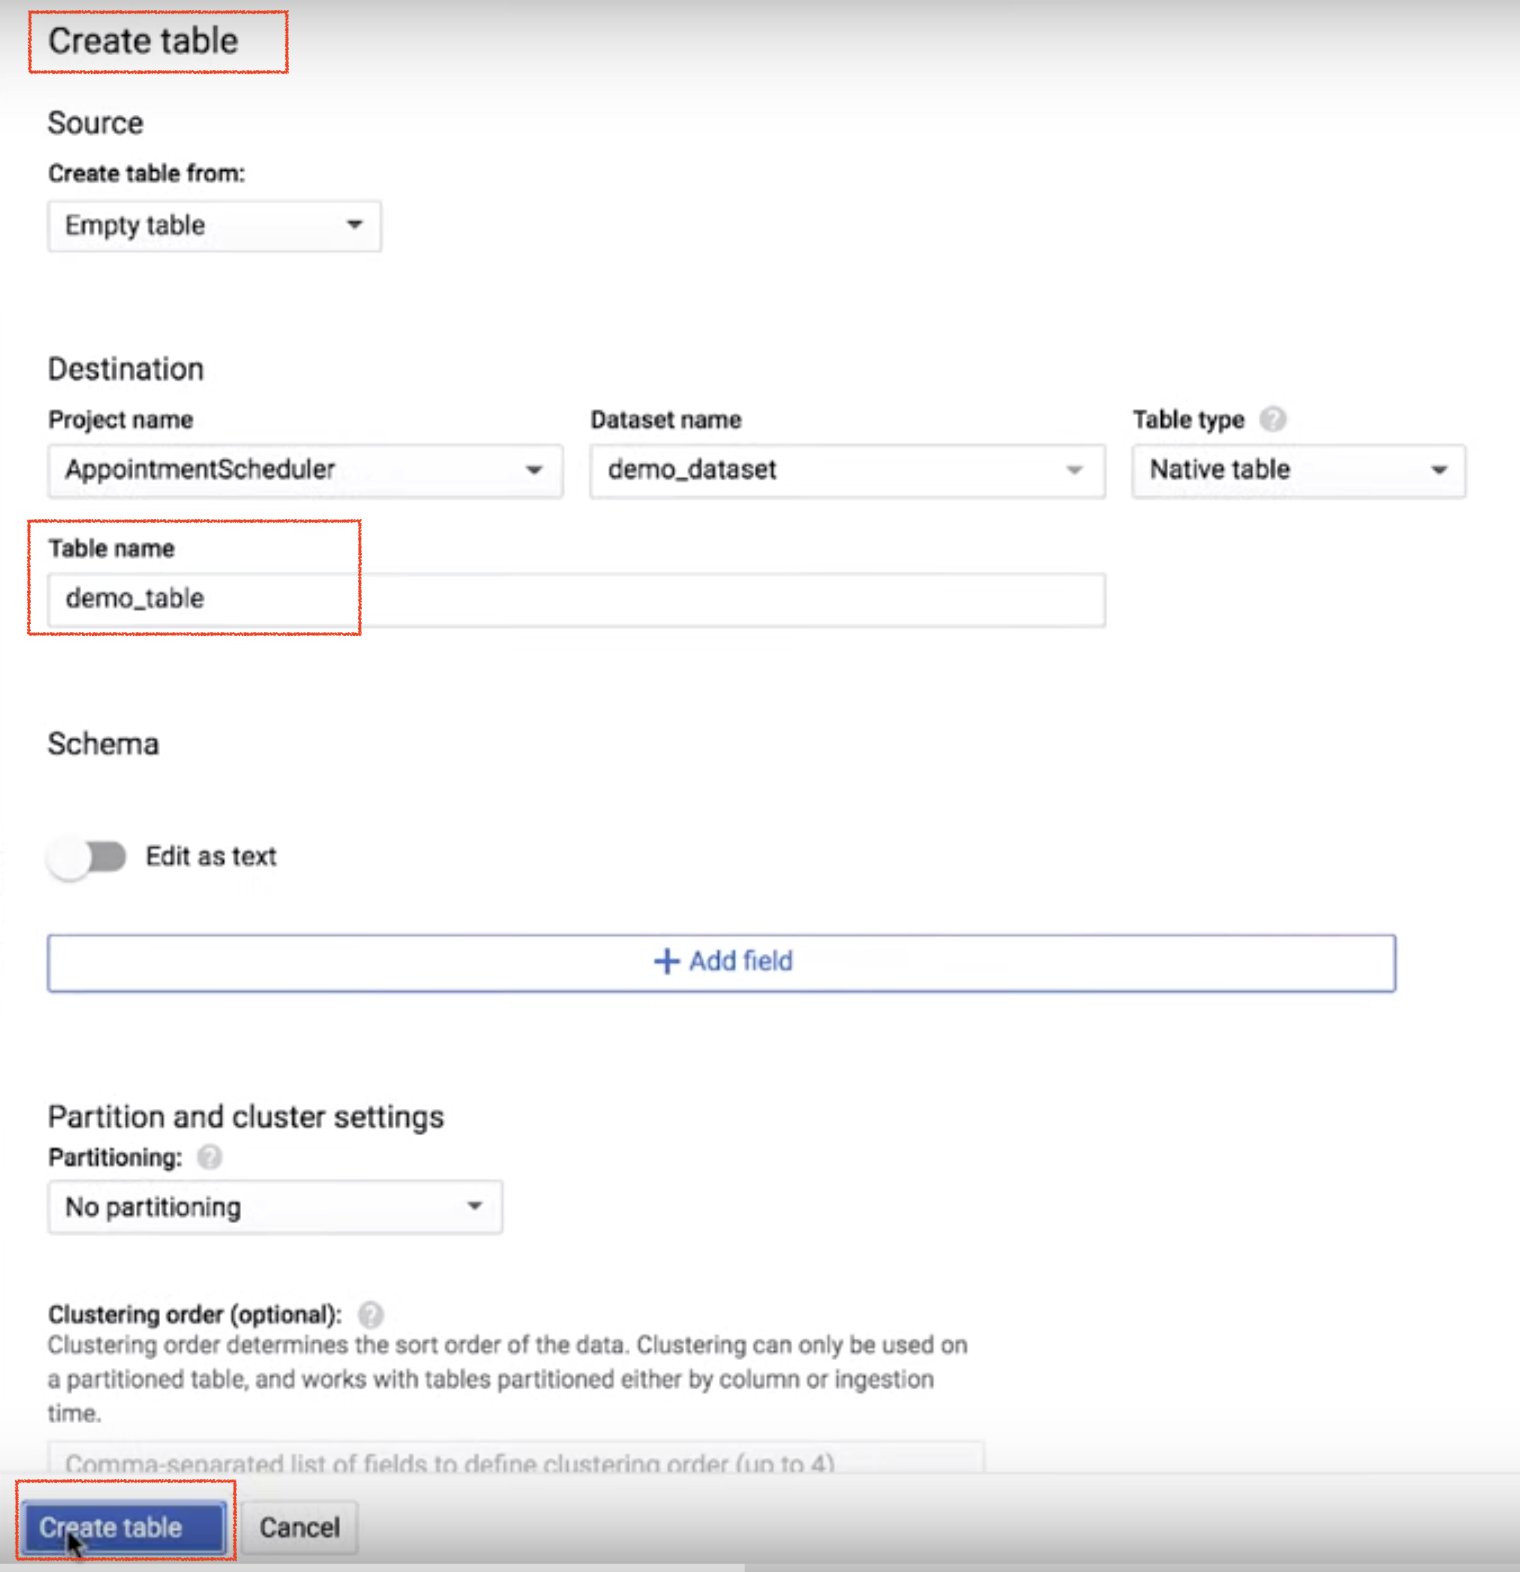
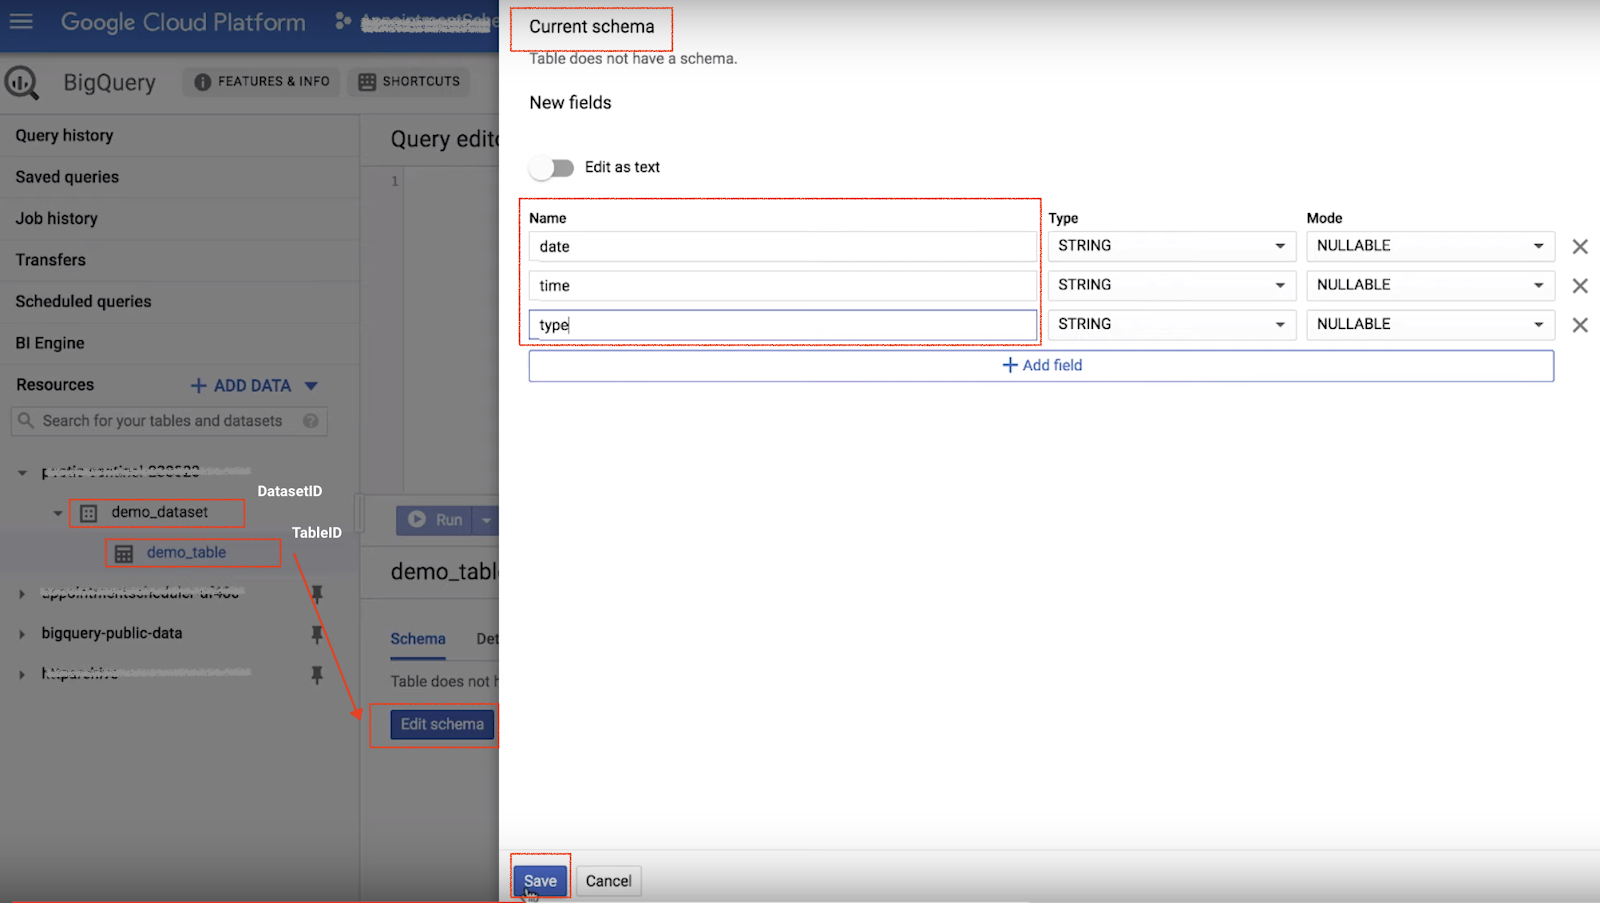
- テーブルが作成されたら、左側のパネルでテーブルをクリックします。右側に [スキーマを編集] ボタンが表示されます。
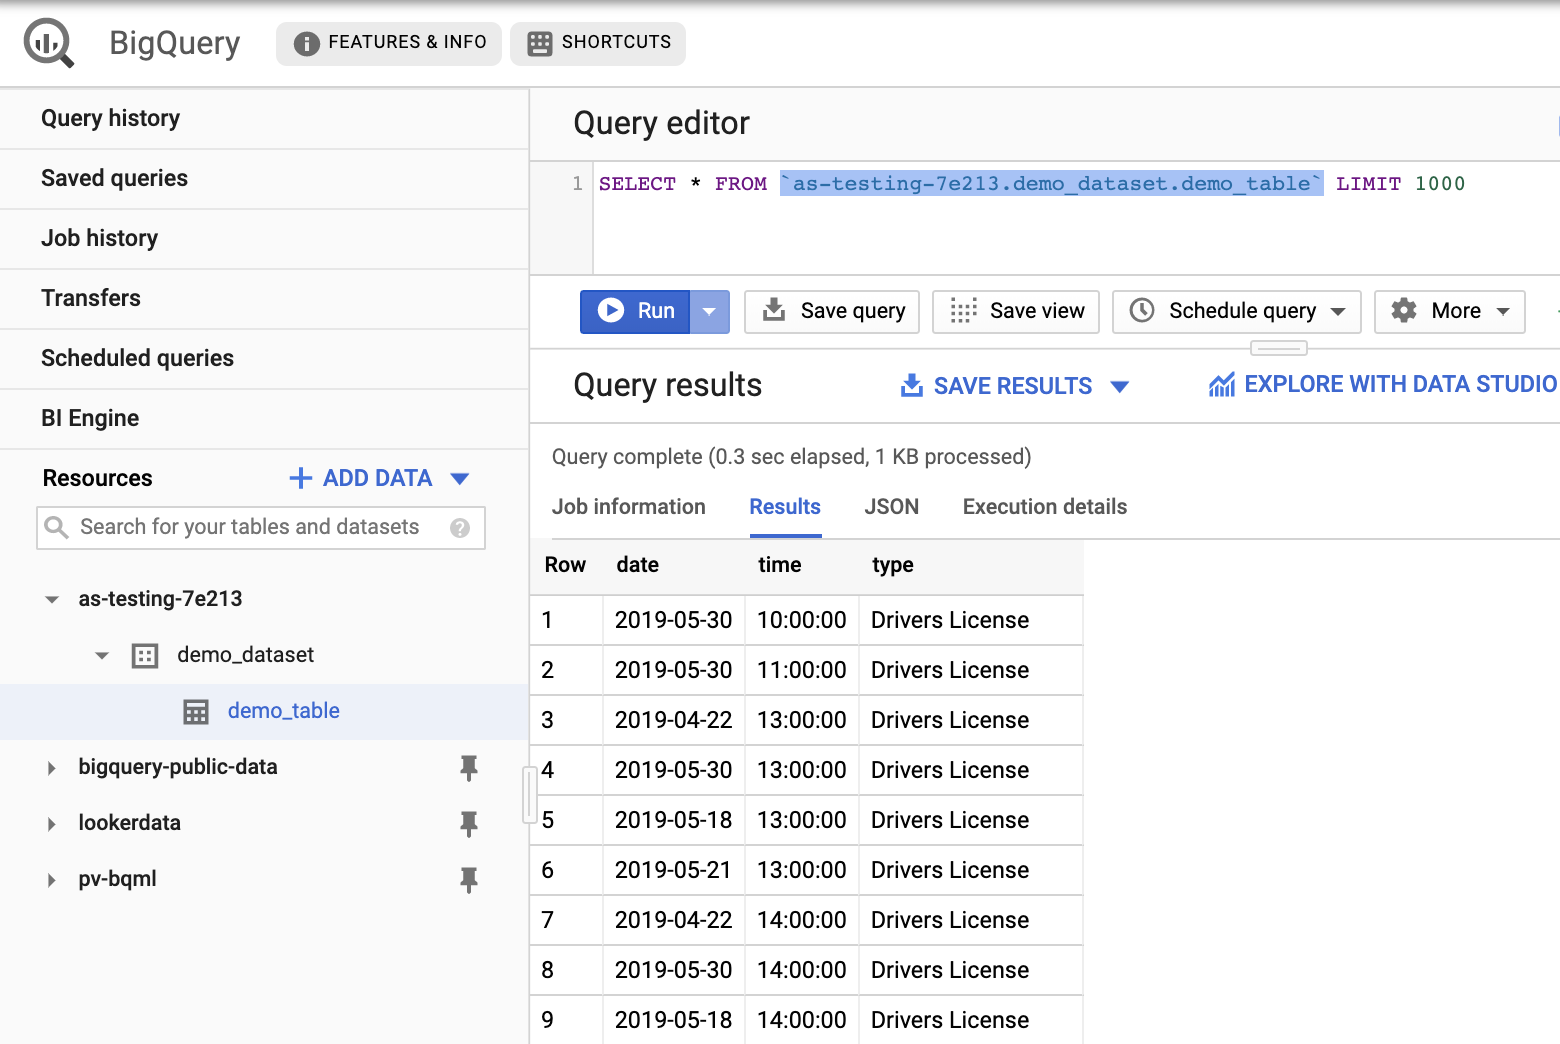
- [スキーマを編集] ボタンをクリックし、[フィールドを追加] ボタンをクリックします。「date」フィールドを追加し、「time」と「type」についても同様に繰り返します。
- 「DatasetID」と「tableID」をメモします。
3. BigQuery 接続の詳細を Dialogflow フルフィルメントに追加する
- Dialogflow エージェントを開き、フルフィルメント インライン エディタを有効にします。この手順で不明な点がある場合は、前の ラボを参照してください。
- Dialogflow フルフィルメントのインライン エディタの package.json に BigQuery の依存関係が含まれていることを確認します。"@google-cloud/bigquery": "0.12.0". この記事の手順を行う際は、BigQuery の最新バージョンを使用してください。
- index.js で、BigQuery テーブルに日付、時刻、予約タイプを追加する「addToBigQuery」関数を作成します。
- index.js ファイルの TODO セクションに projectID、datasetID、tableID を追加して、BigQuery テーブルとデータセットをフルフィルメントに適切に接続します。
{
  "name": "dialogflowFirebaseFulfillment",
  "description": "Dialogflow fulfillment for the bike shop sample",
  "version": "0.0.1",
  "private": true,
  "license": "Apache Version 2.0",
  "author": "Google Inc.",
  "engines": {
    "node": "6"
  },
  "scripts": {
    "lint": "semistandard --fix \"**/*.js\"",
    "start": "firebase deploy --only functions",
    "deploy": "firebase deploy --only functions"
  },
  "dependencies": {
    "firebase-functions": "2.0.2",
    "firebase-admin": "^5.13.1",
    "actions-on-google": "2.2.0",
    "googleapis": "^27.0.0",
    "dialogflow-fulfillment": "0.5.0",
    "@google-cloud/bigquery": "^0.12.0"
  }
}
'use strict';

const functions = require('firebase-functions');
const {google} = require('googleapis');
const {WebhookClient} = require('dialogflow-fulfillment');
const BIGQUERY = require('@google-cloud/bigquery');


// Enter your calendar ID below and service account JSON below
const calendarId = "XXXXXXXXXXXXXXXXXX@group.calendar.google.com";
const serviceAccount = {}; // Starts with {"type": "service_account",...

// Set up Google Calendar Service account credentials
const serviceAccountAuth = new google.auth.JWT({
  email: serviceAccount.client_email,
  key: serviceAccount.private_key,
  scopes: 'https://www.googleapis.com/auth/calendar'
});

const calendar = google.calendar('v3');
process.env.DEBUG = 'dialogflow:*'; // enables lib debugging statements

const timeZone = 'America/Los_Angeles';
const timeZoneOffset = '-07:00';

exports.dialogflowFirebaseFulfillment = functions.https.onRequest((request, response) => {
  const agent = new WebhookClient({ request, response });
  console.log("Parameters", agent.parameters);
  const appointment_type = agent.parameters.AppointmentType;

// Function to create appointment in calendar
function makeAppointment (agent) {
    // Calculate appointment start and end datetimes (end = +1hr from start)
    const dateTimeStart = new Date(Date.parse(agent.parameters.date.split('T')[0] + 'T' + agent.parameters.time.split('T')[1].split('-')[0] + timeZoneOffset));
    const dateTimeEnd = new Date(new Date(dateTimeStart).setHours(dateTimeStart.getHours() + 1));
    const appointmentTimeString = dateTimeStart.toLocaleString(
      'en-US',
      { month: 'long', day: 'numeric', hour: 'numeric', timeZone: timeZone }
    );

// Check the availability of the time, and make an appointment if there is time on the calendar
    return createCalendarEvent(dateTimeStart, dateTimeEnd, appointment_type).then(() => {
      agent.add(`Ok, let me see if we can fit you in. ${appointmentTimeString} is fine!.`);

// Insert data into a table
      addToBigQuery(agent, appointment_type);
    }).catch(() => {
      agent.add(`I'm sorry, there are no slots available for ${appointmentTimeString}.`);
    });
  }

  let intentMap = new Map();
  intentMap.set('Schedule Appointment', makeAppointment);
  agent.handleRequest(intentMap);
});

//Add data to BigQuery
function addToBigQuery(agent, appointment_type) {
    const date_bq = agent.parameters.date.split('T')[0];
    const time_bq = agent.parameters.time.split('T')[1].split('-')[0];
    /**
    * TODO(developer): Uncomment the following lines before running the sample.
    */
    //const projectId = '<INSERT your own project ID here>';
    //const datasetId = "<INSERT your own dataset name here>";
    //const tableId = "<INSERT your own table name here>";
    const bigquery = new BIGQUERY({
      projectId: projectId
    });
   const rows = [{date: date_bq, time: time_bq, type: appointment_type}];

   bigquery
  .dataset(datasetId)
  .table(tableId)
  .insert(rows)
  .then(() => {
    console.log(`Inserted ${rows.length} rows`);
  })
  .catch(err => {
    if (err && err.name === 'PartialFailureError') {
      if (err.errors && err.errors.length > 0) {
        console.log('Insert errors:');
        err.errors.forEach(err => console.error(err));
      }
    } else {
      console.error('ERROR:', err);
    }
  });
  agent.add(`Added ${date_bq} and ${time_bq} into the table`);
}

// Function to create appointment in google calendar
function createCalendarEvent (dateTimeStart, dateTimeEnd, appointment_type) {
  return new Promise((resolve, reject) => {
    calendar.events.list({
      auth: serviceAccountAuth, // List events for time period
      calendarId: calendarId,
      timeMin: dateTimeStart.toISOString(),
      timeMax: dateTimeEnd.toISOString()
    }, (err, calendarResponse) => {
      // Check if there is a event already on the Calendar
      if (err || calendarResponse.data.items.length > 0) {
        reject(err || new Error('Requested time conflicts with another appointment'));
      } else {
        // Create event for the requested time period
        calendar.events.insert({ auth: serviceAccountAuth,
          calendarId: calendarId,
          resource: {summary: appointment_type +' Appointment', description: appointment_type,
            start: {dateTime: dateTimeStart},
            end: {dateTime: dateTimeEnd}}
        }, (err, event) => {
          err ? reject(err) : resolve(event);
        }
        );
      }
    });
  });
}
コードからイベントのシーケンスを理解する
- インテント マップは、Google カレンダーで予約をスケジュール設定する makeAppointment 関数を呼び出します。
- 同じ関数内で、BigQuery にロギングするデータを送信するために「addToBigQuery」関数が呼び出されます。
4. チャットボットと BigQuery テーブルをテストする
チャットボットをテストしましょう。シミュレータでテストするか、以前の記事で学習したウェブまたは Google Home の統合を使用できます。
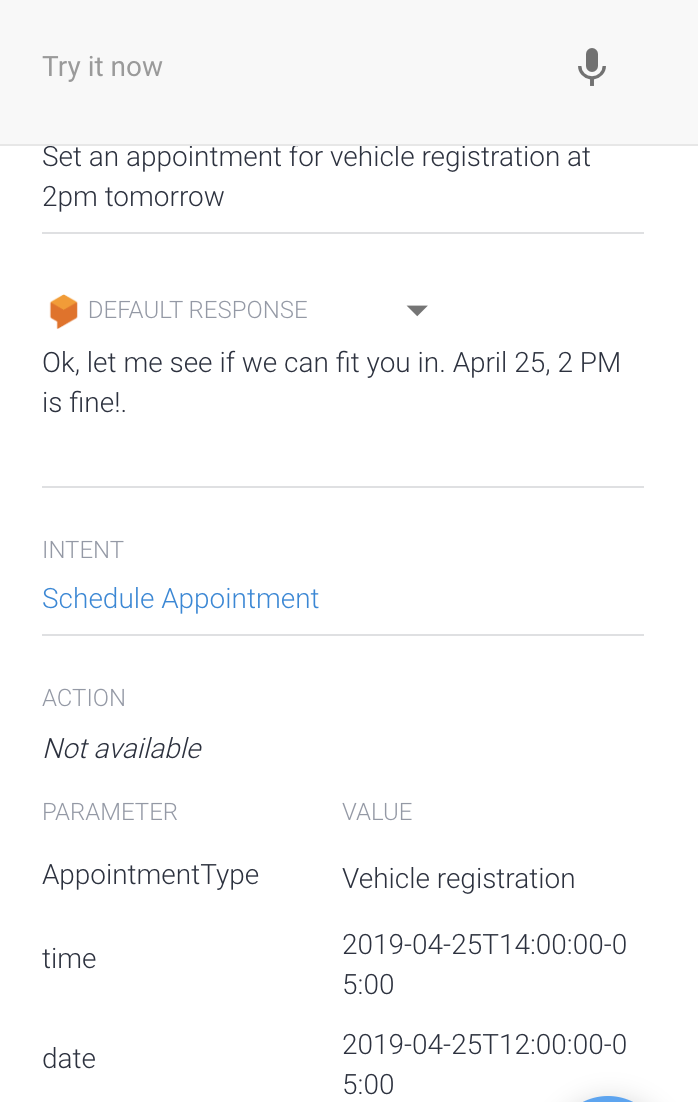
- ユーザー: 「明日の午後 2 時に車両登録の予約をして」
- Chatbot の回答: 「かしこまりました。ご予約をお取りできるか確認いたします。8 月 6 日午後 2 時で大丈夫です。」
- レスポンスの後に BigQuery テーブルを確認します。クエリ「SELECT * FROM
projectID.datasetID.tableID」を使用する
5. クリーンアップ
このシリーズの他のラボを行う予定がある場合は、今すぐクリーンアップを行わないでください。シリーズのすべてのラボを完了してから行ってください。
Dialogflow エージェントを削除する
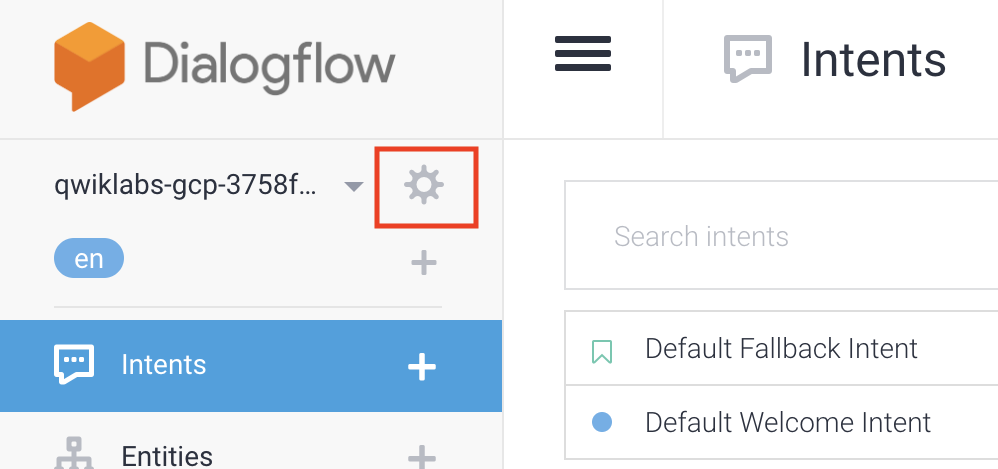
- 既存のエージェントの横にある歯車アイコン
 をクリックします。
- [全般] タブで一番下までスクロールし、[Delete this Agent](このエージェントを削除)をクリックします。
- 表示されたウィンドウに「DELETE」と入力し、[削除] をクリックします。
6. 完了
チャットボットを作成し、BigQuery と統合して分析情報を取得しました。これで chatbot の開発が可能になりました。
以下のリソースもご覧ください。
- Dialogflow の GitHub ページでコードサンプルをご確認ください。