
1. 시작하기 전에
이 Codelab에서는 Dialogflow가 백엔드 시스템과 연결되어 사용자 질문에 풍부하고 동적인 응답을 제공하는 방법을 알아봅니다.
기본 요건
계속하기 전에 다음 Codelab을 완료해야 합니다.
또한 Dialogflow로 챗봇 빌드 학습 과정에 있는 다음 동영상에서 Dialogflow의 기본 개념과 구조를 파악해야 합니다.
학습할 내용
- fulfillment란 무엇인가요?
- Calendar의 서비스 계정을 설정하는 방법
- Calendar 설정 방법
- Dialogflow에서 fulfillment을 사용 설정하는 방법
- fulfillment 테스트 방법
빌드할 항목
- Cloud Functions를 사용한 처리
- Dialogflow와 Calendar 간 통합
필요한 항목
- Dialogflow 콘솔에 로그인할 웹브라우저 및 이메일 주소
- Calendar에 액세스할 Google 계정
2. 이행이란 무엇인가요?
처리는 Dialogflow 에이전트가 인텐트별로 비즈니스 로직을 호출할 수 있게 해주는 웹훅으로 배포되는 코드입니다. 대화 중에는 처리를 통해 Dialogflow의 자연어 처리에서 추출된 정보를 사용하여 동적 응답을 생성하거나 백엔드의 작업을 트리거할 수 있습니다. 대부분의 Dialogflow 에이전트는 풀필먼트를 사용합니다.
다음은 처리를 사용하여 에이전트를 확장할 수 있는 몇 가지 사례입니다.
- 데이터베이스에서 찾은 정보를 기반으로 동적 응답 생성
- 고객이 요청한 제품을 기반으로 주문 실행
- 게임의 규칙 및 승리 조건 구현
3. Calendar API 사용 설정
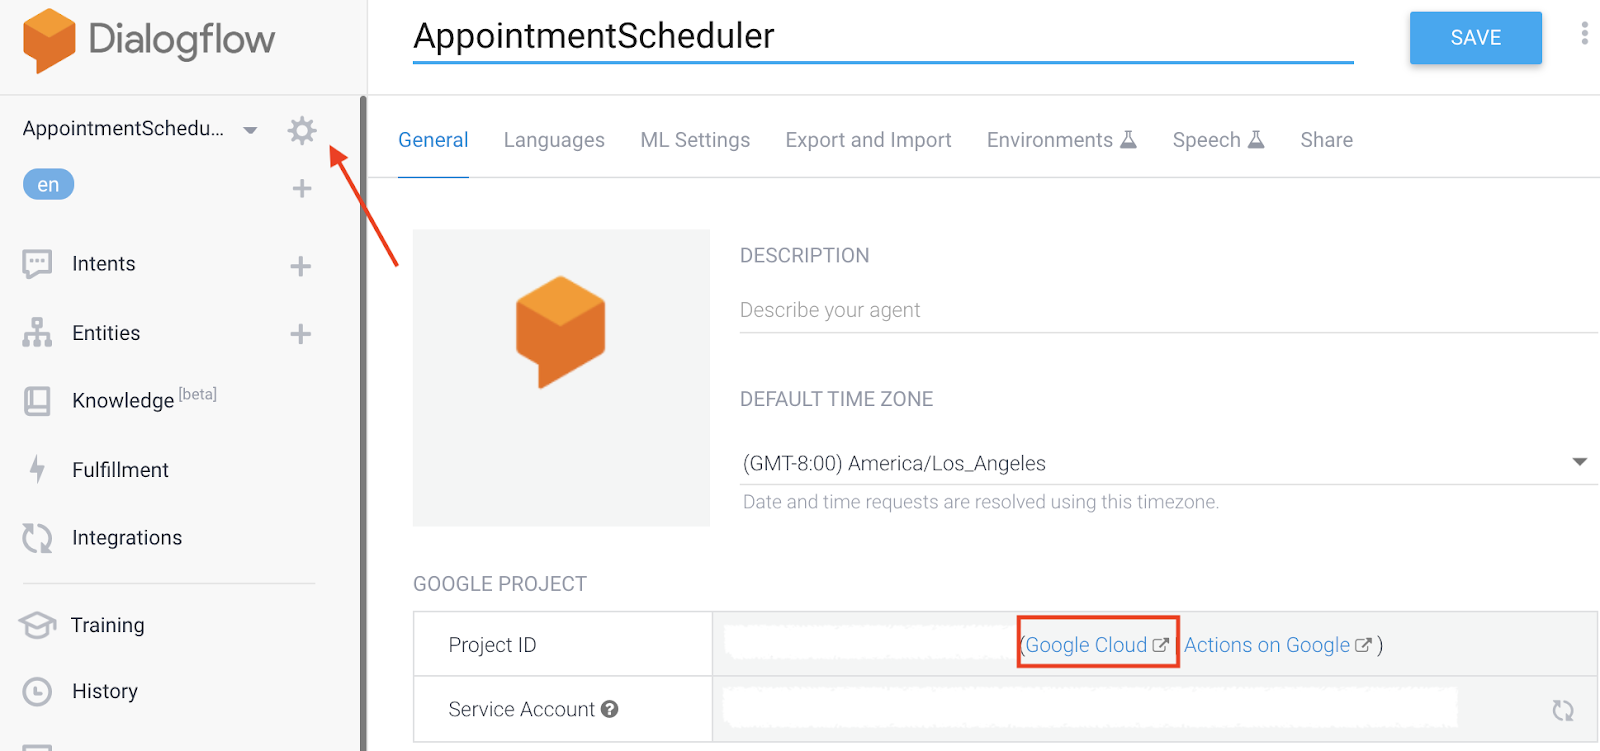
- Dialogflow 콘솔에서
 를 클릭합니다.
 - 일반 탭에서 프로젝트 ID로 스크롤한 다음 Google Cloud
 를 클릭합니다.
- Google Cloud 콘솔에서 탐색 메뉴 ☰ > API 및 서비스 > 라이브러리를 클릭합니다.
- 'Google Calendar API'를 검색한 후 사용 설정을 클릭하여 Google Cloud 프로젝트에서 API를 사용합니다.
4. 서비스 계정 설정
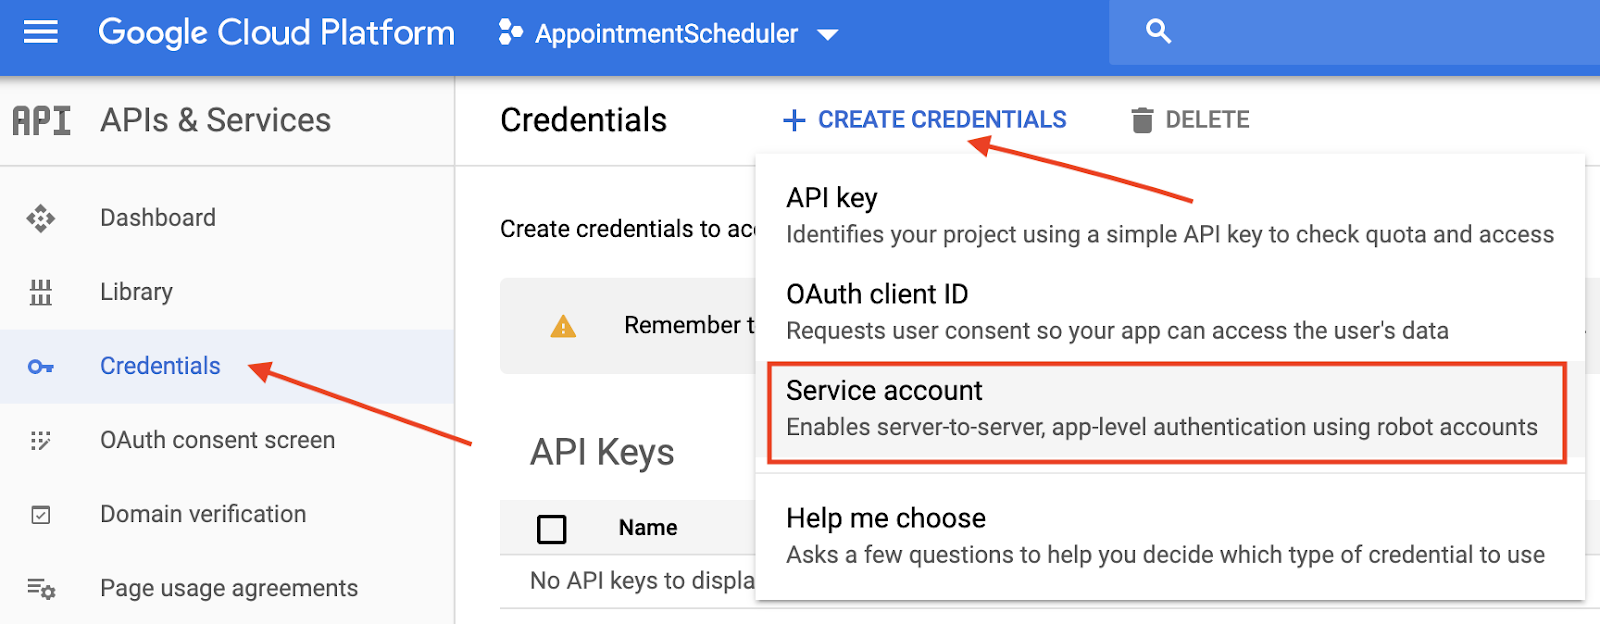
- 탐색 메뉴 ☰ > API 및 서비스 > 사용자 인증 정보를 클릭합니다.
- 사용자 인증 정보 만들기 > 서비스 계정을 클릭합니다.
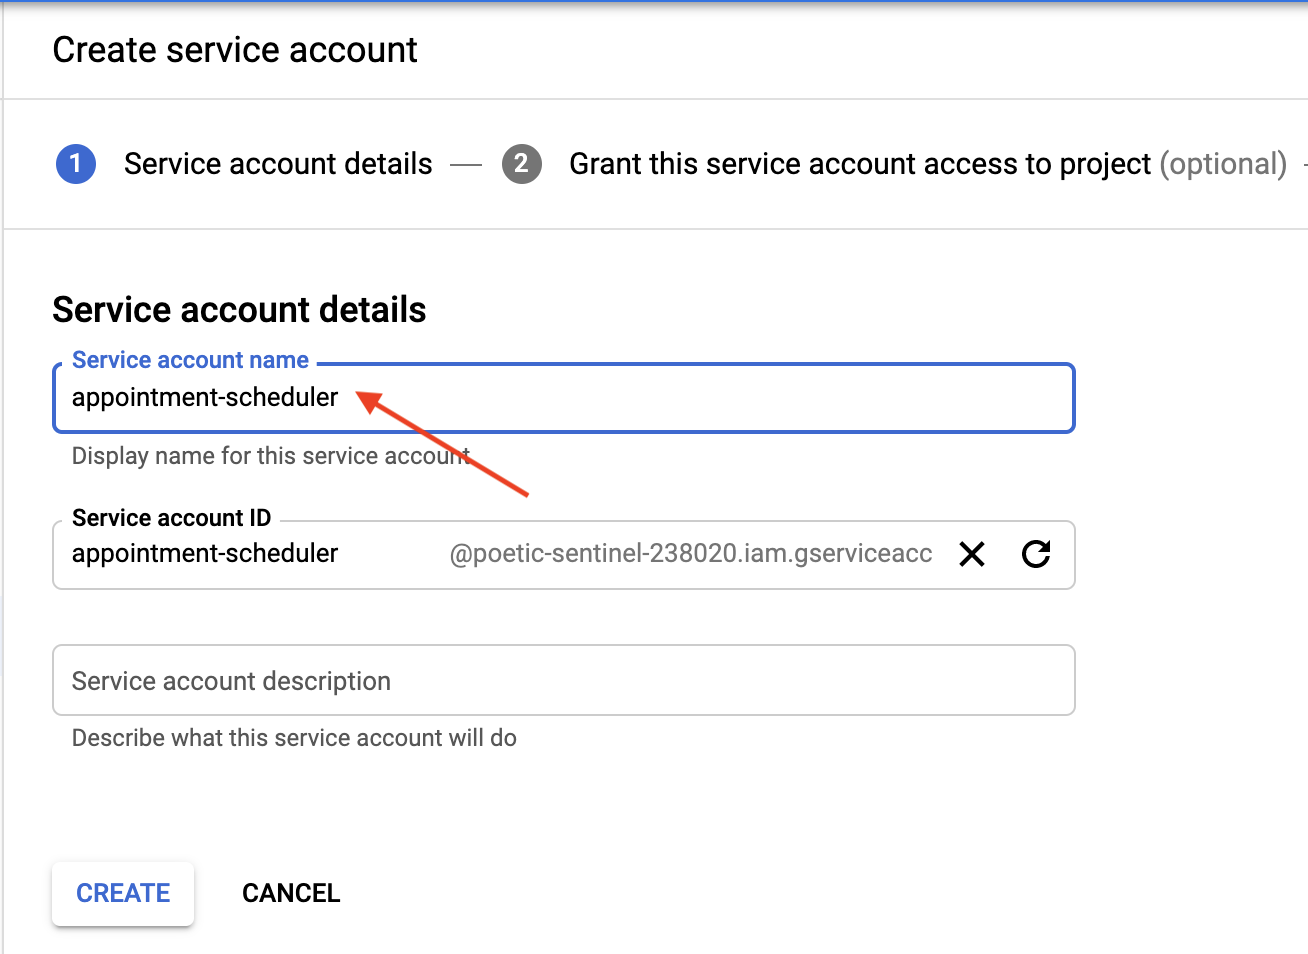
- 서비스 계정 세부정보에서 서비스 계정 이름으로 'appointment-scheduler'를 입력한 다음 만들기를 클릭합니다.
- 이 서비스 계정에 프로젝트에 대한 액세스 권한 부여라고 표시된 부분에서 계속을 클릭하여 건너뜁니다.
- 사용자에게 이 서비스 계정에 대한 액세스 권한 부여 (선택사항)에서 키 만들기를 클릭한 다음 JSON을 선택하고 만들기를 클릭합니다.
JSON 파일이 컴퓨터에 다운로드되며, 이 파일은 다음 설정 섹션에서 필요합니다. 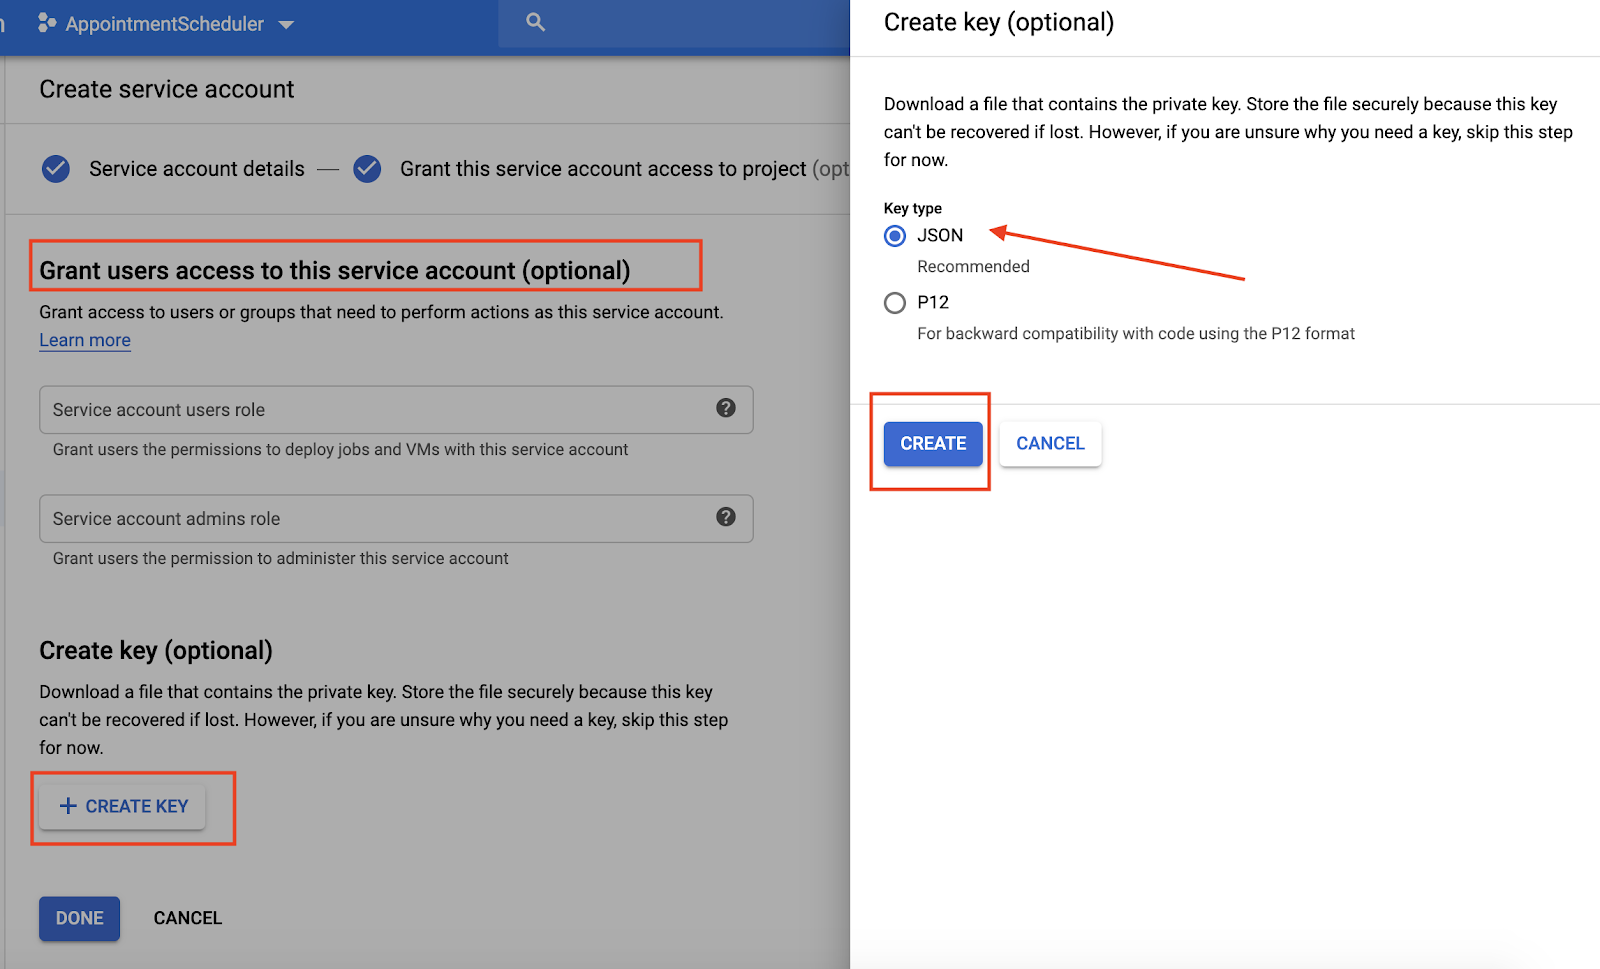
5. Calendar 설정
- Calendar로 이동한 다음 Main menu ☰ > Add other calendars
 > Create new calendar를 클릭합니다.
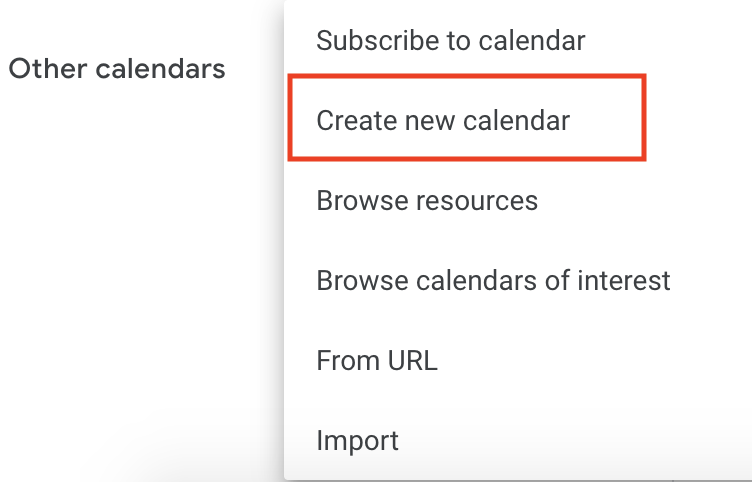
- 캘린더 이름으로 'Appointment Calendar'를 입력하고 캘린더 만들기를 클릭합니다.
- 페이지를 새로고침한 다음 약속 캘린더를 클릭하고 특정 사용자와 공유로 스크롤한 다음 사용자 추가를 클릭합니다.
- 서비스 계정 설정의 일부로 다운로드한 JSON 파일에서
client_email를 복사하여 대화상자에 붙여넣습니다.

- 권한 드롭다운 목록을 클릭한 다음 일정 변경 > 보내기를 클릭합니다.
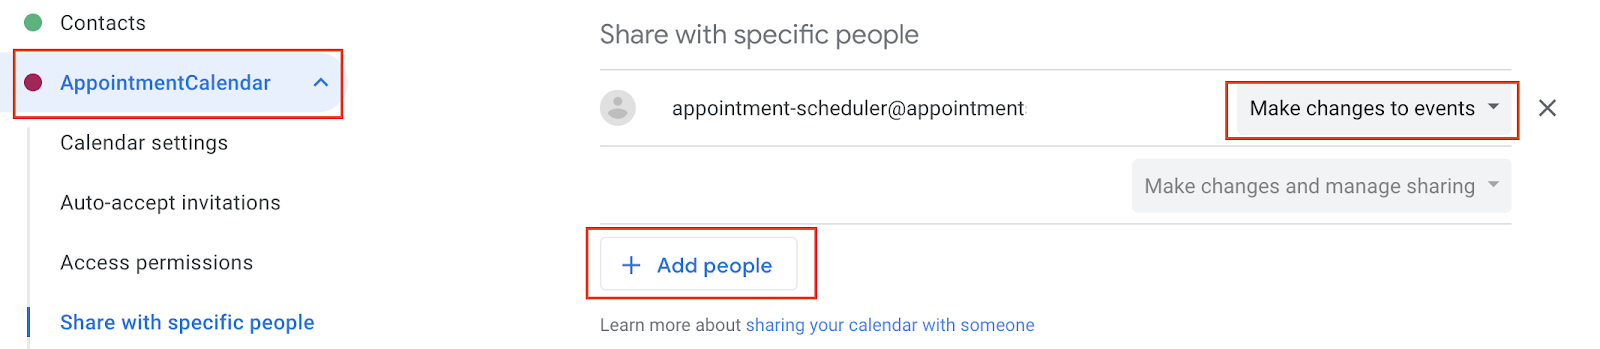
- 설정에 있는 동안 캘린더 통합으로 스크롤하여 캘린더 ID를 복사합니다.

6. Dialogflow에서 Fulfillment 설정
이행에 서비스 계정 및 캘린더 ID 추가
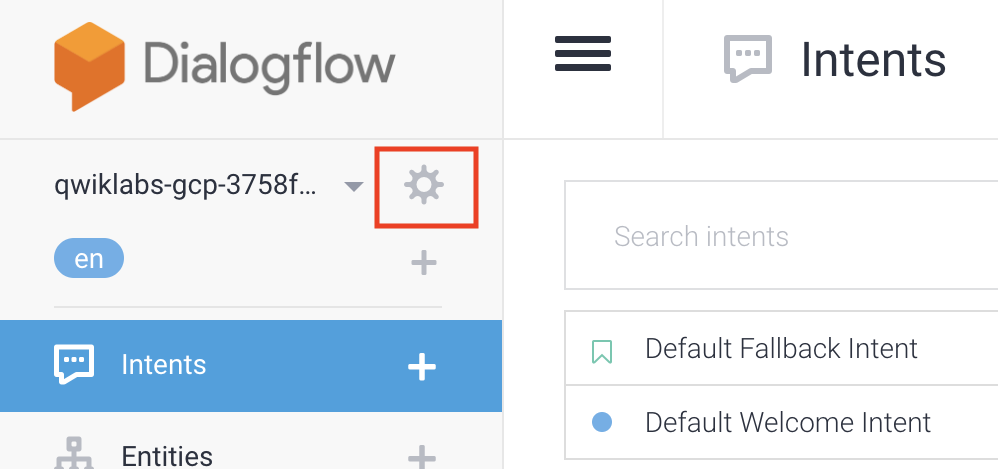
- AppointmentScheduler Dialogflow 에이전트로 이동하여 Fulfillment를 클릭합니다.
- 인라인 편집기를 사용 설정합니다.

- 다음 코드를 사용하여
index.js파일을 업데이트합니다.
'use strict';

// Import the Dialogflow module from Google client libraries.
const functions = require('firebase-functions');
const {google} = require('googleapis');
const {WebhookClient} = require('dialogflow-fulfillment');

// Enter your calendar ID below and service account JSON below
const calendarId = "<INSERT YOUR CALENDAR ID>";
const serviceAccount = {<INSERT CONTENTS OF YOUr JSON FILE HERE>}; // Starts with {"type": "service_account",...

// Set up Google Calendar Service account credentials
const serviceAccountAuth = new google.auth.JWT({
 email: serviceAccount.client_email,
 key: serviceAccount.private_key,
 scopes: 'https://www.googleapis.com/auth/calendar'
});

const calendar = google.calendar('v3');
process.env.DEBUG = 'dialogflow:*'; // enables lib debugging statements

const timeZone = 'America/Los_Angeles';
const timeZoneOffset = '-07:00';

// Set the DialogflowApp object to handle the HTTPS POST request.
exports.dialogflowFirebaseFulfillment = functions.https.onRequest((request, response) => {
 const agent = new WebhookClient({ request, response });
 console.log("Parameters", agent.parameters);
 const appointment_type = agent.parameters.appointment_type;
 function makeAppointment (agent) {
   // Calculate appointment start and end datetimes (end = +1hr from start)
   const dateTimeStart = new Date(Date.parse(agent.parameters.date.split('T')[0] + 'T' + agent.parameters.time.split('T')[1].split('-')[0] + timeZoneOffset));
   const dateTimeEnd = new Date(new Date(dateTimeStart).setHours(dateTimeStart.getHours() + 1));
   const appointmentTimeString = dateTimeStart.toLocaleString(
     'en-US',
     { month: 'long', day: 'numeric', hour: 'numeric', timeZone: timeZone }
   );
    // Check the availability of the time, and make an appointment if there is time on the calendar
   return createCalendarEvent(dateTimeStart, dateTimeEnd, appointment_type).then(() => {
     agent.add(`Ok, let me see if we can fit you in. ${appointmentTimeString} is fine!.`);
   }).catch(() => {
     agent.add(`I'm sorry, there are no slots available for ${appointmentTimeString}.`);
   });
 }

// Handle the Dialogflow intent named 'Schedule Appointment'.
 let intentMap = new Map();
 intentMap.set('Schedule Appointment', makeAppointment);
 agent.handleRequest(intentMap);
});

//Creates calendar event in Google Calendar
function createCalendarEvent (dateTimeStart, dateTimeEnd, appointment_type) {
 return new Promise((resolve, reject) => {
   calendar.events.list({
     auth: serviceAccountAuth, // List events for time period
     calendarId: calendarId,
     timeMin: dateTimeStart.toISOString(),
     timeMax: dateTimeEnd.toISOString()
   }, (err, calendarResponse) => {
     // Check if there is a event already on the Calendar
     if (err || calendarResponse.data.items.length > 0) {
       reject(err || new Error('Requested time conflicts with another appointment'));
     } else {
       // Create event for the requested time period
       calendar.events.insert({ auth: serviceAccountAuth,
         calendarId: calendarId,
         resource: {summary: appointment_type +' Appointment', description: appointment_type,
           start: {dateTime: dateTimeStart},
           end: {dateTime: dateTimeEnd}}
       }, (err, event) => {
         err ? reject(err) : resolve(event);
       }
       );
     }
   });
 });
}
<INSERT YOUR CALENDAR ID>를 이전 섹션에서 복사한 Calendar ID로 바꿉니다.<INSERT CONTENTS OF YOUR JSON FILE HERE>을 JSON 파일의 내용으로 바꿉니다.- (선택사항) 약속 캘린더의 시간대에 따라 const timeZone 및 const timeZoneOffset을 변경합니다.
- 배포를 클릭합니다.
fulfillment 응답 사용 설정
- Dialogflow 콘솔로 이동하여 인텐트를 클릭합니다.
- Schedule Appointment Intent를 클릭합니다.
- Fulfillment로 스크롤하여 Enable webhook call for the intent를 사용 설정합니다.
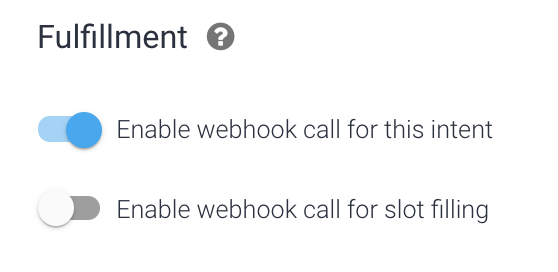
- 저장을 클릭합니다.
- 배포를 클릭합니다.
7. 챗봇 테스트
Actions 시뮬레이터에서 챗봇을 테스트하거나 이전에 알아본 웹 또는 Google Home 통합을 사용할 수 있습니다.
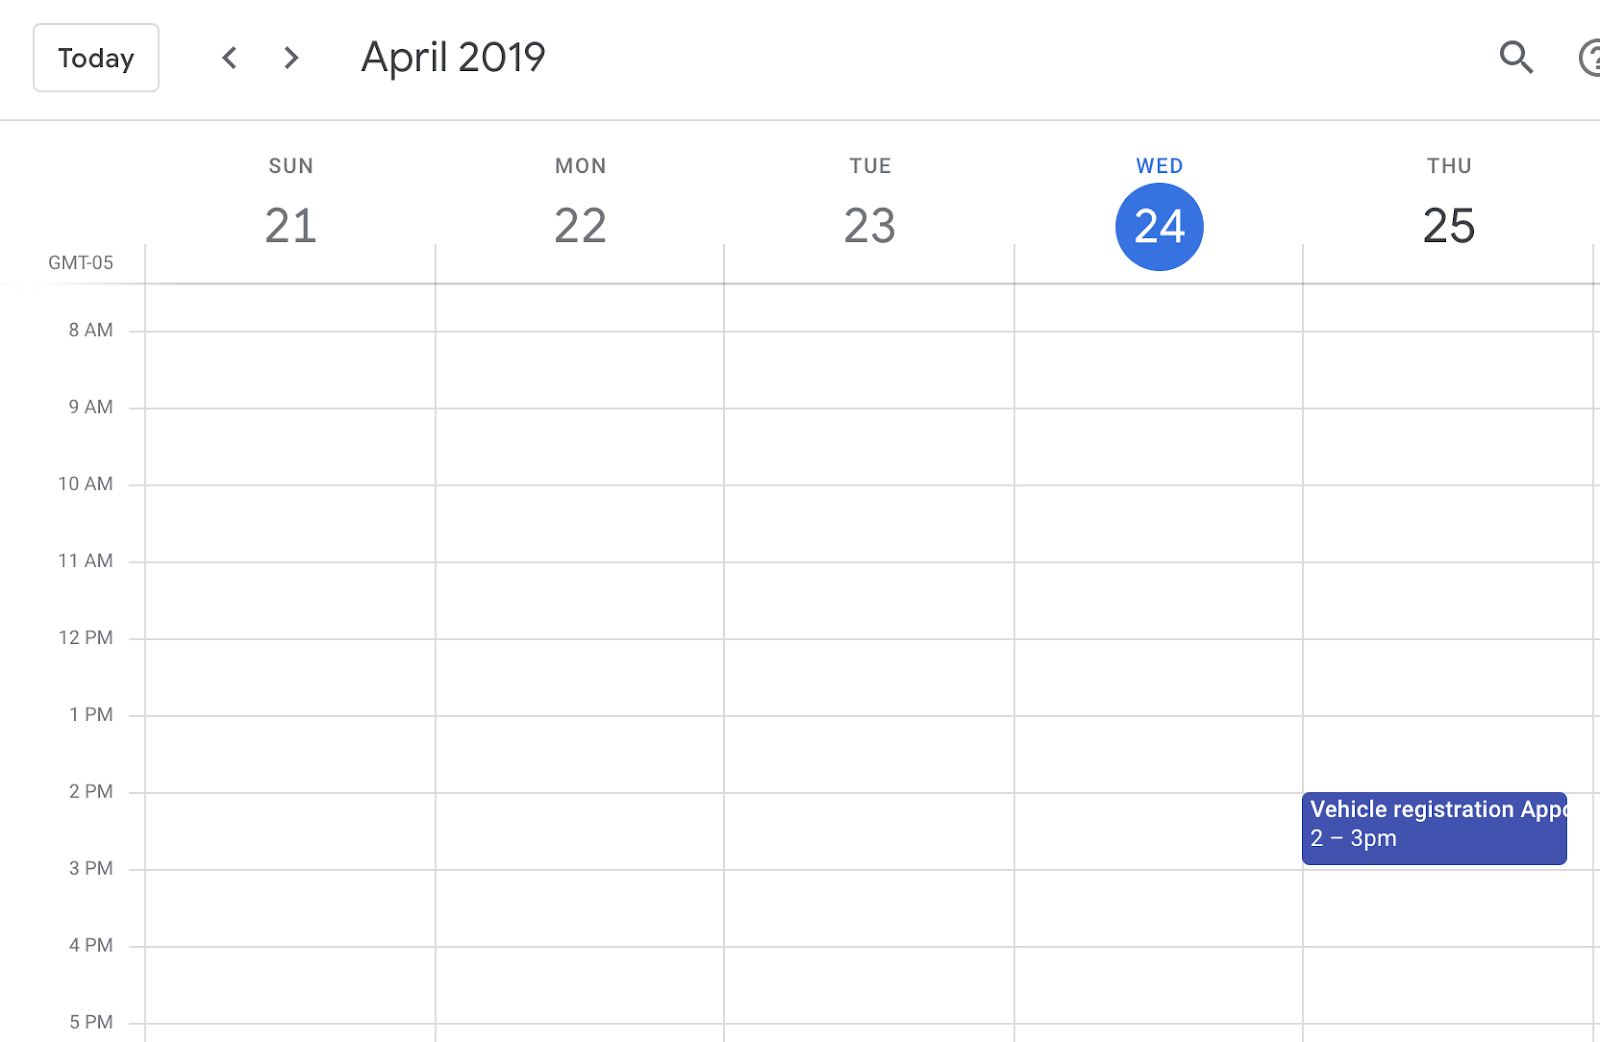
- 사용자: "내일 오후 2시에 차량 등록 약속을 잡아 줘."
- 챗봇: '알겠습니다. 예약이 가능한지 확인해 보겠습니다. 4월 24일 오후 2시가 좋습니다.'
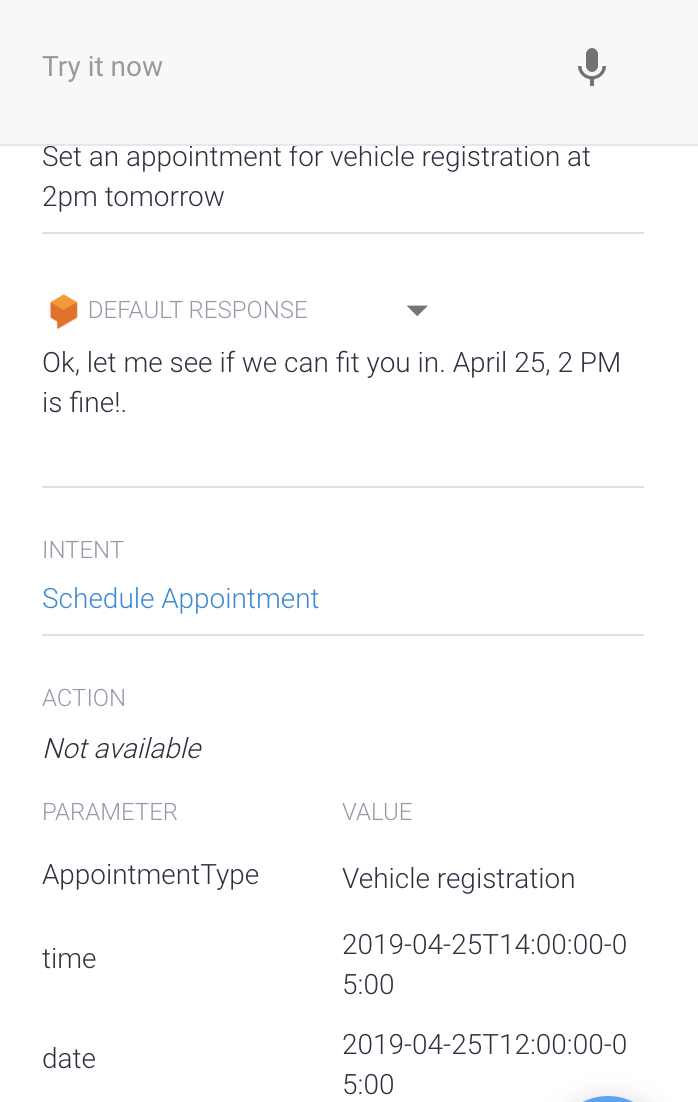
- Calendar에서 응답을 예약합니다.
8. 삭제
다른 Dialogflow Codelab을 완료할 계획이라면 지금은 이 섹션을 건너뛰고 나중에 다시 돌아오세요.
Dialogflow 에이전트 삭제
- 기존 상담사 옆에 있는
 아이콘을 클릭합니다.
- 일반 탭에서 하단으로 스크롤하여 이 에이전트 삭제를 클릭합니다.
- 대화상자에 삭제를 입력하고 삭제를 클릭합니다.
9. 축하합니다
Dialogflow에서 챗봇을 만들고 Calendar와 통합했습니다. 이제 챗봇 개발자가 되었습니다.
자세히 알아보기
자세한 내용은 Dialogflow GitHub 페이지의 코드 샘플을 참고하세요.