
1. ก่อนเริ่มต้น
ในโค้ดแล็บนี้ คุณจะได้เรียนรู้วิธีที่ Dialogflow เชื่อมต่อกับระบบแบ็กเอนด์เพื่อแสดงคำตอบที่สมบูรณ์และเป็นแบบไดนามิกต่อคำถามของผู้ใช้
ข้อกำหนดเบื้องต้น
ก่อนดำเนินการต่อ คุณต้องทำตาม Codelab ต่อไปนี้ให้เสร็จ
- สร้างเครื่องมือตั้งเวลานัดหมายด้วย Dialogflow
- ผสานรวม Dialogflow กับ Actions on Google
- ทําความเข้าใจเอนทิตีใน Dialogflow
นอกจากนี้ คุณยังต้องทำความเข้าใจแนวคิดและโครงสร้างพื้นฐานของ Dialogflow ซึ่งคุณสามารถดูได้จากวิดีโอต่อไปนี้ในเส้นทางสร้างแชทบอทด้วย Dialogflow
สิ่งที่คุณจะได้เรียนรู้
- การดำเนินการตามคำสั่งซื้อคืออะไร
- วิธีตั้งค่าบัญชีบริการสำหรับปฏิทิน
- วิธีตั้งค่าปฏิทิน
- วิธีเปิดใช้การดำเนินการตามคำสั่งใน Dialogflow
- วิธีทดสอบการดำเนินการตามคำสั่งซื้อ
สิ่งที่คุณจะสร้าง
- การดำเนินการตามคำสั่งโดยใช้ Cloud Functions
- การผสานรวมระหว่าง Dialogflow กับปฏิทิน
สิ่งที่คุณต้องมี
- เว็บเบราว์เซอร์และอีเมลสำหรับเข้าสู่ระบบคอนโซล Dialogflow
- บัญชี Google เพื่อเข้าถึงปฏิทิน
2. การดำเนินการตามคำสั่งคืออะไร
การดำเนินการตามคำสั่งคือโค้ดที่ได้รับการติดตั้งใช้งานเป็น Webhook ซึ่งช่วยให้เอเจนต์ Dialogflow เรียกตรรกะทางธุรกิจตามความตั้งใจได้ ในระหว่างการสนทนา การดำเนินการตามคำสั่งจะช่วยให้คุณใช้ข้อมูลที่ดึงออกมาโดยการประมวลผลภาษาธรรมชาติของ Dialogflow เพื่อสร้างคำตอบแบบไดนามิกหรือทริกเกอร์การดำเนินการในแบ็กเอนด์ได้ Agent ของ Dialogflow ส่วนใหญ่ใช้การดำเนินการตามคำสั่ง
ตัวอย่างกรณีที่คุณใช้การดำเนินการตามคำสั่งเพื่อขยายเอเจนต์ได้มีดังนี้
- เพื่อสร้างคำตอบแบบไดนามิกโดยอิงตามข้อมูลที่ค้นหาจากฐานข้อมูล
- เพื่อสั่งซื้อตามผลิตภัณฑ์ที่ลูกค้าขอ
- เพื่อใช้กฎและเงื่อนไขการชนะสำหรับเกม
3. เปิดใช้ Calendar API
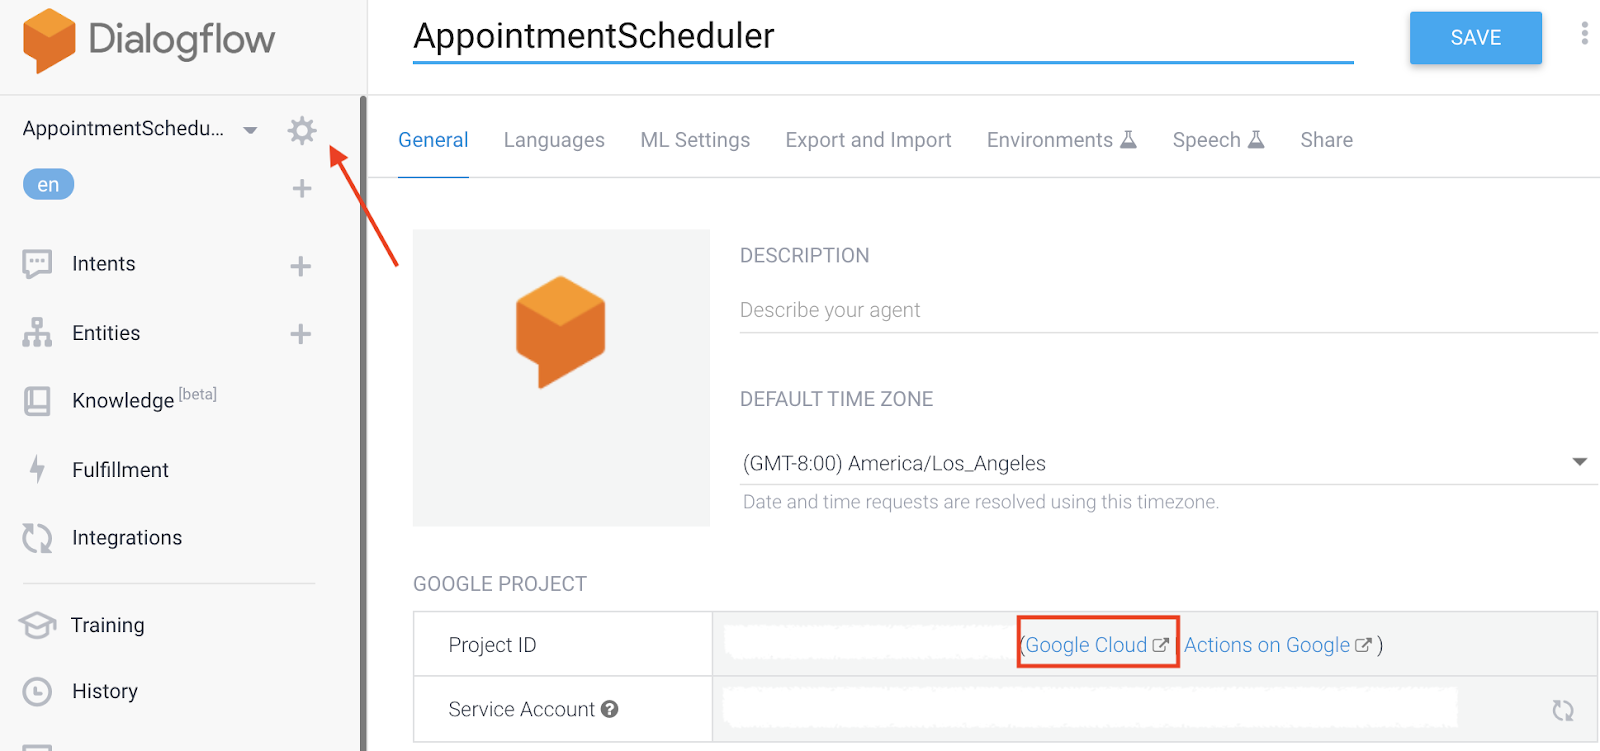
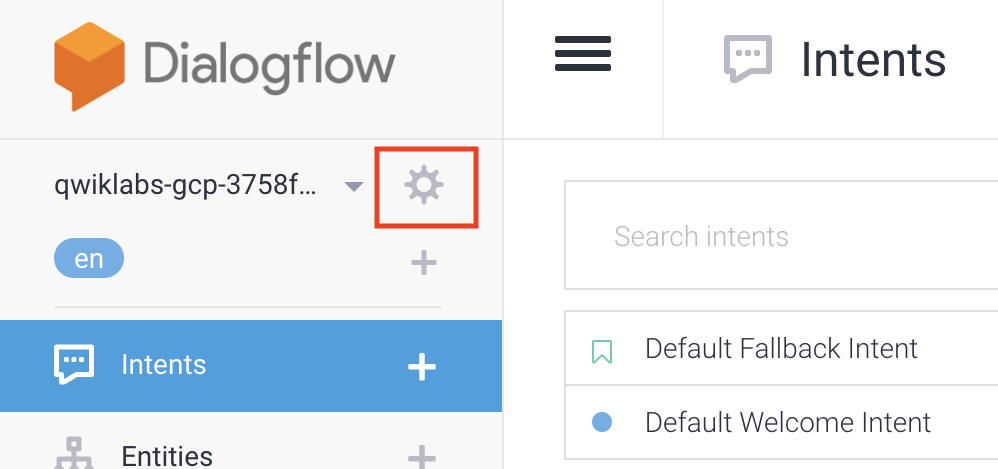
- ในคอนโซลของ Dialogflow ให้คลิก

- ในแท็บทั่วไป ให้เลื่อนไปที่รหัสโปรเจ็กต์ แล้วคลิก Google Cloud

- ในคอนโซล Google Cloud ให้คลิกเมนูการนำทาง ☰ > API และบริการ > ไลบรารี
- ค้นหา "Google Calendar API" แล้วคลิกเปิดใช้เพื่อใช้ API ในโปรเจ็กต์ Google Cloud
4. ตั้งค่าบัญชีบริการ
- คลิกเมนูการนำทาง ☰ > API และบริการ > ข้อมูลเข้าสู่ระบบ
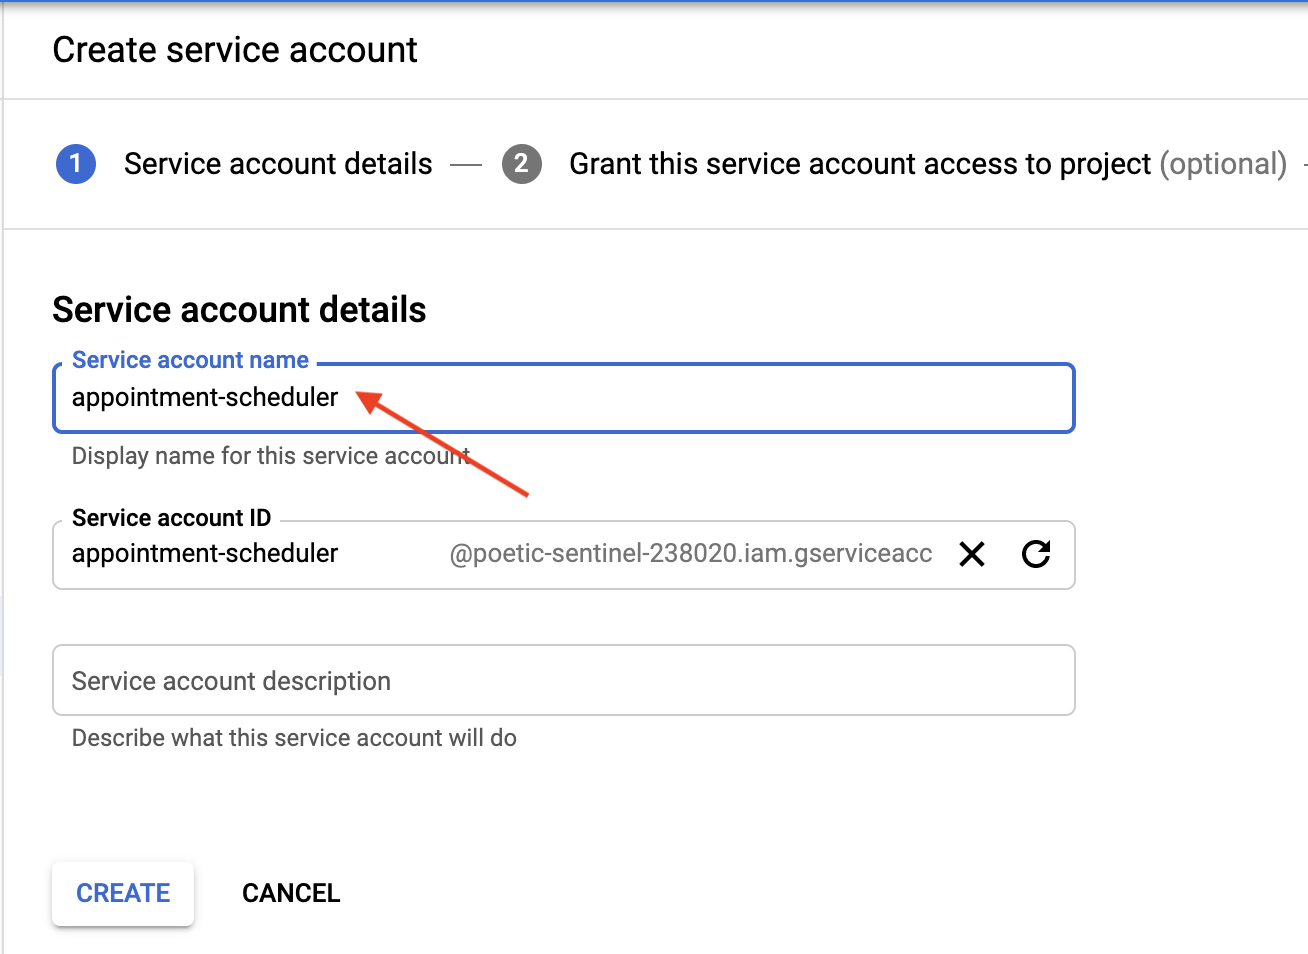
- คลิกสร้างข้อมูลเข้าสู่ระบบ > บัญชีบริการ

- ในรายละเอียดบัญชีบริการ ให้ป้อน "appointment-scheduler" เป็นชื่อบัญชีบริการ แล้วคลิกสร้าง
- ในส่วนที่ระบุว่าให้สิทธิ์เข้าถึงโปรเจ็กต์แก่บัญชีบริการนี้ ให้คลิกต่อไปเพื่อข้าม
- ในส่วนที่ระบุว่าให้สิทธิ์ผู้ใช้เข้าถึงบัญชีบริการนี้ (ไม่บังคับ) ให้คลิกสร้างคีย์ จากนั้นเลือก JSON แล้วคลิกสร้าง
ระบบจะดาวน์โหลดไฟล์ JSON ลงในคอมพิวเตอร์ ซึ่งคุณจะต้องใช้ในส่วนการตั้งค่าต่อไปนี้ 
5. การตั้งค่าปฏิทิน
- ไปที่ปฏิทิน แล้วคลิกเมนูหลัก ☰ > เพิ่มปฏิทินอื่น
 > สร้างปฏิทินใหม่
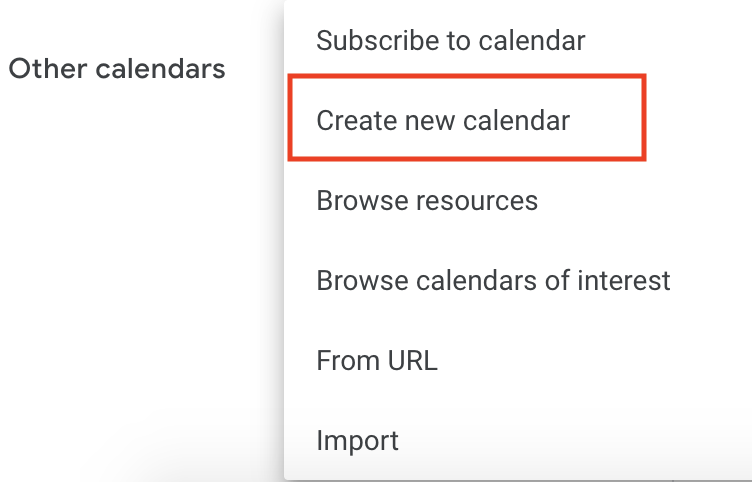
- ป้อน "ปฏิทินการนัดหมาย" เป็นชื่อปฏิทิน แล้วคลิกสร้างปฏิทิน
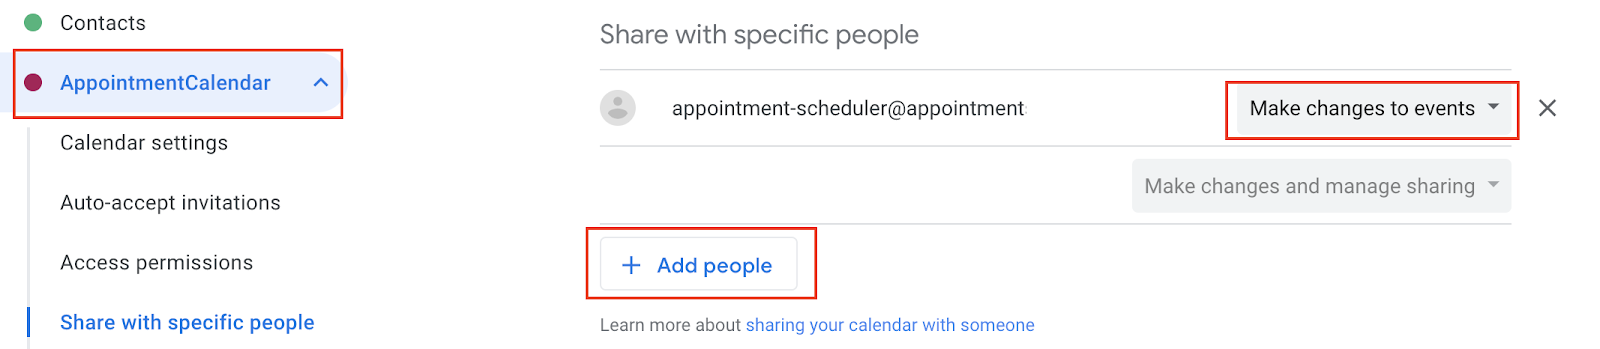
- โหลดหน้าเว็บซ้ำ จากนั้นคลิกปฏิทินการนัดหมาย เลื่อนไปที่แชร์กับบุคคลที่ระบุ แล้วคลิกเพิ่มบุคคล
- คัดลอก
client_emailจากไฟล์ JSON ที่คุณดาวน์โหลดเป็นส่วนหนึ่งของการตั้งค่าบัญชีบริการ แล้ววางลงในกล่องโต้ตอบ

- คลิกลูกศรลงของรายการแบบเลื่อนลงสิทธิ์ จากนั้นคลิกทำการเปลี่ยนแปลงกิจกรรม > ส่ง
- ขณะที่ยังอยู่ในการตั้งค่า ให้เลื่อนไปที่ใช้งานร่วมกับปฏิทิน แล้วคัดลอกรหัสปฏิทิน

6. ตั้งค่าการดำเนินการตามคำสั่งใน Dialogflow
เพิ่มบัญชีบริการและรหัสปฏิทินลงในการจัดการคำสั่งซื้อ
- ไปที่เอเจนต์ Dialogflow ของ AppointmentScheduler แล้วคลิก Fulfillment
- เปิดใช้เครื่องมือแก้ไขในหน้า

- อัปเดตไฟล์
index.jsด้วยโค้ดต่อไปนี้
'use strict';

// Import the Dialogflow module from Google client libraries.
const functions = require('firebase-functions');
const {google} = require('googleapis');
const {WebhookClient} = require('dialogflow-fulfillment');

// Enter your calendar ID below and service account JSON below
const calendarId = "<INSERT YOUR CALENDAR ID>";
const serviceAccount = {<INSERT CONTENTS OF YOUr JSON FILE HERE>}; // Starts with {"type": "service_account",...

// Set up Google Calendar Service account credentials
const serviceAccountAuth = new google.auth.JWT({
 email: serviceAccount.client_email,
 key: serviceAccount.private_key,
 scopes: 'https://www.googleapis.com/auth/calendar'
});

const calendar = google.calendar('v3');
process.env.DEBUG = 'dialogflow:*'; // enables lib debugging statements

const timeZone = 'America/Los_Angeles';
const timeZoneOffset = '-07:00';

// Set the DialogflowApp object to handle the HTTPS POST request.
exports.dialogflowFirebaseFulfillment = functions.https.onRequest((request, response) => {
 const agent = new WebhookClient({ request, response });
 console.log("Parameters", agent.parameters);
 const appointment_type = agent.parameters.appointment_type;
 function makeAppointment (agent) {
   // Calculate appointment start and end datetimes (end = +1hr from start)
   const dateTimeStart = new Date(Date.parse(agent.parameters.date.split('T')[0] + 'T' + agent.parameters.time.split('T')[1].split('-')[0] + timeZoneOffset));
   const dateTimeEnd = new Date(new Date(dateTimeStart).setHours(dateTimeStart.getHours() + 1));
   const appointmentTimeString = dateTimeStart.toLocaleString(
     'en-US',
     { month: 'long', day: 'numeric', hour: 'numeric', timeZone: timeZone }
   );
    // Check the availability of the time, and make an appointment if there is time on the calendar
   return createCalendarEvent(dateTimeStart, dateTimeEnd, appointment_type).then(() => {
     agent.add(`Ok, let me see if we can fit you in. ${appointmentTimeString} is fine!.`);
   }).catch(() => {
     agent.add(`I'm sorry, there are no slots available for ${appointmentTimeString}.`);
   });
 }

// Handle the Dialogflow intent named 'Schedule Appointment'.
 let intentMap = new Map();
 intentMap.set('Schedule Appointment', makeAppointment);
 agent.handleRequest(intentMap);
});

//Creates calendar event in Google Calendar
function createCalendarEvent (dateTimeStart, dateTimeEnd, appointment_type) {
 return new Promise((resolve, reject) => {
   calendar.events.list({
     auth: serviceAccountAuth, // List events for time period
     calendarId: calendarId,
     timeMin: dateTimeStart.toISOString(),
     timeMax: dateTimeEnd.toISOString()
   }, (err, calendarResponse) => {
     // Check if there is a event already on the Calendar
     if (err || calendarResponse.data.items.length > 0) {
       reject(err || new Error('Requested time conflicts with another appointment'));
     } else {
       // Create event for the requested time period
       calendar.events.insert({ auth: serviceAccountAuth,
         calendarId: calendarId,
         resource: {summary: appointment_type +' Appointment', description: appointment_type,
           start: {dateTime: dateTimeStart},
           end: {dateTime: dateTimeEnd}}
       }, (err, event) => {
         err ? reject(err) : resolve(event);
       }
       );
     }
   });
 });
}
- แทนที่
<INSERT YOUR CALENDAR ID>ด้วยรหัสปฏิทินที่คุณคัดลอกในส่วนก่อนหน้า - แทนที่
<INSERT CONTENTS OF YOUR JSON FILE HERE>ด้วยเนื้อหาของไฟล์ JSON - (ไม่บังคับ) เปลี่ยน const timeZone และ const timeZoneOffset ตามเขตเวลาสำหรับปฏิทินการนัดหมาย
- คลิกทำให้ใช้งานได้
เปิดใช้การตอบกลับการดำเนินการ
- ไปที่คอนโซล Dialogflow แล้วคลิกเจตนา
- คลิก Schedule Appointment Intent
- เลื่อนลงไปที่การดำเนินการตามคำสั่งซื้อ แล้วเปิดเปิดใช้การเรียกใช้ Webhook สำหรับ Intent
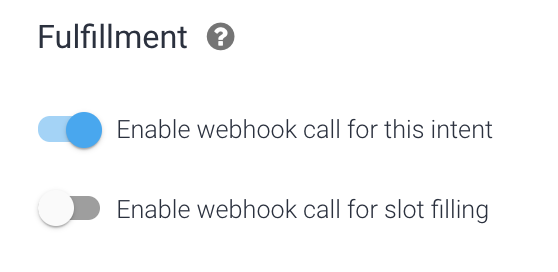
- คลิกบันทึก
- คลิกทำให้ใช้งานได้
7. ทดสอบแชทบ็อต
คุณสามารถทดสอบแชทบอทในเครื่องจำลอง Actions หรือใช้การผสานรวมเว็บหรือ Google Home ที่คุณได้เรียนรู้ไปก่อนหน้านี้
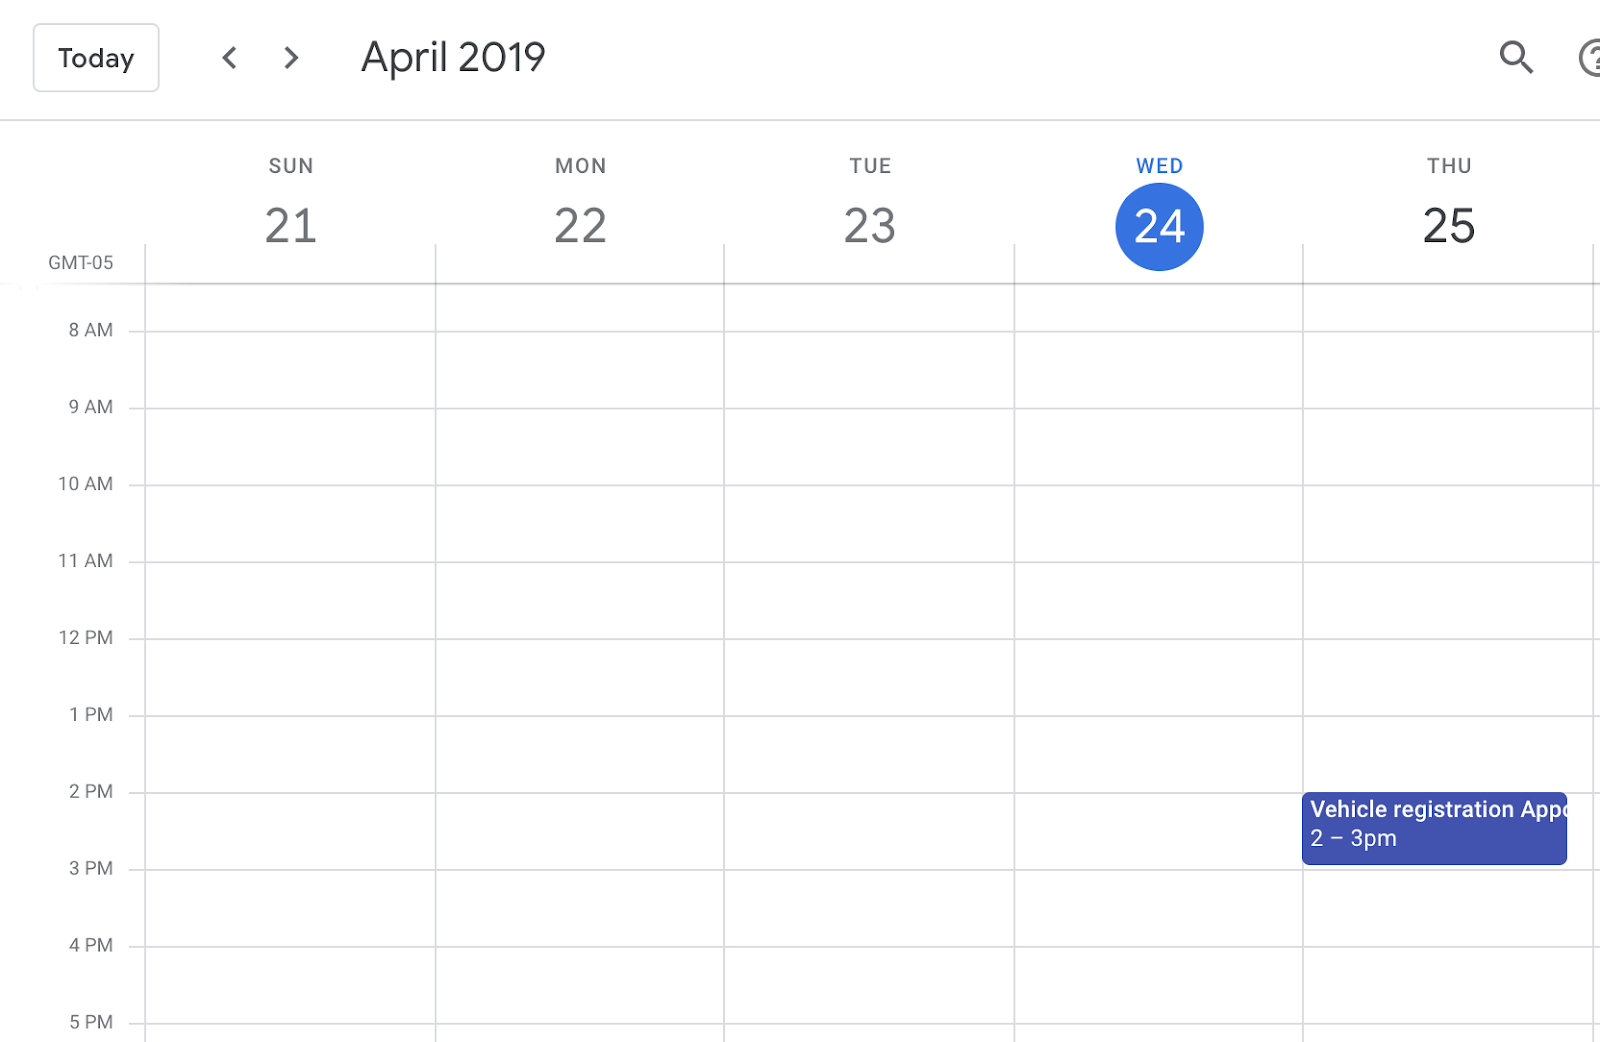
- ผู้ใช้: "นัดหมายการจดทะเบียนยานพาหนะเวลา 14:00 น. พรุ่งนี้"
- แชทบอท: "โอเค เดี๋ยวฉันดูให้ว่าเราจะจัดเวลาให้คุณได้ไหม วันที่ 24 เมษายน เวลา 14:00 น. ได้เลย"

- ปฏิทินจะบันทึกคำตอบ
8. ล้างข้อมูล
หากคุณวางแผนที่จะทำ Codelab อื่นๆ ของ Dialogflow ให้เสร็จสมบูรณ์ ให้ข้ามส่วนนี้ไปก่อนและกลับมาทำในภายหลัง
ลบเอเจนต์ Dialogflow
- คลิก
 ข้างตัวแทนที่มีอยู่
- ในแท็บทั่วไป ให้เลื่อนไปที่ด้านล่างแล้วคลิกลบเอเจนต์นี้
- พิมพ์ลบในกล่องโต้ตอบ แล้วคลิกลบ
9. ขอแสดงความยินดี
คุณสร้างแชทบอทใน Dialogflow และผสานรวมกับปฏิทิน ตอนนี้คุณเป็นนักพัฒนาแชทบ็อตแล้ว
ดูข้อมูลเพิ่มเติม
ดูข้อมูลเพิ่มเติมได้ที่ตัวอย่างโค้ดในหน้า Dialogflow Github