
1. Introduction
The Modern Agent Stack
Building a production-grade AI agent requires more than just a large language model (LLM). While an LLM provides the reasoning capabilities, a robust agent needs to interact with the outside world, manage conversation state, and remember user preferences over time.
In this workshop, you will learn how to architect and build a comprehensive agentic system using three foundational technologies:
- Connectivity (MCP): To give your agent access to local tools and data.
- Orchestration (ADK): To manage the agent's reasoning loop and state.
- Memory (Memory Bank): To provide long-term, personalized context.
Core Concepts
Component | Function |
Model Context Protocol (MCP) | A universal standard that connects AI models to external systems (databases, filesystems, APIs) without custom integrations. |
Agent Development Kit (ADK) | A framework that provides the runtime environment for agents, managing the event loop, state transitions, and tool execution. |
Session Service | Handles short-term memory. It preserves the immediate conversation context (e.g., "What did the user just ask?") but is cleared when the session ends. |
Vertex AI Memory Bank | Handles long-term memory. It persists user-specific facts and preferences (e.g., "User prefers Python") indefinitely, allowing the agent to personalize future interactions. |
Vertex AI Agent Engine | The managed infrastructure service that hosts your agent logic and memory components at scale. |
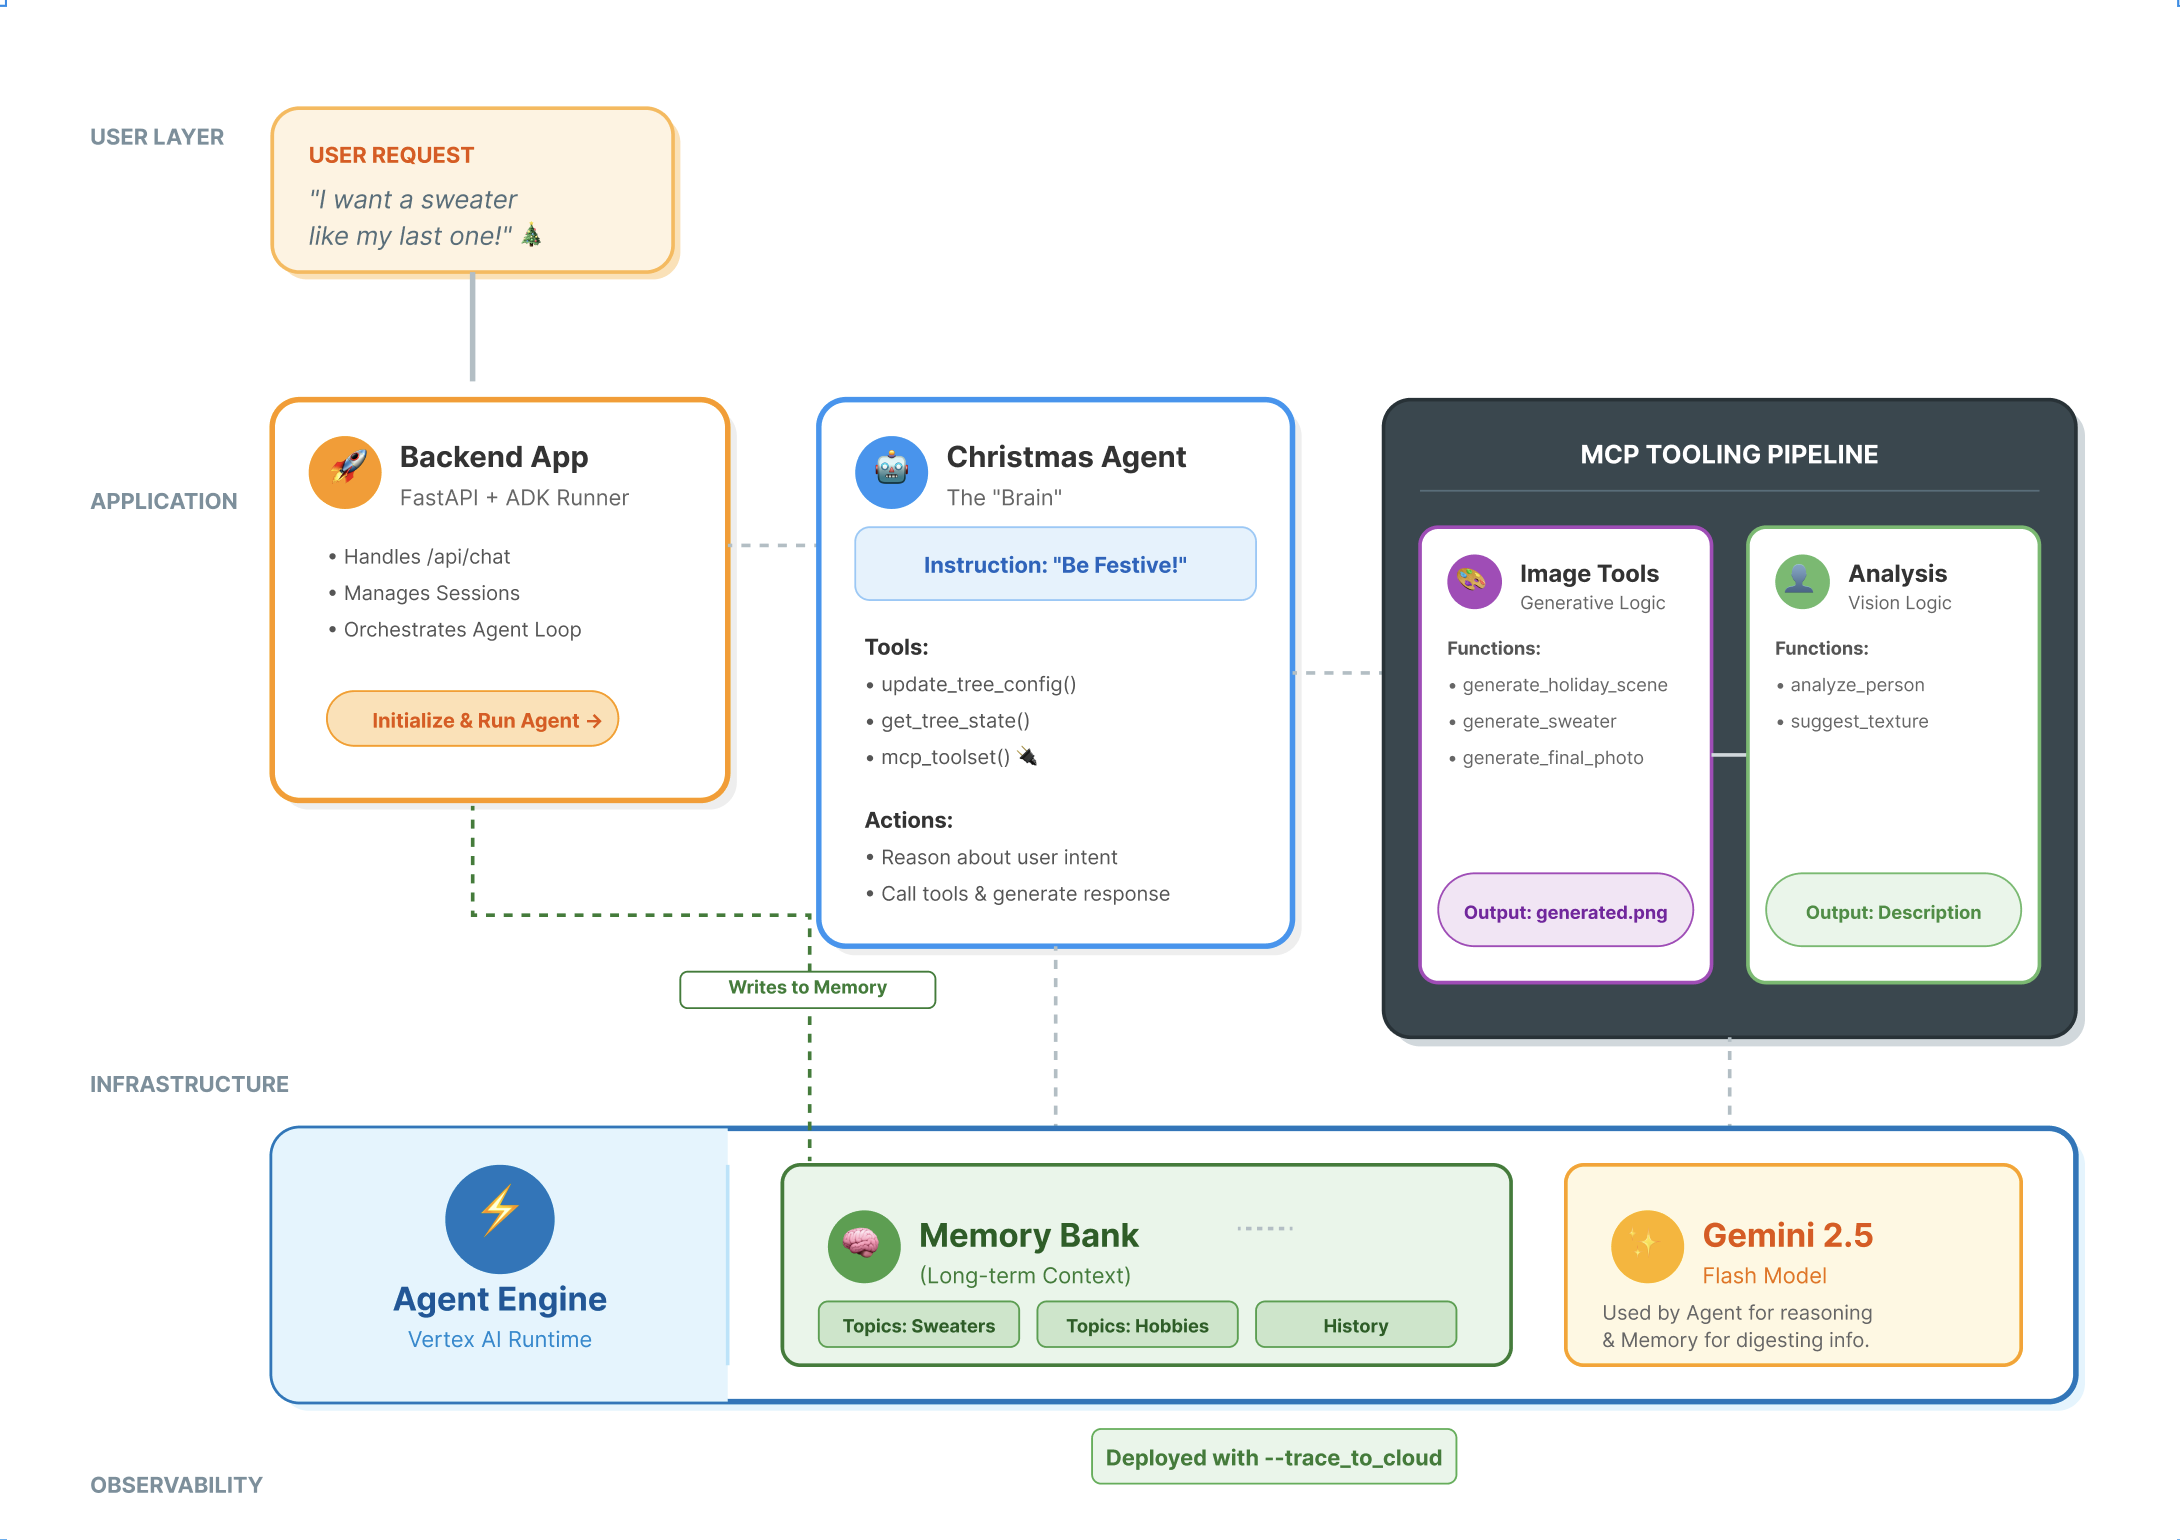
What You Will Build
To demonstrate these concepts, you will build a Holiday Design Assistant. This agent will be capable of taking high-level user requests and autonomously orchestrating local Python tools to generate personalized code and images.
You will progress through three stages:
- Tooling Layer: Create an MCP server to expose local Python functions to the AI.
- Agent Layer: Use ADK to build an agent that plans and executes multi-step workflows.
- Memory Layer: Integrate Memory Bank to enable the agent to learn and remember user style preferences.
2. Set Up
To power our AI agents, we need two things: a Google Cloud Project to provide the foundation.
Part One: Enable Billing Account
To run this codelab, you need a billing account with some credit. Use the credits from the banner at the top of this codelab to get started. If you are already connected to a billing account, you can skip this step.
Part Two: Open Environment
- 👉 Click this link to navigate directly to Cloud Shell Editor
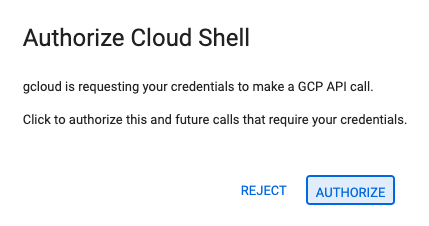
- 👉 If prompted to authorize at any point today, click Authorize to continue.
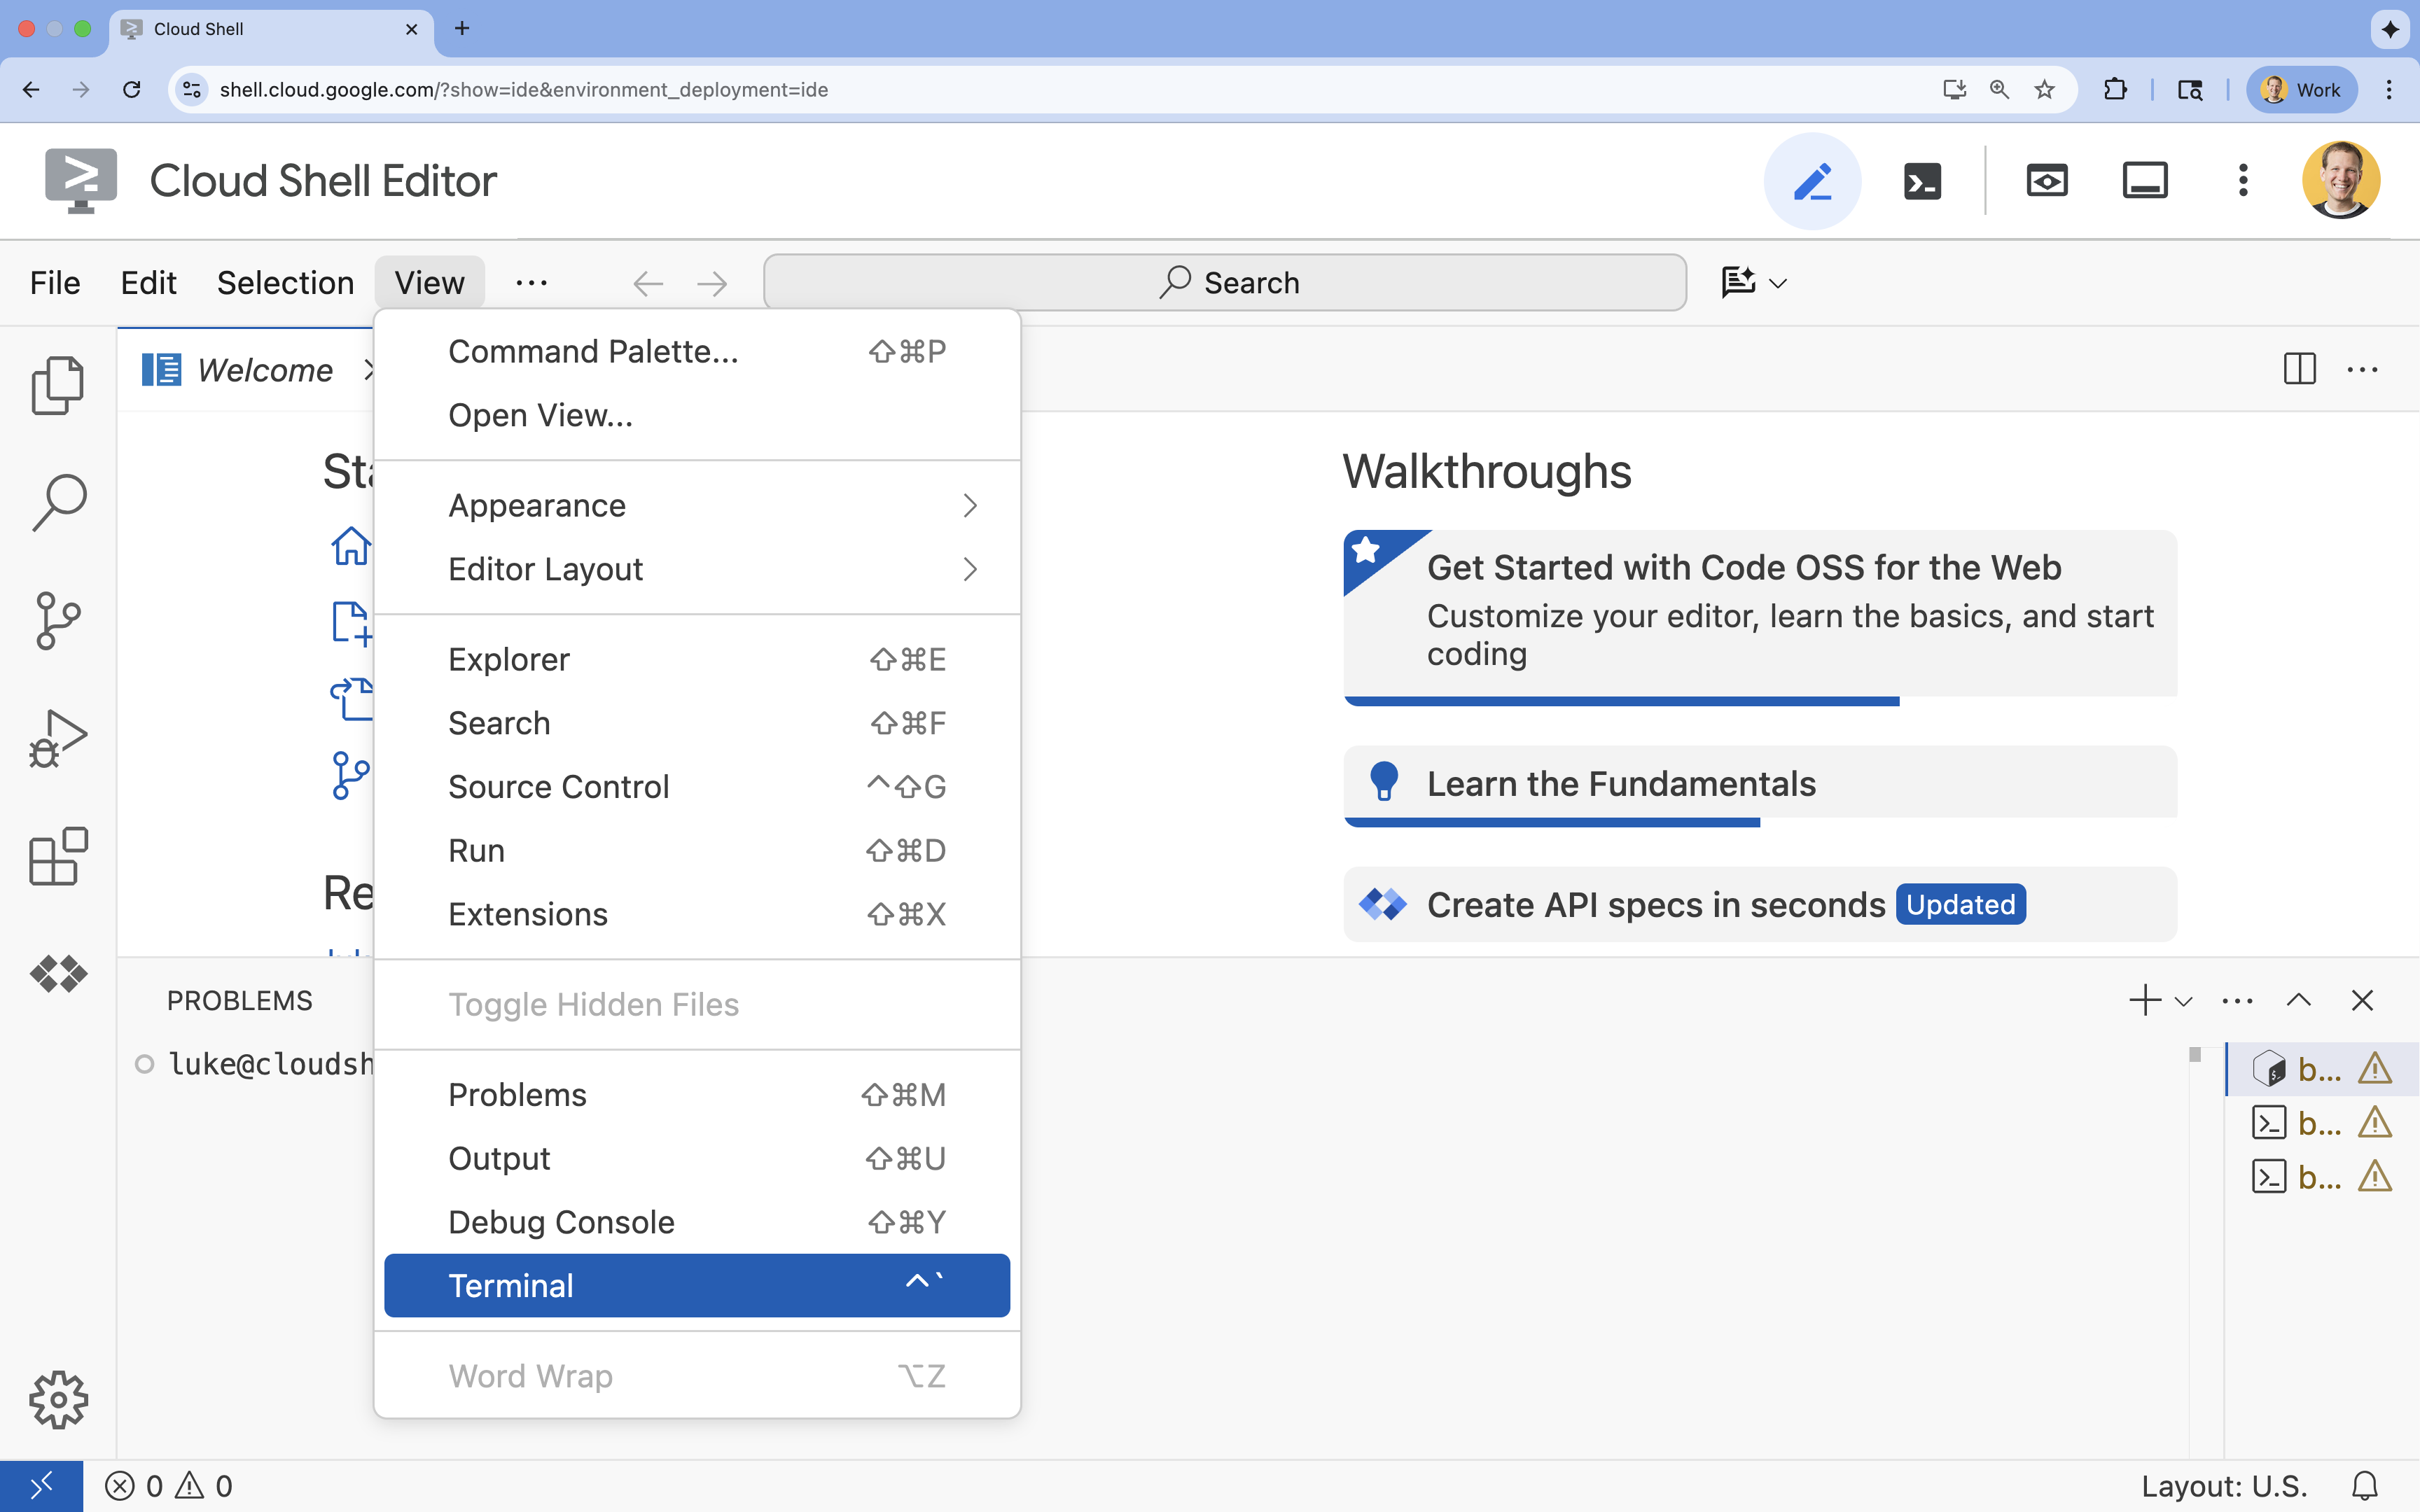
- 👉 If the terminal doesn't appear at the bottom of the screen, open it:
- Click View
- Click Terminal
- 👉💻 In the terminal, verify that you're already authenticated and that the project is set to your project ID using the following command:
gcloud auth list - 👉💻 Clone the bootstrap project from GitHub:
git clone https://github.com/cuppibla/holiday_workshop - 👉💻 Run the setup script from the project directory.
cd ~/holiday_workshop ./init.sh - 👉💻 Set the Project ID needed:
gcloud config set project $(cat ~/project_id.txt) --quiet
Part Three: Setting up permission
- 👉💻 Enable the required APIs using the following command. This could take a few minutes.
gcloud services enable \ cloudresourcemanager.googleapis.com \ servicenetworking.googleapis.com \ run.googleapis.com \ aiplatform.googleapis.com \ compute.googleapis.com - 👉💻 Grant the necessary permissions by running the following commands in the terminal:
. ~/holiday_workshop/set_env.sh
Notice that a .env file is created for you. That shows your project information.
3. Powering Up with MCP
The "USB-C" Moment for AI
Imagine if every time you bought a new mouse, you had to solder it to your motherboard. That was the state of AI tools until recently. Developers had to write custom "glue code" to connect LLMs to databases, filesystems, or APIs.
Enter the Model Context Protocol (MCP). Think of MCP as the USB-C port for AI applications. It provides a standardized way to connect AI models to data sources and tools.
If you build an MCP server for your tools once, you can plug it into Gemini CLI, an IDE, or any other MCP-compliant client without changing a single line of code.
What You Will Build
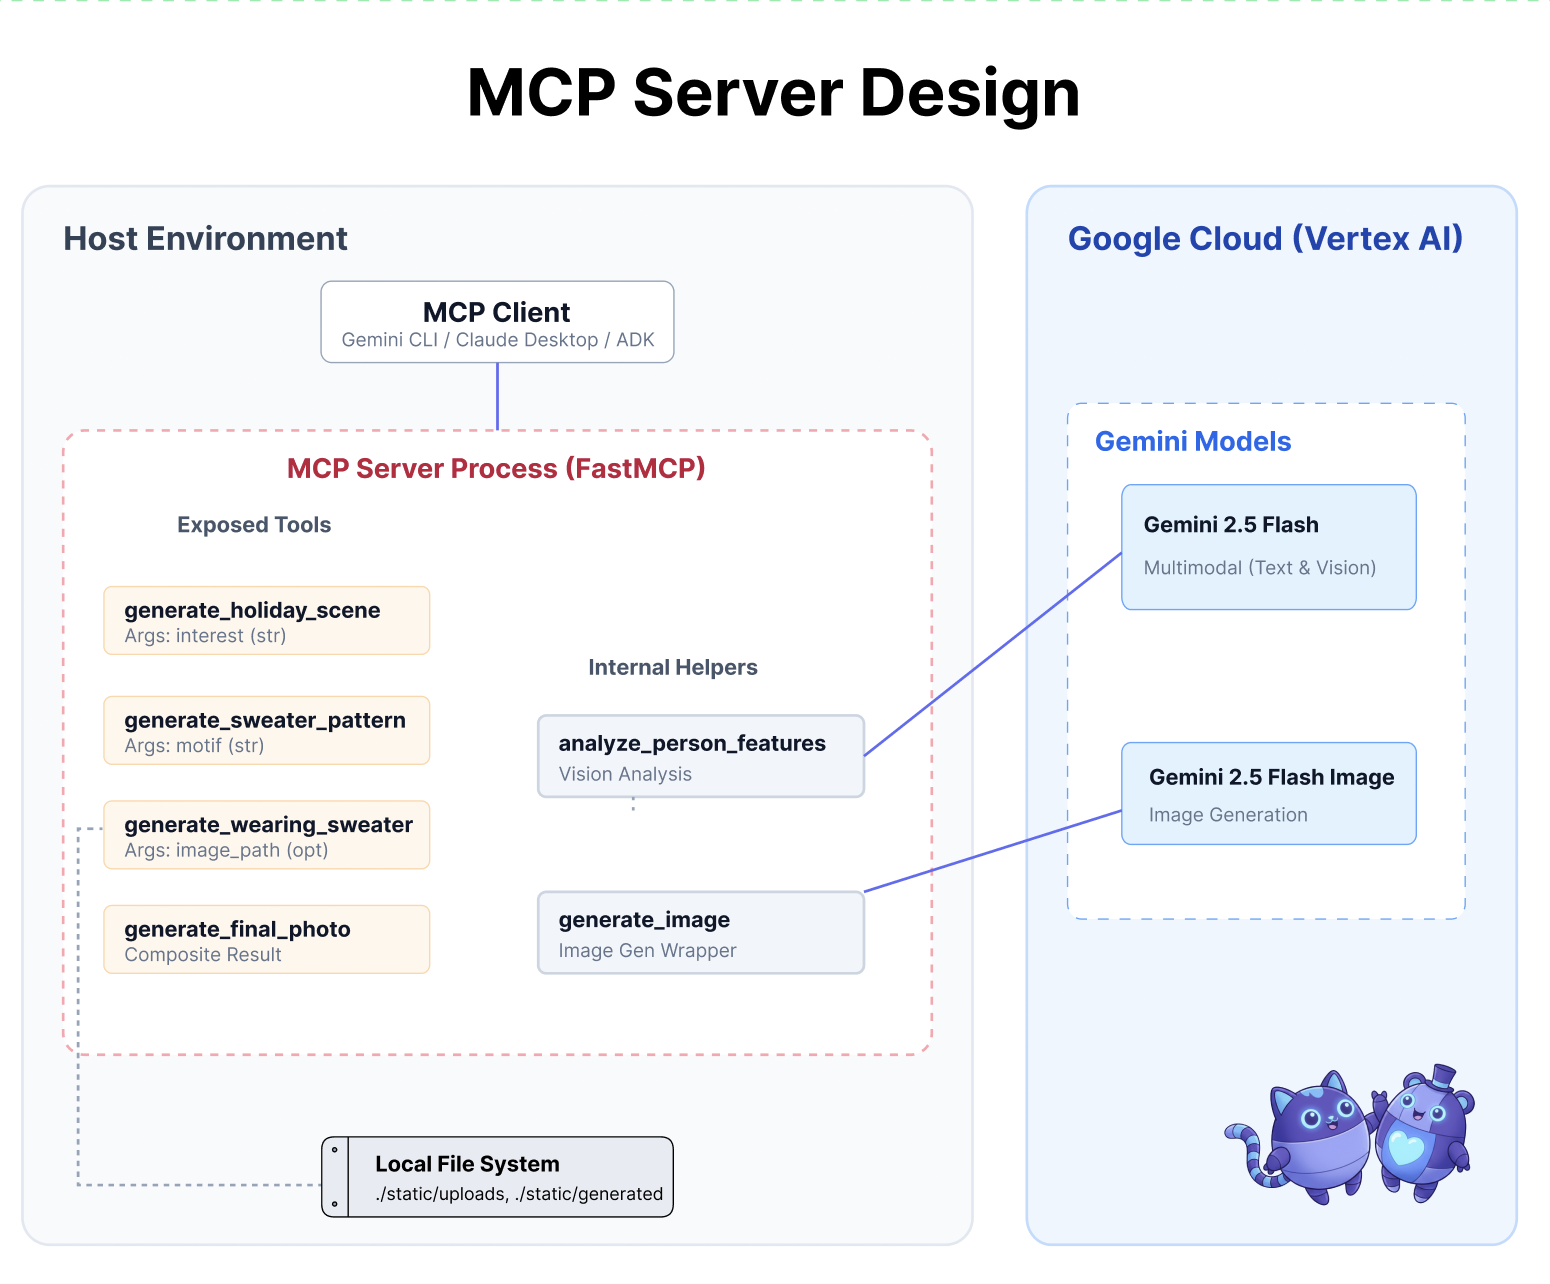
In this codelab, you will build a Holiday Design Assistant that:
- Connects to your local environment (studio tools) using MCP.
- Manages conversation context reliably using the Agent Development Kit (ADK).
- Remembers your preferences (e.g., "I prefer Python code") across different sessions using Vertex AI Memory Bank.
Building the Server Logic
We have prepared the environment, but the server logic is incomplete. We need to implement the four specific tools that our Agent will eventually use to build our holiday card.
Part One: Open the Server Skeleton
We will be working in the 01-MCP-Files-Testing/01-starter directory.
- In your Cloud Shell terminal, make sure you are in the correct directory:
cd ~/holiday_workshop/01-MCP-Files-Testing/01-starter/ - Open the file in the Cloud Shell Editor by running:
cloudshell edit ~/holiday_workshop/01-MCP-Files-Testing/01-starter/mcp_server.py
You will notice the boilerplate code (setting up the MCP server, handling connections, and initializing the Vertex AI client) is already done. However, the four core functions are currently empty placeholders.
Part Two: Implement the Holiday Scene Generator
First, we need a tool that takes a user's interest (e.g., "birds") and turns it into a rich, detailed prompt optimized for image generation.
Locate the comment #REPLACE_GENERATE_HOLIDAY_SCENE inside the generate_holiday_scene function.
Replace this whole line with the following code:
    prompt = (
        f"""
        Create a cozy, high-fidelity 3D render of a winter holiday scene.
        The scene should be warm and inviting with soft cinematic lighting.

        Seamlessly integrate the following specific theme/interest into the
        holiday decor or landscape: {interest}.

        The style should be whimsical but detailed.
        Aspect Ratio: 16:9 Landscape.
        """
    )
    generate_image(prompt, "16:9", "static/generated_scene.png")
    return "Done! Saved at generated_scene.png"
Part Three: Implement the Final Photo Result
Finally, we want to ensure the lighting and style look photorealistic and festive.
Locate the comment #REPLACE_GENERATE_FINAL_PHOTO.
Replace this whole line with the following code to perform the final style transfer and rendering:
    prompt = (
        """
        Generate a photorealistic close-up shot of a rustic wooden fireplace mantle.

        Lighting: Warm, glowing ambient light from a fire below (out of frame).
        Background: Softly blurred (bokeh) pine garland and twinkling lights.

        Foreground Composition:
        1. A wooden picture frame containing the [attached selfie image].
           The face in the photo must be clearly visible.
        2. A folded holiday greeting card standing upright next to the frame.
           The front of the card displays the [attached holiday scene image] as a print.

        Ensure the perspective is grounded and realistic, as if taken with a 50mm lens.
        """
    )
    generate_image(prompt, "16:9", "static/generated_final_photo.png", ["static/generated_selfie.png", "static/generated_scene.png"])
    return "Done! Saved at generated_final_photo.png"
Environment Setup
Now that the code is in place, we need to ensure our dependencies are installed. We will use uv, a fast Python package and project manager.
👉💻 In your terminal, run the following to add FastMCP as a dependency of our project:
cd ~/holiday_workshop/01-MCP-Files-Testing/01-starter/
uv add fastmcp
You will see a new dependency fastmcp>=2.13.3 is added to your ~/holiday_workshop/01-MCP-Files-Testing/01-starter/pyproject.toml file.
4. Testing with Gemini CLI for MCP Server
Now that our server code is complete, how do we test it?
Usually, testing a backend server requires building a frontend UI or writing complex curl requests. However, here we can use the Gemini CLI.
This is incredibly useful for development because it isolates the logic. You can verify that the model understands your tools and calls them correctly before you ever worry about building a web interface or an agent framework.
Connect and Run
We will tell Gemini CLI to manage our server using the mcp add command.
In your terminal, run:
gemini mcp add holidays uv run ~/holiday_workshop/01-MCP-Files-Testing/01-starter/mcp_server.py
add holidays: We gave our server a nickname ("holidays").uv run ...: We provided the explicit command to start the Python server we just modified.
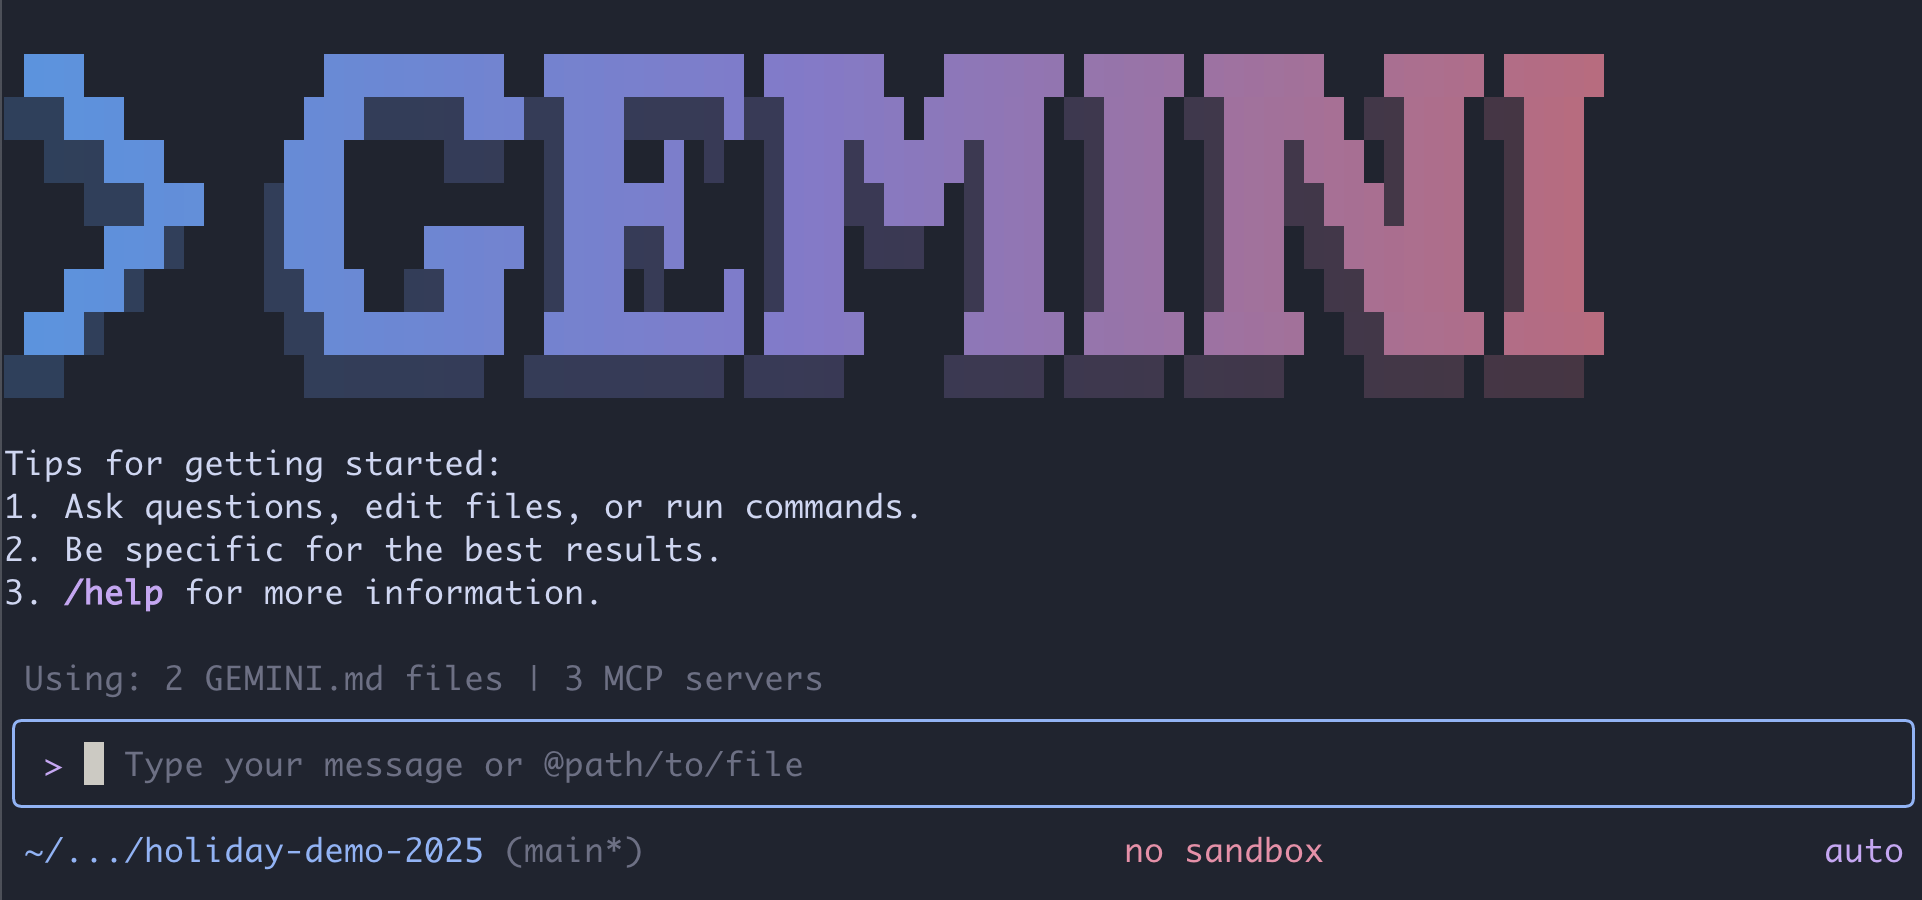
Let's Make Magic!
Now, start the chat session:
gemini
Try the following prompt to test if Gemini can "see" your new tools. Note that you may need to allow Gemini CLI the use of our holidays tool.
- 👉 User:
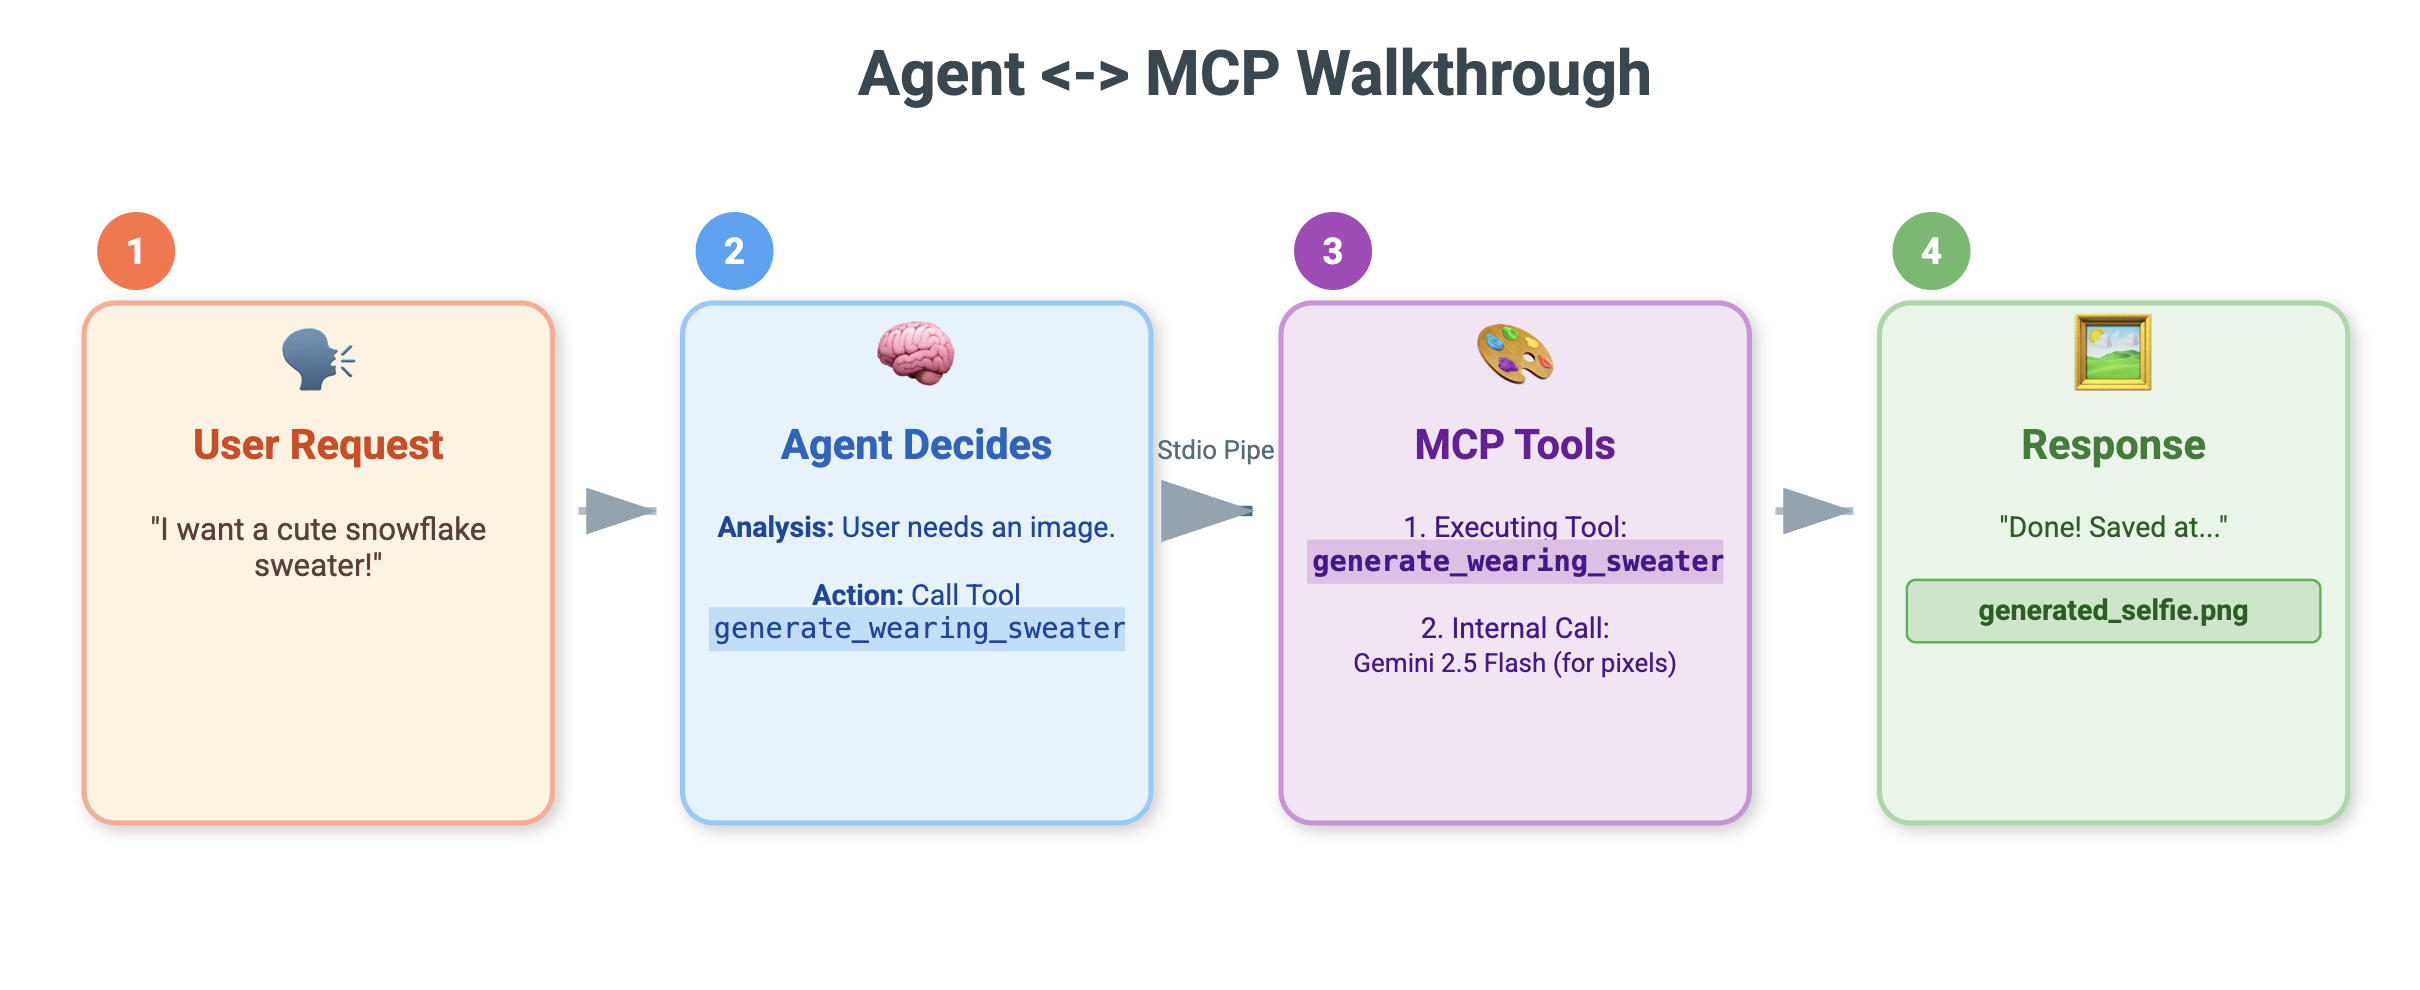
"I want to create a festive holiday photo. I like birds a lot." - Gemini:
*Thinking...* *Calling tool: generate_holiday_scene(interest='birds')* Done! Saved at generated_scene.png - 👉 User:
"Great! Now generate a knitting pattern for a sweater with reindeer on it." - Gemini:
*Thinking...*
*Calling tool: generate_sweater_pattern(motif='reindeer')*

Done! Saved at generated_pattern.png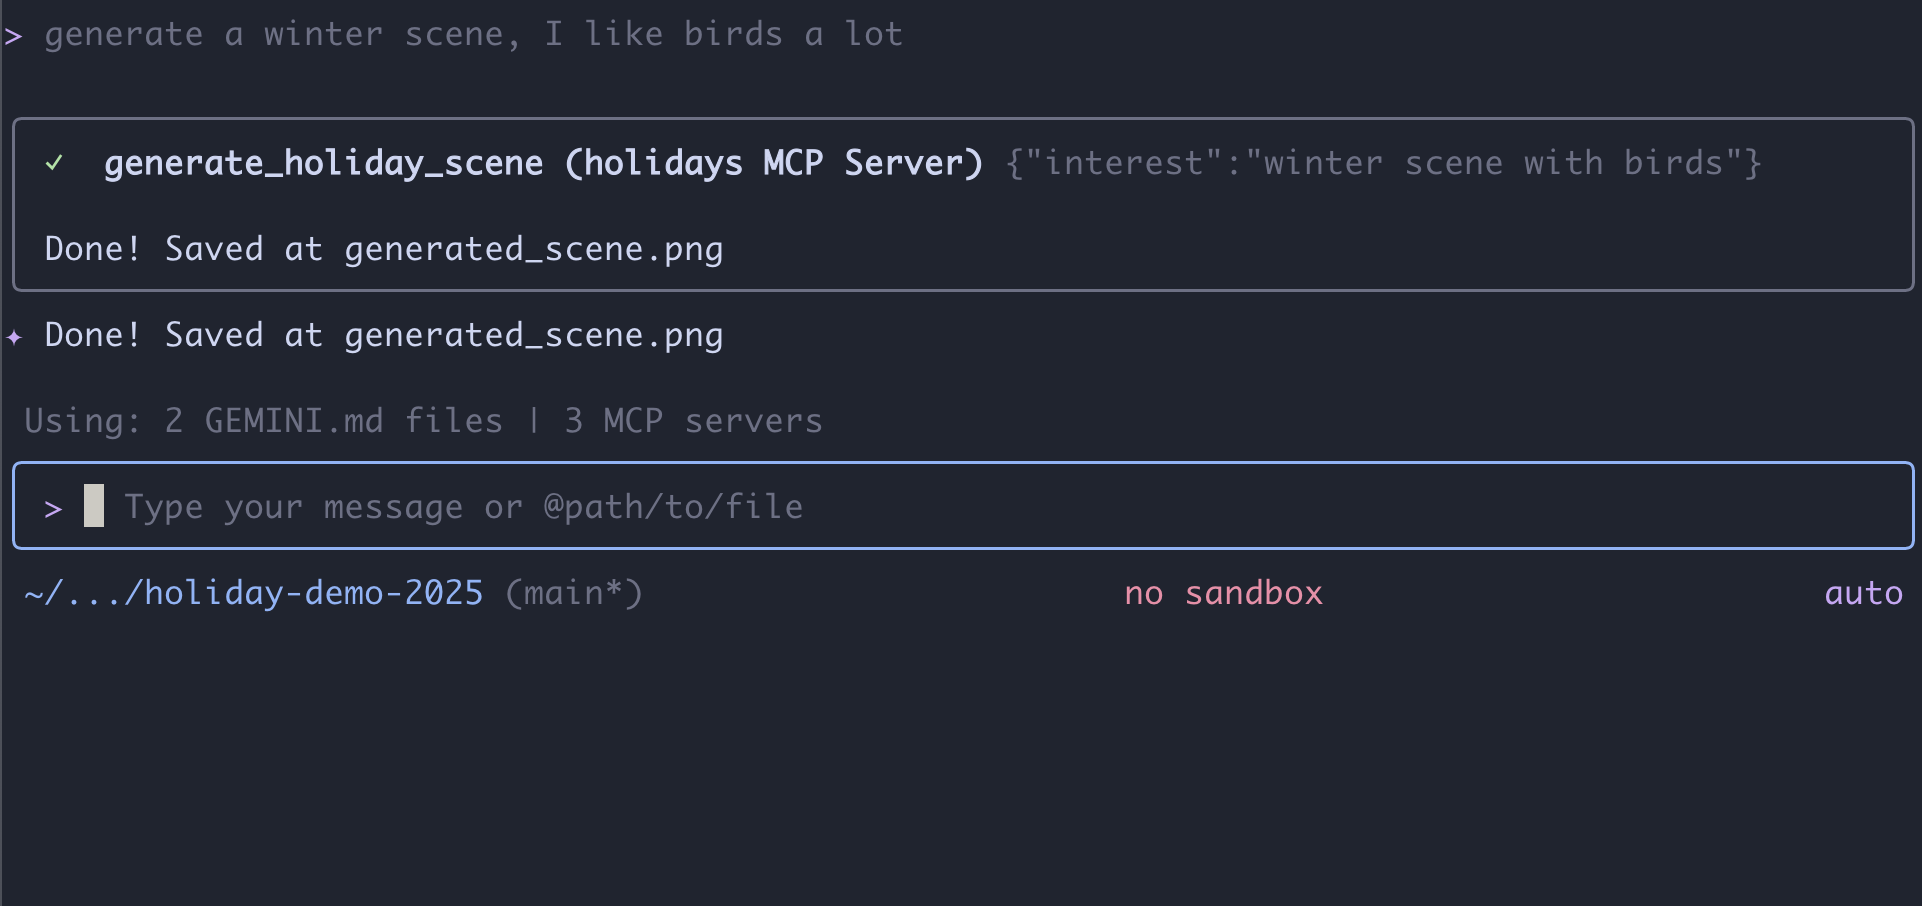
Review the Picture
- End the Gemini CLI by pressing
Control+C. - Check the generated picture in your folder:
~/holiday_workshop/01-MCP-Files-Testing/01-starter/static.
Review your photo here: 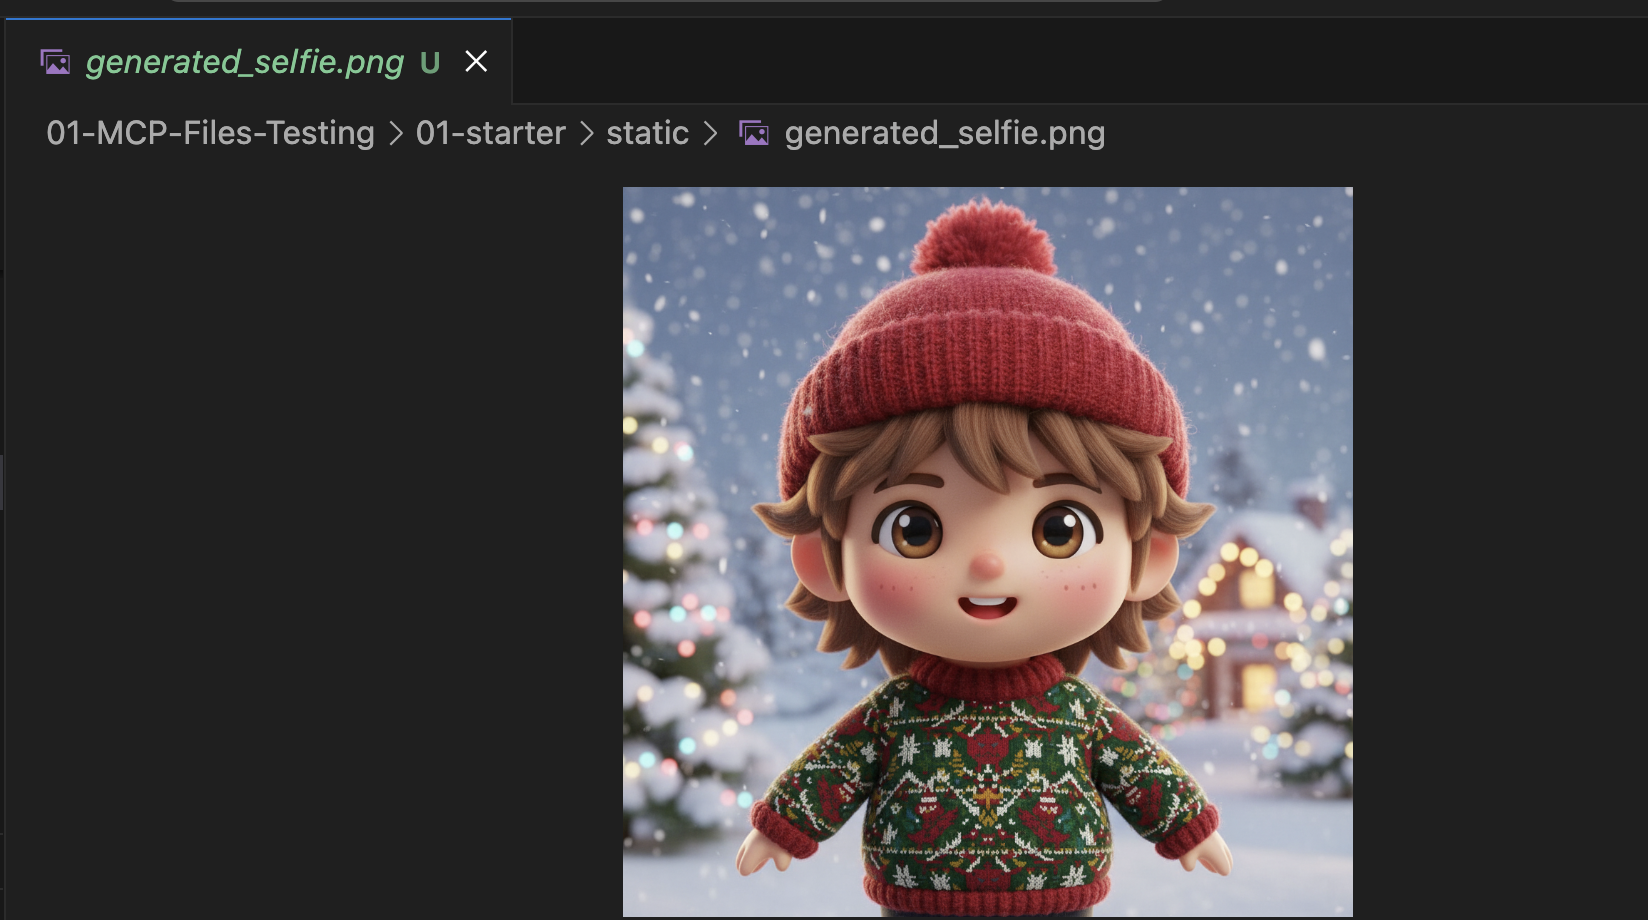
Conclusion & Next Steps
Congratulations! You have successfully built a working MCP server. You now have a functional set of "AI tools" that can generate patterns, composite images, and refine scenes.
However, did you notice something in the test above? You had to drive the process. You had to ask for the scene, then ask for the pattern, then ask to combine them.
While Gemini is smart, for a complex production workflow—where we need to generate a pattern before we can put it on a sweater, and handle errors if the image generation fails—we want more control. We want a dedicated system that can plan, critique its own work, and manage the state of our holiday card without us holding its hand every step of the way.
In the next section, we will bring order to this creative chaos. We are going to implement the Agent Development Kit (ADK) to build a structured Agent that orchestrates these MCP tools into a perfect production pipeline.
5. Vibe-Coding an ADK Agent
We have a working set of tools (our MCP server), but currently, we are the ones doing all the heavy lifting—telling Gemini exactly which tool to call and when.
In this section, we will build an AI agent: a system that can reason, plan, and execute multi-step tasks autonomously. To do this, we will use the Agent Development Kit (ADK).
What is an Agent?
If the MCP tools are the "hands" (doing the work), the Agent is the "brain." An agent uses an LLM to understand a user's intent ("Make me a holiday card"), breaks it down into steps ("First I need a scene, then a pattern..."), and decides which tools to use to achieve the goal.
What is ADK?
The Agent Development Kit (ADK) is a framework from Google that makes building these agents easy. It handles the complex "plumbing", like managing chat history, connecting to tools, and switching between different models—so you can focus on the personality and logic of your app.
Context-Based Vibe-Coding
It's a common pattern to use a single, massive prompt to generate code. However, when building complex applications, it is often better to treat the AI as a partner that maintains context over time.
We will use Gemini CLI's Memory features to set the stage before we write a single line of code.
1. Prepare the Environment
Open your terminal and navigate to the starter directory:
cd ~/holiday_workshop/02-Vibe-Coding-ADK-Agent/01-starter
Start Gemini CLI:
gemini
2. Managing Context and Memory
When vibe-coding, the AI needs to know who it is and what it knows. Gemini CLI allows us to manage this explicitly.
/memory show: Type this to see what the AI currently knows about your project and session./memory add: Use this to inject foundational knowledge that the AI should remember throughout the conversation.
Let's start by defining our coding partner's persona. Run the following command inside Gemini CLI:
/memory add "You are an expert Python developer specialized in the Google Agent Development Kit (ADK). You write clean, modular code and prefer using the latest ADK patterns."
Gemini now understands its role. This context will influence every subsequent response, ensuring high-quality ADK-compliant code.
3. Step 1: Vibe-Coding the Basic Agent
Instead of trying to generate the whole system at once, let's start with the skeleton. We want to establish the file structure and the basic agent personality.
Enter the following prompt into Gemini CLI:
Let's start by building the basic agent structure.

Please create a file structure for a `root_agent`.
1. Create `root_agent/__init__.py` that imports `agent`.
2. Create `root_agent/agent.py` by following exactly how this file is doing import and agent creation @~/holiday_workshop/02-Vibe-Coding-ADK-Agent/01-starter/agent_reference.py

In `agent.py`:
- Create an `Agent` named "root_agent" using the model "gemini-2.5-flash".
- The instruction string should define a "Holiday Magic Assistant".
- The personality should be enthusiastic (`🎄✨`) and prefer "cute, kawaii, cartoon" styles for any visual tasks.
Gemini will generate the file structure and the initial Python code. Review it to ensure it looks correct, then apply/accept the changes.
4. Step 2: Adding the MCP Server (The Tools)
Now that we have a basic agent, we need to give it "hands." We need to connect the agent to the MCP server we built in the previous lab.
Enter the following prompt into Gemini CLI:
Now, let's give the agent access to tools. Update `agent.py` to include our local MCP server. By following exactly how this agent is connecting to mcp tool @~/holiday_workshop/02-Vibe-Coding-ADK-Agent/01-starter/agent_reference.py

In `agent.py`:
- Import `McpToolset` to define our STDIO MCP server. as @~/holiday_workshop/02-Vibe-Coding-ADK-Agent/01-starter/agent_reference.py
- Connect to the python file located at `../mcp_server.py` relative to agent.py.
Gemini will now refactor your existing agent.py to include the tool definitions and connection logic.
Note: If you want to check your work or if the generated code isn't working as expected, you can compare your files against the reference solution located in: ~/holiday_workshop/02-Vibe-Coding-ADK-Agent/solution
6. Run the Agent Web Interface
The ADK comes with a built-in testing interface called adk web. This spins up a lightweight chat UI so we can talk to our agent immediately.
- If you still have GeminiCLI open, press
control+Cto close it. Now in your terminal(this is insolutionfolder, you can go tostarterto test your code by runninguv run adk webin yourstarterfolder), run:cd ~/holiday_workshop/02-Vibe-Coding-ADK-Agent/02-solution uv run adk web --port 8000 - Cloud Shell will alert you that a service is running on port 8000. Click "Web Preview" -> "Preview on port 8000".
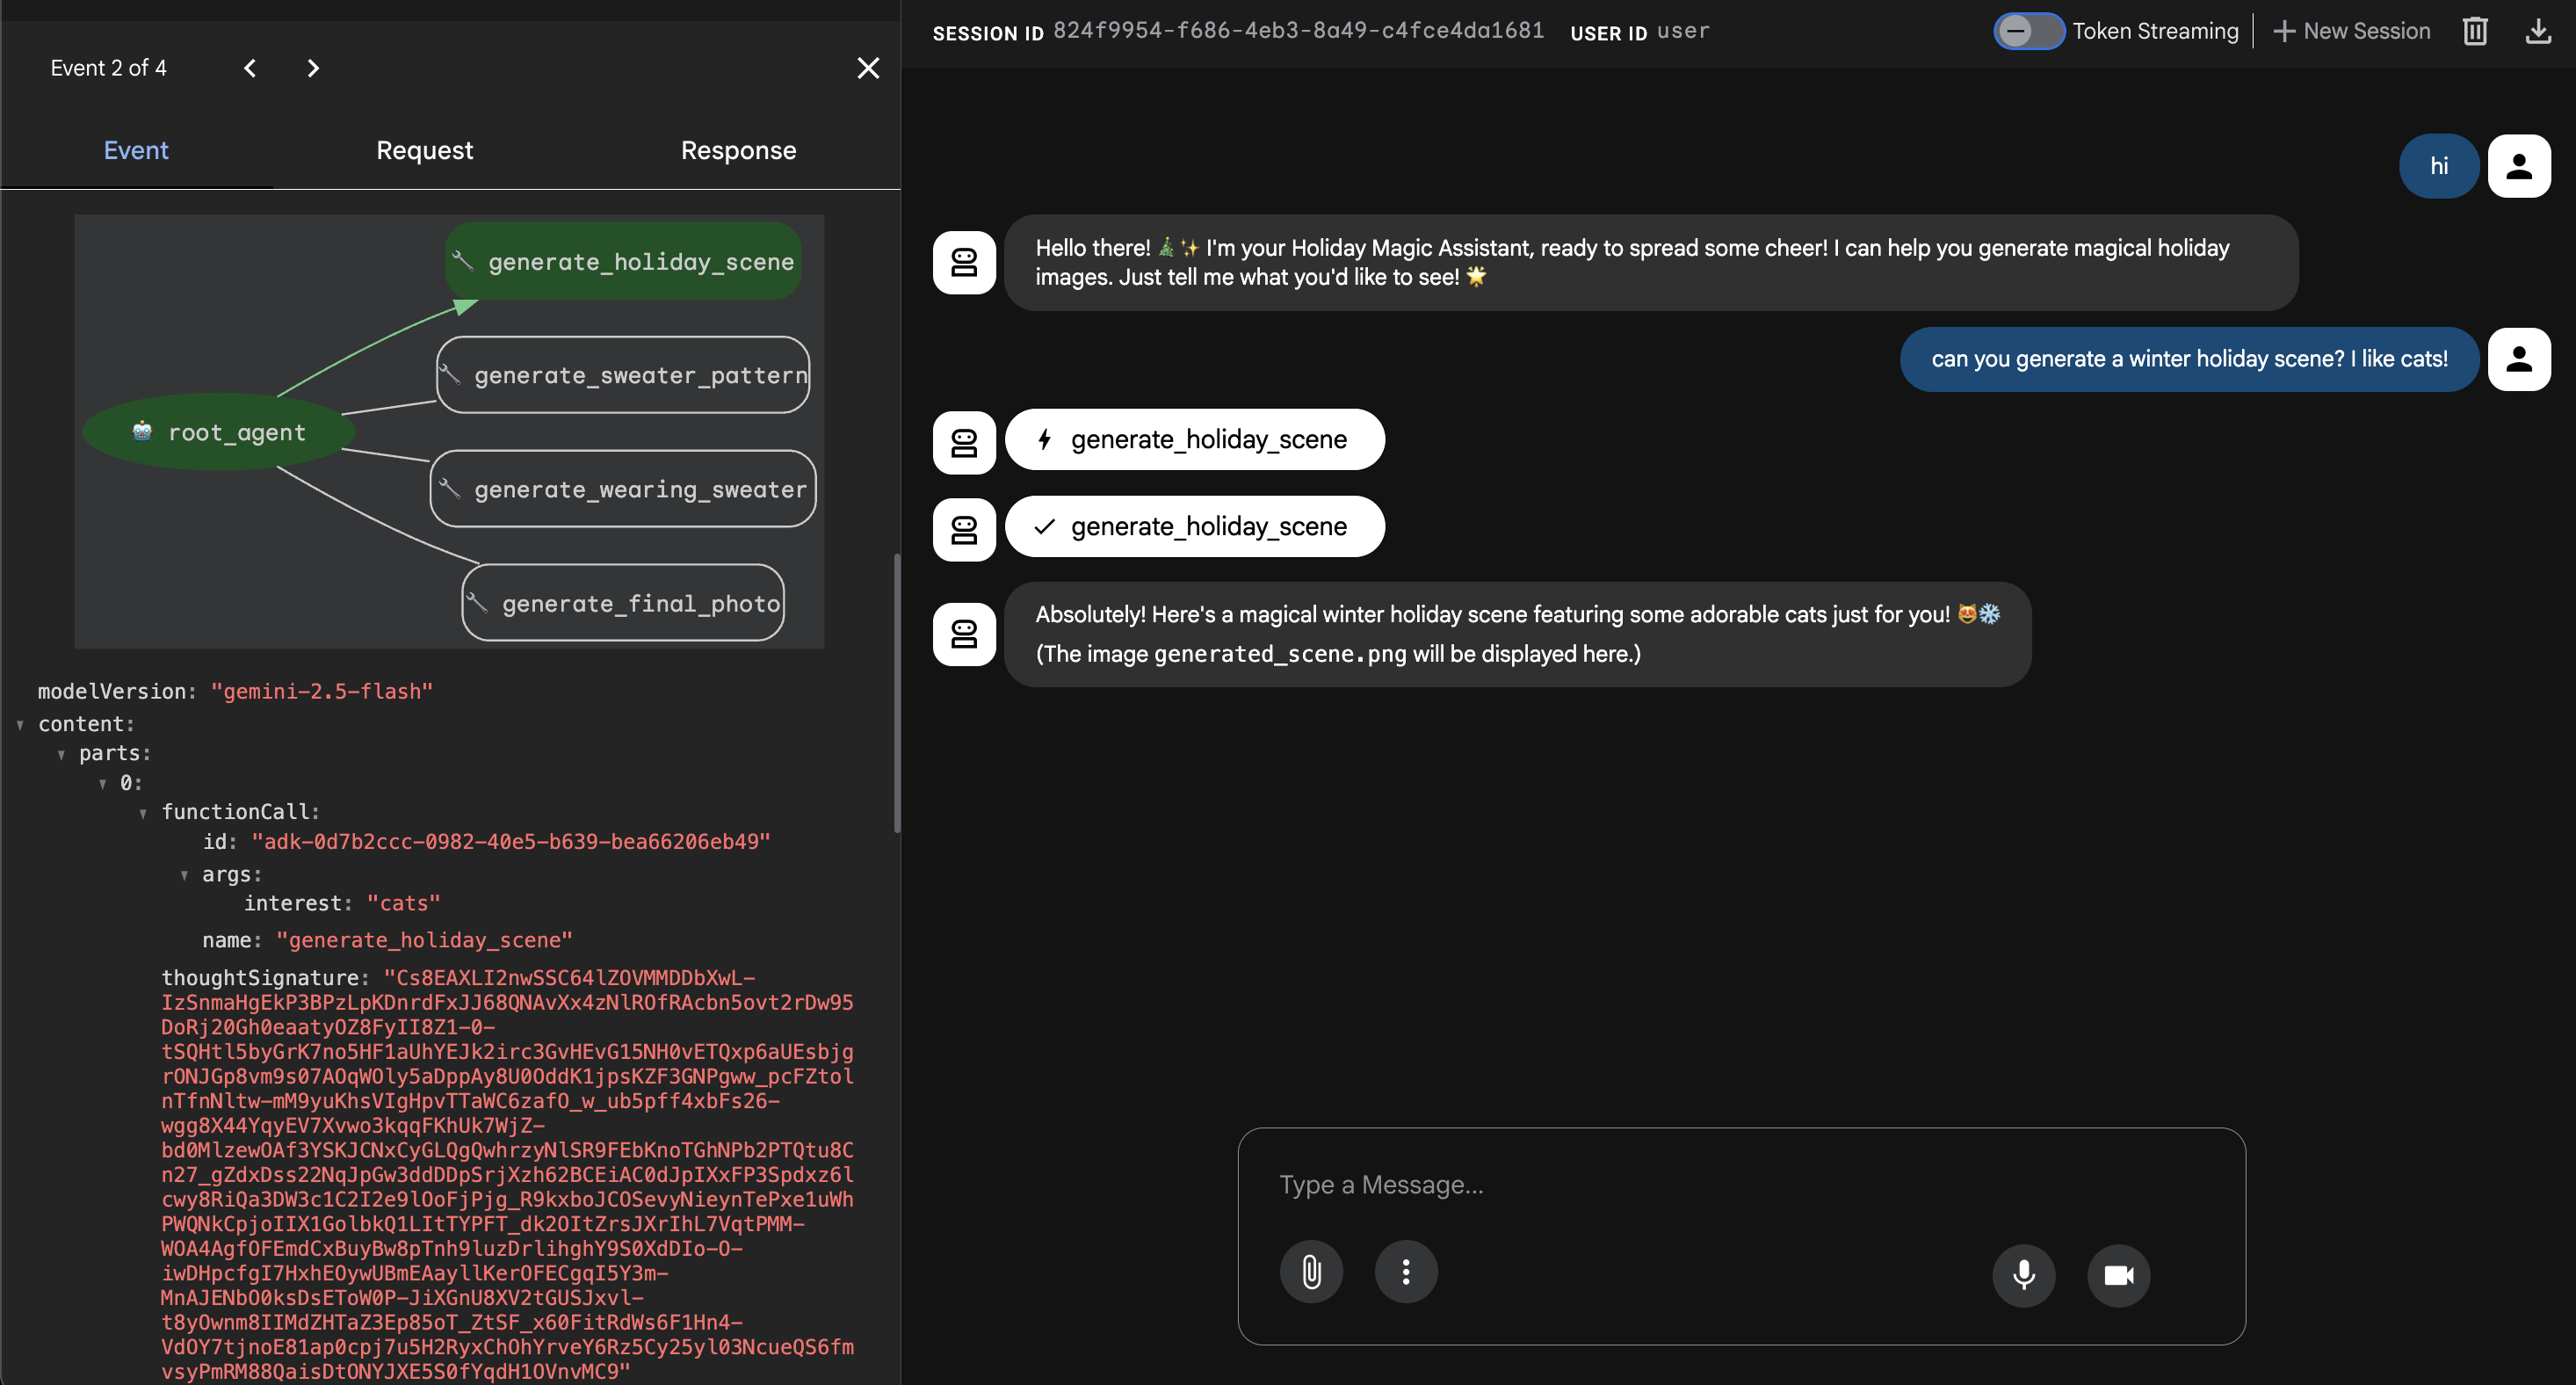
Test the Agent
You should now see a chat interface. Let's see if our Agent follows its new instructions and correctly accesses the MCP tools.
Try these prompts:
- "Hi! Who are you?"
- (Expect a festive, enthusiastic response).
- "I need a background for my holiday card. Make it a snowy village."
- (The Agent should call
generate_holiday_scene. Notice how it automatically applies the "cute/cartoon" style defined in the system instructions).
- (The Agent should call
- "Generate a sweater pattern with little pizza slices on it."
- (The Agent should call
generate_sweater_pattern).
- (The Agent should call
You can view the image generated here:
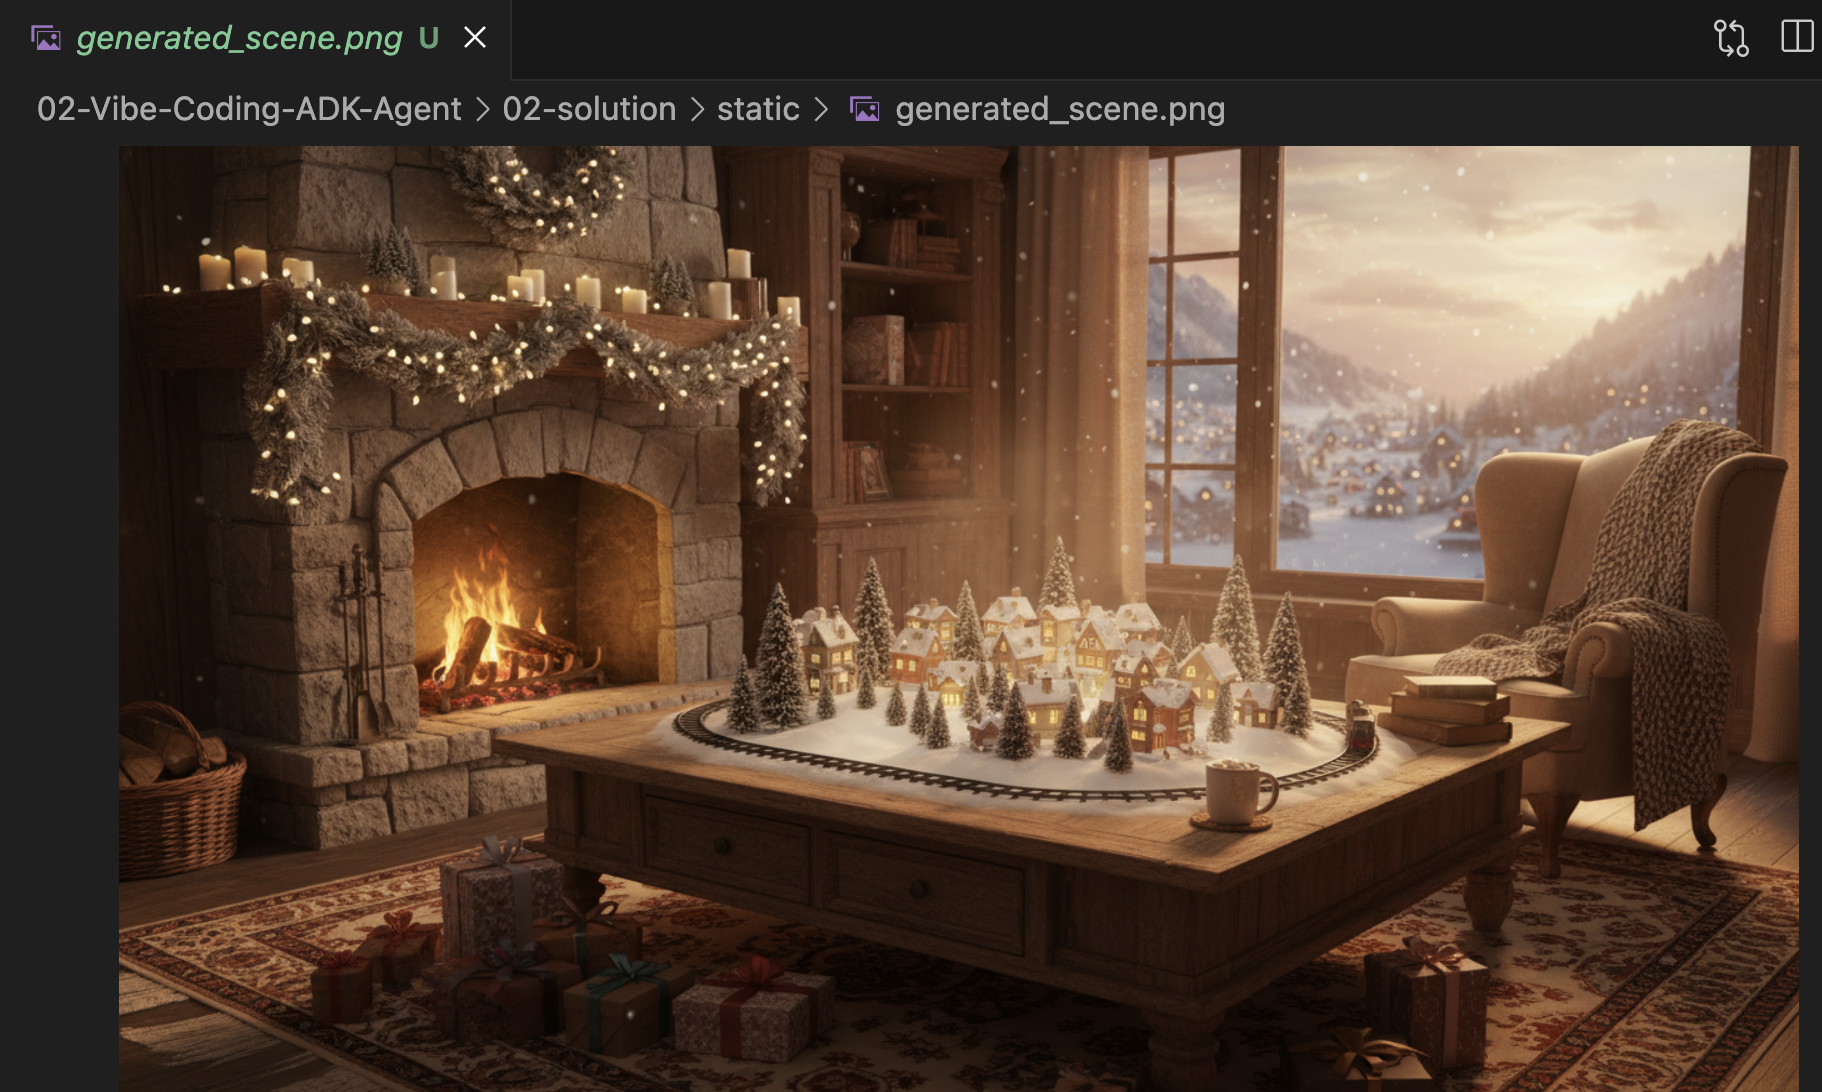
Press Control+C to exit if you finish testing.
Conclusion & Next Steps
You have now successfully "Vibe-Coded" a Google ADK Agent using a context-aware approach!
- We established Context: We used
/memory addto define an expert persona. - We built Iteratively: We created the skeleton first, then added the tool connections.
The built-in ADK web preview is great for testing, but for our final product, we want a custom, branded experience. In the next section, we will integrate this Agent into a custom web frontend.
7. Connecting ADK with UI
Now that we have an Agent definition, we need to run it. This is where the Runner and Session Service come in.
Implementation
- 👉 Type the following in your command:
cloudshell edit ~/holiday_workshop/03-Connect-ADK-MCP-UI/01-starter/backend/main.py~/holiday_workshop/03-Connect-ADK-MCP-UI/01-starter/backend/main.pyin your editor. - Replace the
# TODO: Create Session Servicewith the following:from google.adk.sessions import InMemorySessionService from google.adk.memory import InMemoryMemoryService session_service = InMemorySessionService() memory_service = InMemoryMemoryService() - Replace the
# TODO: Initialize Runnerwith the following:runner = Runner( app_name="agents", agent=christmas_agent, session_service=session_service, memory_service=memory_service, )
- Review line 158 at this
~/holiday_workshop/03-Connect-ADK-MCP-UI/01-starter/backend/main.py(no action needed): If you wonder how the application get the final response? Below is event loop that powered by runner:async for event in runner.run_async( user_id=user_id, session_id=session_id, new_message=content )
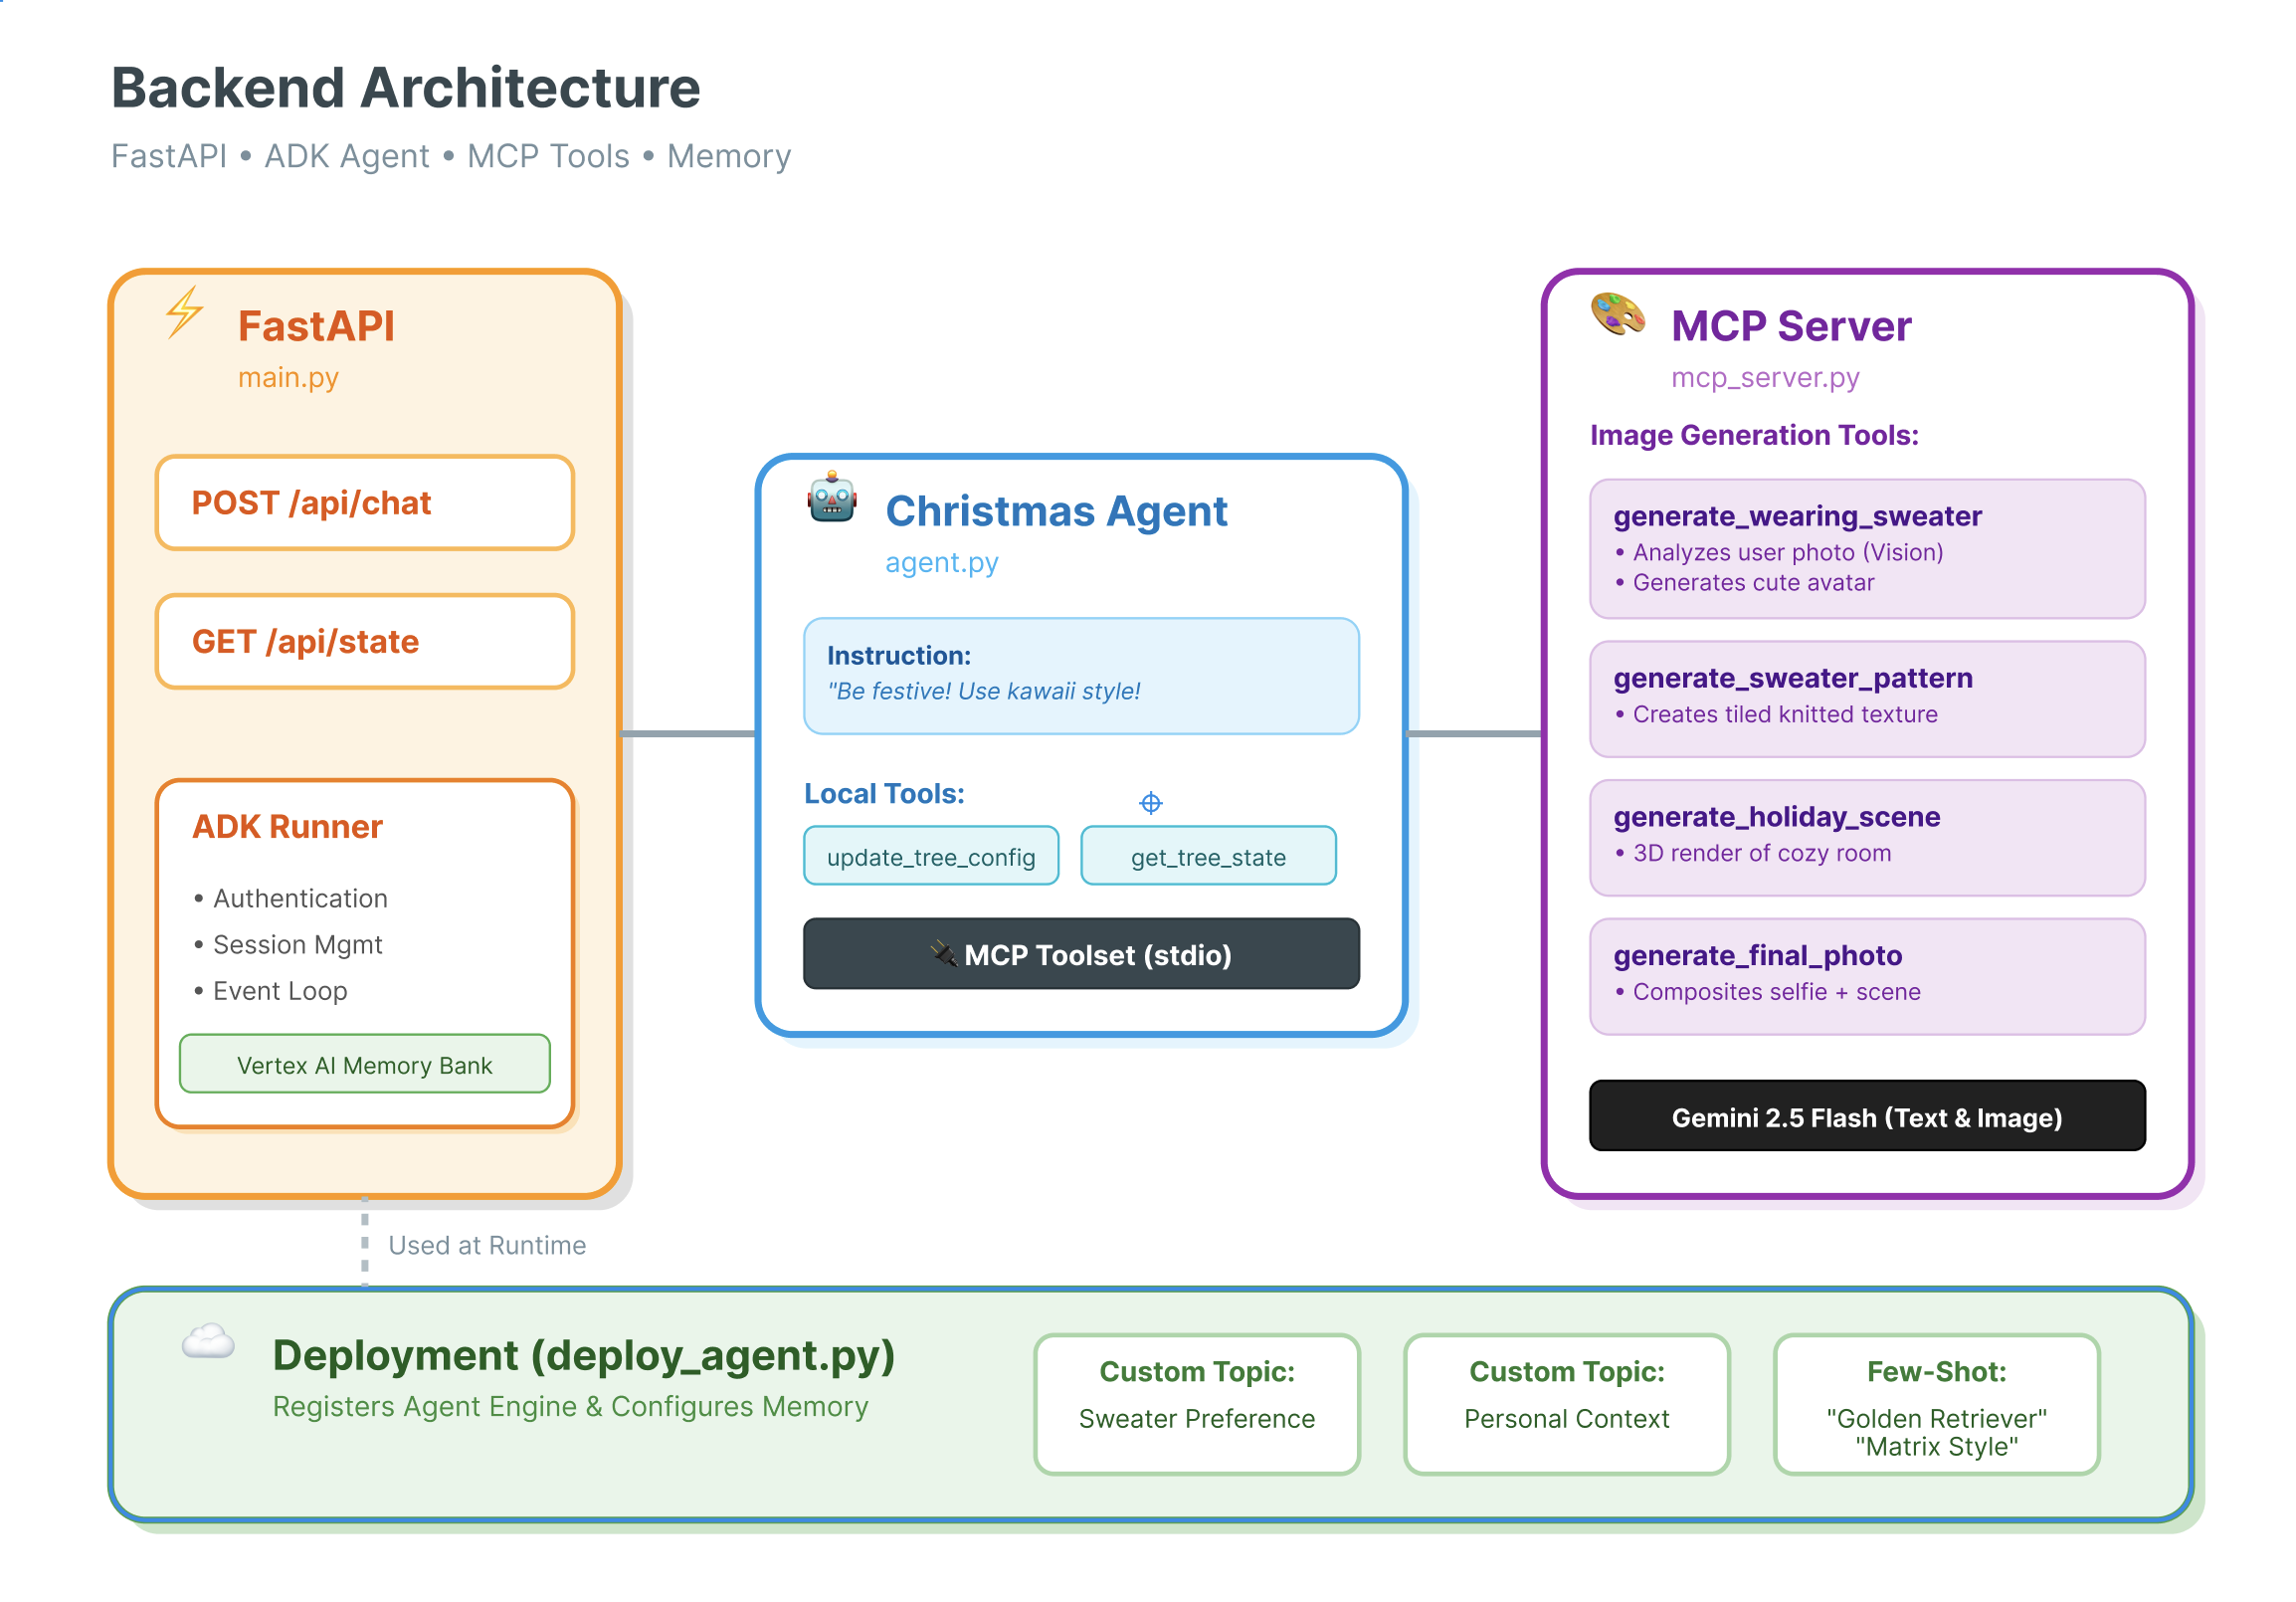
Deep Dive: Architecture & Deployment
We are using FastAPI to serve this agent.
- Why FastAPI?: Agents are often I/O bound (waiting for LLMs). FastAPI's async nature handles this perfectly.
- Statelessness: Notice our API endpoint is stateless. We don't save variables in global scope. We rely on
session_idand theSessionServiceto reconstruct the state for every single request. This means you can deploy this to Cloud Run (Serverless) and scale to zero!
8. Try the application with the agent magic
- 👉💻 Type the following in your command:
cd ~/holiday_workshop/03-Connect-ADK-MCP-UI/01-starter ./start_app.sh~/holiday_workshop/03-Connect-ADK-MCP-UI/01-starter/backend/main.pyin your editor. - You will see the result like below:
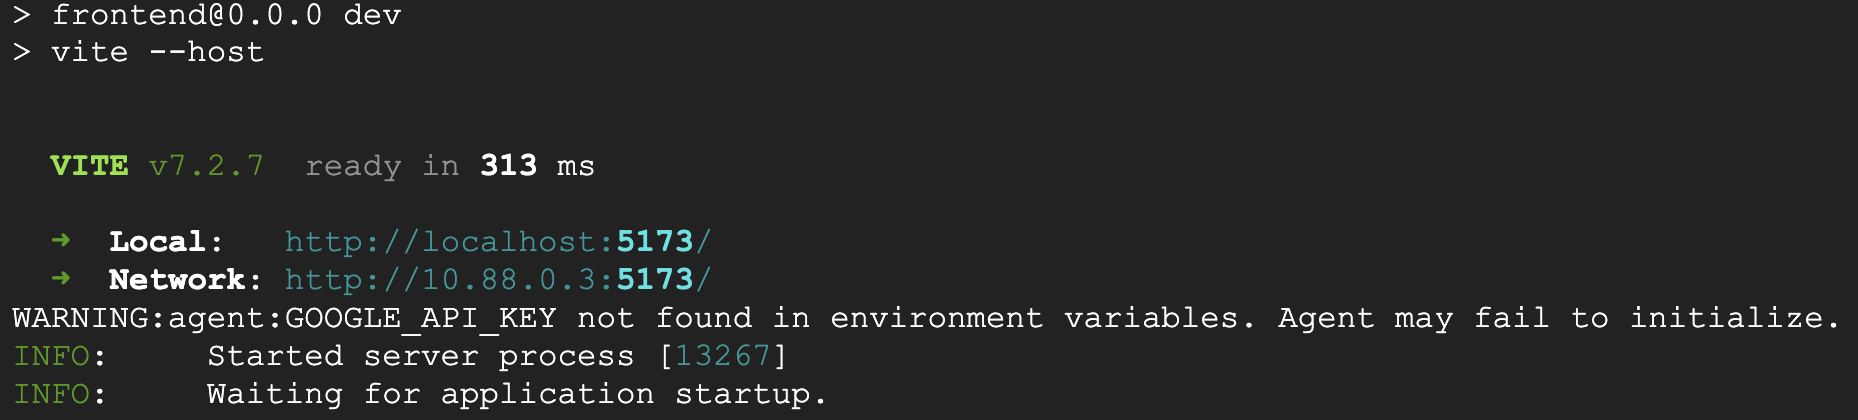 👉👉 Make sure you click into
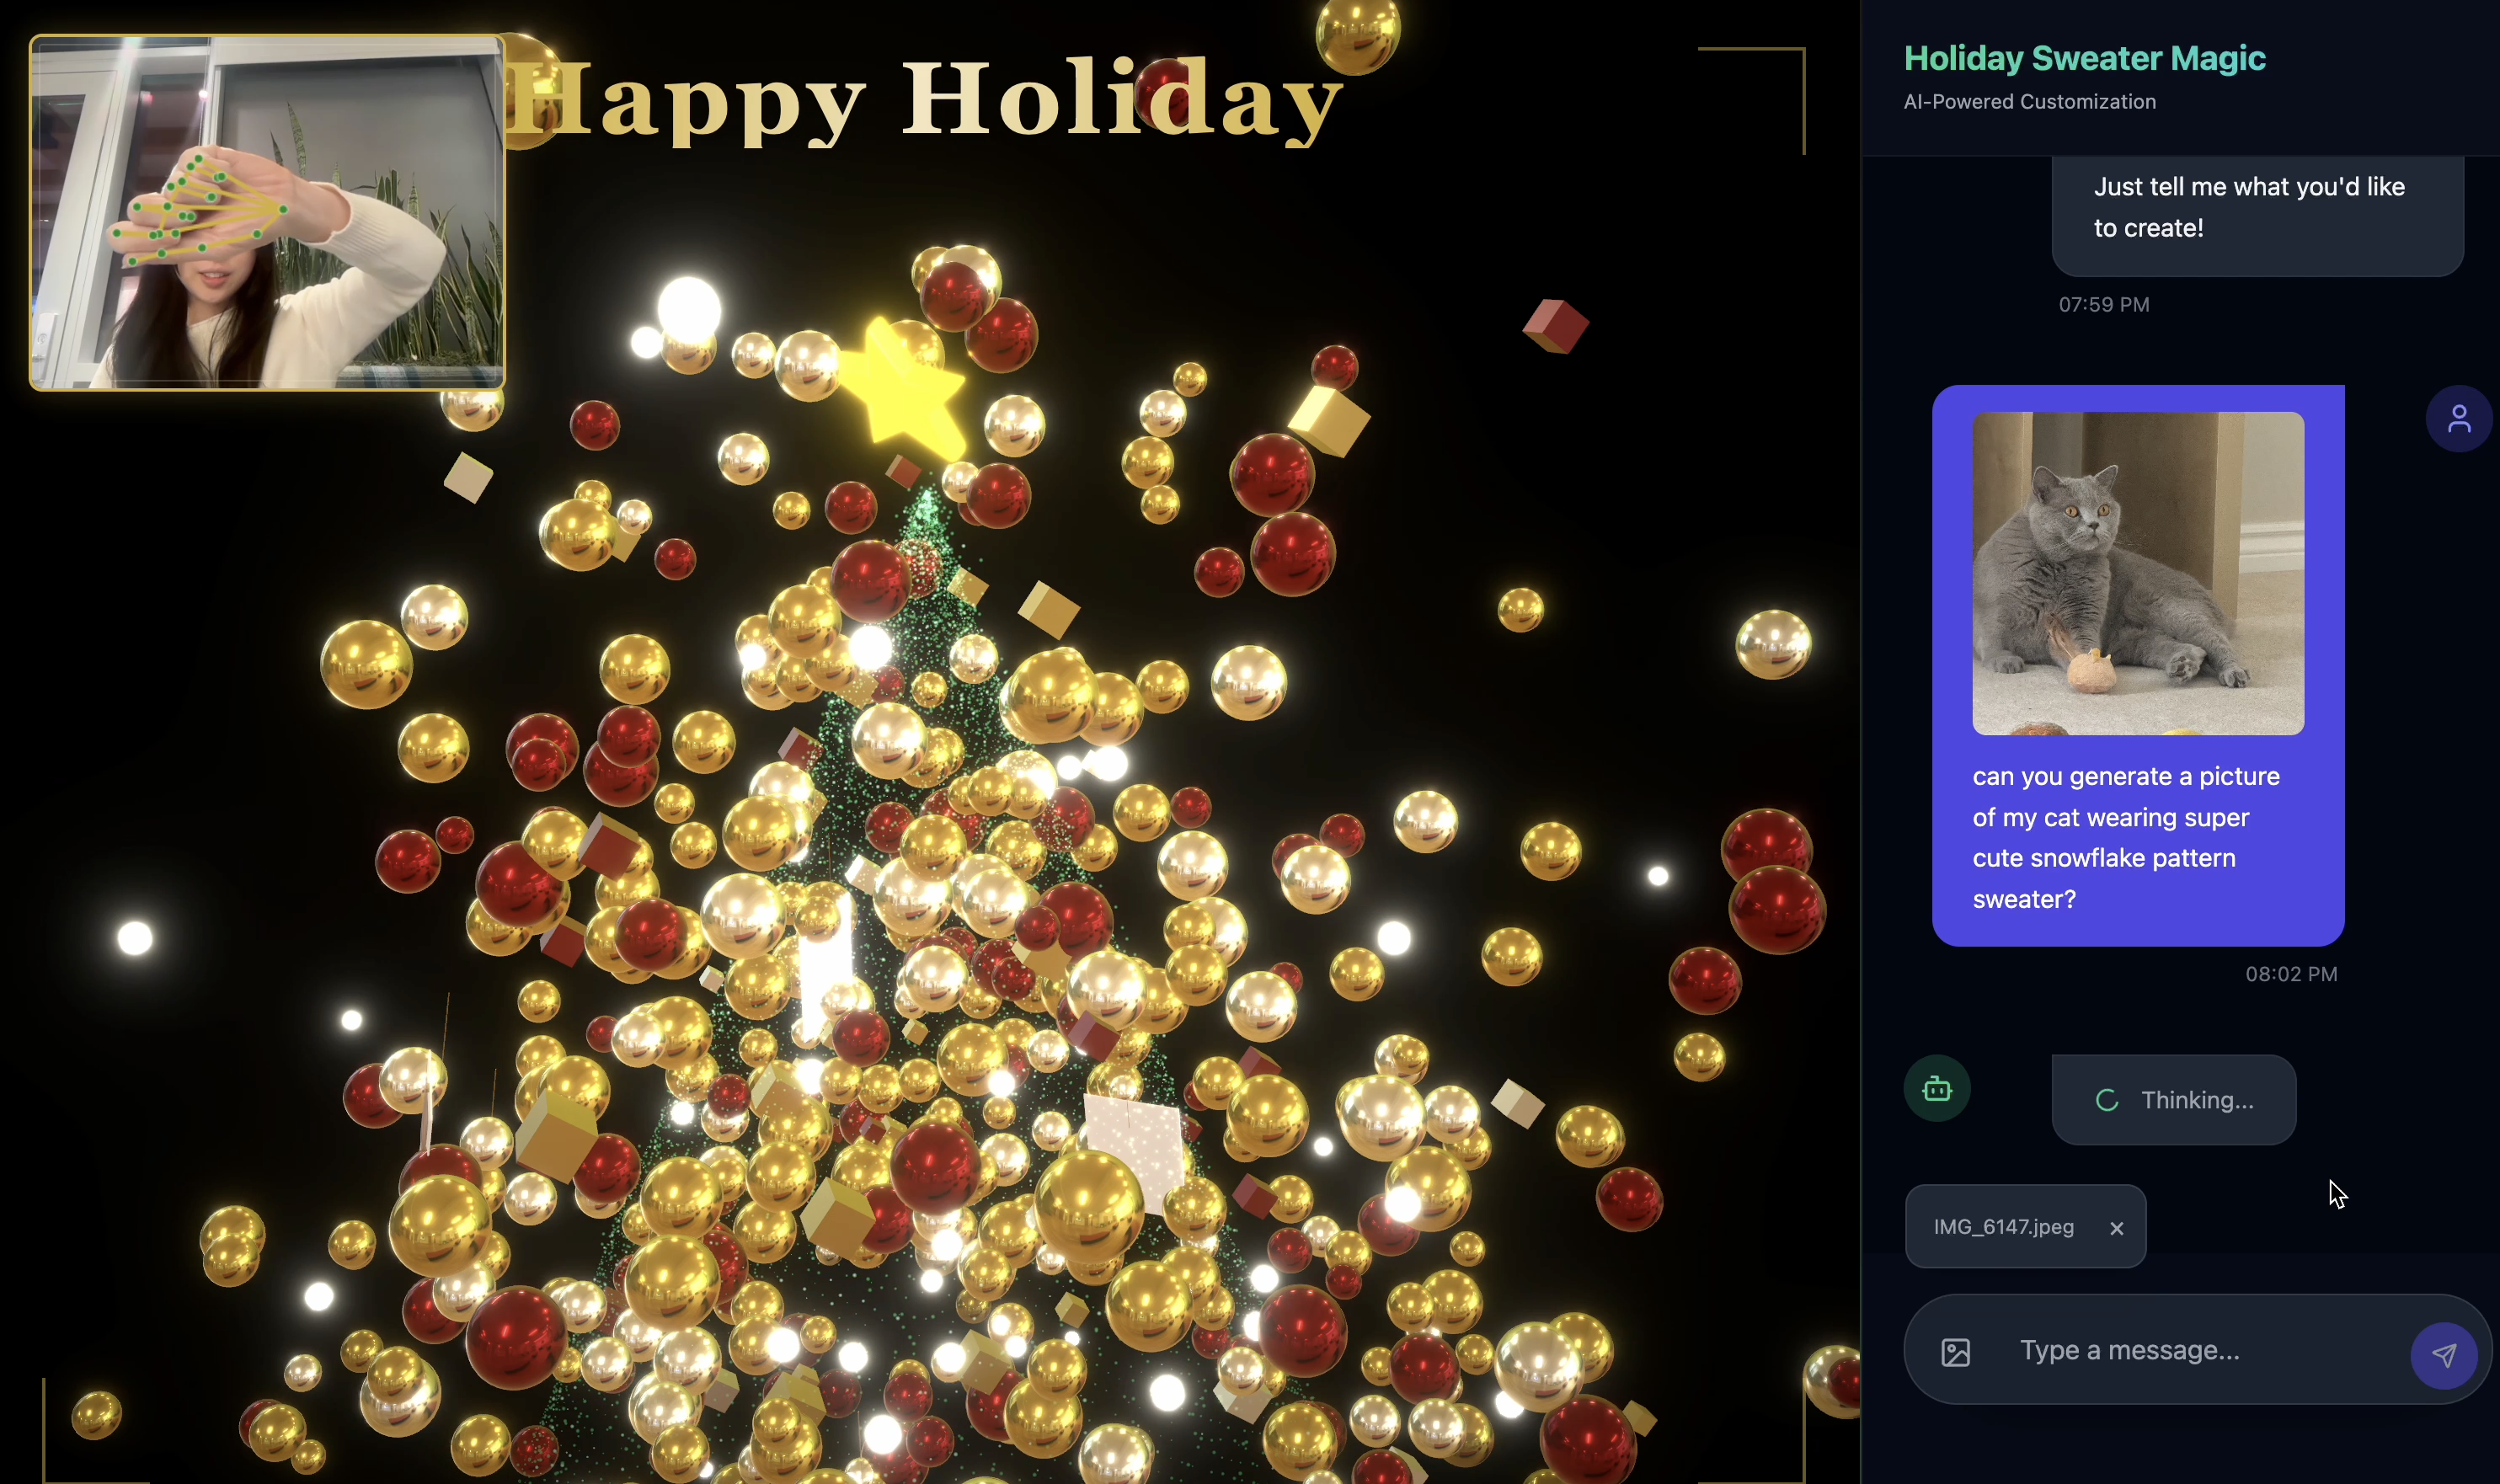
 http://localhost:5173/, or open a new window and typehttp://localhost:5173/. - Then You will the website with chat interface:

- Test by upload one image(It can be yourself, or your pet)
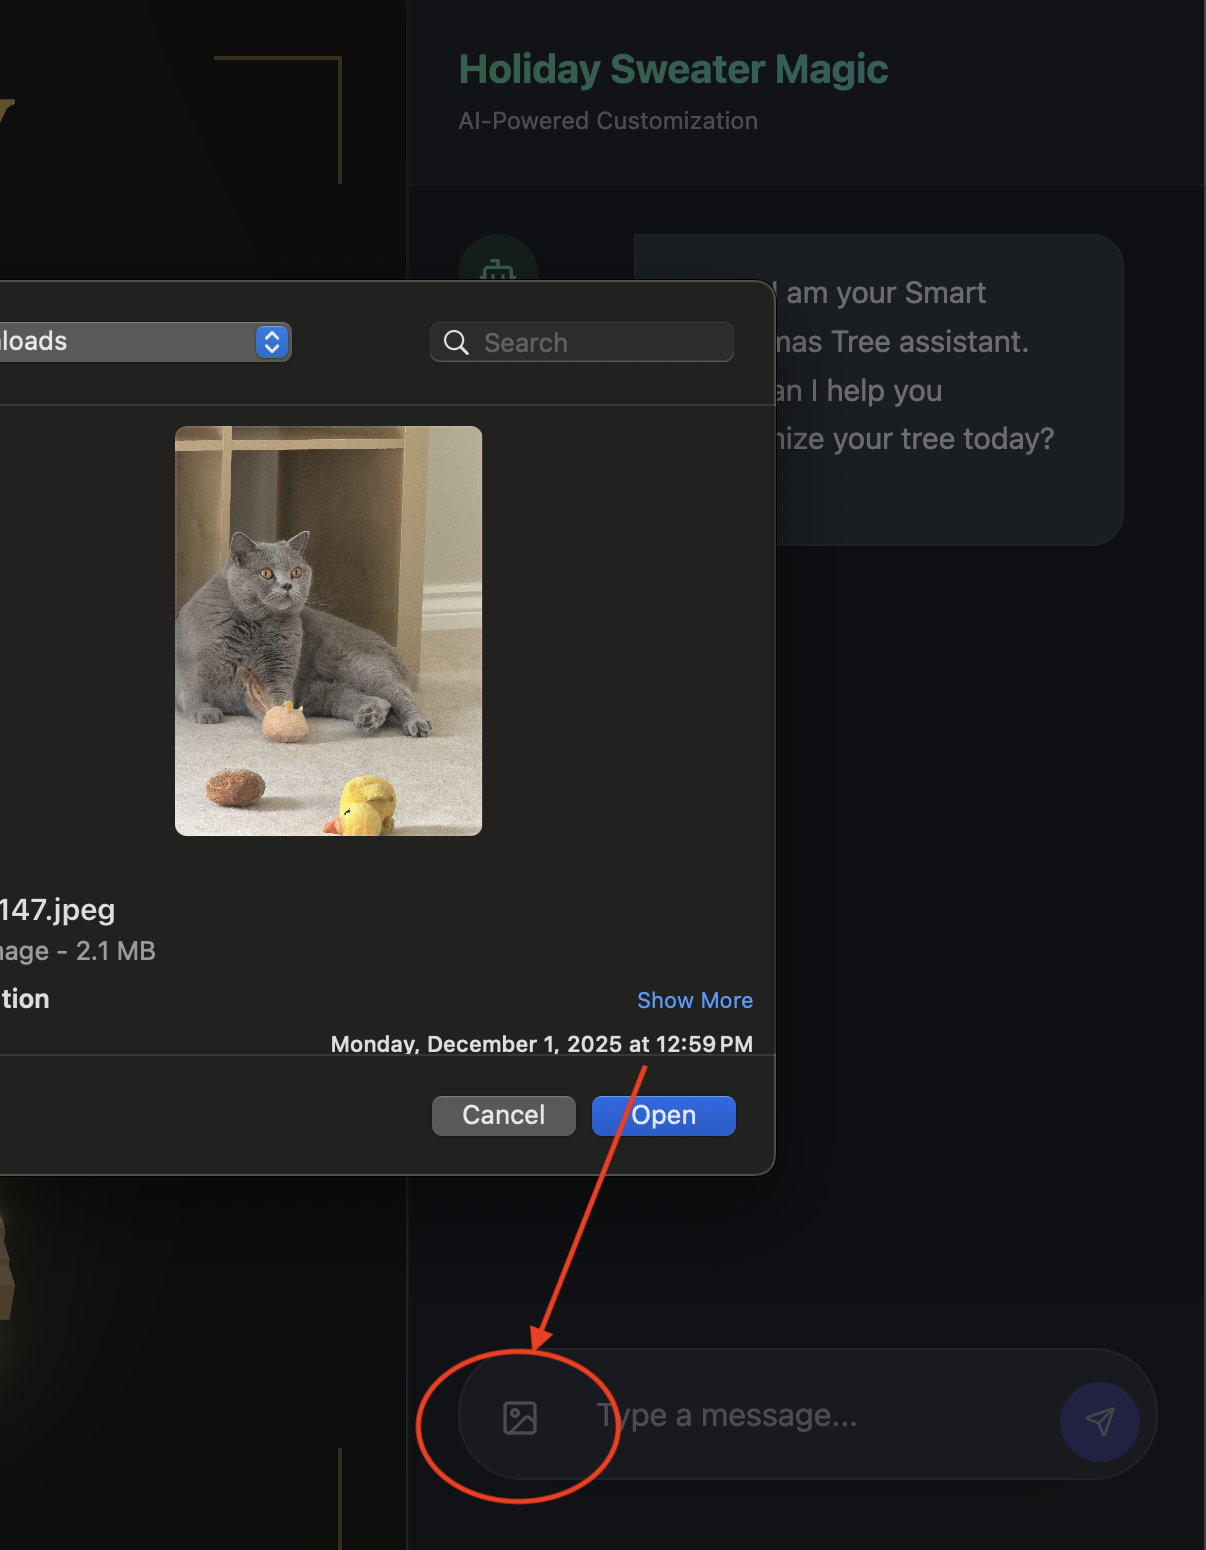
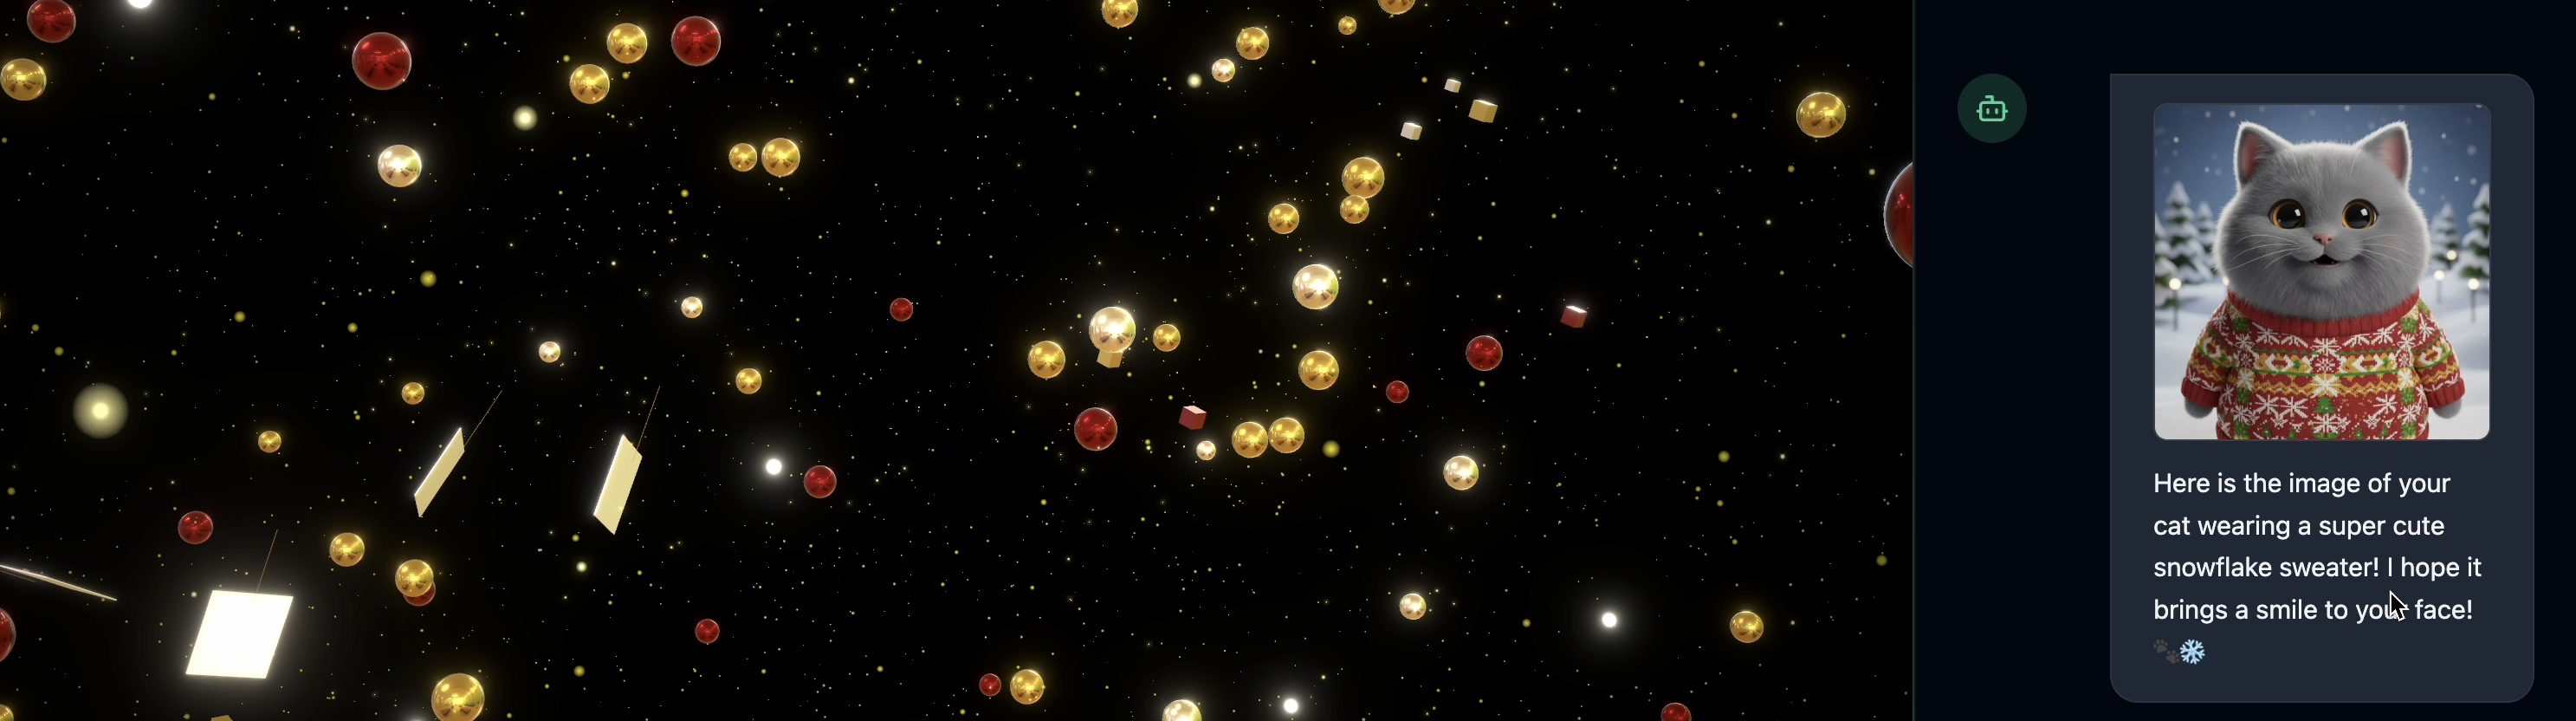
- 👉 Then ask
Can you generate a picture my cat wearing snowflake pattern sweater?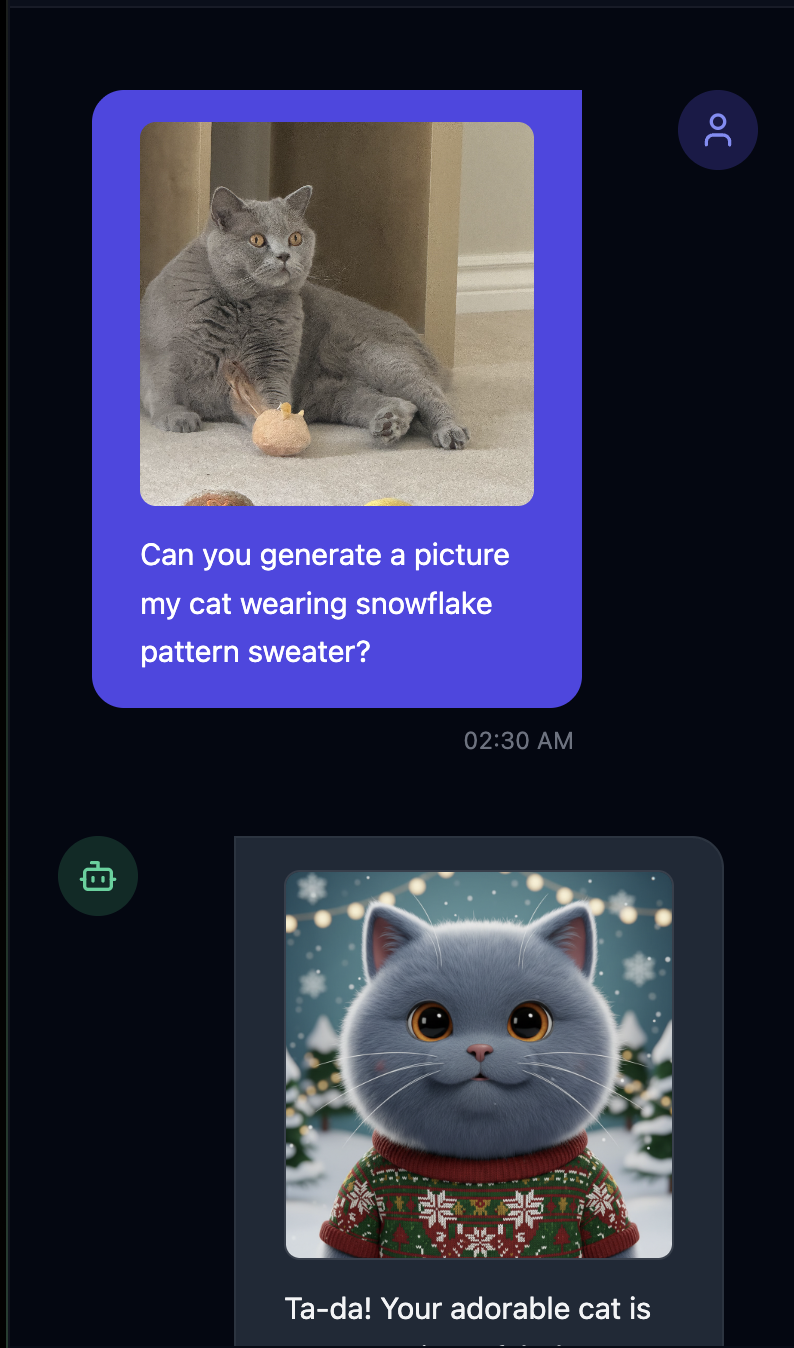
- 👉💻 Once you finished testing, press
control+Cin the terminal to end the process.
If you don't see things work as expected, you can go to ~/holiday_workshop/03-Connect-ADK-MCP-UI/02-solution, and run ./start_app.sh, then do the same steps as above.
9. Vertex AI Memory Bank
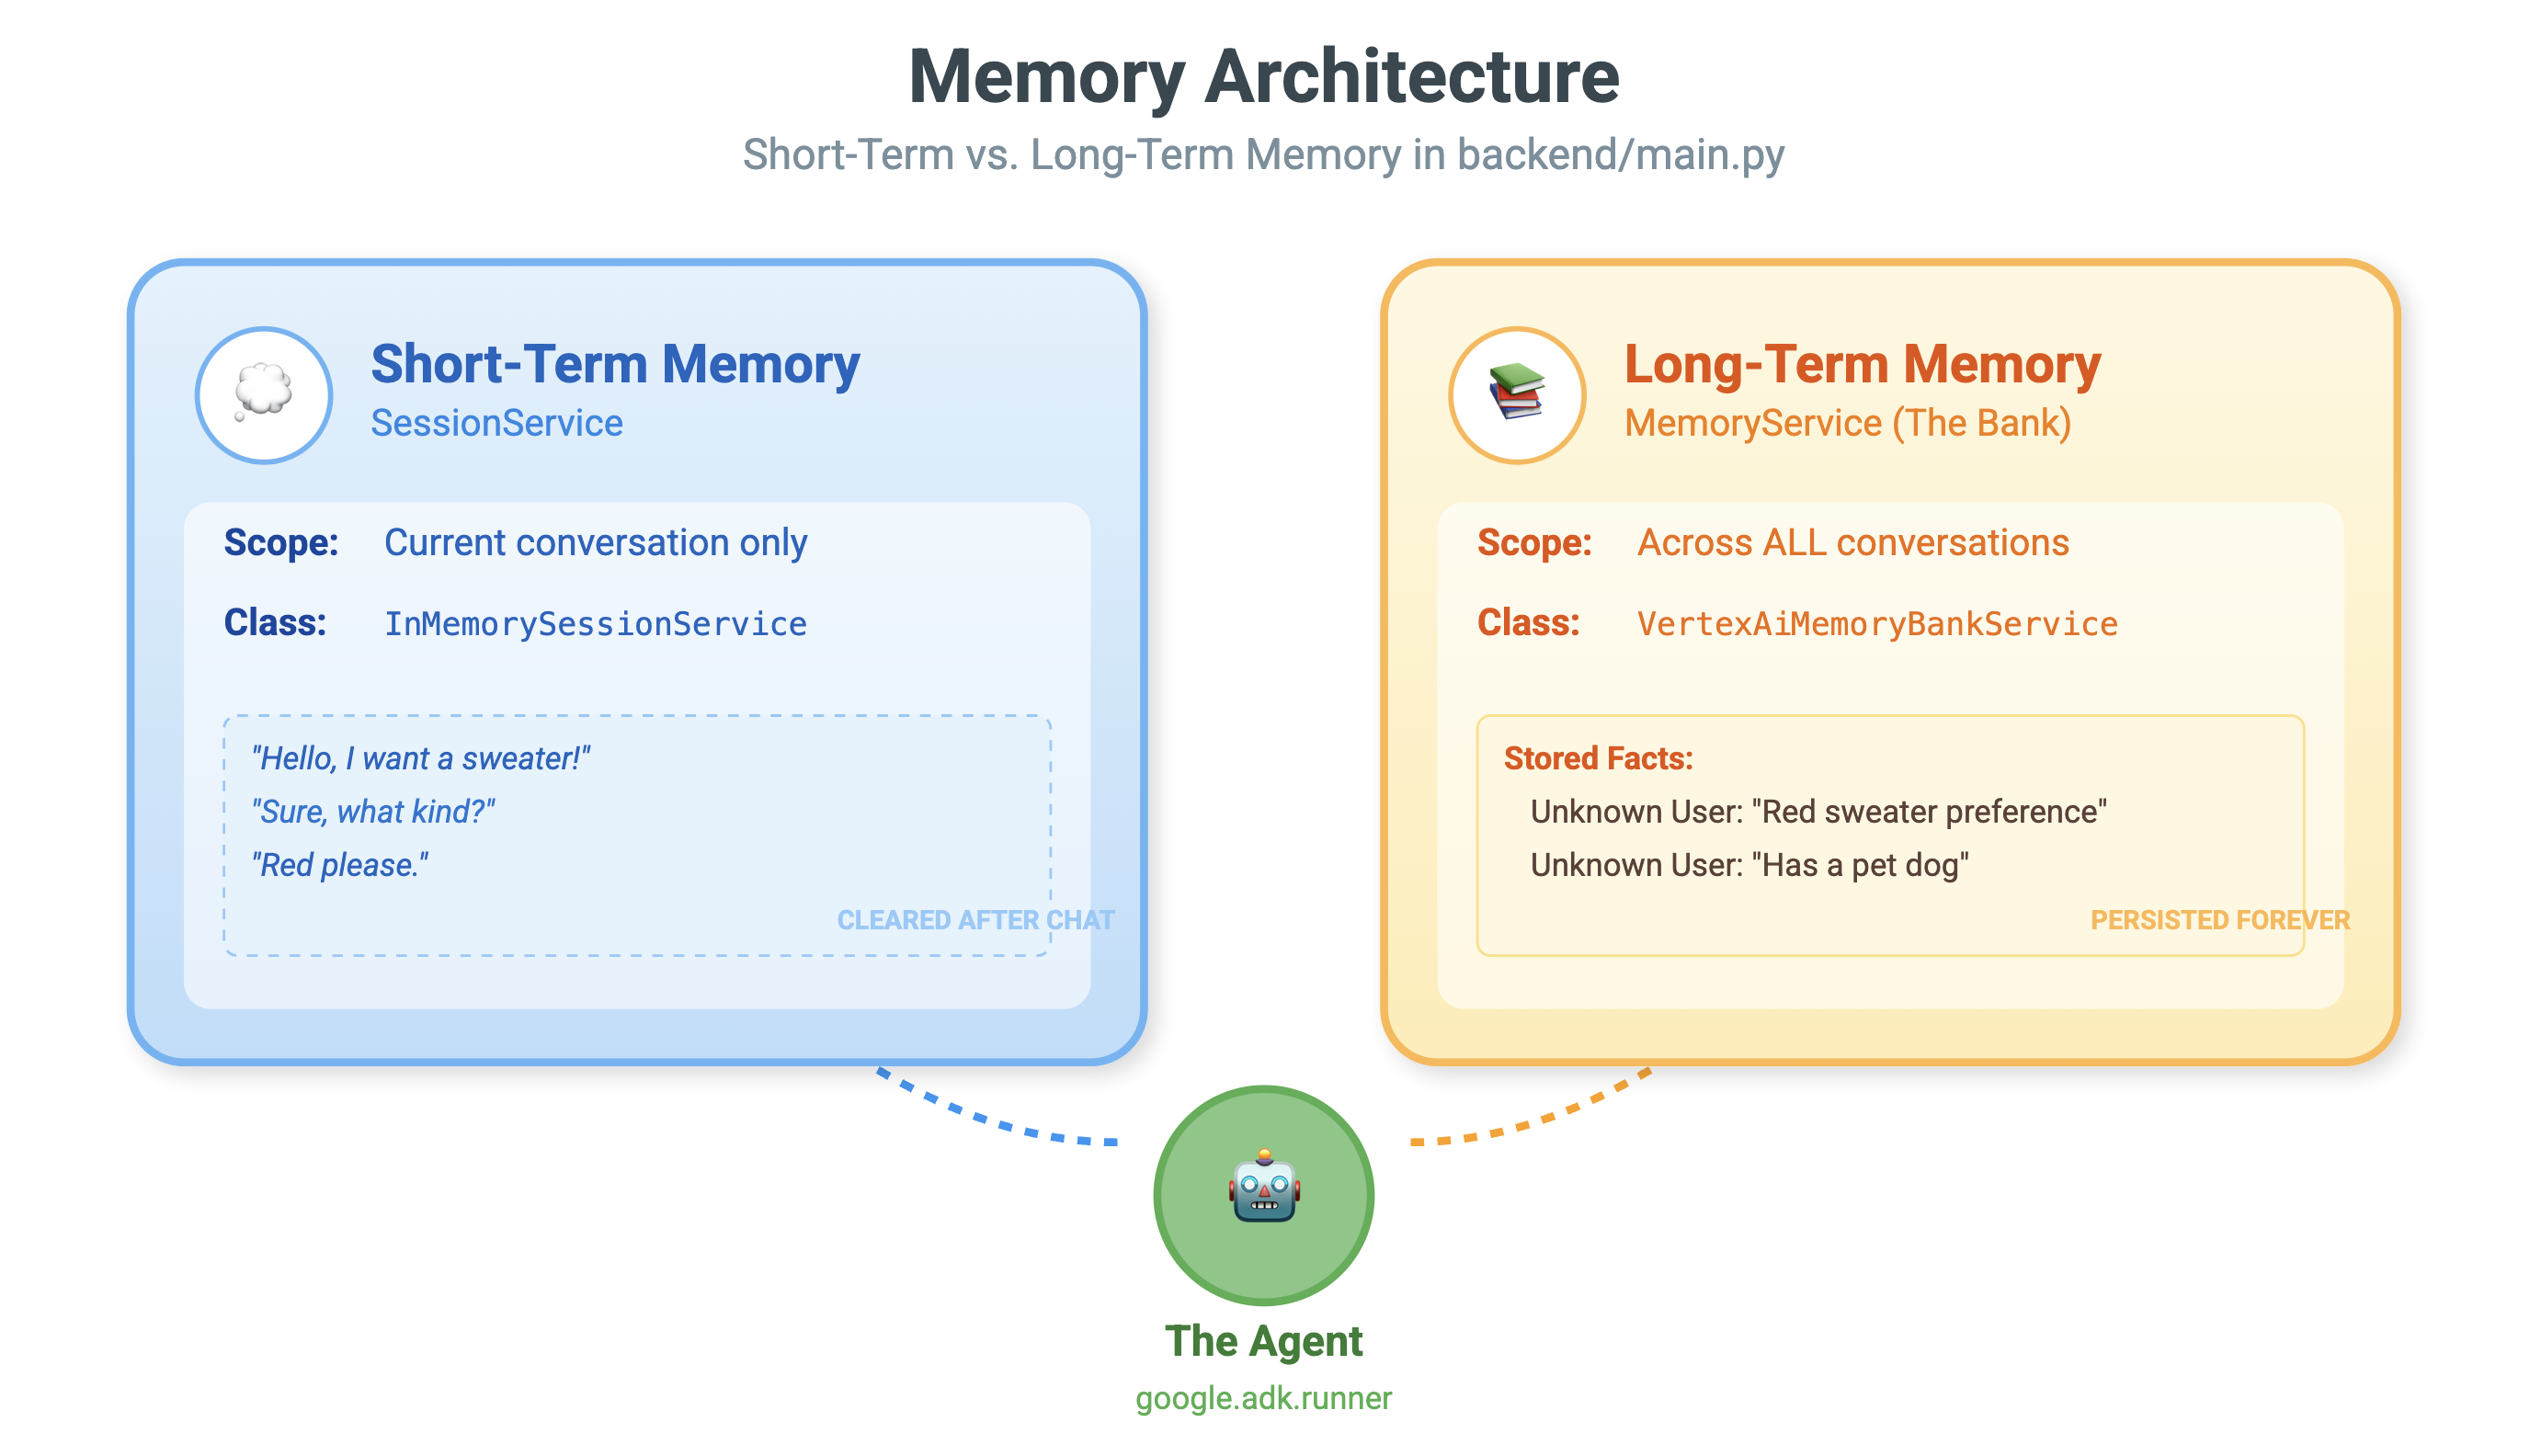
Short-term vs. Long-term Memory
- Short-term Context: "What did I just say?" (Session history). This is lost when the chat window closes.
- Long-term Memory: "What is my favorite programming language?" (User preferences). This should persist forever.
Vertex AI Memory Bank provides this long-term storage. It allows the agent to store and retrieve personalized information about the user.
Sessions vs. Memory Bank
- Sessions (
VertexAiSessionService): This is the Log. It stores the raw, chronological sequence of every message, tool call, and event (AppendEvent,ListEvents). It provides the ground truth for what happened. - Memory Bank (
VertexAiMemoryBankService): This is the Knowledge. It stores synthesized, long-term facts (GenerateMemories,RetrieveMemories). It is scoped to a specificuser_id, ensuring privacy and isolation.
- 👉💻 Type the following in your command:
cloudshell edit ~/holiday_workshop/04-Adding-Memory-Bank/01-starter/backend/main.py~/holiday_workshop/04-Adding-Memory-Bank/01-starter/backend/main.pyin your editor. - Find
# TODO: Create Vertex AI Session Service & Memory Bank Service, replace the whole line with the following:session_service = VertexAiSessionService( project=PROJECT_ID, location=LOCATION, agent_engine_id=AGENT_ENGINE_ID ) memory_service = VertexAiMemoryBankService( project=PROJECT_ID, location=LOCATION, agent_engine_id=AGENT_ENGINE_ID )
- 👉💻 Type the following in your command:
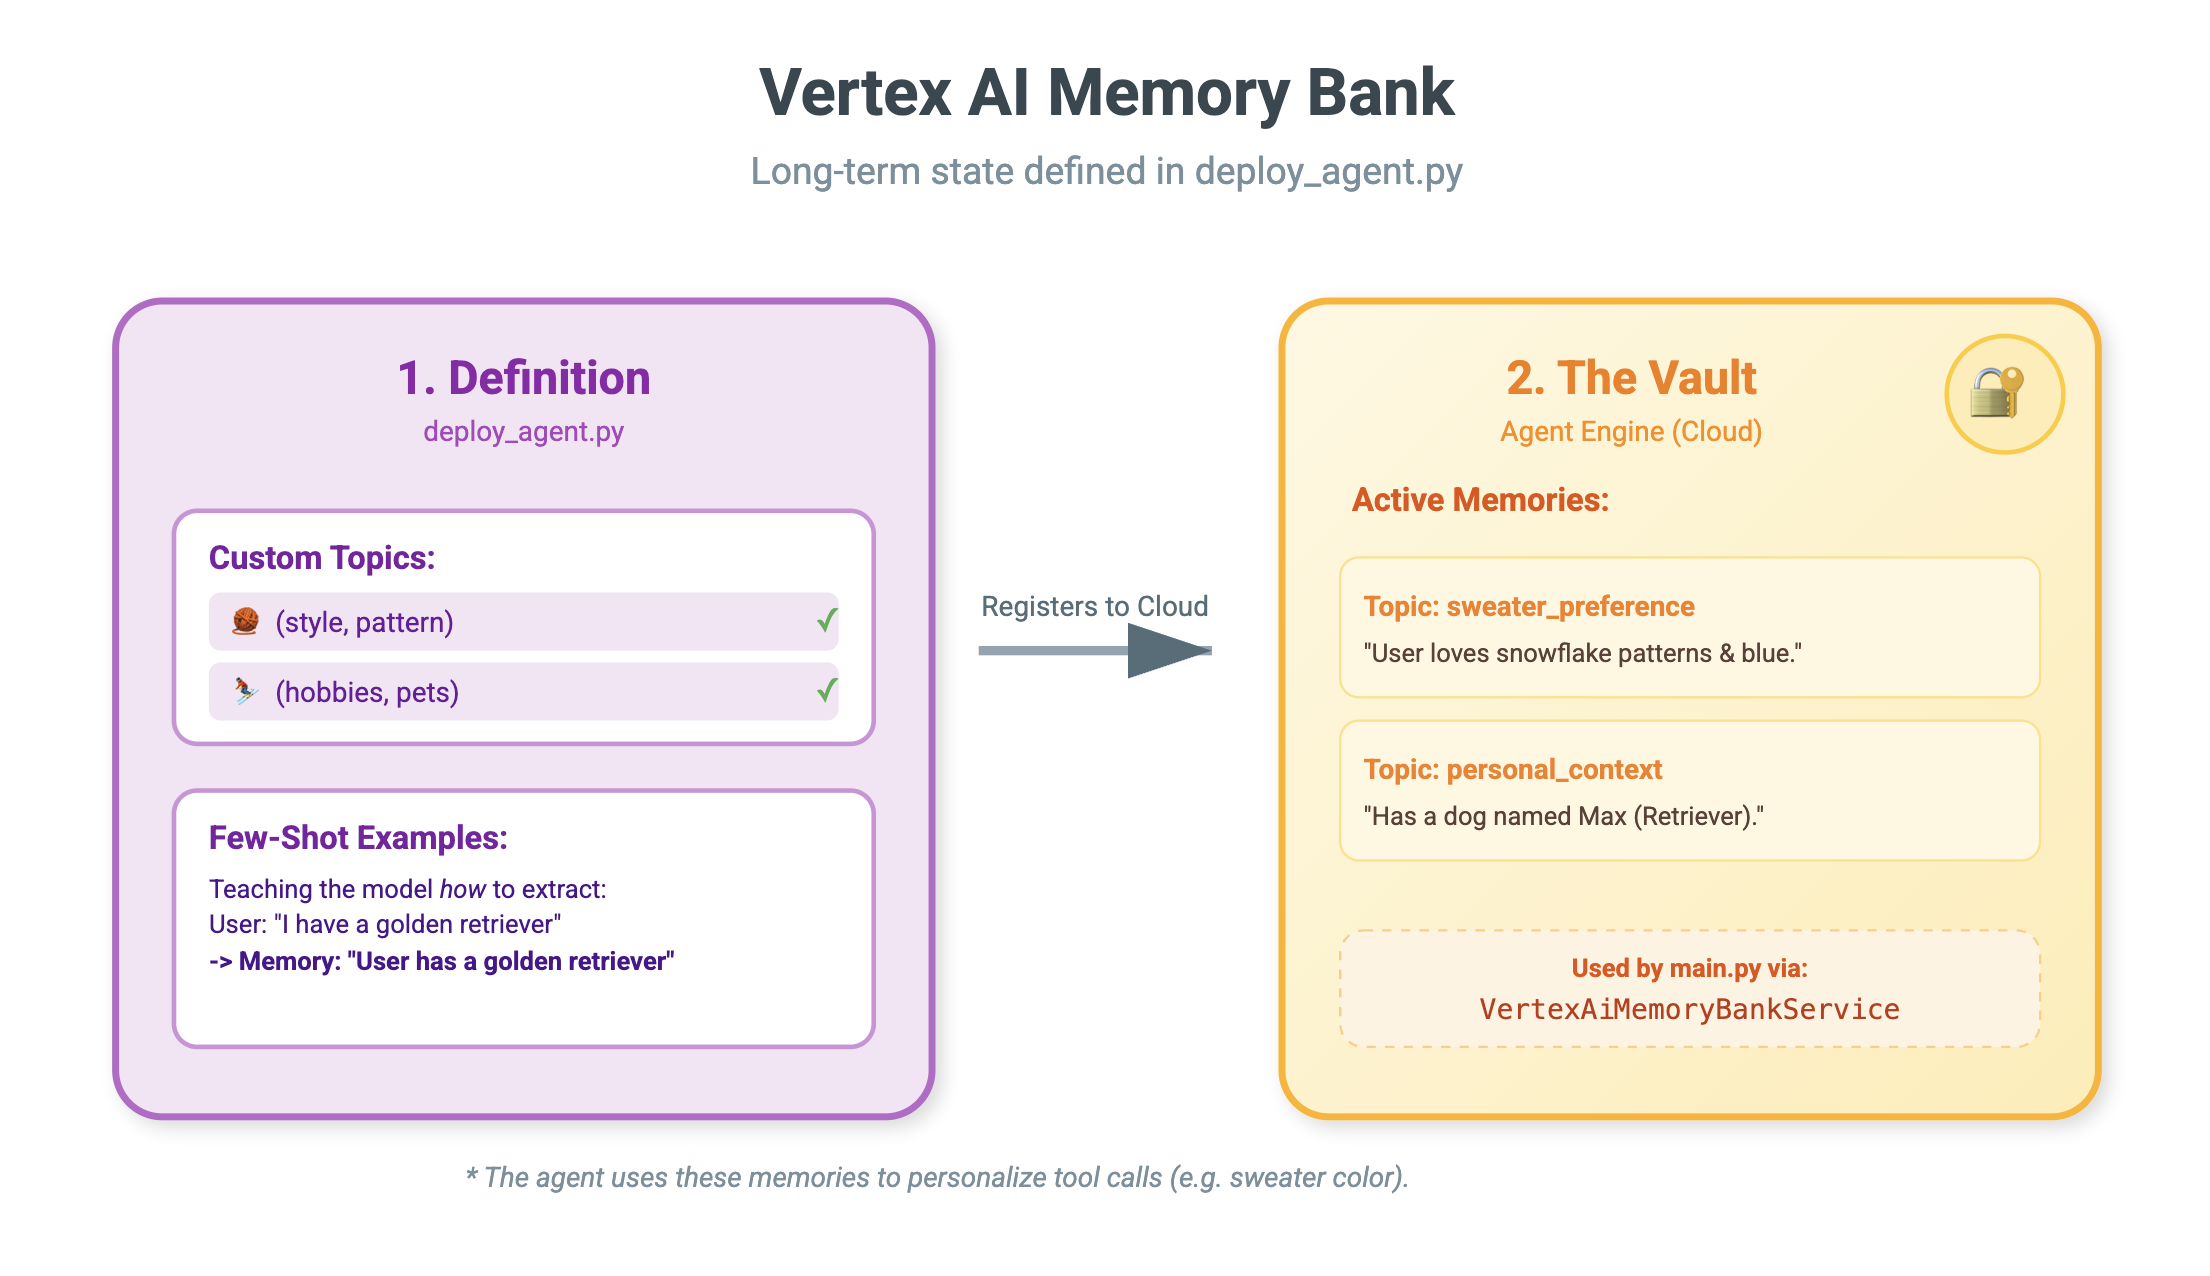
cloudshell edit ~/holiday_workshop/04-Adding-Memory-Bank/01-starter/backend/deploy_agent.py~/holiday_workshop/04-Adding-Memory-Bank/01-starter/backend/deploy_agent.pyin your editor. - Replace the
# TODO: Set Up Configurationwith the following:# Basic configuration types MemoryBankConfig = types.ReasoningEngineContextSpecMemoryBankConfig SimilaritySearchConfig = ( types.ReasoningEngineContextSpecMemoryBankConfigSimilaritySearchConfig ) GenerationConfig = types.ReasoningEngineContextSpecMemoryBankConfigGenerationConfig # Advanced configuration types CustomizationConfig = types.MemoryBankCustomizationConfig MemoryTopic = types.MemoryBankCustomizationConfigMemoryTopic CustomMemoryTopic = types.MemoryBankCustomizationConfigMemoryTopicCustomMemoryTopic GenerateMemoriesExample = types.MemoryBankCustomizationConfigGenerateMemoriesExample ConversationSource = ( types.MemoryBankCustomizationConfigGenerateMemoriesExampleConversationSource ) ConversationSourceEvent = ( types.MemoryBankCustomizationConfigGenerateMemoriesExampleConversationSourceEvent ) ExampleGeneratedMemory = ( types.MemoryBankCustomizationConfigGenerateMemoriesExampleGeneratedMemory )
- 👉 In the same file:
04-Adding-Memory-Bank/01-starter/backend/deploy_agent.py. Look for the# TODO: Set up topic, replace the whole line with the following:custom_topics = [ # Topic 1: Sweater Preference MemoryTopic( custom_memory_topic=CustomMemoryTopic( label="sweater_preference", description="""Extract the user's preferences for sweater styles, patterns, and designs. Include: - Specific patterns (snowflake, reindeer, geometric, fair isle, solid, etc.) - Style preferences (chunky knit, cardigan, pullover, turtleneck, oversized, fitted) - Color preferences (red, green, navy, pastel, etc.) - Material preferences if mentioned (wool, cotton, cashmere, itchy/soft) - Themes (retro, modern, ugly christmas sweater, elegant) Example: "User wants a retro style sweater with a pixelated reindeer pattern." Example: "User prefers dark blue colors and hates itchy wool." """, ) ), # Topic 2: Personal Context MemoryTopic( custom_memory_topic=CustomMemoryTopic( label="personal_context", description="""Extract the user's personal context including hobbies, pets, interests, job, and preferred scenes. Include: - Hobbies and activities (skiing, reading, gaming, cooking, etc.) - Pets (type, breed, name, color) - Job or profession if relevant to their style - General interests (sci-fi, nature, vintage, tech) - Preferred scenes or vibes (cozy fireplace, snowy mountain, cyberpunk city, beach) Example: "User has a golden retriever named Max." Example: "User loves skiing and wants a snowy mountain background." Example: "User is a software engineer who likes cyberpunk aesthetics." """, ) ) ] - 👉 In the same file:
04-Adding-Memory-Bank/01-starter/backend/deploy_agent.py. Look for the# TODO: Create Agent Engine, replace the whole line with the following:agent_engine = client.agent_engines.create( config={ "display_name": AGENT_DISPLAY_NAME, "context_spec": { "memory_bank_config": { "generation_config": { "model": f"projects/{PROJECT_ID}/locations/{LOCATION}/publishers/google/models/gemini-2.5-flash" }, "customization_configs": [customization_config] } }, } )
Why not just use the Prompt?
You might ask, "Why don't we just paste the user's history into the prompt?"
- Size Limits: Context windows are large, but not infinite. You can't fit 5 years of history.
- Cost: Processing 1 million tokens for every "Hello" is prohibitively expensive.
- Focus: Memory Bank acts as a Search Engine for your agent. It retrieves only the relevant facts.
- 👉💻 Type the following in your command:
cloudshell edit ~/holiday_workshop/04-Adding-Memory-Bank/01-starter/backend/agent.py~/holiday_workshop/04-Adding-Memory-Bank/01-starter/backend/agent.pyin your editor. - In the file:
~/holiday_workshop/04-Adding-Memory-Bank/01-starter/backend/agent.pyReplace the# TODO: Add PreloadMemoryToolwith the following:if USE_MEMORY_BANK: agent_tools.append(PreloadMemoryTool())
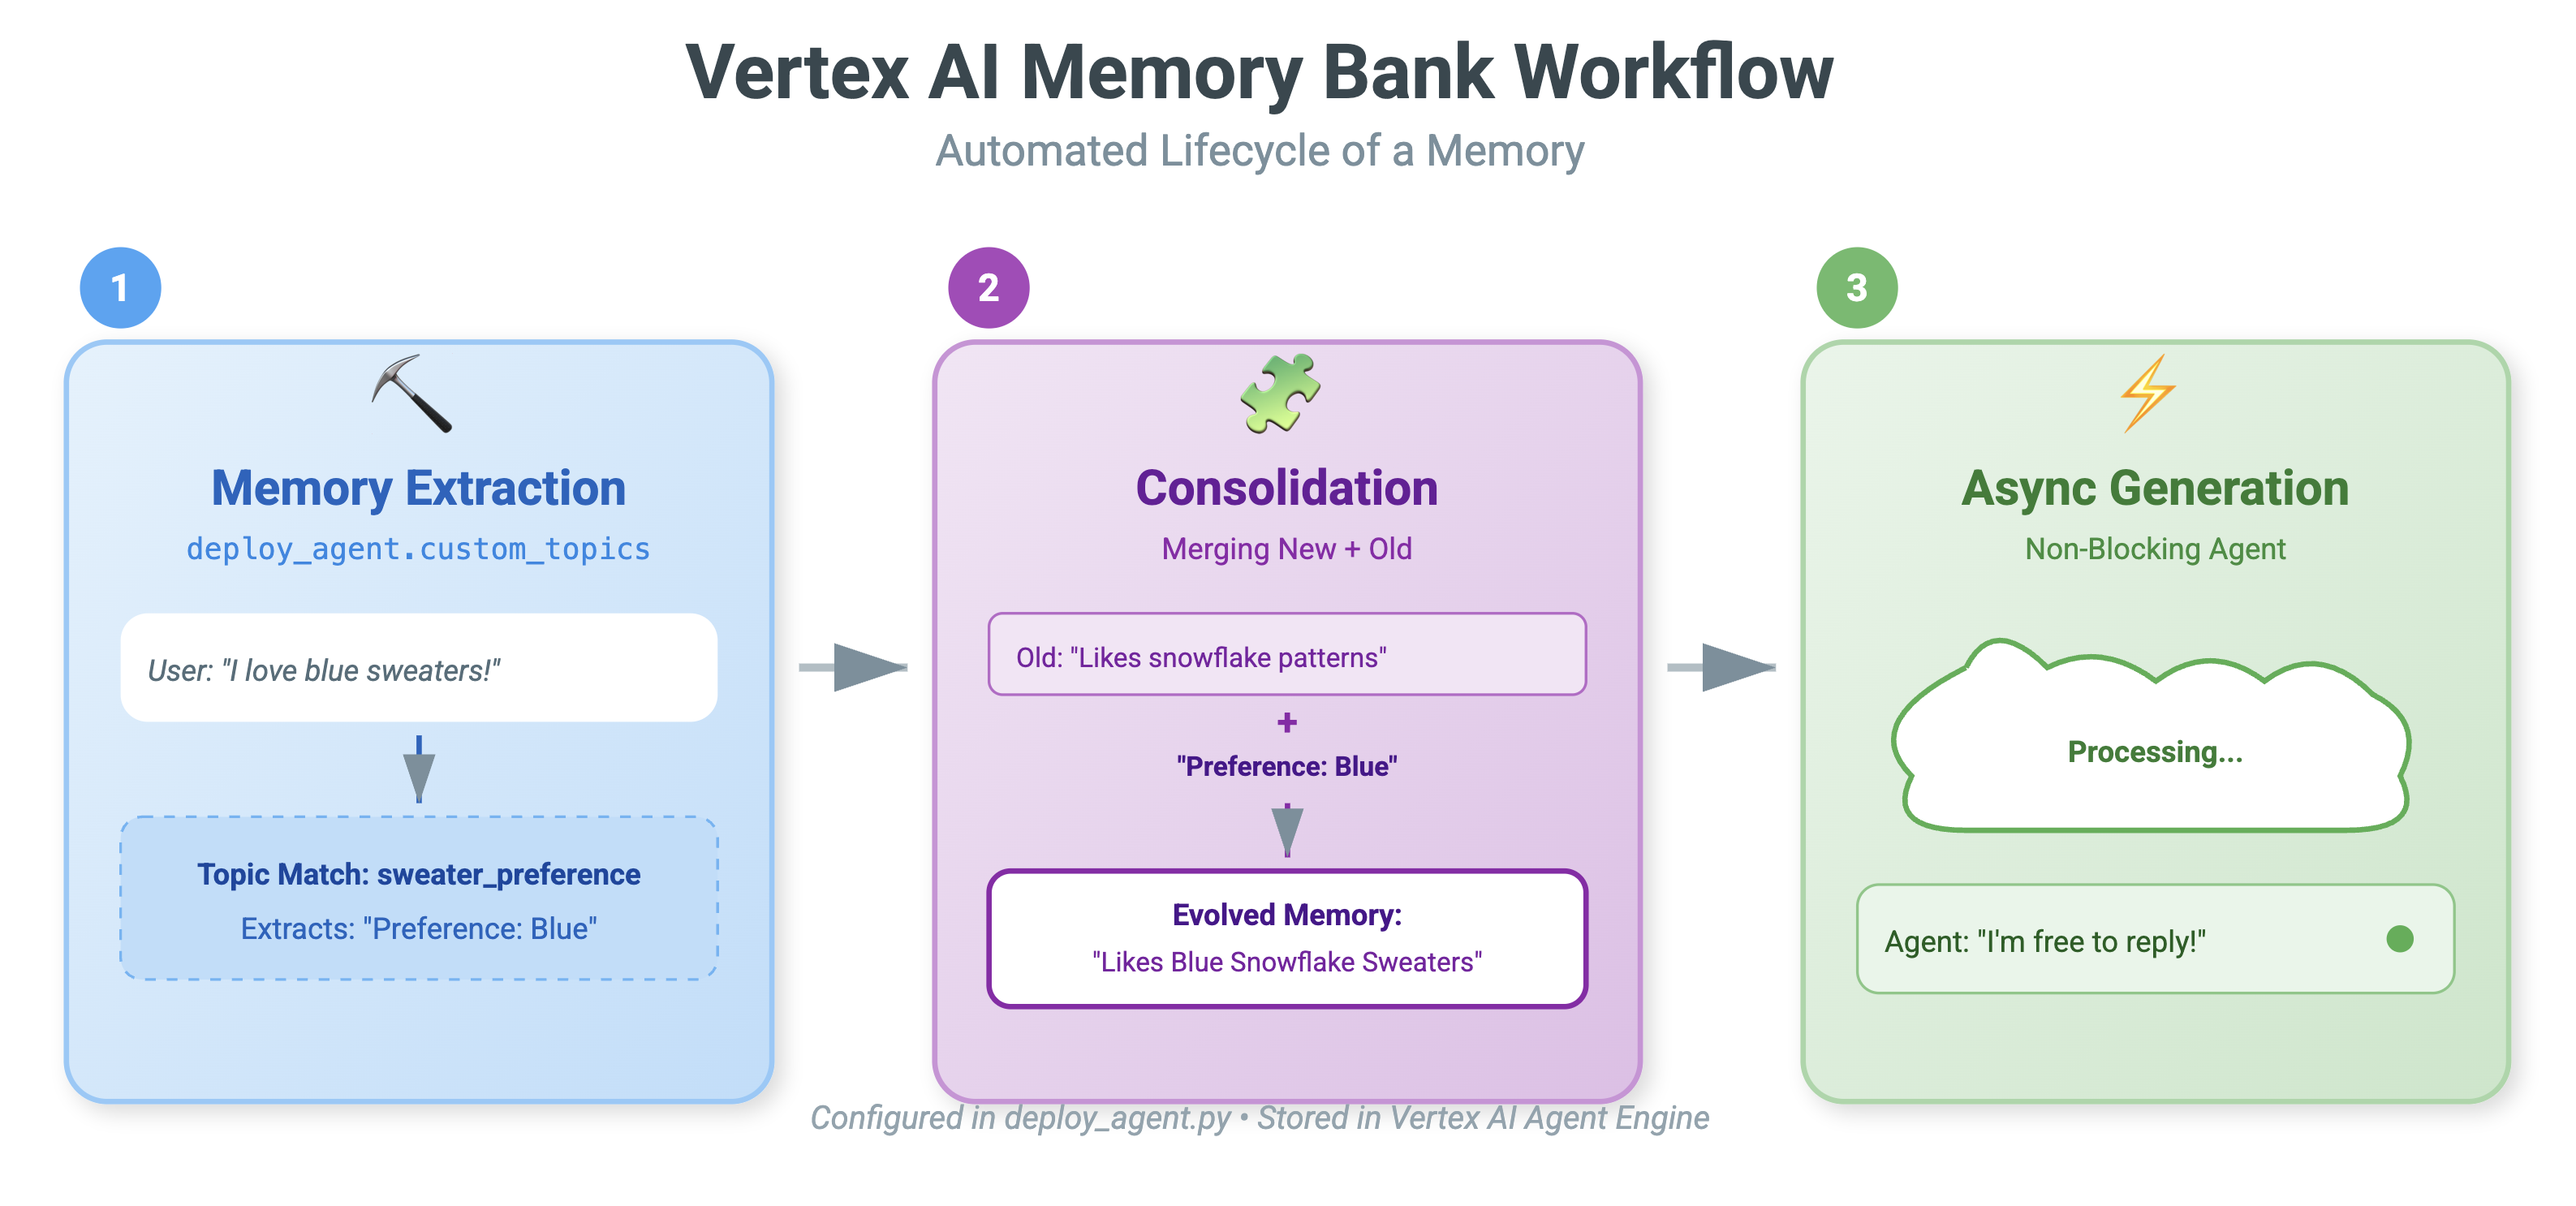
PreloadMemoryTool & add_session_to_memory
In agent.py, you'll see two key components:
PreloadMemoryTool: This is a tool that allows the agent to "Google itself." If the user asks something vague like "Get me my usual coffee," the agent can use this tool to query the Memory Bank for "coffee preferences" before answering.add_session_to_memory: This is a background callback.- Why Async? Saving memory takes time (summarizing the chat, extracting facts). We don't want the user to wait for this. We run it in the background (
add_session_to_memory) usingafter_agent_callback.
- Why Async? Saving memory takes time (summarizing the chat, extracting facts). We don't want the user to wait for this. We run it in the background (
10. Memory Bank In Action
- 👉💻 Type the following in your command:
cd ~/holiday_workshop/04-Adding-Memory-Bank/01-starter ./use_memory_bank.sh Check you
 ~/holiday_workshop/.envfile, you will see (no action needed)USE_MEMORY_BANK=TRUE AGENT_ENGINE_ID={agent_engine_id} - 👉💻 Test the memory with application UI. Type the following in your command:
cd ~/holiday_workshop/04-Adding-Memory-Bank/01-starter ./start_app.shhttp://localhost:5173/, or open a new window and typehttp://localhost:5173/.Note thatUvicorn running on http://0.0.0.0:8000is just backend server, not the actual link we want to click into.Now the chat interface in website has become your personalized agent! - 👉Test the memory. If you type in the UI:
I want a sweater that matches my dog. He's a golden retriever.I'm a programmer, so I want something geeky. Maybe a matrix style?I like snowflake sweater pattern
The agent will identify this as a preference and store it in the Memory Bank.
Next week(or anytime you restart the application by Control+C and ./start_app.sh), if you ask:
what is my preference on sweater pattern?
The agent will query the Memory Bank, see your preference, and generate sweater pattern without being asked. 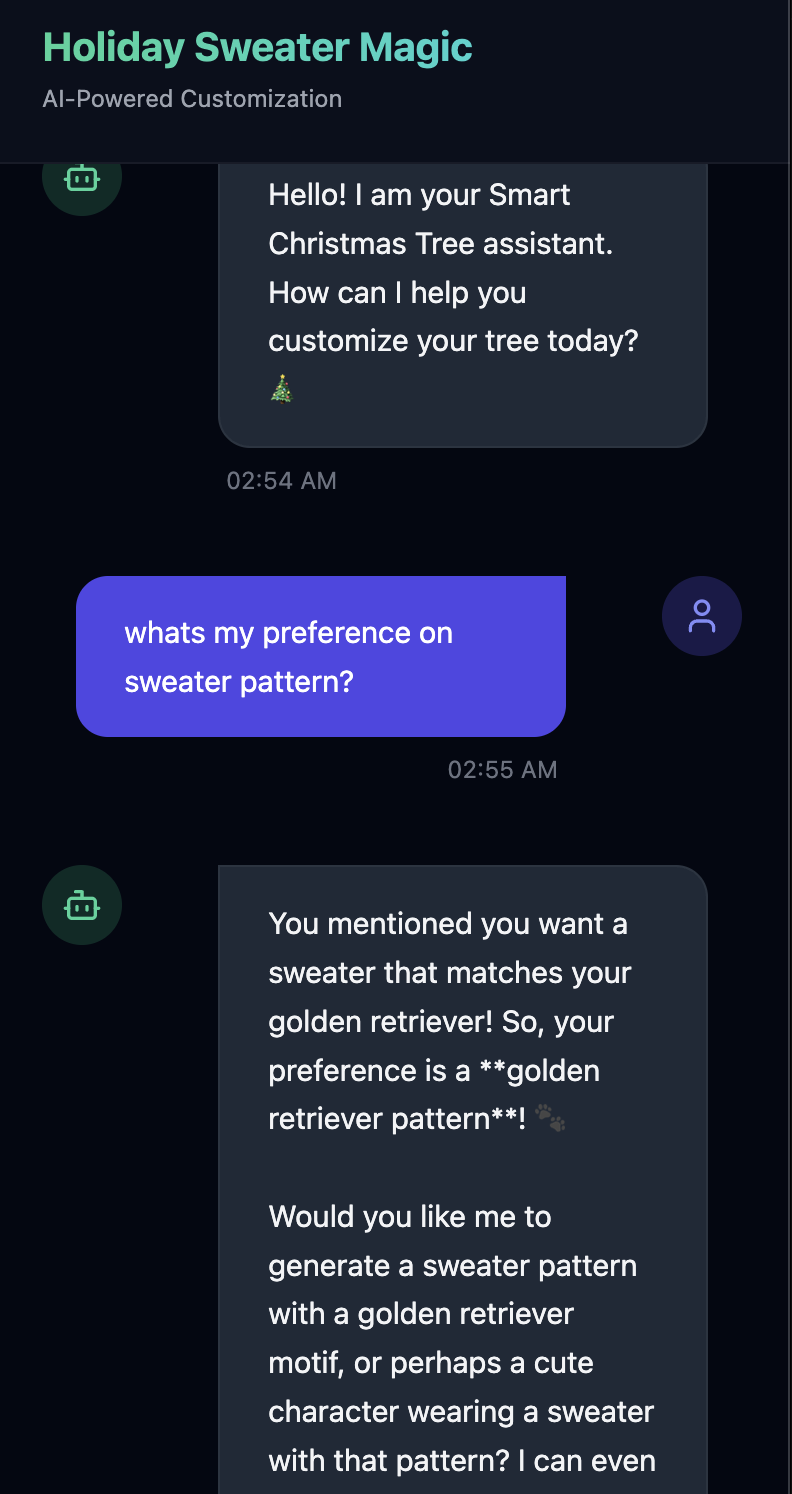
- Verify in Vertex AI Agent Engine, by go to Google Cloud Console Agent Engine
- Make sure you select the project from top left project selector:
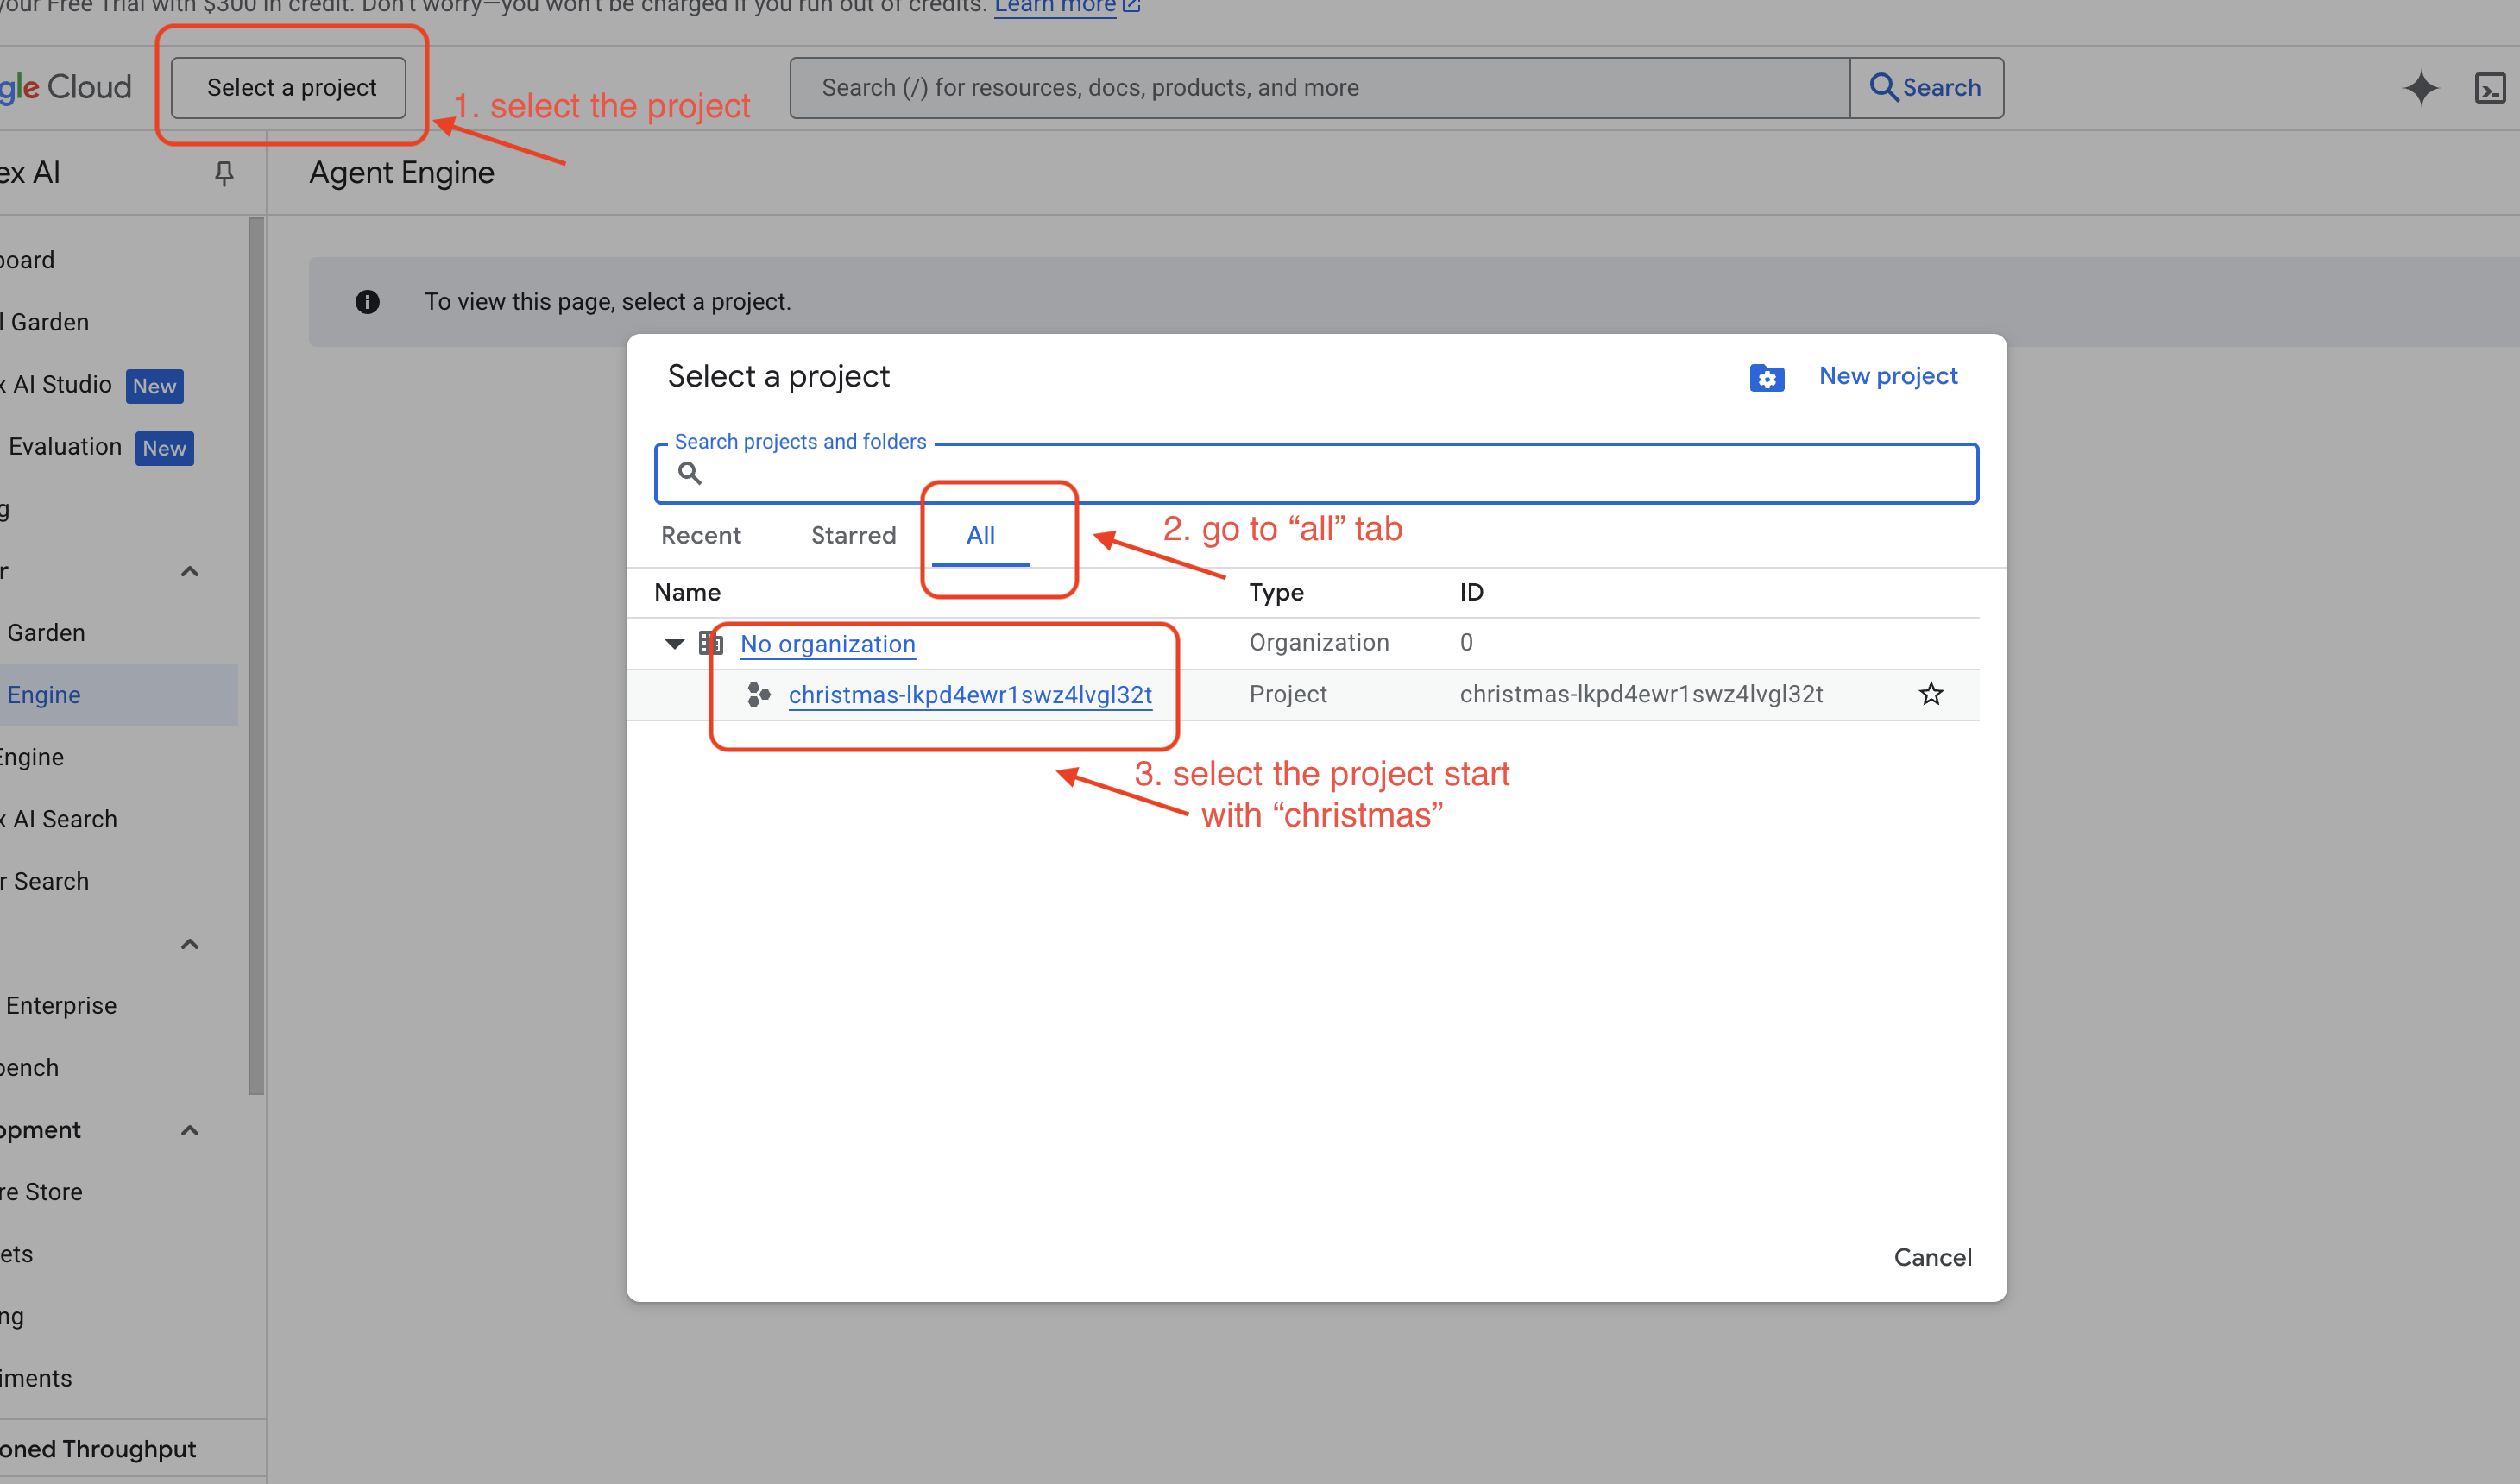
- And verify the agent engine you just deployed from previous command
use_memory_bank.sh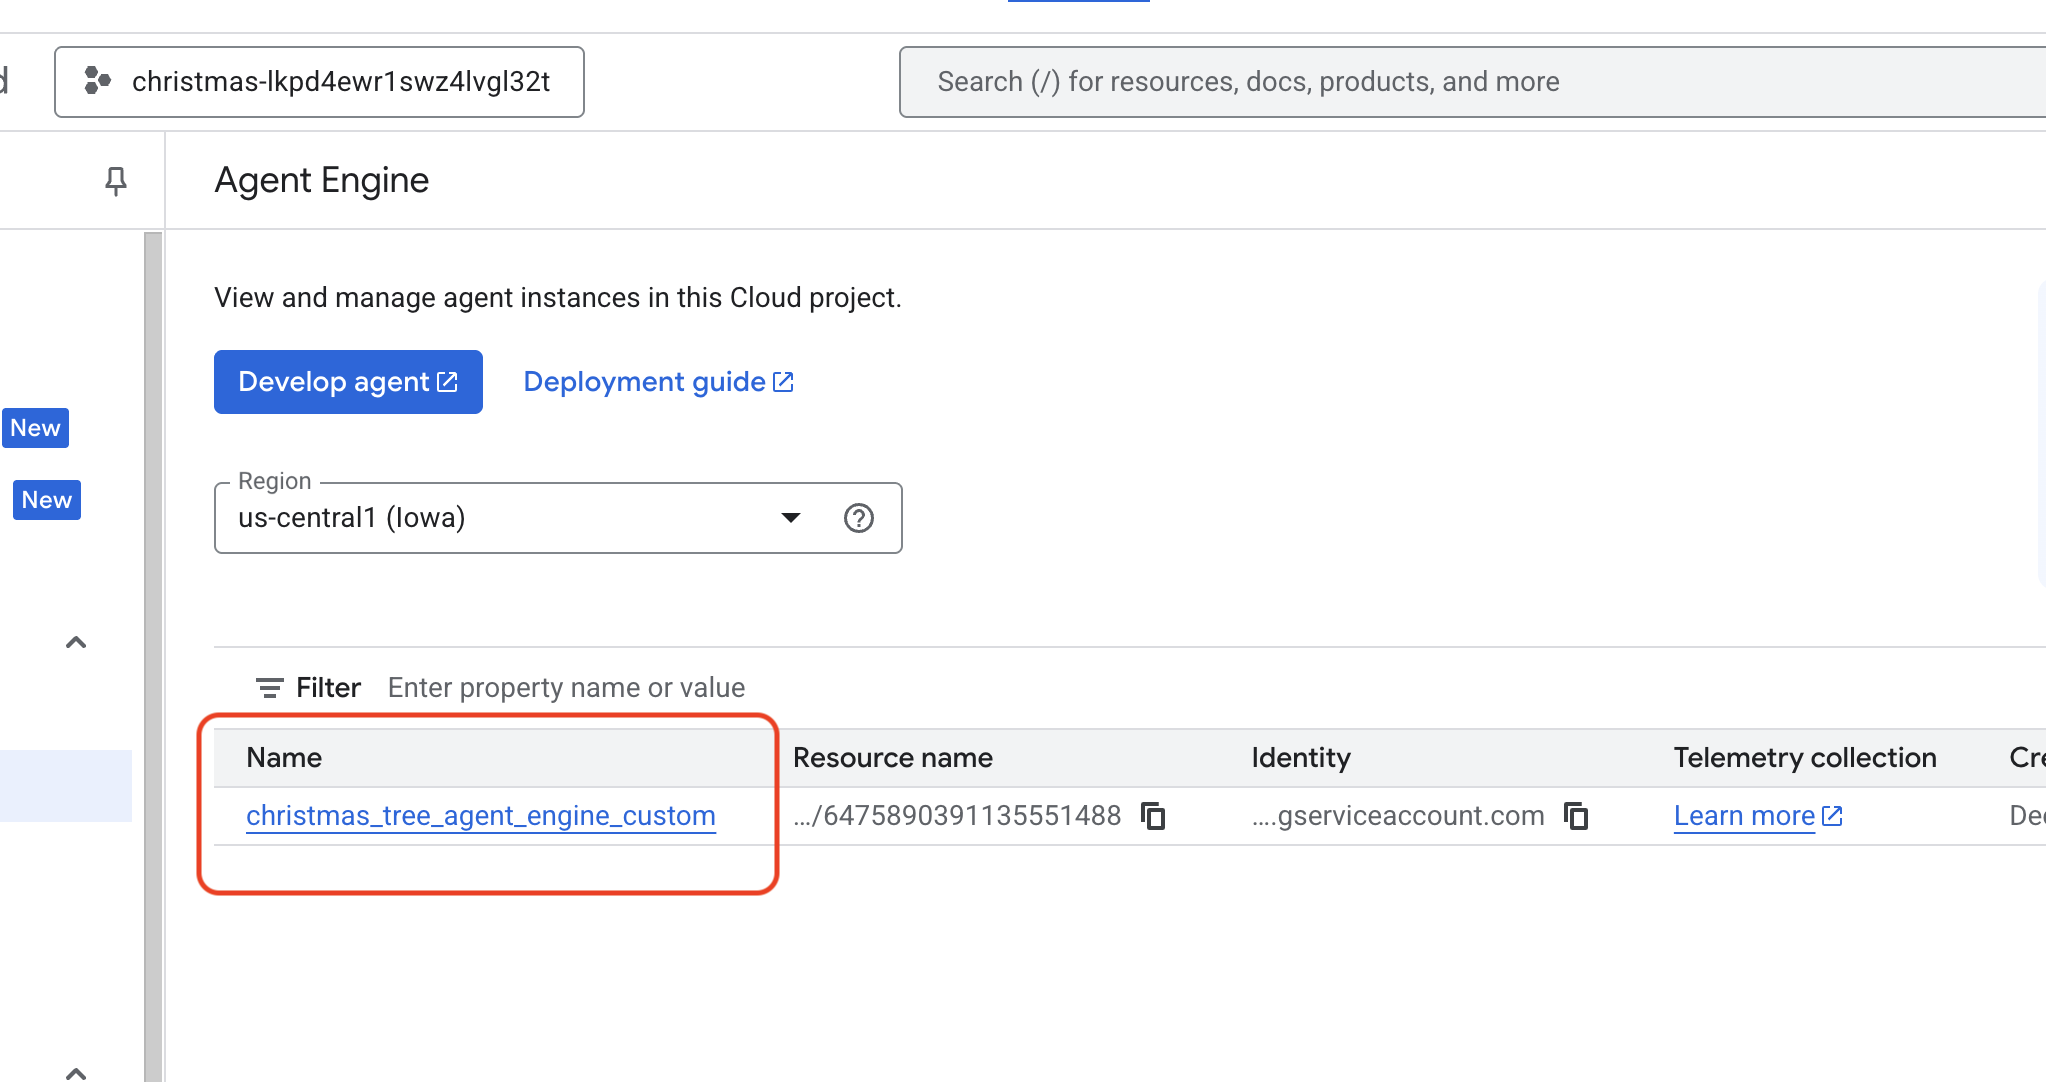 Click into the agent engine you just created.
- Make sure you select the project from top left project selector:
- Click the
MemoriesTab in this deployed agent, you can view all the memory here.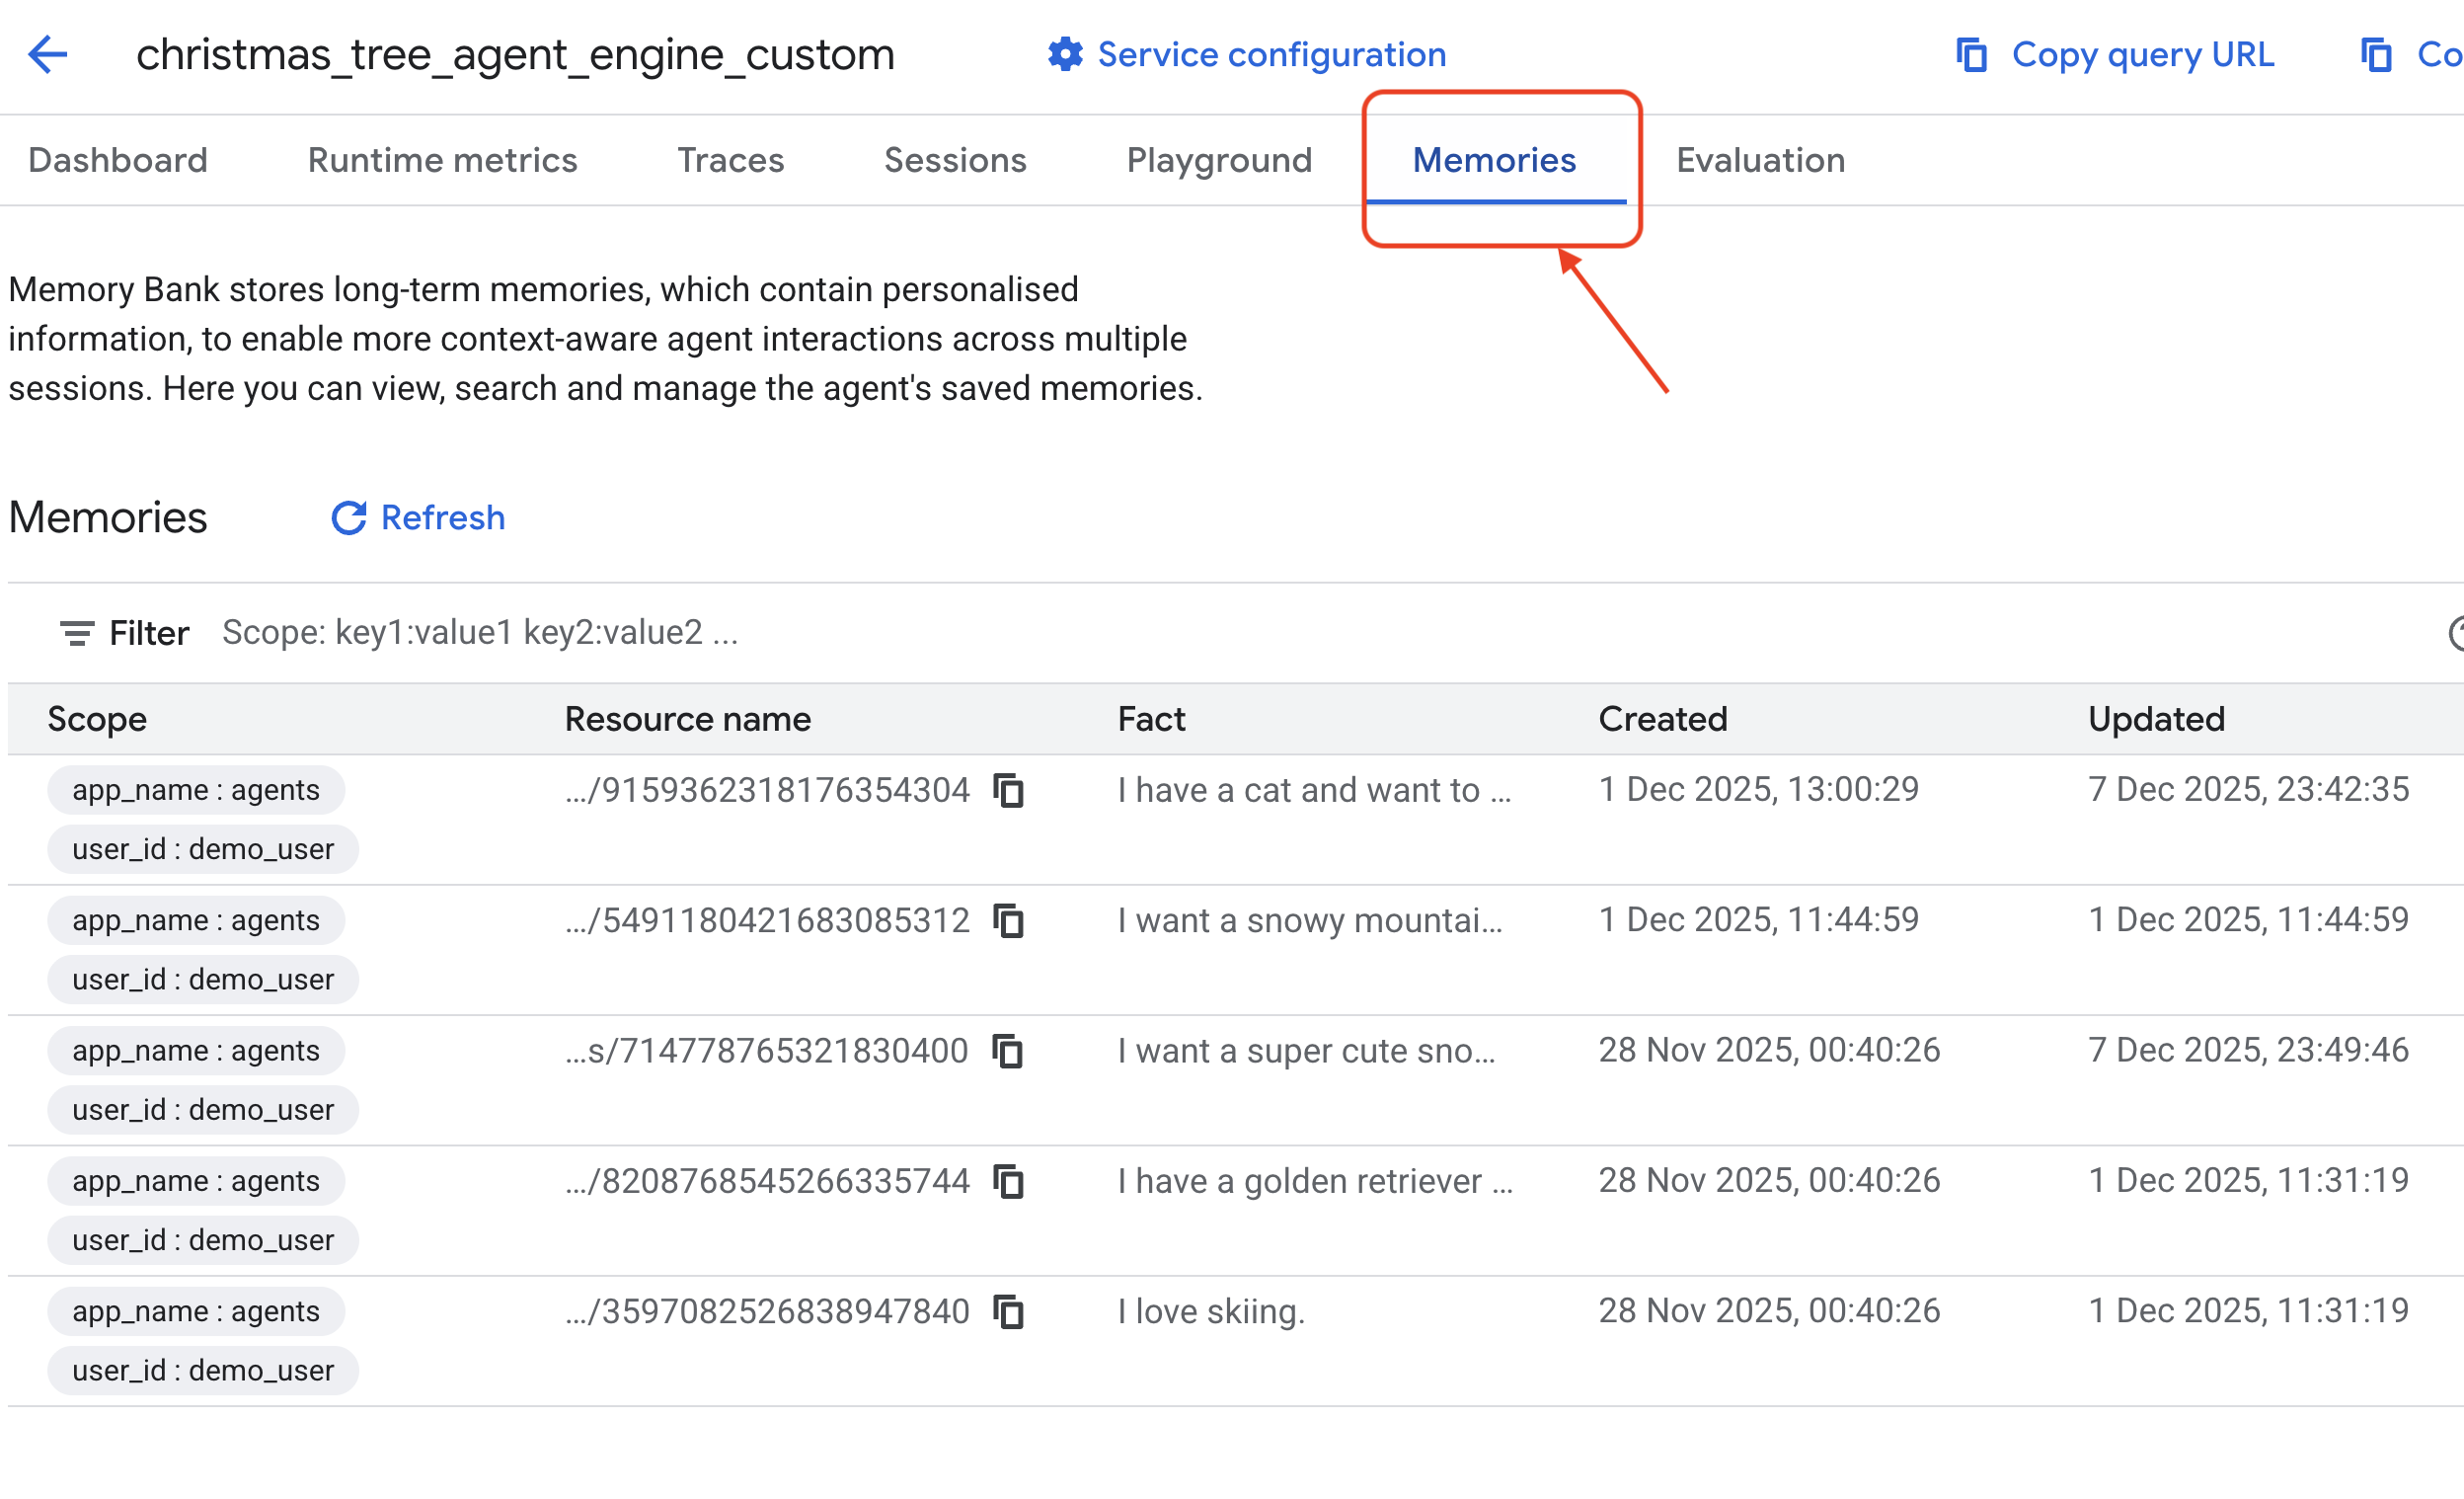
Congratulations! You just attached the meomory bank to your agent!
11. Conclusion
Summary
You have successfully architected and built a complete agentic system.
- Connectivity: You used MCP to standardize how your agent accesses local tools.
- Orchestration: You used ADK to manage the complex reasoning loop required for multi-step tasks.
- Personalization: You used Memory Bank to create a persistent, learning layer that remembers user context.
Next Steps
- Build your own MCP Server: Create a server for your internal API or database.
- Explore ADK Patterns: Learn about "Reasoning Loops" and "Orchestration" in the ADK documentation.
- Deploy: Take your agent from a local script to a production service on Cloud Run.