
1. Overview
The Serverless Migration Station series of codelabs (self-paced, hands-on tutorials) and related videos aim to help Google Cloud serverless developers modernize their appications by guiding them through one or more migrations, primarily moving away from legacy services. Doing so makes your apps more portable and gives you more options and flexibility, enabling you to integrate with and access a wider range of Cloud products and more easily upgrade to newer language releases. While initially focusing on the earliest Cloud users, primarily App Engine (standard environment) developers, this series is broad enough to include other serverless platforms like Cloud Functions and Cloud Run, or elsewhere if applicable.
There are situations when you don't have an "entire app" to require the resources of App Engine or Cloud Run. If your code consists only of a microservice or simple function, Cloud Functions is likely a better fit. This codelab teaches you how to migrate simple App Engine apps (or break apart larger apps into multiple microservices) and deploy them to Cloud Functions, another serverless platform specifically created for use cases like this.
You'll learn how to
- Use Cloud Shell
- Enable the Google Cloud Translation API
- Authenticate API requests
- Convert a small App Engine app to run on Cloud Functions
- Deploy your code to Cloud Functions
What you'll need
- A Google Cloud Platform project with an active GCP billing account
- Basic Python skills
- Working knowledge of common Linux commands
- Basic knowledge of developing and deploying App Engine apps
- A working Module 2 Cloud NDB Python 3 App Engine app
- Recommended: Complete the Module 2 codelab plus the bonus step of porting the app from Python 2 to 3
Survey
How will you use this tutorial?
How would you rate your experience with Python?
How would you rate your experience with using Google Cloud services?
2. Background
PaaS systems like Google App Engine and Cloud Functions provide many conveniences for users. These serverless platforms enable your technical team to focus on creating business solutions rather than spend time on investigating platforms to use and determining the amount of hardware needed. Applications can autoscale up as needed, scale down to zero with pay-per-use billing to control costs, and they allow for a variety of today's common development languages.
However, while full-stack web application development or complex back-ends for mobile apps is a great fit for App Engine, it's often the case that developers are mainly trying to put some functionality online, such as updating a news feed or pulling in the latest score of the home team's playoff game. While coding logic exists for both scenarios, neither appear to be full-blown "applications" requiring the power of App Engine. This is where Cloud Functions come in.
Cloud Functions is for deploying the small bit of code that:
- Isn't a part of an entire application
- Isn't needed in an entire development stack
- Is in an application or single mobile app backend that focuses on one thing
You can also use Cloud Functions to break up a large, monolithic application into multiple microservices, each using a shared common database such as Cloud Firestore or Cloud SQL. And if you want your function or microservice containerized and executed serverlessly on Cloud Run, you can do that too.
Our sample App Engine app that's been featured in almost all of the migration tutorials is a short app with basic functionality that works just as well in Cloud Functions. In this tutorial, you'll learn how to modify that app to run on Cloud Functions. From the App Engine perspective, because functions are simpler than entire apps, your getting started experience should be easier (and faster), and with less "overhead" in general. This migration features these steps:
- Setup/Prework
- Remove configuration files
- Modify application files
3. Setup/Prework
This codelab begins with the Python 3 version of the Module 2 Cloud NDB App Engine sample app because Cloud Functions does not support Python 2. First, let's set up our project, get the code, then deploy the baseline app to confirm we're starting with working code.
1. Setup project
If you completed the Module 2 codelab (and ported it to Python 3), we recommend reusing that same project (and code). Alternatively, you can create a brand new project or reuse another existing project. Ensure the project has an active billing account with the App Engine service enabled.
2. Get baseline sample app
One of the prerequisites to this codelab is to have a working Module 2 sample app. If you don't have one, go complete either tutorial linked above before moving ahead here. Otherwise if you're already familiar with its contents, you can start by grabbing the Module 2 code below.
Whether you use yours or ours, the Module 2 Python 3 code is where we'll START. This Module 11 codelab walks you through each step, concluding with code that resembles what's in the Module 11 repo folder (FINISH).
- START: Module 2 code (3.x [Module 2b repo folder])
- FINISH: Module 11 code (3.x)
- Entire repo (to clone or download ZIP)
The directory of Python 3 Module 2 STARTing files (yours or ours) should look like this:
$ ls
README.md               main.py                 templates
app.yaml                requirements.txt
3. (Re)Deploy baseline app
Your remaining prework steps to execute now:
- Re-familiarize yourself with the
gcloudcommand-line tool - Re-deploy the sample app with
gcloud app deploy - Confirm the app runs on App Engine without issue
Once you've successfully executed those steps, you're ready to convert it to a Cloud Function.
4. Remove configuration files
The app.yaml file is an App Engine artifact not used with Cloud Functions so delete it now. If you don't or forget to do this, there is no harm as Cloud Functions doesn't use it. That's the only configuration change as requirements.txt stays identical to what it is from Module 2.
If you're also porting a Python 2 App Engine app to Python 3, delete appengine_config.py and the lib folder if you have one. They are App Engine artifacts unused in the Python 3 runtime.
5. Modify application files
There is only one application file, main.py, so all necessary changes to move to Cloud Functions occur in this file.
Imports
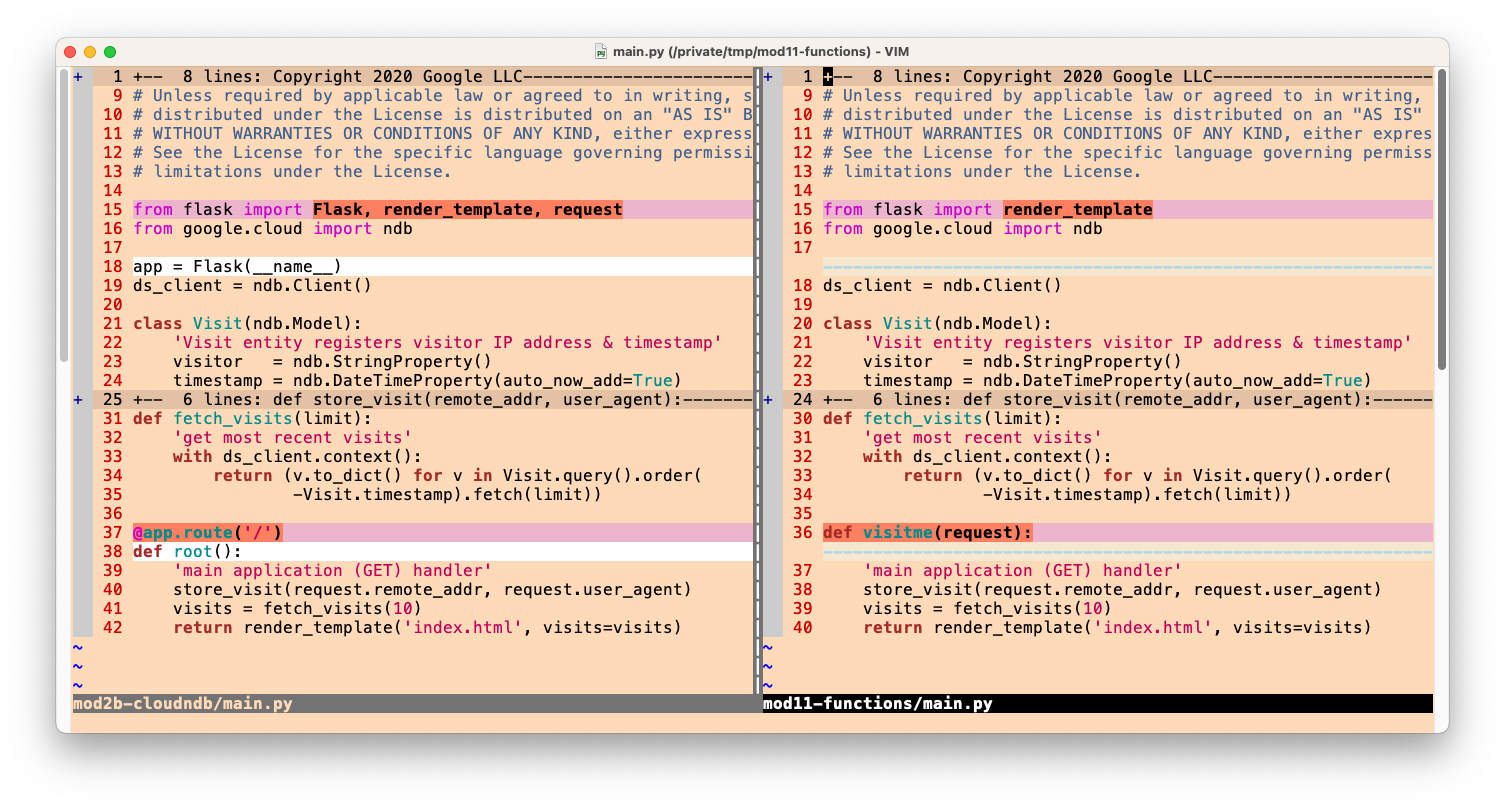
Because we're only working with functions, there's no need for a web application framework. However, for convenience, when Python-based Cloud Functions are called, they are automatically passed a request object for your code to use as needed. (The Cloud Functions team selected it to be a Flask Request object passed to your function.)
Because web frameworks aren't part of the Cloud Functions landscape, there are no imports from Flask unless your app uses other Flask features. This is indeed our case as template rendering is still taking place after conversion to a function, meaning a to call flask.render_template() is still required, thus its import from Flask. No web framework means there's no need to instantiate a Flask app, so delete app = Flask(__name__). Your code looks like the following, before and after applying the changes:
BEFORE:
from flask import Flask, render_template, request
from google.cloud import ndb

app = Flask(__name__)
ds_client = ndb.Client()
AFTER:
from flask import render_template
from google.cloud import ndb

ds_client = ndb.Client()
If you are dependent on the app object (app) or any other web framework infrastructure, you need to resolve all those dependencies, finding appropriate workarounds, or remove their usage entirely or find proxies. Only then can you convert your code to a Cloud Function. Otherwise, you'll be better of staying on App Engine or containerizing your app for Cloud Run
Update main handler function signature
The changes required in the function signature are as follows:
- Flask is no longer used after converting the app to a Cloud Function, so remove route decorators.
- Cloud Functions automatically passes in the Flask
Requestobject as a parameter, so create a variable for it. In our sample app, we'll call itrequest. - Deployed Cloud Functions must be named. Our main handler was named appropriately
root()in App Engine to describe what it was (the root application handler). As a Cloud Function, it makes less sense to use that name. Instead, we'll deploy the Cloud Function with the namevisitme, so use that as the Python function's name as well. Similarly, in Modules 4 and 5, we also named the Cloud Run servicevisitme.
Here are the before and after with these updates:
BEFORE:
@app.route('/')
def root():
    'main application (GET) handler'
    store_visit(request.remote_addr, request.user_agent)
    visits = fetch_visits(10)
    return render_template('index.html', visits=visits)
AFTER:
def visitme(request):
    'main application (GET) handler'
    store_visit(request.remote_addr, request.user_agent)
    visits = fetch_visits(10)
    return render_template('index.html', visits=visits)
That concludes all of the necessary updates. Note that the changes made only affected the application's "infrastructure" code. No changes are needed in the core application code, and none of the app's functionality was altered. Here is a pictorial representation of the changes that were made to illustrate this point:
Local development and testing
Whereas App Engine has the dev_appserver.py local development server, Cloud Functions has its Functions Framework. With this framework, you can develop and test locally. Your code can be deployed to Cloud Functions, but it can also be deployed to other compute platforms such as Compute Engine, Cloud Run, or even on-prem or hybrid cloud systems supporting Knative. See below for additional links to Functions Framework.
6. Build and deploy
Deploying to Cloud Functions differs slightly from App Engine. As no configuration files are used outside of requirements.txt, more information about the code must be specified on the command-line. Deploy your new HTTP-triggered Cloud Function running under Python 3.10 with this command:
$ gcloud functions deploy visitme --runtime python310 --trigger-http --allow-unauthenticated
Expect output similar to the following:
Deploying function (may take a while - up to 2 minutes)...⠛
For Cloud Build Logs, visit: https://console.cloud.google.com/cloud-build/builds;region=REGION/f5f6fc81-1bb3-4cdb-8bfe?project=PROJECT_ID
Deploying function (may take a while - up to 2 minutes)...done.
availableMemoryMb: 256
buildId: f5f6fc81-1bb3-4cdb-8bfe
buildName: projects/PROJECT_ID/locations/REGION/builds/f5f6fc81-1bb3-4cdb-8bfe
dockerRegistry: CONTAINER_REGISTRY
entryPoint: visitme
httpsTrigger:
  securityLevel: SECURE_OPTIONAL
  url: https://REGION-PROJECT_ID.cloudfunctions.net/visitme
ingressSettings: ALLOW_ALL
labels:
  deployment-tool: cli-gcloud
name: projects/PROJECT_ID/locations/REGION/functions/visitme
runtime: python310
serviceAccountEmail: PROJECT_ID@appspot.gserviceaccount.com
sourceUploadUrl: https://storage.googleapis.com/uploads-853031211983.REGION.cloudfunctions.appspot.com/8c923758-cee8-47ce-8e97-5720a5301c34.zip
status: ACTIVE
timeout: 60s
updateTime: '2022-05-16T18:28:06.153Z'
versionId: '8'
After your function has deployed, use the URL from the deployment output and visit your app. The URL is of the form: REGION-PROJECT_ID.cloudfunctions.net/visitme. The output should be identical to when you deployed it earlier to App Engine:

As with most other codelabs and videos in the series, the baseline app functionality doesn't change. The purpose is to apply one modernization technique and have the app work exactly as before but powered by newer infrastructure, for example migrating from an older App Engine legacy service to its replacement Cloud standalone product, or, as in the case of this tutorial, moving an app to another Google Cloud serverless platform.
7. Summary/Cleanup
Congratulations for converting this small App Engine app to a Cloud Function! Another appropriate use case: breaking-up a large monolithic App Engine app into a series of microservices, each as a Cloud Function. This is a more modern development technique resulting in a more "plug-and-play" component (a la " JAM stack") style. It allows for mixing and matching, and code reuse, which are two goals, but another benefit is that these microservices will continue to get debugged over time, meaning stable code and lower maintenance costs overall.
Clean up
After completing this codelab, you can disable the Module 2 App Engine app (temporarily or permanently) to avoid incurring billing. The App Engine platform has a free quota, so you won't be billed as long as you stay within its usage tier. The same applies to Datastore; see the Cloud Datastore pricing page for more details.
Deploying to platforms like App Engine and Cloud Functions incurs minor build and storage costs. In some regions, Cloud Build has its own free quota as does Cloud Storage. Builds consume some of that quota. Be aware of your storage usage to minimize potential costs, especially if your region doesn't have such a free tier.
Unfortunately Cloud Functions doesn't have a "disable" feature. Backup your code and just delete the function. You can always redeploy it with the same name later. However, if you're not going to continue with any other migration codelabs and want to delete everything completely, shut down your Cloud projects.
Next steps
Beyond this tutorial, other migration modules to look at include containerizing your App Engine app for Cloud Run. See the links to the Module 4 and Module 5 codelabs:
- Module 4: Migrate to Cloud Run with Docker
- Containerize your app to run on Cloud Run with Docker
- This migration allows you to stay on Python 2.
- Module 5: Migrate to Cloud Run with Cloud Buildpacks
- Containerize your app to run on Cloud Run with Cloud Buildpacks
- You do not need to know anything about Docker, containers, or
Dockerfiles. - Requires your app to have already migrated to Python 3 (Buildpacks doesn't support Python 2)
Many of the other modules focus on showing developers how to migrate away from App Engine bundled services to Cloud standalone replacements:
- Module 2: migrate from App Engine
ndbto Cloud NDB - Modules 7-9: migrate from App Engine Task Queue push tasks to Cloud Tasks
- Modules 12-13: migrate from App Engine Memcache to Cloud Memorystore
- Modules 15-16: migrate from App Engine Blobstore to Cloud Storage
- Modules 18-19: migrate from App Engine Task Queue (pull tasks) to Cloud Pub/Sub
If containerization has become part of your application development workflow, particularly if it consists of a CI/CD (continuous integration/continuous delivery or deployment) pipeline, consider migrating to Cloud Run instead of Cloud Functions. See Module 4 to containerize your app with Docker, or Module 5 to do it without containers, Docker knowledge, or Dockerfiles. Whether considering Cloud Functions or Cloud Run, switching to another serverless platform is optional, and we recommend considering the best options for your apps and use cases before making any changes.
Regardless of which migration module you consider next, all Serverless Migration Station content (codelabs, videos, source code [when available]) can be accessed at its open source repo. The repo's README also provides guidance on which migrations to consider and any relevant "order" of Migration Modules.
8. Additional resources
App Engine migration module codelabs issues/feedback
If you find any issues with this codelab, please search for your issue first before filing. Links to search and create new issues:
Migration resources
Links to the repo folders for Module 8 (START) and Module 9 (FINISH) can be found in the table below. They can also be accessed from the repo for all App Engine codelab migrations which you can clone or download a ZIP file.
Codelab | Python 3 |
Online resources
Below are online resources which may be relevant for this tutorial:
App Engine
- App Engine documentation
- Python 2 App Engine (standard environment) runtime
- Python 3 App Engine (standard environment) runtime
- Differences between Python 2 & 3 App Engine (standard environment) runtimes
- Python 2 to 3 App Engine (standard environment) migration guide
- App Engine pricing and quotas information
- Second generation App Engine platform launch (2018)
- Comparing first & second generation platforms
- Long-term support for legacy runtimes
- Documentation migration samples repo
- Community-contributed migration samples repo
Cloud Functions
- gcloud functions deploy command
- Pricing information
- Cloud Functions next-generation announcement
- Differences between first & second generation functions
- Functions Framework (local development) howto, usage docs and repo
- Product pages
- Documentation
Other Cloud information
- Python on Google Cloud Platform
- Google Cloud Python client libraries
- Google Cloud "Always Free" tier
- Google Cloud SDK (
gcloudcommand-line tool) - All Google Cloud documentation
Videos
- Serverless Migration Station
- Serverless Expeditions
- Subscribe to Google Cloud Tech
- Subscribe to Google Developers
License
This work is licensed under a Creative Commons Attribution 2.0 Generic License.