
About this codelab
1. Overview
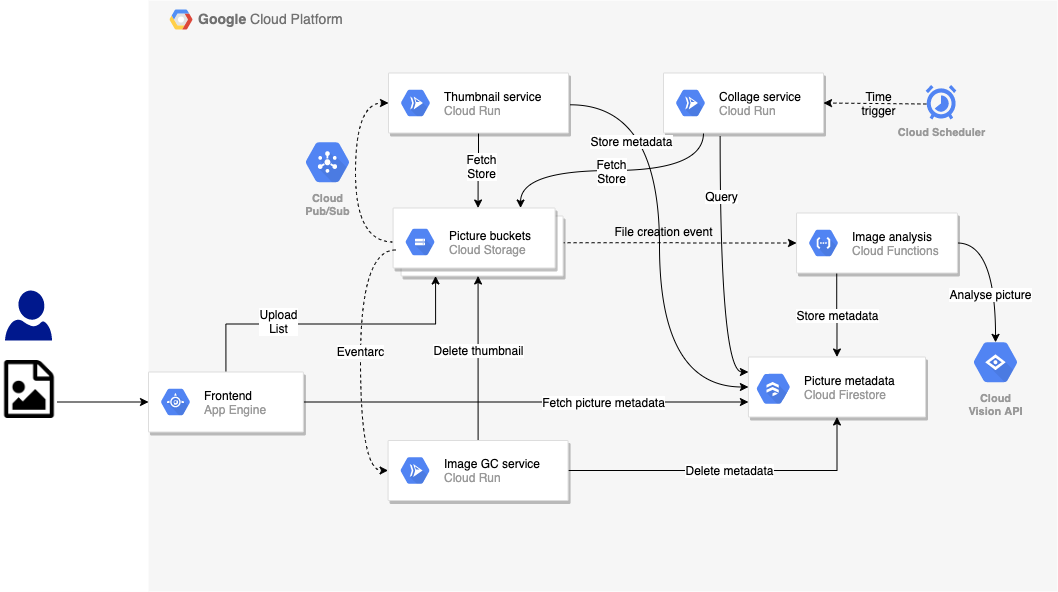
In the previous labs, you built an event-driven version of the Pic-a-daily app that used a Google Cloud Storage triggered Cloud Function for the Image Analysis service, a GCS triggered Cloud Run container via Pub/Sub for the Thumbnail service and Eventarc to trigger the Image Garbage Collector service on Cloud Run. There was also a Cloud Scheduler triggered Collage service:
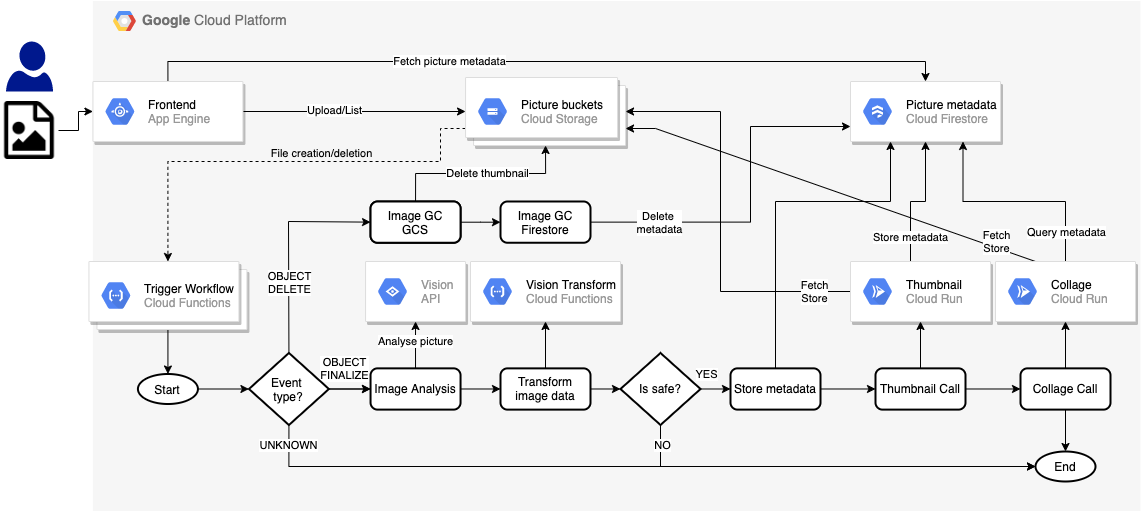
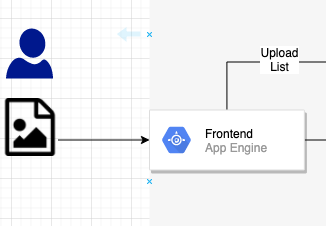
In this lab, you will create an orchestrated version of the app. Instead of different types of events flowing through the system, you will use Workflows to orchestrate and call services as follows:
What you'll learn
- App Engine
- Cloud Firestore
- Cloud Functions
- Cloud Run
- Workflows
2. Setup and Requirements
Self-paced environment setup
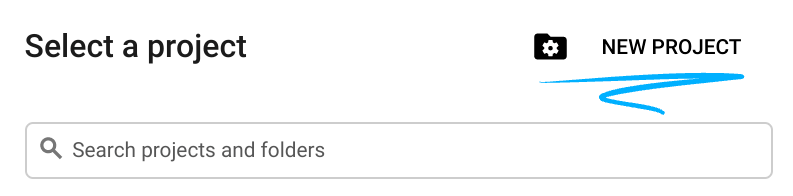
- Sign in to Cloud Console and create a new project or reuse an existing one. (If you don't already have a Gmail or Google Workspace account, you must create one.)

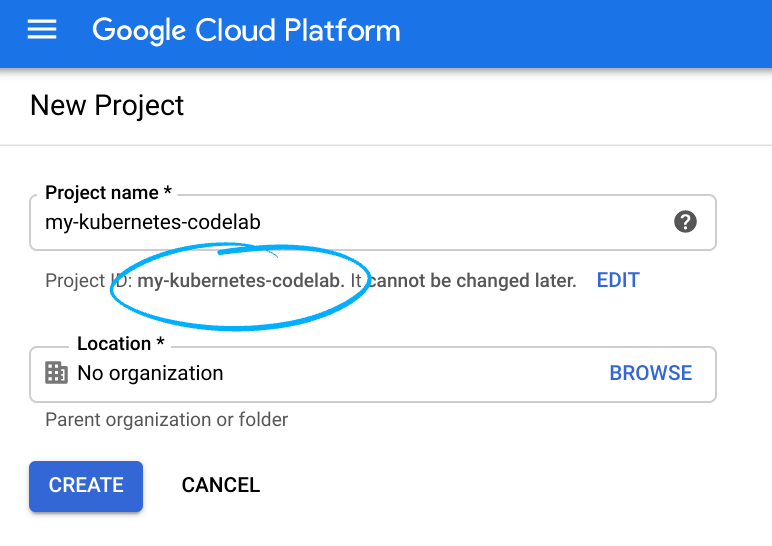
Remember the project ID, a unique name across all Google Cloud projects (the name above has already been taken and will not work for you, sorry!). It will be referred to later in this codelab as PROJECT_ID.
- Next, you'll need to enable billing in Cloud Console in order to use Google Cloud resources.
Running through this codelab shouldn't cost much, if anything at all. Be sure to to follow any instructions in the "Cleaning up" section which advises you how to shut down resources so you don't incur billing beyond this tutorial. New users of Google Cloud are eligible for the $300 USD Free Trial program.
Start Cloud Shell
While Google Cloud can be operated remotely from your laptop, in this codelab you will be using Google Cloud Shell, a command line environment running in the Cloud.
From the GCP Console click the Cloud Shell icon on the top right toolbar:

It should only take a few moments to provision and connect to the environment. When it is finished, you should see something like this:

This virtual machine is loaded with all the development tools you'll need. It offers a persistent 5GB home directory, and runs on Google Cloud, greatly enhancing network performance and authentication. All of your work in this lab can be done with simply a browser.
3. Introduction to Workflows

You can use Workflows to create serverless workflows that link a series of serverless tasks together in an order you define. You can combine the power of Google Cloud's APIs, serverless products like Cloud Functions and Cloud Run, and calls to external APIs to create flexible serverless applications.
As you might expect from an orchestrator, Workflows allows you to define the flow of your business logic in a YAML/JSON based workflow definition language and provides a Workflows Execution API and Workflows UI to trigger those flows.
It is more than a mere orchestrator with these built-in and configurable features:
- Flexible retry and error handling between steps for reliable execution of steps.
- JSON parsing and variable passing between steps to avoid glue-code.
- Expression formulas for decisions allow conditional step executions.
- Subworkflows for modular and reusable Workflows.
- Support for external services allows orchestration of services beyond Google Cloud.
- Authentication support for Google Cloud and external services for secure step executions.
- Connectors to Google Cloud services such as Pub/Sub, Firestore, Tasks, Secret Manager for easier integration.
Not to mention, Workflows is a fully-managed serverless product. No servers to configure or scale and you only pay for what you use.
4. Enable APIs
In this lab, you will be connecting Cloud Functions and Cloud Run services with Workflows. You will also use App Engine, Cloud Build, Vision API and other services.
In Cloud Shell, make sure all the necessary services are enabled:
gcloud services enable \
  appengine.googleapis.com \
  cloudbuild.googleapis.com \
  cloudfunctions.googleapis.com \
  compute.googleapis.com \
  firestore.googleapis.com \
  run.googleapis.com \
  vision.googleapis.com \
  workflows.googleapis.com \
After some time, you should see the operation finish successfully:
Operation "operations/acf.5c5ef4f6-f734-455d-b2f0-ee70b5a17322" finished successfully.
5. Get the code
Get the code, if you haven't already in the previous code labs:
git clone https://github.com/GoogleCloudPlatform/serverless-photosharing-workshop
You will have the following folder structure that's relevant for this lab:
frontend
 |
workflows
 |
 ├── functions
 ├── |── trigger-workflow
 ├── |── vision-data-transform
 ├── services
 ├── |── collage
 ├── |── thumbnails
 ├── workflows.yaml
These are the relevant folders:
frontendcontains the App Engine frontend that we will reuse from Lab 4.functionscontains the Cloud Functions created for the Workflow.servicescontains the Cloud Run services modified for the Workflow.workflows.yamlis the Workflow definition file.
6. Explore the Workflows YAML
The workflows.yaml defines the Workflow in a series of steps. Let's go through it to understand it better.
At the beginning of the workflow, there are some parameters that are passed in. They will be passed in by two Cloud Functions triggering the Workflows. We'll get to these functions later but this is how the Workflows starts:
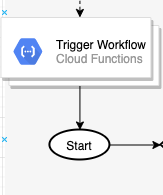
In YAML, you can see that these parameters are assigned to variables in the init step such as the file and bucket names triggering the event, and URLs of some Cloud Functions and Cloud Run services that Workflows will call:
main:
  params: [args]
  steps:
    - init:
        assign:
          - file: ${args.file}
          - bucket: ${args.bucket}
          - gsUri: ${"gs://" + bucket + "/" + file}
          - projectId: ${sys.get_env("GOOGLE_CLOUD_PROJECT_ID")}
          - urls: ${args.urls}
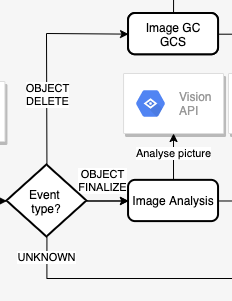
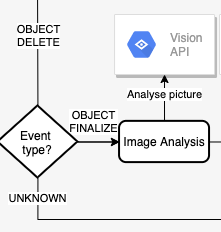
Next, Workflows check the event type. There are 2 event types supported: object.finalize (emitted when a file is saved in the cloud storage bucket) and object.delete (emitted when a file is deleted). Anything else will raise an event not supported exception.
Here is the step, in the YAML workflow definition, where we check the type of the file storage event:
    - eventTypeSwitch:
        switch:
            - condition: ${args.eventType == "google.storage.object.finalize"}
              next: imageAnalysisCall
            - condition: ${args.eventType == "google.storage.object.delete"}
              next: pictureGarbageCollectionGCS
    - eventTypeNotSupported:
        raise: ${"eventType " + args.eventType + " is not supported"}
        next: end
Notice how Workflows supports switch statements and exception handling, with the switch instruction and its various conditions, and the raise instruction to raise an error when the event is not recognized.
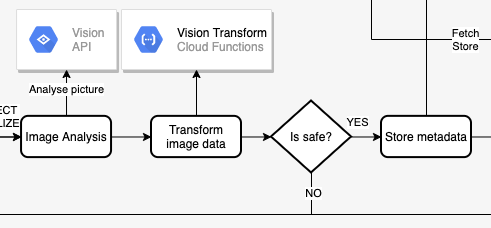
Next, let's take a look at the imageAnalysisCall. This is a series of calls from Workflows to call the Vision API to analyze the image, transform the Vision API response data to sort the labels of things recognized in the picture, pick the dominant colors, check whether the image is safe to display, and then save the metadata to Cloud Firestore.
Note that everything is done in Workflows except the Vision Transform Cloud Functions (that we will deploy later):
This is how the steps look in YAML:
    - imageAnalysisCall:
        call: http.post
        args:
          url: https://vision.googleapis.com/v1/images:annotate
          headers:
            Content-Type: application/json
          auth:
            type: OAuth2
          body:
            requests:
            - image:
                source:
                  gcsImageUri: ${gsUri}
              features:
              - type: LABEL_DETECTION
              - type: SAFE_SEARCH_DETECTION
              - type: IMAGE_PROPERTIES
        result: imageAnalysisResponse
    - transformImageAnalysisData:
        call: http.post
        args:
          url: ${urls.VISION_DATA_TRANSFORM_URL}
          auth:
            type: OIDC
          body: ${imageAnalysisResponse.body}
        result: imageMetadata
    - checkSafety:
        switch:
          - condition: ${imageMetadata.body.safe == true}
            next: storeMetadata
        next: end
    - storeMetadata:
        call: http.request
        args:
          url: ${"https://firestore.googleapis.com/v1/projects/" + projectId + "/databases/(default)/documents/pictures/" + file + "?updateMask.fieldPaths=color&updateMask.fieldPaths=labels&updateMask.fieldPaths=created"}
          auth:
            type: OAuth2
          method: PATCH
          body:
            name: ${"projects/" + projectId + "/databases/(default)/documents/pictures/" + file}
            fields:
              color:
                stringValue: ${imageMetadata.body.color}
              created:
                timestampValue: ${imageMetadata.body.created}
              labels:
                arrayValue:
                  values: ${imageMetadata.body.labels}
        result: storeMetadataResponse
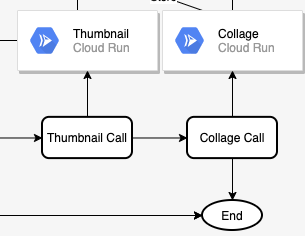
Once the image is analyzed, the next two steps are to create the thumbnail of the image and a collage of the most recent images. This is done by deploying 2 Cloud Run services and making calls to them from thumbnailCall and collageCall steps:
Steps in YAML:
   - thumbnailCall:
        call: http.post
        args:
          url: ${urls.THUMBNAILS_URL}
          auth:
            type: OIDC
          body:
              gcsImageUri: ${gsUri}
        result: thumbnailResponse
    - collageCall:
        call: http.get
        args:
          url: ${urls.COLLAGE_URL}
          auth:
            type: OIDC
        result: collageResponse
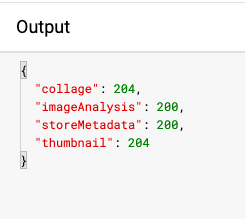
This branch of the execution ends by returning status codes from each service in finalizeCompleted step:
    - finalizeCompleted:
        return:
          imageAnalysis: ${imageAnalysisResponse.code}
          storeMetadata: ${storeMetadataResponse.code}
          thumbnail: ${thumbnailResponse.code}
          collage: ${collageResponse.code}
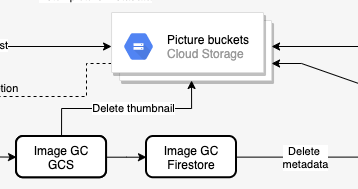
The other branch of the execution is when a file is deleted from the main storage bucket, containing the high-resolution versions of the pictures. In this branch, we want to delete the thumbnail of the image, in the bucket containing thumbnails and delete its metadata from Firestore. Both of these are done with HTTP calls from Workflows:
Steps in YAML:
    - pictureGarbageCollectionGCS:
        try:
          call: http.request
          args:
            url: ${"https://storage.googleapis.com/storage/v1/b/thumbnails-" + projectId + "/o/" + file}
            auth:
              type: OAuth2
            method: DELETE
          result: gcsDeletionResult
        except:
          as: e
          steps:
              - dummyResultInOutVar:
                  assign:
                      - gcsDeletionResult:
                          code: 200
                          body: "Workaround for empty body response"
    - pictureGarbageCollectionFirestore:
        call: http.request
        args:
          url: ${"https://firestore.googleapis.com/v1/projects/" + projectId + "/databases/(default)/documents/pictures/" + file}
          auth:
            type: OAuth2
          method: DELETE
        result: firestoreDeletionResult
The delete branch ends by returning results / codes from each step:
    - deleteCompleted:
        return:
          gcsDeletion: ${gcsDeletionResult}
          firestoreDeletion: ${firestoreDeletionResult.code}
In the following steps, we will create all the external dependencies of the Workflows: buckets, Cloud Functions, Cloud Run services and Firestore database.
7. Create the buckets
You need 2 buckets for images: 1 to save original high-resolution images and 1 to save thumbnails of images.
Create a public regional (in this case in Europe) bucket with uniform access for users to upload pictures to, using gsutil tool:
export BUCKET_PICTURES=uploaded-pictures-${GOOGLE_CLOUD_PROJECT}
gsutil mb -l EU gs://${BUCKET_PICTURES}
gsutil uniformbucketlevelaccess set on gs://${BUCKET_PICTURES}
gsutil iam ch allUsers:objectViewer gs://${BUCKET_PICTURES}
Create another public regional bucket for thumbnails:
export BUCKET_THUMBNAILS=thumbnails-${GOOGLE_CLOUD_PROJECT}
gsutil mb -l EU gs://${BUCKET_THUMBNAILS}
gsutil uniformbucketlevelaccess set on gs://${BUCKET_THUMBNAILS}
gsutil iam ch allUsers:objectViewer gs://${BUCKET_THUMBNAILS}
You can double check that buckets are created and public by visiting the Cloud Storage section of Cloud Console:

8. Vision Data Transform (Cloud Function)
Workflows.yaml starts with init, eventTypeSwitch, eventTypeNotSupported steps. These make sure the events coming from buckets are routed to the correct steps.
For the object.finalize event, imageAnalysisCall step makes a call to Vision API to extract metadata of the created image. All of these steps are done within Workflows:
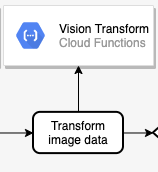
Next, we need to transform the data returned from Vision API, before we can save it to Firestore. More specifically, we need to:
- List the labels returned for the image.
- Retrieve the dominant color of the image.
- Determine if the picture is safe.
This is done in code in a Cloud Function and Workflows simply calls this function:
Explore the code
The Cloud Function is called vision-data-transform. You can check its full code in index.js. As you can see, the sole purpose of this function is to do a JSON to JSON transformation, so as to store the picture metadata conveniently in Firestore.
Deploy to Cloud Functions
Navigate to the folder:
cd workflows/functions/vision-data-transform/nodejs
Set the region of your choice:
export REGION=europe-west1
gcloud config set functions/region ${REGION}
Deploy the function with:
export SERVICE_NAME=vision-data-transform
gcloud functions deploy ${SERVICE_NAME} \
  --source=. \
  --runtime nodejs10 \
  --entry-point=vision_data_transform \
  --trigger-http \
  --allow-unauthenticated
Once the function is deployed, Workflows transformImageAnalysisData step will be able to call this function to do the Vision API data transformation.
9. Prepare the database
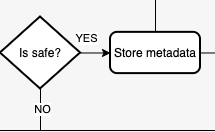
Next in the Workflows is to check the safety of the image from the image data and then store the information about the picture returned by the Vision API into the Cloud Firestore database, a fast, fully managed, serverless, cloud-native NoSQL document database:
Both of these are done in Workflows but you need to create the Firestore database for the storage of metadata to work.
First, create an App engine app in the region where you want the Firestore database (a requirement for Firestore):
export REGION_FIRESTORE=europe-west2
gcloud app create --region=${REGION_FIRESTORE}
Next, create the Firestore database in the same region:
gcloud firestore databases create --region=${REGION_FIRESTORE}
The documents will be created programmatically in our collection and will contain 4 fields:
- name (string): the file name of the uploaded picture, which is also the key of the document
- labels (array of strings): the labels of recognised items by the Vision API
- color (string): the hexadecimal color code of the dominant color (ie. #ab12ef)
- created (date): the timestamp of when this image's metadata was stored
- thumbnail (boolean): an optional field that will be present and be true if a thumbnail image has been generated for this picture
As we will be searching in Firestore to find pictures that have thumbnails available, and sorting along the creation date, we'll need to create a search index. You can create the index with the following command:
gcloud firestore indexes composite create --collection-group=pictures \
  --field-config field-path=thumbnail,order=descending \
  --field-config field-path=created,order=descending
Note that the index creation can take up to 10 minutes or so.
Once the index is created, you can see it in Cloud Console:
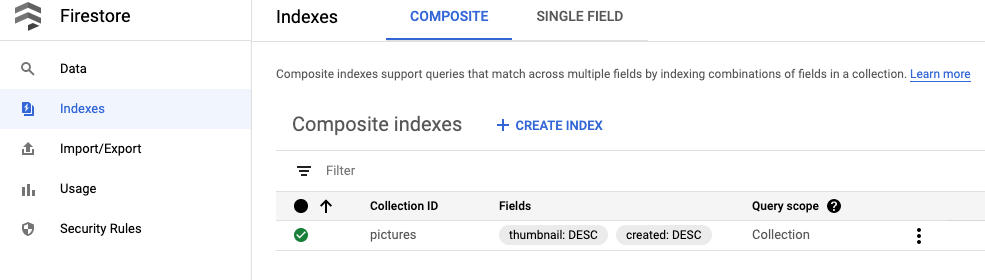
Workflows storeMetadata step will be able to store the image metadata to Firestore now.
10. Thumbnail service (Cloud Run)
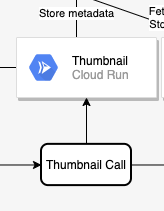
Next in the chain is to create a thumbnail of an image. This is done in code in a Cloud Run service and Workflows calls this service in thumbnailCall step:
Explore the code
The Cloud Run service is called thumbnails. You can check its full code in index.js.
Build and publish the container image
Cloud Run runs containers but you first need to build the container image (defined in Dockerfile). Google Cloud Build can be used to build container images and then host to Google Container Registry.
Navigate to the folder:
cd workflows/services/thumbnails/nodejs
Build:
export SERVICE_SRC=thumbnails
export SERVICE_NAME=${SERVICE_SRC}-service
gcloud builds submit \
  . \
  --tag gcr.io/${GOOGLE_CLOUD_PROJECT}/${SERVICE_NAME}
After a minute or two, the build should succeed and the container will be deployed to Google Container Registry.
Deploy to Cloud Run
Set some needed variables and configuration:
export BUCKET_THUMBNAILS=thumbnails-${GOOGLE_CLOUD_PROJECT}
export REGION=europe-west1
gcloud config set run/region ${REGION}
gcloud config set run/platform managed
Deploy with the following command:
gcloud run deploy ${SERVICE_NAME} \
    --image gcr.io/${GOOGLE_CLOUD_PROJECT}/${SERVICE_NAME} \
    --no-allow-unauthenticated \
    --memory=1Gi \
    --update-env-vars BUCKET_THUMBNAILS=${BUCKET_THUMBNAILS}
Once the service is deployed, Workflows thumbnailCall step will be able to call this service.
11. Collage service (Cloud Run)
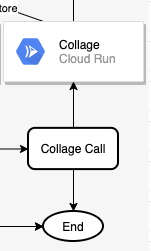
Next in the chain is to create a collage from the most recent images. This is done in code in a Cloud Run service and Workflows calls this service in collageCall step:
Explore the code
The Cloud Run service is called collage. You can check its full code in index.js.
Build and publish the container image
Cloud Run runs containers but you first need to build the container image (defined in Dockerfile). Google Cloud Build can be used to build container images and then host to Google Container Registry.
Navigate to the folder:
cd services/collage/nodejs
Build:
export SERVICE_SRC=collage
export SERVICE_NAME=${SERVICE_SRC}-service
gcloud builds submit \
  . \
  --tag gcr.io/${GOOGLE_CLOUD_PROJECT}/${SERVICE_NAME}
After a minute or two, the build should succeed and the container will be deployed to Google Container Registry.
Deploy to Cloud Run
Set some needed variables and configuration:
export BUCKET_THUMBNAILS=thumbnails-${GOOGLE_CLOUD_PROJECT}
export REGION=europe-west1
gcloud config set run/region ${REGION}
gcloud config set run/platform managed
Deploy:
gcloud run deploy ${SERVICE_NAME} \
    --image gcr.io/${GOOGLE_CLOUD_PROJECT}/${SERVICE_NAME} \
    --no-allow-unauthenticated \
    --memory=1Gi \
    --update-env-vars BUCKET_THUMBNAILS=${BUCKET_THUMBNAILS}
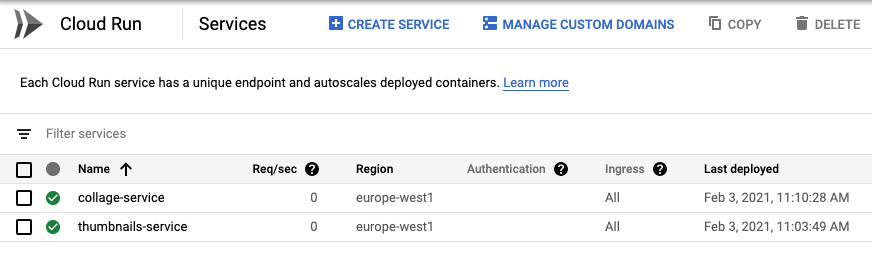
Once the service is deployed, you can check both services are running under Cloud Run section of Cloud Console and Workflows collageCall step will be able to call this service:
12. Workflows deployment
We deployed all the external dependencies of Workflows. All of the remaining steps (finalizeCompleted, pictureGarbageCollectionGCS, pictureGarbageCollectionFirestore, deleteCompleted) can be completed by Workflows itself.
It's time to deploy the Workflows!
Navigate to the folder that contains the workflows.yaml file and deploy it with:
export WORKFLOW_REGION=europe-west4
export WORKFLOW_NAME=picadaily-workflows
gcloud workflows deploy ${WORKFLOW_NAME} \
  --source=workflows.yaml \
  --location=${WORKFLOW_REGION}
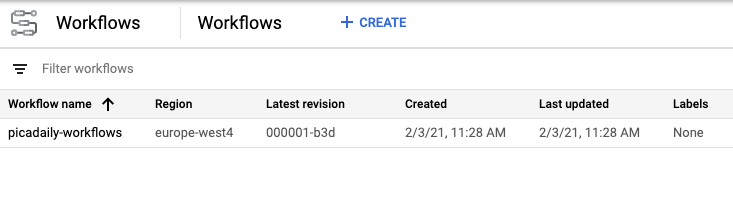
In a few seconds, the Workflow should deploy and you can see it in the Workflows section of Cloud Console:
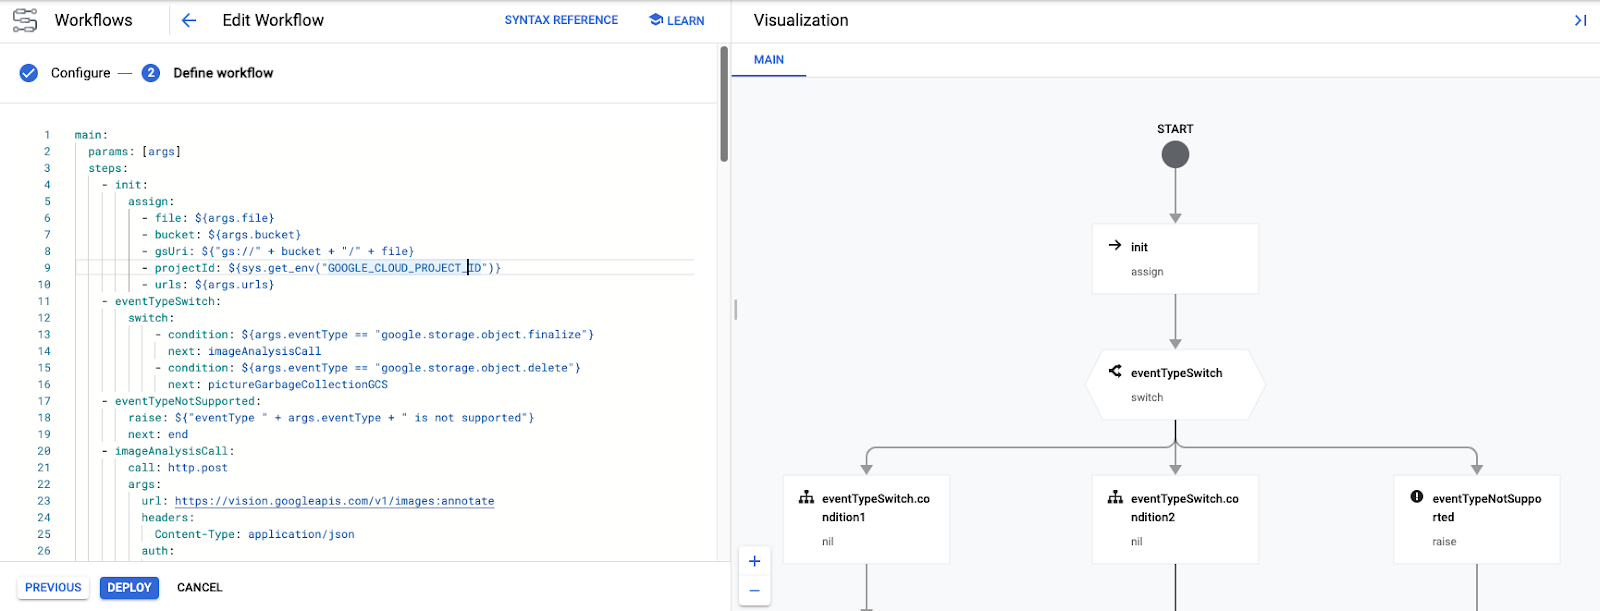
You can click on the Workflow and edit it, if you like. During editing, you get a nice visual representation of the Workflow:
You can also execute the Workflow from Cloud Console manually with the right parameters. Instead, we will execute it automatically in response to Cloud Storage events in the next step.
13. Workflows triggers (Cloud Functions)
The workflow is deployed and ready. Now, we need to trigger the Workflows when a file is created or deleted in a Cloud Storage bucket. These are storage.object.finalize and storage.object.delete events respectively.
Workflows have APIs and client libraries for creating, managing and executing Workflows that you can use. In this case, you will use Workflows Execution API and more specifically its Node.js client library to trigger the Workflow.
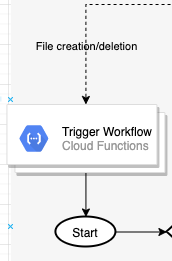
You will trigger the Workflows from Cloud Function listening to Cloud Storage events. Since a Cloud Function can only listen for one event type, you will deploy two Cloud Functions to listen for both create and delete events:
Explore the code
The Cloud Function is called trigger-workflow. You can check its full code in index.js.
Deploy to Cloud Functions
Navigate to the folder:
cd workflows/functions/trigger-workflow/nodejs
Set some needed variables and configuration:
export BUCKET_PICTURES=uploaded-pictures-${GOOGLE_CLOUD_PROJECT}
export REGION=europe-west1
export WORKFLOW_NAME=picadaily-workflows
export WORKFLOW_REGION=europe-west4
export COLLAGE_URL=$(gcloud run services describe collage-service --format 'value(status.url)')
export THUMBNAILS_URL=$(gcloud run services describe thumbnails-service --format 'value(status.url)')
export VISION_DATA_TRANSFORM_URL=$(gcloud functions describe vision-data-transform --format 'value(httpsTrigger.url)')
gcloud config set functions/region ${REGION}
Deploy the function responding to finalize events:
export SERVICE_NAME=trigger-workflow-on-finalize
gcloud functions deploy ${SERVICE_NAME} \
  --source=. \
  --runtime nodejs10 \
  --entry-point=trigger_workflow \
  --trigger-resource=${BUCKET_PICTURES} \
  --trigger-event=google.storage.object.finalize \
  --allow-unauthenticated \
  --set-env-vars GOOGLE_CLOUD_PROJECT=${GOOGLE_CLOUD_PROJECT},WORKFLOW_REGION=${WORKFLOW_REGION},WORKFLOW_NAME=${WORKFLOW_NAME},THUMBNAILS_URL=${THUMBNAILS_URL},COLLAGE_URL=${COLLAGE_URL},VISION_DATA_TRANSFORM_URL=${VISION_DATA_TRANSFORM_URL}
Deploy the second function responding to delete events:
export SERVICE_NAME=trigger-workflow-on-delete
gcloud functions deploy ${SERVICE_NAME} \
  --source=. \
  --runtime nodejs10 \
  --entry-point=trigger_workflow \
  --trigger-resource=${BUCKET_PICTURES} \
  --trigger-event=google.storage.object.delete \
  --allow-unauthenticated \
  --set-env-vars GOOGLE_CLOUD_PROJECT=${GOOGLE_CLOUD_PROJECT},WORKFLOW_REGION=${WORKFLOW_REGION},WORKFLOW_NAME=${WORKFLOW_NAME},THUMBNAILS_URL=${THUMBNAILS_URL},COLLAGE_URL=${COLLAGE_URL},VISION_DATA_TRANSFORM_URL=${VISION_DATA_TRANSFORM_URL}
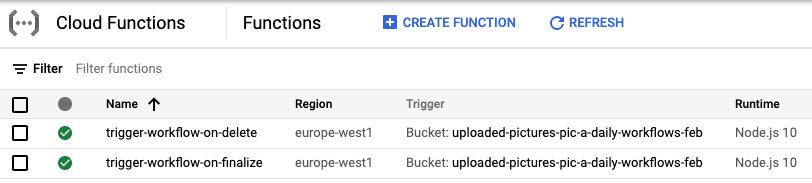
When the deployment is complete, you can see both functions in Cloud Console:
14. Frontend (App Engine)
In this step, you create a web frontend on Google App Engine from Pic-a-daily: Lab 4—Create a web frontend that will let users upload pictures from the web application, as well as browse the uploaded pictures and their thumbnails.
You can learn more about App Engine and read the code description in Pic-a-daily: Lab 4—Create a web frontend.
Explore the code
The App Engine app is called frontend. You can check its full code in index.js.
Deploy to App Engine
Navigate to the folder:
cd frontend
Set the region of your choice and also replace the GOOGLE_CLOUD_PROJECT in app.yaml with your actual project id:
export REGION=europe-west1
gcloud config set compute/region ${REGION}
sed -i -e "s/GOOGLE_CLOUD_PROJECT/${GOOGLE_CLOUD_PROJECT}/" app.yaml
Deploy:
gcloud app deploy app.yaml -q
After a minute or two, you will be told that the application is serving traffic:
Beginning deployment of service [default]...
╔════════════════════════════════════════════════════════════╗
╠═ Uploading 8 files to Google Cloud Storage                ═╣
╚════════════════════════════════════════════════════════════╝
File upload done.
Updating service [default]...done.
Setting traffic split for service [default]...done.
Deployed service [default] to [https://GOOGLE_CLOUD_PROJECT.appspot.com]
You can stream logs from the command line by running:
  $ gcloud app logs tail -s default
To view your application in the web browser run:
  $ gcloud app browse
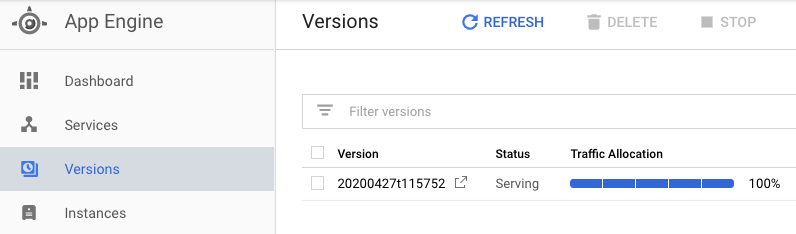
You can also visit the App Engine section of Cloud Console to see that the app is deployed and explore features of App Engine like versioning and traffic splitting:
15. Test the Workflows
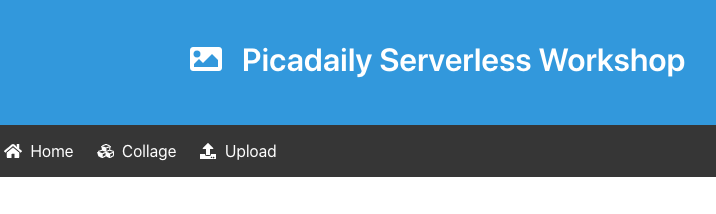
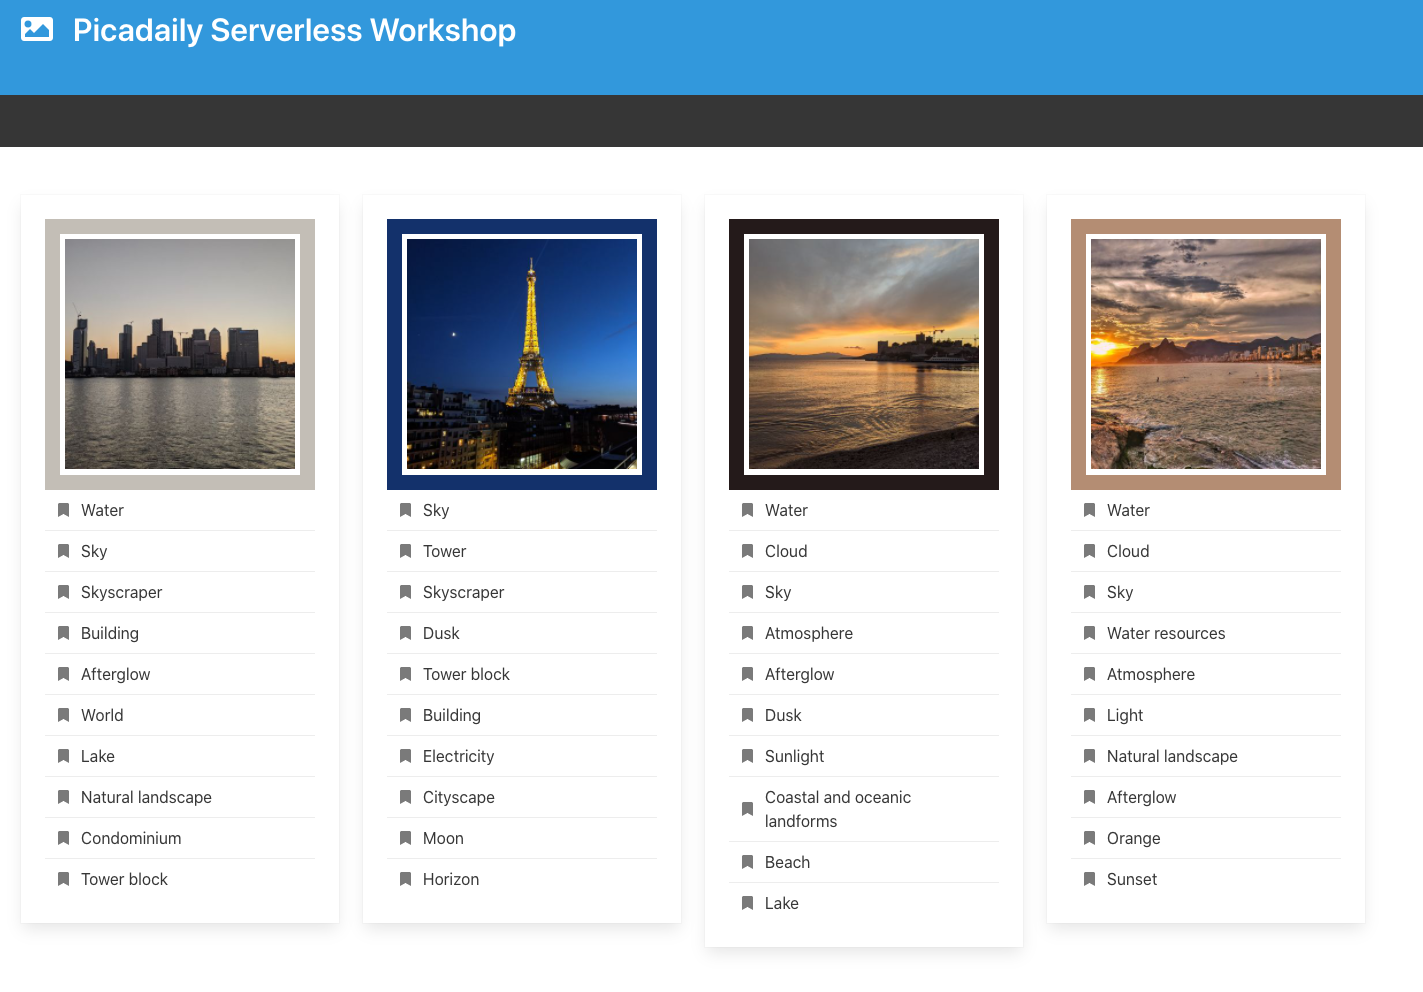
To test, go to the default App Engine URL for the app (https://<YOUR_PROJECT_ID>.appspot.com/) app and you should see the frontend UI up and running!
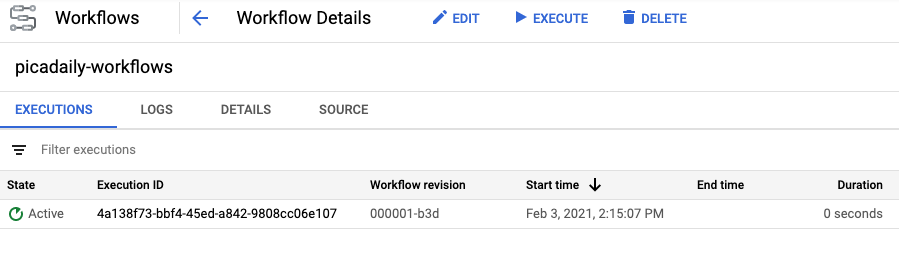
Upload a picture. This should trigger the Workflows and you can see Workflow execution in Active state in Cloud Console:
Once the Workflows is done, you can click on the execution ID and see the output from different services:
Upload 3 more pictures. You should also see the thumbnail and collage of the images in Cloud Storage buckets and App Engine frontend updated:
16. Clean up (Optional)
If you don't intend to keep the app, you can clean up resources to save costs and to be an overall good cloud citizen by deleting the whole project:
gcloud projects delete ${GOOGLE_CLOUD_PROJECT}
17. Congratulations!
You created an orchestrated version of the app using Workflows to orchestrate and call services.
What we've covered
- App Engine
- Cloud Firestore
- Cloud Functions
- Cloud Run
- Workflows