1. Introduction

Cloud Run is a managed platform that enables you to run stateless containers that are invocable via HTTP requests. Cloud Run is serverless: it abstracts away all infrastructure management, so you can focus on what matters most — building great applications.
It is built from Knative, letting you choose to run your containers either fully managed with Cloud Run, or in your Google Kubernetes Engine cluster with Cloud Run on GKE.
The goal of this codelab is for you to build a container image and deploy it to Cloud Run.
2. Setup and Requirements
Self-paced environment setup
- Sign-in to the Google Cloud Console and create a new project or reuse an existing one. If you don't already have a Gmail or Google Workspace account, you must create one.


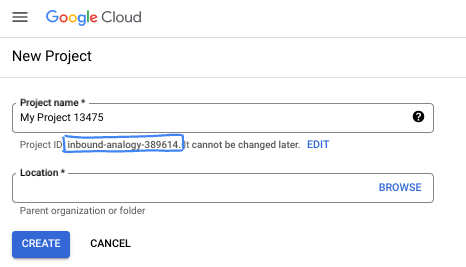
- The Project name is the display name for this project's participants. It is a character string not used by Google APIs. You can always update it.
- The Project ID is unique across all Google Cloud projects and is immutable (cannot be changed after it has been set). The Cloud Console auto-generates a unique string; usually you don't care what it is. In most codelabs, you'll need to reference your Project ID (typically identified as
PROJECT_ID). If you don't like the generated ID, you might generate another random one. Alternatively, you can try your own, and see if it's available. It can't be changed after this step and remains for the duration of the project. - For your information, there is a third value, a Project Number, which some APIs use. Learn more about all three of these values in the documentation.
- Next, you'll need to enable billing in the Cloud Console to use Cloud resources/APIs. Running through this codelab won't cost much, if anything at all. To shut down resources to avoid incurring billing beyond this tutorial, you can delete the resources you created or delete the project. New Google Cloud users are eligible for the $300 USD Free Trial program.
Google Cloud Shell
While Google Cloud can be operated remotely from your laptop, in this codelab we will be using Google Cloud Shell, a command line environment running in the Cloud.
Cloud Shell is an online development and operations environment accessible anywhere with your browser. You can manage your resources with its online terminal preloaded with utilities such as the gcloud command-line tool, kubectl, and more. You can also develop, build, debug, and deploy your cloud-based apps using the online Cloud Shell Editor.
This virtual machine is loaded with all the development tools you need. It offers a persistent 5GB home directory and runs directly in Google Cloud, greatly enhancing network performance and authentication. This means that all you will need for this codelab is a browser (yes, it works on a Chromebook).
- To activate Cloud Shell from the Cloud Console, simply click Activate Cloud Shell :

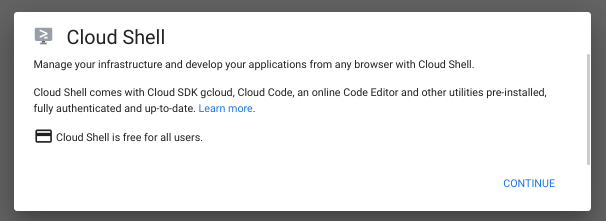
If this is your first time starting Cloud Shell, you're presented with an intermediate screen describing what it is. If you were presented with an intermediate screen, click Continue

It should only take a few seconds to provision the environment :

Once connected to Cloud Shell, you should see that you are already authenticated :
gcloud auth list
Command output
Credentialed Accounts

ACTIVE: *
ACCOUNT: <my-account>@<mydomain>
The project should also already be set to your PROJECT_ID (assuming you had selected a project in the web console) :
gcloud config list project
Command output
[core]
project = <PROJECT_ID>
If, for some reason, the project is not set, simply issue the following command:
gcloud config set project <PROJECT_ID>
Looking for your PROJECT_ID? Check out the drop-down at the top of Cloud Console :

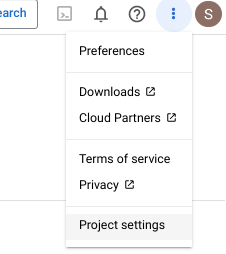
You can also check out your project details using the "Setting and utilities" section:

Cloud Shell also sets some environment variables by default, which may be useful as you run future commands.
echo $GOOGLE_CLOUD_PROJECT
Command output
<PROJECT_ID>
- Finally, you can set the default zone :
gcloud config set compute/zone us-central1-f
You can choose different zones. For more information, see Regions & Zones.
Enable the Cloud Run API
From Cloud Shell, enable the Cloud Run API :
gcloud services enable run.googleapis.com
This should produce a successful message similar to this one :
Operation "operations/acf.cc11852d-40af-47ad-9d59-477a12847c9e" finished successfully.
3. Write the sample application
We'll build a simple ASP.NET C# application responding to HTTP requests.
To create your application, use dotnet command line tool in Cloud Shell:
dotnet new web -o helloworld-csharp
Change to helloworld-csharp directory:
cd helloworld-csharp
Next, update Program.cs to match the following:
var builder = WebApplication.CreateBuilder(args);

var port = Environment.GetEnvironmentVariable("PORT") ?? "8080";
var url = $"http://0.0.0.0:{port}";
builder.WebHost.UseUrls(url);

var app = builder.Build();

app.MapGet("/", () => "Hello World!");

app.Run();
This code creates a basic web server that listens on the port defined by the PORT environment variable and replies back with Hello World.
You can test the app by running it locally in Cloud Shell. You should see it listening on port 8080:
$ dotnet run
Using launch settings from /home/atameldev/helloworld-csharp/Properties/launchSettings.json...
Hosting environment: Development
Content root path: /home/atameldev/helloworld-csharp
Now listening on: http://0.0.0.0:8080
Application started. Press Ctrl+C to shut down.
4. Deploy to Cloud Run
Deploy your application to Cloud Run with the following command:
gcloud run deploy hello-world \
    --allow-unauthenticated \
    --region us-central1 \
    --source .
hello-worldis the service name.allow-unauthenticatedflag deploys the service as a publicly available service with no authentication requirements.us-central1is the region where the app will be deployed.sourceflag determines the location of the source to build. Cloud Run uses buildpacks to automatically create a container out of the source code.
Wait a couple of minutes until the deployment is complete. On success, the command line displays the service URL :
Service [hello-world] revision [hello-world-00001-yos] has been deployed and is serving 100 percent of traffic.
Service URL: https://helloworld-wdl7fdwaaa-uc.a.run.app
You can now visit your deployed container by opening the service URL in a web browser :

Congratulations! You have just deployed an application packaged in a container image to Cloud Run. Cloud Run automatically and horizontally scales your container image to handle the received requests, then scales down when demand decreases. You only pay for the CPU, memory, and networking consumed during request handling.
5. Time to clean up
You can either decide to delete your GCP project to avoid incurring charges, which will stop billing for all the resources used within that project, or simply delete the Cloud Run service:
gcloud run services delete helloworld
6. What's next?
A good next step would be to Deploy to Cloud Run on GKE.
For more information on building a stateless HTTP container suitable for Cloud Run from code source and pushing it to Container Registry, see:
