
1. Introduction
In this lab, you will build an agent with Agent Development Kit (ADK)! You will learn how to build a software bug assistant agent using ADK and various tool types. You will start with a basic agent and progressively add tools to enhance its capabilities, including function tools, built-in tools, third-party tools, and Model Context Protocol (MCP) tools.
What you'll learn
- How to set up a Python project for ADK development.
- How to create a basic ADK agent.
- How to implement and use Function Tools.
- How to integrate Built-in Tools like Google Search.
- How to leverage Third-Party Tools from frameworks like LangChain within ADK.
- How to use MCP Tools to interact with databases (Cloud SQL) and APIs.
2. Overview
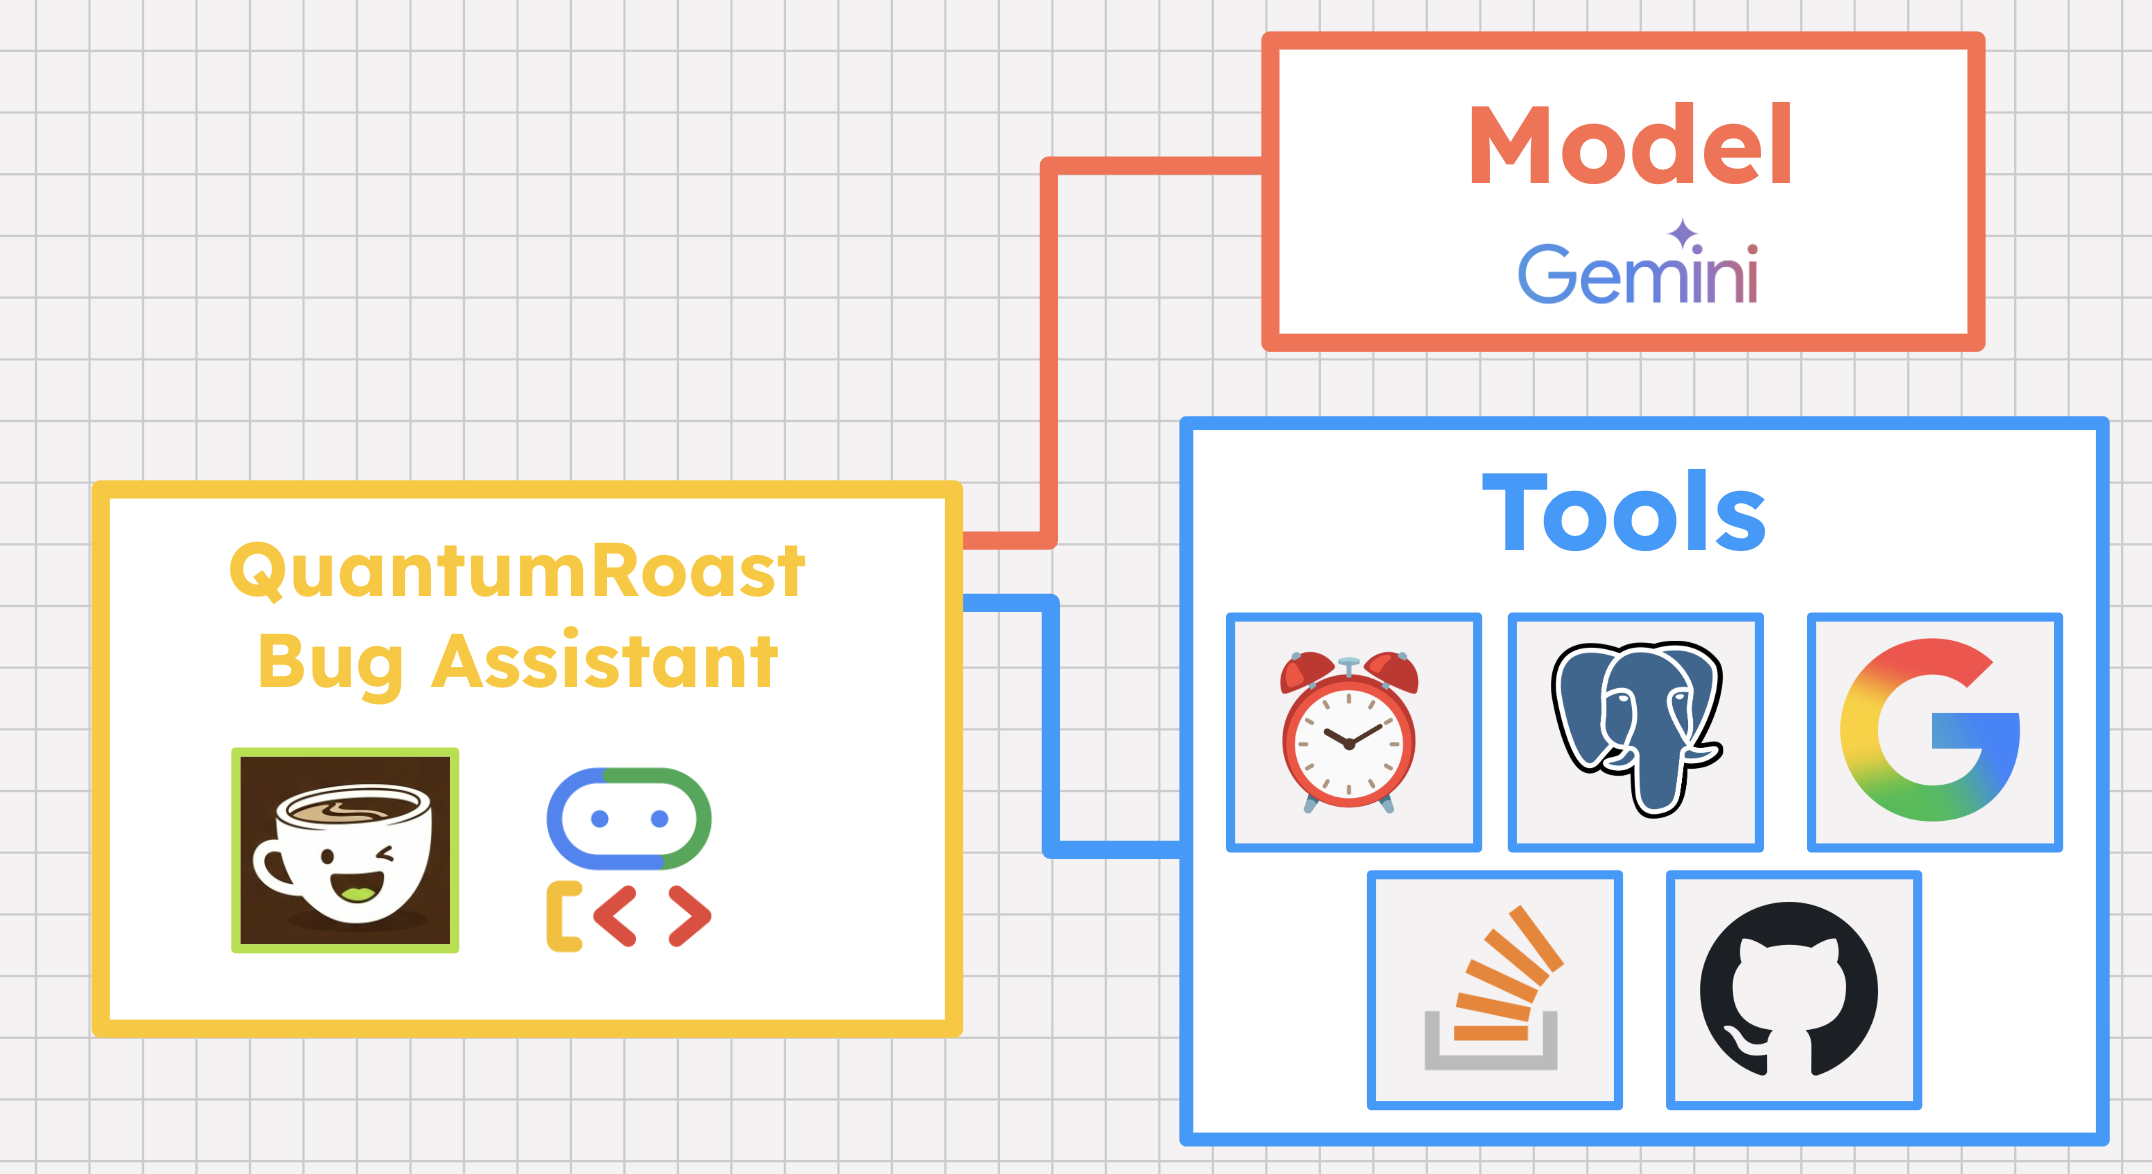
Imagine that you're a project manager at QuantumRoast, a global coffee machine company.
![]()
You help your teammates navigate a sea of engineering roadmaps, sudden strategy pivots (we're doing matcha now!), and incoming tickets from customers — everything from buggy invoice systems to a coffee machine that's making a high-pitched noise 24/7.
On a regular day, you have about fifty open browser tabs: the internal ticket system, email, chat, GitHub, Google Search, StackOverflow, and more. You like your job and your teammates — but some days, you get overwhelmed.

What if there was a helper we could build to help you create and triage software tickets, and debug issues? An AI agent makes this possible.

Agent Development Kit (ADK)
Agent Development Kit (ADK) is a flexible and modular framework for developing and deploying AI agents. While optimized for Gemini and the Google ecosystem, ADK is model-agnostic, deployment-agnostic, and is built for compatibility with other frameworks. ADK was designed to make agent development feel more like software development, to make it easier for developers to create, deploy, and orchestrate agentic architectures that range from simple tasks to complex workflows.
ADK is the framework that we will use for building our QuantumRoast software bug assistant.
Tools 101
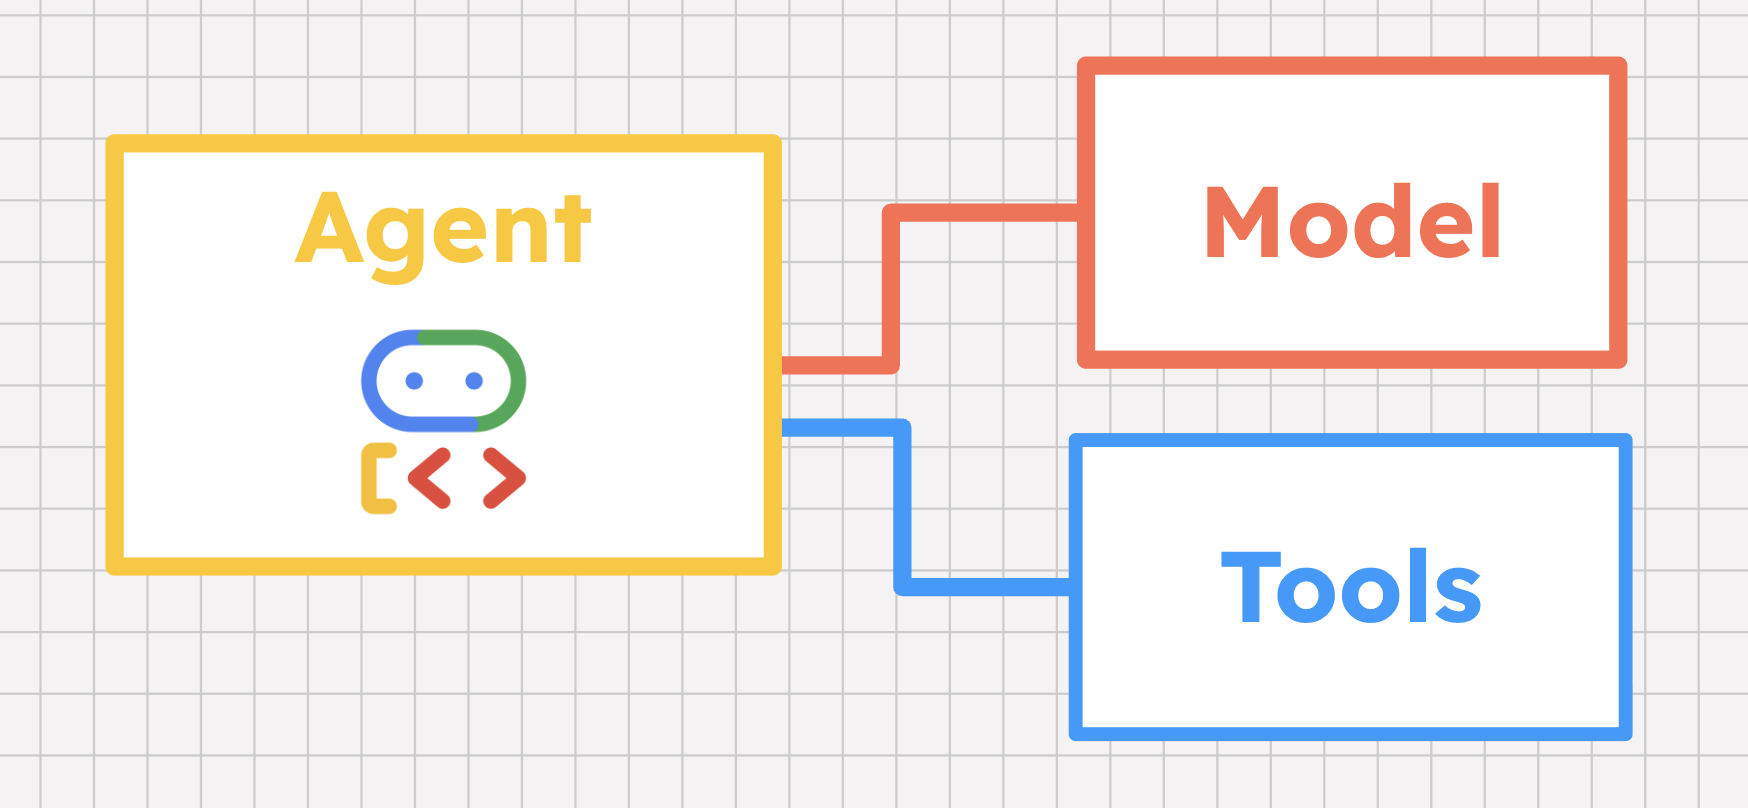
AI agents use models, not just hard coded logic, to reason their way through a problem. But more than just LLM-based reasoning, AI agents are uniquely powered to gather external data and then take action on behalf of the user. Rather than telling you how to solve a problem, an AI agent can help you actually solve it. How do we do this? With tools!
A tool is a capability that helps an AI agent interact with the world. A tool can be almost anything: an inline function, a hosted database, a third-party API , or even another agent. AI Agent frameworks like Agent Development Kit (ADK) have built-in support for tools, supporting a variety of tool types that we'll cover in just a moment.
But how does an agent know not only when to call a certain tool, but also how to call it? The agent's model plays a few key roles here.
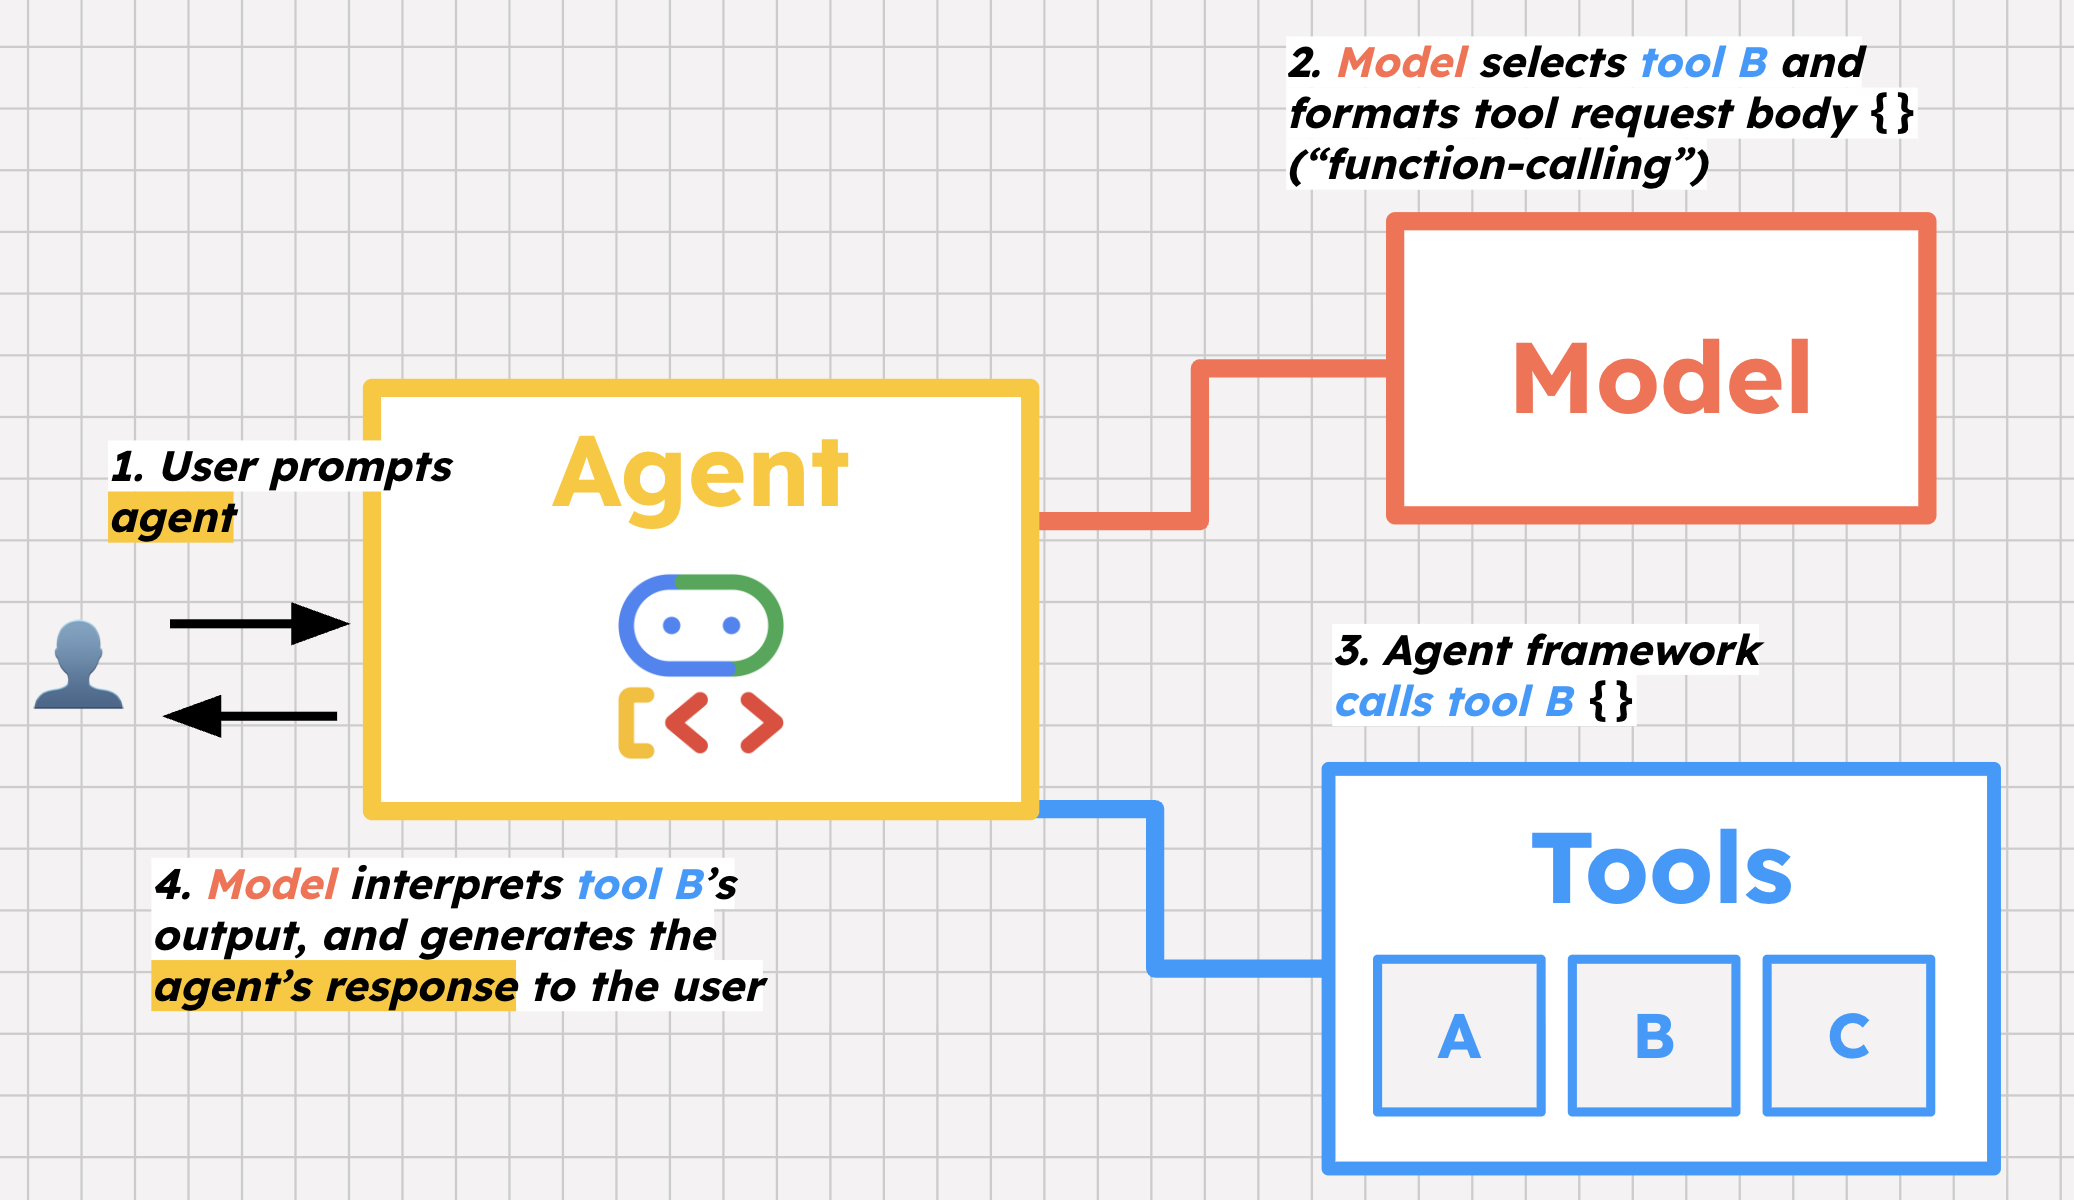
The first is tool selection. We provide our agent with a list of tools and some instructions for how to use them. When a user prompts the agent, the agent's model helps decide which tools to call, and why, in order to help the user.
The second key step is function-calling. Function calling is a bit of a misnomer because the model is not actually calling the tool, but rather, preparing to call it by formatting the request body that the framework then uses to call the tool.
Lastly, the model helps interpret the response from that tool — say, a list of open bugs from the database— and decides whether to take further action, or respond to the user with that information.
To see all this in action, it is time to build the QuantumRoast bug assistant agent using ADK Python.
3. Before you begin
Google Cloud Project Setup
- If you don't already have a Google Account, you must create a Google Account.
- Use a personal account instead of a work or school account. Work and school accounts may have restrictions that prevent you from enabling the APIs needed for this lab.
- Sign-in to the Google Cloud Console.
- Enable billing in the Cloud Console.
- Completing this lab should cost less than $1 USD in Cloud resources.
- You can follow the steps at the end of this lab to delete resources to avoid further charges.
- New users are eligible for the $300 USD Free Trial.
- Create a new project or choose to reuse an existing project.
Open Cloud Shell Editor
- Navigate to Cloud Shell Editor
- If the terminal doesn't appear on the bottom of the screen, open it:
- Click the hamburger menu

- Click Terminal
- Click New Terminal
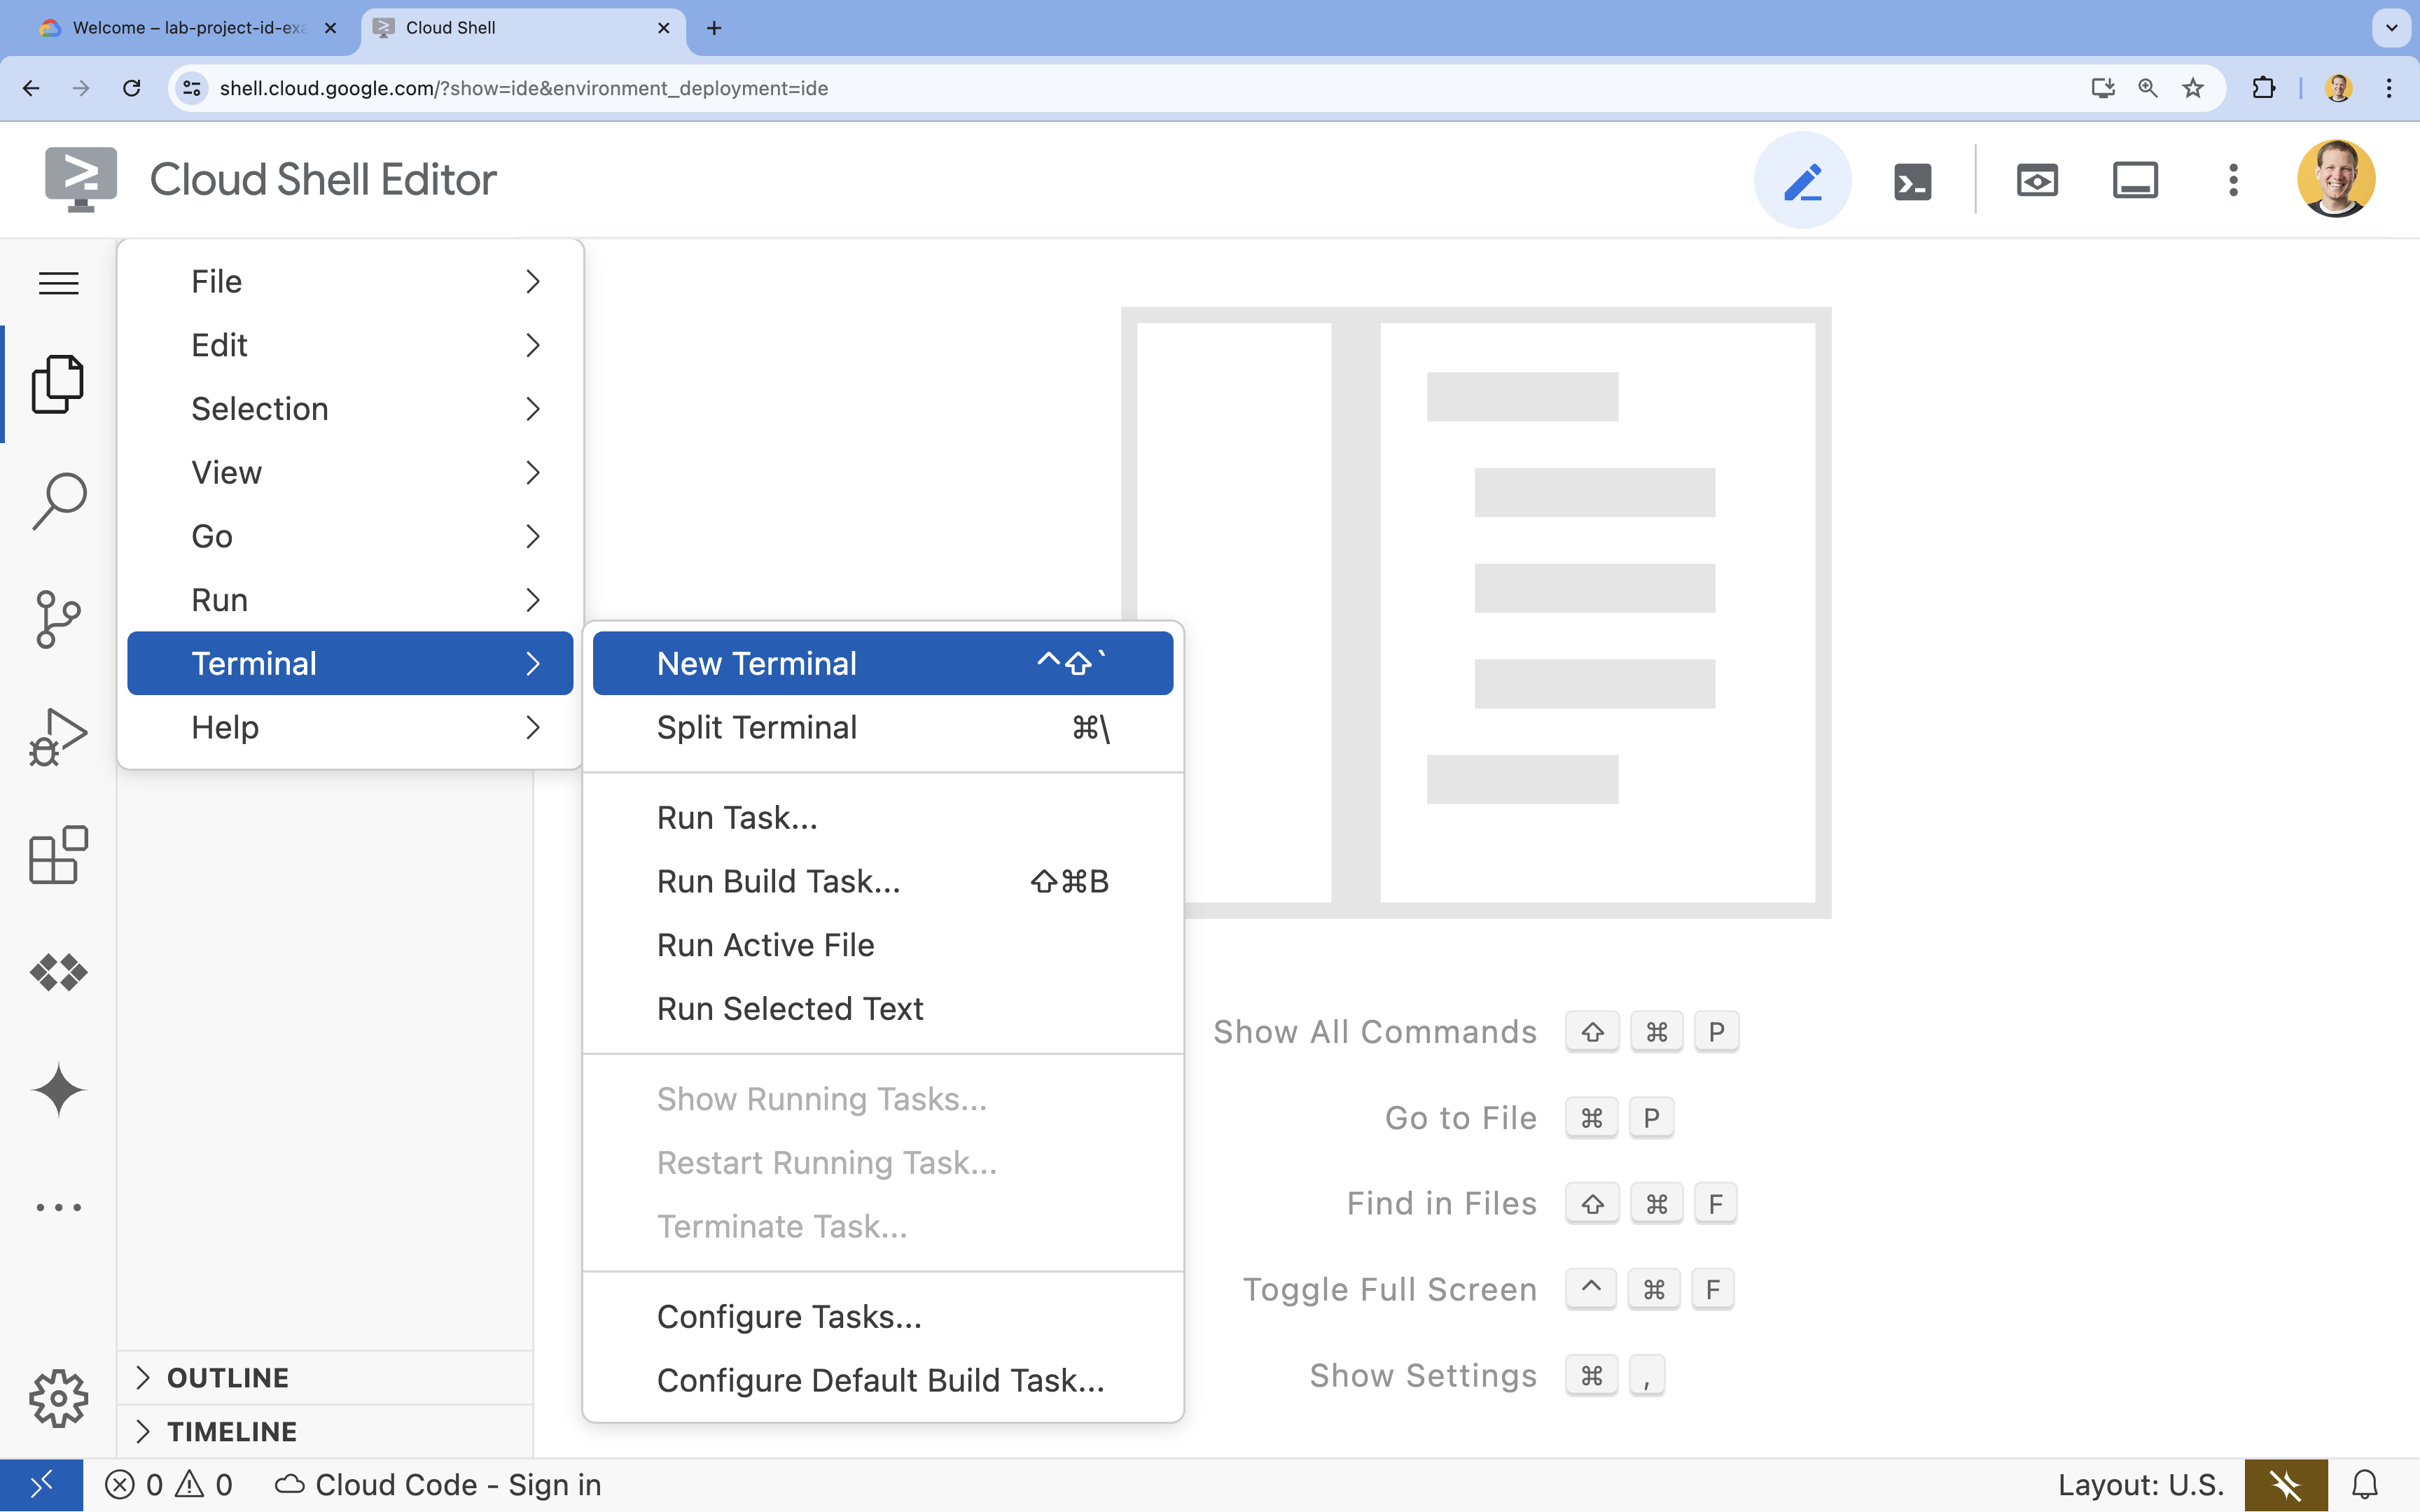
- Click the hamburger menu
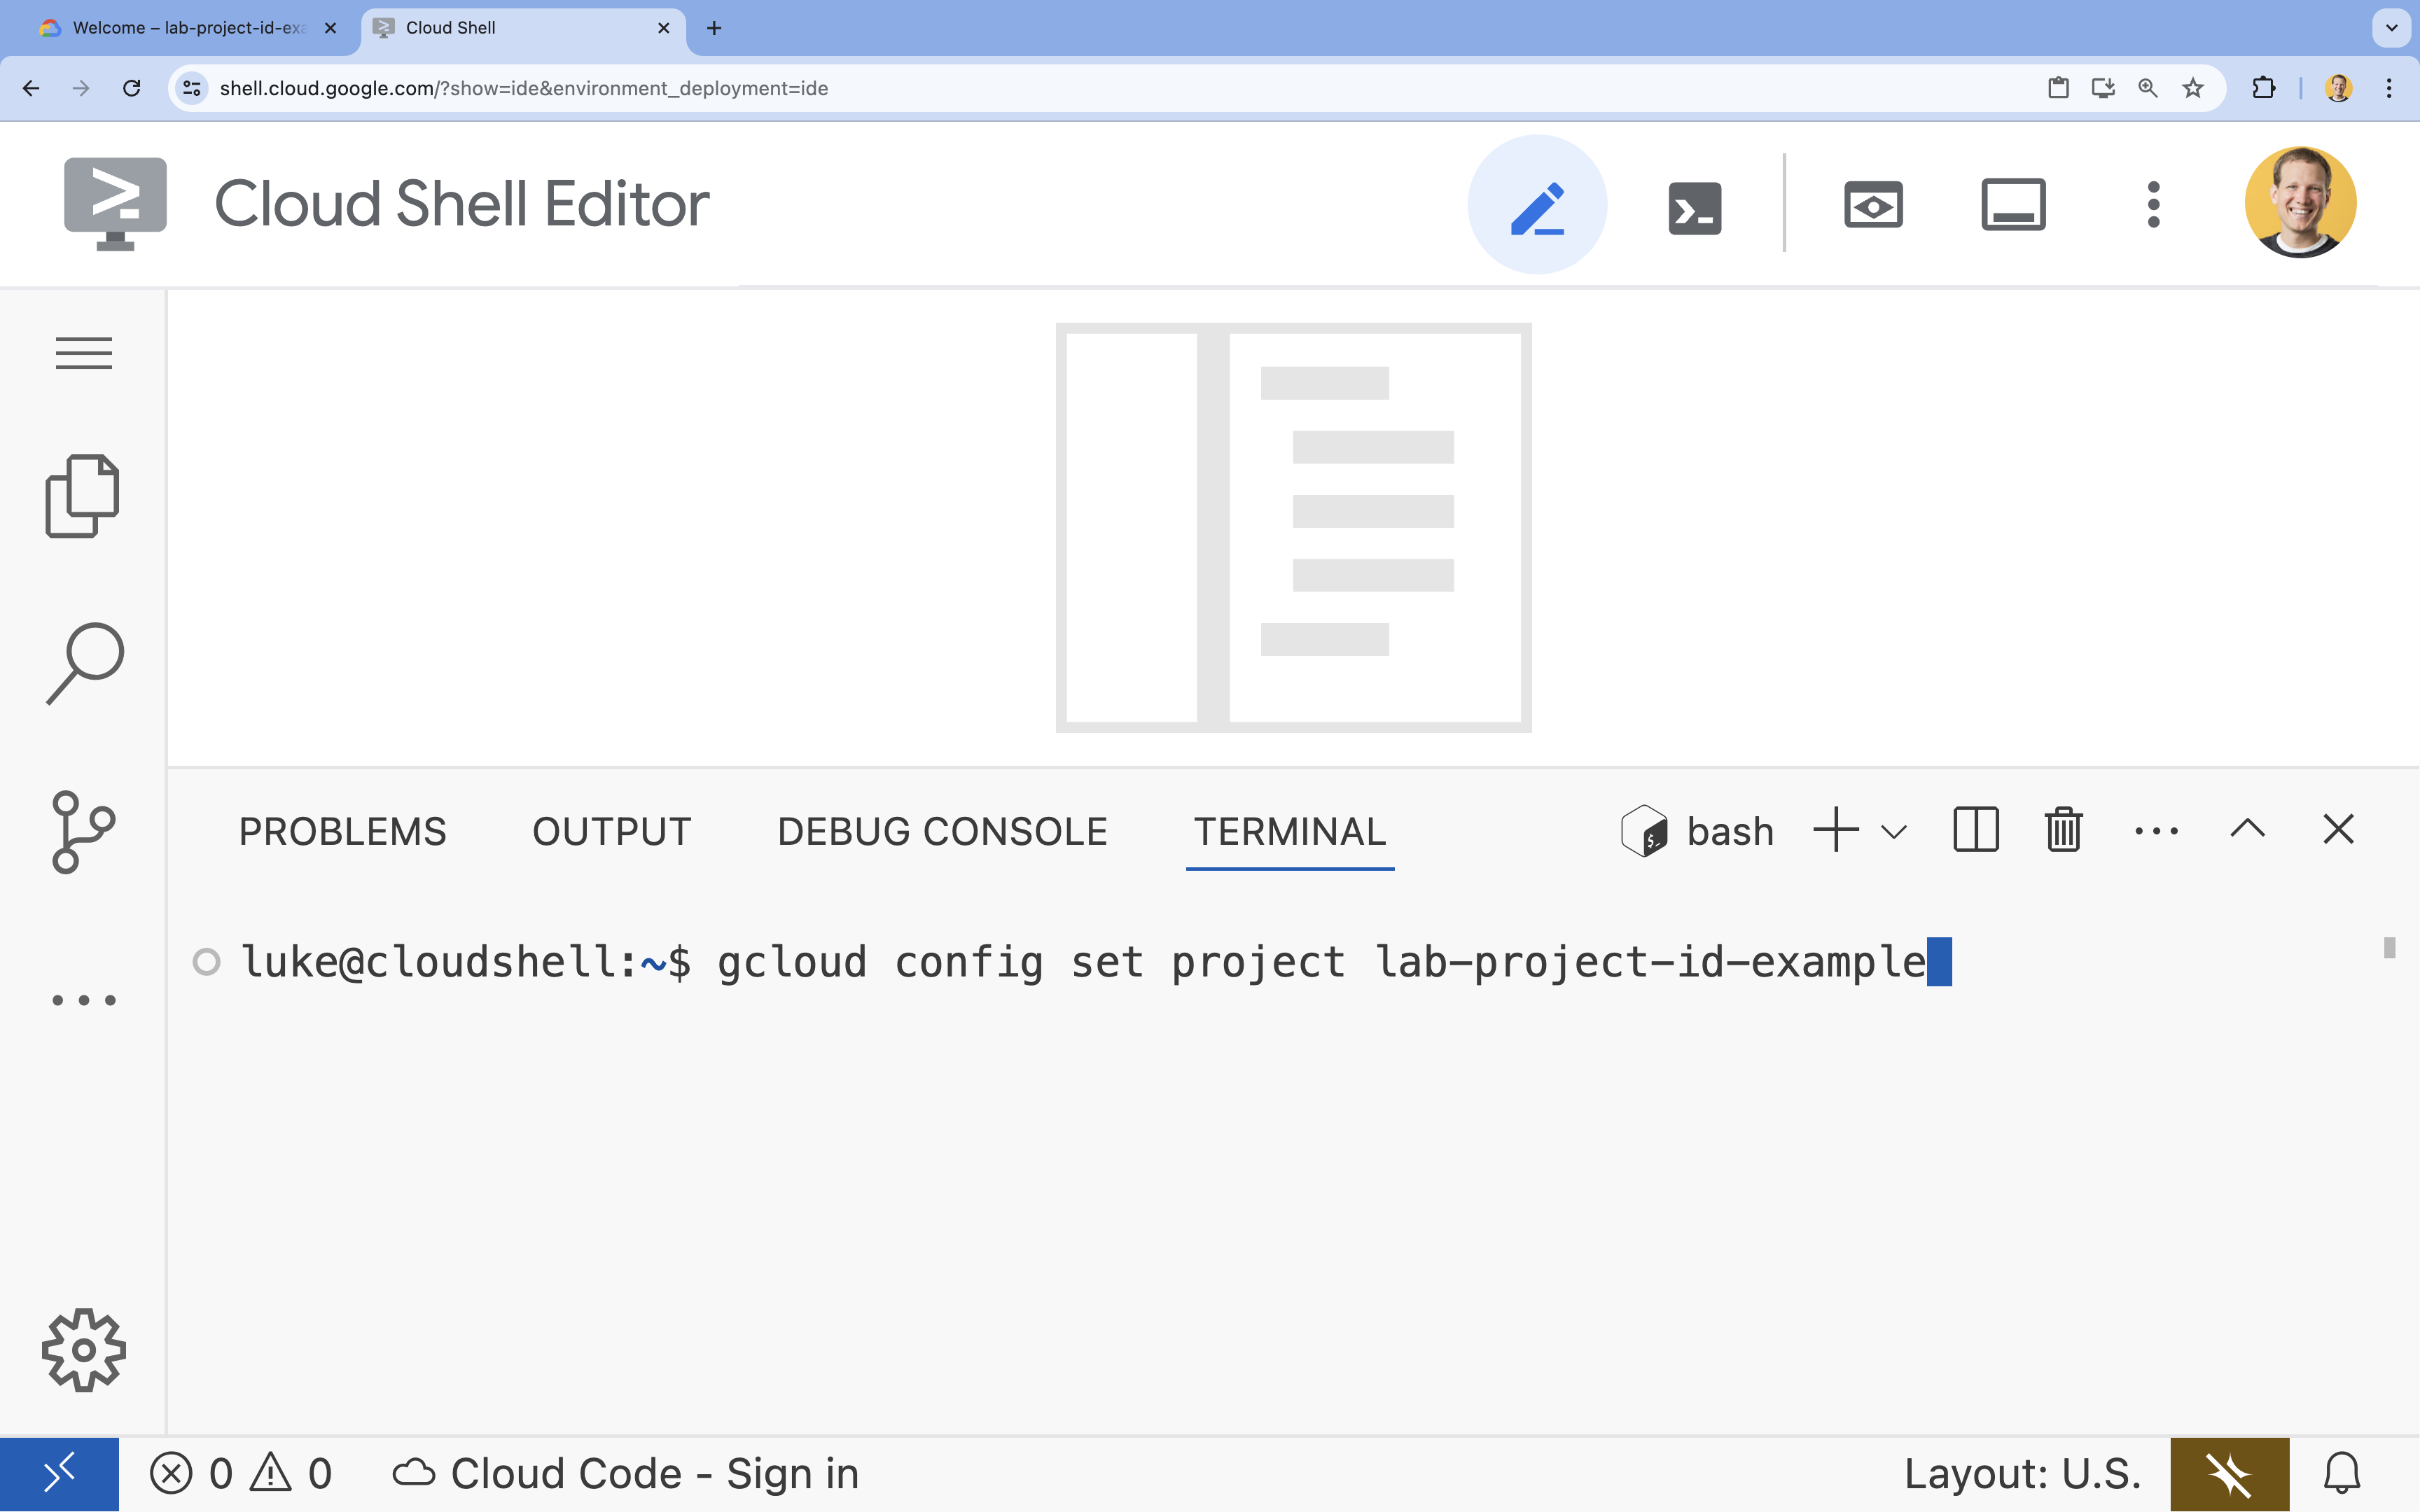
- In the terminal, set your project with this command (replacing
YOUR_PROJECT_ID):- Format:
gcloud config set project YOUR_PROJECT_ID - Example:
gcloud config set project lab-project-id-example - If you can't remember your project ID:
- You can list all your project IDs with:
gcloud projects list | awk '/PROJECT_ID/{print $2}'
- You can list all your project IDs with:
- Format:
- If prompted to authorize, click Authorize to continue.

- You should see this message:
Updated property [core/project].
WARNINGand are askedDo you want to continue (Y/N)?, then you have likely entered the project ID incorrectly. PressN, pressEnter, and try to run thegcloud config set projectcommand again. - In the terminal, set
PROJECT_IDenvironment variable to be used in later steps.export PROJECT_ID=$(gcloud config get project)
Enable APIs
In the terminal, run the following command to enable the necessary Google Cloud APIs:
gcloud services enable sqladmin.googleapis.com \
   compute.googleapis.com \
   cloudresourcemanager.googleapis.com \
   secretmanager.googleapis.com \
   servicenetworking.googleapis.com \
   aiplatform.googleapis.com \
   run.googleapis.com \
   artifactregistry.googleapis.com \
   cloudbuild.googleapis.com
Create a Cloud SQL for PostgreSQL instance
QuantumRoast has a bug ticket database that holds all internal tickets. Let's go ahead and set it up by creating a Cloud SQL for PostgreSQL instance.
gcloud sql instances create software-assistant \
   --database-version=POSTGRES_16 \
   --tier=db-custom-1-3840 \
   --region=europe-west4 \
   --edition=ENTERPRISE \
   --enable-google-ml-integration \
   --database-flags cloudsql.enable_google_ml_integration=on \
   --root-password=admin
Wait for the instance to be created (it may take a few minutes).
Once created, you can view your instance in the Cloud Console here.
Create a Cloud SQL Database
Create a SQL database (tickets-db), and grant the Cloud SQL service account access to Vertex AI (so that we can create embeddings to perform similarity search).
gcloud sql databases create tickets-db --instance=software-assistant

SERVICE_ACCOUNT_EMAIL=$(gcloud sql instances describe software-assistant --format="value(serviceAccountEmailAddress)")
echo $SERVICE_ACCOUNT_EMAIL

gcloud projects add-iam-policy-binding $PROJECT_ID --member="serviceAccount:$SERVICE_ACCOUNT_EMAIL" --role="roles/aiplatform.user"
Setup the tickets table
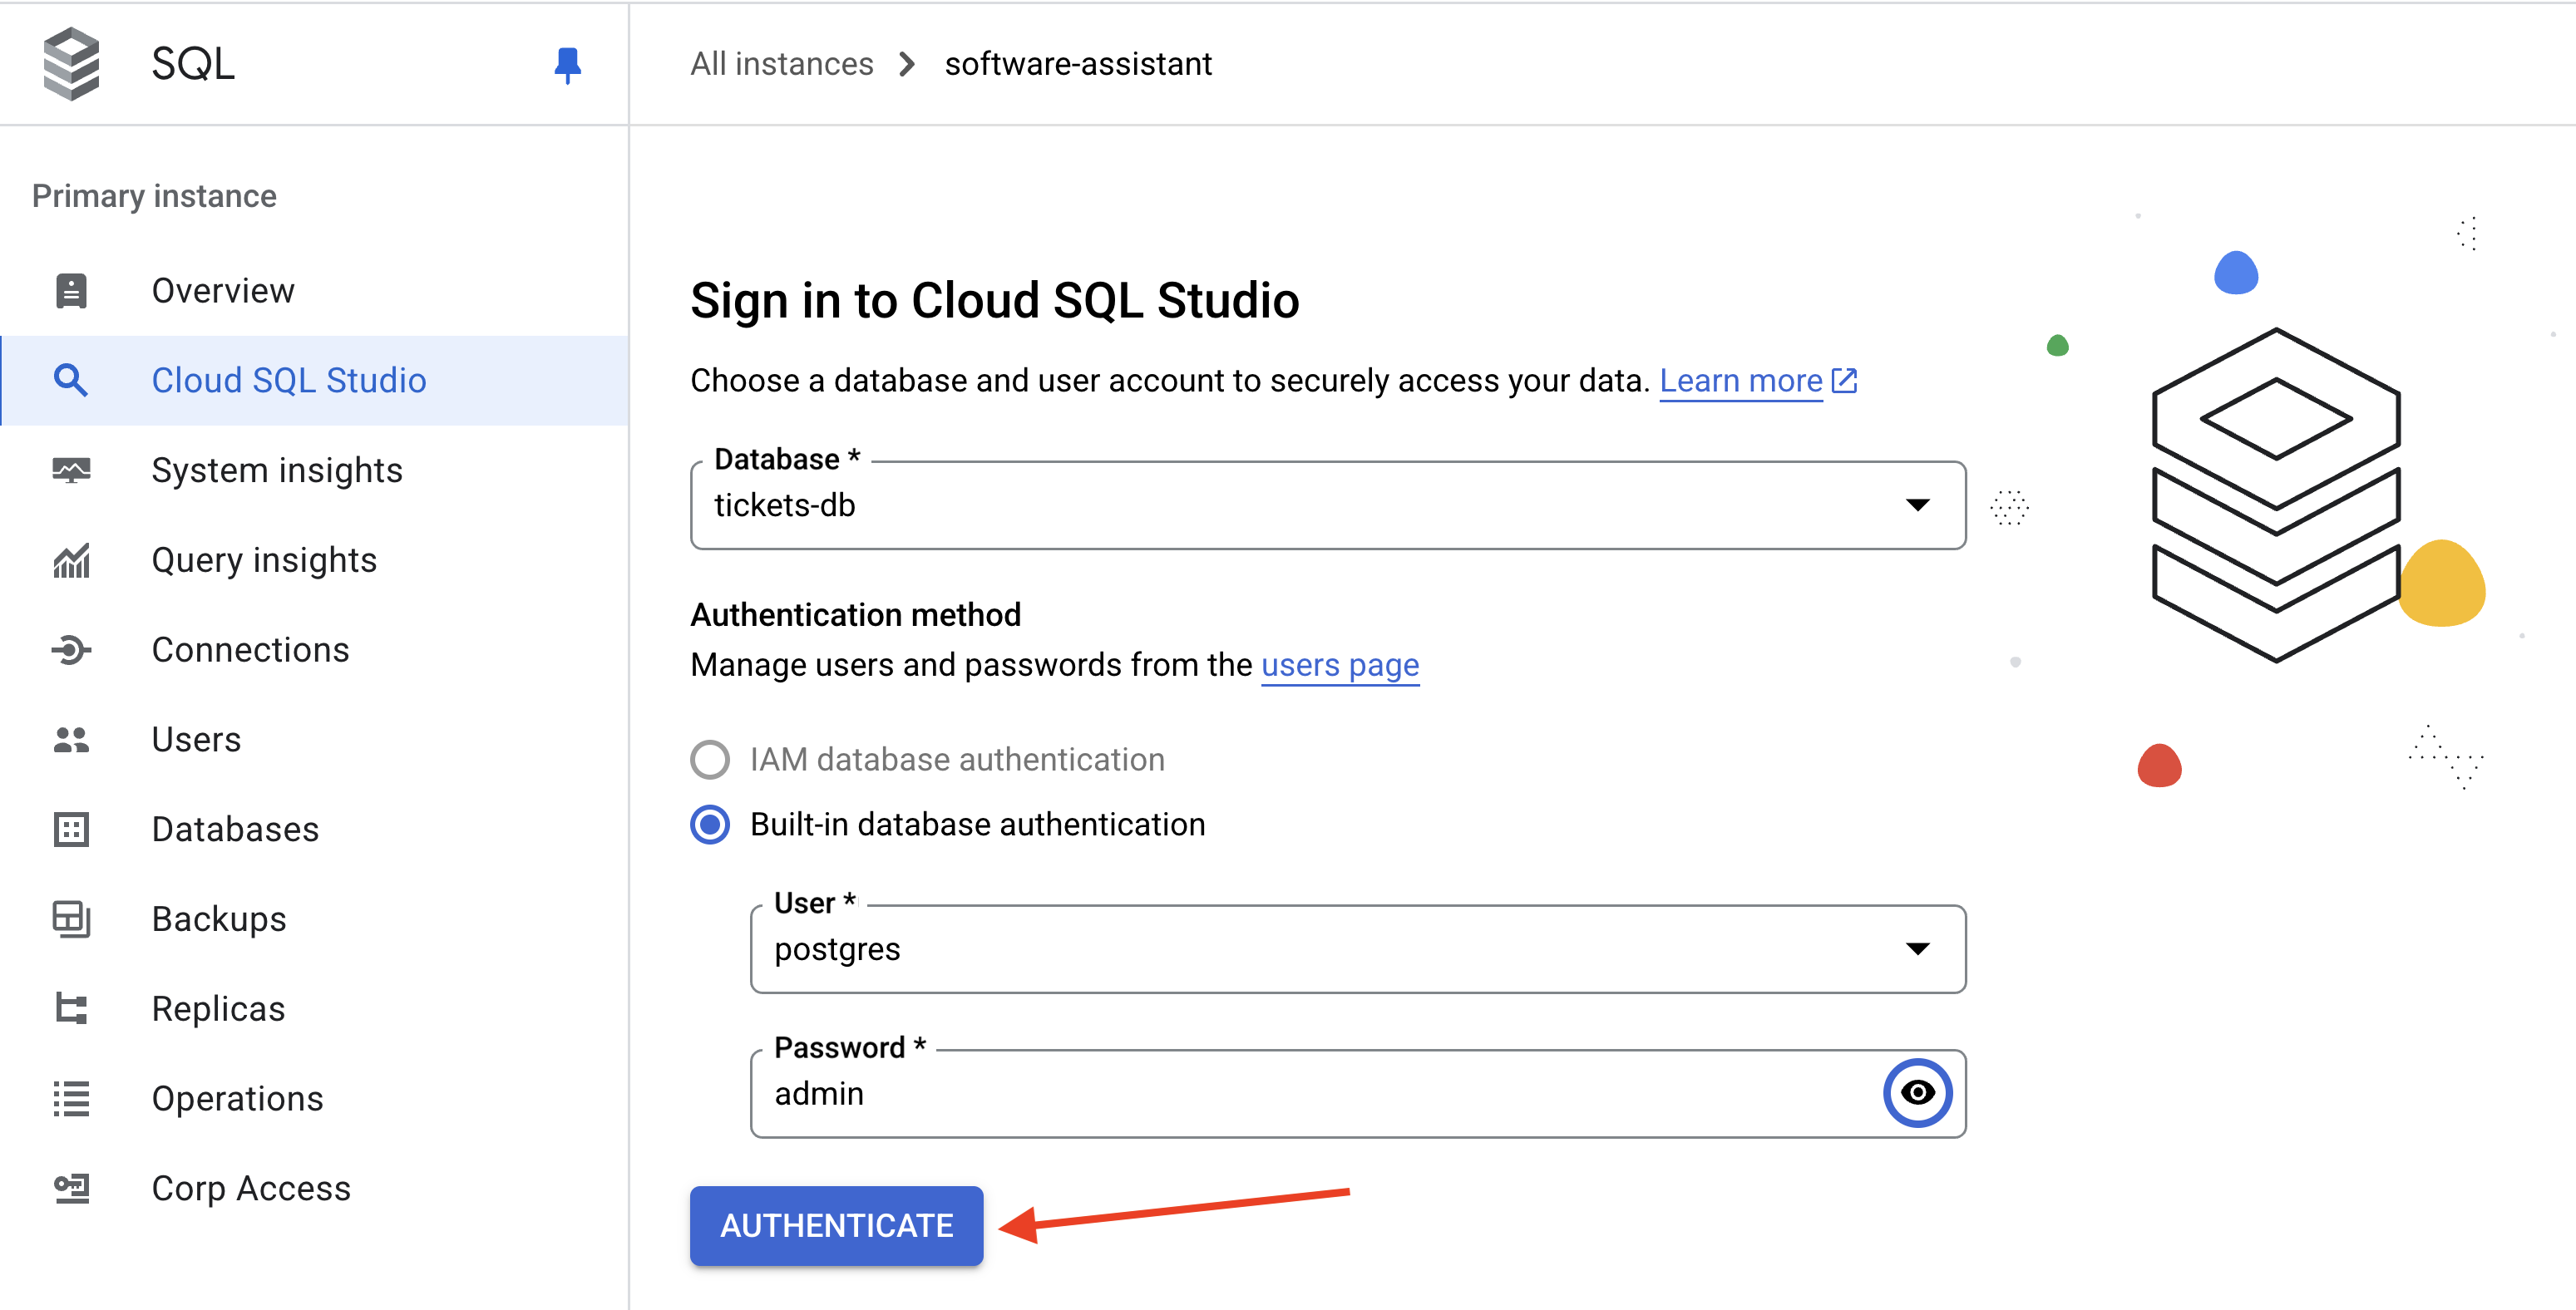
From the Cloud Console (Cloud SQL), open Cloud SQL Studio for the software-assistant instance.
Log into thetickets-db database using the postgres user and admin as the password.
Open a new Editor tab.
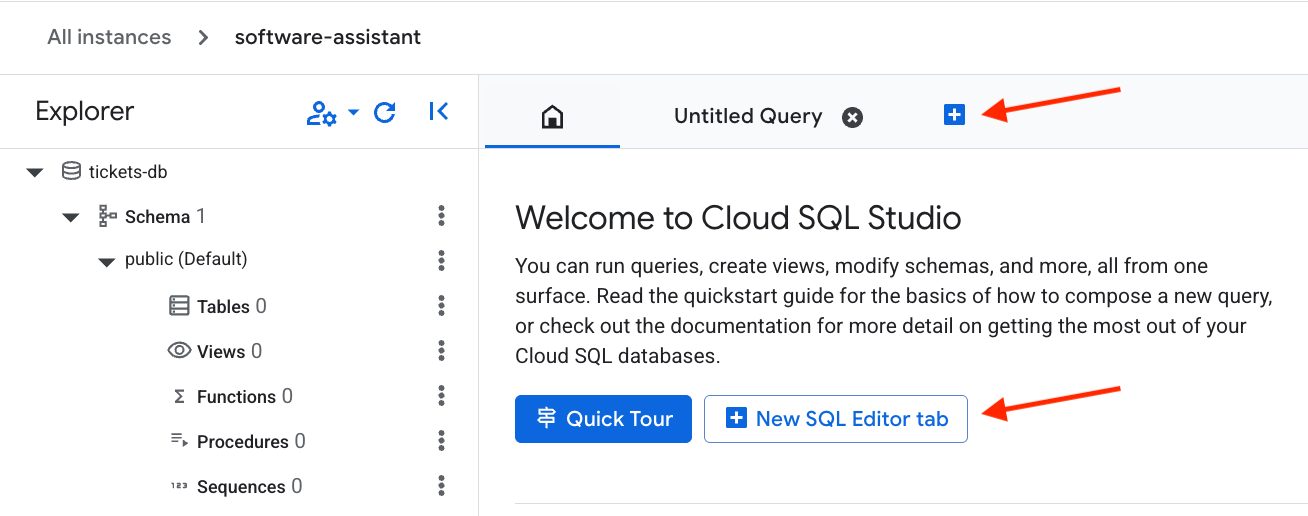
Then, paste in the following SQL code to set up the table and create vector embeddings. Hit the Run button to execute the command.
CREATE EXTENSION IF NOT EXISTS google_ml_integration CASCADE;
CREATE EXTENSION IF NOT EXISTS vector CASCADE;
GRANT EXECUTE ON FUNCTION embedding TO postgres;

CREATE TABLE tickets (
    ticket_id SERIAL PRIMARY KEY,             -- PostgreSQL's auto-incrementing integer type (SERIAL is equivalent to INT AUTO_INCREMENT)
    title VARCHAR(255) NOT NULL,              -- A concise summary or title of the bug/issue.
    description TEXT,                         -- A detailed description of the bug.
    assignee VARCHAR(100),                    -- The name or email of the person/team assigned to the ticket.
    priority VARCHAR(50),                     -- The priority level (e.g., 'P0 - Critical', 'P1 - High').
    status VARCHAR(50) DEFAULT 'Open',        -- The current status of the ticket (e.g., 'Open', 'In Progress', 'Resolved'). Default is 'Open'.
    creation_time TIMESTAMP WITH TIME ZONE DEFAULT CURRENT_TIMESTAMP, -- Timestamp when the ticket was first created. 'WITH TIME ZONE' is recommended for clarity and compatibility.
    updated_time TIMESTAMP WITH TIME ZONE DEFAULT CURRENT_TIMESTAMP  -- Timestamp when the ticket was last updated. Will be managed by a trigger.
);
The tickets table has been created, click Clear to clear the old query.
Now insert the sample data and hit the Run button once again.
INSERT INTO tickets (title, description, assignee, priority, status) VALUES
('Login Page Freezes After Multiple Failed Attempts', 'Users are reporting that after 3 failed login attempts, the login page becomes unresponsive and requires a refresh. No specific error message is displayed.', 'samuel.green@example.com', 'P0 - Critical', 'Open');

INSERT INTO tickets (title, description, assignee, priority, status) VALUES
('Dashboard Sales Widget Intermittent Data Loading Failure', 'The "Sales Overview" widget on the main dashboard intermittently shows a loading spinner but no data. Primarily affects Chrome browser users.', 'maria.rodriguez@example.com', 'P1 - High', 'In Progress');

INSERT INTO tickets (title, description, assignee, priority, status) VALUES
('Broken Link in Footer - Privacy Policy', 'The "Privacy Policy" hyperlink located in the website footer leads to a 404 "Page Not Found" error.', 'maria.rodriguez@example.com', 'P3 - Low', 'Resolved');

INSERT INTO tickets (title, description, assignee, priority, status) VALUES
('UI Misalignment on Mobile Landscape View (iOS)', 'On specific iOS devices (e.g., iPhone 14 models), the top navigation bar shifts downwards when the device is viewed in landscape orientation, obscuring content.', 'maria.rodriguez@example.com', 'P2 - Medium', 'In Progress');

INSERT INTO tickets (title, description, assignee, priority, status) VALUES
('Critical XZ Utils Backdoor Detected in Core Dependency (CVE-2024-3094)', 'Urgent: A sophisticated supply chain compromise (CVE-2024-3094) has been identified in XZ Utils versions 5.6.0 and 5.6.1. This malicious code potentially allows unauthorized remote SSH access by modifying liblzma. Immediate investigation and action required for affected Linux/Unix systems and services relying on XZ Utils.', 'frank.white@example.com', 'P0 - Critical', 'Open');

INSERT INTO tickets (title, description, assignee, priority, status) VALUES
('Database Connection Timeouts During Peak Usage', 'The application is experiencing frequent database connection timeouts, particularly during peak hours (10 AM - 12 PM EDT), affecting all users and causing service interruptions.', 'frank.white@example.com', 'P1 - High', 'Open');

INSERT INTO tickets (title, description, assignee, priority, status) VALUES
('Export to PDF Truncates Long Text Fields in Reports', 'When generating PDF exports of reports containing extensive text fields, the text is abruptly cut off at the end of the page instead of wrapping or continuing to the next page.', 'samuel.green@example.com', 'P1 - High', 'Open');

INSERT INTO tickets (title, description, assignee, priority, status) VALUES
('Search Filter "Date Range" Not Applying Correctly', 'The "Date Range" filter on the search results page does not filter records accurately; results outside the specified date range are still displayed.', 'samuel.green@example.com', 'P2 - Medium', 'Resolved');

INSERT INTO tickets (title, description, assignee, priority, status) VALUES
('Typo in Error Message: "Unathorized Access"', 'The error message displayed when a user attempts an unauthorized action reads "Unathorized Access" instead of "Unauthorized Access."', 'maria.rodriguez@example.com', 'P3 - Low', 'Resolved');

INSERT INTO tickets (title, description, assignee, priority, status) VALUES
('Intermittent File Upload Failures for Large Files', 'Users are intermittently reporting that file uploads fail without a clear error message or explanation, especially for files exceeding 10MB in size.', 'frank.white@example.com', 'P1 - High', 'Open');
At QuantumRoast, we may want to know when a bug/ticket was last updated.
To do so we can create a trigger to update the updated_time field every time a record is updated.
Click Clear and then paste the following SQL to implement a trigger.
Hit the Run button to execute.
CREATE OR REPLACE FUNCTION update_updated_time_tickets()
RETURNS TRIGGER AS $$
BEGIN
    NEW.updated_time = NOW();  -- Set the updated_time to the current timestamp
    RETURN NEW;                -- Return the new row
END;
$$ language 'plpgsql';

CREATE TRIGGER update_tickets_updated_time
BEFORE UPDATE ON tickets
FOR EACH ROW                  -- This means the trigger fires for each row affected by the UPDATE statement
EXECUTE PROCEDURE update_updated_time_tickets();
Create vector embeddings from the description field. This will give our agent the ability to perform similarity search on our database. For example, "Are there any open issues related to the websites homepage?".
ALTER TABLE tickets ADD COLUMN embedding vector(768) GENERATED ALWAYS AS (embedding('text-embedding-005',description)) STORED;
You can now query the database to verify it is ready.
SELECT * FROM tickets;
You should see 10 rows returned that resemble the following:
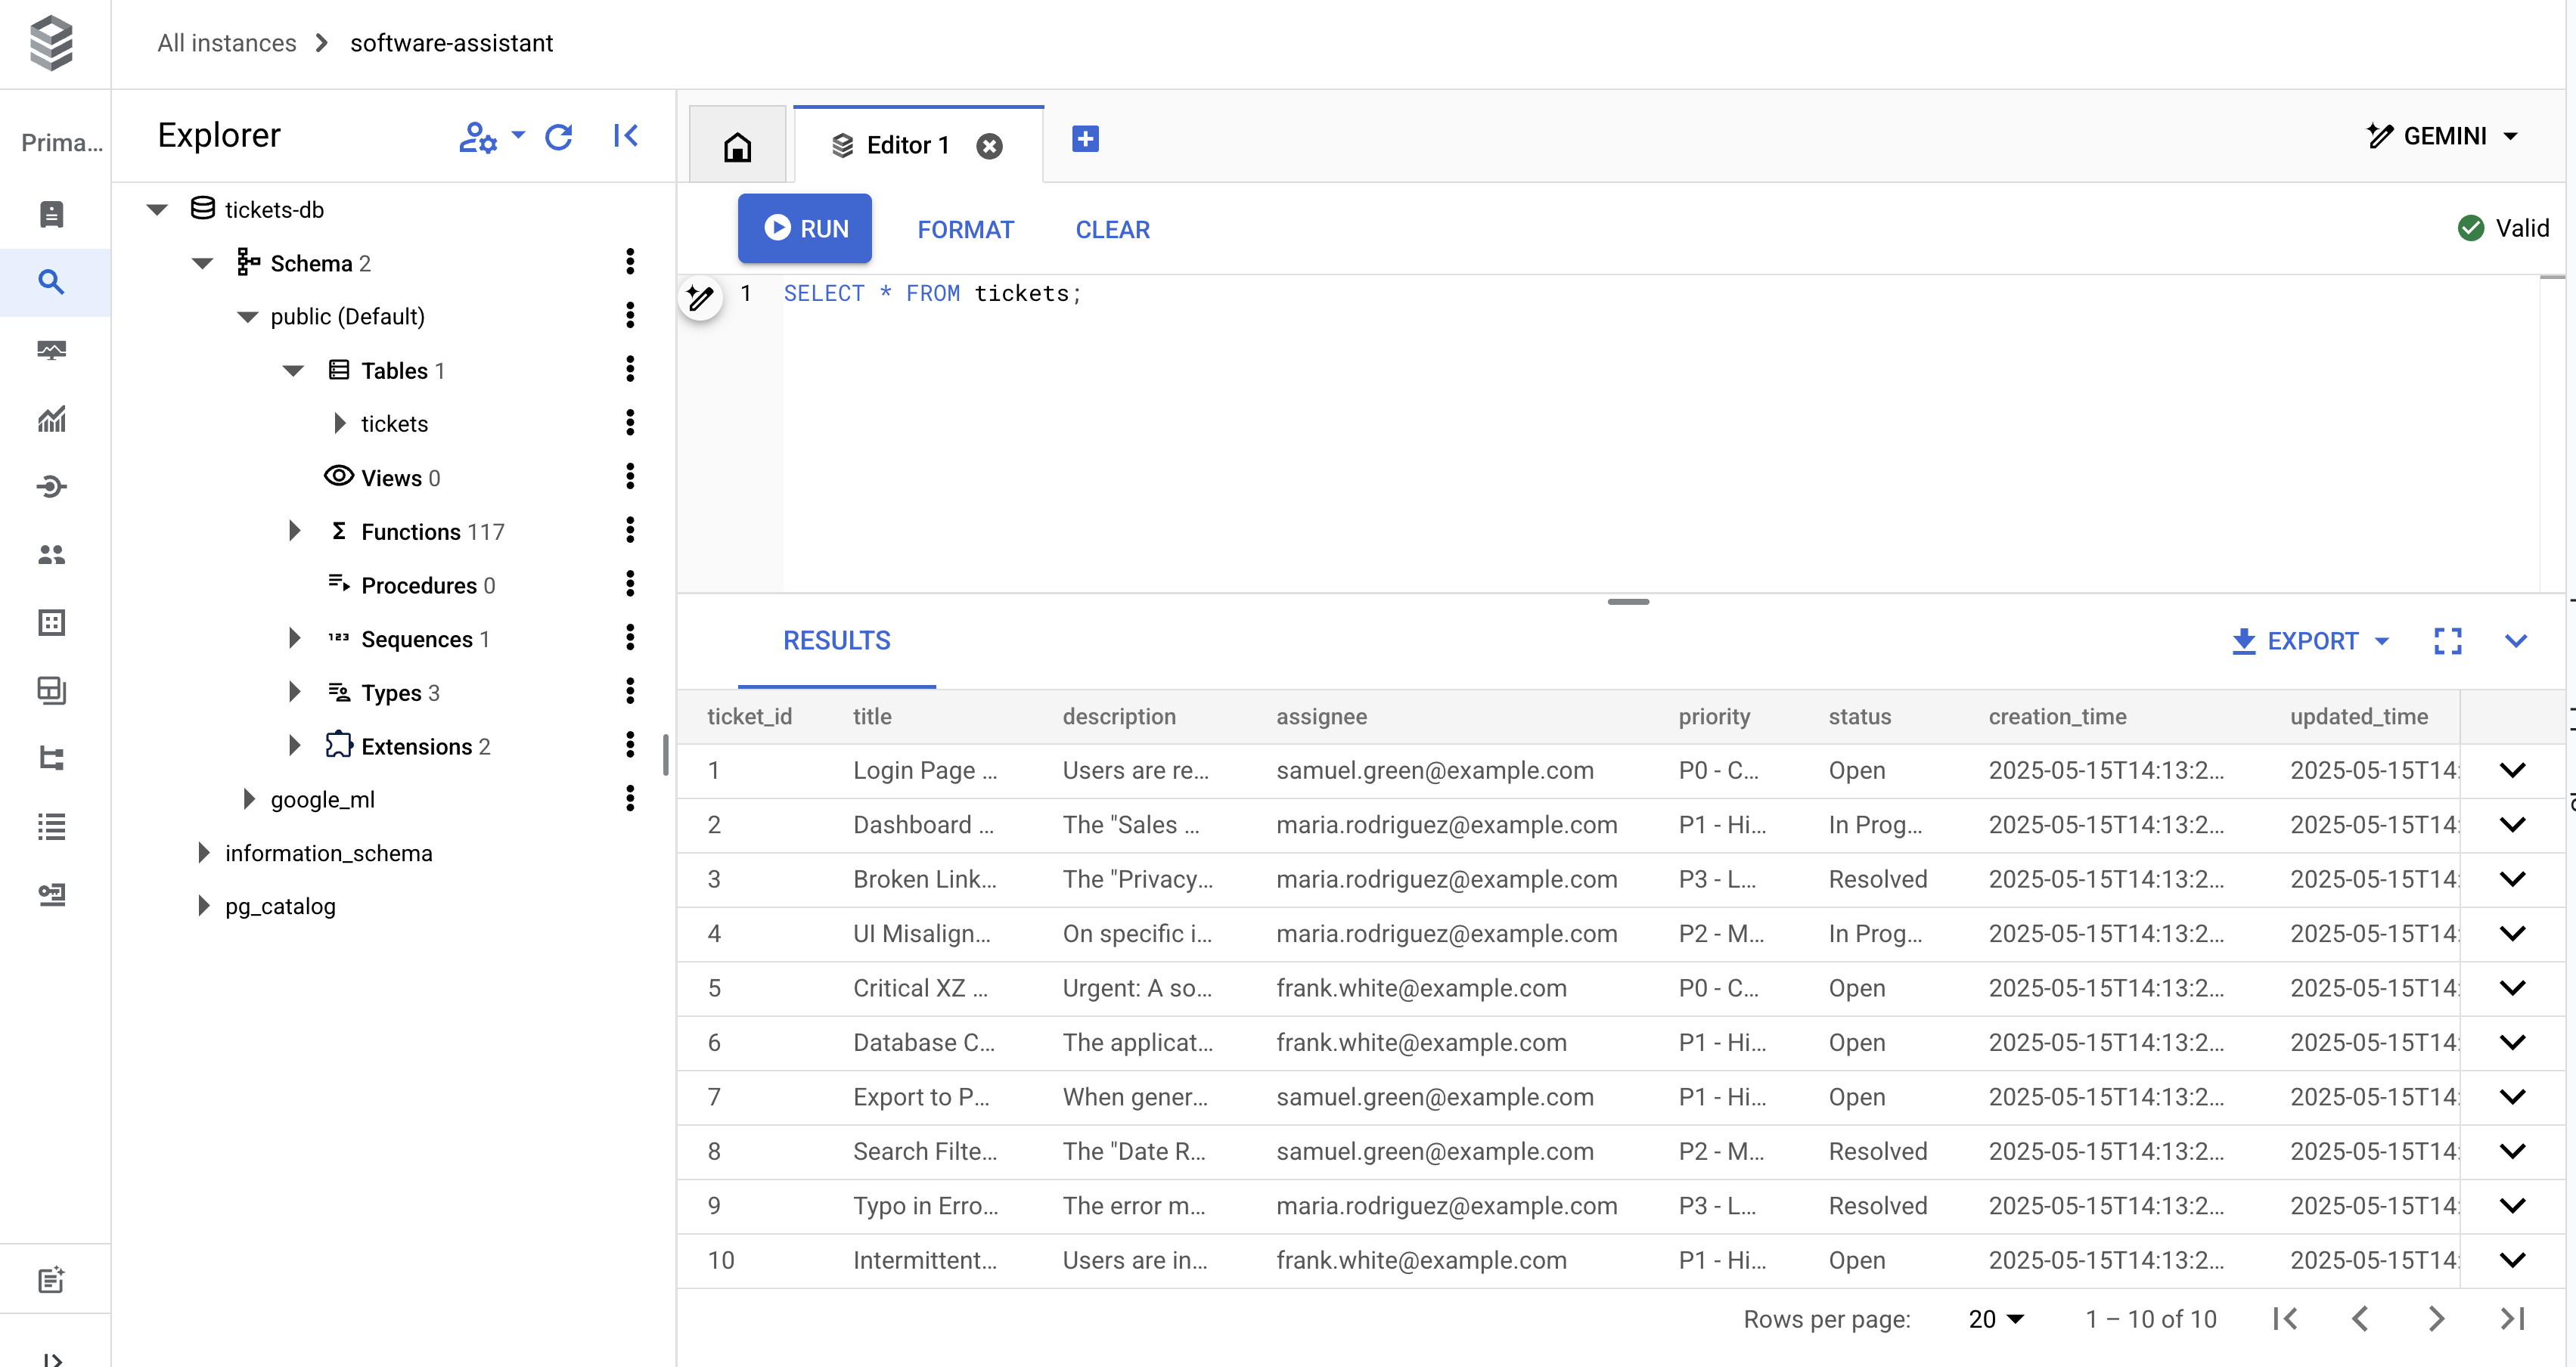
Now you are ready to move on to the fun part, the code!
4. Python Project Setup
Before we can dive into building our agent we must make sure we have a proper Python project setup. We will do it all in Cloud Shell!
First, create a quantum-roast folder and cd into it:
mkdir quantum-roast && cd quantum-roast
Now that we have a folder for our project, it is time to initialize our project and create the corresponding files we will need.
We will use uv (Python's extremely fast package and project manager) which comes pre-installed in Cloud Shell for managing our project and dependencies. Uv will help us setup some of our files as well manage virtual environments, dependencies, etc. So that we don't have to!
Initialize a new project with uv init:
uv init --description "QuantumRoast Software Bug Assistant with ADK" --bare --python 3.10
After running the command, we should have a pyproject.toml file for our project. To verify, run cat pyproject.toml in the Cloud Shell terminal:
cat pyproject.toml
The following should be seen as output:
[project]
name = "quantum-roast"
version = "0.1.0"
description = "QuantumRoast Software Bug Assistant with ADK"
requires-python = ">=3.10"
dependencies = []
Time to add google-adk (ADK) as a dependency to our project using uv add.
uv add google-adk==1.11.0
This adds google-adk to the dependencies list in our pyproject.toml.
ADK expects a certain project structure in order to achieve best results.
quantum-roast/
    software_bug_assistant/
        __init__.py
        agent.py
        .env
Create the software_bug_assistant folder and files within it:
mkdir software_bug_assistant && touch software_bug_assistant/__init__.py \
software_bug_assistant/agent.py \
software_bug_assistant/tools.py \
software_bug_assistant/.env
Verify the creation of the files using ls:
ls -a software_bug_assistant/
You should see the following:
__init__.py . .. .env agent.py tools.py
Time to populate the .env file with the environment variables required for ADK to properly call Gemini models. We will access Gemini through Vertex API.
echo "GOOGLE_GENAI_USE_VERTEXAI=TRUE" >> software_bug_assistant/.env \
&& echo "GOOGLE_CLOUD_PROJECT=$PROJECT_ID" >> software_bug_assistant/.env \
&& echo "GOOGLE_CLOUD_LOCATION=europe-west4" >> software_bug_assistant/.env
To verify the .env was populated correctly, run the following:
cat software_bug_assistant/.env
You should see the following where your-project-id is your project ID:
GOOGLE_GENAI_USE_VERTEXAI=TRUE
GOOGLE_CLOUD_PROJECT=your-project-id
GOOGLE_CLOUD_LOCATION=europe-west4
We are now set to start on creating our ADK agent.
5. Base ADK Agent
Let's get setup with a base ADK agent that we can add tools one-by-one to during this workshop to create a powerful bug assistant!
Open agent.py in Cloud Shell Editor:
cloudshell edit software_bug_assistant/agent.py
Paste the following code into agent.py and save the file Ctrl + s:
from google.adk.agents import Agent

# --- Agent Definition (model, instructions, tools) ---
root_agent = Agent(
    model="gemini-2.5-flash",
    name="software_assistant",
    instruction="""
    You are a skilled expert in triaging and debugging software issues for a
    coffee machine company, QuantumRoast.
    """,
    tools=[],
)
Run your newly created agent by starting up ADK's dev UI (adk web). Doing so with uv run will automatically create a virtual environment with ADK installed.
uv run adk web --port 8080 --reload_agents
In the console you should see the successful start up of the ADK Web Server.
INFO:     Started server process [1557]
INFO:     Waiting for application startup.

+-----------------------------------------------------------------------------+
| ADK Web Server started                                                      |
|                                                                             |
| For local testing, access at http://localhost:8080.                         |
+-----------------------------------------------------------------------------+

INFO:     Application startup complete.
INFO:     Uvicorn running on http://127.0.0.1:8080 (Press CTRL+C to quit)
Open Cloud Shell's Web Preview to see the UI.
You should see the ADK web UI.
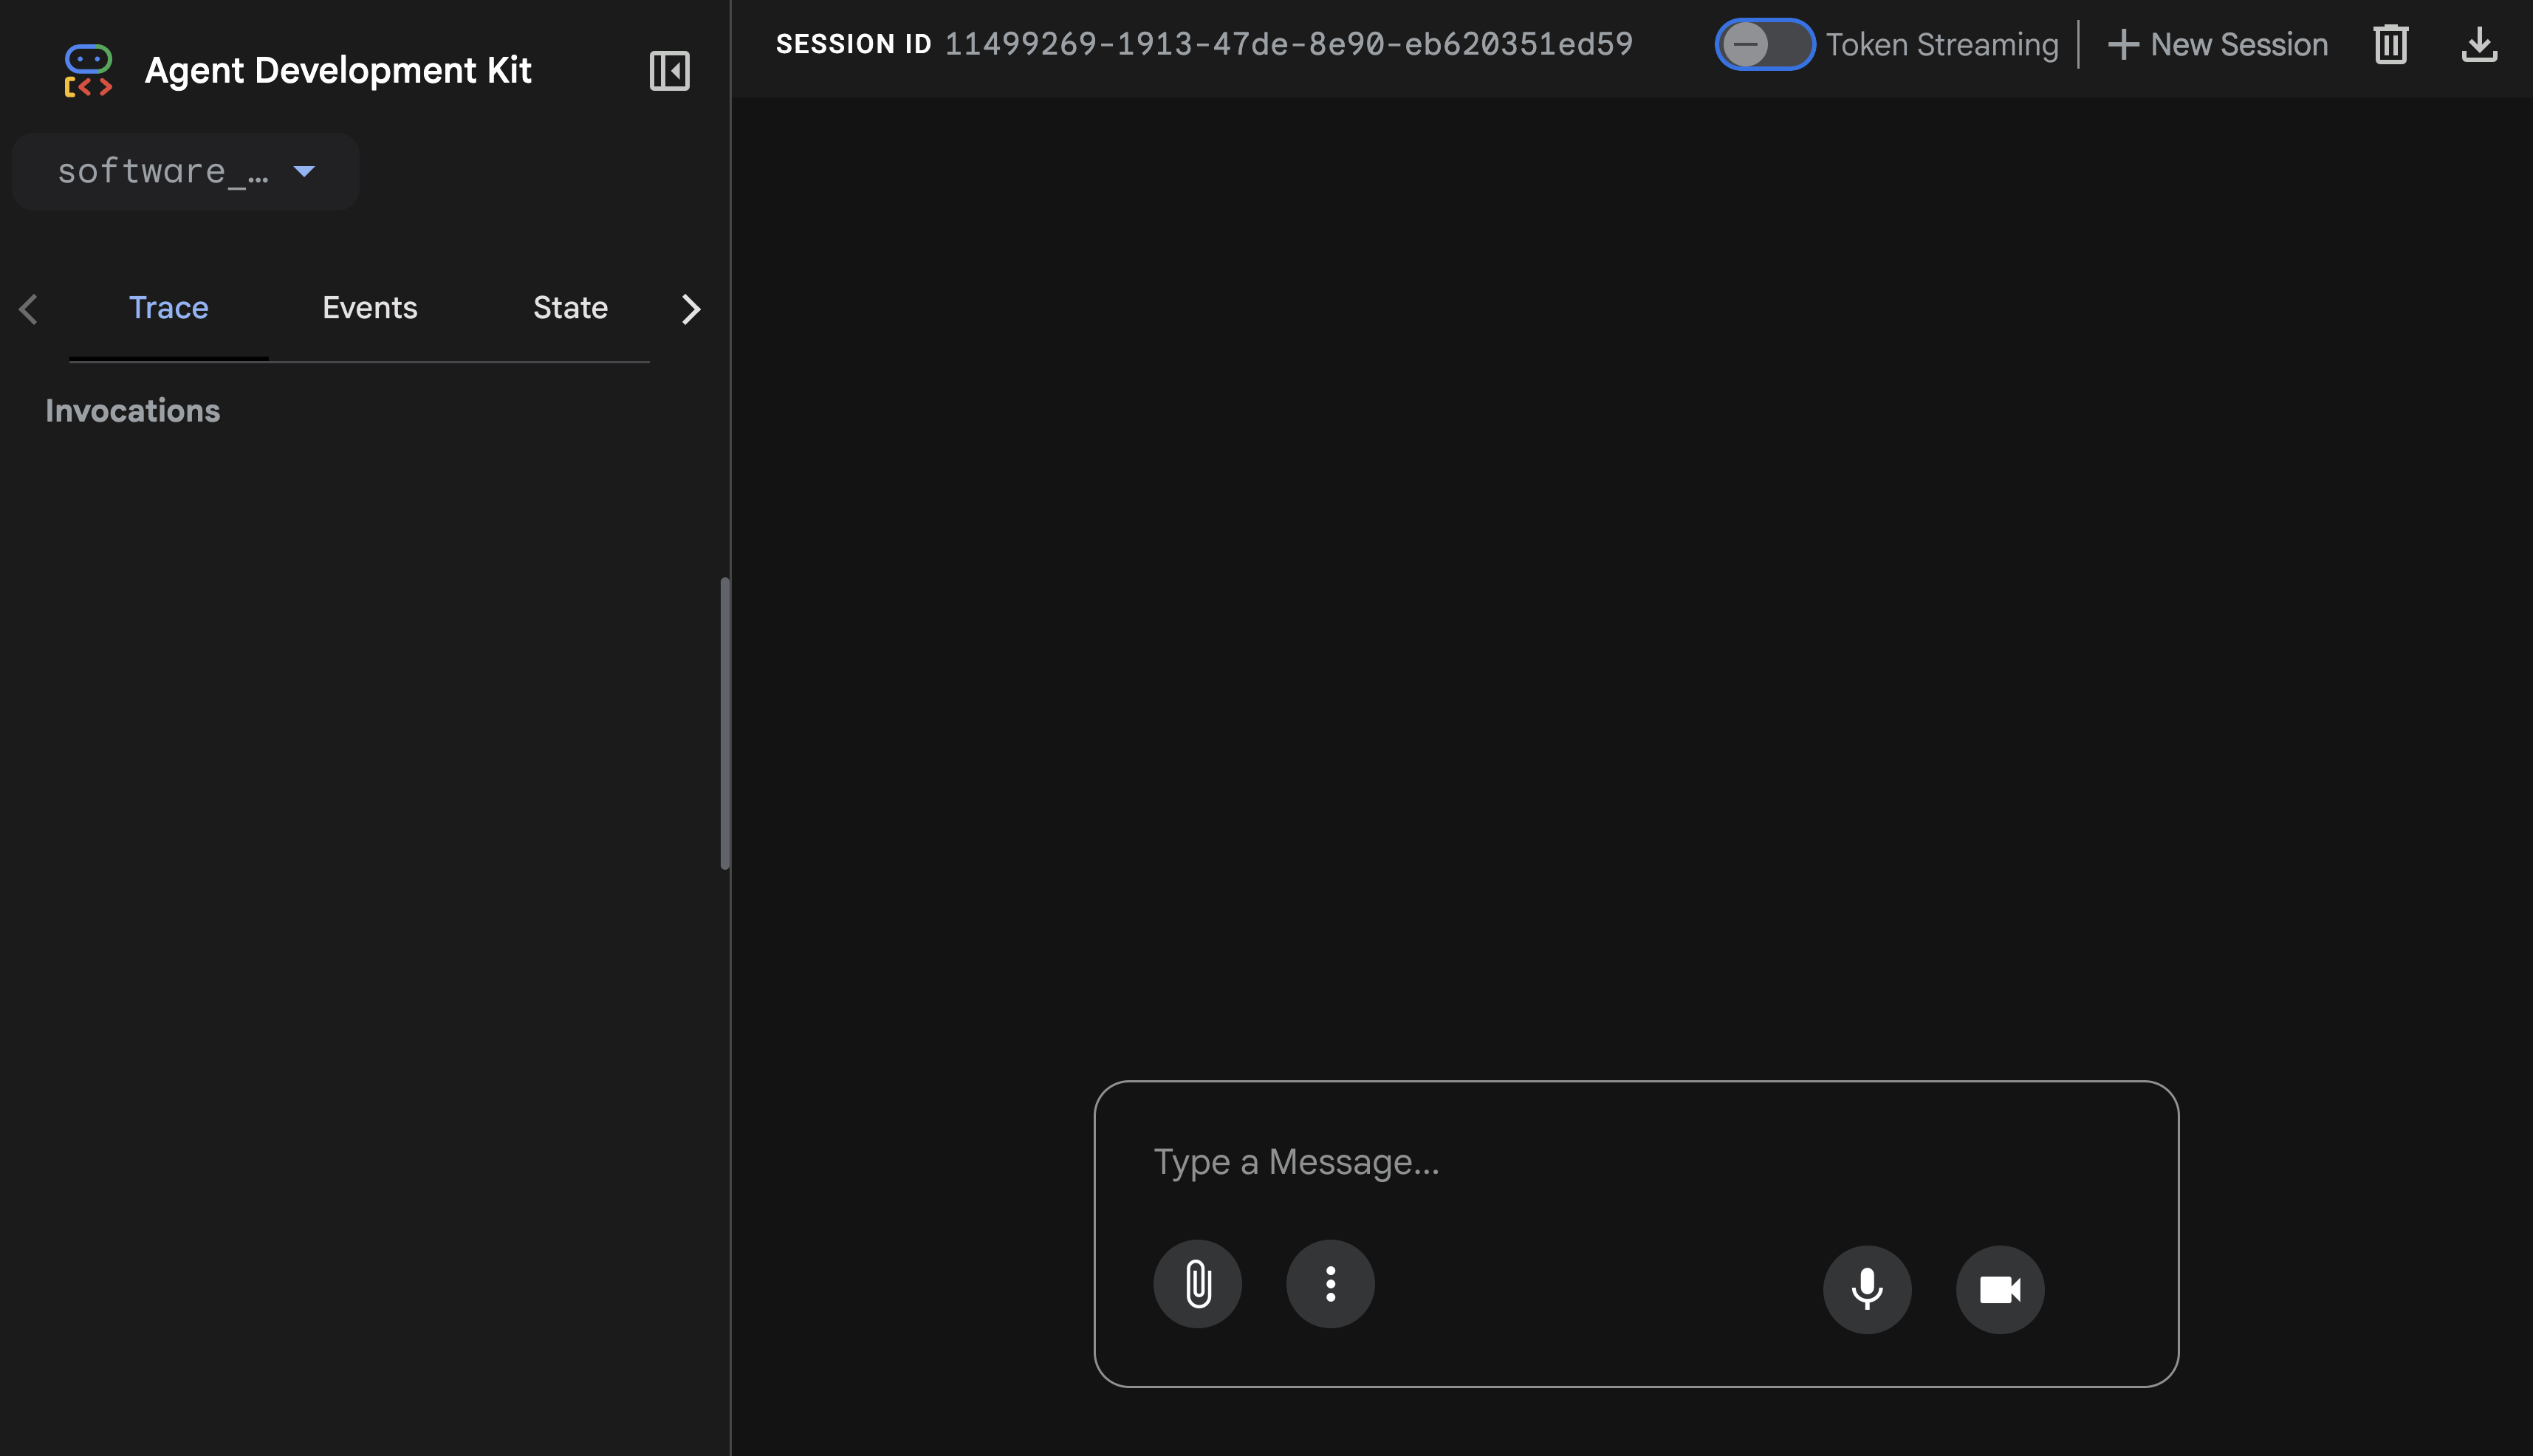
Go ahead and try chatting with the ADK agent.
Ask the agent What day is it today?.
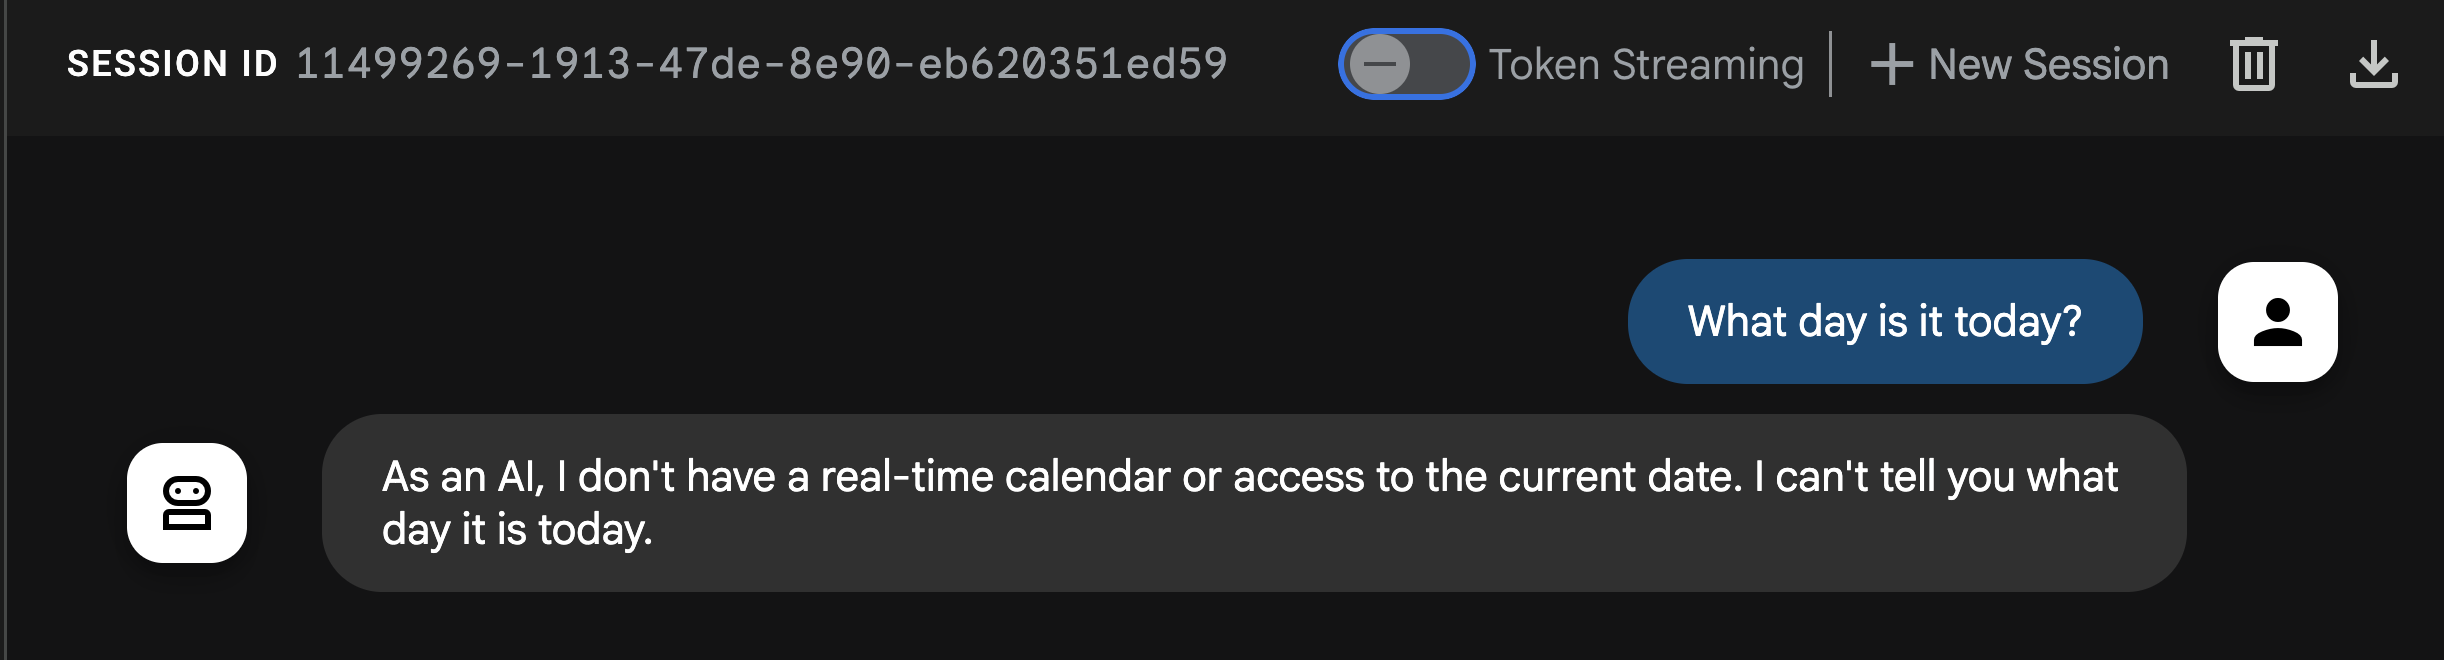
You'll notice from the response that the agent can't answer this basic question! Reminder that LLMs are isolated systems, trained on past data. They don't have real-time context on recent events or even the current date... unless you give them tools!
Time to implement ADK's first tool type, a Function Tool.
6. Function Tool
The first and simplest ADK tool type is the function tool. It is quite literally what it sounds like, a Python function that gets called by the agent!

Function tools are quite powerful as they allow you to write custom code for the agent to call as a tool, such as performing a calculation, calling an API, querying a database. They can be simple or complex functions, it is fully up to you.
At QuantumRoast we want to define a basic function to get the current day's date , in order to later in this lab handle queries like, "show me bugs from the last week" or "what day is it today?" (it happens to us all).
The tools.py file within the /software_bug_assistant folder is where we will organize all the tools we build throughout this lab.
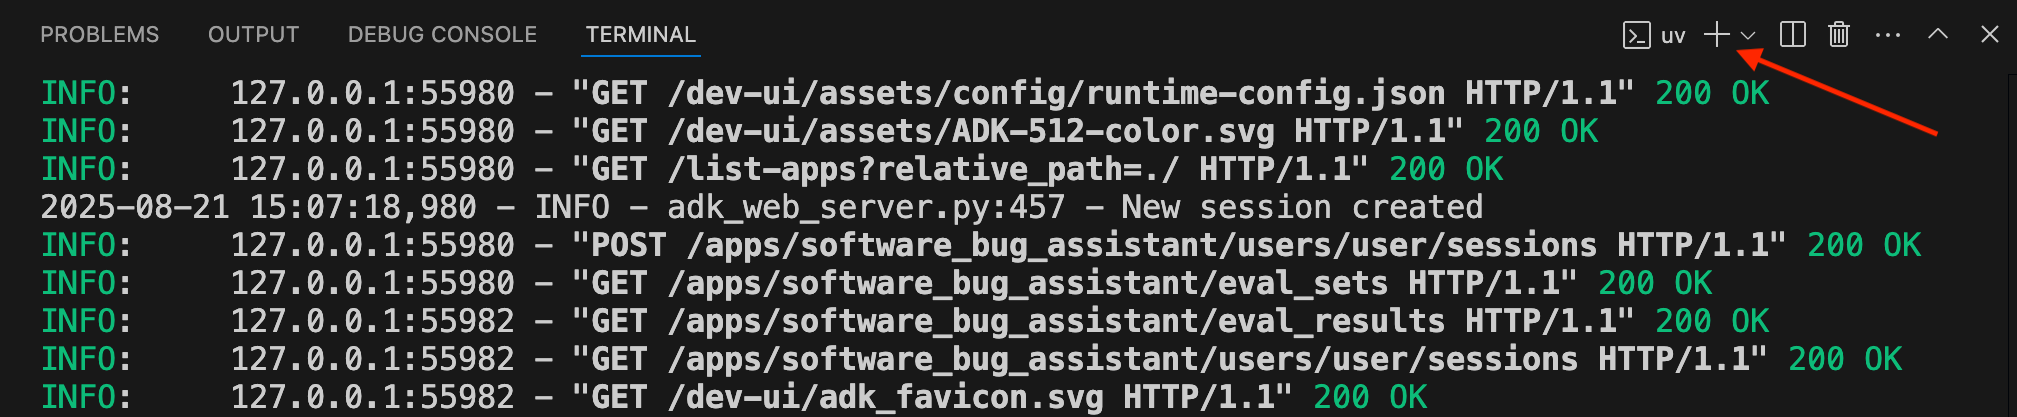
Open a NEW terminal by clicking the + icon.
Now in the new terminal, set PROJECT_ID and open tools.py:
cd quantum-roast
export PROJECT_ID=$(gcloud config get project)
cloudshell edit software_bug_assistant/tools.py
Now define the get_current_date function which will be used as a Function tool.
from datetime import datetime

# ----- Example of a Function tool -----
def get_current_date() -> dict:
    """
    Get the current date in the format YYYY-MM-DD
    """
    return {"current_date": datetime.now().strftime("%Y-%m-%d")}
The function is now defined! Time to pass it as a tool to the agent.
Open agent.py in Cloud Shell Editor:
cloudshell edit software_bug_assistant/agent.py
We want to import the get_current_date function from tools.py and pass the function to the agent's tools argument.
The updated agent.py looks as follows:
from google.adk.agents import Agent

from .tools import get_current_date

# --- Agent Definition (model, instructions, tools) ---
root_agent = Agent(
    model="gemini-2.5-flash",
    name="software_assistant",
    instruction="""
    You are a skilled expert in triaging and debugging software issues for a
    coffee machine company, QuantumRoast.
    """,
    tools=[get_current_date],
)
Now if you are to return to the Web Preview tab running the ADK Web UI and ask What day is it today? again...
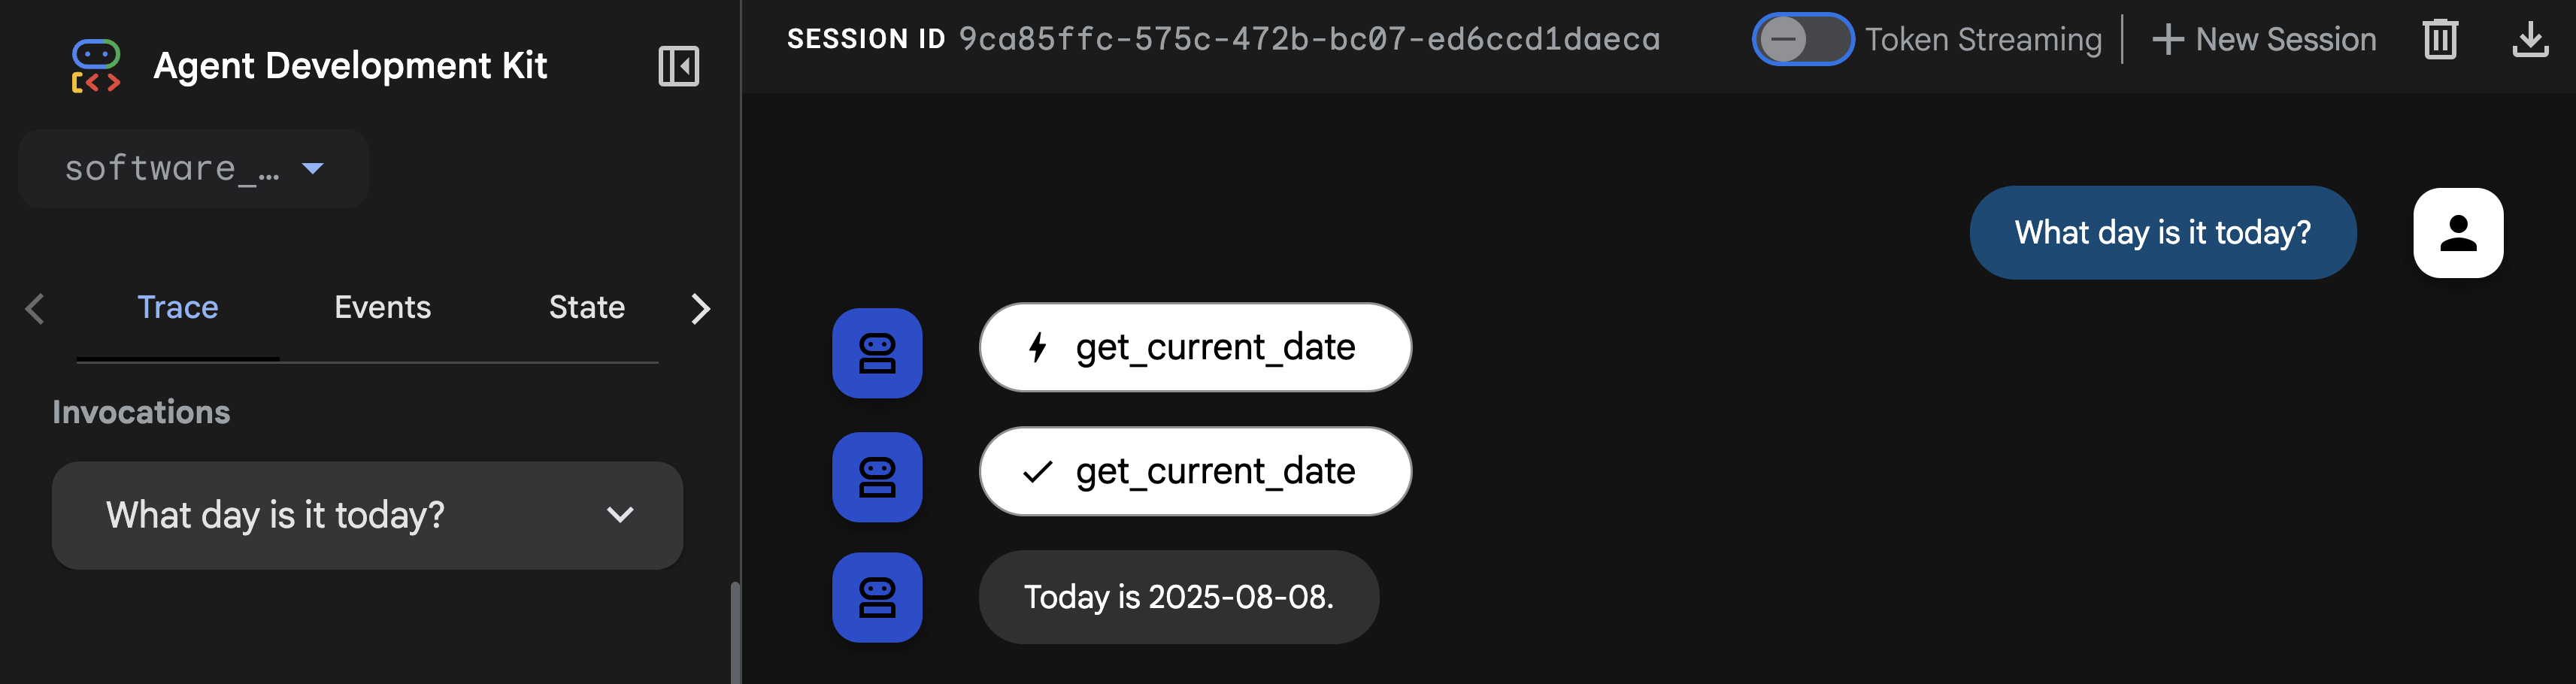
The agent can successfully tell the date by calling the get_current_date Function Tool! 🎉
Time to explore the next ADK tool type.
7. Built-in Tool
Another type of ADK tool is a built-in tool. These are tools that work with Google's flagship model features, like code execution inside the model itself. We can attach the Google Search built-in tool to our bug assistant agent to ground the agent in relevant context by giving it access to search the web. This will allow the agent gather more current information about a bug or well known vulnerability.

Open the tools.py file to add support for the Google Search built-in tool.
cloudshell edit software_bug_assistant/tools.py
Add the following to the bottom of tools.py:
# ----- Built-in Tool Imports -----
from google.adk.agents import Agent
from google.adk.tools import google_search
from google.adk.tools.agent_tool import AgentTool

# ----- Example of a Built-in Tool -----
search_agent = Agent(
    model="gemini-2.5-flash",
    name="search_agent",
    description="A specialist in Google Search.",
    instruction="""
    You're a specialist in Google Search.
    """,
    tools=[google_search],
)

search_tool = AgentTool(search_agent)
Here, we're actually wrapping that Google Search tool in its own agent with its own system instructions, effectively using an agent as a tool.
Now we can import and pass the search_tool to the root agent in agent.py:
cloudshell edit software_bug_assistant/agent.py
You can replace agent.py with the following code to include search_tool:
from google.adk.agents import Agent

from .tools import get_current_date, search_tool

# --- Agent Definition (model, instructions, tools) ---
root_agent = Agent(
    model="gemini-2.5-flash",
    name="software_assistant",
    instruction="""
    You are a skilled expert in triaging and debugging software issues for a
    coffee machine company, QuantumRoast.
    """,
    tools=[get_current_date, search_tool],
)
Save the file and head back over to your open that has the ADK Web UI running.
At QuantumRoast we want to make sure our website and software is protected against Common Vulnerabilities and Exposures (CVEs) which are public cybersecurity vulnerabilities. We can use our agent's new Google Search tool To search the web for the most recently discovered CVEs.
Run the following query: Do a web search for 5 of the most recent CVEs?.
Our agent should call the search_agent to search the web.
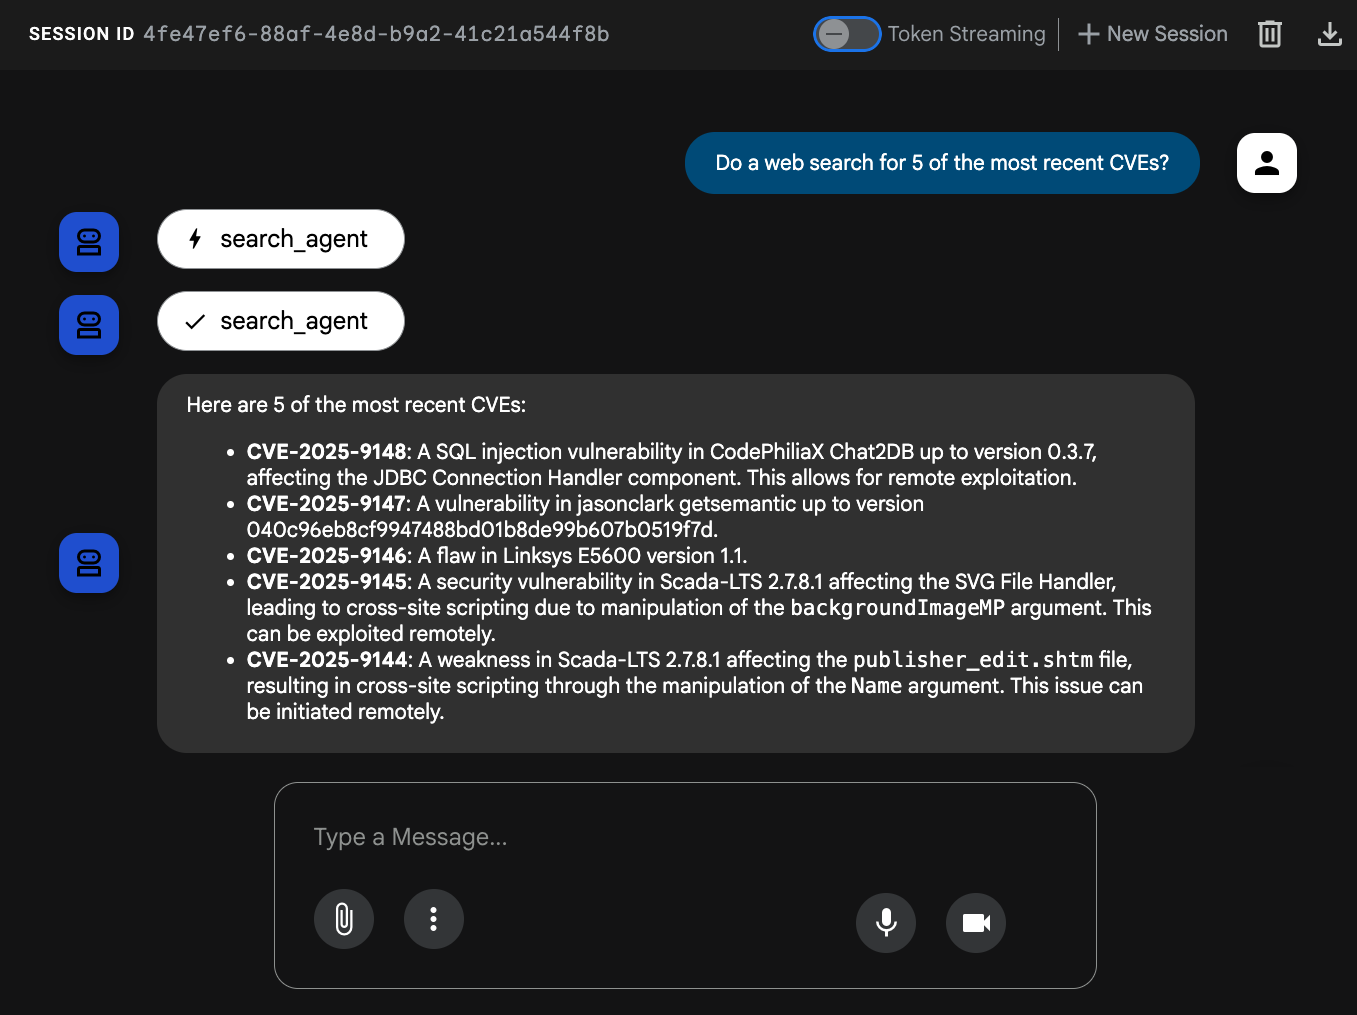
Our agent has now successfully unlocked the ability to search the web through ADK's built-in tool for Google Search! 🎉
Onto the next ADK tool type.
8. Third-party Tool
ADK is designed to be highly extensible, allowing you to seamlessly integrate tools from other third-party AI Agent frameworks like CrewAI and LangChain. This interoperability is crucial because it allows for faster development time and the ability to reuse existing tools.

To plug our bug agent into StackOverflow's powerful Q&A data, we can pull from LangChain's extensive tools library specifically, the StackExchange API Wrapper tool. ADK supports third-party tools like LangChain, so adding this tool to our ADK agent requires just a few lines of code!
First, we must add new dependencies for LangChain and StackOverflow (langchain-community and stackapi) to our project:
uv add langchain-community==0.3.27 stackapi==0.3.1
Open the tools.py file to add support for the LangChain StackExchange tool.
cloudshell edit software_bug_assistant/tools.py
Add the following to the bottom of tools.py:
# ----- Example of a Third-Party Tool -----
from google.adk.tools.langchain_tool import LangchainTool
from langchain_community.tools import StackExchangeTool
from langchain_community.utilities import StackExchangeAPIWrapper

stack_exchange_tool = StackExchangeTool(api_wrapper=StackExchangeAPIWrapper())
langchain_tool = LangchainTool(stack_exchange_tool)
Now we can import and pass the langchain_tool to the root agent in agent.py:
cloudshell edit software_bug_assistant/agent.py
You can replace agent.py with the following code to include langchain_tool:
from google.adk.agents import Agent

from .tools import get_current_date, langchain_tool, search_tool

# --- Agent Definition (model, instructions, tools) ---
root_agent = Agent(
    model="gemini-2.5-flash",
    name="software_assistant",
    instruction="""
    You are a skilled expert in triaging and debugging software issues for a
    coffee machine company, QuantumRoast.
    """,
    tools=[get_current_date, search_tool, langchain_tool],
)
Save the file and head back over to your open tab with the ADK Web UI.
Try asking the agent something about the previous CVEs, "Are there similar issues on stack exchange?" or something new like "Our database queries with SQLAlchemy seem to be timing out, is there anything on StackExchange relevant to this?".
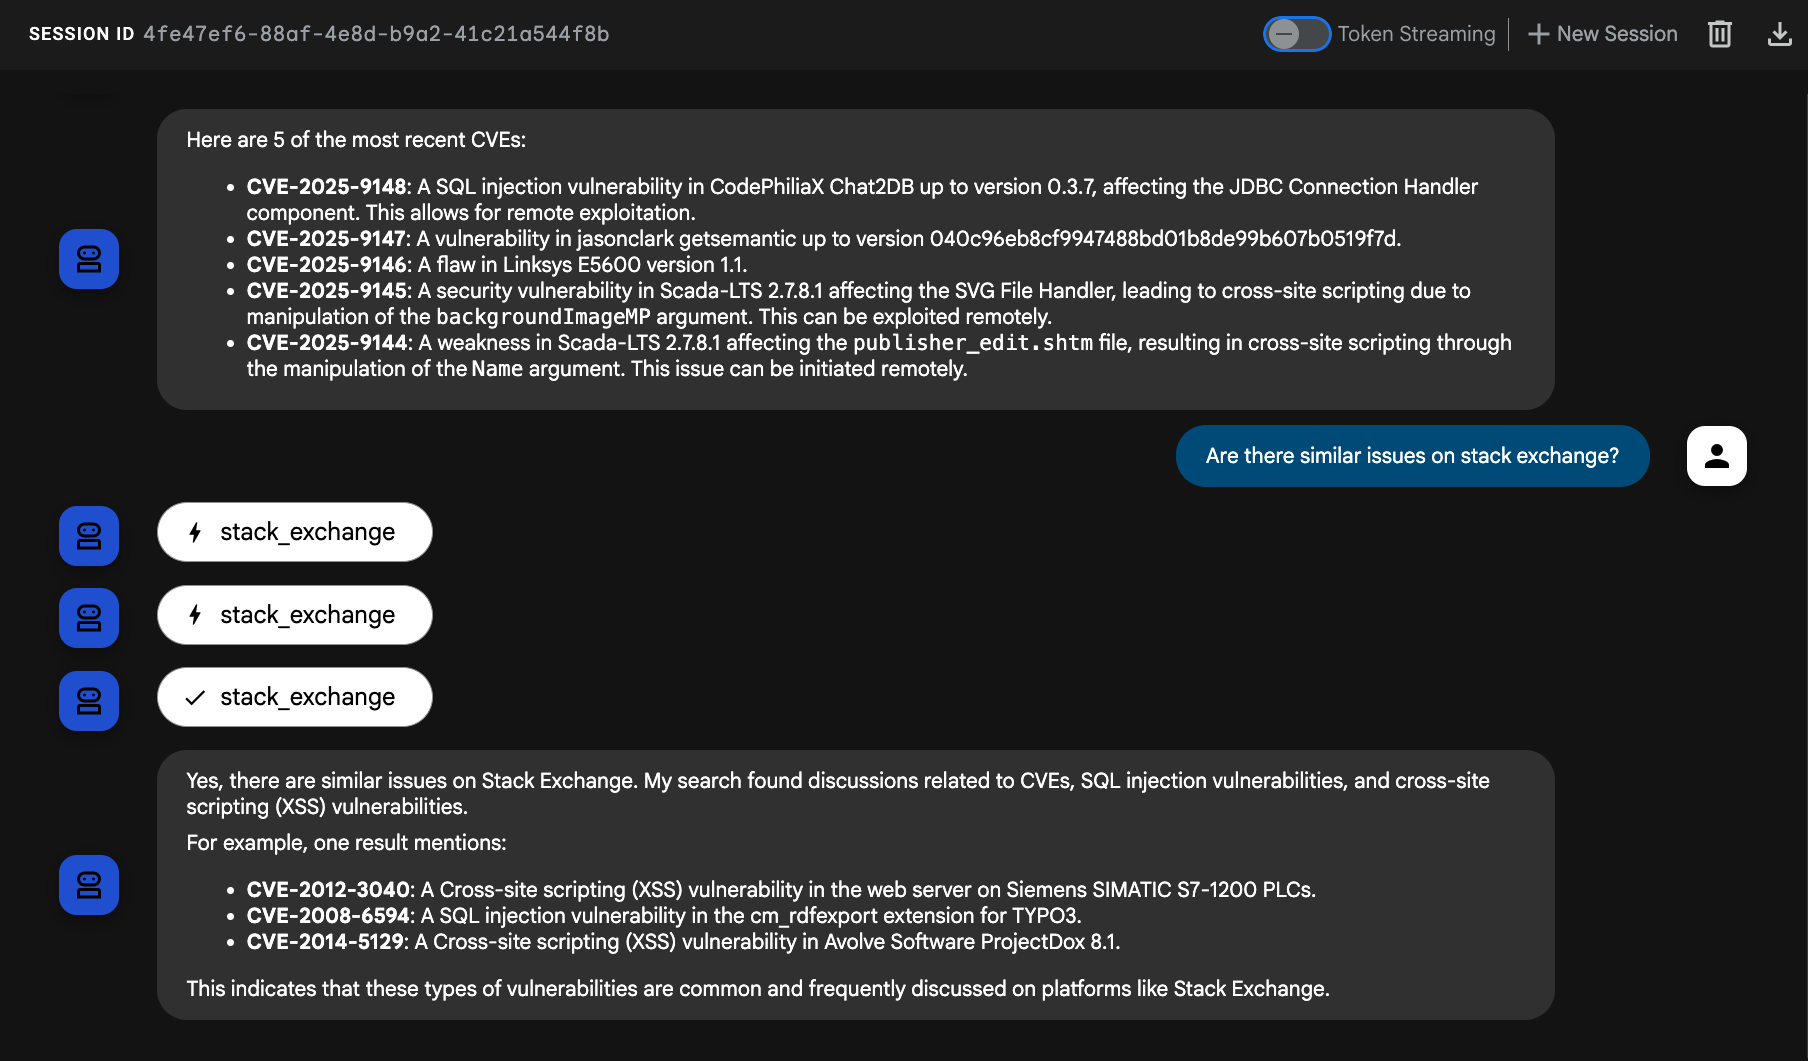
Our agent has now successfully leveraged a LangChain tool in ADK to query StackOverflow. 🥳
Time for the next ADK tool type... MCP Tools!
9. MCP Tool (Database)
MCP stands for Model Context Protocol. It's an open protocol introduced by Anthropic in 2024. MCP provides an abstraction layer between your AI agent and tool "backends" (APIs, databases).
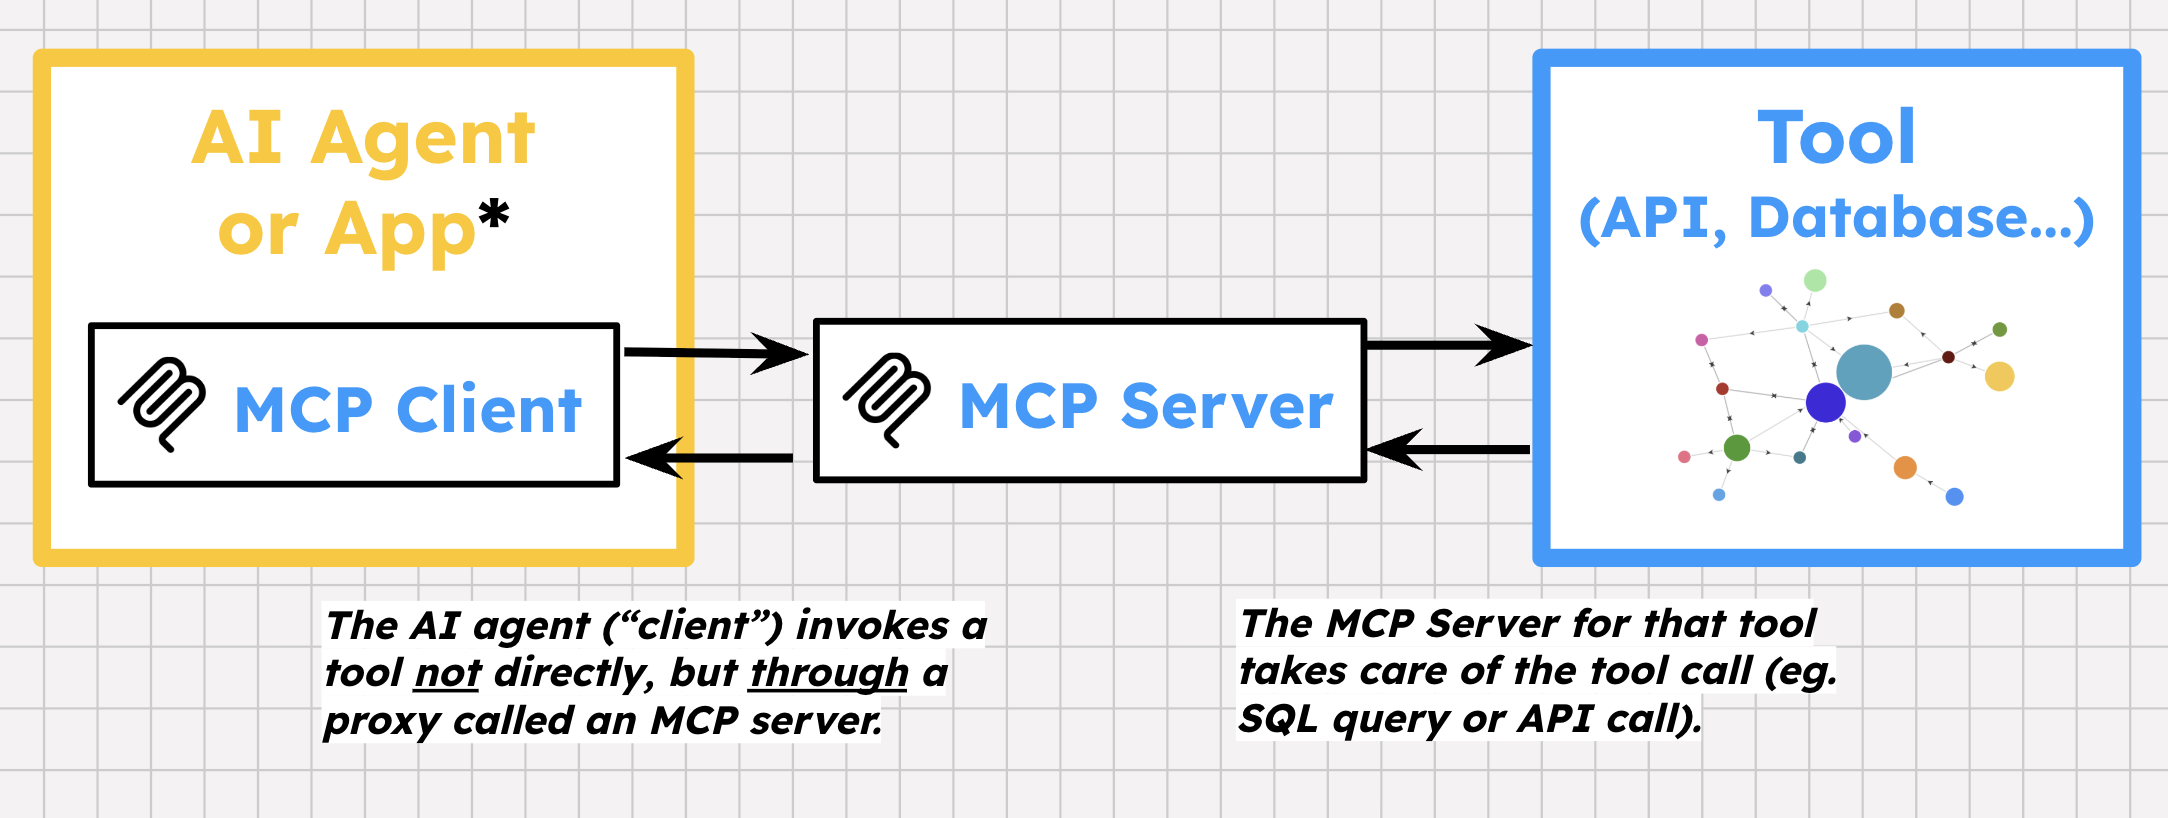
MCP has some unique specifications. Unlike standard HTTP, MCP provides a stateful, two-way connection between the client and server. It has its own way of defining tools and tool-specific error messages. A tool provider can then build MCP Servers on top of their APIs, exposing one or more prebuilt tools for developers and users. Then, agent frameworks can initialize MCP Clients inside an agent application, to discover and call those tools.
At QuantumRoast, we have a Cloud SQL for PostgreSQL database for internal software bugs. We want to create ADK tools so that our agent can perform certain queries on our database.

The easiest way to do this is with MCP Toolbox for Databases , an open-source MCP server for databases! Toolbox supports 15+ databases, one of which is Cloud SQL!
Toolbox provides:
- Simplified development: Integrate tools to your agent in less than 10 lines of code, reuse tools between multiple agents or frameworks, and deploy new versions of tools more easily.
- Better performance: Best practices such as connection pooling, authentication, and more.
- Enhanced security: Integrated auth for more secure access to your data
- End-to-end observability: Out of the box metrics and tracing with built-in support for OpenTelemetry.
ADK has support for MCP Toolbox for Database tools which makes integrating quick.

Deploy MCP Toolbox for Databases Server to Cloud Run
First, we will deploy the MCP Toolbox for Databases Server to Cloud Run and point it at our Cloud SQL instance.
Toolbox requires a YAML file for configuration, where you outline the database source and the tools to configure.
Create a tools.yaml file for the deployment.
cloudshell edit tools.yaml
Paste the following content into the tools.yaml:
sources:
  postgresql:
    kind: cloud-sql-postgres
    project: ${PROJECT_ID}
    region: europe-west4
    instance: software-assistant
    database: tickets-db
    user: postgres
    password: admin

tools:
  search-tickets:
    kind: postgres-sql
    source: postgresql
    description: Search for similar tickets based on their descriptions.
    parameters:
      - name: query
        type: string
        description: The query to perform vector search with.
    statement: |
      SELECT ticket_id, title, description, assignee, priority, status, (embedding <=> embedding('text-embedding-005', $1)::vector) as distance
      FROM tickets
      ORDER BY distance ASC
      LIMIT 3;
  get-ticket-by-id:
    kind: postgres-sql
    source: postgresql
    description: Retrieve a ticket's details using its unique ID.
    parameters:
      - name: ticket_id
        type: string
        description: The unique ID of the ticket.
    statement: SELECT * FROM tickets WHERE ticket_id = $1;
  get-tickets-by-assignee:
    kind: postgres-sql
    source: postgresql
    description: Search for tickets based on assignee (email).
    parameters:
      - name: assignee
        type: string
        description: The email of the assignee.
    statement: SELECT * FROM tickets WHERE assignee ILIKE '%' || $1 || '%';
  update-ticket-priority:
    kind: postgres-sql
    source: postgresql
    description: Update the priority of a ticket based on its ID.
    parameters:
      - name: priority
        type: string
        description: The priority of the ticket. Can be one of 'P0 - Critical', 'P1 - High', 'P2 - Medium', or 'P3 - Low'.
      - name: ticket_id
        type: string
        description: The ID of the ticket.
    statement: UPDATE tickets SET priority = $1 WHERE ticket_id = $2;
  update-ticket-status:
    kind: postgres-sql
    source: postgresql
    description: Update the status of a ticket based on its ID.
    parameters:
      - name: status
        type: string
        description: The new status of the ticket (e.g., 'Open', 'In Progress', 'Closed', 'Resolved').
      - name: ticket_id
        type: string
        description: The ID of the ticket.
    statement: UPDATE tickets SET status = $1 WHERE ticket_id = $2;
  get-tickets-by-status:
    kind: postgres-sql
    source: postgresql
    description: Search for tickets based on their current status.
    parameters:
      - name: status
        type: string
        description: The status of the tickets to retrieve (e.g., 'Open', 'In Progress', 'Closed', 'Resolved').
    statement: SELECT * FROM tickets WHERE status ILIKE '%' || $1 || '%';
  get-tickets-by-priority:
    kind: postgres-sql
    source: postgresql
    description: Search for tickets based on their priority.
    parameters:
      - name: priority
        type: string
        description: The priority of the tickets to retrieve (e.g., 'P0 - Critical', 'P1 - High', 'P2 - Medium', 'P3 - Low').
    statement: SELECT * FROM tickets WHERE priority ILIKE '%' || $1 || '%';
  create-new-ticket:
    kind: postgres-sql
    source: postgresql
    description: Create a new software ticket.
    parameters:
      - name: title
        type: string
        description: The title of the new ticket.
      - name: description
        type: string
        description: A detailed description of the bug or issue.
      - name: assignee
        type: string
        description: (Optional) The email of the person to whom the ticket should be assigned.
      - name: priority
        type: string
        description: (Optional) The priority of the ticket. Can be 'P0 - Critical', 'P1 - High', 'P2 - Medium', or 'P3 - Low'. Default is 'P3 - Low'.
      - name: status
        type: string
        description: (Optional) The initial status of the ticket. Default is 'Open'.
    statement: INSERT INTO tickets (title, description, assignee, priority, status) VALUES ($1, $2, $3, COALESCE($4, 'P3 - Low'), COALESCE($5, 'Open')) RETURNING ticket_id;
  get-tickets-by-date-range:
    kind: postgres-sql
    source: postgresql
    description: Retrieve tickets created or updated within a specific date range.
    parameters:
      - name: start_date
        type: string
        description: The start date (inclusive) for the range (e.g., 'YYYY-MM-DD').
      - name: end_date
        type: string
        description: The end date (inclusive) for the range (e.g., 'YYYY-MM-DD').
      - name: date_field
        type: string
        description: The date field to filter by ('creation_time' or 'updated_time').
    statement: SELECT * FROM tickets WHERE CASE WHEN $3 = 'creation_time' THEN creation_time ELSE updated_time END BETWEEN $1::timestamp AND $2::timestamp;

toolsets:
  tickets_toolset:
    - search-tickets
    - get-ticket-by-id
    - get-tickets-by-assignee
    - get-tickets-by-status
    - get-tickets-by-priority
    - get-tickets-by-date-range
    - update-ticket-priority
    - update-ticket-status
    - create-new-ticket
The YAML file defines 9 tools related to the QuantumRoast tickets database.
Time to configure a service account for the Toolbox Cloud Run service, grant it permission to access Cloud SQL and Secret Manager, and create a Secret Manager secret for our tools.yaml file.
Secret Manager is where we'll store our tools.yaml file because it contains sensitive Cloud SQL credentials.
gcloud iam service-accounts create toolbox-identity

gcloud projects add-iam-policy-binding $PROJECT_ID \
    --member serviceAccount:toolbox-identity@$PROJECT_ID.iam.gserviceaccount.com \
    --role roles/secretmanager.secretAccessor

gcloud projects add-iam-policy-binding $PROJECT_ID \
    --member serviceAccount:toolbox-identity@$PROJECT_ID.iam.gserviceaccount.com \
    --role roles/cloudsql.client

gcloud secrets create tools --data-file=tools.yaml
Time to deploy MCP Toolbox for Databases to Cloud Run. We'll use the latest release version of the MCP Toolbox container image.
gcloud run deploy toolbox \
    --image us-central1-docker.pkg.dev/database-toolbox/toolbox/toolbox:latest \
    --service-account toolbox-identity \
    --region europe-west4 \
    --set-secrets "/app/tools.yaml=tools:latest" \
    --set-env-vars="PROJECT_ID=$PROJECT_ID" \
    --args="--tools-file=/app/tools.yaml","--address=0.0.0.0","--port=8080" \
    --labels=dev-tutorial=codelab-toolbox \
    --no-invoker-iam-check
Wait for the deployment to finish...
Verify that Toolbox is running by querying the Cloud Run logs:
gcloud run services logs read toolbox --region europe-west4 --limit 10
You should see:
2025-08-20 18:03:55 2025-08-20T18:03:55.465847801Z INFO "Initialized 1 sources."
2025-08-20 18:03:55 2025-08-20T18:03:55.466152914Z INFO "Initialized 0 authServices."
2025-08-20 18:03:55 2025-08-20T18:03:55.466374245Z INFO "Initialized 9 tools."
2025-08-20 18:03:55 2025-08-20T18:03:55.466477938Z INFO "Initialized 2 toolsets."
2025-08-20 18:03:55 2025-08-20T18:03:55.467492303Z INFO "Server ready to serve!"
Save the Cloud Run URL for the Toolbox service as an environment variable so the ADK agent knows where to find it.
export MCP_TOOLBOX_URL=$(gcloud run services describe toolbox --region europe-west4 --format "value(status.url)")
echo MCP_TOOLBOX_URL=$MCP_TOOLBOX_URL >> software_bug_assistant/.env
Update QuantumRoast Agent
Second, we must add the dependency for the MCP Toolbox for Databases SDK (toolbox-core) to our project:
uv add toolbox-core==0.5.0
Open the tools.py file to add support for the MCP Toolbox tools.
cloudshell edit software_bug_assistant/tools.py
Add the following to the bottom of tools.py:
# ----- Example MCP Toolbox for Databases tools -----
import os
from toolbox_core import ToolboxSyncClient

TOOLBOX_URL = os.getenv("MCP_TOOLBOX_URL", "http://127.0.0.1:5000")

# Initialize Toolbox client
toolbox = ToolboxSyncClient(TOOLBOX_URL)
# Load all the tools from toolset
toolbox_tools = toolbox.load_toolset("tickets_toolset")
Now we can import and pass the toolbox_tools to the root agent in agent.py:
cloudshell edit software_bug_assistant/agent.py
You can replace agent.py with the following code to include toolbox_tools:
from google.adk.agents import Agent

from .tools import get_current_date, langchain_tool, search_tool, toolbox_tools

# --- Agent Definition (model, instructions, tools) ---
root_agent = Agent(
    model="gemini-2.5-flash",
    name="software_assistant",
    instruction="""
    You are a skilled expert in triaging and debugging software issues for a
    coffee machine company, QuantumRoast.
    """,
    tools=[get_current_date, search_tool, langchain_tool, *toolbox_tools],
)
Save the file and head back over to your open tab with the ADK Web UI.
You can now ask questions about the tickets stored in our Cloud SQL internal tickets database!
Ask a question like one of the following:
I am seeing an issue with database timeouts, has anyone else seen a similar issue?How many bugs are assigned to samuel.green@example.com? Show a table.Can you bump the priority of ticket with ID 6 to to P0 - Critical priorityCreate a new ticket(let the agent guide you through bug creation)
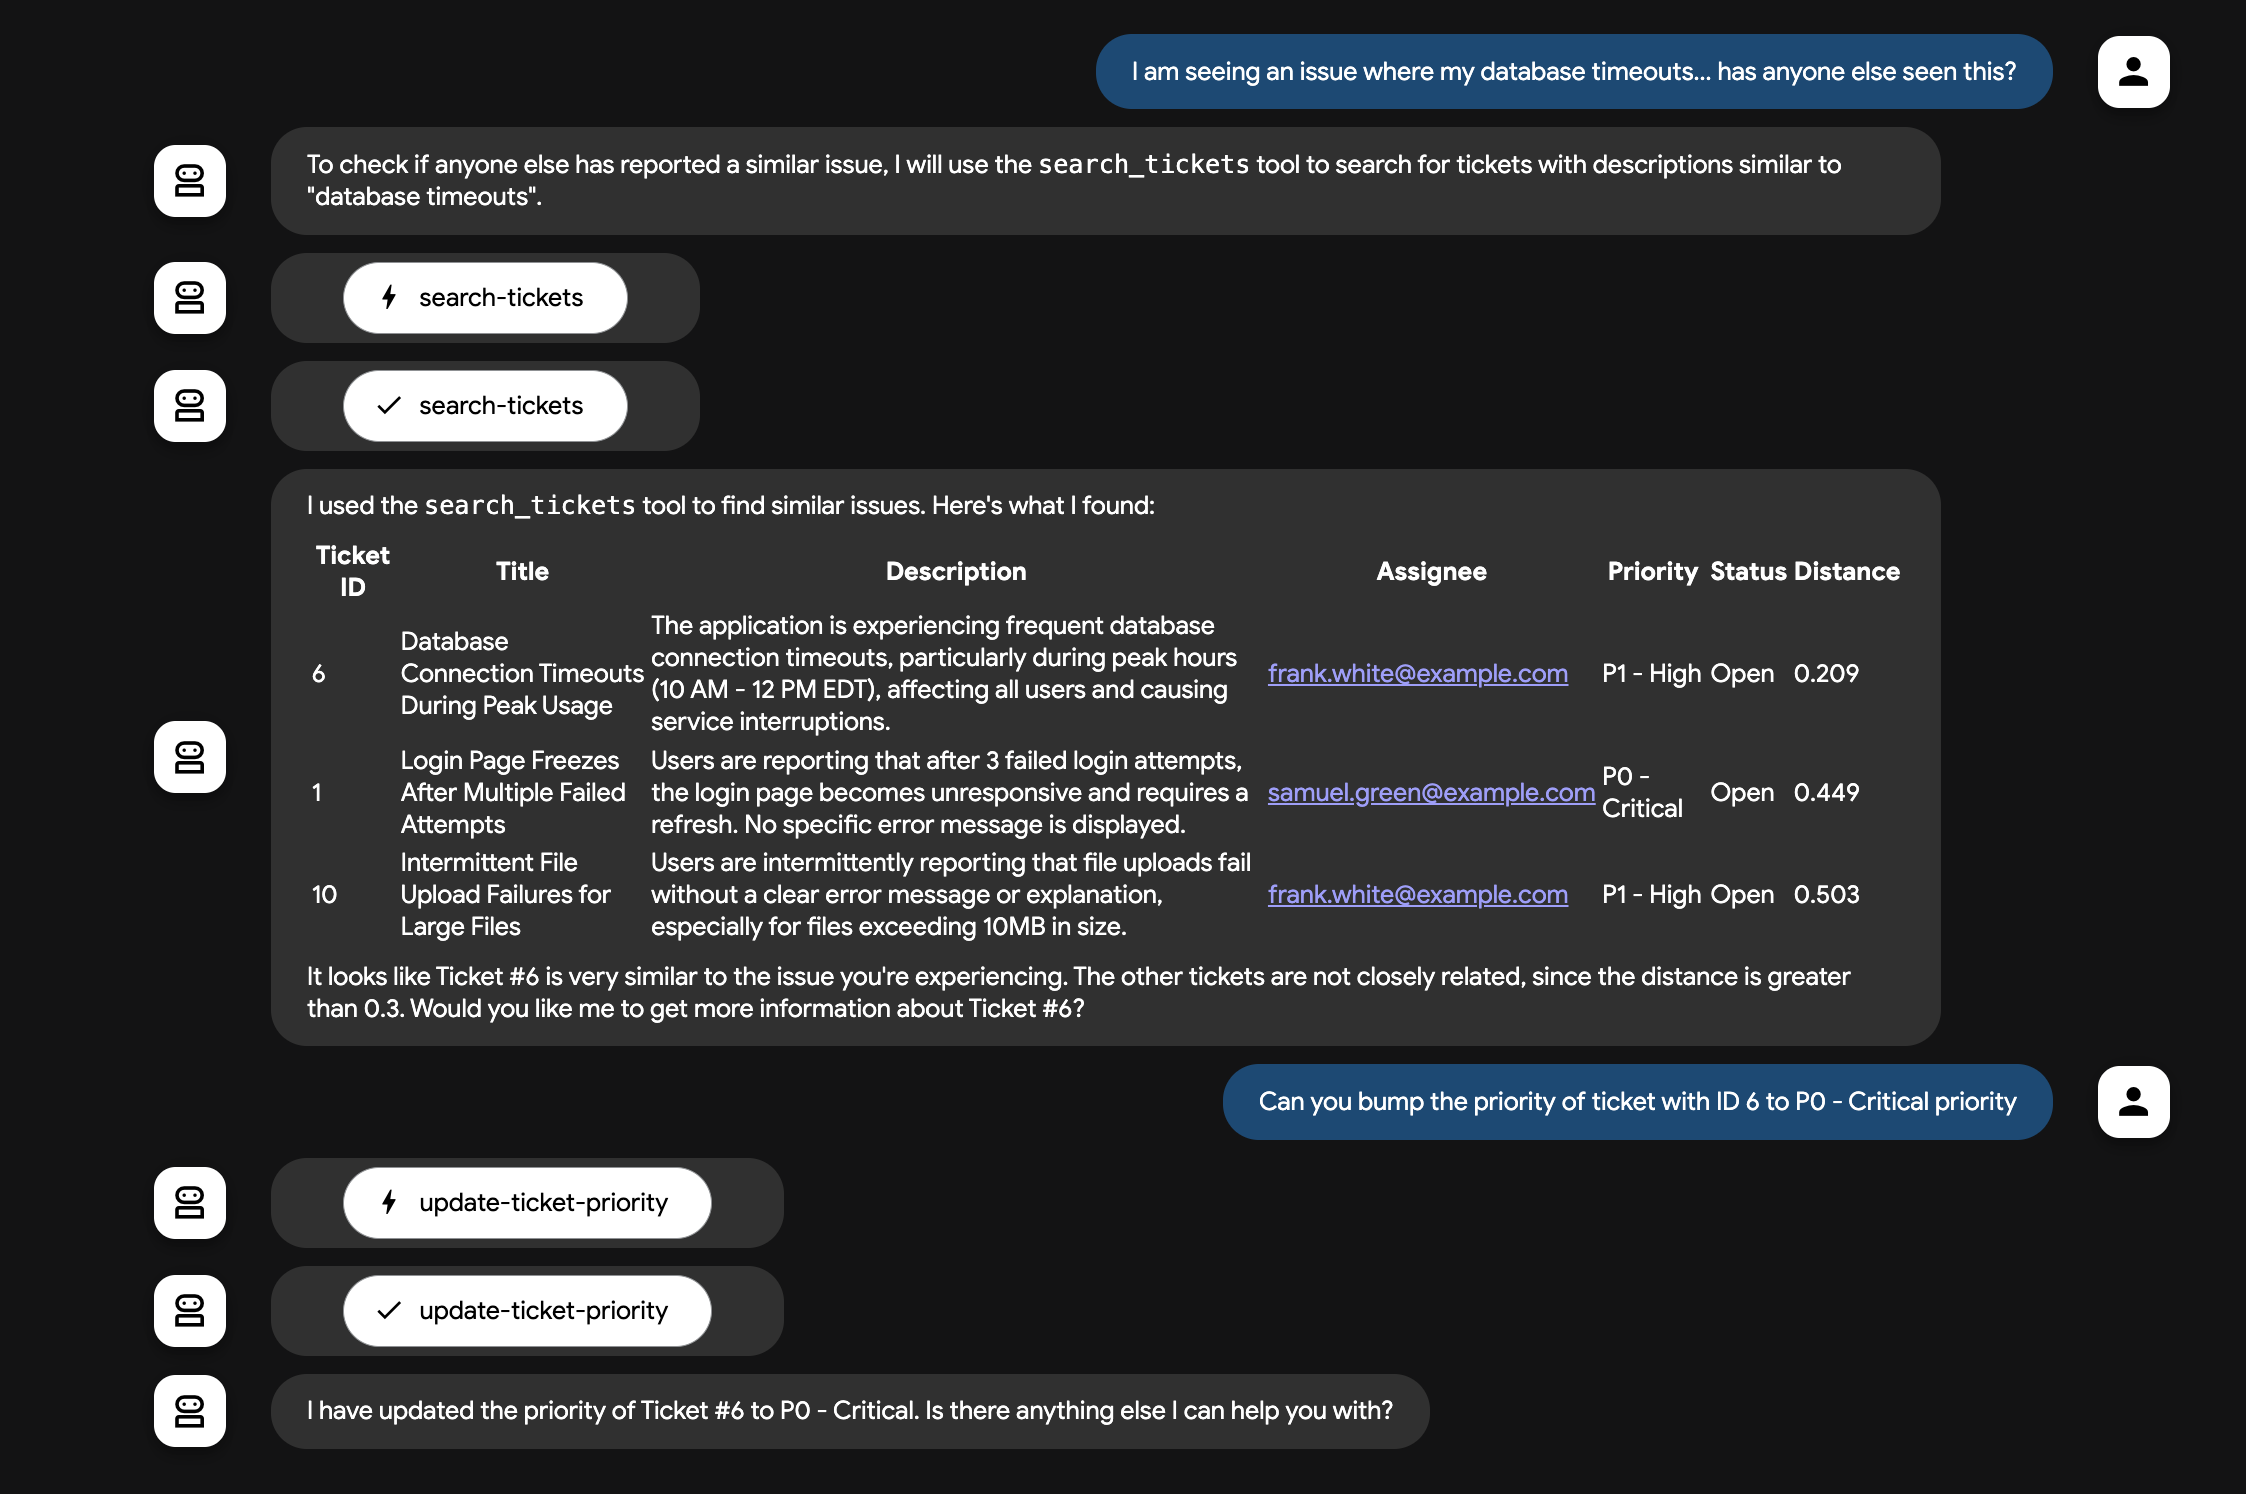
Our ADK agent has now successfully queried our database through MCP Toolbox for Databases tools!🚀
10. Optional: MCP Tool (API)
What about connecting our ADK agent to MCP tools that don't have their own SDK like MCP Toolbox for Database does?
ADK supports generic MCP tools through it's MCPToolset class. The MCPToolset class is ADK's primary mechanism for integrating tools from an MCP server.

MCPToolset can be used to connect to local or remote MCP servers, at QuantumRoast we want to connect our agent to GitHub's remote MCP server — to easily call GitHub's APIs. This will allow our agent to pull information on issues from public software repositories or even our own codebases. The GitHub MCP server exposes different parts of GitHub's functionality, from issue and pull requests, to notifications and code security.

GitHub Personal Access Token (PAT)
To authenticate with the GitHub MCP server, you need a GitHub Personal Access Token.
In order to acquire one, follow these steps:
- Go to your GitHub Developer settings.
- Click "Personal access tokens" -> "Tokens (classic)".
- Click "Generate new token" -> "Generate new token (classic)".
- Give your token a descriptive name.
- Set an expiration date for your token.
- Important: For security, grant your token the most limited scopes necessary. For read-only access to repositories, the
repo:status,public_repo, andread:userscopes are often sufficient. Avoid granting full repository or admin permissions unless absolutely necessary. - Click
Generate token. - Copy the generated token.
In the Cloud Shell terminal, run the following to set your GitHub PAT for The agent to be able to use. Replace YOUR_GITHUB_PAT with your generated PAT.
export GITHUB_PAT=YOUR_GITHUB_PAT
Update QuantumRoast Agent
For our bug assistant, we will expose just some read-only GitHub tools, to allow QuantumRoast employees to find issues related to open-source dependencies, to see if that can help root-cause bugs they're seeing in the internal ticket system. We'll use ADK's MCPToolset with a tool_filter to set this up. The tool-filter exposes only the GitHub tools we need, which not only hides the tools we don't want users accessing (think: sensitive repository actions), but also protects the agent's model from getting overwhelmed when trying to choose the right tool for the job.
Open the tools.py file to add support for the GitHub tools.
cloudshell edit software_bug_assistant/tools.py
Add the following to the bottom of tools.py:
# ----- Example MCP Tools with MCPToolset (GitHub) -----
from google.adk.tools.mcp_tool import MCPToolset, StreamableHTTPConnectionParams

mcp_tools = MCPToolset(
    connection_params=StreamableHTTPConnectionParams(
        url="https://api.githubcopilot.com/mcp/",
        headers={
            "Authorization": "Bearer " + os.getenv("GITHUB_PAT"),
        },
    ),
    # Read only tools
    tool_filter=[
        "search_repositories",
        "search_issues",
        "list_issues",
        "get_issue",
        "list_pull_requests",
        "get_pull_request",
    ],
)
Note how we also need to provide the GitHub Personal Access Token (PAT) to our MCPToolset definition, just like how you'd provide an auth token when setting up a standard API client in your code. This PAT is scoped to only access public repository data, with no scopes around sensitive user or repository actions.
Now we can import and pass the mcp_tools to the root agent in agent.py:
cloudshell edit software_bug_assistant/agent.py
You can replace agent.py with the following code to include mcp_tools:
from google.adk.agents import Agent

from .tools import get_current_date, langchain_tool, mcp_tools, search_tool, toolbox_tools

# --- Agent Definition (model, instructions, tools) ---
root_agent = Agent(
    model="gemini-2.5-flash",
    name="software_assistant",
    instruction="""
    You are a skilled expert in triaging and debugging software issues for a
    coffee machine company, QuantumRoast.
    """,
    tools=[get_current_date, search_tool, langchain_tool, *toolbox_tools, mcp_tools],
)
Save the file and head back over to your open tab with the ADK Web UI.
Now, we have a set of GitHub MCP tools that our agent can call. QuantumRoast's services relies on XZ utils, a data compression tool. Our internal bug ticket system is tracking a CVE (security vulnerability) from last year, which we can trace back to the XZ Utils GitHub repository using the StackOverflow and Google Search tools. We can then use one of GitHub's MCP tools, search_issues, to determine when and how that CVE was patched:
Ask the agent the following:
Find the official XZ Utils GitHub repositorySearch the repository for issues related to CVE-2024-3094
You should see the GitHub tools being called by the agent.
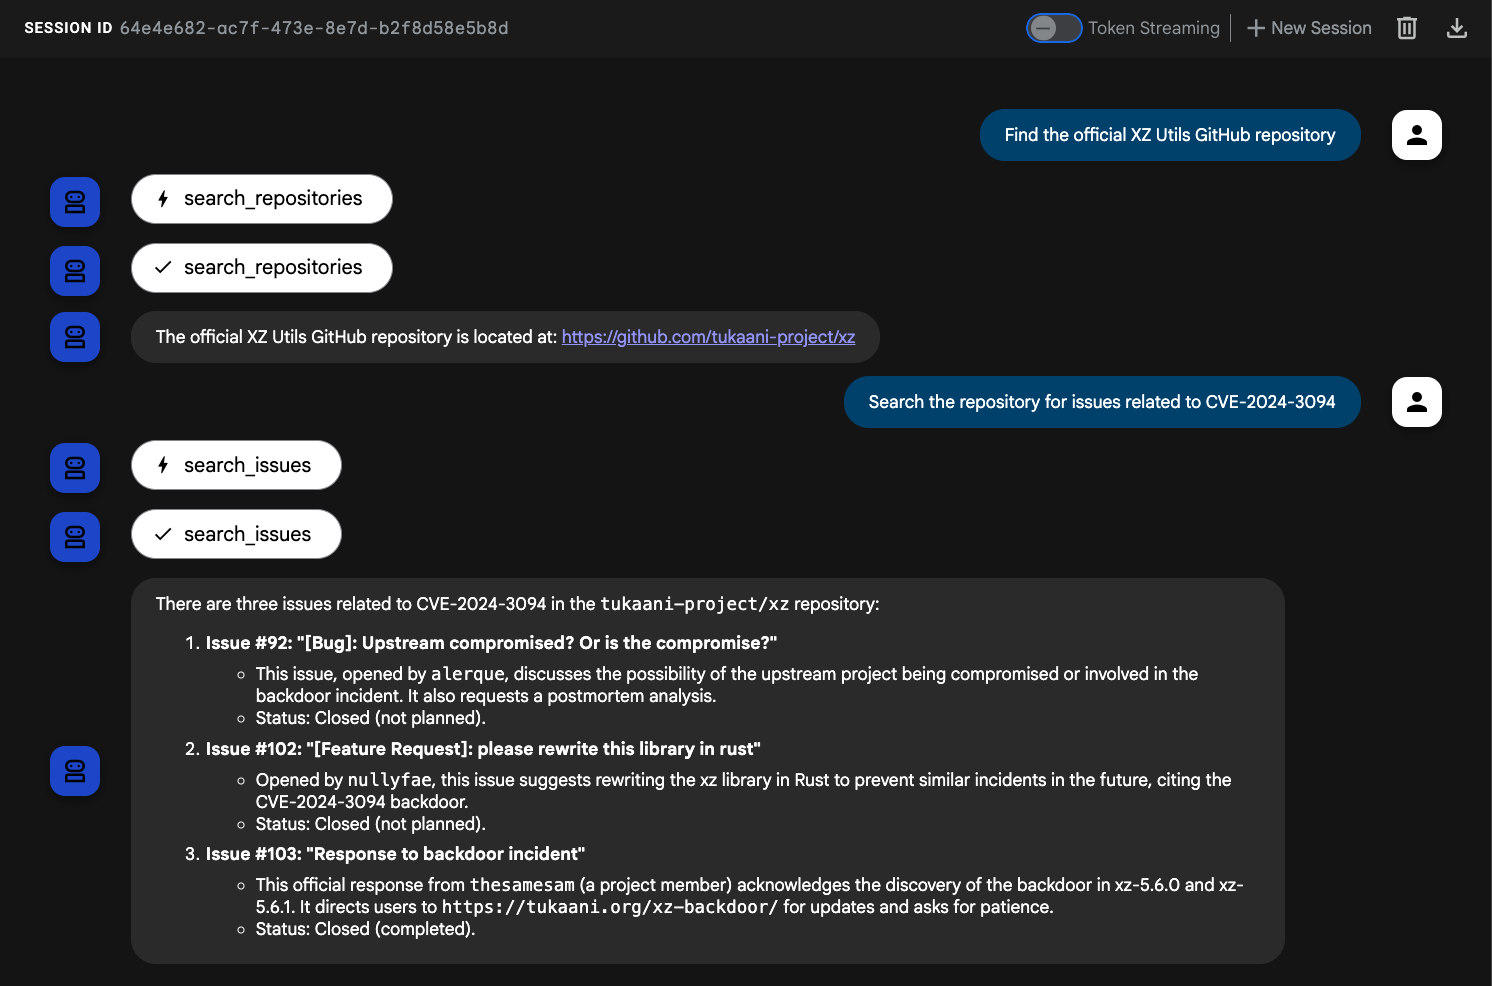
The QuantumRoast ADK agent is now able to interact with the GitHub MCP server tools! 🤩
11. Congratulations
Congratulations! You have successfully built the QuantumRoast bug assistant agent using Agent Development Kit (ADK) and integrated various tool types to enhance its capabilities. You started with a basic agent and progressively added Function Tools, Built-in Tools, Third-Party Tools, and MCP Tools.
What we've covered
- How to set up a Python project for ADK development.
- How to create a basic ADK agent.
- How to implement and use Function Tools.
- How to integrate Built-in Tools like Google Search.
- How to leverage Third-Party Tools from frameworks like LangChain within ADK.
- How to use MCP Tools to interact with databases (Cloud SQL) and APIs.

Cleanup
You can delete your Cloud project to avoid incurring additional charges.
While Cloud Run does not charge when the service is not in use, you might still be charged for storing the container image in Artifact Registry. Deleting your Cloud project stops billing for all the resources used within that project.
If you would like, delete the project:
gcloud projects delete $GOOGLE_CLOUD_PROJECT
You may also want to delete unnecessary resources from your cloudshell disk. You can:
- Delete the codelab project directory:
rm -rf ~/quantum-roast - Warning! This next action is can't be undone! If you would like to delete everything on your Cloud Shell to free up space, you can delete your wholehome directory. Be careful that everything you want to keep is saved somewhere else.
sudo rm -rf $HOME